Chapter 5: Creating Visual and Audio Content
Just because the program is called WordPress does not mean pictures and sounds are not welcome. In fact, WordPress provides all the tools you need to use images, audio, and video files with your blog.
Understanding Display and Image Dimensions
Upload and Insert an Image While Posting
Format an Image from the Edit Image Window
Add Images to the Media Library
Insert Images from Web Sources
Understanding Unattached Images
Add a Slide Show to Your Posts
Link to YouTube and Other Videos
Upload Video Files to Your Host
Link to a Podcast or Sound File from Your Blog
Consider Media Issues
A blog rarely includes words and only words. You, too, can enrich your readers’ blog experience by including images, sounds, and even video — your own or those created by others, if you have the proper permission. For best results, it helps to understand a bit about how the Internet handles your media. You also are smart to remember that while media can enhance your site, poorly executed images, videos, and podcasts can detract or make your site look decidedly amateurish.
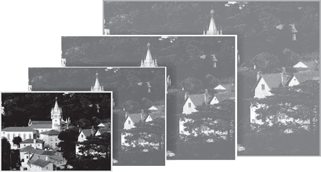
Images and Dimensions
Web browsers display images according to the number of pixels specified for them. If you upload an image 1600 pixels wide, but you have room only for a 500-pixel image, the browser reduces the 1600-pixel image to display it at 500 pixels. The large image causes the page to load more slowly than if you had uploaded a 500-pixel image.
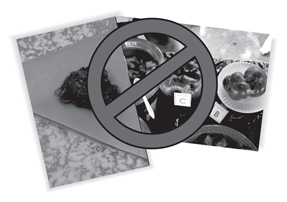
Media Selection
Well-chosen media enhances a blog, but too much or poorly chosen media can be a distraction. Well-chosen media includes a map that shows a location you recommend, a photograph that illustrates a point you have made, or a video clip that demonstrates a process you describe. A poor choice might include a fuzzy photo that fails to make the desired point.
Media and Memory
One picture may be worth more than a thousand words in terms of computer storage. Sound and video files use even more storage space. In fact, WordPress.com requires you to pay for increased storage if you want to upload sound and video. If your blog is self-hosted, make sure you have enough space with your host to store sound and video files.
Off-Site Image and Video Storage
Instead of storing your image, sound, and video files with your web host, you can store them with a hosting service and then link to your files. Flickr, Photobucket, and Picasa are among the free image-storing services available. Video hosts include the well-known YouTube and Vimeo. You also can take advantage of the hosts’ audience to build traffic to your blog. If you embed the work of others, make sure you have their permission.

Off-Site Music and Podcast Storage
You can store and link to your audio files at SoundCloud and podcasts at Liberated Syndication, also known as Libsyn, among others. At WordPress.org sites, the Blubrry PowerPress plugin comes as a recommended and easy way to host your podcasts. You also can link to other people’s sound files, such as those at BandPage and Spotify. Yes, you also can embed slide shows and store and serve documents from your WordPress blog, both the self-hosted and the WordPress.com varieties.

Where to Begin
The media options can seem a bit overwhelming. As with so many aspects of your blog, you are wise to step back and do some thoughtful planning about how media can tie in to your blog’s purpose. Displaying every media type possible not only requires lots of work on your part but it also stands a good chance of making for a confusing site. Thus, the best place to begin is by choosing the medium that best advances your purpose, learn it well, and use it. Then add another medium only when you are sure it benefits your blog and when you have the time to learn and use it.

Understanding Display and Image Dimensions
If you want to consistently get the best media display for your needs, you first need to understand how computers display objects. In the physical world, we tend to think of a dimension as a dimension. That is, an inch or a centimeter looks the same regardless of where you measure or whether you use a metal ruler or a plastic one, variations of accuracy aside. A pixel does not work quite that way. A pixel is a pixel, but the way it looks depends on your screen resolution.
Screen Resolution
You can understand the concept better if you view a few things on your computer with the monitor set at different screen resolutions. First, open a web page or any window on your machine. Then, on a Windows 7 or Windows 8 computer, right-click in the desktop background and click Screen resolution in the pop-up menu. In the box that appears, click the Resolution drop-down arrow, and move the slider to a lower resolution. Click Apply, and then look at how the windows change appearance. The pixel settings of the content are the same, but they look different because the lower-resolution display makes things look larger but less clear. Mac users go to System Preferences and Display.

Image Resolution
The concept of image resolution, by comparison, is entirely a physical concern when you want to print digital images. With printed images, the more pixels you pack into an inch, the sharper and smaller the image is. But for online display, you can take an image of 400 by 600 pixels and save it as three separate files with three different image resolutions, such as 300 pixels per inch, or ppi, 200 ppi, and 72 ppi. All three images appear exactly the same when you upload them to the Internet.
Take-Away Message
If you remain confused, just remember one thing: The image you upload displays online according to the image’s dimensions stated in pixels. Therefore, uploading an image that is 3200 pixels wide makes no sense if you never intend to display it any wider than 800 pixels. Uploading a large image will, however, take longer, use more storage space, and make it possible for others to make a good print of your image, which you may not want them to do.
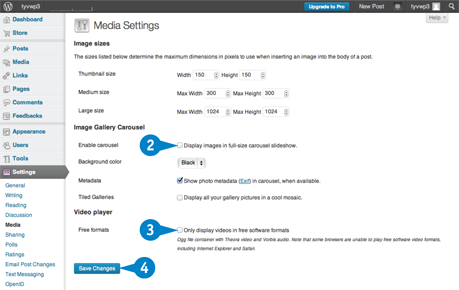
Review Media Settings
The Media settings let you set standard image sizes for a consistent look. These settings can save you time and trouble in the long run. Until you settle on a permanent theme, however, you may want to stick to the default settings, as the maximum width may vary from theme to theme. If you are not sure how wide your blog is, you may be able to find out from the theme developer, from the WordPress.com theme showcase, or by using one of the developer toolbars discussed in Chapter 13.
Review Media Settings
At WordPress.org
 Click Media under the Settings menu in the left menu bar.
The Media Settings panel opens.
 Review the thumbnail, medium, and large dimensions to make sure they are appropriate for your blog and theme.
Note: You can use the Information button in the Web Developer Toolbar introduced in Chapter 13 to determine your blog theme’s dimensions.
 Click Crop thumbnail (
 changes to
  ) unless you want thumbnails to display to an exact size that you specify. (This option is unavailable at WordPress.com.)
 Click Save Changes.

At WordPress.com
Review settings as for WordPress.org above.
Deselect the Enable carousel check box ( changes to ).
Ignore the Video Player setting for now.
Note: This setting applies only if you purchase the VideoPress add-on discussed later in this chapter.
Click Save Changes.
Prepare Images for Uploading
When you take the time to edit and resize images before you post them on your blog, you assure that your images look their best and do not slow down your site. Although WordPress provides some online editing tools, you may do better with an image editor to prepare your photos and other images. It can be a simple and free program, such as GIMP or Picasa or Preview for Mac, or the do-it-all Adobe Photoshop. If you have a digital camera, it may provide a basic editing program, too. Online image editors, such as Pixlr and PicMonkey, are other options.
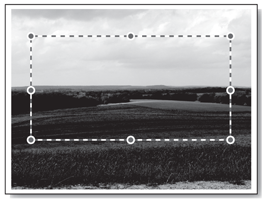
Crop to Focus Interest
Crop is the term that editors use for trimming images. Use your editor’s cropping tool to eliminate distracting activity, objects, or blank areas or to zero in on the item of particular interest. Save an unedited version of the photo, although your editor may do so automatically, in case you change your mind.
Adjust the Image
Take advantage of the editor’s tools to eliminate red eye in flash photos, to straighten out sloping horizons, and to correct poorly rendered color, contrast, and other image flaws. You want people to see the image, not be put off by its shortcomings.

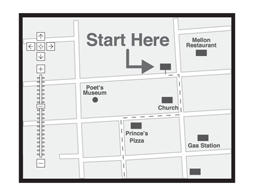
Annotate the Image
Add arrows, labels, and other notations to your image if they would help readers. For example, a simple Start here and an arrow can make a map much more meaningful to your readers than a large amount of text. Similarly, clear labels on graphs aid in understanding.
Save the Image
After you finish editing, you need to save your image in a file format that web browsers can display properly. The acceptable formats are JPEG, which stands for Joint Photographic Experts Group; GIF, or Graphics Interchange Format; and PNG, for Portable Network Graphics.
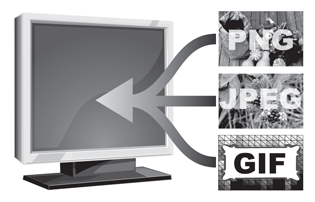
Choose a File Format
GIF is best for images with few colors because it retains quality and creates a small file. GIF often is good for logos. JPEG supports millions of colors and thus is good for photographs, but it creates bigger files unless you increase compression, which reduces JPEG image quality. PNG is the newest format and shares many GIF advantages, but a few old browsers may not support it.

Resize the Image
Chances are reasonably good that your image is bigger than you want on your blog, especially if you downloaded it full size from a digital camera. View the image at 100 percent size in your image editor to see how big the image really is. Use your editor’s resizing tools to reduce it to the largest size you would want it to appear on your site.
Upload and Insert an Image While Posting
By using the tools that WordPress provides, you can upload your images from your computer in a batch or one at a time. Then you can insert them into your blog posts to add some visual pizzazz to your site. As you insert them, you need to add some information to help readers and search engines understand your image. You can upload and insert images as part of your post-writing process or as a separate operation, and WordPress offers multiple upload methods. One is sure to follow your preferred way of working.
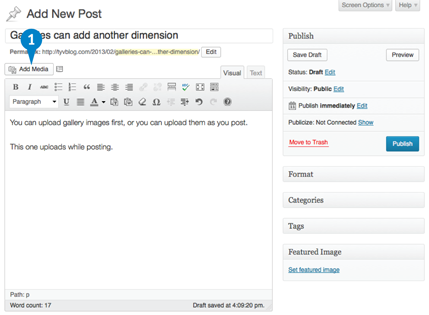
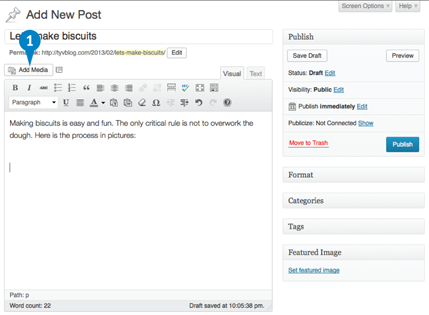
Upload and Insert an Image While Posting
From the Add New Post or Edit Post page, click in your post at the location where you want to insert your image.
Click the Add Media button ( ).
).
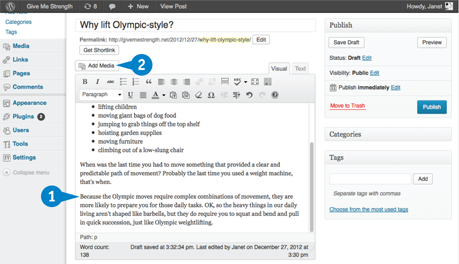
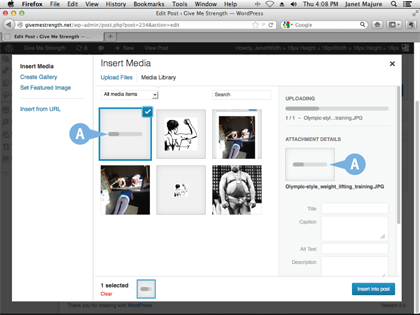
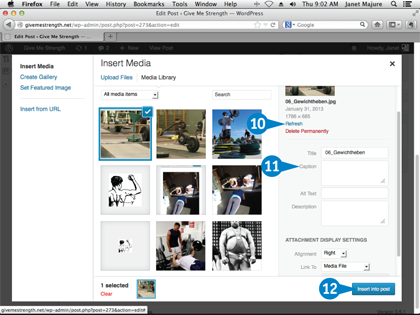
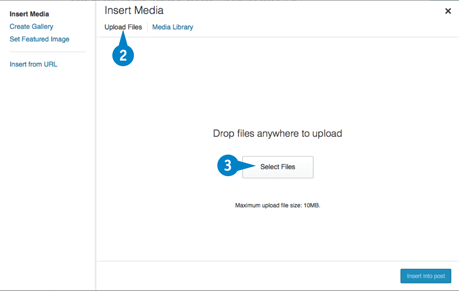
The Insert Media window opens.
Click Upload Files.
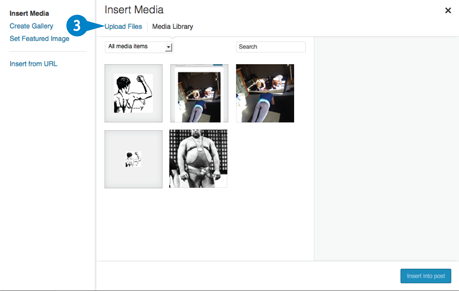
The Upload Files panel appears.
Drag an image from a folder on your computer to the upload window, and release the mouse button when the border of the drop-files area changes color.

A Bars appear, showing the upload progress.
TIP
Do I have to drag and drop? I find it awkward.
No. If you prefer, you can click Select Files in the middle of the Upload Files panel. Doing so opens an upload window by way of your web browser, and then you can browse your computer files for the image or images you want to upload. Click the filename, click Open, and you get the same result as drag and drop.

Adding information to the image as you insert it into your post lets you give readers information about the image. It also can help you keep track of images in the Media Library you add to every time you upload an image. If you want to reuse an image, it is easier to find one named green_apples.jpg than to figure out that the one named DSC123_456 is the image that you want. The information in the Title field is what appears in the Media Library image list.
The upload finishes.
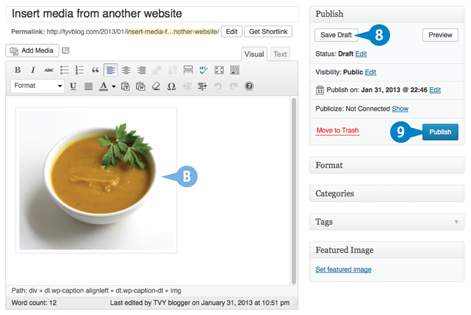
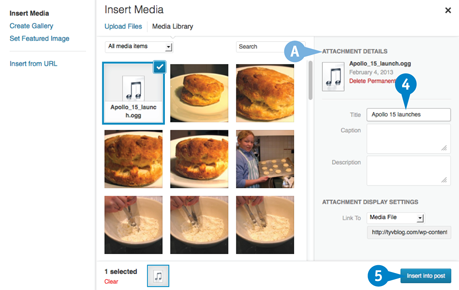
B A thumbnail of the image with a checkmark confirms that the image is selected for insertion.
C The Attachment Details pane shows the filename, upload date, and size.
 In the Title box, type a name for the image’s listing in the Media Library.
Note: The default is the image’s filename.
 Type alternate text to describe the image.

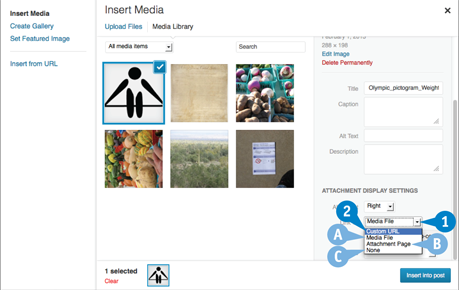
 Scroll down to the Attachment Display Settings.
 Choose a size from the Size drop-down list.
 Click Insert into post.
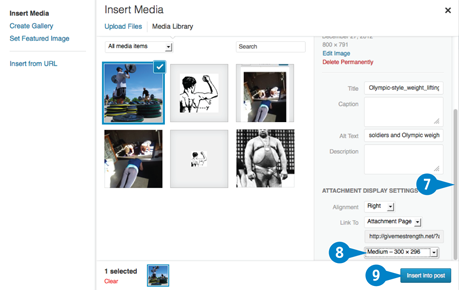
The Add Media window disappears, and the Edit Post window displays the image at the cursor location.
 Click Save Draft/Update Post, depending on whether the post is a new draft or an existing post, to save the change.
 Click Preview.
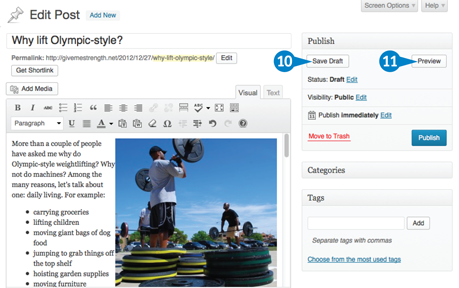
A preview of the post’s individual page appears with the image inserted.

Edit an Image While Uploading
You can edit an image as you upload it, a handy feature should you belatedly realize you overlooked some needed changes. Perhaps you should have cropped out a portion of the picture or realize that you need to rotate the image. Easy-to-use tools allow you to correct those problems as part of the posting process. Start by clicking Add Media on the post-writing panel as described in the preceding task and uploading an image. The editing task occurs within the Insert Media window. WordPress retains your original image.
Edit an Image While Uploading
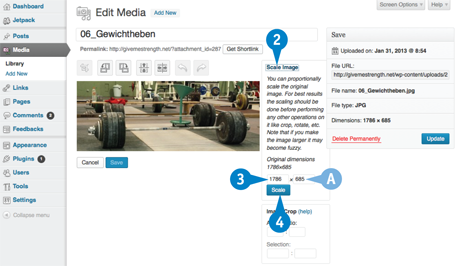
Click Edit Image.

The Edit Media panel appears.
Click Scale Image.
The scaling area expands.
Type the desired maximum display width.
A WordPress automatically adjusts image height proportionally.
Click Scale.
WordPress saves the change.
Click and drag your mouse pointer within the image to define an area to crop.
Click the Crop button ( ).
).
WordPress crops the image.
B You can use these buttons to rotate the image to the left or right and flip it vertically or horizontally.
Click Save.
Click Update.
Click X to close the Edit Media tab.

Click Refresh.
The dimensions and cropping update on-screen, and Refresh changes to Edit.
Add information if desired.
 Click Insert into post.
The edited image is inserted into your post.
TIPS
The Edit Media window behaved differently for me on my WordPress.com blog.
Yes, some details may be slightly different. At this writing, WordPress.com displays a new Edit button after you save an edit. The procedure is essentially the same, though.
How can I undo changes?
You can click the Undo button ( ) as you are editing. You also can click Restore Original Image to eliminate all changes you may have made. You then click Restore Image to confirm your intention. Once you insert the image and save the post, however, these options are not available.
Format an Image from the Edit Image Window
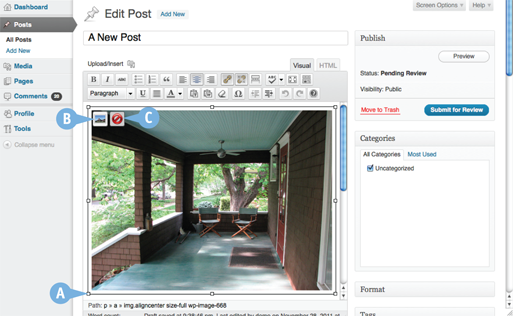
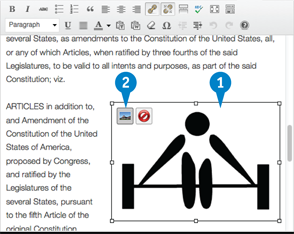
Once an image is inserted into a post, you can move it around, adjust its size, alter or add borders, and more. It all starts by clicking the image in the Edit Post window. When you do, size handles appear around the image, which you can drag to change size. You also can click in the middle of the picture and drag it to the location you prefer. Or you can click a button to edit image properties such as the wrap settings, size, and link.
A Image Handles
Click and drag corner handles to resize an image proportionally. Click and drag a side handle to stretch or squeeze an image. You can click anywhere within the image and drag it to a new location in the post.
B Edit Image
Click to open the Edit Image window to edit size, link, caption, and alignment settings and Advanced Settings, as explained on the next page.
C Delete Image
Click to delete an image from its location in a post, but not from the Media Library.
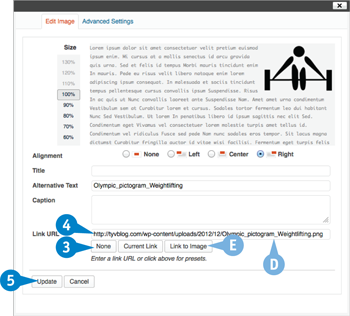
A Size Scale
Click to resize an image display to a percentage of the inserted size.
B Alignment
Click to specify whether image is in line with text via the None setting or whether the image aligns to the left, right, or center relative to the text.
C Edit Options
Click to enter or change the information you provided when you uploaded your image.
D Update/Cancel
Click to save or cancel changes you made in the Edit Image window and then return to the Edit Post window.
E Advanced Settings Tab
Click to open the Advanced Settings window.

A Original Size
Click to reset the image to the uploaded size.
B Image Properties
Click to add or alter borders and spacing around the image.
C Advanced Link Settings
Click to edit characteristics of links associated with the image. These are useful if you are familiar with HTML and CSS.
D Update/Cancel
Click to save or cancel changes you made in the Advanced Image Settings window and return to the Edit Post window.

Add Images to the Media Library
Depending on how you work, you may find it more convenient to upload your images without worrying about where they go in your blog posts. You can do that by adding them to the Media Library with the multi-file uploader. The Media Library also provides a searchable repository for your images and other media. When you add images to the library this way, they are not associated with any posts until you add them to a post.
Add Images to the Media Library
Click Media in the left menu bar.
The Media menu expands, and the Media Library window opens.
Click Add New.
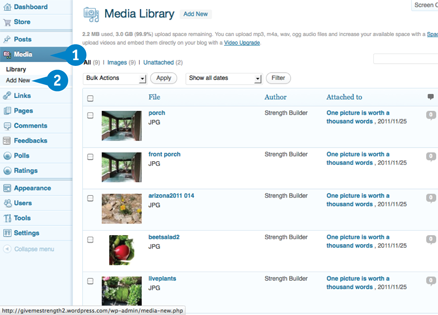
The Upload New Media panel opens.
Click Select Files.
Note: You also can drag and drop images, as described in “Upload and Insert an Image While Posting,” earlier in this chapter.
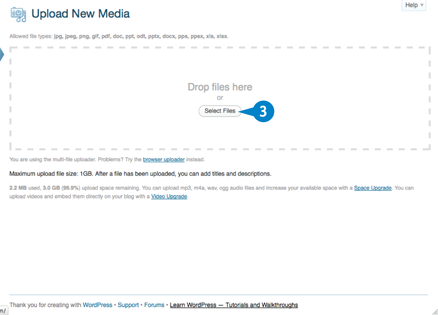
A file selection window opens.
Select the file or files you want to upload.
Note: Press  (
( on a Mac) to select multiple files.
Click Open.
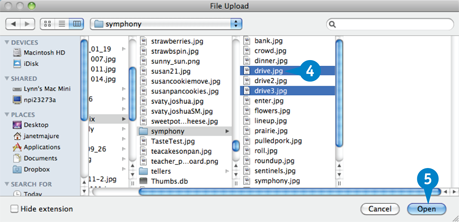
WordPress uploads the files to your server and stores them in your Media Library.
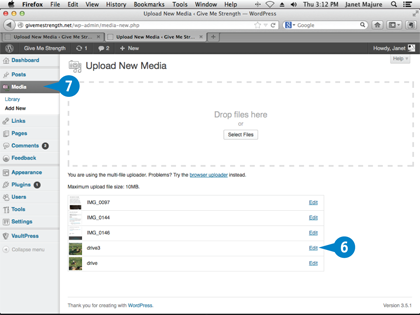
If desired, click Edit to edit image properties, as described in “Edit an Image While Uploading,” earlier in this chapter.
Click Media to return to the Media Library.
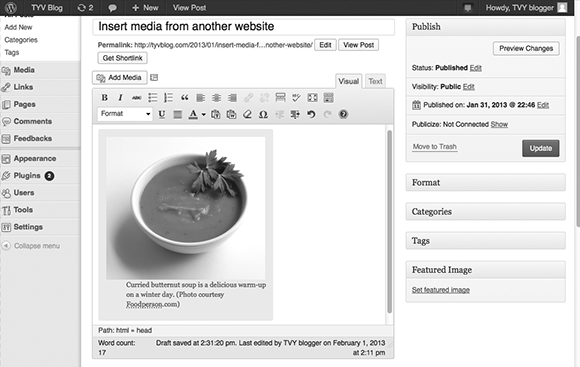
Insert Images from Web Sources
You can save storage space on your web host when you insert images based on other websites. You do not have to download or upload the image files; you embed, or link, them with a URL. Sometimes, though, this can slow your page loading time because your page must retrieve the image from the other site or set the stage for a future broken link should that site’s owner change or delete the URL. Get permission from the image owner to use the image, unless the image is in the public domain or the website gives copyright permission.
Insert Images from Web Sources
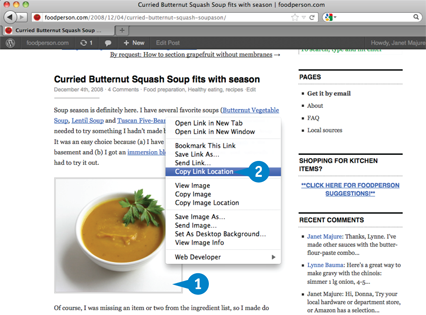
Right-click the image to which you want to link (or +click on a Mac).
Click Copy Image Location.
The link is saved to your computer’s clipboard.
Go to your blog, and click Add Media at the top of the post- or page-writing panel where you want the image to appear.
The Insert Media window opens.
Click Insert from URL.

The Insert from URL view appears.
Paste a copied image URL in the URL box.
A The image to insert appears.
Type alternate text describing the image.
Click Insert into post.
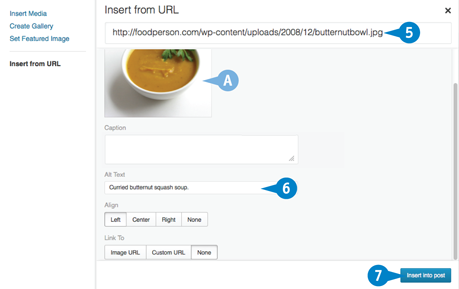
B The Insert Media window disappears, and the writing panel displays the image where your cursor was.
Click Save Draft.
Click Publish to publish the post on your website.
Note: Media embedded into your blog through the URLs of other websites are not saved to your Media Library.
Using Images to Enhance Posts
You can get the best results from your well-chosen images when you use them not just for color but also to enhance the content of your posts. After all, if one picture is worth a thousand words, one picture plus a thousand words must be worth five thousand words, as long as the words and pictures complement each other. Earlier sections provided various ways to insert images. Now consider the best ways to use those images. Remember also that using a reasonably consistent pattern improves your blog’s visual identity.
Art for Interest
As with headings, you can use images to break up a large block of uninterrupted text. If you do not have a suitable image, you can consider microstock images in addition to the public domain images mentioned in the preceding section. Two popular microstock sites are iStockPhoto.com and Shutterstock.com.

Take Advantage of Images’ Words
Besides providing information for visitors using screen readers or other assistive devices, the alternate text for your images also leads search engines to your photos. The image title, which defaults to the filename, appears in some browsers when the mouse pointer rests over the image. The filename also can lead searchers your way. So, name it autumnleaves.jpg rather than img0235.jpg.

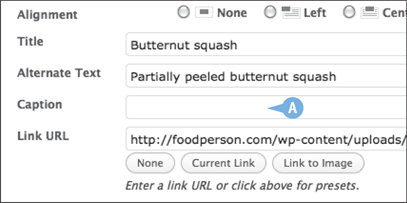
Captions Not Required
Just because your WordPress image-inserting window allows you to type a caption does not mean you must use that option (A). The caption feature generally puts a border around the image with the caption included. You may not like that look. The next section provides some options. And some images require no captions at all.
Consider Wrapping Text
You may want a powerful image to stand alone on a line using the None or Center format. An image that mainly illustrates your words, however, might work better with text wrapping around it, using the left or right alignment. Learn how in “Wrap Text Around an Image,” later in this chapter. Make sure the photo is small enough to allow at least three or so words to fit on every line beside it.

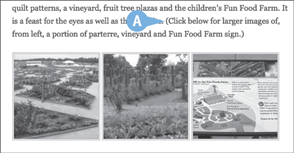
Offer Two Display Options
You can upload a large photo, say one that is 800 × 1200 pixels, but insert it in your post using the Thumbnail option or a percentage display. That represents the size that the image appears in the post, but readers can click the small image and see its larger version in another window. It does not hurt to tell them so (A).
Give Credit
Crediting the source of your images (A) is useful to readers — as well as to artists and photographers, perhaps including you. You can do it in alternate text, but doing it on-screen is nicer. Some people recommend doing it in both places. Also, if you do not want others to use your photos, declare your copyrights with each image.

Add a Caption to an Image
Captions provide added information to your readers about images that you post on your site. You can add a caption when you upload an image, or you can add it after the fact as part of your post. When you use the Caption field in the Media panels, WordPress includes the caption in the image’s display and uses the style specified in your theme’s style sheet. That is the easiest way to add a caption. If you want a caption but not the styling, you can add caption information in other ways.
Add a Caption to an Image
Click the posted image in the post-writing panel.
Click the Edit Image button ( ) that appears.
The Edit Image window appears.
Type a caption.
Click Update.
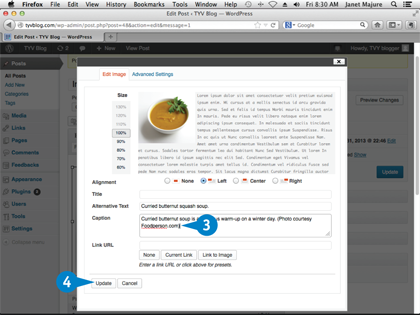
The posting panel returns and shows the caption.
Click Update.
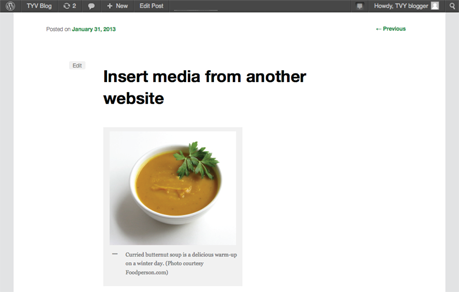
Click View Post.

WordPress opens the post, where you can view the caption as the world sees it.
Wrap Text Around an Image
Wrapping text around an image lets the image be integrated into the text. You can set up the text wrap as part of your image-inserting process while writing a page or post. Place your cursor in the text where you want the image to appear, and click Add Media. After you choose the image you want to upload, you click the appropriate alignment setting. When you insert the image, the text wraps around it.
Wrap Text Around an Image
With an image selected in the Insert Media panel, click the Alignment box down arrow ( ).
).
Click Right.
Click Insert into post.
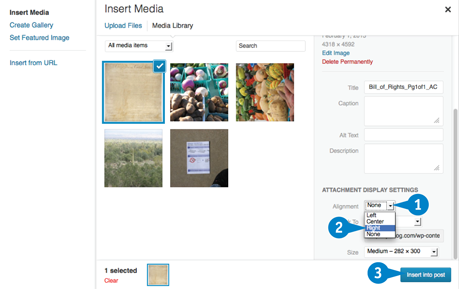
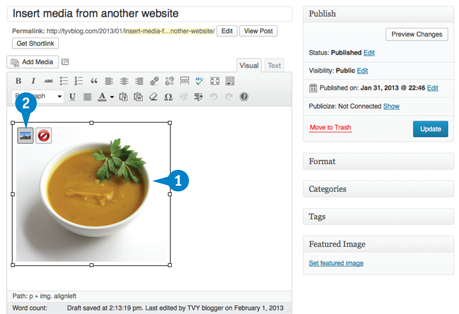
A The image appears, aligned right, in the post panel.
Click Save Draft.
Click Preview.

A preview of the post with the inserted image appears in a new tab.
Click X to close the tab.
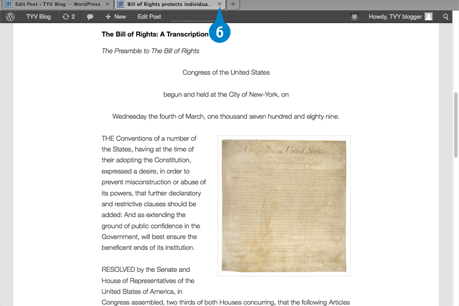
The Edit Post page returns. You can click Publish (B) if you are satisfied, or click the image and then the Edit Image button () to make additional changes.

TIPS
Why does more text appear to the side of the image on one computer than on another?
The answer goes back to differences in screen size and resolution as explained in “Understanding Display and Image Dimensions,” earlier in this chapter. If you are concerned about how much text appears, try viewing the post using different resolutions on your computer.
How can I adjust the amount of space between the image and the text?
Click the image in your post, and then the Edit Image button (). Click the Advanced Settings tab. Type values, in pixels, for the amount of vertical space, which is the space above and below the image, and horizontal space, which is the space beside the image, that you want. Then click Update.
Determine the Image Target
You can determine what happens when someone clicks an image on your site. The options include displaying the image by itself on an otherwise blank web page, opening a totally different web page, and displaying the image as an attachment page. An attachment page displays the image in the same format as a blog post. You also can set it so that a click on the image does nothing. At this writing, the WordPress interface makes the attachment page option a bit confusing, but you can work it out. Start by clicking the Insert Media button in the posting panel.
Determine the Image Target
When Inserting the Image
In the Insert Media window, click the Link To down arrow ().
Click Custom URL.
A Click here to open a blank web page displaying only the full-size image.
B Click here to open the image in an attachment page.
C Click here to cause no action when the image is clicked.
Type a target URL.
Click Insert into post.
WordPress inserts the image and associated URL. You then need to save or update the post. When you publish or preview the post, you can click the image, and it causes your browser to open the specified web page.

When Editing the Image
Click the image.
Click the Edit Image button ().
The Edit Image window appears.
D The current link target appears.
Note: In this case, the target is the image upload location, the equivalent of the Media File target option in the Insert Image window.
Click None.
The link target disappears, which means that clicking on the image creates no action.
E This is the equivalent of the Media File option in the Insert Media window, which causes the image to open in a blank web page.
Type a target URL in the Link URL box, the equivalent of the Custom URL in the Insert Image window.
Click Update.
WordPress updates image and associated URL. You then need to save or update the post. When you publish or preview the post, you can click the image, and it causes your browser to open the specified web page.
Understanding Unattached Images
WordPress developers continue to work with how the software manages the images you upload and store on your site. Understanding a little of the background may help to avoid potential problems such as accidentally deleting images in use on your site or filling your server storage with numerous unused photos if you run a self-hosted site. The WordPress ways of media handling have simplified some matters but confusion still occurs. The question of unattached images may never arise for you, but if it does, a little knowledge will prepare you.
What an Attached Image Is
When you upload and insert an image while posting, that image is forever associated, or attached, to that post. You can delete the image from the post or include it in another post, but as far as WordPress is concerned, it remains attached to the original post unless that post is deleted.
What an Unattached Image Is
An unattached image, unsurprisingly, is one that is not attached to a post. An image could be unattached for several reasons. A formerly attached image could become unattached if you delete the post to which it was originally added. An image could be unattached if you upload it directly to the Media Library without ever attaching it to a post. Similarly, images you upload via FTP to your site remain unattached until they are inserted into a post.

Images and Galleries
You may not think attachment matters, but it does. If you want to add a slide show to your post, for example, the images in the show generally need to be attached to the post. If your post reuses an image attached to another post, that image will not show up in your slide show. The same thing is true for galleries, or collections of images, as described in “Insert an Image Gallery,” later in this chapter.

Unattached Does Not Mean Unused
It is important to remember that unattached does not mean unused. As you maintain your blog, you may decide to reduce the load on your server or simply to eliminate clutter in your Media Library by deleting unused photos. Do not make the mistake of identifying and deleting all unattached photos. Here is what can happen. You have a post with an attached photo or two. Meanwhile, you create a new post and insert the same images, using the Media Library. Then you decide to delete the first post. The post goes away, but the images stay in the library as unattached. If you delete them from the Media Library based on their being unattached, you in effect delete them from the second post. Also, an image you use for your site’s background or header may be unattached even though in use.
Attached Does Not Mean Used
WordPress may create multiple versions of an image when you upload it. These versions fit the thumbnail, medium, and other size options. You do not see each version listed in the Media Library, but they are there, and most probably are attached to a post but not used. At this writing, however, there is no convenient way and no established plugin to identify and delete these extras.

Getting Attached
WordPress provides an easy way to identify unattached images and attach them to posts. The next section in this chapter explains how. You also can use the filter for unattached images to try to identify unused images if you want to delete them. Not all unused images appear in the Media Library, however. You may need to view the contents of the wp-content/uploads folder on your server to see all images stored there.

Attach Images to a Post
When you attach images to a post, you make them readily available for use in galleries and slide shows. WordPress has a convenient way for you to identify unattached photos. You can select the ones that you want to attach, identify the post to which you want to attach them, and soon the images are attached. This technique can be especially useful for you if you prefer to upload images in batches directly to the Media Library or to your host using FTP. WordPress lets you attach media individually or in batches.
Attach Images to a Post
Attach a Single Image
Click Media.
The Media Library panel opens.
Click Unattached.
The library filters for unattached images.
Position your mouse pointer over an image you want to attach and click the Attach link that appears.
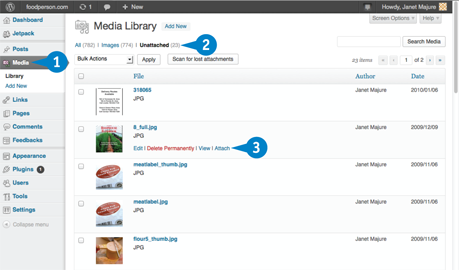
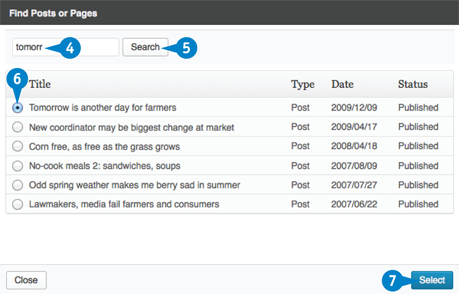
The Find Posts or Pages dialog box appears.
Type a search term.
Click Search.
A list of posts containing the term appears.
Click the radio button next to the post to which you want the image attached ( changes to
  ).
).
Click Select.
WordPress confirms the attachment, removes the item from the Unattached list, and reduces the number of unattached media.

Attach Multiple Images
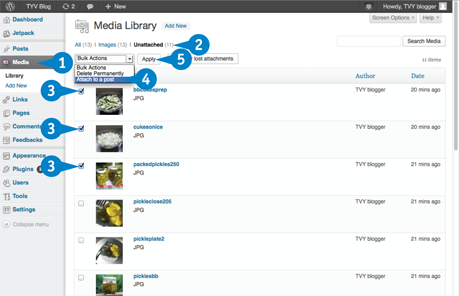
Click Media.
The Media Library panel opens.
Click Unattached.
The library filters for unattached images.
Click the check box next to the images you want to attach to a post ( changes to ).
Click the Bulk Actions drop-down menu, and click Attach to a post.
Click Apply.
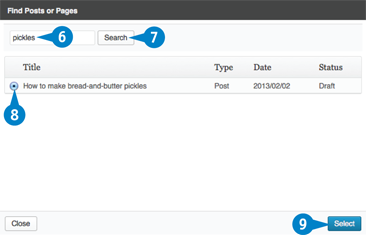
The Find Posts or Pages dialog box appears.
Type a search term.
Click Search.
A list of posts containing the term appears.
Click the radio button next to the post to which you want the image attached ( changes to ).
Click Select.
WordPress confirms the attachment, removes the item from the Unattached list, and reduces the number of unattached media.
TIP
Once I attach an image, does that mean it appears in the post?
No. Attaching an image associates it with the post in the WordPress software. If you want it to appear in the post, you need to insert it. When you do, you choose the Media Library tab in the Insert Media window. You can choose Uploaded to this post from the drop-down menu to see only media attached to that post.

Insert an Image Gallery
A WordPress image gallery gives you a quick and easy way to display a set of photos or other images on your website. The gallery displays thumbnails of the images, and then you can click individual images to view larger versions. You can create a gallery as you upload images to a post, or you can create it from previously uploaded posts. The Create Gallery option in the Insert Media window lets you choose images to display that are attached or not attached to your post. The WordPress.com version lets you choose among multiple possible gallery views.
Insert an Image Gallery
In a new or existing post, click Add Media and upload one or more images, as described in “Upload and Insert an Image While Posting,” earlier in this chapter.
After the images are uploaded, click Create Gallery.
A Newly uploaded images have check marks and will be added to gallery.
B Clicking on an image with a check mark changes the mark to a minus sign. Click it if you do not want that image in the gallery.
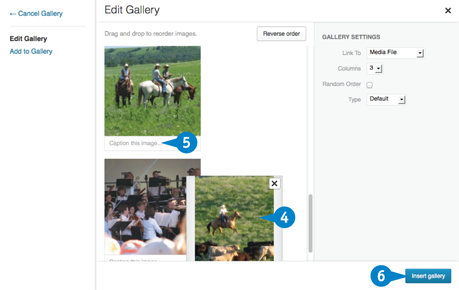
Confirm images for the gallery, and then click Create a new gallery.

Click and drag images to change their order.
Click here and type a caption if desired.
Click Insert gallery.
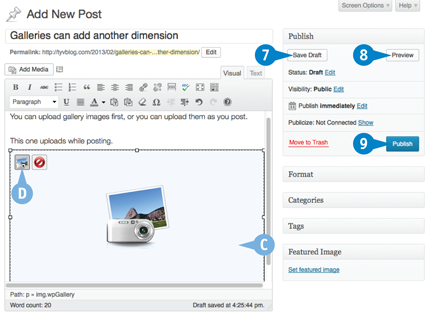
WordPress inserts a gallery placeholder.
C The gallery placeholder indicates gallery location in your post.
D The Edit gallery button, visible when you click the gallery placeholder, opens the Edit Gallery window.
Click Save Draft.
Click Preview to view the gallery.
Click Publish when satisfied.
The post with the gallery appears live on your site.
TIPS
What are the WordPress.com display options?
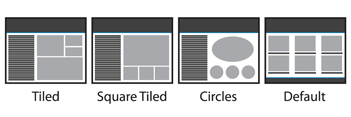
In addition to the default layout, you can choose tiled, square tiled, or circles from the Type drop-down menu in the Edit Gallery window. You can try one, look at the preview, and then change your mind if you like.
What is the difference in the two Link To gallery settings?
This setting determines how individual images appear when you click them in the gallery. The Attachment Page option opens the image in a separate page using your theme’s image attachment template. The Image File option opens the image alone on a blank browser page.
Add a Slide Show to Your Posts
Why limit yourself to an image or two, or even a gallery, if you can have a slide show simply and easily? WordPress recently integrated a slide show option in with its gallery interface, so the setup could not be easier. Self-hosted site owners also have numerous plugins to choose from to create and manage slide shows. The plugins typically provide more options than the built-in slide show, although the built-in version is likely to satisfy the average user. To create a slide show, you start out as you would to create a gallery, and then you choose the Slideshow display option.
Add a Slide Show to Your Posts
In a new or existing post, click Add Media.
Click all images you want to add to the slide show.
A A check mark appears in selected images.
Click Create a new gallery.

The Edit Gallery window appears.
Add captions if desired.
Click Slideshow in the Type drop-down list.
Click Insert Gallery.

The post window returns with a placeholder (B) for the slide show.
Click Save Draft.
Click Preview.
The post preview appears with the active slide show in new tab.
Click X to close the tab.
Publish or edit the post for future publication.

Link to YouTube and Other Videos
Videos are a little more trouble to deal with than images, but they can add a lot of visual energy to your blog posts. Using embedded videos through links may be the easiest way to get them up and running, and you do not have to use your own host space to store the videos.
You can link to most videos hosted at YouTube.com and at Vimeo.com, and you can upload your own videos there, too.
Link to YouTube and Other Videos
After you find the video you want to post on your blog at YouTube.com, click Share.

The linking box appears.
Click Embed.
A The embed code appears.

Scroll down to see embed options, and make any selections you want.
Scroll back up and copy the code.

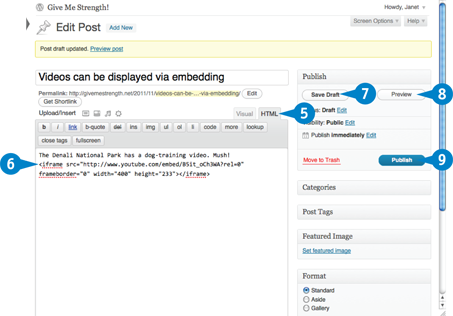
Back at your WordPress Dashboard, start a new post, and click the HTML tab.
Click in the post where you want the video to appear, and paste the code you copied from YouTube.com.
Click Save Draft for a new post or Update for an existing post.
WordPress saves the post and inserts a placeholder for the video in the visual editor.
Click Preview to see how the video appears on your site.
A preview of your post appears in a new window, where you can click a Play button to view the video.
Click Publish to publish the post on your site.
Note: You can use the same process to embed a video on a page or an existing post.
TIPS
Do I have to pay for the video add-on to post YouTube videos with WordPress.com?
No, because you are embedding the video rather than hosting the video on your WordPress.com account. The video add-on is required only if WordPress.com is storing and serving your videos.
Is there any other way to link to videos?
You can simply put the video’s URL in a separate line in the HTML editor and save it, which is the best bet at WordPress.com. To customize it at WordPress.com, see the instructions at http://en.support.wordpress.com/videos/youtube. Self-hosted bloggers can check for YouTube plugins, explained in Chapter 6, at WordPress.org. Chapter 13 explains more options.

Upload Video Files to Your Host
You have more control over the look and performance of your videos when you host them yourself. Doing so takes a few more steps than when you link to videos posted elsewhere. But, unlike most videos at YouTube, for example, you can show your videos without advertisements appearing along with them.
If your blog is hosted on WordPress.com, your first step is to buy the VideoPress upgrade. That upgrade allows you to upload and store your videos at WordPress.com.
Upload Video Files to Your Host
Basic Installation on a Self-Hosted Blog
On the New Post or Edit Post page, click Add Media.

The Insert Media window opens.
Click Upload Files.
Click Select Files.
Note: You can drag a file to the upload window if you prefer.
Your browser opens a file selection window, from which you select the video you want to upload and then click Open.
The Insert Media window returns and shows the progress of the upload.
A When the upload is complete, details about the video appear.
Type a title, which is the text that appears for a link to the video.
Click Insert into Post.
A link to the video file — but no image — appears in your post box.
Full-Featured Installation on WordPress.com
After clicking Store in the left menu panel and then buying the VideoPress upgrade, go to a New Post or Edit Post page, and upload as described in Steps 1 to 5 above for installing video on a self-hosted blog.
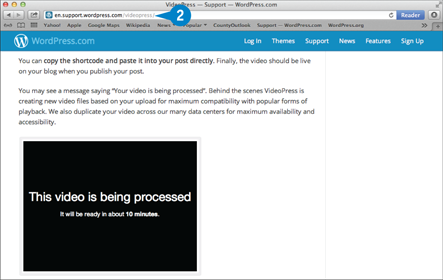
A message appears, informing you that your video is being processed and will be ready in a few minutes.
Note: If you use many videos you may also need to purchase a space upgrade.
While you wait for the video to be processed, go to http://en.support.wordpress.com/videopress to read detailed instructions on setting up your video.
Link to a Podcast or Sound File from Your Blog
With audio files, you can give your readers the sound of your voice, of bird calls, of music. Linking to such files is much like linking to videos, and you also can host them on your site if you do not want to embed or link to audio files. First, you need to find the audio file to which you want to link. Then you upload it, and a very basic audio player appears. Your readers can click it to hear what you have to say.
Link to a Podcast or Sound File from Your Blog
From the New Post or Edit Post window, click Add Media.
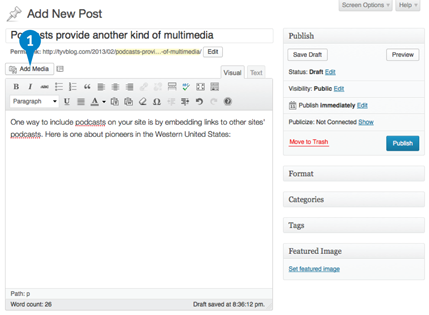
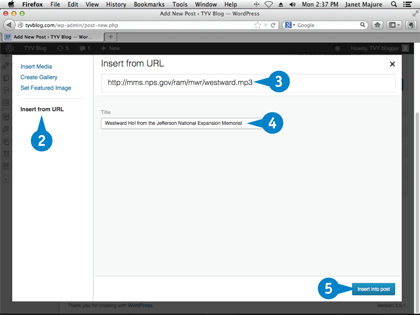
The Insert Media window opens, where you click Insert from URL.
The window changes to Insert from URL.
Type or paste the URL of your chosen audio file into the URL box.
Click here and type a title for the audio file. The title provides the link text.
Click Insert into post.
The Insert Media window closes, and a link to the audio file appears in the post box.
Click Save Draft.
Click Preview.

WordPress displays the post in your browser, where you can click the link to hear the sound file.
The sound file opens at its URL and begins playing.
