Chapter 2: Camera Setup and Image Playback
The time you spend setting up the EOS 7D pays off in greater ease of use and enjoyment while you’re shooting. While some setup options can be set once and forgotten, other options require more frequent changes, depending on the shooting situation. This chapter gives you a look at the settings you’ll want to set up on the 7D to ensure great image quality and a smooth workflow.
Choosing Image Format and Quality
Among the first setup considerations are setting up the image file format and quality level, file numbering, and folder organization. Your choices for these camera settings should support the way you work with images on the computer and the way you organize and store images.
One of your first choices should be whether you will shoot JPEG and/or RAW images. Before you choose, consider the options the camera provides for each format and how they affect your image workflow and the overall printed image quality and the size.
JPEG format
JPEG is the most common file format used for digital images, and it is the default file format on the 7D. JPEG offers efficient, high-quality file compression that saves space on the memory card. It also offers quick display of image files on the camera’s LCD monitor and on the computer.
The small file sizes that JPEG produces allow you to store many images on the CompactFlash (CF) card. To reduce image file size, JPEG compresses files and, in the process, it discards some image data. The higher the compression level, the more image data is discarded, and the smaller the image file size, and vice versa. Because of this loss of data, JPEG is known as a lossy file format. While data loss isn’t ideal, the loss of data at a low compression level is typically not noticeable in prints.
Additionally, JPEG files can be displayed on different computer platforms, on the Web, and in e-mail without the need for special viewing programs or preprocessing.
When you shoot JPEG images, the 7D processes, or edits, the images before storing them on the CF card. This sets the color rendering, contrast, and sharpness so you get a finished file that you can use as is or edit on the computer. With the 7D, you can control JPEG image processing to some extent by choosing among six Picture Styles.
 If you edit JPEG images on the computer, and then save them as JPEGs, the data loss continues to occur. To preserve image data during editing, be sure to save JPEG images as TIFFs or in another file format before you begin editing.
 Picture Styles and color spaces are described in Chapter 4.
Another JPEG advantage is that it provides the 7D’s maximum burst rates when you’re shooting in a Continuous Drive mode. For example, shooting the highest-quality JPEG images, the burst rate is 126 shots at 8 frames per second (fps) using a UDMA card. Thus JPEG capture offers a definite edge for getting the fastest performance from the 7D.
The 7D offers two JPEG compression levels, and you can choose one of three image-recording sizes: 17.9, 8, or 4.5 megapixels. The greater the compression and the smaller the image size, the more images you can capture in a continuous shooing burst, and the more images will fit on the CF card. As discussed earlier, the downside of high compression and low image size is that image quality suffers proportionally.
Further, every 7D image is captured as a 14-bit file that delivers 16,384 colors in each of the three color channels: Red, Green, and Blue. Because the JPEG file format doesn’t support 14-bit files, the 7D automatically converts JPEG images to 8-bit files with only 256 colors per channel. While the conversion from 14- to 8-bit is done judiciously using internal camera algorithms, the fact remains that much of the image color information is discarded in the process.
Combine this data loss with the automatic in-camera editing and JPEG compression, and you get a file that has one-third or more of the image data discarded before it’s written to the CF card. Certainly the JPEG image files are smaller, but with the data loss, the files are not as rich as RAW files, and they offer less latitude and stability when you edit them on the computer.
For photographers who seldom edit images on the computer and want small file sizes with maximum portability, JPEG is the best option. However, for photographers who want to preserve all of the rich image data that the 7D captures, RAW capture is worth exploring.
RAW capture
RAW is the option to choose if you want the best images the 7D can deliver. RAW is a designation for image files that are captured and stored on the CF card with little in-camera processing and with no loss of data from compression or conversion. RAW files are not converted to 8-bit as with JPEG, but rather are captured and stored as 14-bit images. And unlike pre-edited JPEG files, the only settings the camera applies to RAW images are the aperture, ISO, and shutter speed.
With RAW, you can set or adjust key settings such as white balance, brightness, contrast, and saturation after the image is captured. This means that in addition to getting an image file that contains all the 7D can provide, you also get wide latitude when converting the RAW image.
Converting RAW images is done using Canon Digital Photo Professional (DPP), Adobe Camera Raw, or Adobe Lightroom where you adjust the image color, brightness, tonal range, contrast, and color saturation to your liking. If you use Digital Photo Professional, you can also apply a Picture Style, Auto Lighting Optimizer, and other options just as you would apply them in the camera.
In addition, if images have blown highlights or areas where the highlights went to solid white with no image detail, you can often recover some of that image detail during conversion. If an image is underexposed, you can brighten it during conversion. All of the adjustments made during RAW image conversion are non-destructive, as if you made the adjustments in the camera.
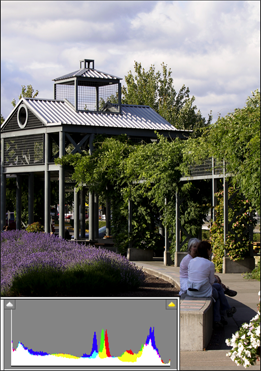
2.1 This is a JPEG image that has the in-camera processing applied as well as the conversion to an 8-bit file. The histogram shows that some of the brightest highlights in the walkway roof are being clipped and that the shadows block up and clip quickly. Exposure: ISO 200, f/11, at 1/125 second.
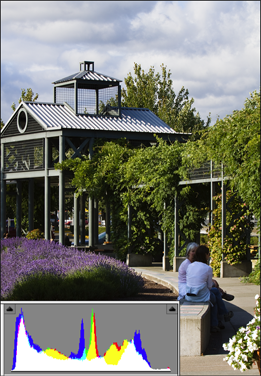
2.2 This is the same scene captured as a RAW file and converted in a RAW processing program. During conversion, I brought in the highlights to avoid clipping. While it may not be visible at this size, I also opened up the shadow areas, and the detail is visible at 100 percent enlargement.
So when image conversion is complete, you have a robust file that you can save as a TIFF or in another file format. Having a robust file is important because when you edit the image in Photoshop or another image-editing program, virtually all the edits are destructive — whether you adjust levels or color balance or set a tonal curve. Less robust JPEG files can suffer posterization, or the loss of smooth gradation among tonal levels, including stretching tonal ranges and the loss of image detail from compressing tonal ranges. By way of contrast, with RAW files, you begin with a rich 14-bit file that you can save as a 16-bit file in a RAW conversion program. Compared to an 8-bit JPEG file, this 16-bit file has much more latitude to withstand destructive image edits.
You can opt to shoot using Canon’s medium or small RAW image-recording options, both of which offer the same advantages as full-size RAW files, but at a smaller image size. The 7D offers Medium (M) RAW at 10.1 megapixels (17.1 MB file), or Small (S) RAW at 4.5 megapixels (11.4 MB file).
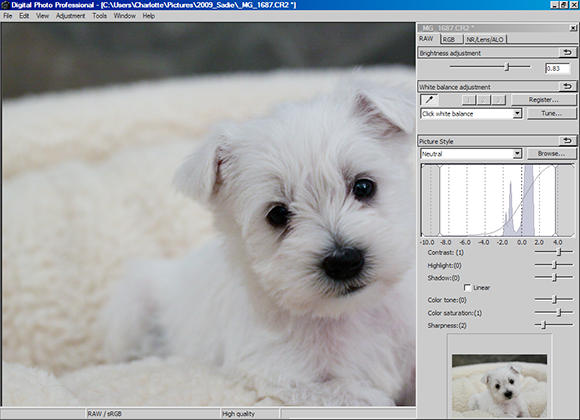
2.3 Canon’s Digital Photo Professional, shown here, is included on the EOS Digital Solution Disk, and provides a full-featured program for converting RAW images.
RAW capture has drawbacks, however. First, RAW files lack the portability of JPEG files. RAW files cannot be edited unless you’ve installed Digital Photo Professional or another RAW conversion program such as Adobe Lightroom or Camera Raw. Second, unless you enjoy working with images on the computer, RAW is not a good option because the files must be converted and saved in another format, such as TIFF, PSD, DNG, or even JPEG. Third, RAW image file sizes are considerably larger than JPEG images.
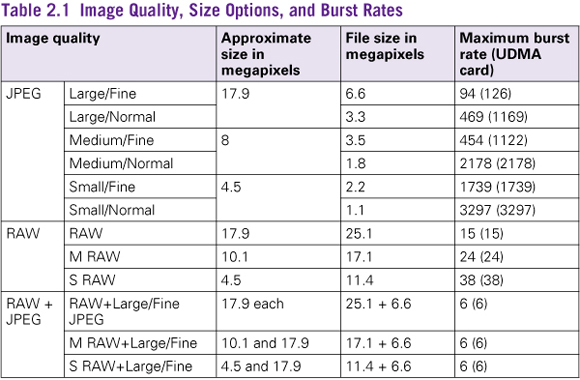
By knowing the advantages and disadvantages of JPEG and RAW capture, you are in a better position to choose whether you want to shoot JPEG or RAW images. You can choose to take advantage of both types of files and select the size for each type. Table 2.1 details the options that you can select on the 7D and their effect on the burst rate during continuous shooting.
The best of both worlds: shooting RAW and JPEG
To get the best of both worlds, you can choose to shoot both RAW and JPEG. You then have the advantage of getting a pre-edited JPEG file you can post online or print directly with no editing. You also get a RAW file, either full-size or smaller, that you can convert and edit. So when you get a great shot that you want to perfect, or when you get a shot that needs some adjustments, the RAW file gives you the latitude to make adjustments.
One downside of shooting RAW+JPEG is the increased space needed on the CF card. For example, on a 4GB card, you can store 122 full-size RAW and Large/Fine JPEG images. Whereas if you shoot only Large/Fine JPEGs, you can store 593 images on the card. If you capture both JPEG and RAW, the images are saved with the same file number in the same folder. They are distinguished by the file extensions of .JPG for the JPEG image and .CR2 for RAW, M RAW, or S RAW. RAW+JPEG capture also slows down the continuous high-speed shooting burst rate as shown in Table 2.1. (Estimates in Table 2.1 are approximate, and vary according to image factors, including ISO, Picture Style, and Custom Function settings, as well as card brand, type, and speed.)
Canon divides the image quality screen between RAW and JPEG options. You can select RAW options by turning the Main dial, and JPEG options by turning the Quick Control dial.
To set the image format and quality, follow these steps.
1. Press the Menu button, highlight the Shooting 1 tab, highlight Quality, and then press the Set button. The Quality screen appears.
2. Turn the Main dial to highlight the RAW option you want. Or, if you are shooting RAW+JPEG, and you want to stop capturing the RAW image, then select the minus sign.
3. Turn the Quick Control dial to highlight the JPEG option you want. Or, if you’re shooting RAW+JPEG images and you want to stop capturing a JPEG image, then select the minus sign.
4. To shoot RAW+JPEG, do steps 2 and 3.
5. Press the Set button. The options you choose remain in effect for all shooting modes until you change them.
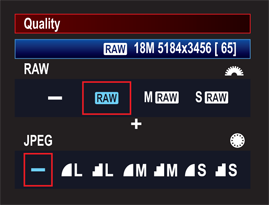
2.4 The Quality screen enables you to select RAW file options by using the Main dial and JPEG options by using the Quick Control dial.
There may be specific times when you may want to capture both RAW and JPEG images without continually capturing both images with every shot. For one-off RAW+JPEG shots, you can set up the camera so that when you press the RAW-JPEG button on the back of the camera, it captures a RAW and a JPEG image. If you have the image quality set to JPEG only, this option enables you to simultaneously capture a RAW image for a single image and vice versa. After the shot, the camera then returns to your regular image-recording setting.
To use the RAW-JPEG button, follow these steps.
1. Press the Menu button, and then highlight the Shooting 3 tab.
2. Select One-touch RAW+JPEG option, and then press the Set button. The One-touch RAW+JPEG screen appears.
3. Turn the Quick Control dial to select Simultaneous RAW or Simultaneous JPEG, and then press the Set button. The Simultaneous RAW or Simultaneous JPEG screen appears depending on your selection.
4. Turn the Quick Control dial to select the image quality you want, and then press the Set button.
5. When you’re ready to shoot, press the RAW-JPEG button on the back of the camera. The image recording quality icon on the LCD blinks to indicate that simultaneous RAW+JPEG capture is active. If you change your mind and want to cancel simultaneous capture, press the RAW-JPEG button again.
6. Take the picture. Both the RAW and JPEG images are captured, and then simultaneous recording is cancelled.
Working with Folders and File Numbering
To create consistency in your workflow, think through the folder structure and file naming that you want to use as you set up the 7D. The more consistent you are with your naming conventions, the easier it is to manage your image collection as it grows.
With the 7D, you can set up folders to organize images on the media card and choose the way in which the files are named in the camera. The 7D enables you to set up multiple folders, and it offers three file-numbering options.
Creating and selecting folders
One handy feature of the 7D is the ability to create up to 999 folders on each CF card to store images, with each folder containing up to 9,999 images. New folders must be created within the main folder, and folders can be created either in the camera or on the computer. Here are the folder guidelines using either option:
 When image 9999 is recorded within a folder on the CF card, the camera displays an error message, and you cannot continue shooting until you replace the CF card, regardless of whether or not the card contains additional free space. This may sound innocuous, but it can cause missed shots. So if the camera stops shooting, try replacing the CF card.
 Creating folders in the camera. Folders created in the camera are numbered sequentially from the next higher number from the existing folder. The camera automatically creates folder 100EOS7D, so if you create a new folder, the next folder name will be 101EOS7D. When you create folders in the camera, the folder naming structure is preset and cannot be changed. If you insert a CF card from another Canon EOS digital SLR, the folder will retain the folder naming from the other EOS camera until you format the CF card in the 7D.
 Creating folders on the computer. You can also create folders on the computer for more flexibility in file naming. However, you must follow naming conventions. Each folder must be labeled with a unique three-digit number from 101 to 999. Then a combination of up to five letters (upper and/or lower case) and/or numbers can be added with an underscore. No spaces are allowed and the same three-digit number can’t be repeated. So, you can create a folder named 102CKL_1, but not one named 102SKL_1.
Unlike image numbering, the 7D does not remember the last highest number when you insert a different media card and create a new folder on the card. And if you format the CF card, the folders you created either in the camera or on the computer are erased along with all images. The only folder that isn’t erased is the default 100EOS7D folder.
When you format the CF card, all existing folders except 100EOS7D are deleted. Thus you need to create new folders after you format the card.
To view an existing folder or create a new folder, follow these steps.
1. Press the Menu button, highlight the Setup 1 tab, and then highlight Select Folder.
2. Press the Set button. The Select folder screen appears with folders and the number of images per folder displayed on the left side and a preview of the first two images in the selected folder on the right.
3. To view an existing folder, turn the Quick Control dial to highlight the folder you want. To create a new folder, turn the Quick Control dial to highlight Create folder, and then press the Set button. The camera displays the Select folder screen with a confirmation message to create a folder with the next incremented number.
4. Turn the Quick Control dial to select OK, and then press the Set button. The Select folder screen appears with the newly created folder selected.
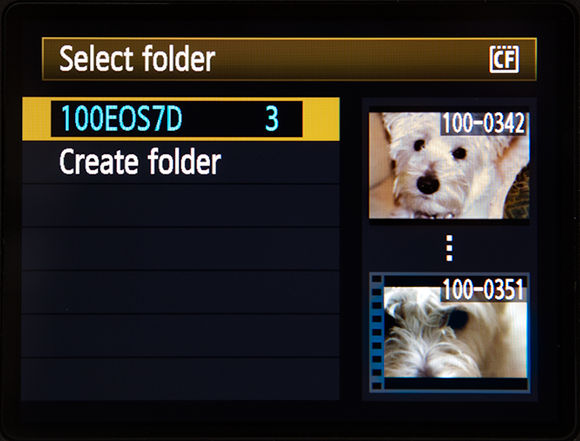
2.5 Main default folder on the 7D
Choosing a file numbering option
Changing the way that the camera numbers files may not seem like a top priority to you, but you may find that one of the other file-numbering methods helps you delineate files in different shooting situations to make your workflow more efficient. Here is a look at each option and some of the shooting scenarios where each option could offer an advantage.
Continuous file numbering
Continuous file numbering is the default setting on the 7D, and every file is numbered sequentially beginning with 0001 through 9999. Image files are stored in the 100EOS7D folder located at the top-level on the CF card.
The camera automatically creates the 100EOS7D folder. File numbering continues uninterrupted unless you insert a CF card that has images stored on it. If the highest number on the card is higher than the last image number on the 7D, then file numbering typically continues from the current highest-numbered image on the CF card. That numbering continues even after you insert an empty formatted card. For example, although I had taken only 200 images with the 7D, when I inserted a CF card from another Canon camera, the next image file number on the 7D was 4521, the next higher number on the CF card.
Likewise, if a CF card contains multiple folders with images in them, then the numbering sequence begins with the highest-numbered existing image in the folder that is being used. But if you insert a card that has a file number that is lower than the last highest file number taken on the 7D (stored in the camera’s internal memory), then the file numbering continues from the last highest file number recorded on the 7D. In short, the camera uses the last highest number from either the card or the number stored in memory. So if you want pristine, continuous file numbering, then always insert a formatted card and do not insert CF cards from other Canon bodies that have images stored on them.
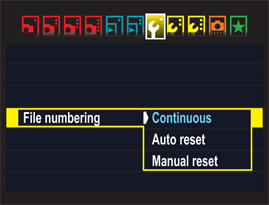
2.6 File numbering options on the 7D
An advantage of continuous file numbering is that it gives you unique filenames on the computer. This helps you to avoid overwriting images with the same filename and file extension. Of course, if you have a second Canon camera body, and you put files from both cameras in the same folders, there is the potential to have duplicate filenames with the same extension. Hence, good folder and image management is essential for peace of mind.
Auto reset
As the name implies, this option resets image file numbering every time you insert a CF card, and when you create a new folder on the CF card. Using Auto reset, image file numbers reset to begin at 0001.
Auto reset is handy for keeping images organized by shoot when photographing different subjects or assignments on the same day. I create separate folders on the CF card or cards, and then save images from different shoots to individual folders. Because the file numbers reset in each folder, it’s easy to check each folder to see the number of images I’ve taken for the assignment. Additionally, I can more easily keep the images separate when I download them to the computer.
But again, the Auto reset option isn’t as straightforward as it seems. If you insert a CF card with existing images stored on it, the camera uses the highest existing image number and continues numbering from there. So if you want Auto reset to reset to 0001, be sure to format the CF card in the camera before shooting with it. In short, it pays to start a shooting day with an adequate supply of freshly formatted CF cards, and to not swap CF cards between cameras to make this and other file numbering methods work best.
Manual reset
This option seems to work around the limitations of the Continuous and Auto reset settings. By its name, it seems that you could force file numbering to reset for a fresh start. However, that’s true only if the default 100EOS7D folder is empty. When you select Manual reset, the next image number is set to 0001. But if the 100EOS7D folder has images in it, when you choose Manual reset, the camera creates a new folder, 101EOS7D, and starts image numbering at 0001 in that folder. That behavior is also true for CF cards that have multiple folders with images in each folder.
When would you use Manual reset? I use it anytime I want to quickly create a new folder and begin shooting at image number 0001. For example, if I’m shooting a wedding, and a member of the wedding party asks me to photograph his family during a break, I can select Manual reset and know that the family shots will be kept in a folder separate from the wedding image folder. Of course, I have to remember to switch back to the wedding folder when I go back to shooting the wedding.
After you choose Manual reset, the 7D returns to the File numbering option that was in effect before the numbering was manually reset, either Continuous or Auto reset. Also, the new folder created is the next sequential number from the existing highest folder number on the CF card.
Changing the File numbering option on the 7D is straightforward, as long as you remember the limitations and behavior of each option. Follow these steps to set the file numbering option you want:
1. Press the Menu button, highlight the Setup 1 tab, and then highlight File numbering.
2. Press the Set button. The camera displays the three File numbering options.
3. Highlight the option you want, and then press the Set button. The option remains in effect until you change it, except for Manual reset, which creates a new folder if there are images in the current folder and in any other folders. If there are no images, then image numbers in the current folder begin with 0001. In both instances, the camera then returns to the previously selected file numbering option.
Miscellaneous Setup Options
There is a laundry list of setup options on the 7D that can make your shooting life easier and make the camera work better for you. You may have already implemented these settings, but in case you missed some, here is a list of helpful setup options.
General setup options
Within general options, I include options typically set only once, although there are some you may revisit for specific shooting scenarios.
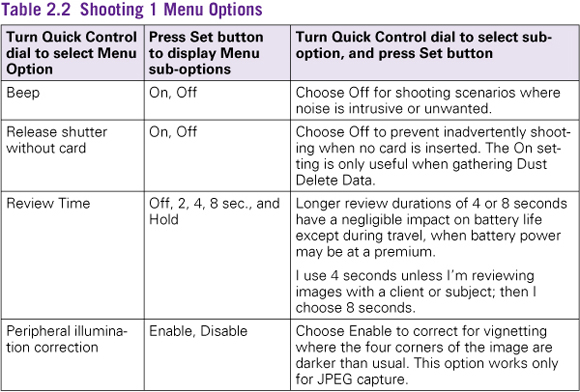
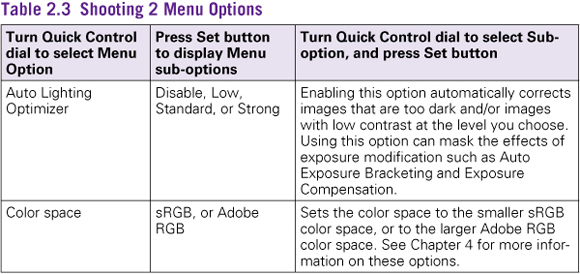
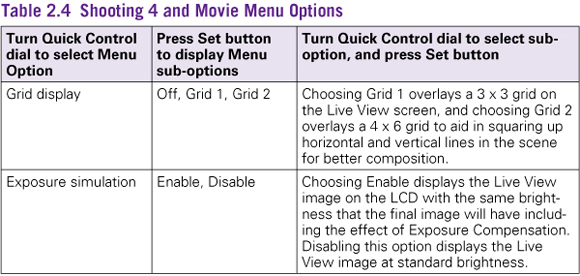
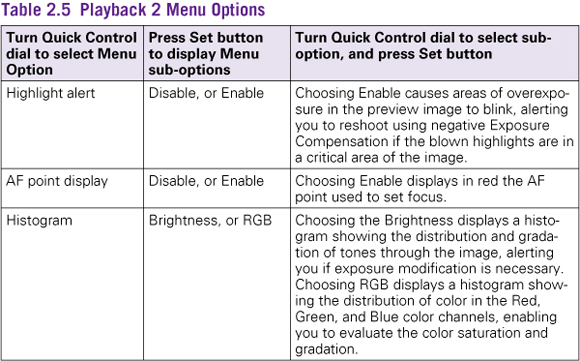
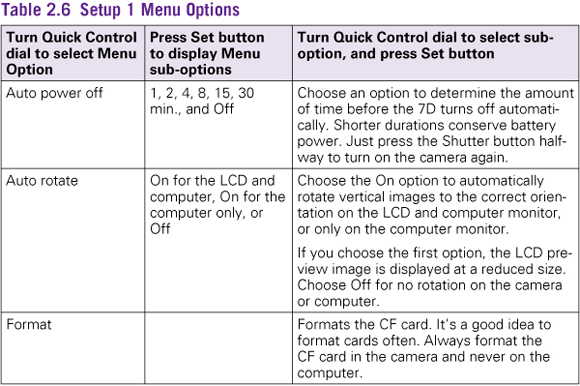
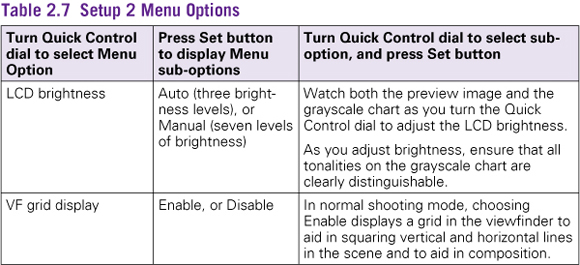
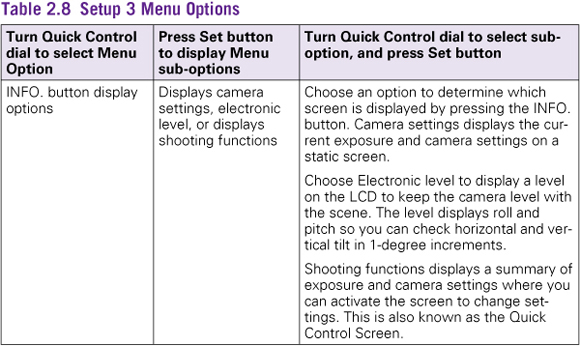
To change general setup options, press the Menu button, turn the Main dial to choose a menu, and then follow the instructions in Tables 2.2 through 2.8.
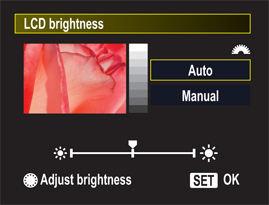
2.7 The LCD brightness screen enables you to monitor brightness with the preview image and the grayscale display on the right.
 To check current battery power, go to the Setup 3 menu tab, highlight Battery info, and then press the Set button. The Battery info screen displays the percentage of remaining capacity, the number of shots taken on the current battery charge, and the relative performance level of the battery’s recharge. If you’re using dual LP-E6 batteries in the BG-E7 grip, the screen displays battery information for both batteries.
Adding copyright information
Copyright identifies your ownership of images. On the 7D, you can append your copyright information to the metadata that is embedded with each image that you shoot.
While including your copyright is a great first step in identifying ownership of the images you make, the process is not complete until you register your images with the United States Copyright Office. For more information, visit www.copyright.gov.
To include your copyright and the camera owner’s name on your images, follow these steps.
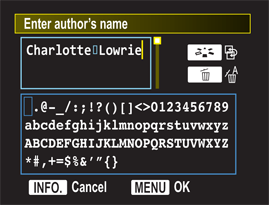
2.8 Author’s name screen
1. Press the Menu button, highlight the Setup 3 tab, and then highlight Copyright information.
2. Press the Set button. The Copyright information screen appears.
3. Highlight the option you want such as Enter author’s name or Enter copyright details, and then press the Set button. A screen appears where you can enter the name or details.
4. Press the Picture Styles button to activate the keyboard portion of the screen, and then turn the Quick Control dial or the Multi-controller to move the cursor to the letter you want to enter.
5. Press the Set button to insert the letter in the top portion of the screen. You can also use the Multi-controller to select text on the keyboard. To delete a character, press the Erase (trashcan) button. You can enter up to 63 characters, numbers, and symbols in the text entry area.
6. Press the Menu button to return to the previous screen where you can choose the second to enter copyright details or the author name, whichever you didn’t choose in step 3. You can cancel entering text by pressing the INFO. button. To display the copyright, repeat steps 1 and 2, and in step 3, chose Display copyright info.
Image Playback Options
These days, the ability to immediately see the last captured image is a given. In fact, on the rare occasions when I shoot film, I instinctively look at the back of the camera for an instant replay. Of course, there is no image preview, and I feel a little lost. While image playback isn’t the final judge and jury on images, it’s the best indicator to know when you need to adjust the exposure, tweak the color or focus, or modify the composition.
To view images on the 7D, just press the Playback button to display the most recently captured image. If you’re in Single image display, then basic shooting information appears in a ribbon above the image. If you’ve turned on the Highlight alert and AF point display options, detailed earlier in this chapter, then the preview image shows these as well, with localized areas of overexposure displayed as blinking highlights.
To move through images on the card, turn the Quick Control dial counterclockwise to view the next most recent image, or clockwise to view the first image. You can change the playback display by pressing the Info button once to cycle through each of these four image-playback displays:
 Single image with basic shooting information. This default playback display gives the largest preview image and provides the shutter speed, aperture, folder number and file number, and media type (CF denotes a CompactFlash card). If you’re showing subjects or friends the images you’ve captured, this display option provides a clean, uncluttered view of the image.
 Single image display with image recording quality. This option builds on the previous display, but it adds the recording quality and the image number relative to the number of images captured (for example, 10/11, or image 10 of 11 stored images).
 Shooting information display. This display includes a summary of exposure and camera settings along with a histogram either Brightness or RGB, depending on what you selected. The image preview is necessarily reduced in size to accommodate the additional information. With this display, you can check the tonal distribution and bias, and verify key camera settings.
 Histogram. This display option shows the three RGB color channel histograms and a Brightness histogram. It includes basic shooting information, metering mode, white balance, file size, image recording quality, and the current image number relative to the total number of shots on the CF card.
 If you’re new to using a histogram, be sure to read Chapter 3, where evaluating exposure using histograms is described.
To check focus and specific details within the image, you can magnify the preview image by pressing the AF-point selection button on the top-right side of the camera back. The button has a magnifying icon under it. If you hold the button, the image magnifies to the maximum of 10x. You can then tilt the Multi-controller to move around the magnified image. Press and hold the AE Lock button to reduce the image magnification. This button has a magnifying icon (indicated with a minus sign) under it.
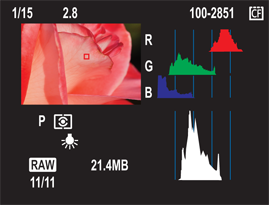
2.9 This is the Shooting information display with the RGB and Brightness histograms.
Searching for images and moving through multiple images
When you need to quickly find an image, or a series of images, on a CF card that has many stored images, you have two options. First, you can display either four or nine images as an index to move through multiple images quickly. Second, you can jump through images by a specified number of images at a time, and by date, folder, movies, or stills (still images).
Here’s how to use both options:
 Display as an index. To display images as an index, press the AE Lock/Reduce button once for a four-image display or twice for a nine-image display. Then turn the Quick Control dial to select a single image, and then press the Set button to display only that image.
 Jump through images. Select the Playback 2 camera menu, select Image jump w/Main dial icon, and then press the Set button. On the Image jump w/Main dial screen, turn the Quick Control dial to select the method for jumping — 1 image, 10 images, 100 images, Date, Folder, Movies, or Stills — and then press the Set button. Now press the Playback button to begin image playback, and then turn the Main dial to display the jump scroll bar and to jump by the method you selected. If you chose Date, you can turn the Main dial to display the date. If you chose Folder, you can select the folder in which to view images.
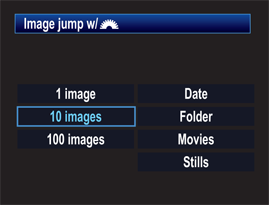
2.10 The Image jump options screen
Displaying images on a TV
Using a TV to view images stored on the CF card is a convenient way to review large images, particularly when traveling. The video cable to connect the camera to a non-HDTV is included in the 7D box. If you want to view images on an HDTV, you’ll need to buy an HDMI Cable HTC-100. Before connecting the camera to the TV, you need to set the video system format using the Setup 2 menu on the camera. The following instructions are for both HD (Hi-Definition) and non-HDTVs.
1. Press the Menu button, and then highlight the Setup 2 menu.
2. Turn the Quick Control dial to select Video system, and then press the Set button. The camera displays the NTSC and PAL options.
 NTSC is the analog TV system used in the United States, Canada, Japan, South Korea, the Philippines, Mexico, and some other countries, mostly in the Americas. PAL is a color encoding system used in TV systems in parts of South America, Africa, Europe, and other countries.
3. Highlight the system you want, and then press the Set button.
4. Turn off the TV and the camera.
5. Attach the AV cable or the HDMI cable to the terminals detailed below. You cannot use the camera’s Video OUT and HDMI OUT terminals simultaneously.
• For a non-HDTV. Attach the AV cable to the camera’s A/V OUT/Digital terminal, and then connect the other end of the video cable to the TV set’s Video IN terminal and to the Audio IN terminal.
• For an HDTV. Connect the HDMI cable to the camera’s HDMI OUT terminal with the plug’s HDMI MINI logo facing the front of the camera, connect the other end to the TV’s HDMI IN port.
6. Turn on the TV, and then switch the TV’s video input to the connected port.
7. Turn the camera’s power switch to the ON position.
8. Press the Playback button. Images are displayed on the TV but not on the camera’s LCD monitor. When you finish viewing images, turn off the TV and the camera before disconnecting the cables.
 You can use the previous steps to not only display images stored on the CF card on the TV, but to also use the TV to display what would appear on the LCD during both general and Live View shooting.
Protecting and Erasing Images
Deleting unwanted images quickly frees up space on the media card when you need it. Although it’s good to delete only images you’re sure you don’t want to keep. Protecting images is just good insurance for preserving them.
Protecting images
Applying protection to images helps prevent accidental erasure of images on the CF card, much like setting a document on the computer to read-only status. Protected images can’t be deleted using the Erase options detailed in the next section. And when you download a protected image, you’re asked to confirm that you want to move or copy read-only files, which indicates that the images have protection applied.
 Protected images are erased when you format the CF card.
You can apply protection to an image by following these steps:
1. Press the Menu button, and then highlight the Playback 1 menu.
2. Turn the Quick Control dial to highlight Protect images, and then press the Set button. The last captured image appears on the LCD. A small key icon and the word Set appear at the top left of the image.
3. Press the Set button again to protect the displayed image, or turn the Quick Control dial to move to the image you want to protect. A key icon appears in the information bar above the image to show that it is protected.
4. To protect additional images, turn the Quick Control dial to scroll to the image you want to protect, and then press the Set button to add protection.
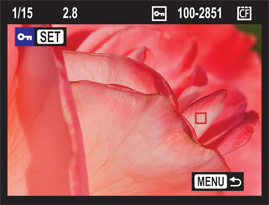
2.11 The protection key icon is displayed to the left of the folder and file numbers at the top of the screen.
If you later decide that you want to unprotect an image, you can remove protection by repeating steps 1 to 3 and pressing the Set button to remove protection for each image. When protection is removed, the key icon in the top information bar disappears.
Erasing images
With the 7D’s large, high-resolution LCD monitor, evaluating images is faster and more accurate than ever before. This makes it easier to decide whether or not an image is a keeper.
 It’s often wiser to look at images on the computer monitor to evaluate the merits or faults before deleting them in the camera.
The 7D offers two ways to delete images: one image at a time or by checkmarking multiple images and deleting all marked images at once.
If you want to permanently erase a single image, just navigate to the image you want to delete during image playback, press the Erase button, highlight Erase, and then press the Set button.
To select and erase multiple images at a time, follow these steps (as you go through these steps, you can optionally choose to erase all images on the card or in a specific folder):
1. Press the Menu button, and then highlight the Playback 1 menu.
2. Turn the Quick Control dial to highlight Erase Images, and then press the Set button. The Erase Images screen appears.
3. Highlight Select and erase images, and then press the Set button. The 7D displays the image playback screen with options at the top left of the LCD to check mark the current image for deletion.
4. Press the Set button to add a checkmark to the current image, or turn the Quick Control dial to move to the image you want to delete, and then press the Set button. Continue selecting all of the images you want to mark for deletion. A checkmark appears on images marked for deletion. You cannot add a checkmark to images with protection applied.
5. Press the Erase button. The Erase Images screen appears.
6. Turn the Quick Control dial to highlight OK, and then press the Set button. The 7D erases the marked images, and the Erase Images screen appears.