Chapter 11
Making Calls with Zoom Phone
IN THIS CHAPTER
 Adding Zoom Phone to your existing subscription
Making inbound and outbound calls via Zoom Phone
Discovering the features and benefits of Zoom Phone
For several reasons, odds are that you don’t give much thought to the idea of a traditional work phone. First, depending on your vocation, they might as well just not exist. Maybe you’re a grade-school teacher, a digital nomad, a freelancer, a touring musician, or a Lyft driver. Second, your employer might provide traditional landlines at the office, and the technology behind these phones doesn’t matter to you at all. Third, your company may provide you with a dedicated smartphone that you’re supposed to use for business purposes only. Ever see someone packing two iPhones? Make no mistake, though: The explosion in technology has not resulted in the death of dedicated office phone numbers — at least, not yet. Oodles of enterprises possess a legitimate need to outfit their employees with them. The options for employers in this regard, however, are a far cry from their counterparts in the 1950s and 1960s. In this vein, companies such as Vonage, Nextiva, RingCentral, and others have offered powerful and affordable business phone systems for decades. Although new to the field, Zoom’s offering compares favorably with those of established players. This chapter provides an overview of Zoom Phone, a service that seamlessly integrates with Zoom’s desktop client.
Getting Started with Zoom Phone
Zoom Phone arrived on January 22, 2019. (Go to bit.ly/zoom-prph to read the press release.) The service represents an add-on to customers’ existing Zoom subscriptions. Note that people using Zoom’s Basic Meetings & Chat plan can add Zoom Phone. At present, Zoom Phone is not a standalone service that organizations can purchase independently. (Zoom will be changing this policy by the end of 2020.) Like much of its competition, the technology behind Zoom Phone relies upon Voice over Internet Protocol (VoIP). For more on the technology behind making calls over the Internet, see Chapter 1. Largely due to space considerations, this chapter focuses on the basics of Zoom Phone. Of course, organizations may want to configure Zoom Phone with separate, dedicated, physical phones. (See bit.ly/zm-ph-hw for more information on configuring Zoom Phone with recommended third-party devices.)
 Also, to keep this book at a reasonable length and cost, I cover only the most popular features of Zoom Phones. (Fans of the cult 1999 flick Office Space may even say that I’m doing the bare minimum here.) Trust me: One could scribe a separate 200-page For Dummies book on a robust system such as Zoom Phone, especially as the company continues to add new functionality to it.
Adding Zoom Phone to your existing plan
Just like with Zoom Webinars, a Zoom account owner can always add Zoom Phone to the organization’s existing Zoom subscription. Note, however, that Zoom Phone isn’t a binary. In fact, you can customize it in myriad ways to meet the specific needs of your organization and avoid paying for licenses that it doesn’t need. Brass tacks: The exact sign-up process and monthly or annual cost differs depending upon the following factors:
- Your current Meetings & Chat plan: Zoom may provide quantity discounts to organizations that need multiple phone numbers and hundreds or even thousands of extensions.
- The number of phone numbers that you need: This number usually hinges upon the number of employees in your organization.
- The specific types of phone numbers that your employees need: Zoom charges extra for toll-free numbers.
- The countries that employees in your organization call: Zoom charges vastly different rates to call different countries.
- The chattiness of your employees: Again, the cost depends on the plan and add-ons that your organization selects. Still, all things being equal, employees who make and take more calls pay more than their reticent counterparts.
- An à-la-carte or an all-you-can-eat calling plan: Employees who call exotic places on a piecemeal basis will run up larger bills than their brethren who don’t pay by the call. Against this backdrop, I’m going to keep it as simple as possible here. For example, say that you already pay for the popular Zoom’s Pro Meetings & Chat plan. What’s more, you want to add a single phone number to it. Two limitations apply:
- Only account owners and admins can provision Zoom Phone licenses to existing users in an account.
- Along these lines, your current role may prohibit you from adding Zoom Phone to your account.
In the event that these limitations don’t apply to you, follow these directions:
- In the Zoom web portal, under the Admin header, click on Account Management.
-
Click on Billing.
Zoom displays your current plans and add-ons.
-
Next to Zoom Phone, click on the white Add button.
 As with all Zoom subscriptions, accounts with fewer than 50 licensed users can add additional ones via the web portal. For larger accounts of 50 and more, Zoom requires organizations to contact its sales department.
 - Select whether you to want to subscribe monthly or annually.
-
Choose the type of calling plan to which you want to subscribe.
Zoom provides a number of different options here depending on your calling needs. For example, an individual who intends to make a small number of calls within the United States may opt for an entirely different plan than a jetsetter who expects to call people in 80 countries over the course of a month.
For more information on the available add-ons and options for Zoom Phone, see Chapter 2.
With Zoom Phone, employees are always connected. They can make and take calls from anywhere on the planet. -
Click on the blue Continue button at the bottom of the page.
Zoom takes you to a page that allows you to verify both your forthcoming purchase as well as your payment information.
-
Click on the blue Buy Now button.
Zoom presents an order summary screen.
-
Click on the orange Confirm button.
Voilà! Zoom emails you an invoice for your purchase.
Setting up Zoom to receive inbound calls
Say that you are an account owner or admin, and you already have subscribed to Zoom Phone. The next step is to select a phone number for incoming calls:
- In the Zoom web portal, under the Admin header, click on Phone System Management.
-
Click on Setup.
At the top of your screen, choose your main company number.
- From the first drop-down menu, select your country or region.
-
From the second drop-down menu, choose your state, province, or territory.
Zoom displays different area codes that correspond to your choice. For example, selecting California as your state results in different options than selecting Oregon.
-
Select the area code and city of your new Zoom phone number.
Zoom allows customers to change their company numbers after setup as long as they possess the rights. That is, as the account owner or administrator, you can make the change. For obvious reasons, people who lack this role cannot. -
Select your phone number from the Choose Number menu.
Zoom may not be able to accommodate your selection here. If that’s the case, return to the previous step and select a new combination of area code and city.
-
Enter a three- to six-digit number under Specify Extension Number for Owner.
Zoom requires this field.
-
Click on the blue Next button.
Zoom presents a confirmation window asking whether you’re sure that you want (123) 456-2112 or whatever as your company number.
-
Click on the blue Yes button.
Zoom asks you to verify your company’s address in the event of an emergency.
- Enter your country address, city, state or province, and zip or postal code.
- At the bottom of the screen, select the following checkbox: By setting your company’s emergency address, you agree to Zoom Phone Emergency Calling Customer Notification.
-
Click on the blue Done button.
Zoom sends you an email indicating that you have successfully activated your Zoom Phone number. Figure 11-1 displays the new Phone icon that appears at the top of the Zoom desktop client.
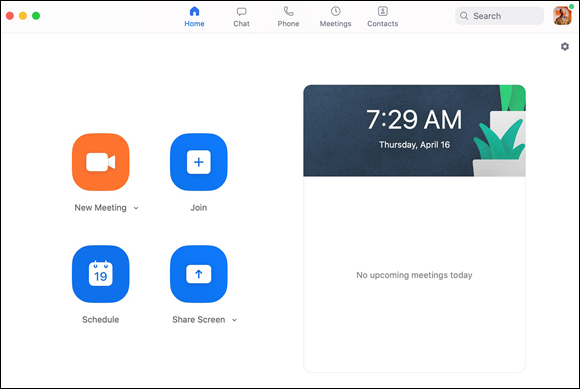
FIGURE 11-1: Zoom updated UI after successfully subscribing to Zoom Phone.
Note how Figure 11-1 is relatively spartan at this point. That’s because I haven’t used Zoom Phone to call anyone and no one has called me — yet. As you use Zoom Phone, however, you can view your call history, access your voicemails and recordings, dial out, and do a whole lot more.
If you do not see the new Phone icon in Figure 11-1 appear, then simply sign out of the Zoom desktop client. After you sign back in, it should appear.
 You can set up different Zoom accounts with different email addresses and add different subscriptions to each account. Keep this fact in mind. For example, say I have set up two separate Zoom accounts:
 phil@marillion.com and phil@ptree.com. I add a Zoom Phone subscription to the marillion.com account, but not the ptree.com account. As a result, I won’t see the Phone icon if I log into Zoom with the latter credentials.
Setting up Zoom to make outbound calls
Before employees in your organization can use Zoom Phone to make outbound calls, you’ll have to assign them a calling plan.
If you want your employees to call other people, then this process is essential. For example, say that I run Nakatomi Corporation. (Yeah, I’m a big fan of the original Die Hard.) I assign myself a calling plan to make outbound calls. However, I forget to do the same for Holly. As a result, she will not be able to use Zoom Phone to call anyone. Period. To allow the employees in your organization to make outbound calls over Zoom Phone, follow this admittedly lengthy process:
-
In the Zoom web portal, under the Admin header, click on Users & Rooms.
Zoom shows the users in your organizations, as Figure 11-2 displays.
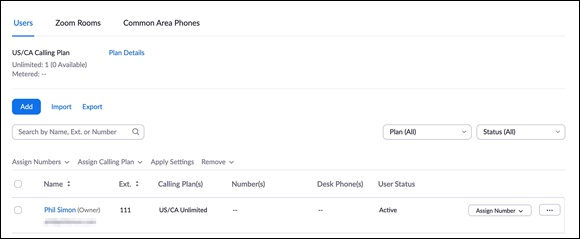
FIGURE 11-2: Zoom users and rooms prior to plan assignment.
-
Select the user(s) to whom you’d like to assign calling plans.
The available plans are the one(s) that you selected when you subscribed to Zoom Plans as an add-on. (See the section “Adding Zoom Phone to your existing plan,” earlier in this chapter.)
You need not assign an outbound calling plan to every employee in your organization. As long as you are an account administrator or owner, Zoom allows you to select a subset of employees to whom you want to grant this option. (See Chapter 3 for more information about roles in Zoom.) -
Click on the Assign Number drop-down list on the right-hand side of the page.
Zoom displays the plan(s) that you have previously selected.
- Select an outbound calling plan for the user(s).
-
Click on the Assign Number drop-down list on the right-hand side of the page.
Zoom displays the plan(s) that you have previously selected. Zoom prompts you to choose an outbound calling number, as Figure 11-3 shows.
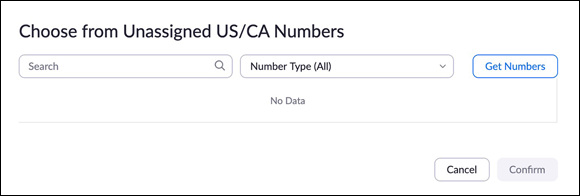
FIGURE 11-3: Zoom Phone first prompt to choose an outbound calling number from unassigned numbers.
-
(Optional) Select a number type from the drop-down list to restrict your forthcoming search.
You can also just click on the Get Numbers button the right-hand side of the screen. Zoom displays the screen in Figure 11-4.
-
Enter a state, providence, or territory from the drop-down list.
The options hinge upon the countries that appear at the top of Figure 11-4. For example, since I selected a US/CA number, I can select only states and provinces in the United States and Canada, respectively.
-
Enter your desired area code.
Yes, your options hinge upon your selection in the prior step.
-
Click on the Search button.
Zoom attempts to display available outbound numbers in your desired area code. If Zoom cannot locate any, then you may still be in luck. Zoom displays the following message:
Please fill out this form to obtain numbers that are not available in Zoom Web Portal.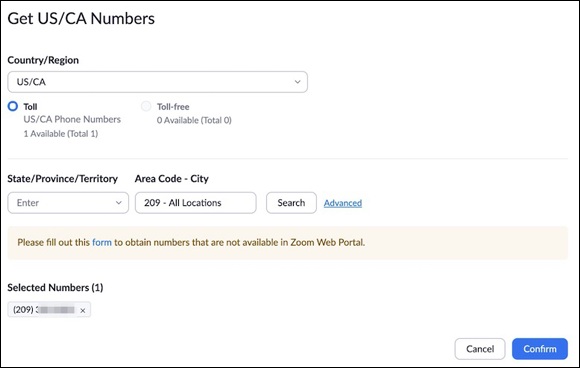
FIGURE 11-4: Zoom’s second prompt to select an outbound calling number.
-
If Zoom didn’t locate any numbers and you want to proceed, click on the word “form” in the message that appeared.
Zoom takes you to a web page in which you can order a phone number in your desired area code.
-
(Optional) Click on the word Advanced for a separate prompt.
Zoom allows you to enter a string of numbers that you’d like to include in the outbound number. For example, say that you want to use a phone number with 2112 in it. Enter those four numbers consecutively and then click the Search button. Zoom returns results that match your criterion.
-
Select the checkbox next to the area code and phone number that appeals to you.
Zoom places the number or numbers selected at the bottom of the screen.
-
Click on the blue Confirm button in the bottom right-hand corner of the screen.
Zoom confirms that you have added the phone number to your subscription. Zoom also sends you a confirmation email, such as the one presented in Figure 11-5.
Now, when you call others, they will see the number that you have selected. If you want to change this selection, see the section “Changing your default calling number,” later in this chapter. You may find Zoom’s process of assigning outbound calling numbers a bit laborious. That position is certainly understandable. As the nearby sidebar illustrates, though, Zoom’s deliberate design choice is a feature, not a bug.

FIGURE 11-5: Email confirming assignment of a new Zoom Phone number.
Reviewing the Basic Features of Zoom Phone
Say that you never heard of Zoom Phone prior to purchasing this book. You are aware, though, of the concept of the telephone, an invention that harkens back to 1876. Congratulations. You already understand the central idea behind Zoom Phone: At the risk of stating the obvious, it lets you talk and listen to other human beings in real time, even if they are somewhere else. After adding Zoom Phone to your existing plan, customers can access their new bells and whistles from a number of places:
- The Zoom desktop client
- The Zoom tablet app
- The Zoom smartphone app
- The phone section of the Zoom web portal
The calling features of Zoom Phone work on every device: on all mobile apps, on the desktop client, and through off-the-shelf VoIP desk phones. For example, say that you want to listen to your voicemail. You can perform this action wherever you like. Note, though, that you can only perform certain administrative Zoom Phone functions via certain mediums. A few examples clarify what I mean:
- You want make and receive phone calls. You can use whatever app you like, but you cannot make calls in the Zoom web portal.
- If you want to configure your voicemail settings, then you will have to use the Phone section of the Zoom web portal. In other words, you can perform certain functions in Zoom Phone only over the web.
In this vein, Zoom Phone resembles other popular mainstream communications products, namely Slack and Microsoft Teams. Say that you mostly work in an office or at home in front of your computer. You’ll probably spend most of your time in the Zoom desktop client. Figure 11-6 displays it along with the specific features of Zoom Phone.
If you or your organization has not subscribed to Zoom Phone, then you will not see the Phone tab at the top of the Zoom desktop client — or on any Zoom app, for that matter. Again, changing other settings requires customers to access the Zoom web portal. Figure 11-7 displays the Phone section of the Zoom web portal.
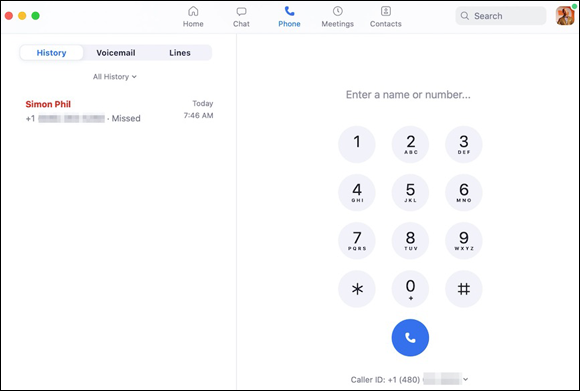
FIGURE 11-6: Zoom desktop client displaying new phone-related features.
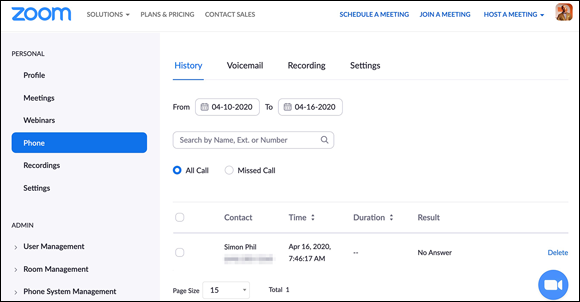
FIGURE 11-7: Phone section of the Zoom web portal.
Before distributing your Zoom Phone number
Zoom offers dozens of ways for its customers to configure and tweak Zoom Phone to their liking. This section provides some highlights, but it hardly provides a comprehensive list of features and settings.
Configuring your voicemail
To set up your voicemail, follow these steps:
- In the Zoom web portal, under the Personal header, click on Phone.
-
Click on the Settings tab at the top of the screen.
Fight the urge to click on the Voicemail tab here. Doing so displays your existing voicemails, if you have any. -
(Optional) Scroll down and select what action you want to occur when you don’t answer a call.
You can select one of the following options:
- Forward to voicemail: This default option is self-explanatory, and, I suspect, the most common among Zoom customers.
- Play a message, then disconnect: Again, this option provides a bit more information to the caller before hanging up.
- Disconnect: Choosing this option terminates the call. This option is a bit more abrupt than the previous one.
- Forward to another extension: If you select this option, then Zoom provides the additional prompts in Steps 5 and 6. Select the option and/or extension that reflects what you want Zoom to do.
- (Optional) Underneath Blocked List and to the right of Voicemail, click on Set.
-
(Optional) Select another Zoom Phone user in your organization who can access the voicemails for your phone number and extension.
Here you can let other Zoom Phone users access the voicemail associated with your number and/or extension.
-
After selecting another user, click on the blue Save button.
If you’re the only one in your organization subscribed to Zoom Phone, then understandably you won’t see any options here. -
(Optional) Under PIN Code, display or edit your original PIN.
By default, Zoom displays a series of asterisks below your PIN. To display your original PIN, click on Show or Edit.
- (Optional) Click on the blue Save button.
Setting your business hours
After you distribute your Zoom Phone number to others, expect others to call it. By default, your Zoom app(s) will ring during all hours of the day and days of the week. If Jesse is up at 2 a.m. your time and rings your number, then Zoom will put your call through. After all, you didn’t tell Zoom to do otherwise. Of course, your brick-and-mortar or digital business may not abide by a 24/7 schedule. As such, Zoom offers its customers the ability to set custom time frames in which outbound calls reach them. To do so, follow these steps:
- In the Zoom web portal, under the Personal header, click on Phone.
- Click on the Settings tab at the top of the screen.
-
Scroll down the page to where you see Business Hours and click on Edit.
Zoom by default displays 24 Hours, 7 Days a Week.
- From the prompt, click on Custom Hours.
-
Select the checkboxes next to the days of the week to indicate that you accept calls during those days.
Zoom displays the grid displayed in Figure 11-8.
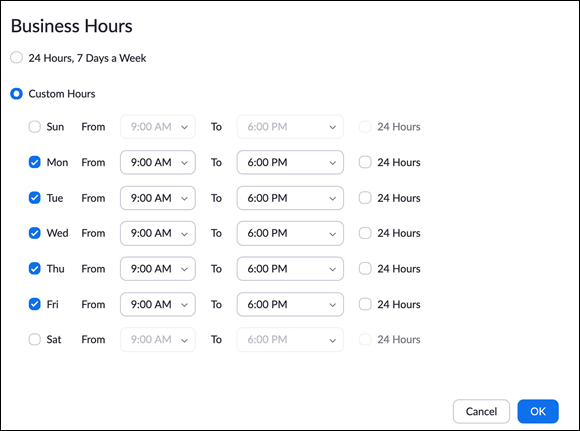
FIGURE 11-8: Setting available business hours in Zoom.
- From the drop-down lists, select the hours for each day that you want to receive calls.
- Click on the blue OK button.
Talking to people via Zoom Phone
As is the case with traditional landlines, you can use Zoom Phone to both make calls to — and receive calls from — others. In both cases, whether call participants use Zoom Phone themselves or not is immaterial. It just works. Also, rest assured, the inbound and outbound calling features in Zoom Phone are remarkably easy to understand and operate.
Placing outbound calls
To call another person or organization, simply follow these steps:
- Launch the Zoom desktop client.
- Click on the Phone icon at the top of the screen.
-
Call a number.
You can use any of the following methods:
- Dial a number using the number pad, just like you would on your smartphone or an old-school landline phone.
- Paste a previously copied phone number into the text field.
- Type a name or phone number in the text field. Zoom will attempt to identify the individual based upon any matches in your contacts.
- Click on the blue Phone icon after you enter a valid name or phone number below the number 0.
-
(Optional) Click on the drop-down list underneath the Phone icon to enable or disable caller ID.
Take advantage of this option if you want to hide the number from the person you’re calling. Of course, in this era of pervasive robocalling, realize that many people these days are wary of answering calls from unknown numbers.
You can make Zoom calls from apps on your tablet and phone as well. The process is very similar to the one described placing outbound calls as described in the preceding steps. However, it may vary slightly based upon your specific device and operating system.
Receiving inbound calls
You’ll get the hang of making calls in Zoom quickly. As for receiving others’ calls, the process is just as simple. Follow these steps:
-
Launch the Zoom desktop client.
Zoom notifies you that you are receiving a call.
Chapter 5 covers how you can set your status in Meetings & Chat. If you set yours to Do Not Disturb (DND), then Zoom won’t bug you. As a result, your call will go to voicemail or your delegate, depending on the option that you selected. -
Assuming that you are accepting calls from the outside world, decide what you want to do with the call.
You can select from one of the following options.
- Accept the call: You can then start talking with the caller(s).
- Decline: Zoom routes your call to voicemail or your delegate, depending on which option you selected. (For more on this subject, see the section “Configuring your voicemail,” earlier in this chapter.)
- Close icon (x): The Zoom call continues to ring on the other devices on which you have installed the Zoom app.
- (Optional) Dismiss: You can skip the call alert and remove yourself from the queue. Zoom attempts to route the call to other people in your organization who belong to its call distribution list. Think call-center reps or sales agents.
-
(Optional) If you’re currently talking to someone via Zoom Phone and you receive another Zoom call, then decide what you want to do.
Zoom displays the following three options:
- Hold & Accept: By clicking here, you answer the incoming call and concurrently put the current one on hold.
- Send to Voicemail: In this epic phone faceoff, the current call wins. You send the incoming caller to voicemail and continue your chat with the current caller.
- End & Accept: This scenario is the reverse of the previous one. The incoming caller wins the phone faceoff, and you terminate the call with the current caller.
Performing in-call actions
Regardless of who called whom, once you’re on a Zoom call, you’ve got plenty of options. Figure 11-9 displays the in-call controls that you see when using the Zoom desktop client.
Zoom has wisely standardized its in-call controls. That is, you can expect to see the same menu regardless of whether your call takes place on a Windows, macOS, Android, or iOS device. Pretty cool.
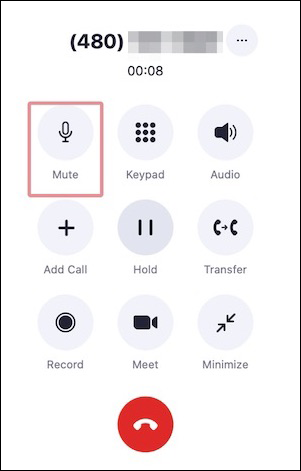
FIGURE 11-9: Zoom Phone in-call controls.
Table 11-1 lists each icon and describes what it does. If you think that Zoom’s icons resemble the ones for making calls on your smartphone, trust your instincts.
TABLE 11-1 In-Call Options for Zoom Phone Calls
|
Icon |
Description and Purpose |
|
|
This option lets you mute and unmute your device’s microphone. |
|
|
Click here to show a dial pad during the call. Perhaps you’re calling a 1-800 number and need to make a selection from the menu. |
|
|
Click here to change the audio settings or the volume of your computer’s speaker or microphone. (Note that this icon appears as Speaker if you’re using the Zoom smartphone app.) |
|
|
Again, much like your smartphone’s functionality, you can add another person to your current call. You can only engage in a three-way call after you have successfully connected to the second person. |
|
|
Nothing new here. If you need to place your fellow caller on hold, then click here. To resume the call, click on Unhold. |
|
|
You can send the call to another number or to voicemail. |
|
|
If you’d like to record the call for future use, then click on this button. |
|
|
Say that you called Saul via Zoom to discuss a complex legal matter. You decide that you should move this call over to video in Meetings & Chat. |
|
|
Hitting this button minimizes the in-call icons. |
|
|
Press or click here to hang up the phone. |


Performing other call-related actions
Zoom Phone wouldn’t be terribly useful if it only let you perform actions while on calls. Fortunately, you can do a number of things that you’d expect from a phone system after your calls conclude and just in general for that matter.
Listening to your voicemails
Say that Steve calls you. You decline the call and send him to voicemail. He actually leaves a message. By default, Zoom sends you an email message with his voicemail attached as an .mp3 file. Figure 11-10 displays a typical email.
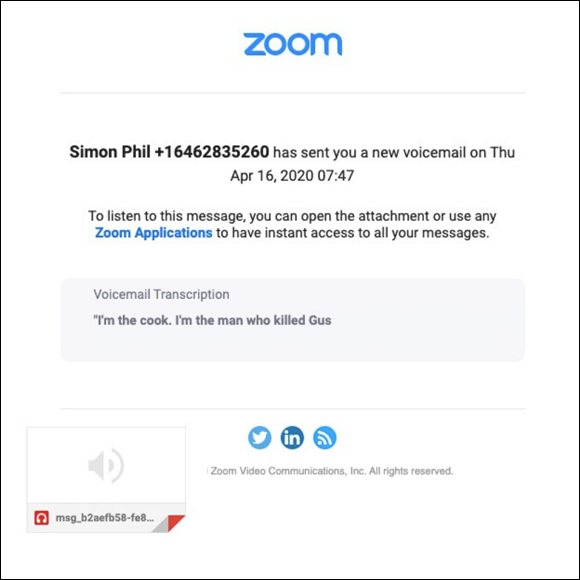
FIGURE 11-10: Zoom email message indicating new voicemail.
Don’t expect perfection in Zoom’s current voicemail transcriptions. They are works in progress in English, let alone in other languages. Although they are improving, it’s best to take them with a bit of salt for now. From the Zoom desktop client, follow these steps to listen to your voicemails:
- Launch the Zoom desktop client.
- Click on the Phone icon at the top of the screen.
-
Click on the Voicemail tab.
You see something resembling Figure 11-11.
-
Click on the Play icon to the right of the call.
Zoom plays the message over your computer.
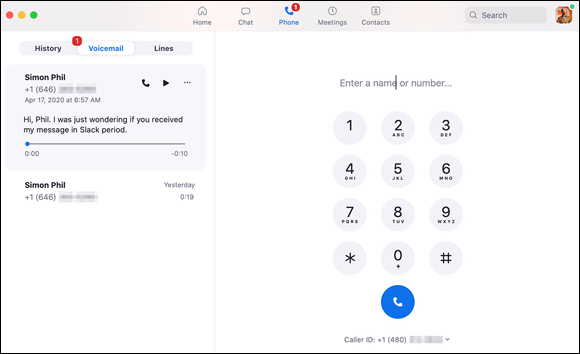
FIGURE 11-11: Accessing your voicemails in the Zoom desktop client.
Accessing your recorded calls
Say that you recorded your conversation with a colleague and want to listen to it. Follow these steps:
- Launch the Zoom desktop client.
- Click on the Phone icon at the top of the screen.
-
Click on the History tab.
By default, Zoom shows you all of your call history. You can hunt and peck for your recorded calls if you like, but it’s easiest to just filter on recorded calls.
-
Underneath the three tabs in the top left-hand corner of the desktop client, select Recording from the drop-down menu.
Zoom now displays only your recorded calls.
-
Click on the Play icon to the right of the call.
Zoom plays the recorded call over your computer.
Viewing your call history and returning your calls
To view a history of your calls, follow these steps:
- Launch the Zoom desktop client.
-
Click on the Phone icon at the top of the screen.
Zoom Phone presents a list of calls on the left-hand side of the screen underneath the History tab in reverse chronological order. If you want to return a missed call, simply mouse over the missed call and click on the Phone icon that appears to the right of the call. Zoom then redials that number. If you want to view only your missed calls, simply click on the drop-down menu underneath the Voicemail tab and select Missed.
Zoom displays only your — wait for it — missed calls.
Changing your default calling number
Say that you have two Zoom numbers at your disposal — the main one associated with your company and your personal one. What’s more, you want to change the one that appears on recipients’ caller IDs. Simply follow these steps:
- Launch the Zoom desktop client.
- Click on the Phone icon at the top of the screen.
- Click on Caller ID underneath the blue Phone icon.
-
From the drop-down list that appears, select how you want Caller ID to display.
Zoom Phone displays the three options shown in Figure 11-12.
- The direct number that you assigned yourself. (For more on this subject, see the section “Setting up Zoom to make outbound calls,” earlier in this chapter.)
- The main company number.
- Hide Caller ID.
Zoom then redials that number.
Play around with Zoom Phone’s individual and organizational settings.
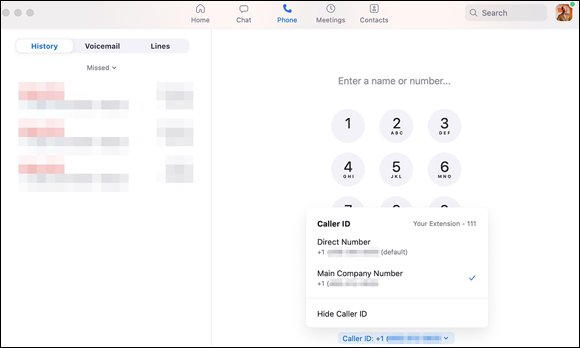
FIGURE 11-12: Zoom Caller ID option.