CHAPTER 25
The Plan’s the Thing
No matter where you travel, there is a game of bridge and therefore new friends nearby.
We have come full circle. In the first chapter, we asked whether you should play the ace or the queen on the first trick of a hand. Before you could answer, you had to consider the question in the context of the whole hand. As you have seen throughout the book, on every hand, before you can decide whether to develop tricks by promotion, or length or through the finesse or, in fact, whether you need to develop tricks at all, you have to consult your plan. The plan’s the thing.
Before you make a decision on how to play a particular suit, or whether or not to play a suit, you need to consult your plan. You need to know how many tricks you need or how many losers you can afford, and what options you have. In organising your plan, choose the option that gives you the best chance of making the contract, trying to combine options whenever possible. Take a look at what may happen if you have to give up the lead to the opponents. Only then are you ready to put the plan into action and play your first card.
Over Zia’s shoulder
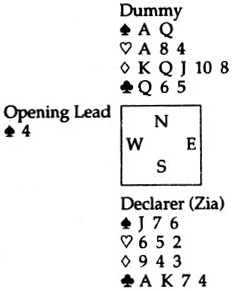
Hand 1 Dealer: West
|
N |
E |
S (Zia) |
W |
|
Pass |
|||
|
1 |
Pass |
1NT |
Pass |
|
3NT |
Pass |
Pass |
Pass |
Here we are, ending our journey together, talking about whether to finesse or not. Let’s make our plan.
Solution to Hand 1:
Contract: 3NT

Well, we’re not going to be so quick as to play the  Q without a little thought.
|
S |
We have to take nine tricks. |
|
T |
We have one spade, one heart and three club tricks, a total of five. |
|
O |
There are three places where we might think about getting extra tricks. We might consider playing the |
|
P |
Since our plan tells us that we don’t need an extra trick from the spade suit, we should win the |
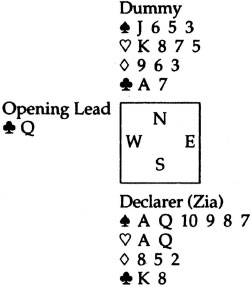
Hand 2 Dealer: East
|
N |
E |
S (Zia) |
W |
|
Pass |
1 |
Pass |
|
|
2 |
Pass |
3 |
Pass |
|
4 |
Pass |
Pass |
Pass |
Contracts in the spade suit always remind me of a lion – a king of the jungle. But what dangers lurk in the forest? I wonder.
Solution to Hand 2:
Contract: 4
|
S |
We can afford to lose three tricks in our 4 |
|
T |
We have one potential spade loser and three diamond losers, one too many. |
|
O |
It is tempting to take the first trick with the |
|
P |
One more thought before we play to the first trick. We will need the |
Hand 3 Dealer: West

|
N |
E |
S (Zia) |
W |
|
Pass |
|||
|
Pass |
Pass |
2NT |
Pass |
|
6NT |
Pass |
Pass |
Pass |
It’s nice to finish off with a slam contract. We’ve got eleven sure tricks and it looks as if there are good chances for a twelfth trick but, before we decide what to do, let’s go through the steps of the plan.
Solution to Hand 3:
Contract: 6NT

|
S |
We need to come up with twelve winners to make our slam. |
|
T |
We have two sure spade tricks, two sure heart tricks, two sure diamond tricks and five sure club tricks. That’s eleven tricks and we need only one more. |
|
O |
The obvious place for our extra trick appears to be in the heart suit. If East has the |
|
P |
Having gone through our plan, we now know to win the first trick with the |

 A. The opponents would end up with five tricks: the
  A and take the spade finesse, trying to get rid of our extra loser that way. We should examine all the possibilities, however, before deciding on our plan. The dummy has an extra heart winner and we could use it to discard one of our diamond losers. This is a better alternative than taking the spade finesse right away. If it does not work – perhaps one of the opponents will trump our heart winner – we can fall back on the spade finesse later.