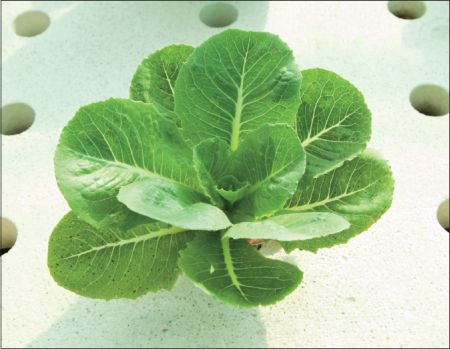
Hydroponics is the method of growing plants in a container filled with a nutrient-rich bath (water with special fertilizer) and no soil. Plants grown in soilless cultures still need the basic requirements of plant growth, such as temperature, light (if indoors, use a heat-lamp and set the container near or on a windowsill), water, oxygen (you can produce good airflow by using a small, rotating fan indoors), carbon dioxide, and mineral nutrients (derived from solutions). But instead of planting their roots in soil, hydroponically grown plants have their roots either free-floating in a nutrient-rich solution or bedded in a soil-like medium, such as sand, gravel, brick shards, Perlite, or rockwool. These plants do not have to exert as much energy to gather nutrients from the soil and thus they grow more quickly and, usually, more productively.
The Benefits and Drawbacks of Growing Plants in a Hydroponics System
Benefits:
• Plants can be grown in areas where normal plant agriculture is difficult (such as deserts and other arid places, or cities).
• Most terrestrial plants will grow in a hydroponics system.
• There is minimal weed growth.

• The system takes up less space than a soil system.
• It conserves water.
• No fear of contaminated runoff from garden fertilizers.
• There is less labor and cost involved.
• Certain seasonal plants can be raised during any season.
• The quality of produce is generally consistent.
• Old nutrient solution can be used to water houseplants.
Drawbacks:
• Can cause salmonella to grow due to the wet and confined conditions.
• More difficult to grow root vegetables, such as carrots and potatoes.
• If nutrient solution is not regularly changed, plants can become nutrient deficient and thus not grow or produce.
Types of Hydroponics Systems
There are two main types of soilless cultures that can be used in order to grow plants and vegetables. The first is a water culture, in which plants are supplied with mineral nutrients directly from the water solution. The second, called aggregate culture or “sand culture,” uses an aggregate (such as sand, gravel, or Perlite) as soil to provide an anchoring support for the plant roots. Both types of hydroponics are effective in growing soilless plants and in providing essential nutrients for healthy and productive plant growth.
Water Culture
The main advantage of using a water culture system is that a significant part of the nutrient solution is always in contact with the plants’ roots. This provides an adequate amount of water and nutrients. The main disadvantages of this system are providing sufficient air supply for the roots and providing the roots with proper support and anchorage.
Water culture systems are not extremely expensive, though the cost does depend on the price of the chemicals and water used in the preparation of the nutrient solutions, the size of your container, and whether or not your are using mechanized objects, such as pumps and filters. You can decrease the cost by starting small and using readily available materials.
What You’ll Need to Make Your Own Water Culture
A large water culture system will need either a wood or concrete tank 6 to 18 inches deep and 2 to 3 feet wide. If you use a wooden container, be sure there are no knots in the wood and seal the tank with non-creosote or tar asphalt.
For small water culture systems, which are recommended for beginners, glass jars, earthenware crocks, or plastic buckets will suffice as your holding tanks. If your container is transparent, be sure to paint the outside of the container with black paint to keep the light out (and to keep algae from growing inside your system). Keep a narrow vertical strip unpainted in order to see the level of the nutrient solution inside your container.
The plant bed should be 3 or more inches deep and large enough to cover the container or tank. In order to support the weight of the litter (where your seeds or seedlings are placed), cover the bottom of the bed with chicken wire and then fill the bed with litter (wood shavings, sphagnum moss, peat, or other organic materials that do not easily decay). If you are starting your plants from seeds, germinate the seeds in a bed of sand and then transplant to the water culture bed, keeping the bed moist until the plants get their roots down into the nutrient solution.
Aeration
A difficulty in using water culture is keeping the solution properly aerated. It is important to try to keep enough space between the seed bed and the nutrient solution so the plant’s roots can receive proper oxygen. In order to make sure that air can easily flow into the container, either prop up the seed bed slightly to allow air flow or drill a hole in your container just above the highest solution level.
In order to make sure there is sufficient oxygen reaching the plant roots, you can install an aquarium pump in your water culture system. Just make sure that the water is not agitated too much or the roots may be damaged. You can also use an air stone or perforated pipe to gently introduce air flow into your container.
Water Supply
Your hydroponics system needs an adequate supply of fresh water in order to maintain healthy plant life. Make sure that the natural minerals in your water are not going to adversely affect your hydroponics plants. If there is too much sodium in your water (usually an effect of softened water), it could become toxic to your plants. In general, the minerals in water are typically not harmful to the growth of your plants.
Nutrient Solution
You may add nutrient solution by hand, by a gravity-feed system, or mechanically. In smaller water culture systems, mixing the nutrient solution in a small container and adding it by hand, as needed, is typically adequate.
If you are using a larger setup, a gravity-feed system will work quite well. In this type of system, the nutrient solution is mixed in a vat and then tapped from the vat into your container as needed. You can use a plastic container or larger earthenware jar as the vat.
A pump can also be used to supply your system with adequate nutrient solution. You can insert the pump into the vat and then transfer the solution to your hydroponics system.
When your plants are young, it is important to keep the space between your seed bed and the nutrient solution quite small (that way, the young plant roots can reach the nutrients). as your plants grow, the amount of space between the bed and solution should increase (but do this slowly and keep the level rather consistent).
If the temperature is rather high and there is increased evaporation, it is important to keep the roots at the correct level in the water and change the nutrient solution every day, if needed.
Drain your container every two weeks and then renew the nutrient solution from your vat or by hand. This must be done in a short amount of time, so the roots do not dry out.
Transplanting
When transplanting your seedlings, it’s important to make sure that you are careful with the tiny root systems. Gently work the roots through the support netting and down into the nutrient solution. Then fill in the support netting with litter to help the plant remain upright.
How to Build a Simple, Homemade Hydroponics System
Things You’ll Need
• External pump
• Air line or tubing
• Air stones
• Waterproof bin, bucket, or fish tank to use as a reserve
• Styrofoam
• Net pots
• Type of growing medium, such as rockwool or grow rocks
• Hydroponics nutrients, such as grow formula, bloom formula, supplements, and pH
• Black spray paint (this is only required if the reservoir is transparent)
• Knife, box cutter, or scissors
• Tape measure
Steps to Building Your Hydroponics System
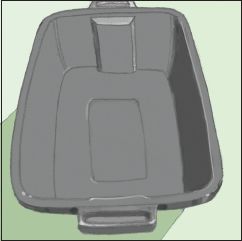
1. Find a container to use as a reservoir, such as a fish tank, a bin, or a bucket. The reservoir should be painted black if it is not lightproof (or covered with a thick, black trash bag if you want to reuse the tank at some point), and allowed to dry before moving on to the next step. Allowing light to enter the reservoir will promote the growth of algae. Use a reservoir that is the same dimensions (length and width) from top to bottom.
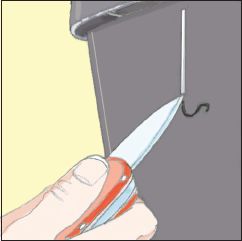
2. Using a knife or sharp object, score a line on the tank (scratch off some paint in a straight line from top to bottom). This will be your water level meter, which will allow you to see how much water is in the reservoir and will give you a more accurate and convenient view of the nutrient solution level in your tank.
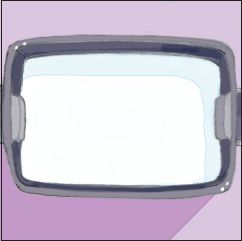
3. Use a tape measure to determine the length and width of your reservoir. Measure the inside of the reservoir from one end to the other. Once you have the dimensions, cut the Styrofoam ¼ inch smaller than the size of the reservoir. For example, if your dimensions are 36 x 20 inches, you should cut the Styrofoam to 35¾ x 19 ¾ inches. The Styrofoam should fit nicely in the reservoir, with just enough room to adjust to any water level changes. If the reservoir tapers off at the bottom (the bottom is smaller in dimension than the top) the floater (Styrofoam) should be 2 to 4 inches smaller than the reservoir, or more if necessary.
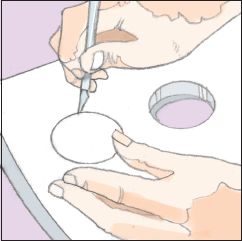
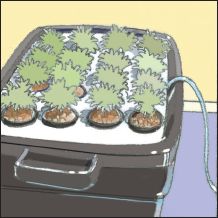
4. Do not place the Styrofoam in the reservoir yet. First, you need to cut holes for the net pots. Put the net pots on the Styrofoam where you want to place each plant. Using a pen or pencil, trace around the bottom of each net pot. Use a knife or box cutter to follow the trace lines and cut the holes for pots. On one end of the Styrofoam, cut a small hole for the air line to run into the reservoir.
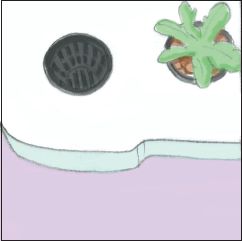
5. The number of plants you can grow will depend on the size of the garden you build and the types of crops you want to grow. Remember to space plants appropriately so that each receives ample amounts of light.
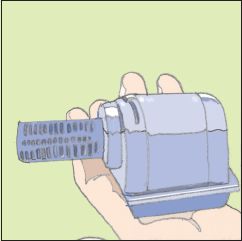
6. The pump you choose must be strong enough to provide enough oxygen to sustain plant life. Ask for advice choosing a pump at your local hydroponics supply store or garden center.
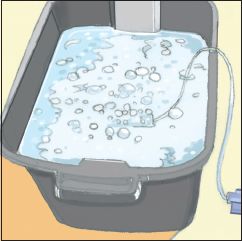
7. Connect the air line to the pump and attach the air stone to the free end. The air line should be long enough to travel from the pump into the bottom of the reservoir, or at least float in the middle of the tank so the oxygen bubbles can get to the plant roots. It also must be the right size for the pump you choose. Most pumps will come with the correct size air line. To determine the tank’s capacity, use a one-gallon bucket or bottle and fill the reservoir. Remember to count how many gallons it takes to fill the reservoir and you will know the correct capacity of your tank.
Setting Up Your Hydroponics System
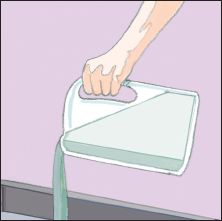
1. Fill the reservoir with the nutrient solution.
2. Place the Styrofoam into the reservoir.
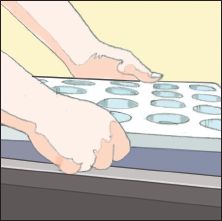
3. Run the air line through the designated hole or notch.
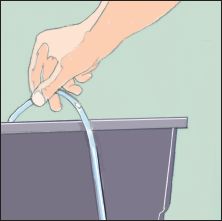
4. Fill the net pots with growing medium and place one plant in each pot.
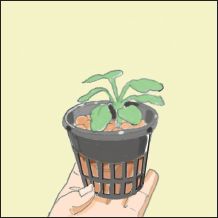
5. Put the net pots into the designated holes in the Styrofoam.
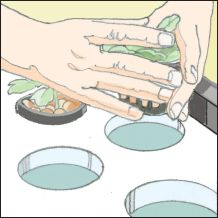
6. Plug in the pump, turn it on, and start growing with your fully functional, homemade hydroponics system.
Things to Consider
• A homemade hydroponics system like this is not ideal for large-scale production of plants or for commercial usage. This particular system does not offer a way to conveniently change the nutrient solution. An extra container would be required to hold the floater while you change the solution.
• Lettuce, watercress, tomatoes, cucumbers, and herbs grow especially well hydroponically.
The Junior Homesteader
Encourage middle or high school aged kids to come up with their own hydroponic designs. Encourage them to research different methods and find materials around the house. Hydroponic growing systems make great science fair projects!
Aggregate Culture
This type of soil-less growing utilizes different mediums that act in the place of soil to stabilize the plant and its roots. The aggregate in the container is flooded with the nutrient solution. The advantage of this type of system is that there is not as much trouble with aerating the roots. Also, aggregate culture systems allow for the easy transplantation of seedlings into the aggregate medium and it is less expensive.
What You’ll Need for an Aggregate Culture System
The container should be watertight to help conserve the nutrient solution. Large tanks can be made of concrete or wood, and smaller operations can effectively be done in glass jars, earthenware containers, or plastic buckets. Make sure to paint transparent containers black.
Aggregate materials may differ greatly, depending on what type you choose to use. Silica sand (well washed) is one of the best materials that can be used. Any other type of coarse-textured sand is also effective, but make sure it does not contain lime. Sand holds moisture quite well and it allows for easy transplantation. A mixture of sand and gravel together is also an effective aggregate. Other materials, such as peat moss, vermiculite, wood shavings, and coco peat, are also good aggregates. You can find aggregate materials at your local garden center, home center, or garden-supply house.
Aeration
Aggregate culture systems allow much easier aeration than water culture systems. Draining and refilling the container with nutrient solution helps the air to move in and out of the aggregate material. This brings a fresh supply of oxygen to the plant roots.
Water Supply
The same water requirements are needed for this type of hydroponics system as for a water culture system. Minerals in the water tend to collect in the aggregate material, so it’s a good idea to flush the material with fresh water every few weeks.
Nutrient Solution
The simplest way of adding the nutrient solution to aggregate cultures is to pour it over the aggregates by hand. You may also use a manual gravity-feed system with buckets or vats. Attach the vat to the bottom of the container with a flexible hose, raise the vat to flood the container, and lower it to drain it. Cover the vat to prevent evaporation and replenish it with new nutrient solution once every two weeks.
A gravity drip-feed system also works well and helps reduce the amount of work you do. Place the vat higher than the container, and then control the solution drip so it is just fast enough to keep the aggregate moist.
It is important that the nutrient solution is added and drained or raised and lowered at least once a day. In hotter weather, the aggregate material may need more wetting with the solution. Make sure that the material is not drying out the roots. Drenching the aggregate with solution often will not harm the plants but letting the roots dry out could have detrimental effects.
Always replace your nutrient solution after two weeks. Not replacing the solution will cause salts and harmful fertilizer residues to build up, which may ultimately damage your plants.
Planting
You may use either seedlings or rooted cuttings in an aggregate culture system. The aggregate should be flooded and solution drained before planting to create a moist, compacted seed bed. Seeds may also be planted directly into the aggregate material. Do not plant the seeds too deep, and flood the container frequently with water to keep the aggregate moist. Once the seedlings have germinated, you may start using the nutrient solution.
If you are transplanting seedlings from a germination bed, make sure they have germinated in soilless material, as any soil left on the roots may cause them to rot and may hamper them in obtaining nutrients from the solution.
Making Nutrient Solutions
In order for plants to grow properly, they must receive nitrogen, phosphorous, potassium, calcium, magnesium, sulfur, iron, manganese, boron, zinc, copper, molybdenum, and chlorine. There are a wide range of nutrient solutions that can be used. If your plants are receiving inadequate amounts of nutrients, they will show this in different ways. This means that you must proceed with caution when selecting and adding the minerals that will be present in your nutrient solution.
It is important to have pure nutrient materials when preparing the solution. Using fertilizer-grade chemicals is always the best route to go, as it is cheapest. When housing your nutrient solution, be sure the containers are not transparent (if they are, paint them black to keep out the light). Make sure the containers are closed and not exposed to air. Evaporation from solution concentrates the amount of salt, which could harm your plants.
Pre-mixed Chemicals
Many of the essential nutrients needed for hydroponic plant growth are now available already mixed in their correct proportions. You may find these solutions in catalogs or from garden-supply stores. They are typically inexpensive and only small quantities are needed to help your plants grow strong and healthy. always follow the directions on the container when using pre-mixed chemicals.
Making Your Own Solution
In the event that you want to make your own nutrient solution, here is a formula for a solution that will provide all the major elements required for your plants to grow.
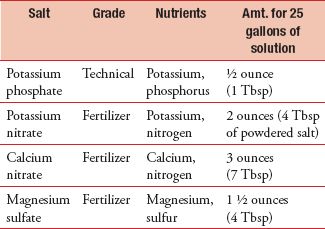
You can obtain all of these chemicals from garden-supply stores or drugstores.
After all the chemicals have been mixed into the solution, check the pH of the solution. a pH of 7.0 is neutral; anything below 7.0 is acidic and anything above is alkaline. Certain plants grow best in certain pHs. Plants that grow well at a lower pH (between 4.5 and 5.5) are azaleas, buttercups, gardenias, and roses; plants that grow well at a neutral pH are potatoes, zinnias, and pumpkins; most plants grow best in a slightly acidic pH (between 5.5 and 6.5).
To determine the pH of your solution, use a pH indicator (these are usually paper strips). The strip will change color when placed in different levels of pH. If you find your pH level to be above your desired range, you can bring it down by adding dilute sulfuric acid in small quantities using an eyedropper. Keep retesting until you reach your desired pH level.
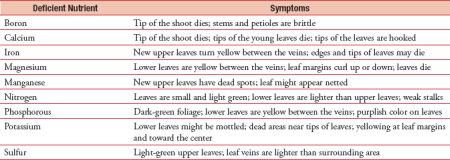
Plant Nutrient Deficiencies
When plants are lacking nutrients, they typically display these deficiencies outwardly. Following is a list of symptoms that might occur if a plant is lacking a certain type of nutrient. If your plants display any of these symptoms, it is imperative that the level of that particular nutrient be increased.
