
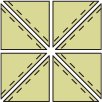
One of the most important details in piecing is obtaining an accurate ¼˝ seam allowance. If your seam allowance is off even slightly, your sewn pieces will not match up.
Be sure to test your seam allowance to make sure it gives accurate results. The thickness of the thread and pressing will affect your results, so sew and press a test sample using the same materials and methods you will be using in the piecing for your project.
To test your seam allowance, follow these steps:
1. Place a rotary cutting ruler under the presser foot of the sewing machine.
2. Slowly lower the needle so it touches just a hair to the right of the ¼˝ line on the ruler. Lower the presser foot to hold the ruler in place. Keep the edge of the ruler parallel with the lines on the throat plate. The edge of the ruler is the starting point for positioning the seam guide. There are several choices for a seam guide:
■Magnetic guide
■Screw-on guide
■Layered ¼˝-wide pieces of mole foam (designed as padding for human feet)
■Layers of masking tape
■Straight-stitch foot with quilting bar guide
■¼˝ foot
3.Sew 2 fabric squares 2½˝ × 2½˝ together using your seam guide.
4.Press the seam allowances toward one side.
5.Measure the pressed unit. It should measure 2½˝ × 4½˝. If it is longer or shorter than 4½˝, adjust your seam allowance accordingly. Sew test samples until you achieve an exact length of 4½˝.
For more detailed information, see The Art of Classic Quiltmaking, Chapter 4.
Refer to your sewing machine manual for guidance. Attempt to adjust the tension by using the tension adjustment dial on your machine first. If this doesn’t solve your tension problem, adjust the bobbin tension. Before turning the screw on the bobbin, make a note of where it is positioned before you start, reading the screw like a clock face. This will allow you to return it to the original setting if need be. Turn the screw to the right to tighten and to the left to loosen.
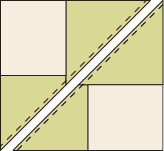
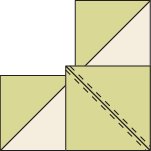
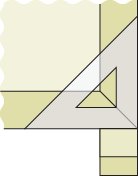
Y-SEAM CONSTRUCTION
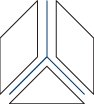
1. Units ready for piecing
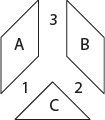
2. Sew seams in numbered order.
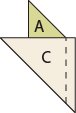
3. Place piece C on top of piece A and sew seam #1 from edge to edge.

4. Finger-press seam allowance as shown by arrow.

5. Place piece B on top of piece C. Flip pieces over so piece C is on top. Start sewing seam #2 at outer point and stop at previous stitch line. Lock stitches with either a lockstitch or backstitch.
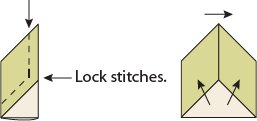
6. Bring the remaining 2 edges together and sew from the point to the previous stitching line, locking the stitches at both ends. Press.
For more detailed information, see The Art of Classic Quiltmaking, Chapters 4 and 15.
HALF-SQUARE TRIANGLE UNITS— METHOD 1: SEW AND SLICE
In this method, you sew 2 oversized squares together, cut them apart, press them, and trim them to size. This eliminates sewing a cut bias edge. You get 2 half-square triangle units from each set of squares.

1. Cut 2 squares 1˝ larger than finished size of desired finished triangle unit. Place squares right sides together and draw a diagonal line from corner to corner. Draw stitching lines ¼˝ on each side of centerline.

2. Stitch on each of the 2 stitching lines. Press.

3. Cut on centerline.

4. Press open with both seam allowances to one side. Trim to size, including seam allowance.
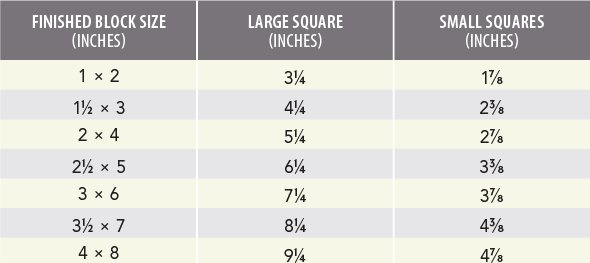
HALF-SQUARE TRIANGLE UNITS— METHOD 2: EIGHT FROM A SQUARE
This is a fun and fast way to make 8 half-square triangle units at a time. Refer to the following chart for sizes.
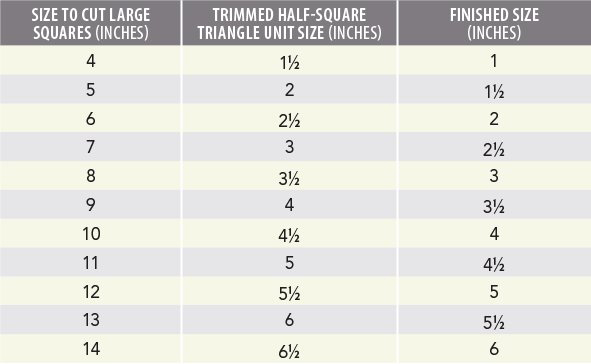

1. Cut 2 squares and place them right sides together. Draw diagonal lines from corner to corner in both directions. Draw stitching lines ¼˝ on each side of diagonal lines.
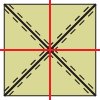
2. Stitch on each of the 4 stitching lines. Press. Then cut as shown in red.
3. Cut on drawn diagonal lines.

4. Press open with both seam allowances to one side. Trim to size, including seam allowance.
HALF-SQUARE TRIANGLE UNITS— METHOD 3: SHEETING TRIANGLES
This method was created by Barbara Johannah and Ernest Haight independently in the early 1970s.
1. Place 2 fabrics right sides together. Draw vertical parallel lines on fabric, spaced the finished size of the squares you desire + ⅞˝ (for example, 2⅞˝ for a finished 2˝ square).

2. Draw horizontal parallel lines the same distance apart as the vertical lines.

3. Draw diagonal lines in every other square, starting in a corner.

4. Draw diagonal lines in opposite direction in remaining empty squares. Pin in every blank space.
5. Stitch in a continuous line in the direction of the arrows, ¼˝ from the lines, using the same side of the presser foot all the time. Continue sewing until all the diagonal lines have stitching on both sides. Cut apart on all the drawn lines. Press.
For more detailed information, see The Art of Classic Quiltmaking, Chapter 13.
CUTTING NUMBERS FOR STITCH-AND-FLIP FLYING GEESE

1. Lightly draw a diagonal line from 1 corner to opposite corner on wrong sides of 2 squares.

2. With right sides together, place a square on end of rectangle.

3. Sew directly on line, trim seam allowance to ¼˝, and press open.
4. With right sides together, place other square on other end of rectangle. Sew directly on line, trim seam allowance to ¼˝, and press open.
CUTTING NUMBERS FOR 4X FLYING GEESE

1. With right sides together, position small squares on large square. Draw centerline from corner to corner on small squares and pin.
2. Stitch a scant ¼˝ from each side of line. Cut unit in half on centerline.

3. Press open.
4. With right sides together, place another small square on the bottom of large triangle. Draw line from corner to corner on small square and pin. Stitch a scant ¼˝ from each side of line.
5. Cut unit in half on drawn line and press open. Repeat Step 4 for remaining piece.
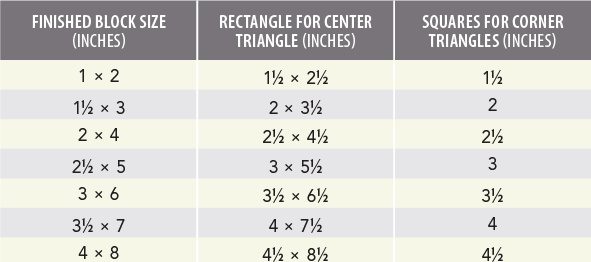
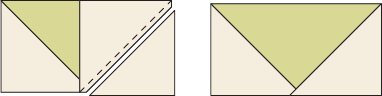
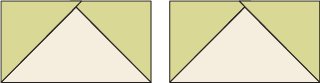
CUTTING NUMBERS FOR SQUARE-IN-A-SQUARE BLOCK
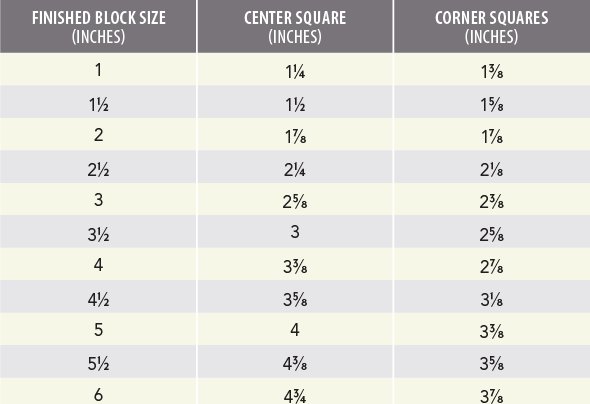
1. Cut 2 corner squares in half diagonally.

2. With right sides together, center long side of 1 triangle on an edge of center square. Pin and stitch. Position second triangle on opposite side of center square. Pin and stitch.

3. Press open.
4. Repeat Steps 2 and 3.
Registration Marks: Method 1
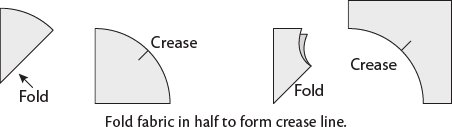
Registration Marks: Method 2

Piecing with Convex Shape on Top
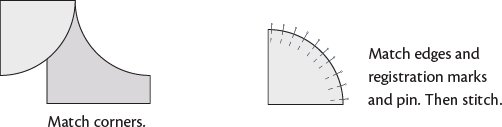
Piecing with Concave Shape on Top


To ensure success, follow these suggestions:
■Lengthen your stitch slightly.
■Stitch slowly to control the fabric.
■Use the needle-down feature on your sewing machine (if available).
■Keep the fabric edges together.
■Sew an accurate ¼˝ seam allowance.
For more detailed information, see The Art of Classic Quiltmaking, Chapter 16.
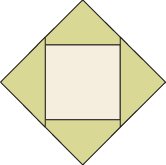
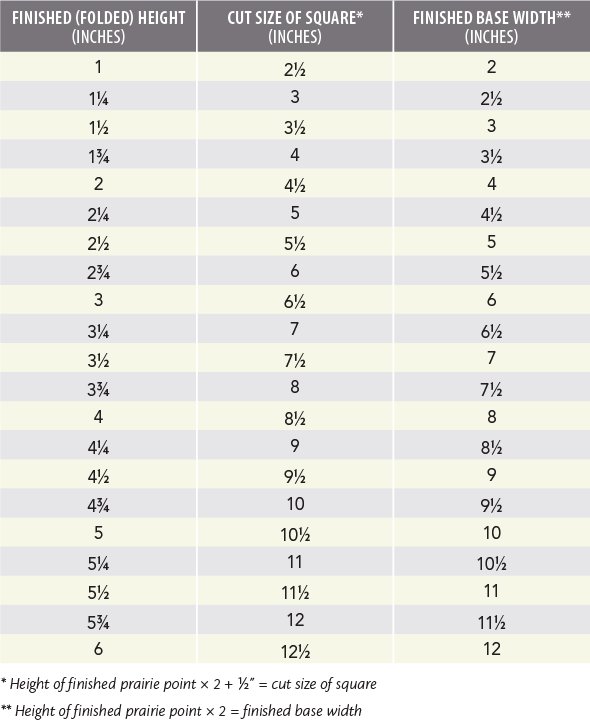
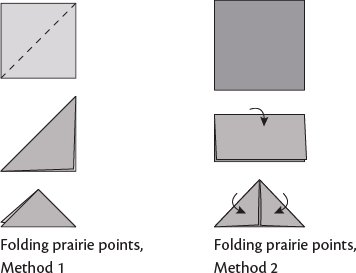
CUTTING NUMBERS FOR PRAIRIE POINTS
MITERED BORDER CORNER CONSTRUCTION

1. Pin securely and stitch strips to quilt top; start and stop stitching ¼˝ from quilt edge.
2. Press borders open and extend excess border length beyond each end.
3. Position border strips for mitering.
4. Fold top border strip under so it meets edge of bottom border strip and forms a 45° angle. Press the fold in place.
5. Pin the fold in place. Position a 90° angle ruler over corner until it is flat and square. Remove pins and press the fold firmly. Center masking tape over mitered fold.

6. Turn quilt top over. Draw a line slightly outside crease. Fold center section of quilt top diagonally from corner, right sides together, and align long edges of border strips. Beginning at inside corner, backstitch and stitch on line. Backstitch at end. Remove tape, trim seam allowance to ¼˝, and press seam open.
For more detailed information, see The Art of Classic Quiltmaking, Chapter 18.
MITERED DOUBLE-FOLD BINDING CORNER CONSTRUCTION

1. Join ends of binding strips together with diagonal seams.
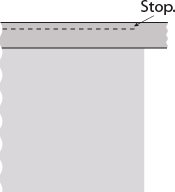
2. Fold strips in half lengthwise, wrong sides together, and press. Align raw edges of binding and quilt. Pin. Start stitching 5˝ from end of the binding strip. Stop ¼˝ from first corner of quilt and backstitch.
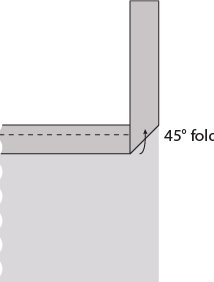
3. Turn quilt. Fold binding straight up as shown, forming a 45° fold.

4. Fold binding back down, lining up this second fold with edge of quilt and aligning raw edges. Stitch binding to quilt top, backstitching at each end. Continue for all 4 sides. Stop stitching about 16˝ from beginning stitches. See pages 61–63 to seam the binding ends. Wrap binding to other side of quilt, adjust mitered corners, and pin.
Three Options for Finishing the Binding

For more detailed information, see The Art of Classic Quiltmaking, Chapter 20.
SEAMING DOUBLE-FOLD BINDING ENDS—METHOD 1

1. Open End 1 and trim at a 45° angle.
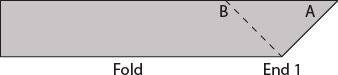
2. Fold and label End 1 as shown.

3. Overlap loose ends of binding where they meet. Lay End 2 binding strip flat. Lay beginning End 1 on top of End 2, keeping both strips folded. Mark Dot A on top layer of End 2. Mark Dot B on bottom layer of End 2.

4. Open End 2 and measure ½˝ to the left of dots for seam allowance.

5. Open End 1. With right sides together, stitch End 1 and End 2, using a ¼˝ seam allowance. Press seam open, fold joined strip in half, and press. Stitch this binding section in place on quilt.
For more detailed information, see The Art of Classic Quiltmaking, Chapter 20.
SEAMING DOUBLE-FOLD BINDING ENDS—METHOD 2

1. Trim End 1 at a 45° angle. Fold under ¼˝ and press.
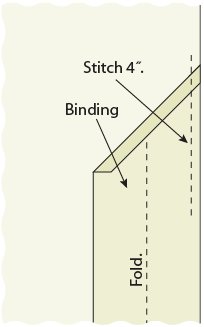
2. With long fold open, stitch 1 thickness of binding to quilt for about 4˝.
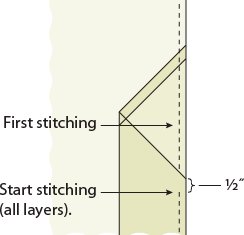
3. Lift presser foot and cut threads. Fold binding over to double thickness. Start stitching about ½˝ past short edge of point and continue around entire quilt.
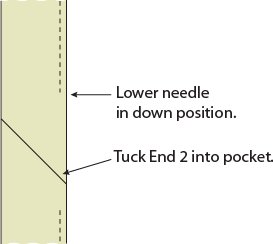
4. Lower needle into fabric. Lay end of binding strip over point and single thickness that was the starting point. Cut off End 2 just before stitching that started going through all layers. Tuck end into pocket and finish closing seam.
For more detailed information, see The Art of Classic Quiltmaking, Chapter 20.
SEAMING DOUBLE-FOLD BINDING ENDS—METHOD 3

1. Fold ending tail of binding back on itself where it meets beginning binding tail. From fold, measure and mark cut width of binding strip. Cut ending binding tail to this measurement. For example, if binding is cut 2⅛˝ wide, measure from fold on ending tail of the binding 2⅛˝ and cut binding tail to this length.

2. Open both tails. Place 1 tail on top of the other at right angles, right sides together. Mark diagonal line from corner to corner and stitch on line. Check that you’ve done it correctly and that binding fits quilt; then trim seam allowance to ¼˝. Press open.
3. Refold the binding and stitch this binding section in place on quilt.
HANGING SLEEVE

1. Cut a strip of fabric the width of the quilt × 8˝. Hem both short edges. Fold strip in half lengthwise, wrong sides together. Stitch down the long side. Press as shown.

2. Position sleeve with long seam against back of quilt. Pin and whipstitch long folded edges to back of quilt.
Note: Another option is to attach top edge of sleeve into seam of quilt top when stitching binding on.
For more detailed information, see The Art of Classic Quiltmaking, Chapter 20.