Chapter 1
Buying a Beetle
The acronym MoT (Ministry of Transport) appears throughout this section, and refers to an annual roadworthiness test of cars in the UK. Most countries will have a similar test.
Finding a Beetle to buy is fairly easy because, with over 20 million manufactured, there are a fair number to choose from. Finding and buying a reliable, rot-free, safe and sound Beetle is anything but easy, however. So many are unreliable, rotten, unsafe and unsound because of patch-repair and cosmetic work, which only make them appear roadworthy. What’s more, the most recent European-manufactured Beetle is now over a quarter of a century old ...
Although the Beetle is rightly renowned as a rugged and long-lived vehicle, many examples (especially older cars) will be suffering from acute, chronic, widespread - and usually camouflaged - rot in the bodyshell and chassis, and/or serious mechanical problems, both of which render the cars totally unsafe for road use. Sometimes cars with dangerous body rot are sold honestly at low prices as ‘restoration project’ cars, although experience suggests that, quite often, the problem areas are hastily and shoddily covered up, and the car sold dishonestly - and sometimes at quite a high prics - as being roadworthy.
It can be difficult for even an experienced person to assess the true condition of a car with expertly camouflaged body rot, although mechanical problems are often self-evident in those cases where they noticeably affect some aspect of the car's performance, such as poor braking, road-holding or acceleration. Some mechanical faults, however, are less evident and demand an expert knowledge of the car and how to properly appraise it.

A Mk I GP Buggy and a ‘Splittie’ pickup share the workshop with a 1972 Beetle.
Body rot and failing major mechanical components can both prove expensive to rectify, and render a car unsafe for use on the road; failings in the electrical and hydraulic components can prove almost as bad. The hydraulic fluid used in the braking system is highly flammable and leakage is both a fire risk and, of course, a reason for loss of braking. Old electrical components, their wires and terminals can not only be unreliable but are also the cause of the majority of car fires. The state of even small components is vitally important when buying a car.
Many of the Beetles which come onto the market may be advertised as ‘restored,’ and offered at an appropriately high price when, in fact, they have been incompetently repaired by a DIY enthusiast or back-street body shop. Price is no guarantee of quality. Many of the customised examples offered for sale may have been converted in a similarly slipshod manner, and even the best-looking and highest-priced restored and customised cars can actually be in poor condition - and a few may even be death-traps.
Another pitfall awaits the unwary buyer: thieves, using a variety of devices - including giving the cars new identities - fraudulently sell stolen cars to honest buyers who will lose both car and their money when the true identity of the car becomes known to the authorities.
So, despite the Beetle’s exceptionally robust construction and reliability, finding a genuinely good example can be just as problematic as finding a good example of any aged car.
The first question to be addressed is: which Beetle? The Beetle world appears to be split into two camps, which can be summed up as the ‘traditionalists’ and the ‘radicals:’ both love the Beetle, but in different ways. The traditionalists like the Beetle just the way it is, and, whilst some might consider the whole topic of customisation to be slightly infra dig, most will accept the custom enthusiast as a kindred spirit; the radicals favour one or other of the various schools of customisation, and might consider that the standard car is quite okay for those who like that sort of thing - but not for them.
The Beetle can be all things to all men: some might be looking for an honest, roadworthy and reasonably-priced example, and demand no more of it than reliable daily transport with a little more character than a modern car has; there are those who seek an early car for restoration or customisation, whilst others may wish to by-pass the countless hours of hard labour which go into such projects and buy an already restored or customised example.
Amongst restored Beetles there's a choice between early and late, convertible or closed, original spec or mildly customised. Amongst customised examples there are Cal lookers, Bajas, Beach Buggies, and a host of kits, plus innumerable one-off specials - the range of available options is huge.
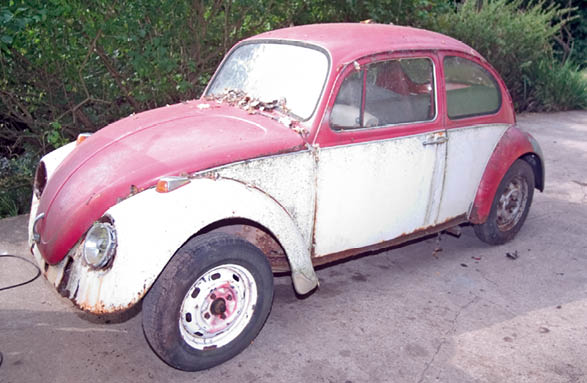
There comes a point at which restoration is simply uneconomic. This car has been standing outdoors for over a decade, and its only value is as a source of spares.
RESTORATION/RE-SHELLING CARS
The flitch panels (inner front wings) and the associated reinforcing pressings of the 1302S, 1303 and 1303S were not available as repair panels when the first edition of this book was written. Thankfully, both full assemblies and some repair sections are again available, though the full assemblies are very expensive to buy at the time of writing.
The alternatives are to use repair pressings to renew rotten structural steel, or to fabricate repair pressings for the structural pressings from heavy gauge steel. However, such work is outside the abilities of all but the most experienced restorers, and the process is so time-consuming to have carried out professionally that it is financially questionable.
Another drastic alternative is to graft a frame head capable of taking the earlier beam axle onto a 1302S with the flat windscreen, then to renew the front end of the car using the flitch, other panels, and suspension components from non-MacPherson cars.
If you’re looking for a Beetle to be the basis of a restoration (or to re-shell or build up into a buggy or other kit) then it will pay you to look for a particular type of car. This will be one which has been in daily use, with a predominance of excellent (recently replaced) mechanical components and good trim, but a shell/chassis that's in need of some welding. Such cars usually come onto the market when they fail the annual road worthiness test (MoT) on bodywork grounds, and they usually come very cheaply, even if the hapless owner has recently spent a small fortune renewing mechanical and electrical components. Never pay a high price for any car that needs welding to make it roadworthy, because, until the car is stripped right down, it's impossible to estimate the extent of the repair work. Such cars have usually been patch-weld repaired over rotten steel for many years; rot which can prove extensive and, in many cases, difficult to repair.
If major mechanical assemblies such as the engine or gearbox are claimed to have been replaced recently, ask to see the invoice/receipt to ensure that the reconditioning was carried out by a reputable company. The price you pay for such a car should be a fraction of the sum of the costs of the new and usable components. The advertisements for these cars usually include the pitiful words ‘some welding needed...’
If you intend to find a restoration project car and repair its rotten bodyshell, be very careful when checking for previous collision damage, and also for rot in the most structurally important areas, which might have allowed a suspension mounting point - or even the frame head - to move out of alignment. Restoring a straight bodyshell is usually within the capabilities of the enthusiastic amateur, but straightening a bent one is most certainly the province of the professional bodyshop equipped with a jig, because misalignment of suspension mounting points can make a car dangerous to drive, and it's doubtful that a bent Beetle spine could be straightened.
The Beetle spine chassis is particularly strong, although rot in the front end of the spine can allow even a minor bump to move the frame head. Checking chassis alignment precisely needs a jig, but taking perpendiculars from suspension points front and rear (mark crosses on the ground underneath), and then moving the car away, allows you to check that the front to back measurements are the same each side of the car and the diagonals are also equal. This method is not precise, but it will certainly reveal all but a tiny misalignment; if you're not sure that the chassis is straight, reject the car. The cost of professionally straightening such a car can be prohibitive, and another chassis (floors and spine) might be the only option.
Whilst it's true to say that any car - no matter how badly the body has rotted - can be rebuilt, there comes a point when it will be uneconomic, and so difficult to do unless you have access to jigs to help align panels, plus a deep enough pocket to buy in a lot of quite expensive body repair and replacement panels. Such cars are best considered as candidates for either re-shelling or conversion into one of the kit cars which come complete with their own chassis.
Mechanical components are widely available and not too expensive in comparison with components for more recent cars, but in the course of a restoration many of them will need at least refurbishment and some will need replacement. The cost of renewing mechanical, electrical and hydraulic components can add up to a sizeable bill on cars in generally poor condition, so check out as many components as possible before negotiating a price for the car.
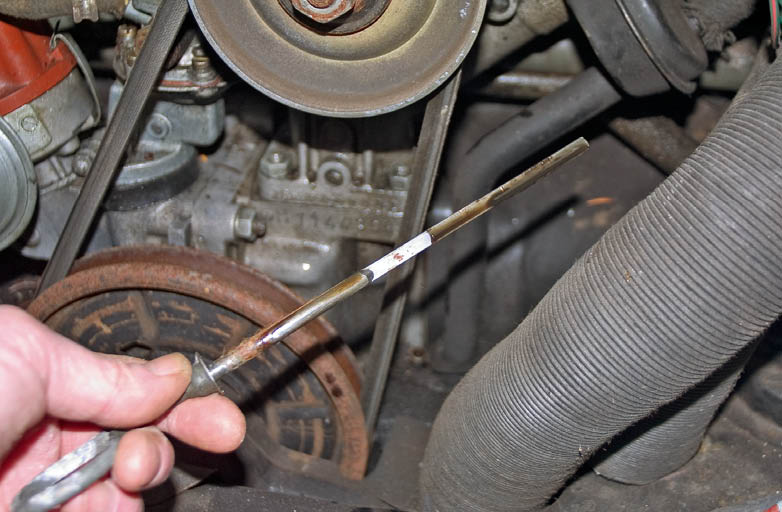
The state of the oil clinging to a dipstick tells a lot about the condition of the engine. Although rather black, this is not unusual, and it’s not thick and full of carbon, which can happen when the engine is burning oil.

If you find an emulsion of oil and water (a creamy substance not unlike mayonnaise) sticking to the oil filler cap, or within the filler neck, this indicates that the car has been used mainly for short journeys. Not a good sign as engine wear is highest during short trips.
Check that the car has been maintained properly by examining the state of the engine oil. If the oil is black, the cylinder bores and piston rings, and/or the valves, are probably worn, and have allowed carbon to mix with the oil. If the oil is a cream colour, then oil changes have been infrequent, and the car used mostly for short runs (water condensing onto the crankcase has formed an emulsion with the oil); neither of which are good for the engine. If the oil smells of petrol then a new fuel pump is needed and, if the leakage has been occurring for any length of time, expect increased wear of engine components due to the reduction in lubrication.
Engine oil plays an important role in preventing the engine from overheating. If a car has black or cream oil, poor oil pressure or a low oil level, and has been used in that condition, it will have run far too hot, and component wear will have been high.
Check whether the engine bay and engine ancillaries (especially the distributor cap and other elements of the ignition system) are clean or covered in dirt or oil; if the car has been properly maintained they will be clean. A car on which maintenance has been skimped will mainly have dubious spares, and the last thing you want is a freshly restored car which keeps breaking down whenever another old component decides to quit.
If you want a quick and easy re-shell, or kit car build-up, avoid cars which have been standing idle for any length of time. Many mechanical, electrical and hydraulic components appear to deteriorate more quickly when the car is left standing than if the car is regularly used. Another point against cars which have not run for some time is the likelihood that many of the nuts and bolts will have seized solid, making the initial strip-down far more difficult and frustrating than it need be, and giving you no option but to cut, drill or grind away seized fittings, which must, of course, be replaced with new ones at increased cost. Even worse, there's always the danger that, when dealing with a recalcitrant fitting, you will damage the associated component.
It's a good idea to look for a car which, although in poor condition bodily, is sound enough be used on the road for however short a period before the test certificate expires. Using the car on the road will help to highlight any looming mechanical problems which can then be dealt with at leisure during the restoration.
The very best Beetle for a restoration is one which, although it may have some body rot, has not been 'bodged.' When, in 1992, the author asked the folk at the Beetle Specialist Workshop to keep an eye out for a Beetle for him, they managed to find a 1970 1500 (RVJ 403H) which had failed the MoT on bodywork, but which had no evidence of previous bodywork repair apart from some body filler on external panels. This car, according to BSW workshop manager, Terry Ball, had ‘not been got at,’ meaning that cover patches had not been welded over areas of rot. When patches of steel are welded over rotting bodywork, the underlying rot accelerates, because it is encapsulated - ideal conditions for the rot to spread. The rot quickly reaches the edges of the cover patch, then carries on to infect surrounding steel.
The rot on RVJ 403H included the heater channel rear ends, sections of the floor pans, the rear body mounting points within the wheelarches, and the rear bumper mounts. Plenty of rot - but honest rot. If you can find such a car then your restoration will be so much easier.
THE WORKHORSE
If you want a low-cost Beetle to put into immediate daily use, then the condition of mechanical and electrical components automatically assumes greater importance than in the case of the restoration car. If you were to buy an older car with mostly tired and worn components, these would inevitably fail, one-by-one, at unpredictable intervals, and the car would never be reliable.
The best advice is to concentrate on finding a low mileage, garaged recent car with documentary evidence of a good service history, or one which has been owned for a long time by a competent and consciousness DIY (do-it-yourself) mechanic who has not skimped on regular servicing. Proper maintenance includes anticipating at what point various components are likely to give problems, and replacing them before they fail. The vendors of such cars should be able to show you a series of invoices for spare parts (and labour charges if the maintenance has been carried out professionally) to prove that the car has been properly cared for.
The state of the bodywork in such cars is even more important than that of the mechanical components because, whilst a mechanical fault can mean taking the car off the road for, perhaps, one or two days whilst the fault is rectified, the rectification of body rot entails taking the car off the road for far longer - sometimes weeks, sometimes months, if the work has to be carried out on a DIY basis.
All European Beetles are now old enough to have had some bodywork repair, so assume that a viewed car will either have had such work, or will need it. As much as with any other Beetle, be vigilant when looking for camouflaged body rot and poor repair.
Accept from the outset that it's very unlikely you'll find a cheap solid and reliable Beetle: when setting a price, owners of such cars will bear in mind the maintenance, repair, new component and/or bodywork costs they have incurred on it. In the long run, it usually works out cheaper to pay a fair price for a good car than buy the cheapest you can find and suffer a constant stream of repair bills every time another tired old component breaks down.
Avoid cars which have been off the road for any length of time because, as stated previously, most mechanical, hydraulic and electrical components actually age far less when the car is in regular use than if the car is left standing. Also best avoided are cars on which the vendor has recently spent a lot of money in mechanical repair; this indicates that many components reached the end of their useful life at the same time; maybe the rest of them will similarly be in need of repair/replacement before too long?
Most large motoring associations will - for a fee - undertake mechanical and body surveys on cars on behalf of members. Motor engineers usually offer the same service. Both will give you a written report on the state of a viewed car and, if you're not confident about your ability to properly assess the condition of a prospective purchase, then the survey fee could repay itself many times over.
Be wary of cars with brand-new roadworthiness test certificates: some - but by no means all - may have had the minimum of work done in order to scrape through the test (which makes them easier to sell). They could also be on the market because they are unreliable, or the owner wants to avoid looming repair bills.
A dwindling number of companies sell Beetles which they have ‘sorted’ the mechanics of in-house, and these usually come with a guarantee and can be safe buys. Other companies sell Beetles which they have fully restored and these, too, are a good option for those who want a reliable car. In both cases it pays to deal with companies fairly close to home; you don’t want to have to drive (or trailer) the car for miles if you have problems with it.
RESTORED CARS
A good quality professional Beetle restoration will generally cost more than the car will be worth afterwards. A full and conscientious DIY restoration not only costs a lot of money, but usually involves thousands of hours of work - not all of it pleasurable. It's little wonder, then, that many would-be Beetle owners seek a ready-restored car, nor that the vendors of good restored cars very often ask high prices.
The first fact to consider is that you will not be able to buy a well restored car cheaply. If a restored car is offered at a low price, this should arouse suspicion regarding the quality of workmanship and/or the extent of the restoration work - not to mention the possibility that the car could be stolen. Apart from the vendor’s natural desire to recoup as much as possible of the financial outlay involved in the restoration, a genuinely good restored car will usually attract other potential purchasers, one of whom may want the car badly enough to try and outbid you.
You should also accept that a high price is no guarantee of quality, and that a number of ‘bodged’ cars will inevitably come onto the market place dressed-up as quality restorations, and priced accordingly.
With professional and amateur restorers alike, it's now almost universal practice to keep a full photographic record of the work-in-progress, and it's recommended that you don't buy a ‘restored’ car unless you can see such a record (and satisfy yourself that the car pictured is actually the car you are buying). Don’t buy unless you can see photographs of the separated body and chassis assemblies - you can’t restore a Beetle to a good standard without splitting the two.
Because there is usually so much money at stake when you are buying a restored car, it may be worth commissioning a motor engineer’s survey before parting with your money. Alternatively, take along a knowledgeable friend when you view cars; if you don’t have a knowledgeable friend, join the nearest Beetle owner’s club and quickly make friends with the most knowledgeable person you meet there!
In addition to the points made in this chapter about assessing cars, there are a few extra checks to be made in the case of restored cars. A restoration basically comprises two parts: the bodywork and the mechanical elements. It is common practice when commissioning a professional restoration, for owners to have the body restoration work carried out professionally, but to undertake the mechanical build-up themselves. It's vital that you attend to small details when examining the mechanical components and, more particularly, their fastenings. Look at the screw slots, the nuts and bolt heads. If the screw slots are distorted, if nuts and bolt heads are rounded, then the person who carried out the rebuild obviously did not possess a very good set of tools, and the state of the fastenings could well be reflected in more important, hidden areas.
Irrespective of whether the bodyshell restoration was carried out professionally or at home, it goes without saying that your inspection of it should be thorough. Rather than try to assess the body inch-by-inch, concentrate on the areas where repair panels (as opposed to full body panels) and home-made patches are commonly used. There is nothing wrong about the use of repair panels, but some people will try to weld them to existing metal which has thinned through rusting (and which will therefore be weak and/or will rust completely through in the fullness of time) instead of replacing the entire affected panel. Where you do find welded joints, assess them, and look for pores, poor penetration, and the usual welded joint faults. (See Chapter Four.)
Welded joints on external panels are usually well finished and should be invisible, so, whenever possible, try to get a look at the inside of the seam. If you find rust there, expect all repaired welded seams on the car to rust out before too long.

It doesn’t matter how good a Beetle looks, you should check all of the areas described in this chapter to ensure that the restoration work is of a high standard.
CUSTOMISED CARS
There's such a wide range of off-the-shelf customisations for Beetles that it is difficult to give advice which is strictly relevant to all types. The main concern must be the build quality (because many such cars are built by amateurs), not only of the bodywork, but especially of fuel, brake, engine, and electrical components. Bear in mind that these are all possible causes of fires, which are even more serious with GRP-bodied cars than with steel-bodied cars.
All Beetle-based kit cars fall into two basic groups. Some utilise the Beetle spine/floor pan assembly and others are built up onto a special chassis. When assessing the former, always pay special attention to the spine/floor pan assembly - it could have started to rot even before the kit body was bolted on, or, in the case of a shortened chassis (Beach Buggy), the welding could be of a very poor standard and the chassis spine consequently weak. The author has seen shortened chassis/floor pans on Buggies which appear to have been crudely ‘stick’ (arc) welded, and which still showed evidence of burning through: the inappropriate welder burns holes through the steel which it is meant to be joining!
Begin by visiting a large Beetle gathering, so that you can see the various customs in the flesh and make a proper decision about which best suits your needs. This will also allow you to see both good and bad examples of the build quality of the custom, and enable you to quickly decide whether a car you subsequently view is a badly or well-built example. Talk to the owners of customs which take your fancy, because they will be able to give you valuable information on what to specifically look for when assessing the cars.
When viewing a customised car, be it a kit or a one-off special, try to establish whether the car meets all legal requirements, bearing in mind that, in some countries, these include the positioning of lights, number plates, etc. Also, check the car over for anything which might cause it to fail the government roadworthiness test (MoT test in the UK), which can include any projections that the tester feels might pose a hazard to other road users or pedestrians, moving parts which are exposed, or an insecure battery, etc.
The availability of any single type of custom Beetle is a fraction of that of standard cars, and the pressure to buy a viewed example ‘before someone else gets it’ is greater. Don’t rush into a purchase as to do so is nearly always a mistake. If you have any cause for doubt about a viewed car and the vendor begins to get pushy, leave the car alone and console yourself with the thought that: A) You could probably build a better one yourself; B) There will probably be a better example available next week; and C) Pushy vendors want you to buy before you find the fault which led to the car being on the market in the first place!
Quite a few customised Beetles come onto the market as unfinished projects. This can happen for a variety of reasons; it's important to establish which it is. Many people simply run out of money before they complete the car, a familiar occurrence in the kit car world, where those essential items - sometimes listed by the kit manufacturers as ‘optional extras’ - can add up to rather more than the cost of the kit, and lead to financial embarrassment for the builder. Some projects are unfinished due to a lack of time, others due to a lack of motivation to see the job through. All of these perfectly plausible reasons for selling an unfinished project custom or Beetle-based kit could be given as a cover-up for a more sinister one; the knowledge that the work done to date is in some way inferior, or the fact that the kit or custom is based on a weak chassis.
When viewing an unfinished project custom car, you really have to be very careful when assessing the build quality of the job to date. Check the floor pan (and any standard body panels which have been retained) for rot and even light rusting. Check GRP panels for signs of damage and/or repair, because someone might have accidentally dropped something onto one.
Buying an unfinished project can save a lot of money in comparison with completing a build-up yourself, but it can also lead to heartache, so tread carefully.
In the case of kit cars, you might also care to acquire the manufacturer’s build manual (most will sell this separately) in order to familiarise yourself with the kit and the way in which it is built. This should help you to properly appraise built examples.
CONVERTIBLES
Convertible Beetles come in three varieties: Karmann originals, professional conversions, and DIY jobs. Karmann convertibles are always towards the very top end of the Beetle price range, so expect to have to pay a lot for one and assess the car as carefully as you can for the usual signs of accident damage and corrosion. Do check for authenticity, because there is money to be made from dressing up a DIY conversion as a Karmann original and selling it at a high price.
Many companies today offer a professional conversion service for the standard Beetle and, whilst cars converted in this way will not be so expensive or exclusive as a Karmann, they offer exactly the same function at a far lower price. Because the roof panels of saloon cars generally contribute greatly to the strength and rigidity of the cars, it is vital that a saloon which is made into a convertible receives some extra strengthening. In the case of a Beetle, the immensely strong chassis/floor pan assembly arguably lessens the need for extra strengthening, but the author would recommend that widely available strengthening members are welded to the heater channel assembly, and to the A-post (to prevent scuttle shake), and the rear crossmember. Professional conversion companies should do this as a matter of course, but it pays to check. The strength afforded by the sill/heater channel assembly of converted cars is vitally important in preventing the bodyshell from twisting, so this area should be assessed very thoroughly. Karmann originals also have a strengthening pressing running under the heater channel; something similar would be reassuring on a aftermarket or DIY conversion.
Most DIY saloon-to-open-top conversions will be based on a commercially manufactured kit. If you are looking for a car which is based on a particular kit, then a visit to one of the larger Beetle events will enable you to talk to existing owners of converted cars, and learn enough about them to be able to assess the build quality. If you are thinking of buying a home-built convertible the first thing you should ask is whether it is based on a kit and, if so, which one? Treat non-kit DIY conversions with caution.

Cabriolet bodyshells are rather different from those of fixed-head Beetles, having strengthening members above and below the heater channels. This is at the base of the ‘A’ post.

This is part of a large bracing pressing situated at the base of the ‘B’ post on cabriolets.
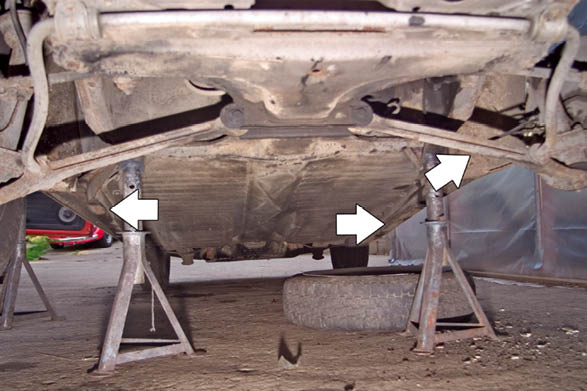
The Karmann convertible has extra longitudinal pressings running under the heater channels to stiffen the car and make up for the absence of a roof.
‘LOOKERS’
By definition, a ‘looker’ will have a very smart external appearance, and some might even appear to have an almost perfect finish outside and in. Irrespective of the plushness and quality of the interior, and the deepness of the gloss of the paint work, cars like this can be heavily bodged examples of basically rotten bodyshells. Because the cars look so good, the asking price - and therefore the stakes - are high. Try to ignore the flash and get down to basics: give the car the most thorough bodywork and mechanical examination you can.
Check that beautiful bodywork with a magnet to discover whether it is steel or GRP and body filler! There's nothing wrong with body filler per se, but if the magnet shows no attraction whatsoever to a panel, this tells you that the thickness of the filler is such that: A) The car has been bodged; and B) The filler is likely to drop out at some point in the future because filler this thick cannot flex with the panel.
The price asked for a looker which has a lot of expensive accessories will sometimes be a reflection of the cost of those accessories, rather than the car. Apart from the very finest exceptions, the value of a non-standard Beetle rarely exceeds, and sometimes falls far below, that of a standard car in similar condition.
There's always a wide selection of custom Beetles offered for sale in the UK, so don't hurry when making a buying decision.
BAJAS
Because Bajas consist of the basic Beetle chassis and body, with sundry GRP bolt-on and bonded panels which contribute nothing to the strength of the body as a whole, the body/chassis can be appraised using exactly the same routine as for a standard Beetle.
The main point to bear in mind when looking for a Baja is that some - but by no means all - will have seen some fairly heavy duty off-road use, and the worst of these could have camouflaged underbody/steering/suspension damage. In addition to this, breathing in dust-laden air will have done nothing for the engine unless good air filters were fitted. Check for off-road damage (including camouflaged damage to the roof and pillars, which results if the car is rolled and, of course, damage to the floor pans, frame head, suspension and steering). Because it is nigh-on impossible to clean all traces of fine dirt from a car, check for this in nooks and crannies. A lot of Bajas are probably - like most off-road vehicles - used only on tarmac, and it's better to go for one like this than one which has been used in the rough. There is a good selection of cars with the popular Baja modification, so don’t be rushed into buying.
Because the Baja is usually raised to increase ground clearance, the effects of transaxle jacking on single-joint drive shaft cars are exaggerated, and the presence of a ‘camber control’ device should be reassuring! The so-called ‘Z’ bar fitted to the 1500cc Beetle is not, as widely supposed, an anti-roll bar, nor is it an ‘equaliser’ (as the author has seen it erroneously described). The Z bar only acts when the transaxle tries to lift itself from the axle shafts and, as such, is an anti-jacking device. The 1500cc Beetle is a good candidate for the Baja conversion because of this.
Be especially careful when assessing a Baja for road legality. In particular and with regard to the UK MoT roadworthiness test, the wheels must not protrude beyond the wheelarches, and no moving part of the engine should be exposed.
WHERE TO LOOK
When you have decided which variety of Beetle you want, the problem arises of where to begin looking for your dream car, who to buy it from, and roughly how much to pay for it.
Beetles for sale are, of course, widely advertised in national magazines and on the Internet, and might, at first sight, seem as good a place as any to begin your search. Unfortunately, because such magazines are distributed nationally, they attract advertisements from all over the country. If you are in the market for a comparatively rare, original UK RHD Karmann convertible, then the national press might be the best (perhaps only) source because it will be the only place where you can find a reasonable selection to choose from. If you're seeking one of the more common variants, then you might as well begin looking nearer to home, and with good reason.
Vendors of Beetles often arrive at an asking price by reference to one of the published classic car value guides in a classic car magazine (although some are misled by agreed value insurance figures - more on this later). This can cause the buyer certain problems. Firstly, the guides often differ from each other in the values they ascribe to particular cars (the author has seen valuations of the same car in two guides, published at the same time, where one valuation is 50 per cent higher) and, secondly, they generally value the cars in one of three groups, according to condition. Group ‘1’ or ‘A’ usually refers to very clean and original cars with little or no rust, and reliable mechanical and electrical components (but not pristine concours winners). Group ‘2’ or ‘B’ usually includes cars which run and possess the relevant certificate of roadworthiness (the MoT certificate in the UK), but which would benefit from a certain amount of mild mechanical repair and/or a small amount of bodywork attention. Group ‘3’ or ‘C’ cars are described as those which may or may not be runners, and may or may not possess a current certificate of roadworthiness, but which do require fairly extensive mechanical and body repair to make them really usable.
Problems arise because a vendor often wrongly assumes that his or her group 3/C car is actually a group 2/B, and asks the appropriate price as indicated in a value guide. It will not be until you come to actually examine the car that the mistake - or sometimes the deliberate misrepresentation - will come to light. This is not too annoying if you have travelled only a short distance to view the car, but following a long and totally wasted drive, it can be infuriating.
If you are looking for a reasonably common Beetle variant you'll save much time, money and temper by only travelling to view cars fairly close to your home. In this case it's best to confine your search initially to local newspapers and other local publications. Word-of-mouth is also an excellent way of finding a local car. Going out and finding a Beetle before it is advertised for sale also has the advantage of allowing you to make an offer without having other potential buyers hovering in the background, ready to outbid you, which can often happen if you and they both answer an advertisement and turn up for a viewing at the same time. Another advantage of viewing locally is that many of the cars you see advertised will not be owned by Beetle enthusiasts, and the prices asked can sometimes be far more reasonable, because the non-enthusiast does not always attach any special ‘classic’ or other value to his or her Beetle: to such people, their Beetle is simply an old car - not a classic, nor a cult car.
In the UK, regional advertisement-only publications which specialise in used cars offer another useful media. These usually feature far more Beetles than local media, giving a much better selection at the cost of having to travel further within the region to view likely cars.
You could always place a ‘wanted’ advert yourself, which should generate a selection of available cars for you to choose from. The greatest benefit of placing an advert yourself is that you will often attract responses from people who would not advertise their Beetle for sale, but who would part-exchange the car, or perhaps sell it to a relative or friend. You may also attract responses from people who were not previously thinking of selling their Beetle; in both cases, you alone will be viewing the car and there won't be other potential buyers around.
The author has noticed particular pricing trends, depending on where the cars are advertised. National magazine advertised cars tend towards the top end of their expected price range, especially cars which are advertised in the more ‘upmarket’ magazines, which have pages full of ads for affordable classic cars, as well as glossy editorial features on Ferraris and pre-war blown Bentleys. There are some ‘man-in-the-street’ type classic magazines which seek to assure readers that their own car is a classic (and that, therefore, they should continue to buy the magazine), and the advertisements in these tend to feature less extravagantly-priced cars. At the time of writing the UK Beetle/VW press appears to include the widest selection of sensibly-priced cars, and is probably the best national shop window.
The prices asked for cars in regional advertisement-only publications - in common with local newspapers - are, in general, realistic, although the occasional silly price creeps in from time-to-time.
If you want to see the very largest selection of Beetles for sale, visit one of the larger Beetle shows held throughout the summer months. Rather than having just a photograph by which to judge the car before embarking on a buying expedition, the cars are there in the flesh. Don’t, incidentally, hand over money at the show (unless buying from a known bona fide dealer), but arrange to visit the vendor and carry out the transaction at his or her own house. The reason for this advice will become clear later in this chapter.
WHO TO BUY FROM
There are five sources from which to buy Beetles. 1) The vast majority of Beetles are bought and sold privately. 2) An increasing number of Beetles are sold by dealers who specialise in classic cars, a particular marque or, preferably, a particular model. 3) Relatively few Beetles nowadays find their way on to general car dealer pitches. 4) The classic car auction is a relatively modern, but growing, phenomenon at which more and more classic cars seem to be traded. 5) General motor auctions very occasionally include a good Beetle. Each source has points for and against, and is briefly discussed in the following text.
Private; looking for a bargain?
The private vendor is often sought out by potential purchasers because it's assumed that the asking price will always be lower than that asked by dealers. This is not necessarily so, for a variety of reasons.
Many vendors, misinterpreting (genuinely or otherwise) classic car value guides or insurance agreed values, ascribe ridiculously high values to their cars. Many sellers - loathe to sell their beloved Beetle but forced to do so because of financial or other reasons - add a degree of ‘sentimental’ value to the actual value of the car when arriving at an asking price. Some private vendors are simply avaricious, prepared to keep their Beetle on the market until they find a buyer foolish enough to pay their inflated asking price.
Buying from a private vendor can sometimes result in your getting a bargain, but the practice does carry huge risks. Private vendors of many products, certainly within the UK, are not subject to the stringent consumer protection laws by which a business selling the same item would have to abide. In the case of a privately sold motor vehicle, it is still (at the time of writing) an offence to misrepresent it, but unless the misrepresentation has been published in an advertisement, there's no proof of this. If the vendor gives a verbal rather than a written assurance that the bodywork is sound, yet the car breaks its back on the first humpback bridge you drive over, you won’t be able to claim that the car was misrepresented. It is, however, an offence in the UK to sell a motor vehicle which is in a dangerous, unroadworthy condition, but unless you can prove that the car was unroadworthy at the actual time of purchase, it is very difficult to take any action against the vendor. A private vendor will usually take the position that, once money has changed hands, the car is your property, and you have driven it away, he or she has no further liability for it. If you put your foot through the floor the first time you use the brakes, you may have to resort to the legal system for redress.
Beetles are now extremely tempting targets for thieves. Not only do the cars command attractive prices, and usually find a ready market, but, even broken down for spares, they're worth real money. Most classic cars that are stolen and offered for sale (certainly in the UK) seem to be the target of a type of organised crime called ‘ringing,’ where a car of a specific year and colour is stolen. In order to sell the car, the thief has to give it a new identity, which he can do in one of two ways. Firstly, he can take the registration document and number, engine, and any other identification numbers of a scrapped example of the vehicle and simply replace the various identification plates on the stolen car (the ‘ringer’). Secondly, he can apply for a duplicate registration document for an existing and perfectly legitimate example of the car (usually one which lives many miles away from the scene of the sale), then buy number plates and other identification plates to create another seemingly legitimate example.
Ringing is far more likely to occur with later cars, because there are so many still in circulation. Of course, with the value of all Beetles likely to continue increasing, there could come a day when it would be financially viable for a thief to respray a ringer - if unable to steal one in the right colour - to match his seemingly legitimate documentation. At the time of writing, however, Beetle values are such that there does not seem to be a real threat of this happening.
Your best guard against buying a ringer is to ask to see not only the current owner's receipt of purchase, but also a current or last tax disc, test certificate, and insurance document, relevant to the vehicle and owner respectively. A vendor who cannot immediately supply these documents can't have used the vehicle for some considerable time, or may never have run it at all if it is a ringer.
Perhaps the safest private vendor to buy from would be a member of a local Beetle club, or a local branch of a nationally-based Volkswagen owners’ club. The enthusiasts who belong to these clubs will often have already verified that the car was legitimate when they bought it. Alternatively, few thieves would risk advertising in club literature, so cars offered for sale through advertisements in club magazines should also, in theory, be safer buys.
To summarise: buying from a private vendor rarely means getting a car at a bargain price, and can be risky.
Specialist dealers
There are certain to be a few rogues among specialist Beetle dealers, just as there are in any other trade or calling, although the dodgy specialist car dealer is usually fairly easy to spot. A good dealer will have repair, and possibly restoration, facilities with which he can honour the terms of whatever guarantee he gives. A dubious dealer will not. A good dealer will usually have proper premises, whilst a dubious dealer will often be found operating from a barn, a small lockup, or even his own front room.
A good dealer will usually specialise in a particular marque, model or type of car, which he knows well enough to properly appraise, whilst a dubious dealer will take anything that comes his way. Without specialist knowledge, he will be vulnerable to being sold poorly restored cars, fakes, and unroadworthy vehicles. A good dealer will avoid such cars, because he knows that, to sell just one, could cost him his reputation.
It's important to establish whether a dealer is honest and reputable. You'll also want the assurance of a worthwhile guarantee to the authenticity, legality, and roadworthiness of a car before you part with your money. If you buy from a rogue, redress will be difficult to achieve.
There is another type of dealer which should be avoided at all costs. This is the individual who trades cars from his own residential premises, usually unofficially. These people often come from the ranks of classic car enthusiasts who, having bought and sold a few cars and made a profit from the activity, try to build it up into a lucrative sideline. They cannot offer guarantees, which would be worthless in any case as they have no facilities to repair the cars. These people are probably breaking various trading laws, as well as avoiding taxes; if they quite happily defraud the authorities, they will just as happily cheat you, the customer. Avoid them at all costs.
Be guided by other Beetle enthusiasts in your choice of dealer, because there are a number of very competent and totally honest small businesses which restore Beetles and offer them for sale. These companies are well known, and their reputation is a pretty good guarantee.
General car dealerships
General used car dealerships do not usually welcome a Beetle on their forecourts, or in their showrooms, for the simple reason that it would probably be the only one amongst a sea of modern vehicles, and therefore very unlikely to sell. General dealers will take Beetles in part-exchange against newer cars, but are often then disposed of through the trade, i.e. sold on to a business that specialises in this type of car, or sent off to the nearest car auction.
The fact that Beetles do occasionally enter the mainstream used car trade can be an advantage for anyone who lives in or near a large town. Simply visit or telephone the car dealer(s) and explain that you wish to buy a particular type of Beetle. The dealer will be certain to let you know the moment he has one, because he can sell it to you for a far higher price than he could get through the trade. The price in question, incidentally, would almost certainly be negotiable, and you may be able to haggle the price down and get a bargain in this way.
Classic car auctions
Classic car auctions have been around for years, but it's only since the start of the classic car boom of the 1980s that there have been so many. In the UK there seems to be an auction taking place somewhere every weekend in summer.
The drawbacks to buying from an auction are that you do not have the opportunity to test drive the car, or place it on ramps or over a pit for a close inspection. However, a practised eye can rule out many cars on the grounds of poor bodywork with a minimal visual inspection, and most auctioneers seem to build a ‘cooling off’ period into their terms of business contract so that, if the loom catches fire when you turn on the ignition to drive the car away, you can back out of the deal.
Classic car auctions attract many very knowledgeable people (and a great number who merely kick tyres and check to see whether the ashtray is full). By listening to the comments of the more expert appraisals, you can glean much useful information about individual cars. Be careful not to get caught doing this, just in case the person giving you a free lesson in car appraisal notices and starts giving out false information!
Auctions are terrible places for impetuous people to shop. In the heat of the moment many buyers get completely carried away, and really need a level-headed companion to keep them in check. Try to take along an experienced Beetle enthusiast who can give you reasoned advice, just in case your enthusiasm takes over completely!
General car auctions
Nobody visits general car auctions expecting to see good examples of the Beetle, so nobody much bothers to enter them in general auctions. Occasionally, a company liquidation, or the auctioning of goods and chattels from an estate, might be the reason a Beetle is entered in a general car auction. In the main, though, a Beetle will be in a general auction because it has proved impossible to sell elsewhere. Avoid these events.
HOW MUCH TO PAY?
A Beetle, like any classic car, has three values: the value to the seller, the value to the buyer and, usually somewhere in-between, the purchase price. Beetles cannot have such accurate published value guides as current and recent cars; Beetles are now old cars, and the value of the individual example will be most heavily influenced by its condition, irrespective of any arbitrary figure which might be ascribed to its year and which model it is.
The entire classic/recreational car market is in a constant state of flux, and so it is important that your cash offer is based on current pricing trends. There are several ways of obtaining current information. Some classic car magazines include value guides and, whilst these can sometimes prove slightly out, they do, over a period of some months, serve to show which way the market is moving.
Some vendors will base their asking price on an insurance valuation. Valuations carried out for insurance purposes are not to be taken too seriously. Some of the figures involved are arrived at by a valuer whose only experience of the individual car is a set of photographs - and you can't tell the condition, and hence the value of a car, simply by looking at photographs. Apart from any other consideration, who is to say that the car in the photographs is not another example in better condition, and only wearing the number plates from the actual vehicle? Some agreed values might be based on some kind of report prepared by a garage business, or other valuer, on behalf of the insurance company, but they cannot be relied on either as it's not possible to rule out collusion between the vendor and the valuer.
More accurate pricing information is usually available from owner’s clubs, which may either be published by the club magazines or, in some circumstances, given out on request. Alternatively, a local club will doubtless have some members who keep an eye on Beetle prices, and they may be persuaded to share their information with a fellow member.
If you have the time and inclination, monitoring adverts across a wide range of platforms (Beetle/VW magazines, local newspapers, and regional advertisement-only publications) will enable you to build up a picture of what money is being asked for what cars. Concentrate only on the particular Beetle which interests you, and within a couple of months you could be as knowledgeable about Beetle values as any authority.
The author prefers to use the following method to value cars. Firstly, he decides how much he can afford, then what he would regard as a fair price to pay for the car he is seeking in the condition he requires. When viewing a car, he lists all of the components which need renewal, plus any other work required (or which will require attention in the near future). He prices this and subtracts the total from the figure he considers a fair value for the car when all of the repairs have been carried out, to arrive at the value of the car to him.
ASSESSING BODYWORK
Because the Beetle is blessed with that rugged spine chassis, the strength of many pressings and assemblies - particularly the sill/heater channel assemblies - is arguably not quite as vital as it is on monocoque-bodied cars. However, the only real difference between the two (apart from perpetually misted windscreens on Beetles with rotten heater channels!) is that the Beetle which has rotten sills but a sound spine chassis is unlikely to suffer distortion capable of moving suspension mounting points, whereas the monocoque bodyshell with rotten sills can easily be bent to the point that the suspension mountings front and rear move, making the car unsafe to drive and necessitating the aid of a jig for the repair work. The work involved in rectifying body rot on the Beetle can be as difficult and time-consuming as the same work on any car. When assessing the bodywork of a Beetle which you intend to buy, therefore, it pays to be thorough.
The suspension mounting points of the Beetle can, it should be noted, be bent in a frontal collision. A bent or misaligned front axle is a sure sign that, not only has the car been involved in a heavy collision, but also that the damage repair was less than thorough. Do bear in mind that it is usually more difficult and time-consuming to repair bodged bodywork repairs than it is to deal with honest-to-goodness rot. Furthermore, there can be little more dispiriting than to discover that a car is heavily bodged only after you have started work on what you believed to be a straightforward restoration. Once you discover just one shoddy bodywork repair, you really have no option but to strip the entire body in order to find all similarly bodged panels.

It’s important to learn to distinguish between rusted steel and rust stain, which can be seen here. The rust that caused this stain is nothing to do with the heater channels but has washed from inside the door.

The heater channels and front and rear crossmembers form a strong framework for the bodyshell. The fact that they sit on a spine chassis does not diminish their contribution to the overall strength of the car.
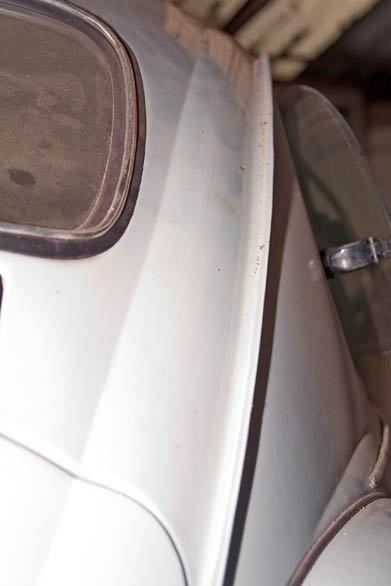
Check the rear roof pillar area for rivelling, which might indicate that the car has been rolled and badly repaired. The swage line and the seam are difficult to make look good, so pay especial attention to them.

Test the front screen pillar for body filler using a magnet. Anything other than the thinnest skim of filler indicates either collision damage or non-welded rot ‘repair.’ If the magnet is not in the least attracted to any area of the roof pillar, reject the car.
One last point in this preamble: Beetles with sound floor pans, front crossmembers, A and B posts, rear body mounting panels, bumper brackets and heater channels, etc., will never come cheaply, and, in the experience of the author (and this is confirmed by BSW worshop manager Terry Ball), Beetles that are offered at low prices always require welded repair or replacement of one or more of these components. Beetles sound in these vital areas, but which may have poor paintwork and tatty interiors, can often be found advertised at prices similar to those of cars with plenty of rot on the inside but gloss on the outside and plush interior trim. Given a choice between the two, take the former.
When you go to view a car, you will need to take the following: a notebook and pen to note down any faults you find (this list of faults may ultimately be long enough to put you off a car - or give you a useful bargaining tool); a magnet to test for body filler; a jack and a pair of axle stands; a torch to help you see into dark crevices, and a sharp implement, such as an old screwdriver, which you can prod into suspect metal to see whether it is sound or rotting. A pair of goggles, gloves and overalls will be needed if the inspection gets serious and you climb under the car. Before getting dirty, however, you might care to examine the external panels; what you discover there may rule out the car before you have to don overalls.
Begin your inspection by examining the visible external body panels for signs of rivelling - corrugations usually caused by heat build-up during gas welding, but also possibly a sign of badly finished body filler which is hiding collision damage. You can spot rivelling best by looking along the panel concerned just a few inches above its surface; this will also allow you to see dents more clearly. If the paintwork is covered with a thin layer of grime (giving it a matt finish), you won't be able to see any but the largest dents, so ask the vendor to give dirty panels a wipe with a damp cloth in order for you to be able to examine them.
Pay particular attention to the roof panel and pillars. Because quite a few Beetles have been rolled onto their roofs, courtesy of the back end breaking away on hard cornering, some cars will have dents that have been roughly beaten out and filled with body filler. Some bodgers don’t bother to beat out roof dents because this entails removing the head lining - and the worst won’t even clean and key the surface for the filler. If there's more than the thinnest skim of filler on the roof panel (or, indeed, any other panel), suspect that the work is of a very poor standard. If you find any evidence of filler in the roof pillars other than a very thin skim covering a welded repair to the windscreen aperture lip, the car has probably been rolled and should be avoided.
On de-seamed cars check for heavy use of filler around the areas where the seams used to be. If a thick layer of filler is found here, chances are that de-seaming the car entailed hammering the seams inwards and flushing over the body filler! Check de-seamed roof pillars with a magnet, because many will have been brazed rather than welded, and braze is not nearly strong enough. In fact, it would be advisable to steer clear of any de-seamed car unless the vendor can provide a photographic record of the de-seaming, clearly showing the standard of workmanship and the materials and methods used.

The proper way to de-seam is to cut/grind away a short length of seam and weld the two edges together before grinding the next length of seam. However, some people might braze the joint, and that’s simply not strong enough, so check the de-seamed area with a magnet to establish that there is weld underneath rather than brass.
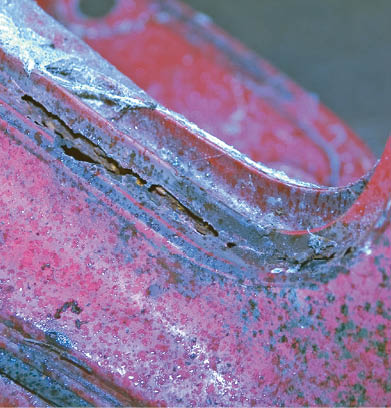
This rotten area is typical (not only on the Beetle, but on most old cars) and is usually caused by perished window rubbers.

Perished window seals allow water in which, inevitably, leads to rot.
Whilst checking the roof and pillars, check the metal near the window rubbers, because if the window has been replaced without sealant, water will have entered the rubber seal and caused rusting of the metal lip underneath. In time, this will spread under the paintwork surrounding the rubber. If this area is freshly painted, incidentally, it's probably hiding rusting of the metal lip - not too difficult a repair apart from refitting the screen afterwards, but nevertheless an indication that the car has been ‘tarted-up’ for sale. If the window seals are in poor condition, expect to find some rusting from within on panels underneath; if the door window rubber is perished, for instance, then rusting out of the door skin and door bottom is likely.
On the subject of doors, check for filler and GRP repairs right in the middle of the door skin, because there is a panel behind this which holds water against the skin. Carefully check door gaps and the hinges and their surrounds for evidence of force being used to make the door fit - tell-tale signs are spacers or even washers hammered in front of the hinge to force it backwards, buckling of the skin adjacent to the hinge (either crash damage or extreme force when fitting the door), and obviously damaged paintwork on the hinges.
Lift the front (luggage compartment) lid: if you are immediately greeted by the smell of petrol either the fuel tank or filler/expansion pipes are leaking, and the car should not be run until the problem has been identified and cured. Disconnect the battery immediately and inform the vendor of the problem and the dangers of using the car, smoking in the vicinity, etc.

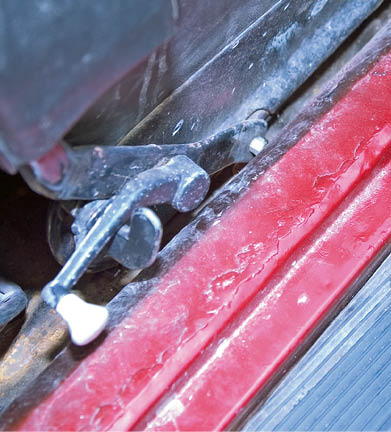
Door hinges rust. If you find a rust stain like this you can safely assume that the car has not been smartened up to deceive you, but has been standing for a long time.

Under the luggage bay lid check the state of the wiring, the spare wheel well floor for rot, the flitch panels, and washer bottle recess. See text for what to do if you smell fuel here.
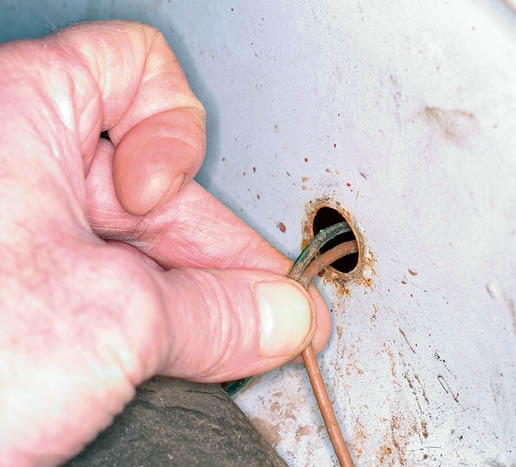
This front indicator feed wire and earth should run through a grommet that prevents them chafing against the edge of the hole in the flitch. If they’re not, it should set alarm bells ringing, because a breakdown of insulation caused by chafing can blow a fuse or - on a non-fused circuit, start an electrical fire.

The luggage bay side seal retaining strip is a common victim of rust and, unless the strip is cut away and a new one fitted, sooner or later rust returns.
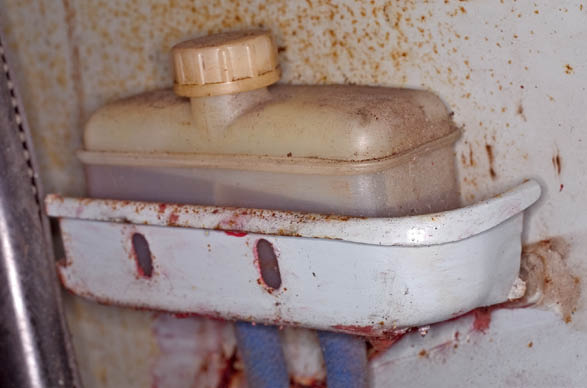
Brake fluid is a very effective paint stripper, so spillage around the reservoir gives rust an easy way to get established. The rust stains on the flitch panel above the reservoir are due to condensation. The rust visible in this photograph is only surface rust, so can be dealt with by sanding back to bare metal and repainting.

Remove the spare wheel and check out the bottom and sides of the spare wheel well, which rusts from the top and from underneath. If this area has been sprayed recently, check carefully to ascertain whether the paint is covering new steel or a non-ferrous bodge, and reject the car if it turns out to be the latter.
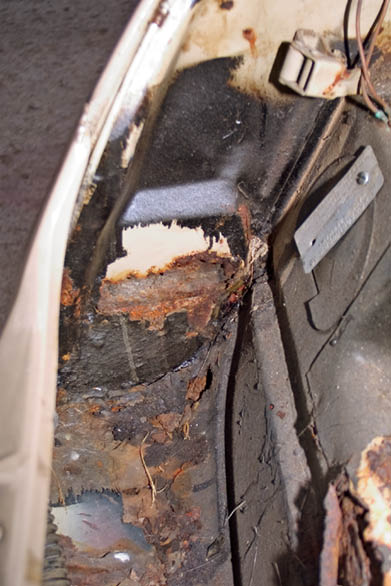
Typical rot inside the spare wheel well means that a difficult repair is needed, which will include the front valance, spare wheel well, washer bottle platform, and lower front flitch repair panels. What you see here is a mixture of rot and GRP.
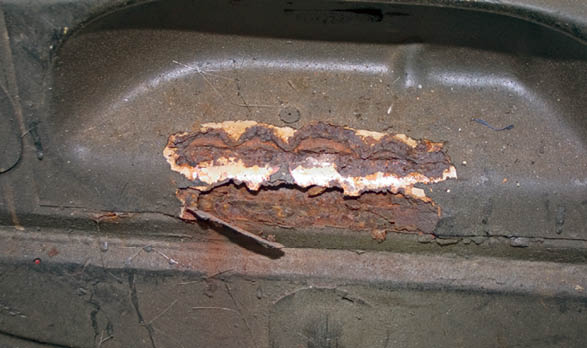
This windscreen washer bottle platform is thoroughly rotten. Repair panels are available.

The area surrounding the strut top on MacPherson strut Beetles should be carefully examined, because it needs to be immensely strong. When it rots it is often plated, and the proper panels are either expensive or not widely available.

Incredible. Various patches have been welded around the - presumably - rotten remains of the ‘A’ post. Not only does this weaken the bodyshell, but also means that rot will spread to the new steel very quickly. When you see evidence of butchery of this level on a car you MUST assume that other areas which have received this sort of attention will be equally poor.
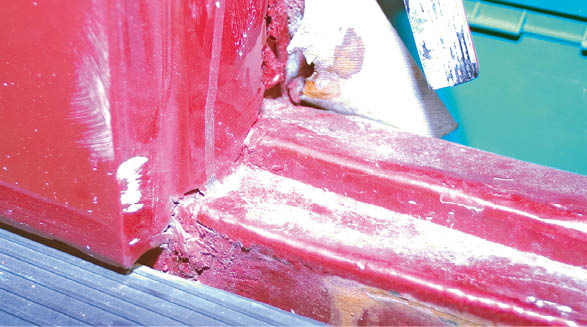
‘Repairs’ like this are, sadly, not uncommon. The heater channel has had a patch welded along the top section under the door aperture, the side of the heater channel appears to be largely body filler, and the ‘B’ post does not even reach the terrible repair sections - yet the car has been resprayed.

The surface rust in the doorstep could be a problem, and a prod with a screwdriver will reveal if it is rusted thin.
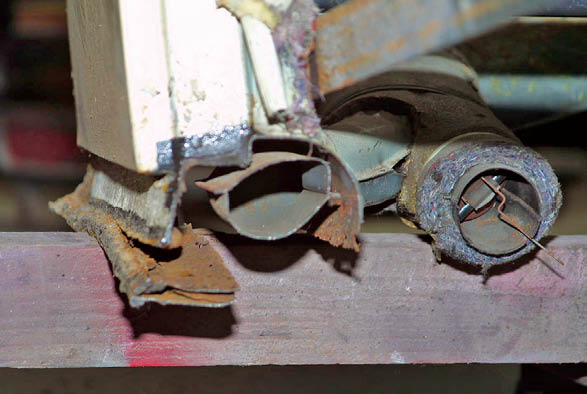
Although the front end of the heater channel air duct on this car was all but rotted away at the ‘A’ post, the duct under the ‘B’ post is remarkably sound. However, the heater channel has had at least one new base welded on, and probably two.
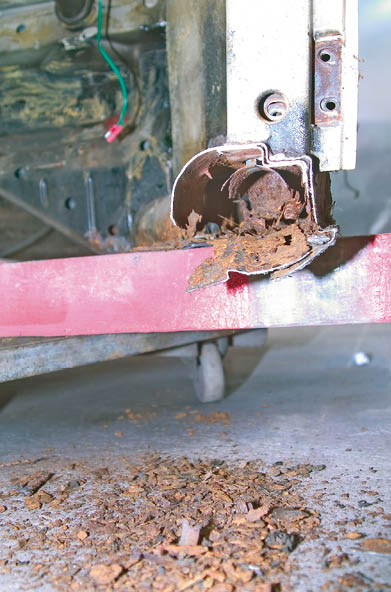
“The demisters don’t work” is a familiar cry of anguish from owners of elderly Beetles, and this picture shows why they often don’t. Note the huge pile of rust flakes on the floor and the cover panels welded onto the heater channel.
If you see anything resembling this don’t buy the car! Outer and inner ‘repair’ sections have been welded over rotten heater channels, and the repairer has not even bothered to try and hide the welded seam before giving this unfortunate Beetle a complete respray.

This car was not given a bare-metal respray, but does have good, renewed heater channels. It’s not unusual to find a car with a first-class paint job but rot in the structural steel, so never buy a ‘restored’ car without checking the heater channels, spine, and frame head.
Check that the lid seal is in position and in good condition, and examine the edge seams for rust; if you discover any, you may well also find that the luggage floor and/or the side channels are rusted. If rusting of the visible section of the luggage floor is bad, expect to have to either patch or replace this pressing (the latter is a difficult task, because only LHD versions appear to be available), and probably also the inner wing/flitch panels at the same time (a task for only advanced DIY-ers). The spare wheel well will normally also be rusted if the luggage floor is, and, if you find that the spare wheel well has recently been replaced on a car which has bad rusting of the adjacent pressings, you will probably also discover that all bodywork repairs throughout the car have involved welding good metal next to bad, so that a total rebuild is called for.
On cars fitted with MacPherson strut front suspension, the loadings from the concentric spring damper unit (i.e. the shocks transmitted from bumps in the road) are fed into the flitch panels. Any rusting or signs of patching/bodging in these panels – especially in the vicinity of the strut top mountings – is to be considered very serious. Don’t go by looks alone, because it is not unknown for these vital areas to be smartened with GRP and body filler – check for metal using a magnet and, if you have any cause for doubt regarding the strength of the area or if you find any evidence of body filler it is best to reject the car or to consider it as a restoration project only. Flitch panel replacement for MacPherson strut cars is possible but the panels are very expensive and the repair is one of the most difficult (and expensive) jobs in Beetle restoration, and in reality the province of the professional and specialist restorer.
Open the doors, and examine them for signs of rusting; in addition to the centre of the panel as already described, also check the lower quarter of the skin and the door base. Attempting to lift the doors will reveal whether there is too much play in the hinges. The A and B posts rot at their bases, so check for signs of rusting and for camouflaged rot and shoddy welded patch repairs. If the sill/heater channel assembly appears to be in better condition than the bottoms of the A and B posts, this indicates that the heater channel was welded onto rusted steel, and means that both will probably have to be renewed together - a time-consuming task. The side of the car between the B post and rear wheelarch tends to rot at its base, so, again, if the heater channel appears to be in better condition than this panel, the car has been bodged.
Inside the car, the most obvious area to find rust is the sill/heater channel assembly and the floor pans. It's common (though not good) practice to patch repair the heater channels, especially on cars which have rot in adjacent bodywork, such as the door posts and car side. If the heater channel is patch repaired, expect to find rot in the whole assembly; if the heater channel alone has been replaced, count on having to rebuild the lot at a future date. If the heater channel has been repaired or replaced, look for signs of burnt rubber, which will be the remains of the belly pan gasket! If the car is carpeted, this will have to be lifted out; if you discover that the carpet is glued to the heater channels, either ask permission to remove it so that the channel can be examined thoroughly, or assume that new heater channels will be required. The same goes for the floor pan and, if the carpet is glued down, at the very least you should be able to lift the outer edges (which is where rot is most likely to be).
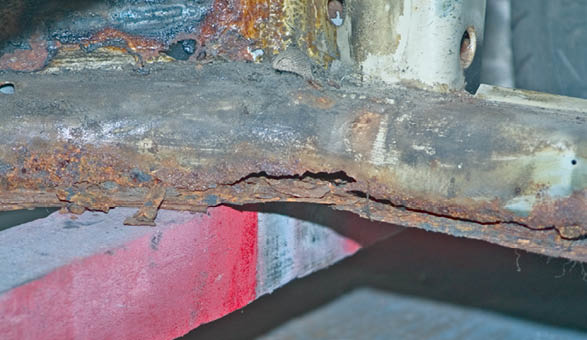
If the carpets have been glued over the heater channels, this is what they might be hiding, so don’t buy unless you can lift the carpet, or are prepared to renew the heater channels.

The bulk of the parcel shelf - seen here from underneath - rusts but rarely rots, though the outer edges are suspect and should be prodded to check for weakness, GRP ‘repair,’ and the like. Fortunately, the panel can be checked from inside the car.
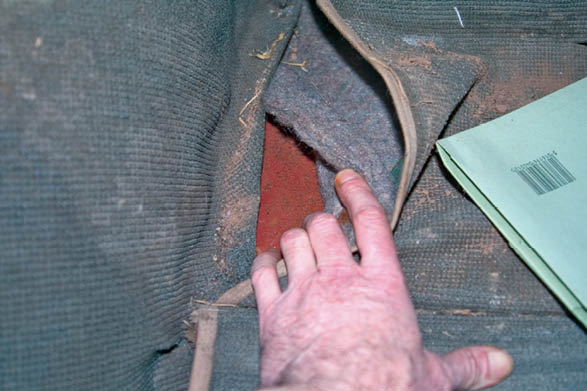
The boot floor panel is situated behind the rear seat. Lift the carpet and check the outer edges; if you find rot there, the inner rear wing will probably also have it.
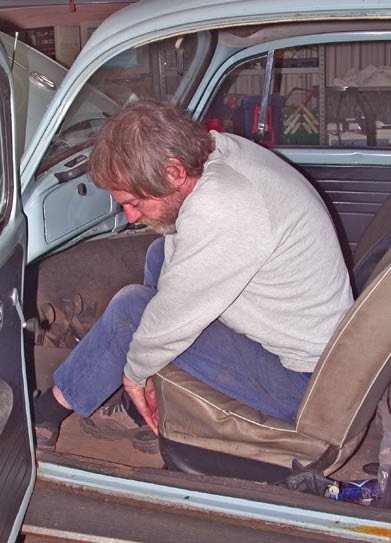
Check the floor pan strength by sitting in each of the front seats, grabbing the lower front edge of the seat with both hands, and pushing on the floor with your feet.
The one area where rot is considered terminal on a Beetle is the spine, so you must be able to lift the inner edge of the carpet to inspect it. The spine rots in a line just above the floor pan inner edge. If you find rot here then the car needs a new rolling chassis.
Lift the carpet and/or sound-deadening material from the rear parcel shelf and check the state of the metal. Rust here indicates a long-term problem with a leaking rear window rubber, and is usually dealt with by patching - far from ideal. The only really satisfactory way to deal with a rotted parcel shelf is complete replacement, along with the adjoining panels which will usually also have rotted - in other words, a bodyshell-off restoration.
If the floor is suspected of being weak, but a close inspection is not possible because of carpet glued to the topside and underseal underneath, sit in each front seat in turn, hold the sides of the seat firmly and push downwards with your feet. A rotten floor pan will flex considerably under such provocation, and you might even hear cracking sounds as rust flakes break loose. A rotten floor pan, or even a partly rotten one, means a bodyshell-off restoration. As an example of the lengths some people will go to in order to dress up a rotten Beetle, Terry Ball tells me he has found floorpans on an outwardly respectable Beetle that consisted largely of GRP - beautifully finished to match the contours of the original, but GRP nonetheless, and a sign that the car needed extensive bodywork repair.
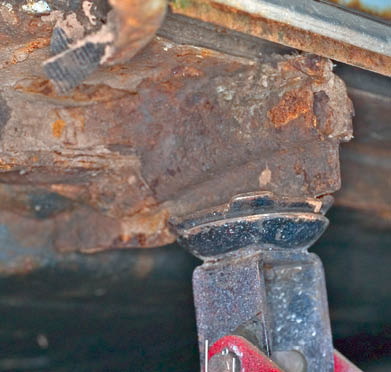
There’s a drain hole immediately above the jacking point and, when it rusts, many people weld a plate over it. Plugging a drain hole, of course, accelerates rusting, which is why so many jacking points crumble when you attempt to use them. Major surgery is then called for, meaning a body-off restoration.
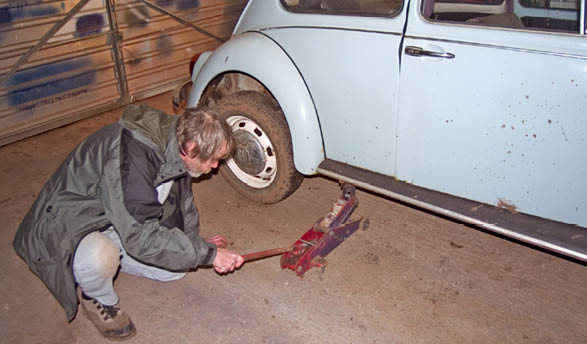
Raise the car using the jacking point - gently, because it’s common for the metal above the jacking points to be so weak that the jacking point crumples upward. Some mechanics won’t use the proper jacking point on the Beetle because so many on old Beetles simply crumple! Always chock the wheels that remain on the ground.
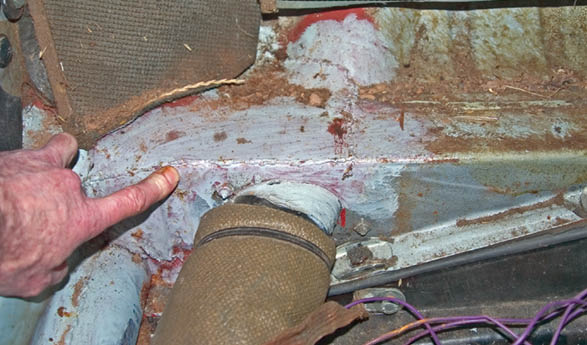
The heel board/rear crossmember outer edge has been repaired using steel plates - not ideal.

This battery platform appeared okay at first sight from inside the cab, but a good wire brushing revealed perforations, most easily visible from underneath. The only way to find this on a car you’re thinking of buying is to poke at the steel with a sharp instrument - if the vendor objects then reject the car. This will have to be renewed: a battery must be securely held.
Still on the subject of the sill/heater channel, one thing you can check without getting your hands dirty is the condition of the jacking point. When rotten, these collapse up into the heater channel. A common ‘repair’ is to weld a sturdy steel plate onto the heater channel base above the jacking point; this panel will effectively have sealed off the drain hole and the heater channel can be expected to rust through in record time afterwards! Later in the examination of the car you will have to jack it up in order to see underneath; if you hear crunching sounds as the jack begins to take the weight of the car, find alternative jacking points rather than risk being blamed for pushing up the jacking point and crushing the heater channel, which is likely to happen. In fact, if the jacking point does start to creak as you attempt to raise the car, reckon on having to renew heater channels, and probably much more besides.
Before leaving the subject of the heater channel assembly and floor pans, it's been known for these to be welded together, whereas they should really be bolted. If you discover that the heater channels are welded to the florpans, this indicates that the car has been most horribly bodged and is worth very little because of the amount of work required to put it right.
When heater channels are replaced, the correct method involves lifting off the bodyshell, complete with remnants of old channels, bolting new channels onto the floors, then cutting the old channels from the bodyshell and lowering the shell back onto the chassis for welding to the heater channels. If this sequence is not followed, the holes in the floor pan and heater channel assembly don’t line up, with the result that either the heater channels are welded to the floor pan as already described, or new holes are drilled in the floor edge to accept the heater channel fixing bolts. Some cars have extremely enlarged or multiple holes along the floor pan edge because of this. Not a problem in itself, but a sure sign of shoddy restoration which will, no doubt, be repeated throughout the rest of the car.
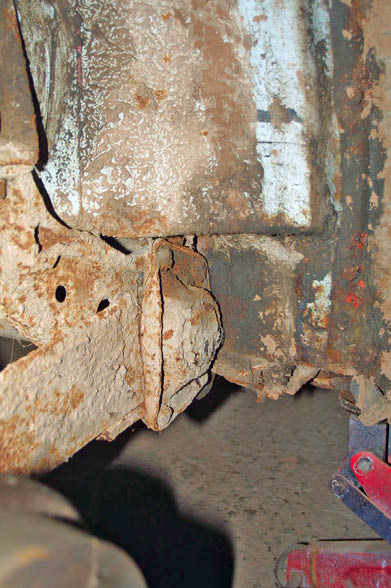
The rear crossmember (heel board) edges are a common spot to find bodged repairs. If this area is weak, expect to find rot in vital adjacent panels.

Splits in the engine bay rubber seal can allow exhaust fumes to enter the engine bay, and hence the air intake. Best renew it.
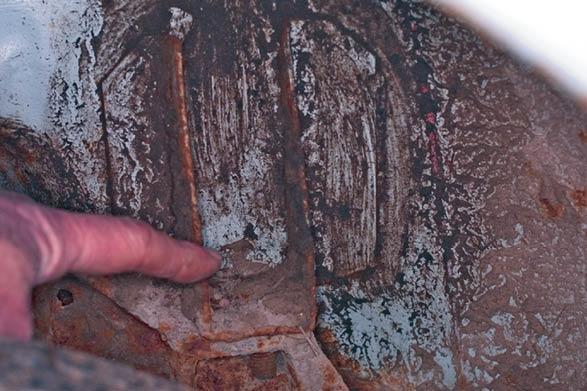
This is the major rear bodyshell mounting. The panel, as a whole, is a notorious rot-spot, so probe with a screwdriver. This is all you can see with the wheel in place.

This rust stain looks dreadful but is really nothing serious. The rear lamp unit and mount can easily be removed, and the steel underneath cleaned bright and repainted.
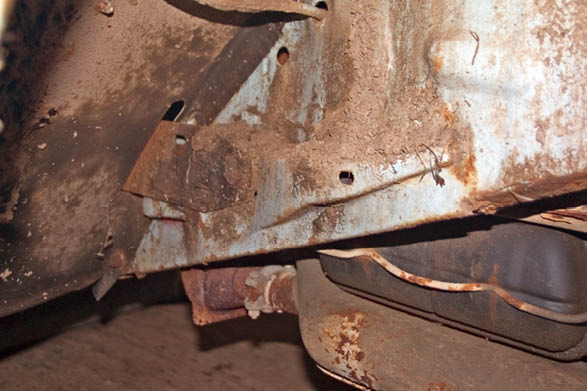
This is the whole of the rear bumper mounting panel. Replacing it is not an especially difficult job but, if this panel has rotted, except the adjacent panelwork to be rotten, also. You can’t weld to rot!
Still inside the car, examine the rear crossmember at its outer edges where the heater ducting is connected to the heater channel; this is one of the most frequently encountered Beetle-bodge areas, and rust here is commonly dealt with by GRP, or even body filler and wire mesh! Welded repairs to this area would certainly destroy the belly pan gasket, so, for a proper repair, the body has to come off the car.
Lift the engine lid and examine the seal, then the folded lips for signs of rusting; also examine the air intake grille. The rear panel (valance) is prone to rot, so check for the use of filler and GRP. Check the fit of the engine bay to valance gasket - gaps indicate that a new rear valance has at some time been welded on in the wrong position.
Before jacking the car, clean all of the dirt from the rear body to damper casting mounting points within the rear wheelarches. This is a prime rot spot, so give it a good stabbing with a blunt instrument. If rot is found here, expect to also find it in the rear bumper mounts, the heater channel closing panels, and most probably the heater channel/sill assemblies. Be extra careful when feeling for rot around the bumper mounting points, because sharp edges can make a mess of your hand.
Crumpled bumpers obviously indicate collision damage: perhaps less obviously, you should look for distortion of the flitch panels and engine bay/rear inner wing areas, which can also reveal collision damage. If you find evidence of collision damage, check the fit of the doors carefully, because heavy damage will have dictated that, if the door gaps are to look right, the hinges and idoor surround would have come in for some heavy duty bodging.
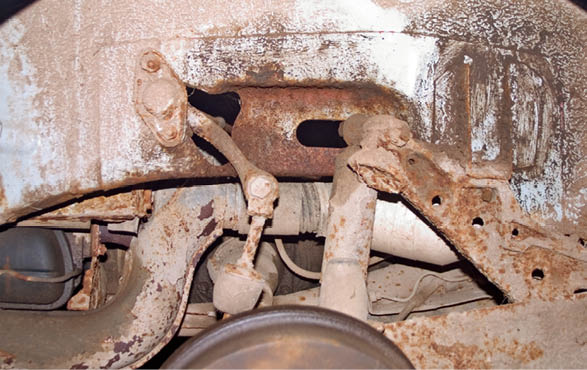
This is the whole of the reinforcing panel, which includes the rear body mounting point. If you find rot anywhere on this panel, but the rear body mounting bracket appears okay, it has been bodged to make it look good.

When placing axle stands, watch out for anything that could be damaged when the car is lowered onto the stands, such as this grease nipple.
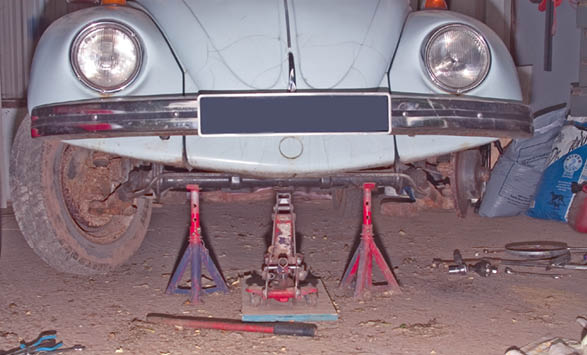
Raising and supporting the front end of the car. The jack is a lifting device, and should not be used to support the car while you’re working on it - use axle stands. I favour placing the stands under the beam axle, which is very stable, yet gives plenty of working space around the wheels/brakes.
UNDERNEATH
Apply the handbrake, chock the rear wheels and raise the front end of the car with a jack placed under the track control arm pressing, then support the car on axle stands. Examine the frame head. Rot here is very expensive and time-consuming to deal with and, in most cases, will entail a full strip down to a bare chassis before it can be properly dealt with. Any sign of collision damage on the frame head or axle (torsion bar cars), or the flitch panels of MacPherson strut cars, should be taken very seriously because suspension mounting points could have been disturbed. In cases such as these, it will pay to commission a motor engineer’s report if you are still interested in the car.
Turn the wheels from lock-to-lock so that you can examine the flitch panels (inner wings); rotted flitch panels are not only a very difficult repair, but also indicate a strong likelihood of serious (and perhaps camouflaged) rot in adjacent panels.
Using a torch for illumination and a blunt instrument to stab with, check as best you can the underside of the luggage compartment/spare wheel well. Also check the insides of the front wings; if you find an area which appears to be thicker than the rest, this is filler.
Whilst the front of the car is raised, check the wheel bearings, brakes and steering (see mechanical examination).
Slacken the rear wheel nuts, transfer the chocks to the front wheels, raise the rear of the car and remove the road wheels. Examine the inner wheelarch area closely, probing for rot and checking for body filler or GRP, and look for creases in the panels which indicate poorly corrected rear collision damage. The rear body mounting brackets and bumper iron panels are common rot spots, so probe around them for rot. Similarly, check the outer rear crossmember and the underside of the decking (internal rear parcel shelf). Check the inside of the valance. Check the small horizontal panels each side of the engine bay.
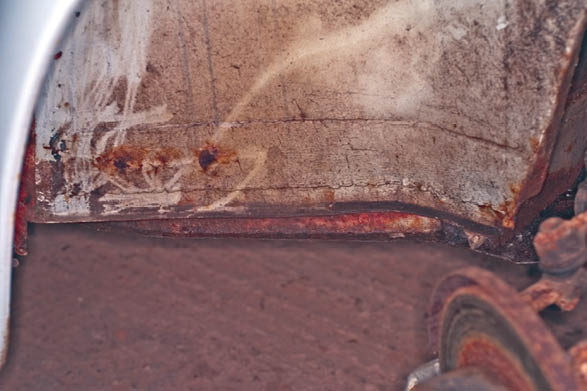
The lower edge of the flitch panel rots and will, at some stage, have been replaced or repaired - most are repaired. Your job is to determine how well the repair was done. If the rot was simply covered up by repair panels, putting matters right will be a very difficult business. If the rot was cut out and new steel welded in, as here, it’s a fairly straightforward job to repair it.
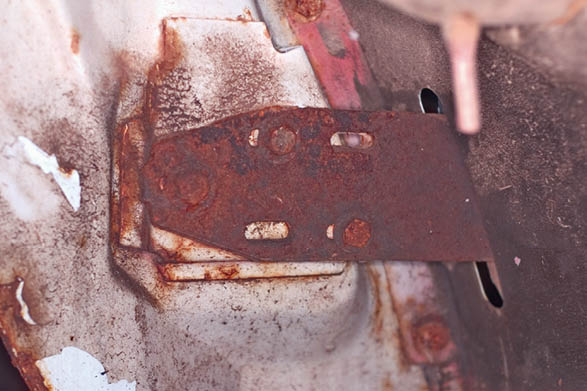
The front bumper mounting. The steel to which the mounting bracket is welded is rot-prone, being the side of the spare wheel well, so have a prod with a screwdriver to check the steel is sound. The base of the panel is usually the first area to rot. Also check for signs of collision damage, which will buckle the area.

The heater channel and floor pan edge are prime rot-spots. Be suspicious if either are covered in fresh underseal; give them a good prod to make sure they’re sound.
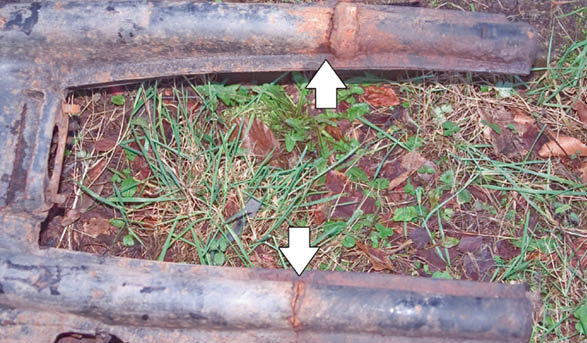
Strong though they are, the engine mounting legs can break. This chassis is best considered scrap.
MECHANICAL EXAMINATION/TEST DRIVE
Whether you undertake the mechanical examination or the test drive first is your choice. In favour of test driving first is the fact that some mechanical faults might come to light which allow you to rule out the car without getting your hands dirty! More seriously, a mechanical examination might reveal faults that would make a test drive risky, even dangerous. For this reason, the author recommends that you check the car before taking it on the road.
MECHANICAL/ELECTRICAL
Inside the car
Begin your inspection inside the car where you can remain clean and (hopefully) dry. Check all of the electrical equipment; lights, wipers, and horn. Grasp the steering wheel and try to lift and lower it; movement indicates poor mounting. Turn the steering wheel and try to ascertain how much the perimeter moves before the front wheels react. If the steering wheel turns by more than an inch or so, it could be due to slack wheel bearings, worn kingpins, a worn or maladjusted steering box/rack, or a loose mounting. If a car has a lot of null steering wheel movement, the front wheels can react freely to bumps in the road and you will have no way of knowing which way the car will jump when a front wheel hits a bump or pothole.
Check that the windscreen is free of cracks and scratches (a possible cause of roadworthiness test failure, depending on country and current standards), and that all of the rubbers are in good condition (not perished and free from cracks).
Press the brake pedal and hold it down. If the pedal is spongy rather than firm, there is air in the system, which will have to be bled and the source of the air found and rectified. If the pedal sinks slowly to the toeboard the master cylinder is faulty.
Remove the rear seat base and check the condition of the wiring and the battery. Wire insulation must be intact and free from signs of scorching (indicating a short to earth fault which, if not cured, can result in the loom catching fire), and the battery should be clean, free from spillage and securely fastened. Check the electrolyte level in each cell, and use a torch to see whether the plates are buckled, in which case the battery is on the way out. Check the condition of the wiring in the vicinity of the voltage regulator (under the rear seat base, left hand side of the car), not only for damaged insulation, but also for melting of the insulators of sleeves, which happens when new heater channels, or a lower quarter repair panel, are welded in wrongly or carelessly. If you find welding damage to the wiring, reject the car.
Check all seat belt mounting points by tugging on the belts, and also check the condition of the seat belt fabric and mechanism because frayed or damaged belts are an MoT failure point.
Establish that window winders, screen washers, and all instruments work. Are the sun visors firmly held in the upright position (you don’t want them dropping down unexpectedly), and do winding windows open and close without too much winding effort - renewing winder mechanisms isn’t easy? Check that the doors close properly and stay shut.
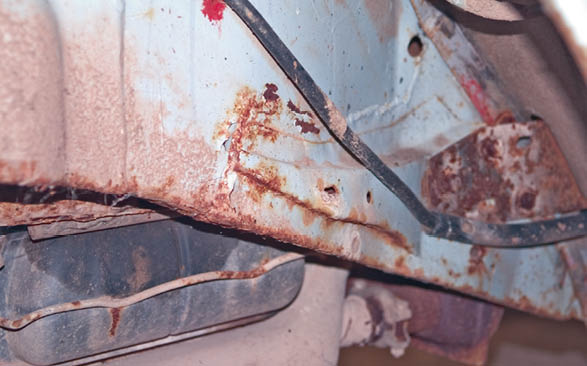
This rusting of the bumper mount pressing area looks bad but, in reality, it’s only surface rust which can be cleaned off and the area painted.
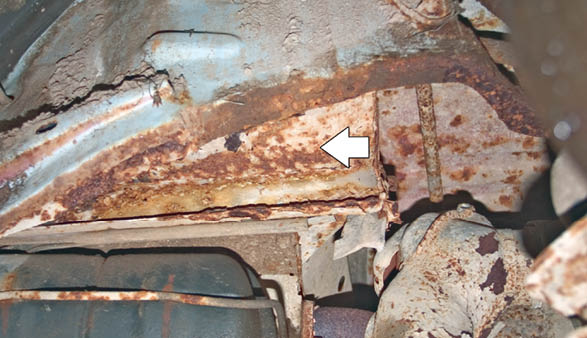
This is the underside of one of the panels that runs along each edge of the engine bay, but which cannot be seen from inside the bay because it’s covered by sound-deadening material. Checking the condition means getting down under the car. Rust is normal - check for rot by proding the panels with a screwdriver.

This is the battery platform on the author’s car after it had been standing for a couple of years. It looks dreadful, but all that rust is only on the surface, so all that’s needed is a clean up and a lick of paint.
Outside the car
‘Bounce’ each corner of the car; push it sharply downwards and let go so that the suspension pushes upwards. If the corner rises, falls and rises again then the damper is faulty. This is a very unscientific test, and damper problems are more readily detectable on the road (vague handling and a tendency to rock backward and forward on acceleration or braking). If, however, bouncing the car indicates ineffectual dampers, don’t drive the car on the road, because worn dampers reduce tyre grip to an unbelievable degree.
Then move to the engine bay. Firstly, if there's a strong smell of petrol, and the fuel delivery system is leaking, immediately disconnect the battery and don’t run the engine until the cause has been found and dealt with. Grasp the crankshaft pulley firmly and try to move it backwards and forwards; if the movement (crankshaft end float) is much greater than 0.005in (0.13mm) the engine requires attention. An alternative way to test the end float is to get a helper to depress the clutch pedal whilst you watch for movement of the pulley. Try to lift the crankshaft pulley to test for worn mains; if the pulley can be pulled up and down, the crankcase will probably have to be align bored and the crankshaft probably reground - an expensive repair.
If you have a compression tester, use it! Remove all four sparkplugs (marking the leads if you are unsure of which goes where), and pull the king HT lead from the coil turret. Have an assistant turn the engine over on the starter motor whilst you check in turn the compression for each cylinder. This normally runs in the range of 100-142 pounds per square inch. If one or more cylinders are lower than the rest, apply a little engine oil through the plug hole (to seal the piston rings) and recheck. If the pressure is now okay, the problem lies with leakage between the piston rings and cylinder bores. If the low pressure persists this means that the leakage is past a valve stem, and a cylinder head overhaul will be needed.
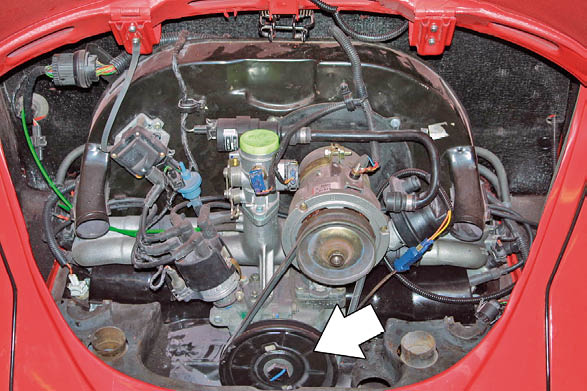
If the crankshaft pulley can be moved up and down an engine build might be on the cards, because this indicates worn main bearings. Forward and backward movement of more than 0.13mm (0.005in) also indicates a worn engine.

Take a look inside the distributor cap. That condensation is not a good sign because it can lead to misfiring by redirecting the HT charge. Also, it’s clear that this is a fairly old cap, which suggests that maintenance intervals have not been observed.
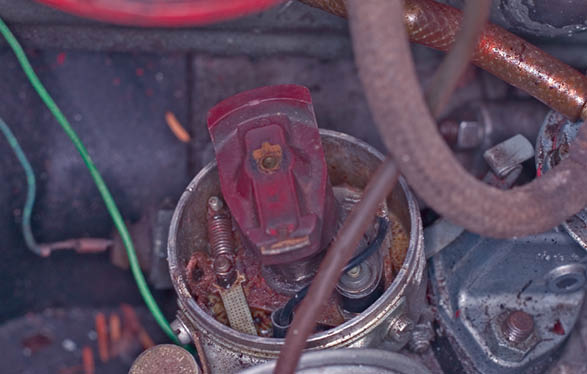
More maintenance issues. The rotor arm is almost a museum piece, yet the condenser seen bottom left is almost new. This indicates that the condenser has been replaced to cure a misfire, and that other aged ignition components will probably also soon be causing problems.
Check the engine oil level and the condition of the oil; if you don’t know what signs to look for, take along someone who does! Check the condition of the sparkplugs, leads, distributor cap (look for minute splits), and the points (check that the surfaces are level and not pitted). The general condition of the engine bay can tell you a lot about a car. If it's dirty and covered with oil, maintenance has obviously been a low priority. The Beetle engine is good for well over 100,000 miles if cared for, but a neglected engine will have a much shorter life.
Check the condition of the wiring, looking for burns and abrasions. If your bodywork inspection reveals that the rear chassis mounts have been replaced, lift the sound deadening material from the engine bay side and check that the wiring insulation is not burned. Check that the wiring is original and that it has not been added to, or otherwise tampered with.
Check that the tinware is all properly fastened in place. This might not seem terribly important, but the author has seen a shattered dynamo pedestal which was broken by violent vibration caused by unfastened tinware.
Whilst the rear of the car is raised for the bodywork/chassis inspection, check the rear brakes, suspension, and wheel bearings. There are small inspection holes in the brake back plate through which, with the help of a torch, you can see the thickness of the brake lining. If there appears to be less than 1in of frictional material on the brake shoes, they will have to be renewed. Using a screwdriver (preferably with an angled blade), or the proper tool, check that the brake adjusters are not seized and that the brakes are correctly adjusted (see Chapter Four). Maladjustment indicates shoddy maintenance; sticking adjusters indicates a total absence of maintenance!
Check the brake back plates for signs of brake fluid, or, perhaps more commonly, oil contamination. The former means getting and fitting wheel cylinder seal kits; the latter entails getting and fitting a hub oil seal kit.

This fuel line should be securely held by a clamp. If the line comes off, there’s the potential for an engine bay fire.
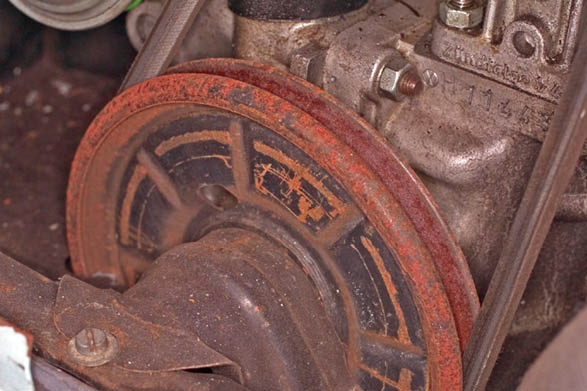
Rusting on the crankshaft pulley is common, but the rust in the channel where the belt runs tells you that the car has been off the road for a long time.
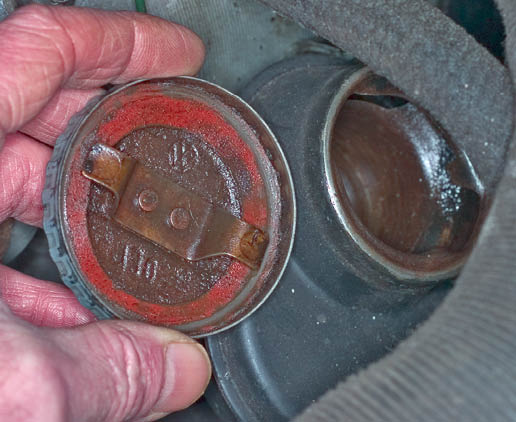
Remove the oil filler cap and look at the underside of the cap and down the filler tube. If you see a creamy emulsion this is oil mixed with the water, caused by too many short trips, which result in high engine wear.
Check the rear tyres for uneven wear. Excessive wear in the centre, or at the outside edges of the tread, indicates over or under inflation respectively. If the tyres are worn on one side only, ask whether they have previously been fitted at the front of the car (indicating ill-adjusted front tracking). If not, suspect that the spring plate has, at some time, been unbolted from the hub and replaced in a different position, which will cause toe in or out. In addition to increasing tyre wear, wrongly tracked rear tyres will suffer reduced grip; this is a problem that needs resolving before the car is used on the road.
Check the condition of the handbrake cables and, if they're frayed, or if they stick, make a note to that effect. Check the brake pipes for corrosion, kinks or damage, and the flexible hoses for signs of damage or perishing. Check the condition of the drive shaft gaiters/boots. Splits are an MoT failure point; leaking gaiters on swing axle cars must be rectified before transaxle oil is lost.
Check the transaxle and the underside of the engine for obvious oil leaks, which must be traced and rectified. If the entire underside of these units is covered with oil, and you are seriously interested in buying the car, wipe off as much of the oil as you can and recheck to establish the cause of the leakage following the test drive. An oil leak from the clutch housing could emanate from either the gearbox input shaft seal, or the rear engine oil seal - the latter is more common but both require removal of the engine, and the latter location means removing the clutch as well.
Check the condition and correct adjustment of the clutch cable, and check that the clutch return spring is not broken.
Check all visible wiring - most especially the starter and solenoid feed wires - for insulation damage. Check the bump stops and all visible bushes for perishing. Check the heater ducting for damage and the exhaust/heat exchangers for leakage and general condition. Exhausts are not too expensive but are an MoT failure point; good quality heat exchangers cost rather a lot.
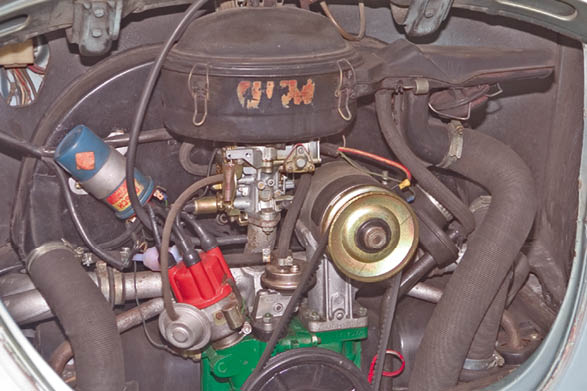
If the crankcase has been painted green, this usually signifies that the engine has been built for use with unleaded fuel (hardened exhaust valve seats in the cylinder heads).

This loom damage must have occurred when the welded ‘repair’ to the heater channel (visible in the background) was carried out. It’s a wonder none of the wires in the loom shorted and started an electrical fire.
Most importantly, use a torch to illuminate the visible section of the fuel line; if you have the slightest suspicion that it may be corroded, you must budget for immediate replacement. This is neither a cheap or pleasant task and, in fact, verges on the impossible.
Whilst the front of the car is raised for bodywork/chassis inspection, take the opportunity to check the front brakes, wheel bearings, suspension, and steering gear. Check drum brake back plates for fluid leakage, use a torch to check the shoe material thickness through the hole provided. On cars with disc brakes, check the thickness of the pad frictional material, and also the condition of the disc - a disc which is thin, or has grooves or pitting on its surface, must be renewed, Check the condition of the lines and flexible hoses (check that the hoses don’t foul the tyres when the steering is at full lock), and check for fluid leakage at unions. Again using a torch, examine the visible portion of the fuel line (see previous comments). Check the dampers for leakage and visually inspect all rubber components for perishing.
Check the tyres for uneven wear. Wear concentrated on both sides of the tread pattern, or in the middle of the tread pattern can indicate simple under or over inflation respectively; wear on one side of the pattern could indicate either that the tracking is wrongly set (an easy adjustment which should be carried out professionally), or that more serious problems lie elsewhere in the suspension. On cars with torsion arm front suspension, check that the beam is not damaged, because it is possible for the suspension to be thrown out by frontal collisions. Check the two vertical pressings on the beam for rot; the beam axle is not cheap or easy to fit, and any rot automatically means renewal. Check that both notches in the large, hexagonal eccentric bushes located in the top of the stub axle assemblies are facing forward. These set the front wheel camber, and, if inserted wrongly, handling will be adversely affected and tyre wear will be high.
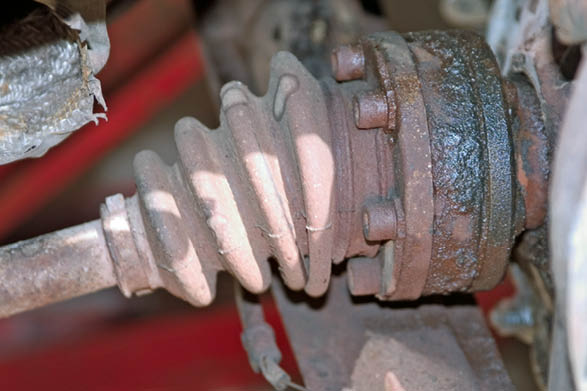
Check there’s no oil on the driveshaft gaiter.
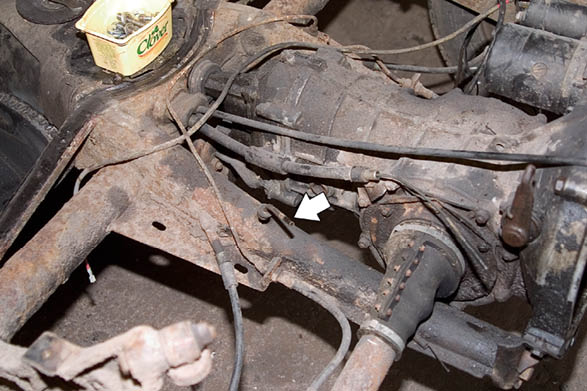
Check the short length of fuel line for damage and corrosion. Replacing the fuel line is probably the most difficult Beetle repair going; a bodyshell-off job, as well.
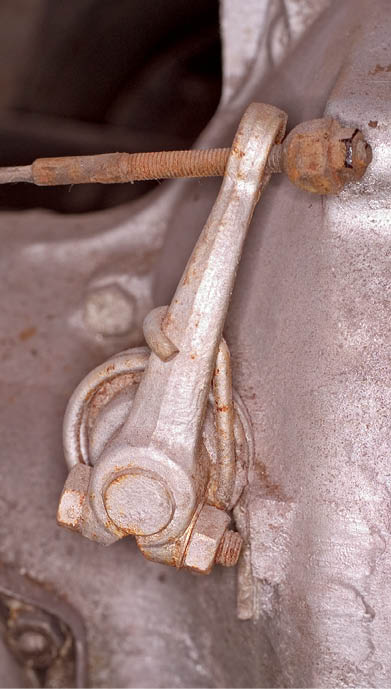
The clutch cable on most Beetles has a wing nut. Check the condition of the operating cable, and that the return spring is not broken.
Place a lever under each tyre and try to lift it - taking care not to unbalance the car from the axle stands supporting it! Vertical free movement indicates kingpin problems. Grasp each tyre at the nine o’clock and three o’clock positions, and try to rock it; movement indicates worn wheel bearings. To double-check that the fault lies with the wheel bearings and not the suspension, have a helper apply the foot brake and repeat the test; if the movement disappears with the brake on, the wheel bearing is definitely at fault. Turn the wheels lock-to-lock, feeling for roughness in the steering box (expensive), and/or stiff/loose points probably caused by the steering damper (easy repair).
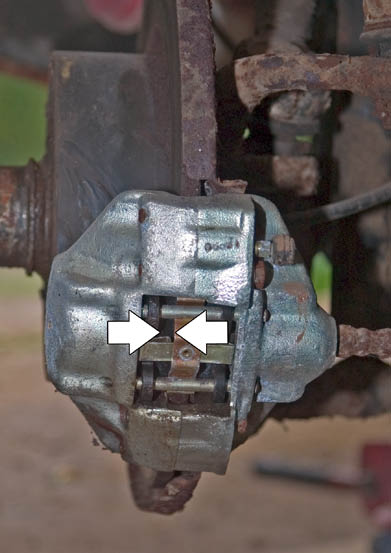
You can see the thickness of brake pads.
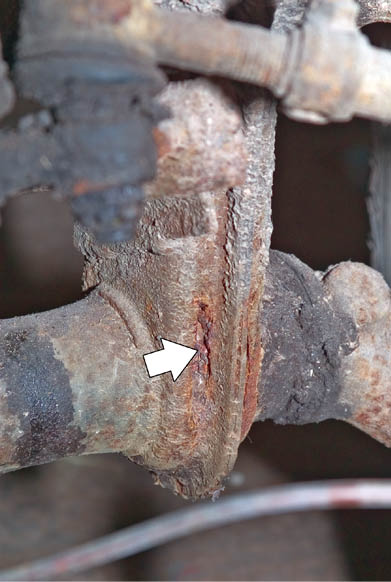
Check the beam axle assembly for rot like this; a new beam axle will be required.
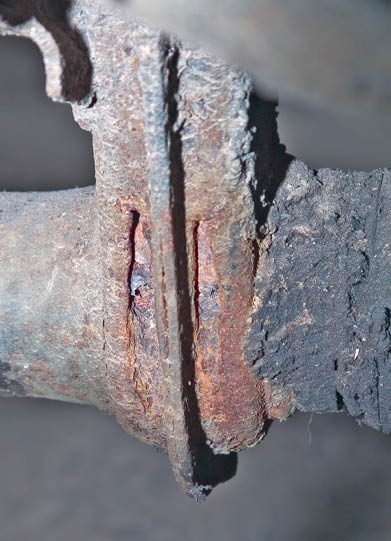
A little probing with a sharp implement shows the extent of the rot. Replacing beam axles is hard work.
TEST DRIVE
If the car has passed all of the tests so far, a road test will enable you to discover many of the possible drive/suspension faults without getting your hands dirty.
Please note that the author and publisher cannot accept responsibility for the consequences of any of the following advice. It's up to the individual to ensure that the car is driven in a safe manner with full regard to the safety of yourself and other road users, and that the car is legally fit to drive. The car must be roadworthy and taxed, and you must be properly insured. If, at any point during the test, you have doubts about the efficiency of the brakes or suspension, it is best to discontinue the road test.
Start off at a moderate speed, and don't try anything fancy until satisfied that the road holding, handling and brakes are up to it. If you're unfamiliar with the on-road behaviour of the Beetle, it's recommended you arrange for an experienced Beetle driver to undertake part or all of the test drive. The experienced Beetle driver will be able to detect problems with the engine, unusual noises from the drive train, and deficiencies in the handling and braking which may not be apparent to the uninitiated.
If the car shows signs of ‘floating’ at speed, the dampers are worn; if the front of the car nose-dives as the brakes are applied, and/or if the bonnet pitches up and down as the car moves away from a standstill, expect to find worn or leaking dampers. A car with worn dampers is unsafe to drive at speed, so continue the test - if at all - slowly.
On an empty stretch of road, brake to a standstill from about 30mph, and note whether the car pulls to one side (sticking, worn or contaminated brakes). If the brakes have to be ‘pumped’ before they will operate properly, there is air in the system. A clonk on braking could indicate suspension problems or a loose brake caliper (disc brake models only). If a clonk can only be heard when the car is first braked when travelling either forwards or in reverse, the caliper pistons could be sticking. Repeat this test using the handbrake.

With each front wheel in turn raised from the ground, grab the tyre each side and turn the wheel lock-to-lock. If the steering feels rough, count on having to fit a new steering box or, if there’s play, adjust the steering box (an easy job). If the car is fitted with a steering damper you should feel consistent resistance throughout the travel - if not, the damper needs renewal (fuel tank out).
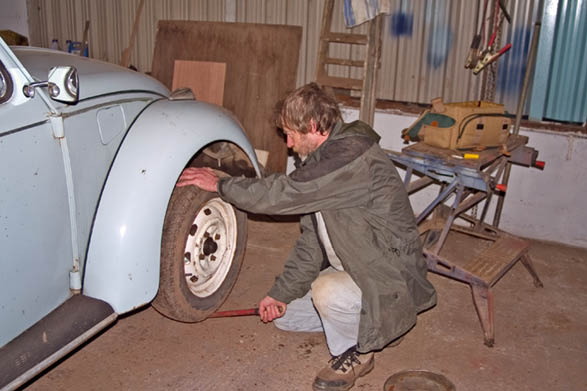
With each front wheel in turn raised from the ground, use a lever as shown to raise and lower the suspension arms. If there is play, repeat the test while a helper applies the foot brake; if the play disappears, a new wheel bearing is needed.
In all gears, accelerate and decelerate sharply to see whether the car can be encouraged (under provocation) to jump out of gear! Reverse the car a short distance and again brake to a halt, listening for clonks which could indicate suspension problems or a loose brake caliper.
Increase to normal road speed and repeat the braking and gear change tests, when any deficiencies in the engine, transmission or suspension not previously noted will be accentuated.
Stop somewhere off the public highway. Engage the handbrake, then slowly let the clutch out, depressing it again immediately the engine begins to labour. If the car begins to creep forwards, the handbrake is out of adjustment, or the rear brakes are worn or contaminated. If the engine does not labour appreciably, the clutch is slipping and in need of attention.
Back on the road slow down to 25-30mph in fourth gear and press the accelerator pedal fully down. If the engine misses or is hesitant, this could indicate a weak mixture, as could pinking (otherwise known as pre-ignition). Pinking has a host of other possible causes, including wrongly set ignition timing, an overheated engine, air induction, or pre-ignition caused by very hot carbon or tiny metal burrs on the cylinder head, which ignite the mixture ahead of the appropriate time. The pinking sound is made by the pistons tipping in the bores. In time, pinking wrecks an engine. If the engine' knocks,' it is almost certainly due for new big-end bearings and a crankshaft regrind; a ‘bottom end’ rebuild or engine exchange, in effect.
When exiting a corner check that the steering wheel returns to the straight ahead position; if not, suspect partial seizure in the kingpins.
THE FINAL ANALYSIS
While you carry out the bodywork and mechanical checks, note down whatever work you think might need doing, and list all the spares that will be needed. Rather than try to haggle a price there and then, it's better to go home and price the spares and labour needed to bring the car to the desired condition; then (if you’re still interested) contact the vendor with an offer which reflects the car’s worth to you.
Equally important as the financial aspect is your gut reaction. While you examine and drive the car you will slowly but unconsciously form an overall opinion - a ‘gut’ feeling - about the car. Your gut feeling should override any other consideration: if you’re not happy with the car or the vendo, the best advice is not to proceed with the purchase. Another car will always come along.
A CAVEAT
Don’t accept a receipt for your cheque or cash (pay by cheque if possible) from the vendor of the car which includes the words ‘sold as seen.’ This is a rather tacky and not entirely effective get-out which some people employ when they want to shift a car they know to have some serious (but undisclosed) fault, intended to put you off pursuing your complaint when said fault comes to light. In the UK, it is an offence during a transaction for anyone to misrepresent an unroadworthy vehicle as fit for the road, so keep hold of any published advertisement as proof of misrepresentation should a car described as being in ‘good’ condition turn out to be unsafe.
WHEN YOU HAVE BOUGHT YOUR BEETLE ...
There's a great temptation to load friends and family into a newly-acquired Beetle and set out on a long ‘test’ drive, but this is not the smartest way to begin your relationship with the car. It would be tragic if your car were to suffer a breakdown - or worse - a fault which leads to an accident on that first drive. No matter how thorough your pre-purchase inspection of the car was, there's always the chance that the car has a fault or faults you might have missed; something so obvious, perhaps, that you will kick yourself when it results in a breakdown.
The vast majority of people are honest, but the vendor could turn out to be a rogue, maybe forgetting to mention that intermittent electrical fault which knocks out the headlights, or occasionally blows a fuse which he uprated so much that the fault is now entirely capable of setting fire to the loom if the driver happens to switch on the wrong combination of electrical devices ...
You might even discover that, during the period between your inspection and collection of the car, the vendor has swapped some of the good components which passed your inspection standards for worn out ones from another car - perhaps something as fundamental as brake pads or dampers. The components which might most typically attract this sharp practice are usually those which are reasonably easy to swap and fairly expensive to replace. You could discover that the reason why the engine bay was spotless when you previously inspected it was because it had just been steam cleaned, and that plenty of fresh oil has, by now, found its way past the cylinder head gasket during the drive home, leaving the engine oil level low.
It is better to begin your acquaintance with your new car in the workshop rather than on the road, and to give it a thorough check-over followed by a service. In addition to tools and consumables, you'll need a good workshop manual.
Bear in mind that many of the Beetles which come to the market have received some mechanical attention just before they are offered for sale. The work could have been carried out to a poor standard; in particular, fixings might not be correctly torqued, or were fitted without shake-proof washers, and these can come loose in a short space of time - perhaps even when driving the car home.
If, at this stage, you don’t feel qualified to carry out the checks yourself, get your local professional mechanic to give the car a once-over. An experienced mechanic should be able to spot a potentially dangerous fault; alternatively, subjecting the car to an MoT test should unearth any faults/problems and list them on the failure sheet.
The following checks and service routines recommended here are all covered in detail later in the book. As ever, the author recommends that you also refer to a good workshop manual.
INSPECTION
Under the car
Begin by chocking one pair of wheels, loosening the wheel nuts and hub nut (drum brakes) on the other pair, disengaging the handbrake, and taking the car out of gear. Raise the non-chocked side of the car and rest it on axle stands.
Remove the road wheels and check the tyres for cuts, abrasions, and bulges. Check the condition of the pads and examine the discs for scoring (disc brakes), back off the adjusters on drum brakes, remove the hub nuts and drums, and check the shoes for wear, the drum for scoring, the back plate for oil or brake fluid contamination (hub seal or wheel cylinder seal kit needed), and (rear wheels), the handbrake components for free operation. With disc brakes, check for fluid leakage from the piston seals.
Visually inspect the dampers for signs of leakage, and condition in general. Check the brake hoses for bulges, cuts, abrasions or collapse. Gaiters on the drive shafts must be free from cuts, and will have to be replaced if damaged.
If you discover that any of these vital components have been swapped for worn out alternatives following your inspection, contact the vendor immediately and confront him/her with the facts. Contact your bank with a view to putting a stop on the cheque, and, if the vendor denies any skulduggery, the trading standards office, police, any motoring organisation or owner’s club to which you belong, and anyone else that you feel may be able to help.
Whilst the car is raised, take the opportunity to check the exhaust for signs of blowing, the visible sections of the fuel line for damage, and the main battery/starter solenoid feed wire for signs of damage. Check any other wiring which runs under the car and inside the engine compartment. If you find wires with damaged insulation, these should be replaced before the car is used, and the battery earth should be disconnected there and then just to be sure that no wires can short to earth.
Rear of the car
Whilst you have access to the rear underside of a Beetle, check the transaxle oil level, and top up, if necessary, with the correct oil. If the oil level IS low, keep an eye on it when you begin to use the car in case there's a serious leak.
Remove the thermostat cover (rear offside of the car) and measure thermostat length with the engine hot and cold. If the thermostat does not alter in length the cold running flaps in the ducted air cooling system will not open, and the engine will overheat, causing accelerated wear and damage to the engine. See Chapter Three for more details about this check. Finally, check the torque of the nuts and bolts which hold the suspension together. Repeat the checks for the other side of the car.
Engine compartment
Establish firstly that the engine compartment and underside of the engine/transaxle are in the same condition as when you examined the car prior to buying it. If everything was spotlessly clean then, but is now covered with oil, there's little doubt that either the engine and transaxle were steam cleaned for your inspection, and the test run (if any) was too short, or that the engine you saw during your inspection has been replaced with another. It is easy to carry out an engine transplant on the Beetle.
Check the generator drive belt for deflection. Check that all the tinware set screws are in position, and that they have been tightened correctly.
Trace back any mysterious lengths of wire which do not appear on the circuit diagram in your workshop manual; they are probably add-ons and might well at some stage in the future overload the fuse for the circuit they are tapping. A blown fuse might not, at first, seem too dangerous, but if your lights went out whilst you were driving the consequences could be terminal ...To be really thorough pay special attention to all earth connections - most intermittent electrical faults can be attributed to poor earths.
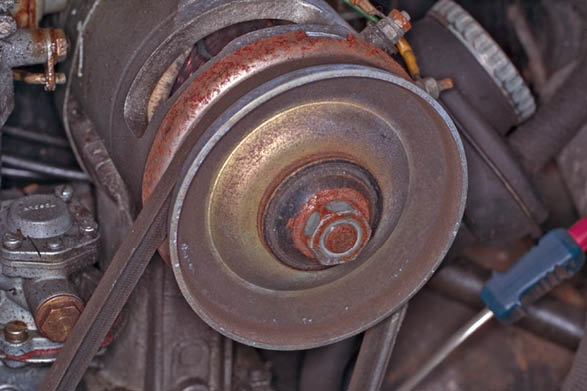
Not necessarily a problem in itself, this surface rusting on the generator drive belt pulley indicates that the car has been standing idle for a long time. Expect problems with ignition components, possible gumming in the carburettor, and a seized handbrake.
GENERAL
Move the front wheels to full lock in each direction, and check that they don’t foul the bodywork; it may be as well to ‘bounce’ each corner of the car to simulate suspension travel when you check this. If the front wheels DO foul the bodywork, chances are that larger or wider wheels and tyres have been fitted. If both prove to be standard, either extremely poor bodywork repair has resulted in badly aligned panels, or the front suspension geometry has been altered because the car has been involved in a front-end collision. In either case, confront the vendor with the evidence.
INTERIOR
Lift the rear seat base and check the battery for condition (ensure it is the one you saw during your inspection of the car), and especially for stability. Were a battery to tip over, at best, leaking electrolyte will make a mess of paintwork, at worst, an electrical fire could be the result. Check the wiring in the vicinity.
Check the seat belts by tugging quite violently; these are anchored to the tops and bottoms of the B posts; it’s better to discover that the mountings are weak with rust (or have been bodged) at this stage then when you’re headed towards the windscreen following a head-on collision, or even partway through an MoT. Weak seat belt mountings make a car unroadworthy, so seek redress from the vendor.
Check the steering by feeling for lost movement; that is, movement of the steering wheel perimeter which does not move the front wheels. If it is much more than about 1in, check that none of the fixings in the steering mechanism have come loose. This can happen when a car has received attention to the steering prior to sale, but nuts and bolts have come loose since. Void steering wheel travel can indicate that the steering box components require adjustment: this is covered in Chapter Four. Also pull and push the wheel to check for play; lift it then push down to check that the steering column fixings have not come loose.
Sit in each front seat in turn, grab the seat firmly and push down on the floor pan with your feet to check that the seat fixings and floorpans are sound.
FIRST SERVICE
It's recommended that a full lubrication/ignition system service is carried out on a newly-acquired car, irrespective of evidence of the fabled full service history, or claim by the vendor that the car is perfect and freshly serviced. Apart from giving you the peace of mind which comes from knowing that the job has been properly done, it might also unearth some latent fault which has so far escaped your attention. It also gives you a clean starting point for future servicing.
These are the jobs. Change the engine oil and clean the strainer. Even better, flush the system with a proprietary cleaning fluid before replacing oil and filter.
Top up the transaxle oil. Go over the car with a grease gun and fill every nipple until clean grease emerges, then wipe off any excess. Get out the pumping oil can and attend to the hinges, locks, window winding mechanisms, etc.
It's advisable to change the brake fluid, not only to get new fluid pumping through the lines, but also to establish that the bleed nipples are not seized. Then adjust the handbrake and handbrake lever travel, and check the efficiency of the brakes against the engine before venturing out onto the public highway. To check the brakes, simply let the clutch pedal out slowly with the engine at tick over, the car in first gear, and either the handbrake or foot brake engaged, ready to depress the clutch pedal the moment that the engine begins to labour. If the engine does not labour, the clutch is slipping, UNLESS the car happens to be moving forwards, in which case the brakes are not functioning proprely.
The tracking should be checked at a service centre.
AND FINALLY ...
Before setting out on your first drive in the car, do check that you have a jack and wheelbrace - and that there is air in the spare tyre!