THREE
FLEXIBILITY TRAINING
BELIEVE IT OR NOT, stretching is one of the most controversial subjects in exercise and sport. For many years, experts, would-be experts, athletes, and coaches have disagreed about:
• Whether stretching prevents injuries, causes injuries, or does neither
• Whether stretching enhances athletic performance, hinders it, or has no effect either way
• When and how often one should stretch, if ever
• Perhaps most important, how a muscle ought to be stretched, if it’s going to be stretched at all
I wish I could tell you that all of these issues have been resolved, but they haven’t. Nevertheless, based on extensive research and personal experience, I’ll say with complete confidence that every runner should stretch regularly, and I’m going to recommend some reliable guidelines for doing so. I can also assure you that appropriate stretching practices will never cause an injury and may prevent and rehabilitate many.
However, because stretching for sports remains an inexact science, some of these guidelines are relatively loose, and I’ll give you options to choose from. Specifically, I will present four distinct types of flexibility training—static, active-isolated (AI), contract-relax (CR), and yoga—and leave it to you to decide which method or combination of methods you will use.
In terms of frequency and volume of stretching, I’ll give you recommended minimums but leave open the options of stretching more often and of doing a greater variety of stretches than the minimum. I’ll also refrain from pretending that any absolute laws exist regarding when you should stretch: before runs, after runs, before and after runs, or at other times of day far removed from your runs.
Your body will have the final say as to which flexibility training practices work best for you. None of the options I suggest will harm you, but I can’t guarantee that all of them will work equally well for every runner. In this regard, flexibility work is a lot like other aspects of training: Each athlete is an experiment of one.
THE FLEXIBILITY NEEDS OF RUNNERS
Stretching advocates frequently promote the idea that the more flexible your joints are, the better you will perform in all sports. This is simply not true. Flexibility needs differ widely from one sport to another, and there is such a thing as excessive flexibility in most types of athlete, runners included. In one study, a group of elite runners was tested for both hamstring flexibility and running economy. Those with the least flexible hamstrings had the greatest economy. The study concluded that the runners with tighter hamstrings probably had more stable knee joints. Thus, in theory, they used less energy per stride than runners with more wobbly knees.
Interesting, to be sure, but you can’t look at a study of elite runners and assume the findings apply to you. If I were to make a generalization about the average runner, I’d say you’re more likely to be held back by hamstrings that are too tight than hampered by hamstrings that are too loose. Still, I think I’ve made my point that flexibility is not a case of “the more, the better.” A runner requires sufficient range of motion to take long, powerful strides. Any extra range of motion will provide no additional benefit and will more likely reduce energy economy.
There are two distinct types of flexibility, only one of which really matters to runners. Passive flexibility refers to the extreme limits of a joint’s range of motion (ROM) when an outside force—a person or object—is used to position the limb or limb segment. A good example is the full front split, since you’re using the floor to help your legs get into this position. The ability to do a split demonstrates a high degree of passive flexibility in your hip joints. Dynamic flexibility, on the other hand, refers to how far a given limb is able to move by its own force. A leaping full front split demonstrates a high degree of dynamic flexibility in your hip joints, because your legs must achieve the split position without assistance from any outside force.
Passive flexibility comes mostly from elasticity in the connective tissues surrounding your joints. Dynamic flexibility, by contrast, comes from a combination of elasticity in the connective tissues and strength in the muscles that create joint actions. Put another way, passive flexibility is range of motion, plain and simple. Dynamic flexibility is strength throughout the range of motion. There is some degree of overlap between the two types of flexibility, but they are distinct.
What matters to runners is dynamic, not passive, flexibility, because when you run, each leg moves itself. Consider the still-action photographs you’ve seen depicting elite runners in full stride. The toe of the trailing leg is just coming off the ground behind the runner. This trailing leg is extended quite a ways behind the runner; the thigh is a good 45 degrees beyond vertical in that direction. The forward leg, meanwhile, is sharply bent, the knee high in front of the runner. What you’re seeing in such images is excellent dynamic range of motion in the striding movement.
Slower runners look quite different. They tend to shuffle, even when running very hard. They don’t achieve the same rear extension with the push-off leg or the same knee lift with the forward leg. This is because they lack elasticity in the muscles that are required to relax and stretch (the antagonists), and possibly also strength in the muscles that contract (the agonists) in the striding movement.
Through flexibility training, runners can increase their dynamic flexibility and stride length. While flexibility training is generally considered to be synonymous with stretching, the best way to increase dynamic flexibility is to combine stretching with strength training. Stretching primarily increases range of motion, while strength training primarily increases strength throughout the range of motion.
So the way I’ve separated strength training from flexibility training in the structure of this book is a somewhat artificial convenience. In fact, stretching and strength training very often happen simultaneously. Whenever you move a joint, muscles on one side of it contract while muscles on the other side relax and stretch. Picture a simple strength exercise, the biceps curl (simple, and functionally useless for runners). The biceps, on the front of your arm, contract as you curl the weight toward your shoulders. The triceps, on the back of your arm, relax and stretch.
Two types of stretching—AI and CR—use this principle to great advantage. You contract one set of muscles, achieving a mild strengthening effect, before you stretch the opposite set of muscles, improving dynamic flexibility. On the other hand, many functional strength-training exercises take the muscles through a full range of motion and therefore serve as a perfect complement to stretching. Strength training does, of course, tend to develop the strength aspect of dynamic flexibility more than stretching will, whereas the latter tends to increase range of motion more, so both are needed.
As I mentioned in the previous chapter on strength training, running tends to reduce the elasticity of certain muscles, resulting in muscular imbalances that frequently cause overuse injuries. So runners need to train for flexibility not just to increase muscle elasticity and thereby improve their performance but also to prevent these same muscles from becoming less elastic. The same methods accomplish both jobs.
One final note: Consistent flexibility training is especially important for masters runners, because muscles gradually lose elasticity with aging.
ROLE MODEL
CATHY O’BRIEN
New Hampshire’s seacoast region was a small hotbed of running fame in the late 1980s, when I was touring its back roads daily as a teenage runner. The girls’ cross-country and track coach at my high school in the town of Durham was none other than Jeff Johnson, the man who named Nike and created many of the company’s early running shoes. One town over, in Newmarket, lived Lynn Jennings, who would win three consecutive World Cross-Country Championships beginning the year after my graduation. And one town over on the other side, in Dover, was Cathy Schiro (soon to become Cathy O’Brien), who had brought glory to the area by winning the 1984 High School National Cross-Country Championship.
O’Brien brought a lot more glory to the area over the next dozen years. She competed in the 1988 and 1992 Olympic marathons, finishing 10th in the latter. She set a world record for 10 miles (51:47) in 1989 and was the top-ranked American road racer the following year. In 1991, she won the Los Angeles Marathon in a career-best time of 2:29:30. She also won the 15-K National Championship in 1995. Now a mother of two, O’Brien still runs competitively and still lives in my old hometown.
The real reason I’m talking about Cathy O’Brien is that she was among the first elite runners to begin dabbling in yoga. Like many runners, she was always rather inflexible. Yoga helped her loosen up, but its greatest benefit, she has said, was the relaxation response that it induced, along with the sheer enjoyment of holding its preternaturally satisfying poses.
O’Brien also enjoys swimming, which she has done when injured to maintain cardiovascular fitness, and with good results. Her strength-training regimen includes calisthenics and leg exercises using a resistance band.
GUIDELINES FOR FLEXIBILITY TRAINING
Stretching before a run is usually neither necessary nor beneficial. An easy jogging warmup, by itself, will loosen up your running muscles enough to allow them to perform effectively and without straining.
Having said this, I do recommend that you stretch right before the high-intensity portions of your workouts. Most acute hamstring strains and calf-muscle pulls befall runners during speed workouts, when they’re taking their longest and most forceful strides. A simple warmup jog may not prepare your muscles to safely handle such a test. And if you’re dealing with an existing injury—a mild muscle pull or strain, for example—you should stretch the affected muscle after every warmup, whether or not high-intensity work follows.
In those cases, choose an appropriate static, AI, or CR stretch from the selection presented later in this chapter, and perform it following 5 or more minutes of walking or easy running. (Yoga poses don’t make the best warmup stretches; they aren’t as functional for runners, and in some cases they require their own warmup—stretches to prepare you for stretches.)
The best stretches to do before high-intensity running are those that increase your main running muscles’ active range of motion from a resting level to a level that’s appropriate for fast running. After a gentle warmup run lasting at least 5 minutes, perform the following three drills in the order presented.
WARMUP DRILLS
HIGH KNEES. Run in place for 20 seconds. Bring your thighs up parallel to the ground with each stride. In addition to building strength, as described in the previous chapter, this drill increases the active ROM of the hamstrings and calves. It also elevates the heart rate and warms, lubricates, and shunts extra blood to the leg muscles, preparing them for sustained running.
GIANT STEPS. Walk about 50 meters by taking giant lunge steps. You should achieve a 90-degree bend in the forward leg before pushing off with the toes and taking a subsequent giant step with the trailing leg. This drill increases the active ROM of the hip flexors, hamstrings, and calves.
SKIPPING. Skip 50 meters at a brisk but controlled pace. Begin by bringing one leg up to the point where the thigh is parallel to the ground, as in the high knees drill. When this leg is at peak height, take a small hop-step forward with the opposite foot. Lower the striding foot to the ground a step ahead of the hopping foot, and then stride with the second leg. Move your arms in opposition to your legs as you would when running normally. This drill increases the active ROM of the calves and hamstrings.
The ideal time to stretch is immediately after running or any endurance cross-training. The muscles are warm and well-lubricated, and therefore prepared to stretch without straining (as long as you stretch properly). It’s also easiest to counteract the muscle-tightening effect of running when you stretch regularly following training sessions.
Stretching right after a workout may also accelerate the muscle-recovery process by keeping bloodflow elevated, thereby speeding the delivery of nutrients (especially amino acids, needed for tissue repair) and the removal of metabolic wastes. You may even feel the benefit in the form of reduced postworkout muscle soreness. While clinical investigations of the link between postexercise stretching and muscle soreness have produced mixed results, in my experience (and in that of countless other runners), there is a clear positive connection. I definitely experience less muscle soreness and stiffness when I stretch regularly following workouts than when I do not. Stretching after strength training works the same magic for me.
You can also stretch at other times: while watching a ballgame on TV on a weekend afternoon, before going to bed, at work, whenever. But when you do stretch at times that are completely separate from your workouts, you have to remember that your muscles are cold and simply won’t have the same range of motion they’ll have when fully warm. This is okay—there’s really nothing wrong with stretching cold muscles. Your body can deal with it. You just have to ease into it very gradually. Your muscles won’t necessarily warm up while you’re stretching—in fact, their internal temperature may go down a bit—but your muscles and connective tissues can still get the message and can lengthen without injuring themselves.
On the other hand, if you stretch them too far too quickly—whether they’re warm or cold—you’ll create injuries within muscle fibers and connective tissues. You don’t need me to tell you that’s two steps backward, in place of the intended step forward.
Is there a bad time to stretch? I can think of two: one fixed, one situational.
I think it’s a terrible idea to stretch first thing in the morning, right when you get out of bed. Your spinal discs fill up with fluid overnight, when you’re horizontal, and are much more prone to injury when you first wake up. (For that reason, first-thing-in-the-morning strength training can be a hazard, too, if you neglect a thorough warmup.) After you’ve been vertical for an hour or two, your discs should be lighter and less vulnerable.
I also recommend extreme caution when you stretch strained or pulled muscles. If the injury is mild, gentle stretching will help the muscle heal at a functional length and may also help minimize scar-tissue formation. If gentle stretching is painful, leave the muscle be until you can stretch it without pain. Try massaging it instead.
As for how often you should stretch, three times a week should be considered a minimum. If you stretch any less, it’s doubtful that you’ll be able to prevent the tightening of muscles such as the hamstrings and gastrocnemius that results from frequent running, let alone increase your dynamic flexibility. Once-daily stretching is more or less the perfect amount for most muscle groups in most runners. But if you have a “problem area” that is extremely tight and hindering performance or perhaps teetering on the brink of injury, twice-daily stretching may be in order.
The most important muscles to stretch are the hamstrings, gastrocnemius, soleus, and hip flexors. Two tendons, the iliotibial band and the Achilles, deserve equal attention. Your stretching routine should cover these muscles and tendons at least, and you should always stretch them the most. Of secondary importance are the lower back, piriformis (located deep within the buttock), hip abductors and adductors, and quadriceps. (Refer back to the muscle illustrations in chapter 2 for the locations of these important muscles.) I strongly advise you to stretch these muscles regularly, too, but if you’re stubborn, then stretch the first group for now and add the second group once you’ve learned to love flexibility training. (It really is a very pleasant activity once you’ve made it a habit.) There’s some benefit to stretching the muscles of the trunk as well, especially for those with postural irregularities (which is most of us). I do so twice a week. Nor is there any harm in stretching the rest of your body—shoulders, chest, neck, arms, hands, and feet. However, I don’t include stretches for all of these areas in this chapter.
You increase dynamic flexibility much the same way you gain strength and build endurance. Think “incremental gains” rather than “instant results.” Pushing your stretches hard from the first day makes about as much sense as running 22 miles on your first day of marathon training. The best advice I can offer is to ease into it, be patient, and enjoy making progress step-by-step.
FOUR WAYS TO STRETCH
STATIC. Of the four types of stretching I mentioned at the start of this chapter—static, AI, CR, and yoga—the first is the simplest and most popular. The standard toe touch is an example of a static stretch.
Static stretches are usually facilitated, meaning that the targeted muscles don’t stretch themselves. They’re stretched by the work of other muscles. Take that basic toe touch, for example. The hamstrings don’t stretch themselves, and the opposing muscles, the quadriceps on the front of the thigh, don’t really do anything either. Rather, the stretch happens because your pelvis tilts forward.
Most of the time, you’ll hold static stretches for 10 to 30 seconds. Two repetitions seem to work better than 1, unless you hold the first stretch long enough for the muscle to relax and then go into a deeper stretch from that point.
Static stretching generally gets high marks in scientific research; it definitely improves your passive range of motion. Whether it increases dynamic range of motion is open to debate and likely depends on the other training activities you do. For example, static stretching combined with functional strength training is probably a good way to get improvements in passive and dynamic range of motion.
The biggest criticism of static stretching comes from those who advocate AI and CR. They contend that if you hold a stretch longer than a second or two, a protective reflex causes the muscle to contract and shorten in order to prevent overstretching and, thus, injury. According to that point of view, static stretches attempt the impossible: lengthening a muscle while it’s fighting to shorten itself. At best, this makes the effort useless, from a functional point of view. At worst, it could lead to injury.
Research doesn’t exactly back up this argument, however. Static stretching seems to improve passive range of motion at least as well as AI does. And as mentioned above, you can teach your body to relax into a deeper stretch, thus circumventing the muscle-tightening stretch reflex. The mechanism at work is called the inverted stretch reflex, which causes a muscle to go with the flow of a prolonged stretch. You can learn to use it, but it takes some practice and focus. You have to concentrate on relaxing the targeted muscles throughout the stretch, something few athletes will do.
A second limitation of static stretching is that few traditional stretches successfully isolate individual muscle groups. While muscle isolation is not desirable in strength training, it is generally preferable in flexibility training, because the more muscles share a stretch, the less each muscle is stretched. The toe touch stretches not just the hamstrings but also the buttocks and lower back. If you straighten your knees completely, it also tugs on your calf muscles. The AI and CR methods have more ways to stretch individual muscles, making a hamstring stretch truly a hamstring stretch. Still, static stretching is the simplest form of stretching and is demonstrably effective.
ACTIVE-ISOLATED. Active-isolated stretching is a form of flexibility training that was created specifically to overcome the drawbacks of static stretching. In an AI stretch, you put your body in a position that allows you to stretch a single muscle group. Then you contract the muscles opposite the ones you want to stretch while pulling the targeted muscles into a deeper stretch than would ordinarily be possible. For example, you’d contract your quadriceps while stretching your hamstrings. Each stretch lasts 2 seconds and is usually performed in sets of 10 repetitions.
Most AI stretches require a rope to help you pull the muscles into deeper stretches. The major limitation of the method is that some of the stretches are rather awkward and simply don’t feel like they’re doing much.
AI stretching was originally developed as an assisted stretching method; a partner (or in some cases one’s own hand or hands) served in place of the rope. While I’ve never had a partner help me perform AI stretches, I’m certain that some of the stretches would be much more effective if I did have one. For example, I no longer perform AI stretches for my calves, because I get a better feeling and, I think, better results from static stretches for the calves.
CONTRACT-RELAX. Contract-relax stretches are similar to AI. Both entail isolation of a single, targeted muscle group via briefly held stretches. In CR stretching, however, you precede each stretch with an isometric contraction of the targeted muscle. So if you’re stretching your hamstrings, you first contract them, then relax and stretch them. This helps trigger the inverted stretch reflex. CR has scored high marks as a flexibility-training tool in studies. But like certain AI stretches, a few CR stretches would seem to be more effective if assisted by a partner.
YOGA. Yoga involves static-active stretching, making it a hybrid of the other forms of stretching I’ve just described. As in static stretching (whose proper technical name is static-passive stretching), you assume and hold positions in which certain muscles are lengthened. Like CR, yoga also involves isometric contractions, but with a crucial difference: In CR, you contract and relax the same muscle in a coordinated sequence; in yoga, you hold one set of muscles in isometric contractions while relaxing and stretching the muscles opposite them.
Yoga is seen by many as a complete form of exercise. It increases passive and dynamic flexibility as well as balance and coordination, which seems obvious. Some new research shows it also has strong, and nearly instant, powers to alleviate anxiety and stress.
It’s also thought to improve strength, depending on the type of yoga practiced. For example, power yoga, in which you move quickly from one pose to the next, probably improves strength, particularly if you aren’t performing any other type of strength training. Because it involves sustained isometric muscle contractions, yoga is a lot more taxing than other forms of flexibility training.
I made the mistake of trying my first yoga class within 3 weeks before racing a marathon. Unaccustomed to the type of physical challenge imposed by yoga, I found myself barely able to move the next day and sore for another 3 days. It spoiled my running for more than half a week—a crucial week. The lesson: Yoga is challenging; approach it accordingly. If you’ve never done it, I recommend that you try it during the off-season or the early portion of the base phase of the training cycle, beginning slowly.
In addition to the yoga poses demonstrated in this chapter, you can learn many other poses from books, videos, and classes. In any case, I strongly recommend that a beginner take at least a few classes led by a professional instructor, because it’s very difficult to perform many of the poses properly at first, and without supervision it’s equally difficult to know exactly what you might be doing improperly.
The following pages provide examples of each of the four types of stretching. I encourage you to experiment with the various stretching methods. This is the best way to ensure that you wind up doing the best stretch for each muscle group. If you happen to like, say, all of the CR stretches best, so be it; but if you find that you feel best when you supplement these with yoga stretches or when you substitute in a couple of static stretches, there’s no reason not to go ahead and do so.
STATIC STRETCHES
CHEST AND SHOULDERS
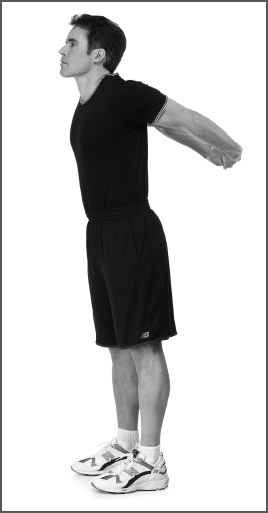
Lace the fingers of both hands together behind your buttocks with your arms fully extended. Now rotate your arms gently upward until you feel a stretch in your chest and in the front of your shoulders. Hold for 20 seconds, relax, and repeat.
UPPER BACK
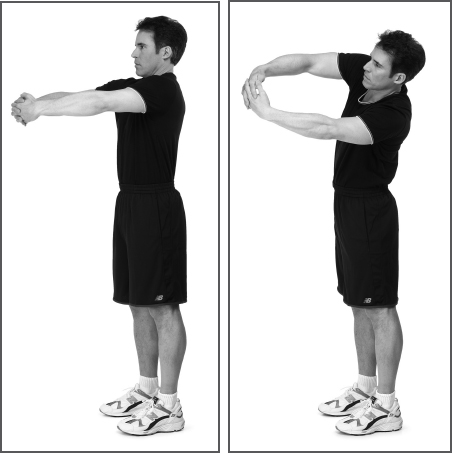
Lace the fingers of both hands together and extend your arms in front of your chest so that your arms and shoulders form a circle. Now shrug your shoulders upward and forward. You should feel a stretch in the rear of your shoulders and your upper back. Hold this stretch for 10 seconds and then lean to the left. The stretch will migrate into the large muscles on the right side of your back. Hold for 10 seconds, then lean to the right and stretch the left side of your back for another 10 seconds. Repeat the entire sequence.
LOWER BACK
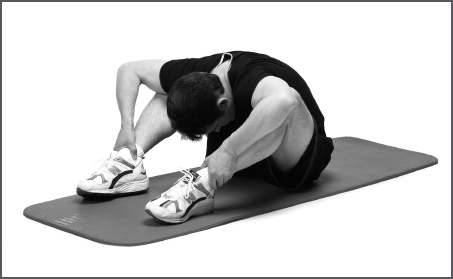
Sit on the floor with both legs sharply bent and both heels resting on the floor, feet shoulder-width apart. Reach between your legs with both arms and rest your hands on the floor. Begin with your trunk upright. By contracting your abdominal muscles, tilt your trunk toward the floor as far as you can. Tuck your chin toward your chest as you begin the movement. As you near the limit of your range of motion, grab your lower shins or the bottoms of your feet with your hands, and extend the movement slightly with a gentle pull. Hold for 20 seconds, relax, and repeat.
GLUTES AND HIP ABDUCTORS
Lie on your back with your right arm extended away from your body and resting palm down on the floor. Bend your right leg 90 degrees, and reach the knee across your body and toward the floor outside your left hip. Make sure your right shoulder blade maintains contact with the floor. Use pressure from your left hand to enhance the stretch. Hold the stretch for 15 to 20 seconds, and then stretch your left side. Repeat on both sides.
HIP FLEXORS
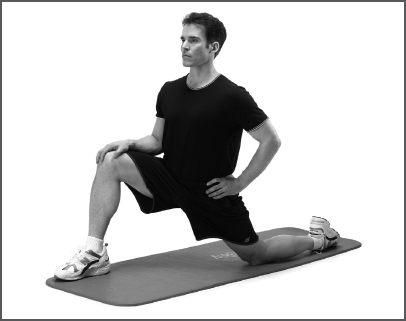
Kneel on your left knee and place your right foot flat on the floor well in front of your body. Draw your navel toward your spine. Now put your weight forward into the lunge until you feel a good stretch in the front of your left hip. Hold the stretch for 20 seconds, and then repeat with your left foot forward, stretching your right-side hip flexors. Repeat on both sides.
HIP ADDUCTORS
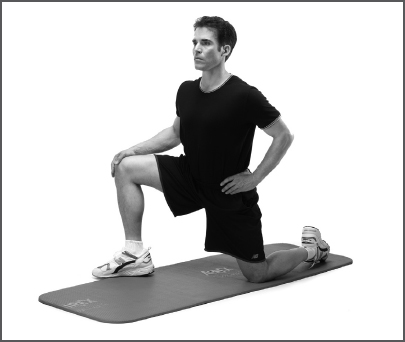
Perform this one just as you would the hip-flexor stretch, but start with your forward foot angled out 45 degrees instead of straight ahead. Again, hold the stretch for 20 seconds, and then stretch the opposite side. Repeat on both sides.
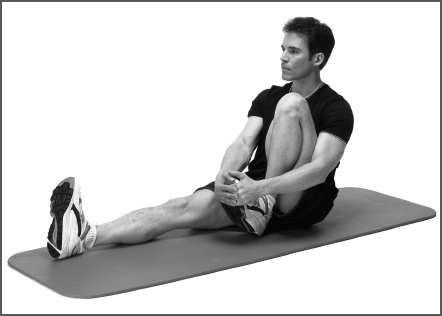
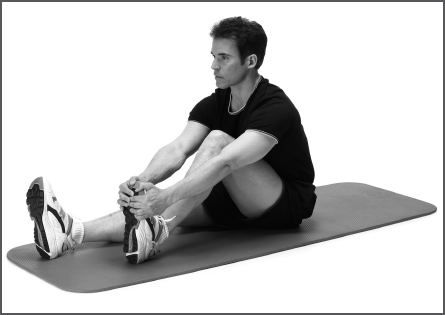
HAMSTRINGS
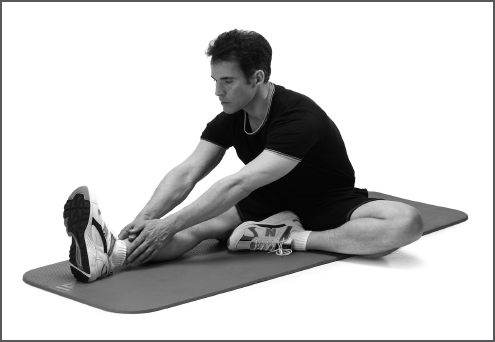
Sit with your right leg outstretched in front of you. Splay your left knee wide and tuck the foot against the inside of your right thigh. (This is often called a figure-four stretch, because your legs form that numeral.) Bend forward from the hips, and grasp the shin of your right leg as close to the foot as you can. Don’t round your back; that’ll increase your reach but actually take emphasis off your hamstrings, making the stretch less effective. Hold the stretch for 10 to 15 seconds, and then stretch your left leg. Repeat on both sides.
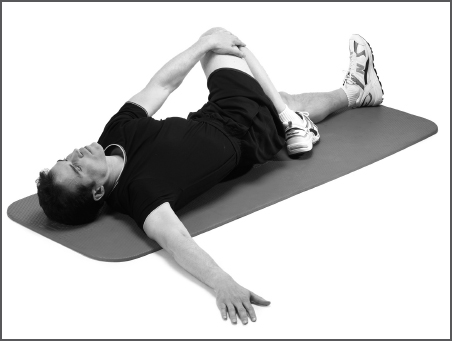
ILIOTIBIAL BAND
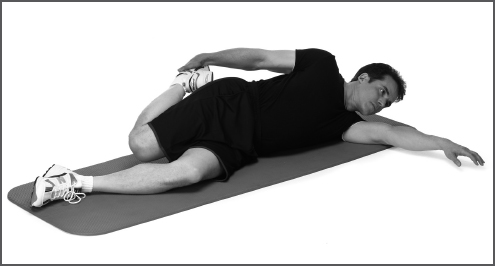
Lie on your left side with your left leg slightly bent and your right leg bent fully. Grasp the top of your right foot with your right hand. Pull your foot back as you reach toward the floor with your knee so that your thigh simultaneously moves backward and rotates internally. You should feel a stretch along the outside of your thigh. Hold this stretch for 20 seconds, and then switch to your right side and stretch the left leg. Repeat on both sides.
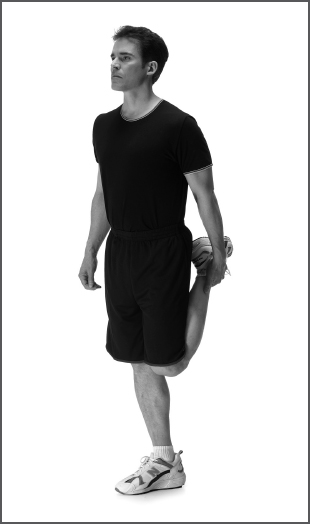
QUADRICEPS
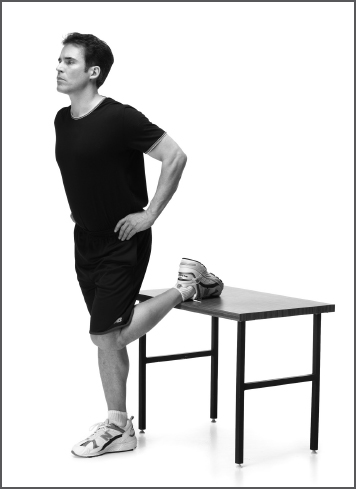
Stand on one foot and rest the top of the other foot on a desk-height object behind you. The thigh of this leg should be perpendicular to the floor. Rest your hands on your hips. Rotate your pelvis backward. Hold the stretch for 10 to 15 seconds, and then stretch the opposite leg. Now repeat the stretch on both sides.
GASTROCNEMIUS AND SOLEUS
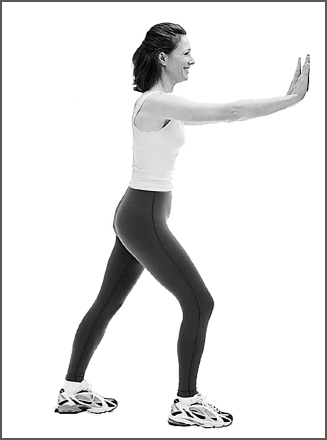
Brace your hands against a wall and extend one leg far enough behind you that you feel a good stretch in your calf when you place the foot flat on the ground. Hold for 10 to 12 seconds, and then bend the knee slightly so that the stretch migrates from your gastrocnemius to your soleus. Hold for 10 seconds, and then stretch the opposite leg. Repeat the entire sequence.
ACHILLES TENDON
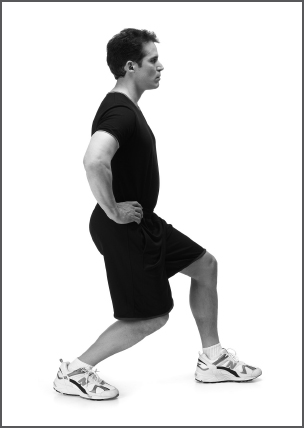
Stand in a split stance, one foot a step ahead of the other, with both feet flat on the ground and both knees slightly bent. Bend your back leg a little more and concentrate on trying to “sink” your butt straight down toward the heel of that foot. Keep your torso upright. You should begin to feel a stretch in your Achilles tendon. You may have to fiddle with your position before you find it. When you do, hold for 10 to 12 seconds, relax, and then stretch the opposite leg. Repeat on both sides.
ACTIVE-ISOLATED STRETCHES
NECK
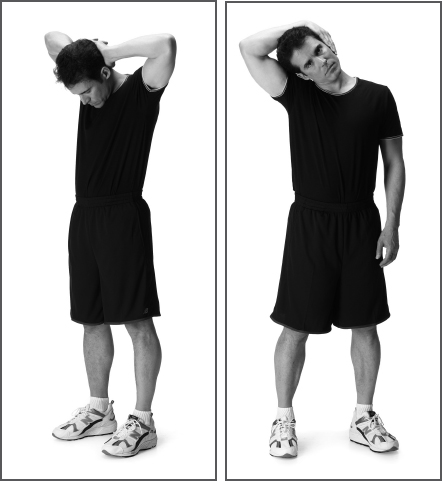
Lace together the fingers of both hands and place them against the back of your head. Tip your head forward as far as comfortably possible and extend the movement slightly with gentle pressure from your hands. Pause for 1 second and relax. Perform 10 repetitions. Then place just the right hand on the left side of your head. Tilt your head to the right as far as comfortably possible, pause, relax, and repeat 9 times. Stretch the right side of your neck in the same way by using your left hand.
SHOULDER ROTATORS
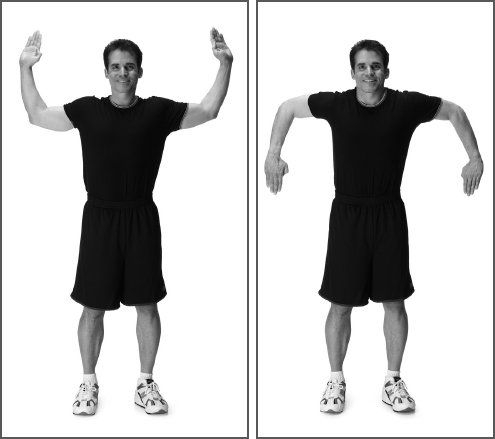
Raise your arms into a “Don’t shoot!” position—upper arms forming a straight line with your shoulders, forearms vertical. Now contract the muscles of your rear shoulders and squeeze your shoulder blades together so that your arms move backward several inches. At the limit of this small movement, pause briefly, relax, and repeat. Perform 10 repetitions and then invert your position so that your forearms are extended directly toward the floor and your palms face backward. Again, squeeze your shoulder blades together 10 times.
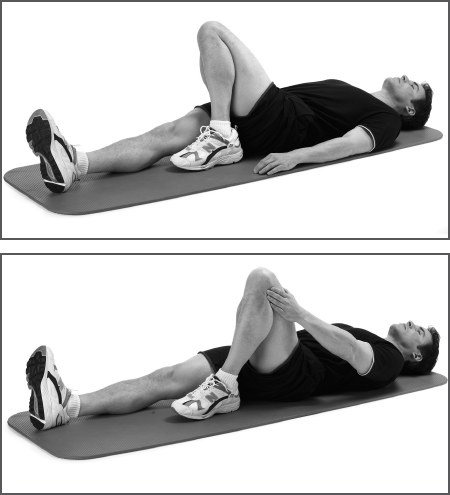
LOWER BACK
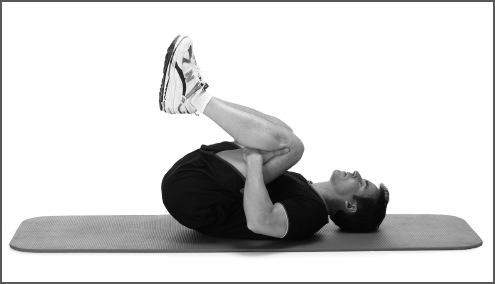
Lie on your back, bend both knees, and begin with your feet flat on the floor. Place your hands on your hamstrings just above your knees. Pull your knees as close to your chest as possible by contracting your stomach muscles and hip flexors. Gently assist the movement with pressure from your hands. Hold for 2 seconds, then lower your legs. Do 10 repetitions.
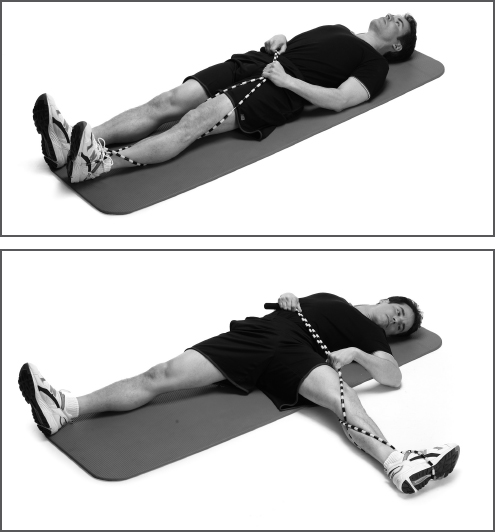
BENT-LEG HAMSTRINGS
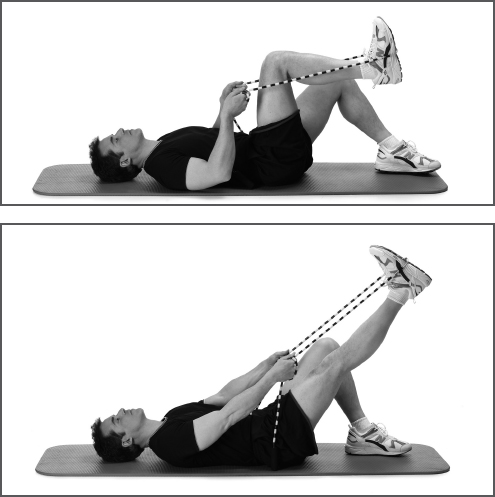
Lie on your back with both legs bent. Begin with your left foot flat on the floor and your right leg elevated so that the thigh is perpendicular to the floor and the shin is parallel to the floor. Loop a rope around the bottom of your right foot and grasp the two ends of the rope with your right hand next to your right knee. Contract your quadriceps, thus straightening your right leg completely. Pull the rope toward your head until you feel a good stretch in your hamstrings. (You don’t have to pull hard, just enough to feel that you’re challenging the muscles.) Hold for 2 seconds, and relax by bending your right knee again. After completing 10 repetitions, stretch your left leg.
STRAIGHT-LEG HAMSTRINGS
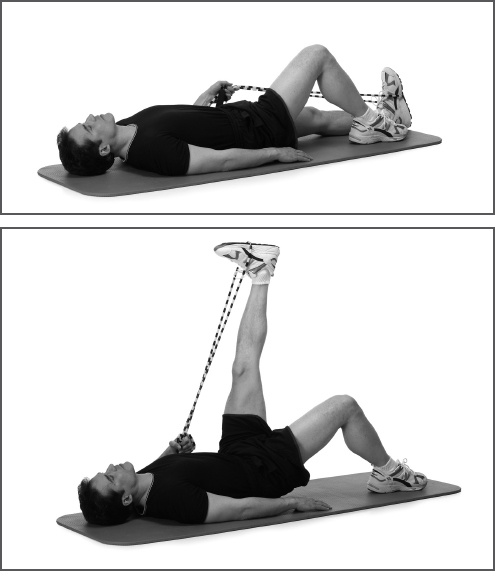
Loop a rope around the bottom of your left foot. Lie on your back with your left leg extended fully along the floor and your right leg bent slightly, with the foot resting flat on the floor. Hold the ends of the rope in your left hand at about the level of your upper thigh. By contracting your hip flexors, lift your left leg (keeping it completely straight) as high as you can. Extend this movement slightly with a gentle pull on the rope. Hold for 2 seconds, then relax. After completing 10 repetitions, stretch your right leg.
QUADRICEPS
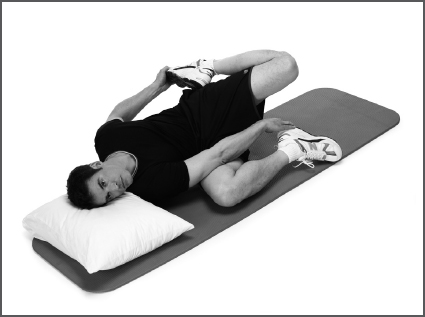
Lie on your right side in a fetal position. Rest your head on the floor or on a pillow. Grasp the bottom of your right foot with your right hand and the top of your left foot with your left hand. By contracting the hamstrings and glutes, swing your left upper leg backward as far as possible. Extend this movement slightly by pulling with your left arm. Hold for 2 seconds, then relax. After completing 10 repetitions, stretch your right leg.
HIP FLEXORS
Stand on your right foot, bend your left leg fully, and hold your left foot in your hand behind you. By contracting your glutes and hamstrings, reach back as far as you can with your knee and bring your foot as close as you can to your lower back. Don’t arch your back excessively while performing this stretch. Extend the movement slightly by pulling your foot toward your lower back with your hand. Hold for 2 seconds, then relax. After completing 10 repetitions, stretch your right leg.
GLUTES
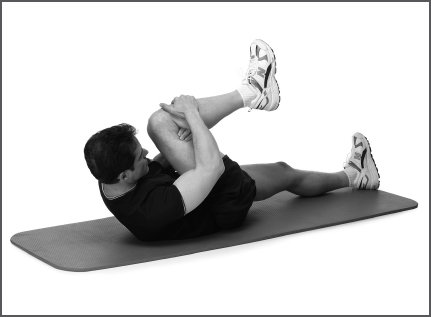
Lie on your back with your left leg extended fully on the floor and your right leg bent 90 degrees and elevated so that the thigh is vertical. Place your left hand on your right hamstring just above the knee, and place your right hand on your right shin, just below the knee. By contracting your abdominal muscles and hip flexors, reach your right knee as far as possible toward your left shoulder. Use pressure from both hands to extend this movement slightly. Hold for 2 seconds at the end of the movement, then relax. After completing 10 repetitions, stretch your left side.
HIP ADDUCTORS
Lie on your back with both legs fully extended. Loop a rope around the bottom of your left foot. Wrap the two segments of the rope around your lower leg, and grasp them at the level of your upper thigh with your left hand. Grasp the ends in your right hand and rest them on your belly. Raise your left leg 1 inch above the floor. By contracting the muscles on the outside of your hip, sweep the left leg out to the side as far as you can. Extend this movement slightly by pulling the rope gently away from your body. Hold for 2 seconds, then relax. After completing 10 repetitions, stretch your right leg.
ACHILLES TENDON
Sit on the floor with your right leg outstretched in front of you and your left leg sharply bent so that the heel of the foot is as close to your butt as you can get it. With both hands, grasp the bottom of your left foot. Keeping your left heel in place, raise the toes of that foot off the floor and back toward your shin by contracting the muscles on the front of your shin. Use pressure from your hand to extend the motion slightly. Hold for 2 seconds, then relax. After completing 10 repetitions, stretch your right leg.
SOLEUS
Perform this stretch exactly as you would the Achilles tendon stretch, except bend the leg you’re stretching to 90 degrees only instead of bending it fully.
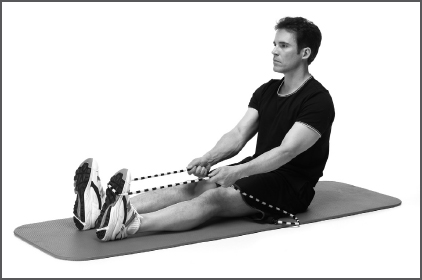
GASTROCNEMIUS
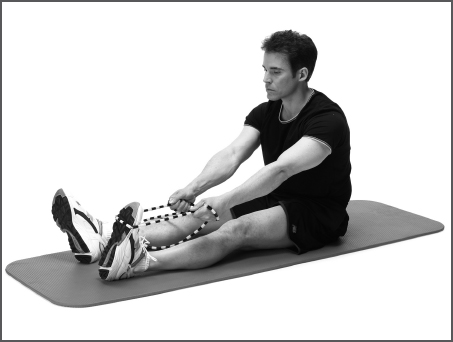
Sit on the floor with both legs outstretched in front of you. Loop a rope around the bottom of your left forefoot. Hold the two segments of the rope in your hands with your arms outstretched, your torso upright, and tension in the rope. By contracting the muscles on the front of your shin, pull your toes as far as you can toward your body. Extend the motion slightly by pulling gently on the rope. Hold for 2 seconds, then relax. After completing 10 repetitions, stretch your right leg.
CONTRACT-RELAX STRETCHES
TRUNK ROTATORS
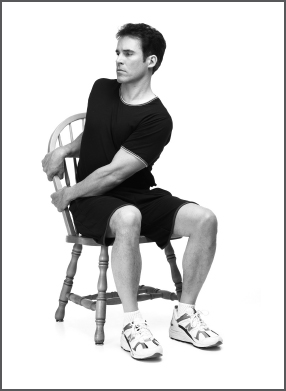
Sit comfortably upright in a straight-back chair. Twist to the right as far as comfortably possible, keeping your head aligned with your shoulders. When you reach the limit of your range of motion, grasp the side of the chair back with both hands to hold yourself in position. Now contract your back muscles as if to rotate back in the other direction, but use your arms to prevent any movement. Hold the contraction for 6 to 8 seconds, relax, then return to the starting position for one breath. Do 3 repetitions toward each side.
LOWER BACK
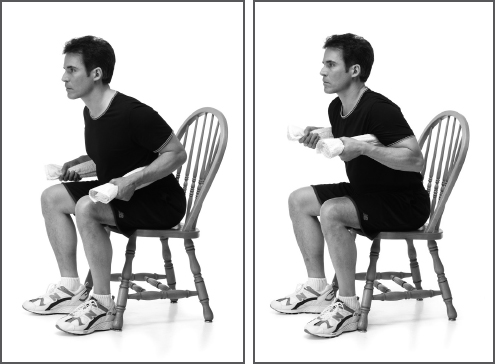
Sit upright in a chair with a folded towel stretched across your lower back, the ends of the towel held taut in your hands. Tip your torso forward by bending at the hips. Go as far as you comfortably can, making sure not to round your back. Now contract your lower-back muscles as if to raise yourself back upright, but prevent your torso from actually moving by pulling downward on both ends of the towel. Hold this contraction for 6 to 8 seconds and then relax for 2 or 3 seconds. Relax and return to the starting position for one breath. Shift the towel a few inches higher on your back, then repeat. Continue repeating until the towel reaches the level of your shoulder blades (four or five total stretches).
PIRIFORMIS
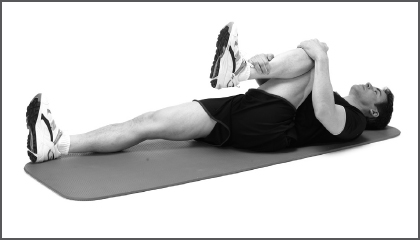
Lie faceup, bend your left leg to 90 degrees, and lift the left leg so that the thigh is perpendicular to the floor. Place your left hand on your left knee and your right hand on your lower left shin. Now rotate your left hip outward as you flex your hip abductors so that your lower leg swings inward and your entire left leg moves toward your head. Use very slight pressure from your hands to hold your leg in position at the end of this movement. You should feel a stretch deep in your left glute. Contract the same muscle you feel stretching, as if to reverse the movement you just completed, and use pressure from your hands to hold your leg in place. Hold the contraction for 6 to 8 seconds, relax, and return to the starting position for one breath. Repeat the stretch twice more, going farther each time. Then stretch your right side.
HIP FLEXORS
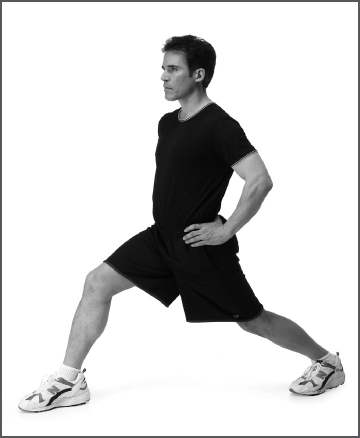
Stand in a split stance with your right foot positioned a large step ahead of your left, both feet flat on the floor, knees slightly bent, hands on hips. Rotate your pelvis backward and shift your weight forward and downward, bending your knees a bit more. You should feel a stretch at the front of your left hip. Contract this muscle as if you were going to take a forward step, but keep your weight on the leg so that it remains in place. Hold the contraction for 6 to 8 seconds, and then relax for one breath. Deepen the stretch twice more, then stretch your right side.
HIP ABDUCTORS
Lie faceup on the floor and bend your left leg sharply. Place your left foot flat on the floor next to your right knee and tip your left knee toward the floor to the right. You should feel a stretch on the outside of your hip. Contract this same muscle as if to swing your leg back in the opposite direction, but prevent it from doing so by placing your left hand on your left thigh and applying pressure. Hold the contraction for 6 to 8 seconds, relax, and return to the starting position for one breath. Deepen the stretch twice more, then stretch the right side.
HAMSTRINGS

Lie on your back with both legs extended fully. Loop a rope around the bottom of your left foot, and grasp both segments in your hands at about the level of your upper thigh. By contracting your left hip flexors, lift your left leg (keeping it completely straight) as high as you can. Pull the rope gently to hold your leg in place at the limit of your range of motion. Contract your left hamstrings as if to lower your leg again, but continue to hold it in place with the rope. Hold the contraction for 6 to 8 seconds, relax, and return to the starting position for one breath. Deepen the stretch by lifting your leg slightly higher twice more, then stretch your right leg.
QUADRICEPS
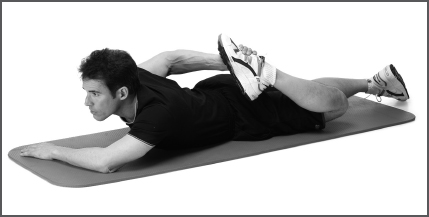
Lie facedown with your left leg bent fully. Reach behind your back with your right arm and grab your left foot. Stretch your left quadriceps by using your hand to gently pull the foot slightly closer to your buttocks. Contract your quadriceps as if to straighten your leg again, but prevent it from moving with resistance from your hand. Hold the contraction for 6 to 8 seconds, relax, and return to the starting position for one breath. Deepen the stretch by bending your leg a bit more two more times, then stretch your right leg.
GASTROCNEMIUS AND SOLEUS
Stretch the gastrocnemius first. Sit upright on the floor with both legs extended straight in front of you. Loop a rope around the bottom of your left foot, and grasp the two segments in your hands at about the level of your knees. Contract the muscles on the front of your left shin, and try to pull your toes toward your knee as far as possible. Pull gently on the rope to assist the stretch. Contract your left calf as if to point your toes, but hold your foot in place by pulling harder on the rope. Hold the contraction for 6 to 8 seconds, relax for one breath, then deepen the stretch by bringing your toes closer to your knee twice more. Bend your left knee to 90 degrees and repeat this stretch, using your hands to provide resistance instead of the rope. Bending the knee moves the stretch from the gastrocnemius to the soleus. Then stretch the opposite leg.
YOGA STRETCHES
I recommend performing these six yoga poses in a sequence wherein you move smoothly and without interruption from one to the next. The poses are ordered to make this easy to do. Try to complete the full sequence two or three times.
FORWARD BEND
(HAMSTRINGS, BUTTOCKS, LOWER BACK)
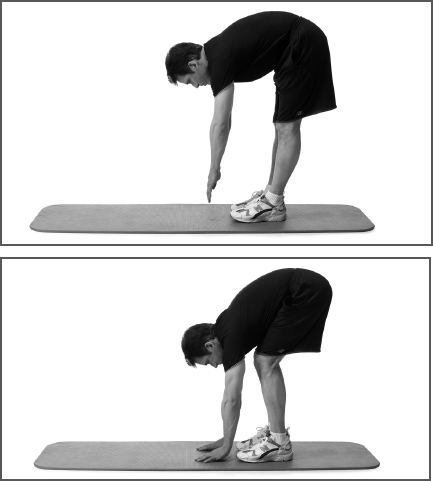
Stand comfortably and bend forward at the pelvis and waist, reaching toward the floor with both hands. Go as far as you can without discomfort. Pause, exhale, and then place your palms flat on the floor in front of your feet. (You’ll probably have to bend your knees slightly to accomplish this.) Inhale and straighten your legs again. Exhale and return your palms to the floor.
DOWN DOG
(CALVES, HAMSTRINGS)
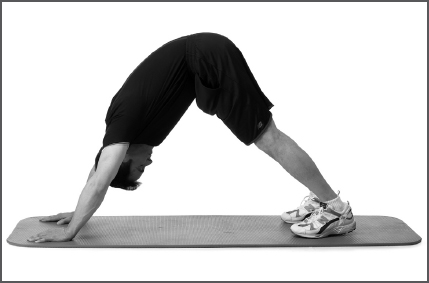
From the forward bend position, walk your hands forward so that your body forms an inverted V. Go no farther than you can without your heels coming off the floor. Hold for 30 seconds while breathing slowly, pressing your heels into the floor, and trying to relax every muscle in your body as much as possible.
COBRA
(HIP FLEXORS, ABDOMEN)
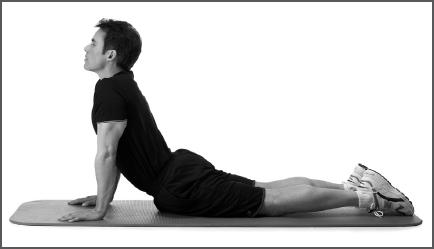
From the down dog position, swoop headfirst downward, forward, and back up again as though you were trying to sneak underneath a low barbed wire. You will end up in an arched pushup position. Hold for 20 seconds while breathing slowly and trying to relax your whole body.
LUNGE
(HIP FLEXORS, HAMSTRINGS, HIP ADDUCTORS, CALVES)
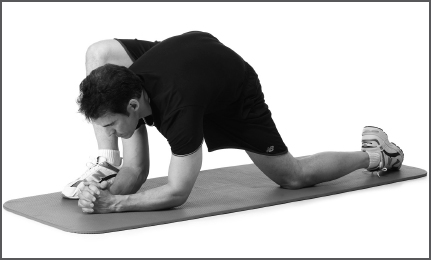
From the cobra position, draw your right leg forward and place the foot next to and just outside your right hand. Lower your elbows to the floor and lace your fingers together. Bend the knee of your right leg as much as necessary to achieve this position, but no more. (It’s okay for your right heel to come off the floor.) Hold for 20 seconds while breathing slowly and trying to relax your whole body. Reverse the position, extending the right leg backward and drawing the left forward. Hold for 20 seconds.
SPINE TWIST
(LOWER BACK, OBLIQUES, HAMSTRINGS, CALVES)
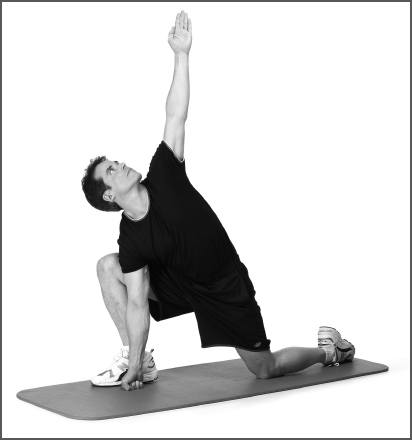
From the lunge position, raise your torso slightly and plant your right fist on the floor just inside your right foot. Straighten this arm completely and use it to support a share of your weight. Twist your torso to the left and raise your left arm straight overhead. Turn your head in the same direction so that you can see your upraised hand. Hold for 20 seconds while breathing slowly and trying to relax your whole body. Reverse your position, twist to the other side, and hold again for 20 seconds.
BOW POSE
(HIP FLEXORS, QUADRICEPS, ABDOMEN, CHEST, SHOULDERS)

From the spine twist position, lie facedown on the floor. Bend both legs, reach behind your body with both arms, and grasp the tops of your feet. Pull upward so that your head, torso, and thighs come off the ground as far as possible. Look forward and slightly upward. Hold for 20 seconds while breathing slowly and eliminating all unnecessary muscle tension.
STRETCHLIKE THERAPEUTIC EXERCISES
Lengthening the muscles through movement and positioning of the limbs is the most effective way to increase functional range of motion. But there is another, rather different way to increase mobility in various parts of the body that can serve as a supplement to the forms of stretching I’ve just demonstrated. The idea is to lengthen the muscles in the same way you flatten bread dough with a rolling pin, but instead of a rolling pin (ouch!) you use a therapeutic foam roller like the one pictured. (They are available from many physical-therapy offices and exercise-equipment retailers.)
Three parts of the body in particular benefit from these foam-roller exercises: the spine, the buttocks, and the iliotibial band.
SPINE MOBILIZATION EXERCISE
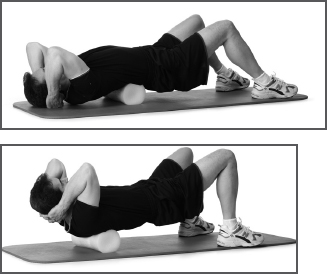
This exercise helps to increase spine mobility and correct posture. Sit on the floor with your knees bent and feet flat on the floor. Place a foam roller on the floor behind you, positioned so that it will run across your back just beneath the shoulder blades when you lie back. Support your neck in your hands with your fingers laced together and elbows wide. Slowly lean backward until your spine comes into contact with the foam roller. Even more slowly, ease your weight onto the roller. You should feel the vertebra in this area “releasing,” which may be slightly uncomfortable at first but should not be painful. Go back as far as you can comfortably go, and hold for 3 to 5 seconds.
After returning to the start position, move the foam roller 2 inches closer to your butt and repeat. Move the roller twice more to mobilize all the vertebrae in the thoracic (midback) section of your spine.
ILIOTIBIAL BAND MASSAGE
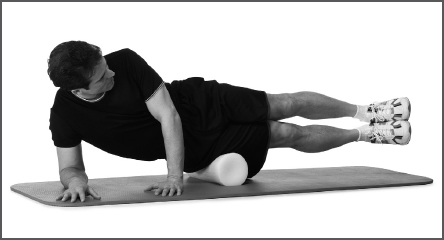
This exercise uses the “rolling pin principle” to lengthen the iliotibial band. I once used it to put a quick end to a nagging case of iliotibial band syndrome, wherein the IT band becomes tight and begins to rub during running, causing pain and inflammation. It works fast, but it can be quite painful. Lie on your side with a foam roller positioned crossways beneath your upper thigh. Keep your legs straight and both feet off the floor. Use your arms to slowly drag yourself forward while causing the roller to roll so that it squeezes your IT band from just below the hip to just above the knee. Walk your hands in the opposite direction for a reverse squeeze. Do this a few times, then repeat on the other side. It gets less painful when you do it consistently.
BUTTOCK TRIGGER-POINT RELEASE
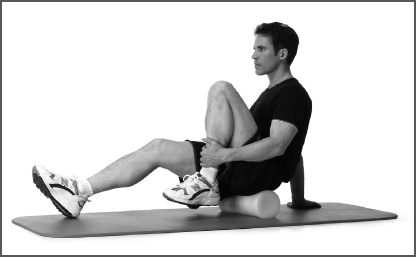
A trigger point is an area of concentrated tightness and tenderness that develops in a muscle. The piriformis, located deep inside the buttock, is a classic trigger point in runners. Releasing it through the therapeutic application of pressure can increase the mobility of your hips and reduce pain or tenderness in this area. Sit on a foam roller, place your left ankle on your right thigh, and shift most of your weight onto your left buttock. Roll very slowly backward and forward on the roller until you find the point of maximum tenderness. Get as much pressure as you can on this precise spot, and try to let your muscles relax (the gluteal muscles naturally contract to protect the piriformis from the pressure). You will suddenly feel your gluteal muscles release, and you will actually sink down into the roller another quarter-inch or so. The tenderness will increase as the roller gets more direct access to your piriformis. Continue for about 20 seconds, and then release the other side.