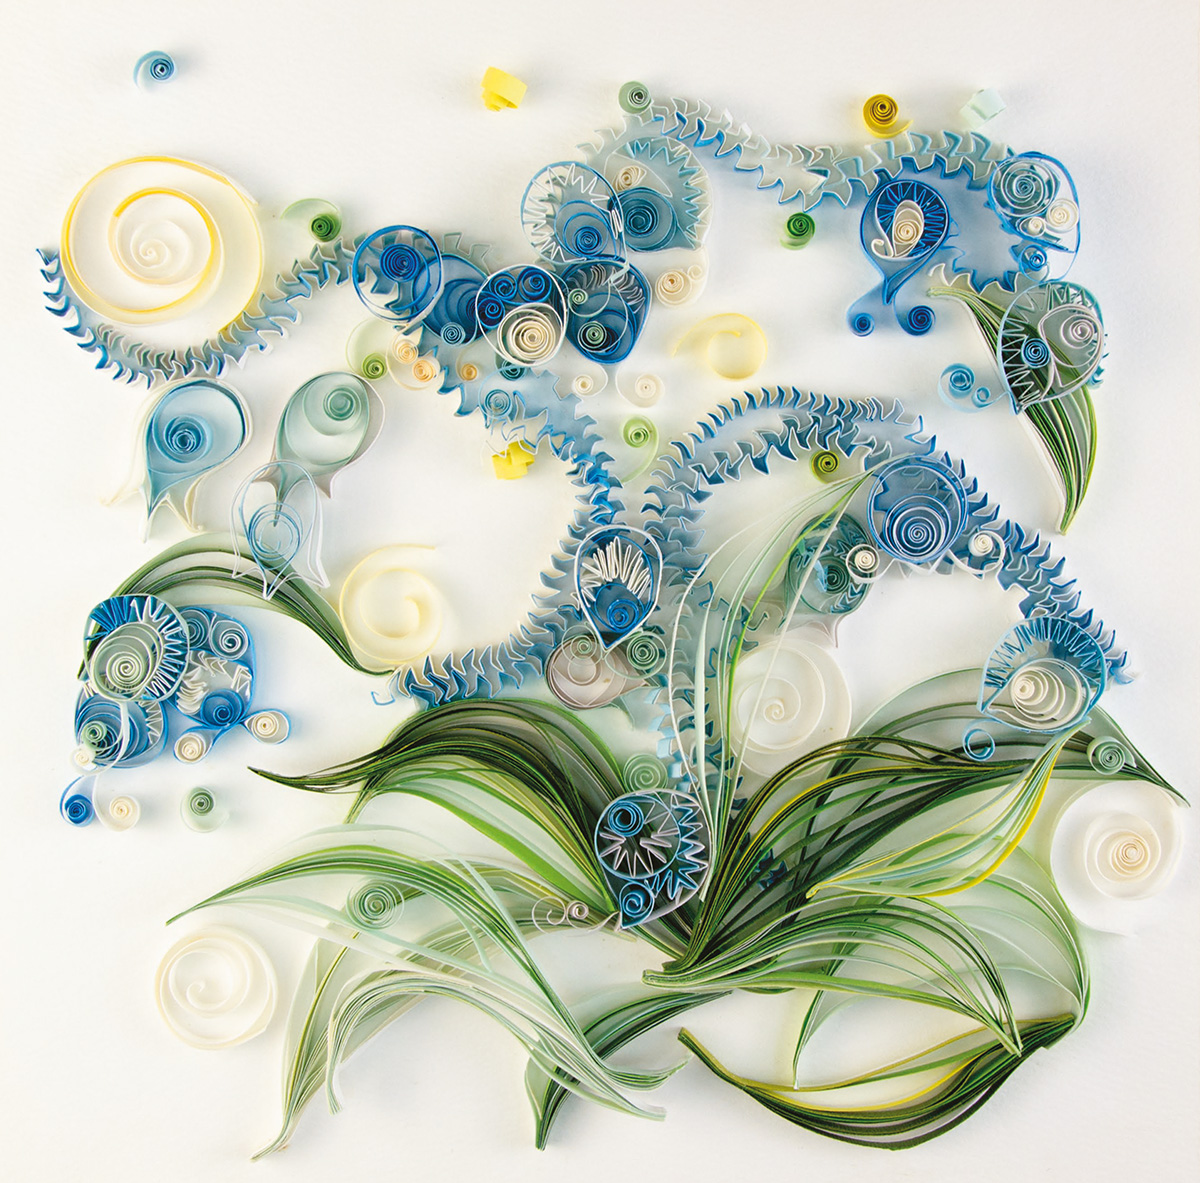
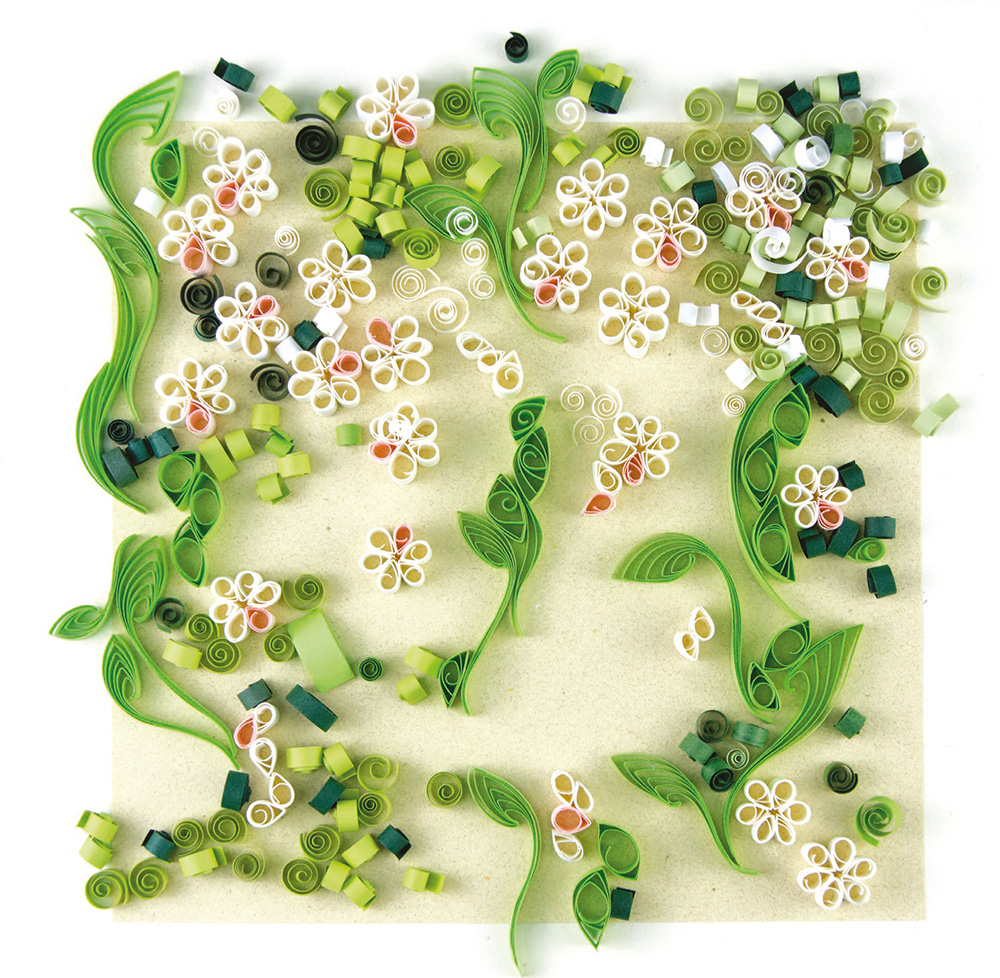
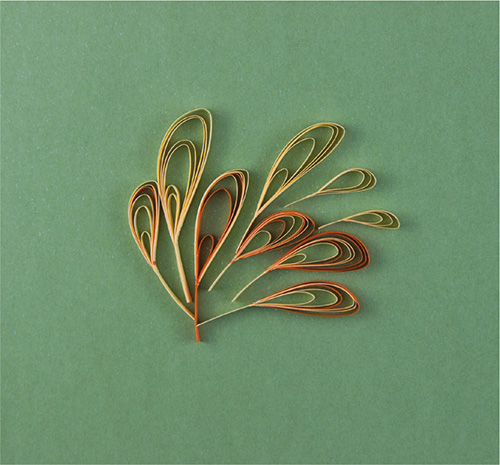
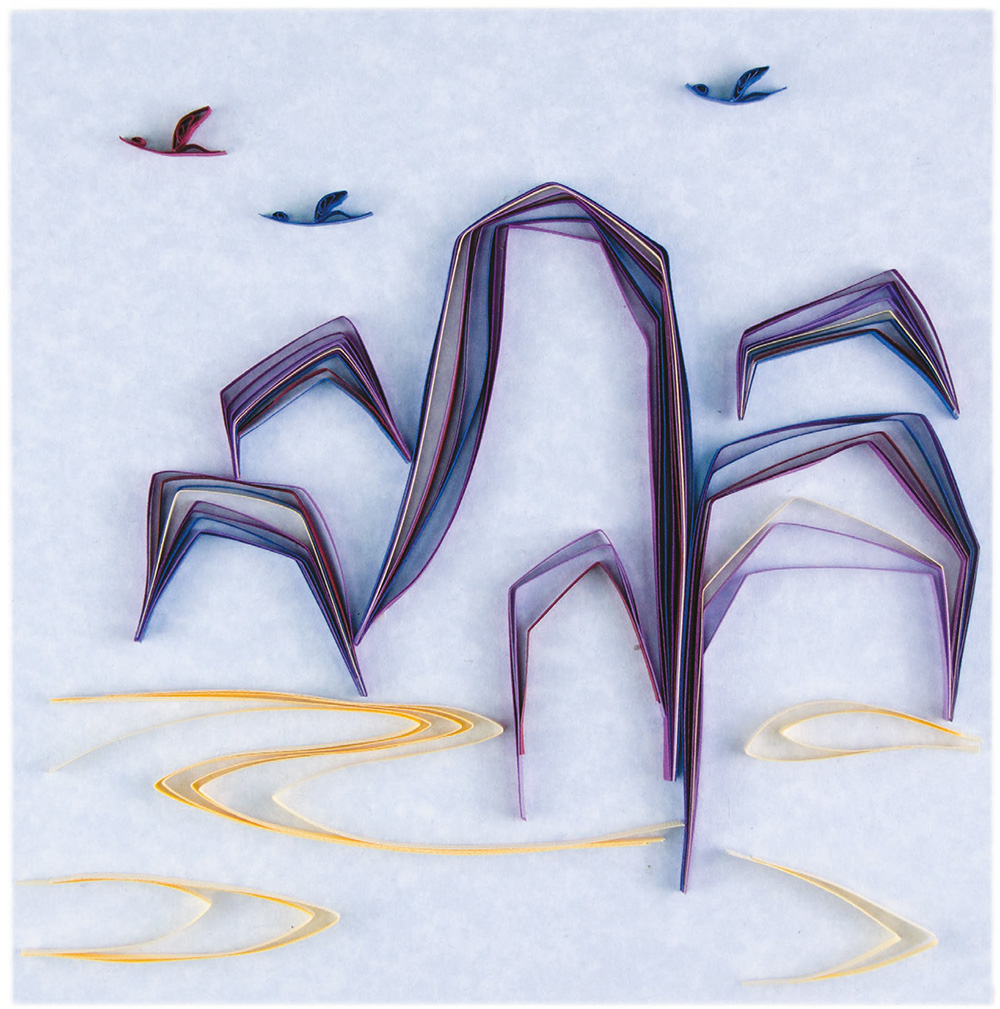
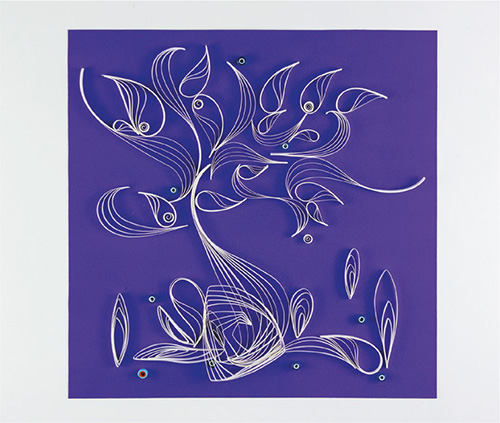
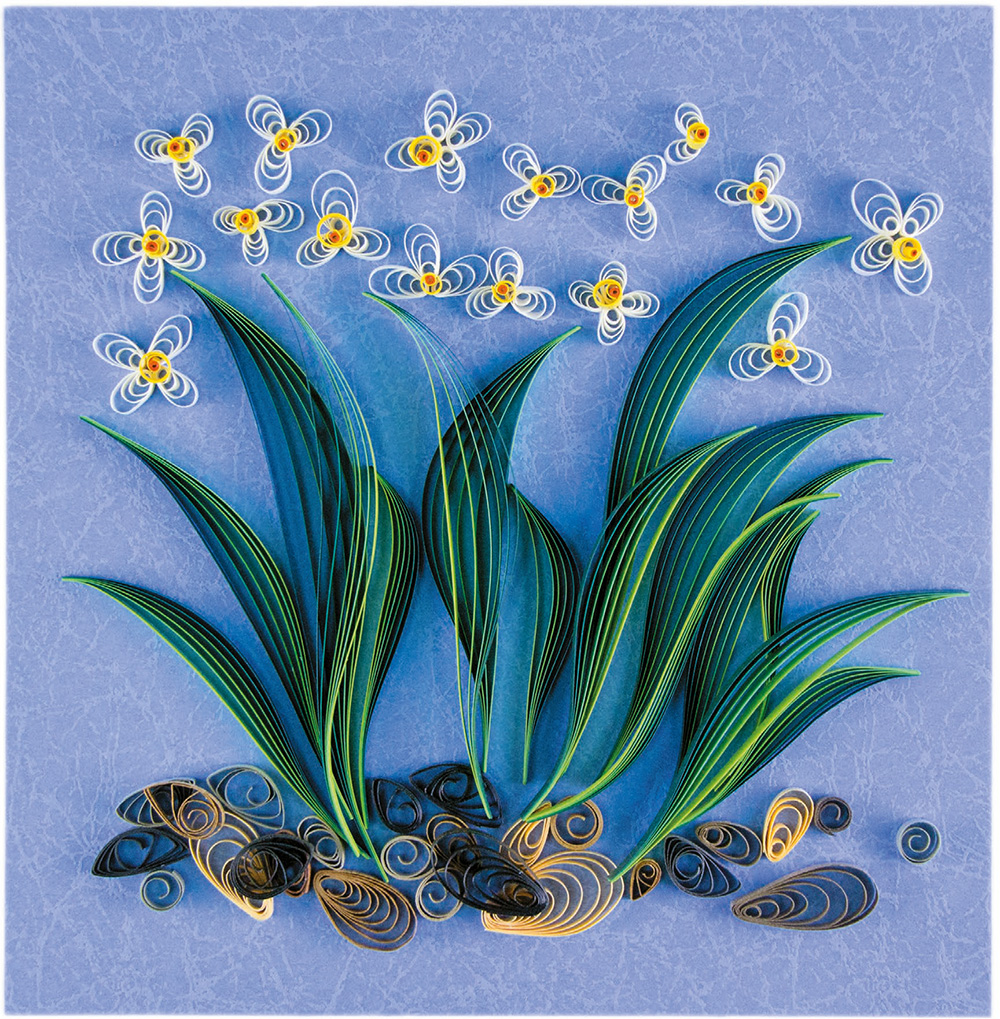
Fig. 25 Flowers and Grass
Dimensions: 27 by 27 centimeters
This work is untraditional in shape and surrealistic in style.
CHAPTER III
Beginner Tutorial
The 24 works in this chapter integrate the 24 solar terms typical of China. They are simple in structure, but rich in connotation, vivid and interesting. Through practicing with these works, you will be able to make a comprehensive use of the tools, materials, techniques, methods and basic elements we introduce in the previous chapters. You can also have hands-on experience of color collocation and picture composition, thus increasing your understanding of and interest in paper quilling. Now, please join us to explore the colorful kingdom of Chinese-style paper quilling.
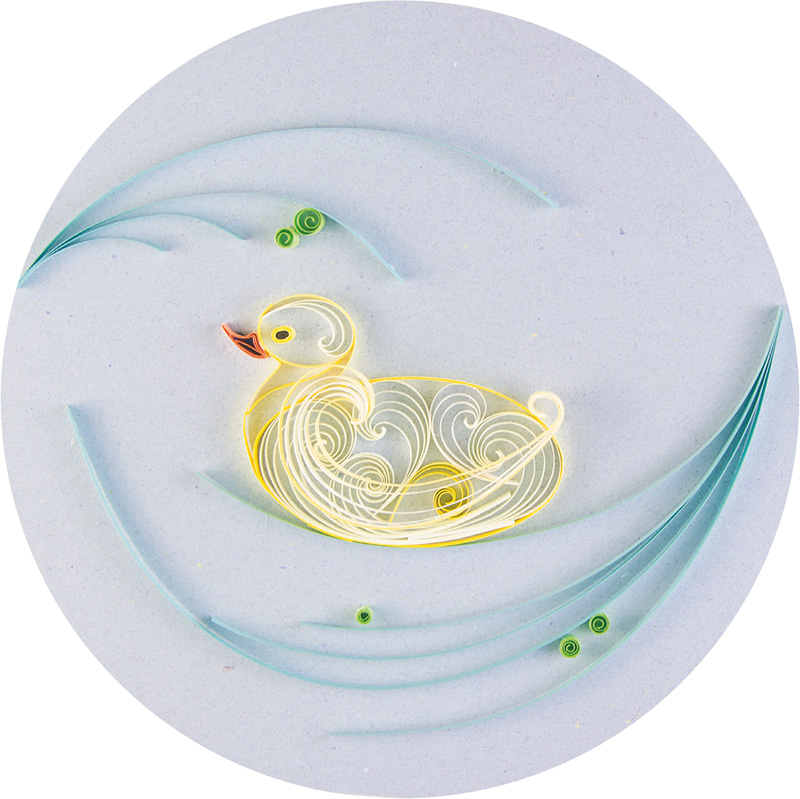
1. Beginning of Spring
Beginning of Spring (lichun) normally falls on Feb. 3 to 5 each year. It is the first of the 24 solar terms and an important one in Chinese tradition. By then, the east wind brings warm air, melting the ice and snow and revitalizing things on earth. During these days in ancient times, the emperor would greet the coming of spring with his officials and officers and pray for a bumper harvest. The ordinary people would prefer to celebrate this solar term by traveling, exchanging gifts, planting winter jasmines, setting up spring banners and eating spring rolls.
This work attempts to reproduce the picturesque scene created by the great Chinese poet Su Shi (1037–1101) in his poetic lines: Beyond the bamboo grove, several peach trees are in bloom. The river is warming up, which the ducks are the first to feel. In the work is a yellow duckling swimming in the water among some peach branches. The gentle spring wind creates ripples and brings warmth.
Materials and Elements
Duckling:  loop: oval loop; line: curved line
Feathers and wing:  crescent: wave crescent
Duckling eye:  coil: tight coil
Duckling beak:  coil: tower coil
Peach branches:  line: curved line
Peach leaves:  coil: loose coil
Background: white watercolor paper (suggested size: 27 by 27 centimeters), blue-gray embossed paper (suggested size: a piece of round paper with a diameter of 21 centimeters)

1 Make two oval loops, one bigger and the other smaller, with the lemon-yellow paper slips. The smaller one serves as the head of the duckling and the bigger one its body. Then make three curved lines following the picture to serve as the neck.
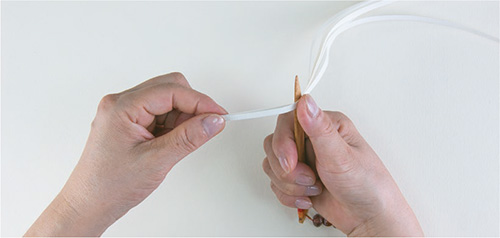
2 Paste five white paper slips on the beginning end, and then scrape the paper with a small bamboo knife or a similar tool until it curves.
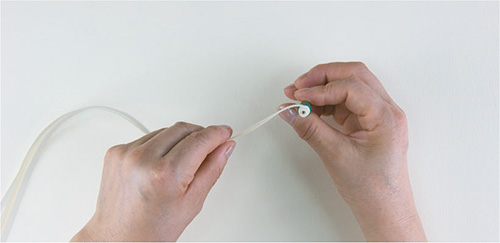
3 Roll the paper from the beginning end with the slotted tool, adding more curvature to it.
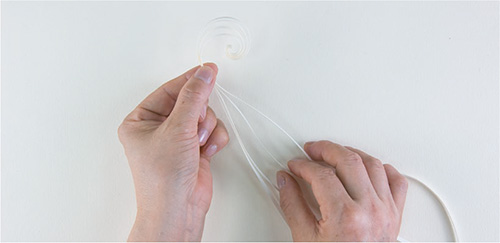
4 Hold the paper near the beginning end with one hand, and use another hand to draw the paper slips downward with different lengths, so the curvature of the slips proportionately increases from inside out.
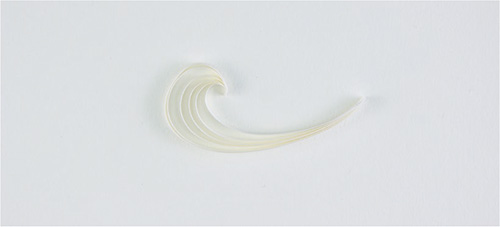
5 Paste the end together with white latex, and then cut the redundant part to complete the wave crescent, which is a variation of the basic crescent and a very common element in Chinese-style paper quilling.
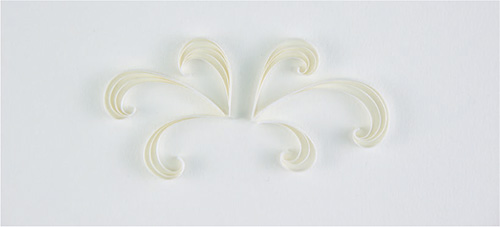
6 Make six wave crescents of different sizes and layers with white paper slips.
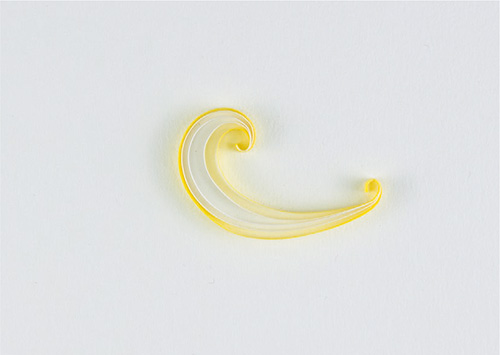
7 Make a wave crescent with two lemon-yellow and three white paper slips, with the lemon-yellow slips as the outermost layers and the white slips as the internal layers. Roll the end of the wave crescent with the slotted tool to make it curve. This will serve as the wing of the duckling.
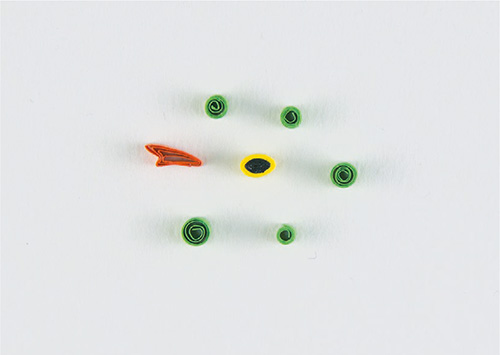
8 Make an oval tight coil with black and yellow paper slips, which will serve as the eye of the duckling. Make a loose coil with the orange-red paper slip and then pinch and produce a tower coil out of it as the duckling’s mouth. Make several loose coils with grass-green paper slips, which will serve as peach leaves.
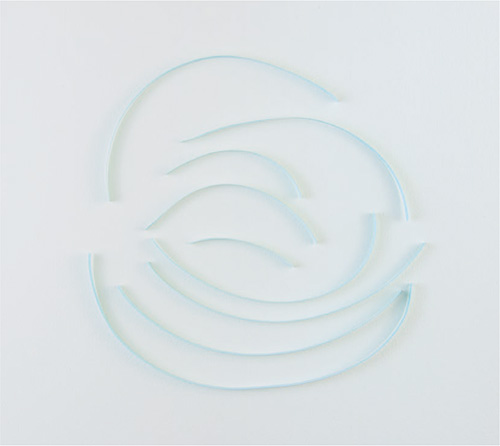
9 Make nine light-blue curved lines for peach branches by scraping.
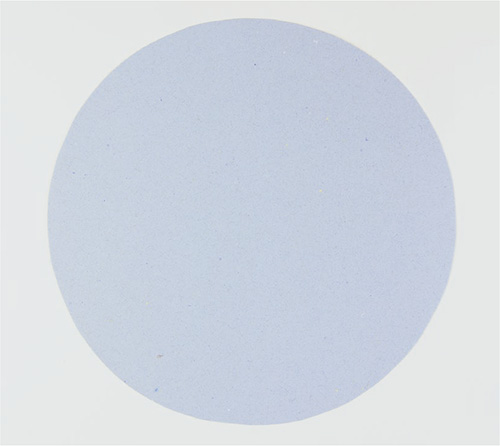
10 Stick the blue-gray circular embossed paper onto the center of the white watercolor paper.

11 Place the head and body of the duckling on the center of the embossed paper.
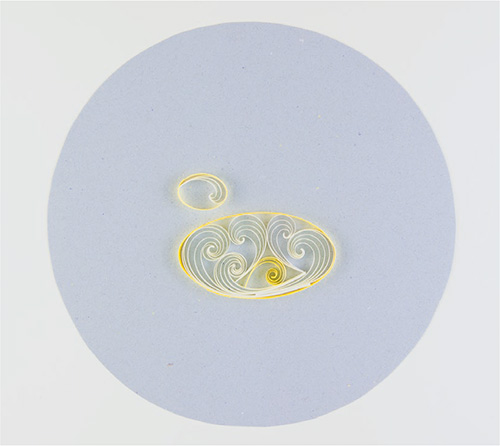
12 Add wave crescents inside the head and body to serve as feathers.
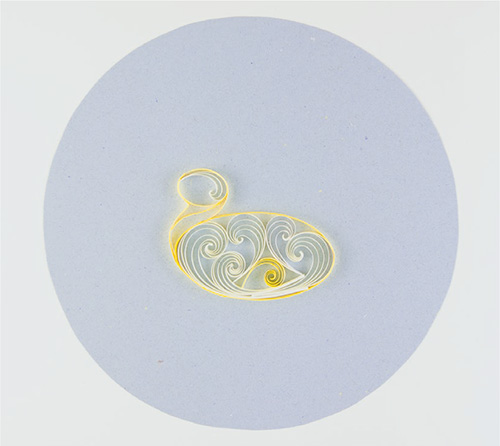
13 Make the neck of the duckling with the three curved lines.
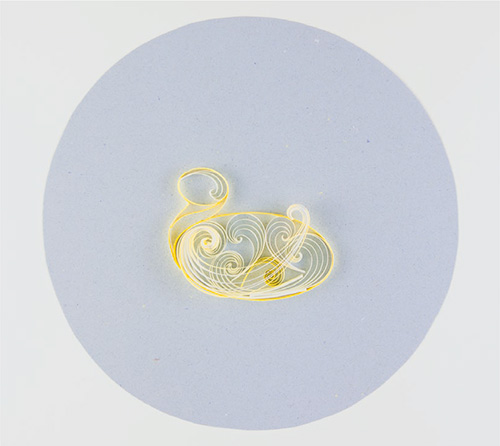
14 Add the wing onto the duckling’s body.
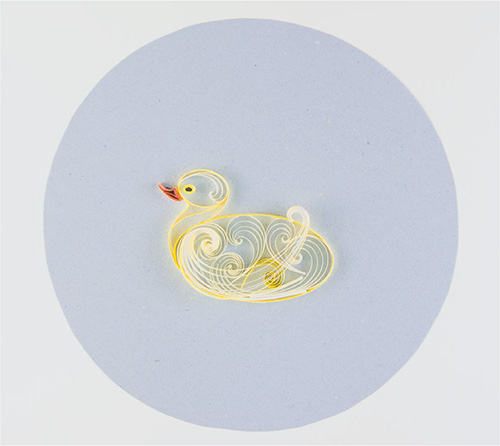
15 Add the eye and the beak onto the head of the duckling.
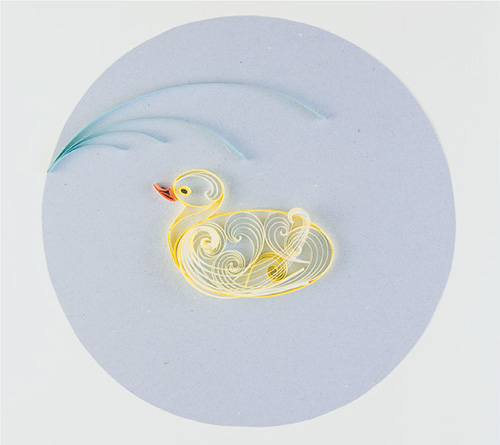
16 Add four light-blue curved lines as peach branches on the upper left of the picture.
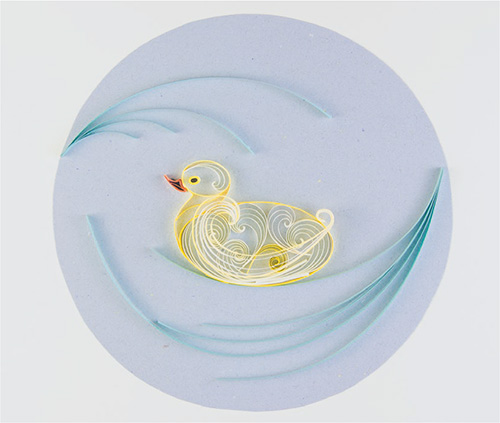
17 Add five peach branches on the bottom of the picture.
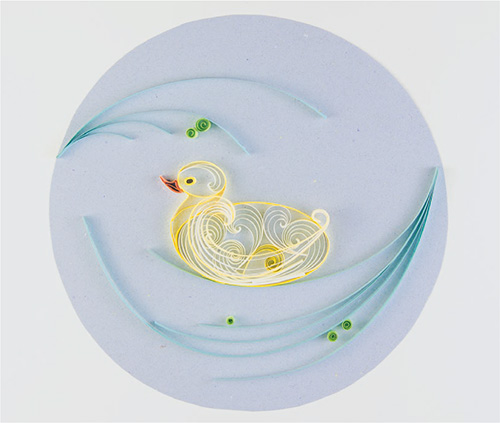
18 Add some grass-green loose coils between the peach branches as peach leaves. Complete the work by adjusting and fixing its contents with white latex.
2. Rain Water
Rain Water (yushui) as a solar term often falls on Feb. 18 to 20 each year. By then, the ice and snow will thaw with the warm east wind and there will be more rainfall, hence the name of Rain Water. During this period, the temperature goes up again, injecting life into everything on earth and heralding the advent of spring.
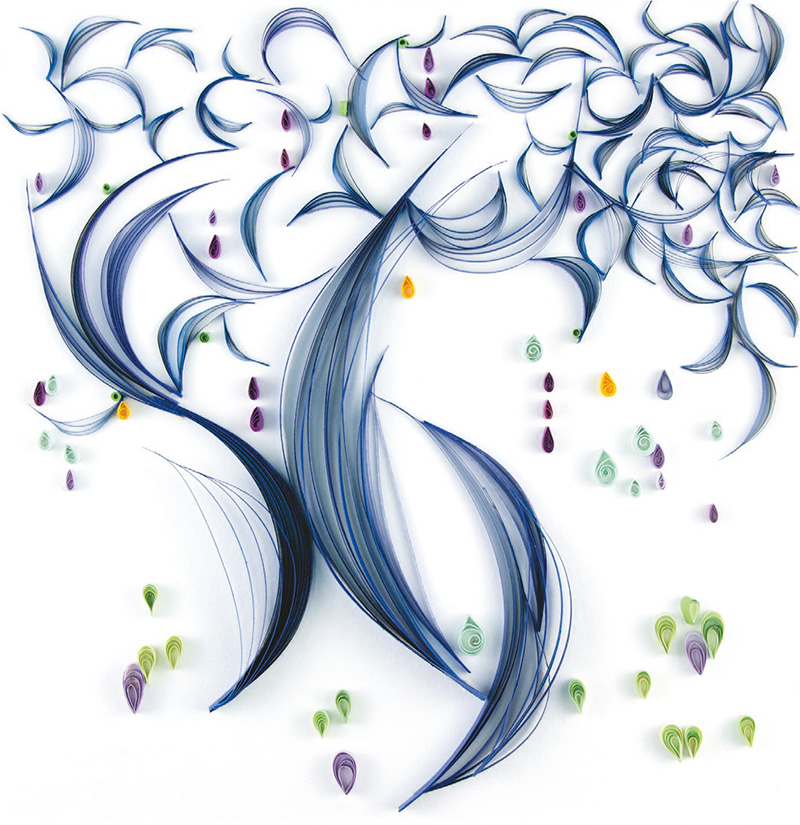
This work, with blue as its main tone, seeks to embody the color of water in an abstract way, with the colorful teardrop coils and raindrop loops showing the shapes of rain. In the picture stand several trees bathing in a spring drizzle. Vigorous and vibrant, they make the viewer feel as if spring were on its way here.
What is worth noticing is that paper slips of varied sizes are used in this work. The crescent tree branches are made of paper slips 1.5, 3 and 5 millimeters wide respectively, while the trunks are made of paper slips 5 millimeters wide and cut diagonally. This unique method of production shows the degree of freedom of Chinese-style paper quilling. While making your own works, you can also try to create different artistic effects through changing the size of paper slips.
Materials and Elements
Trunks:  crescent: basic crescent (the ends of the paper slip are thicker on one end and thinner on the other)
Branches:  crescent: basic crescent (three specifications)
Raindrops:  loop: raindrop loop; coil: teardrop coil
Background: white watercolor paper (suggested size: 27 by 27 centimeters)
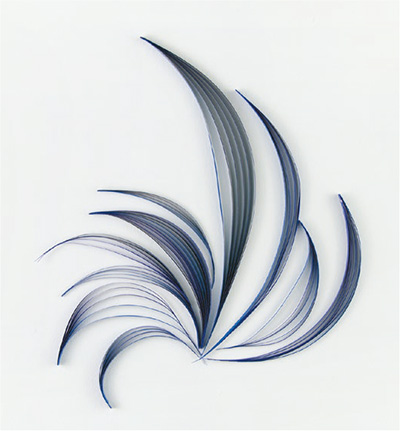
1 Cut the 5-millimeter ultramarine-blue paper slip into two along the diagonal, one end thicker and the other thinner. Make 10 basic crescent trunks of different shapes and layers, each of them thick on one end and thin on the other.
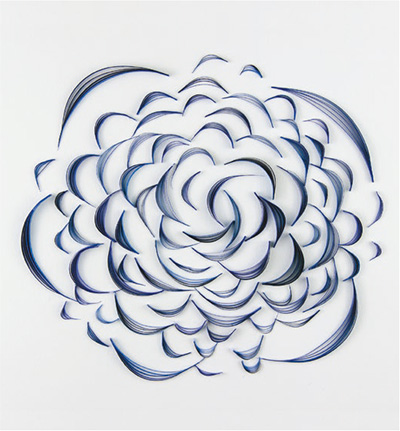
2 Make a large number of basic crescent branches of different sizes, shapes and layers with paper slips 1.5, 3 and 5 millimeters wide.
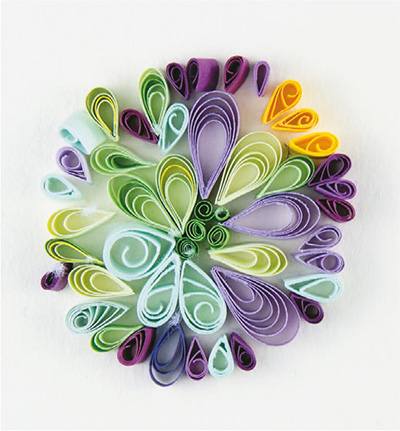
3 Make many raindrop loops and teardrop coils as rainwater with violet, pink purple, pink green, light green, grass green, light blue and medium yellow paper slips.
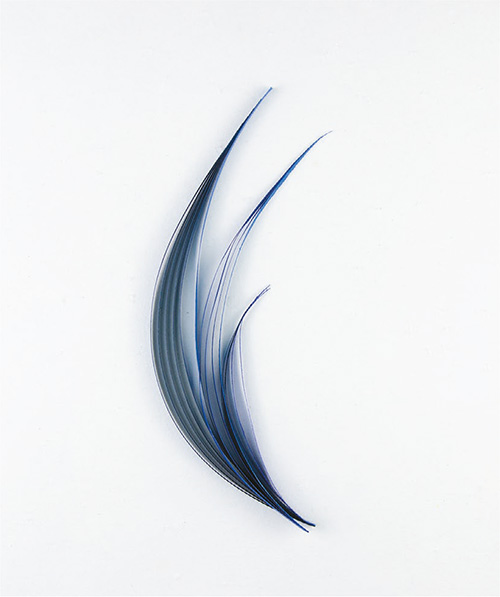
4 Place three basic crescent elements from left to right, big to small, in the center, which serve as the trunk of the first tree.
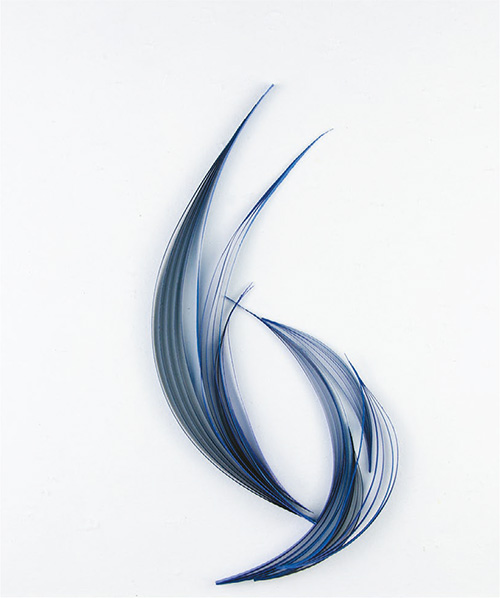
5 Add several basic crescent elements to the bottom right of the trunk. They bend in an opposite direction to the first trunk. The elements can superimpose to form the trunk of the second tree.
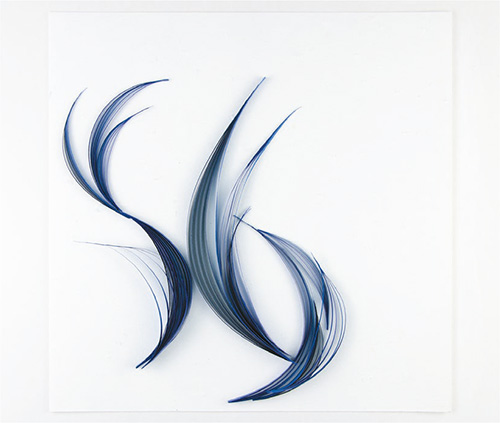
6 Add several basic crescents as the trunk of the third tree to the left of the first trunk according to the picture.
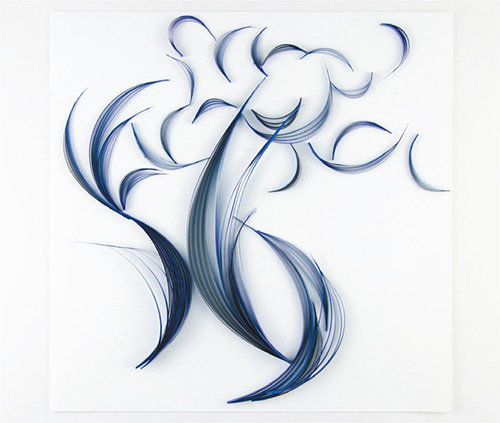
7 Add smaller crescents above the three trunks as branches. Be careful that the branches face different directions and differ in distribution.
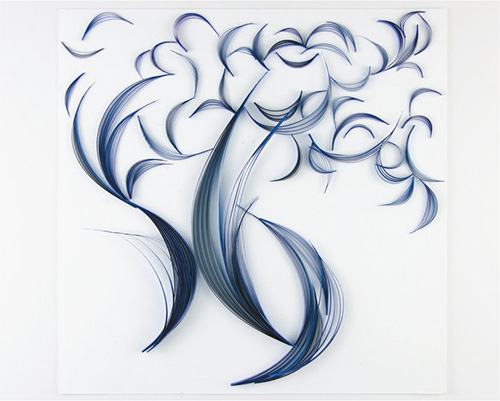
8 Add more branches and arrange them in picturesque disorder.
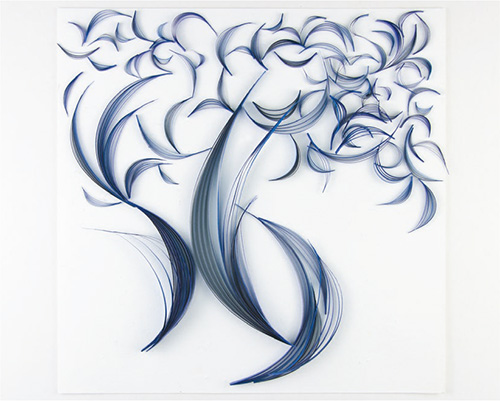
9 Add more crescents to make the branches look more three-dimensional. The branches on the right can be denser than those on the left so that they look in natural disorder.
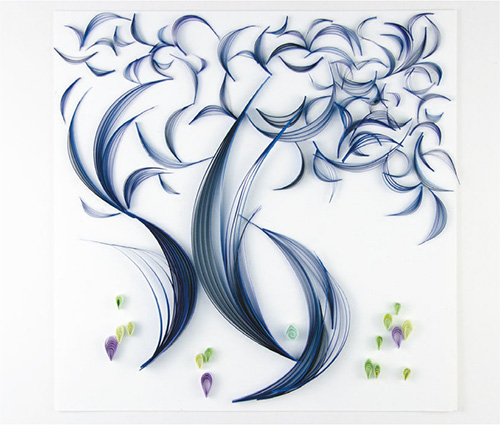
10 Add raindrop loops and teardrop coils onto the bottom board as rainwater.
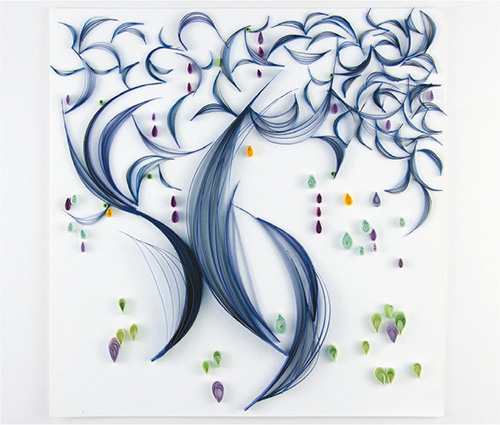
11 Add rainwater between the branches and right under the trees. Complete the work by adjusting the contents in the picture and fixing with white latex.
3. Waking of Insects
Waking of Insects (jingzhe) normally falls on Mar. 5 to 7 each year, meaning the awakening of insects from hibernation. By then, it has turned warmer. The rumbling of spring thunder wakes the insects from sleep. Peach flowers are in full blossom, orioles begin to sing, and everything on earth starts awakening.
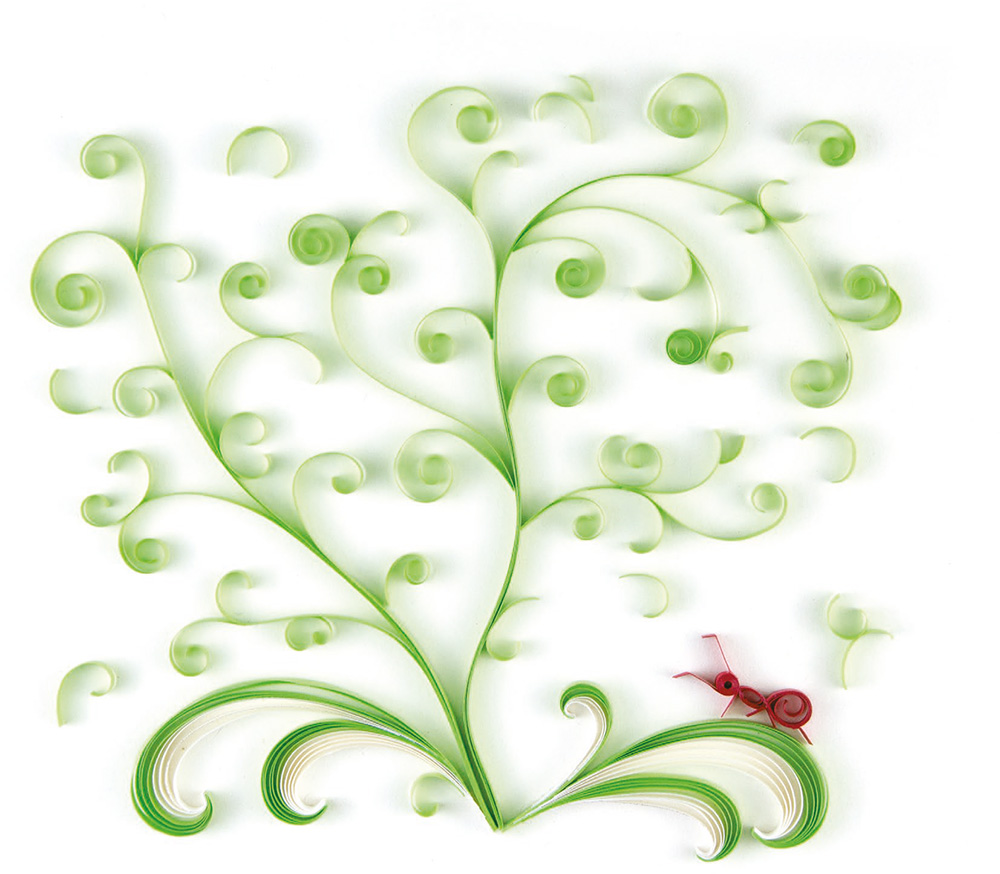
In this work, the author reproduces the birth of spring plants with grass-green paper slips and presents this solar term with an ant just moving out of the dirt. The whole work is concise with smooth lines, giving the viewers a sense of freshness. The vivid-looking ant reaches forward with its two feelers, as if looking for the breath of spring. Just awakened by spring thunder, it moves out of the dirt with caution.
Materials and Elements
Plant roots:  crescent: wave crescent
Plant stems and leaves:  lines: curved lines; scroll: long-tail scroll, basic scroll
Ant:  coil: loose coil, tight coil, marquise coil; line: broken line
Background: white watercolor paper (suggested size: 27 by 27 centimeters)
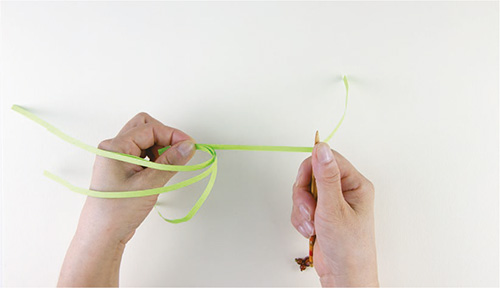
1 Paste five grass-green paper slips together at the beginning end, the middle one (i.e. the third one) being the longest, the second and fourth shorter and the first and fifth the shortest. Scrape the paper slips on the most outside with small bamboo knife forcibly so that they curve.
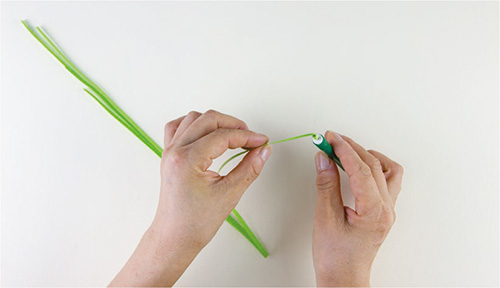
2 Roll the paper slip along the curve with the slotted tool.
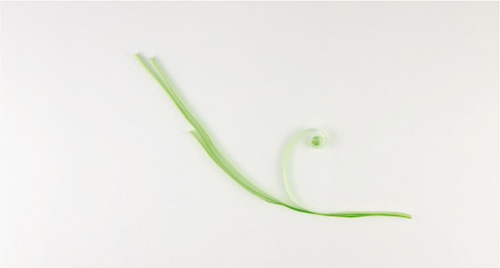
3 After the slotted tool is removed, the tail end of the slip forms a spiral.
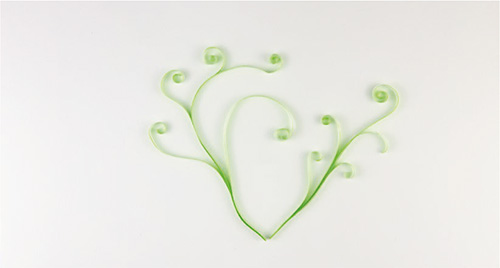
4 Treat four other paper slips similarly. The spirals, which are paired freely, can face either inward or outward. Then follow the previous steps and make a similar one with grass-green paper slips. They serve as the stems of the plant.
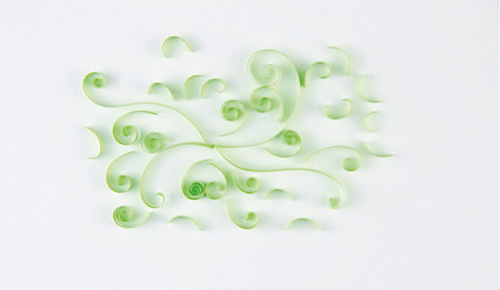
5 Make curved lines and scrolls (long-tail scrolls and basic scrolls) of different shapes in large quantities with grass-green paper slips. They will serve as the leaves on the stems.

6 Make five wave crescents of varied shapes, sizes and layers with grass-green and white paper slips, which will serve as the root of the plant.
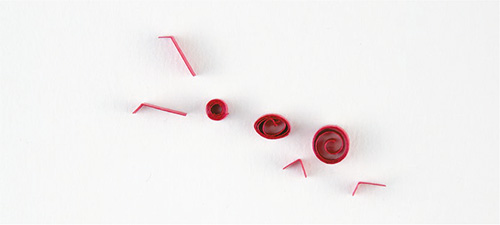
7 Make a tight coil with the deep-red paper slip to serve as the head of the ant, a marquise coil as the thorax, and a loose coil as the abdomen. Make four broken lines to serve as the ant’s feelers and feet.
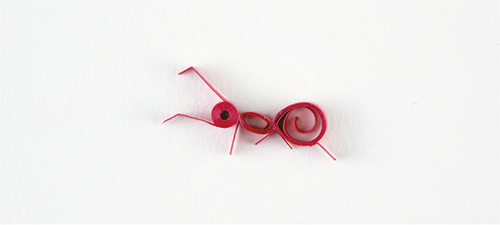
8 Put different parts of the ant together and glue them with white latex.
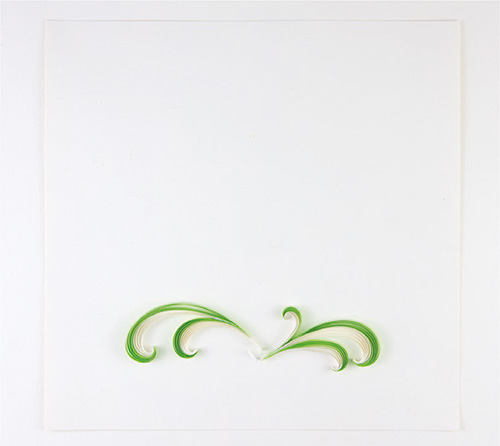
9 Add wave crescents at the bottom of the picture to form the root of the plant.
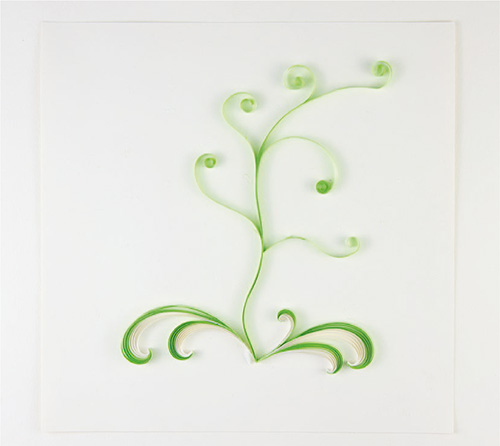
10 Add a stem onto the root.
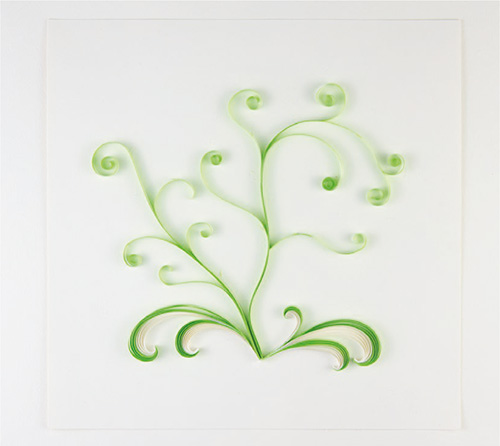
11 Add one more stem.
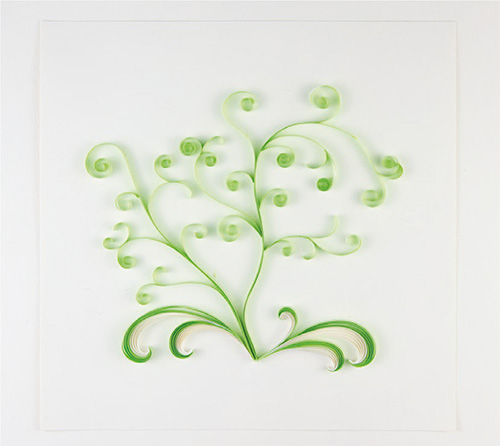
12 Add spiral-shaped leaves onto the stems.
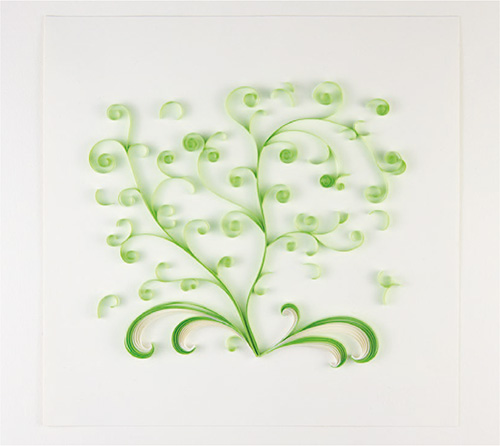
13 Add more leaves here and there in the picture.
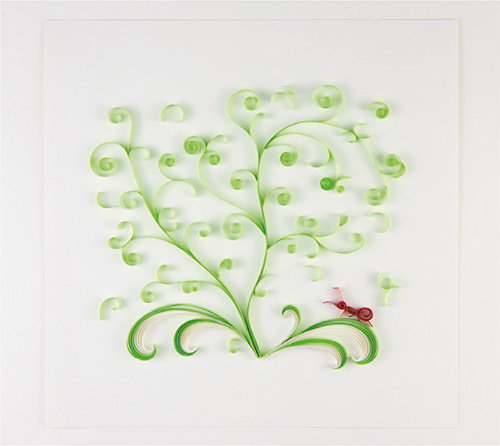
14 Place the ant at the bottom of the plant. Complete the work by adjusting and fixing its contents with white latex.
4. Vernal Equinox
Vernal Equinox (chunfen) is a solar term that means half of the spring has gone. It normally falls on Mar. 20 to 21 each year. On this day, the sun almost shines directly on the equator and the day is almost as long as the night across the world. After that day, the day becomes increasingly longer in the Northern Hemisphere and shorter in the Southern Hemisphere. In ancient times, Chinese emperors would offer sacrifices to the sun on that day and the people would start to sweep their ancestors’ tombs. In addition, there are some other customs associated with this solar term, such as balancing eggs and flying kites.
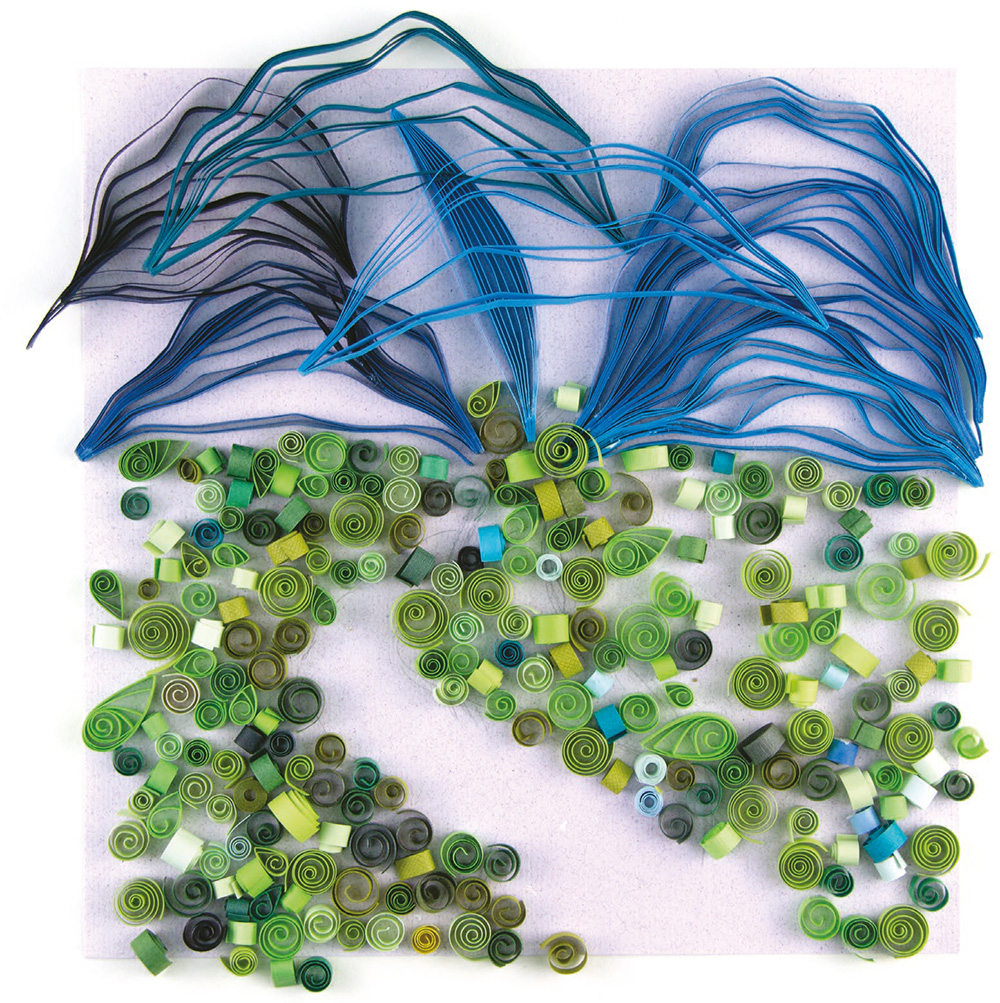
Adopting the freehand genre from Chinese traditional painting, this work portrays a beautiful scene of mountains and rivers in spring. It consists of blue mountains in the distance and the green grassland nearby, the latter being separated into two by the purposefully-left blank space that symbolizes a river as well as “half” connoted by the Vernal Equinox. Overall, the colors used in this work display the charm of spring.
Materials and Elements
Waterfall:  crescent: basic crescent
Mountains:  crescent: irregular crescent
Grassland:  coil: teardrop coil, loose coil, tight coil
Background: white watercolor paper (suggested size: 27 by 27 centimeters), light-purple embossed paper (suggested size: 21 by 21 centimeters)
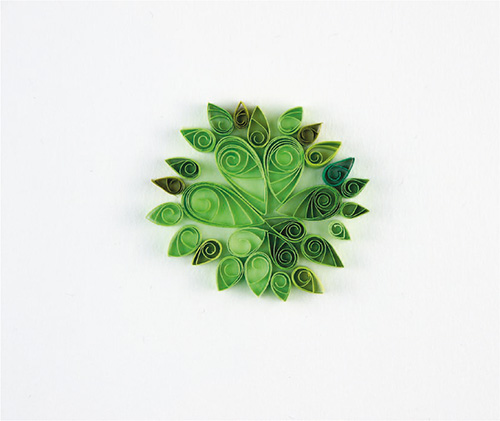
1 Make some teardrop coils of different sizes with paper slips in various shades of green.
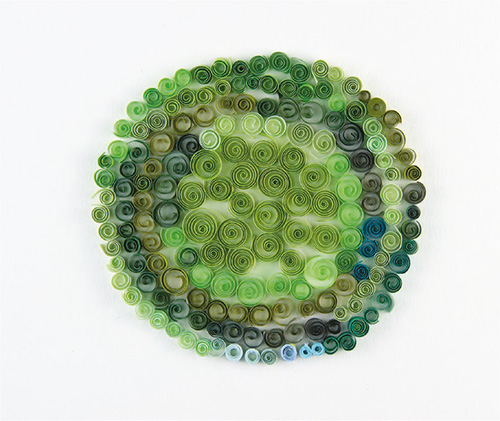
2 Make a number of loose and tight coils of different sizes with paper slips in various shades of green and blue, mainly in the green colors.
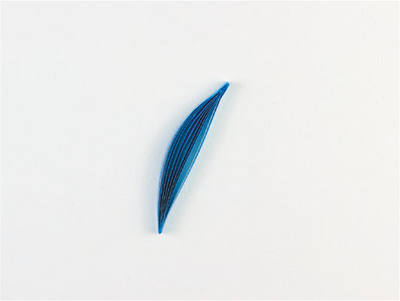
3 Make a 10-layered basic crescent with lake-blue paper slips, which will serve as the waterfall.
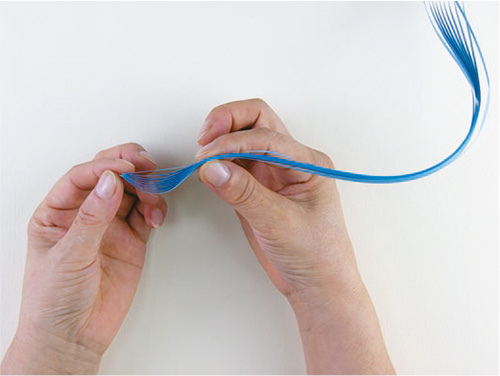
4 Paste 10 lake-blue paper slips at the beginning end and treat them in the same way the basic crescent is made.

5 Do not fix the tail end of the basic crescent with white latex. Instead, fix it by folding it as shown in the picture.

6 Fold it several times until four to five creases appear. Fix the tail end to form the shape of a mountain rock.
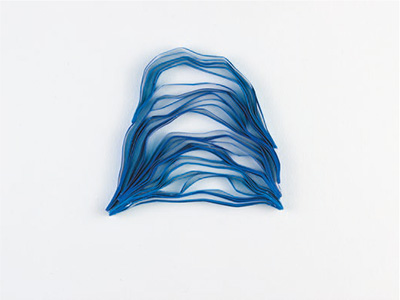
7 Make four rock shapes altogether. Put them together and fix them with white latex to form a complete mountain.

8 Make five more rock shapes of different postures with paper slips in shades of blue.

9 Stick the light-purple embossed paper onto the center of the white watercolor paper.
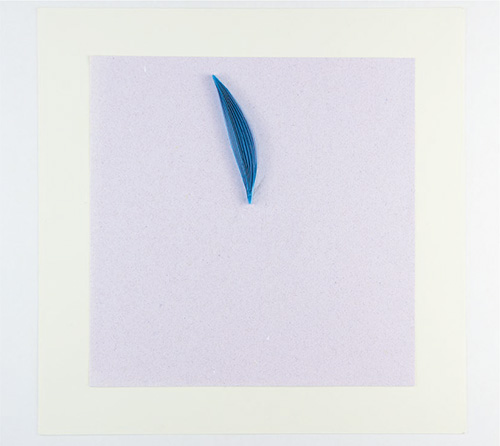
10 Add the waterfall onto the top of the picture.
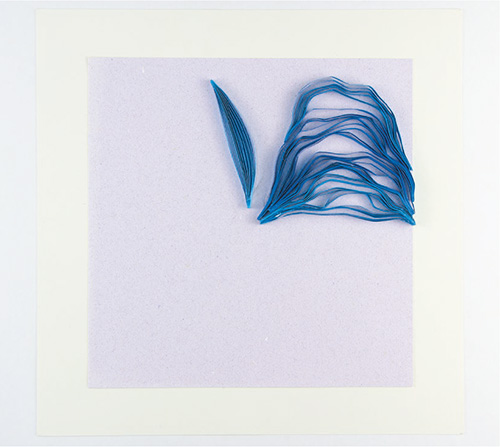
11 Add the mountain to the right of the waterfall.
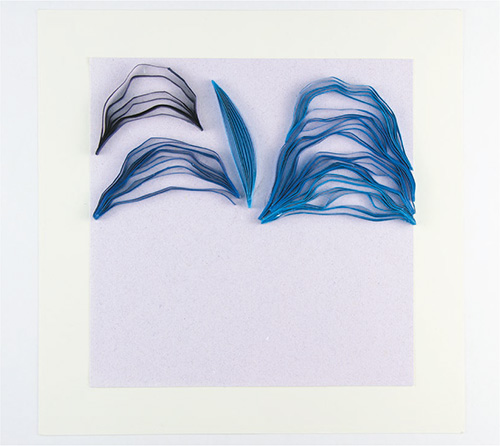
12 Add two rock shapes on the left of the waterfall.
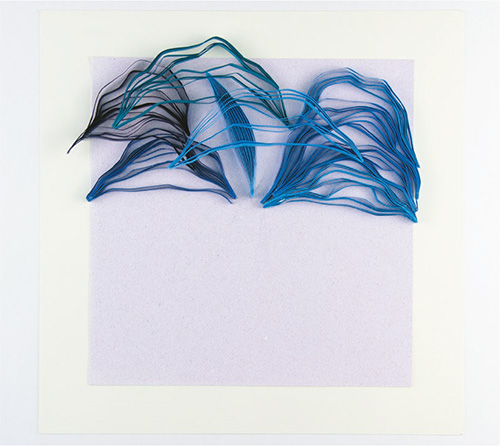
13 Add rock shapes on the waterfall to create an impression of peaks rising upon each other.
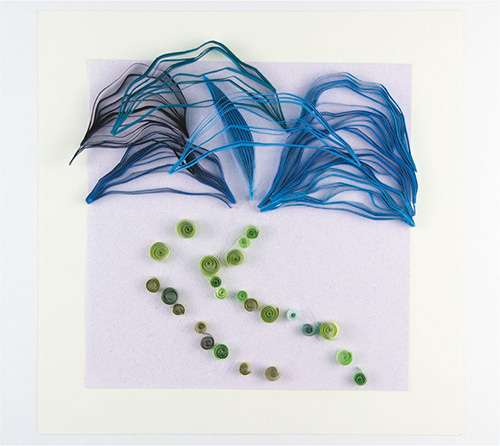
14 Produce the outline of a river in the lower part of the picture with the tight and loose coils.
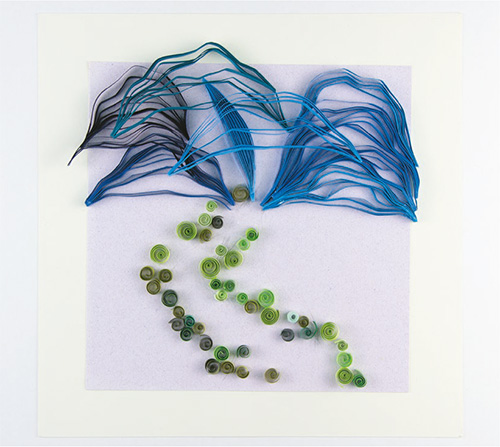
15 Keep adding tight and loose coils on both sides of the river to make the outline of the river more prominent.
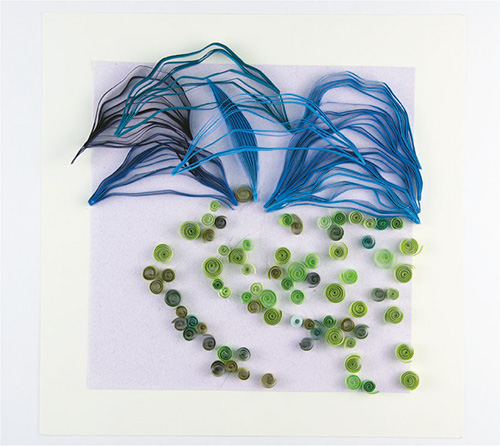
16 Add tight and loose coils of various colors on the right side of the river.
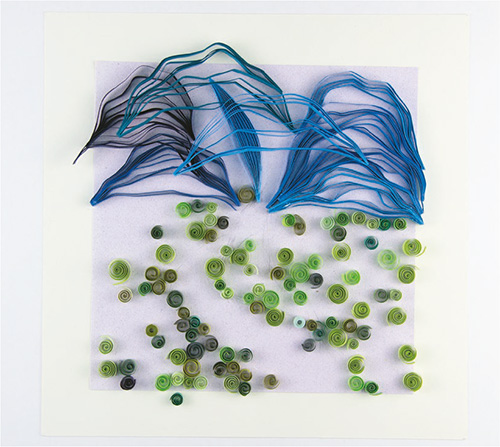
17 Add more tight and loose coils on the left side of the river to form the whole stretch of the grassland.
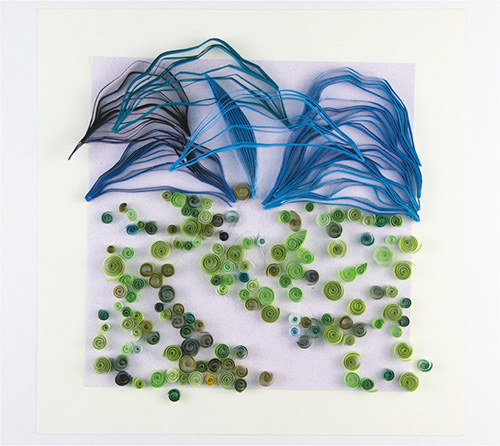
18 Add smaller paper coils onto the grassland to make it look more luxuriant.
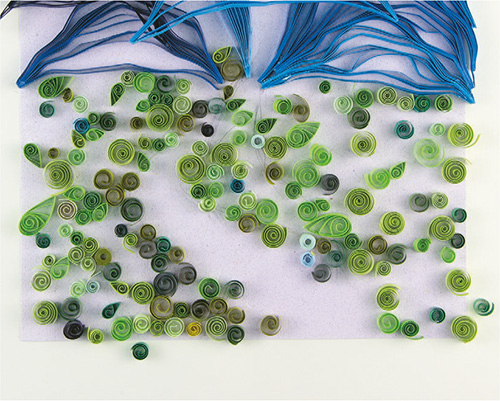
19 Add teardrop coils to the grassland to enrich its variations.
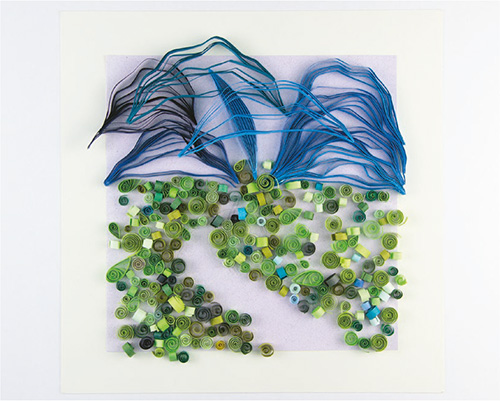
20 Stand some paper coils sideways and add them onto the grassland to increase the three-dimensional effect. Complete the work by adjusting its contents and fixing with white latex.
5. Pure Brightness
Pure Brightness (qingming) normally falls on Apr. 4 to 6 each year, meaning the weather turns clear and bright and all the things on earth begin to grow, because by this time it has become increasingly warmer, trees and grass have begun to sprout, and farmers have started spring ploughing. The customs associated with this solar term include going for a spring outing, having cold food and sweeping ancestors’ tombs. Originally, Pure Brightness was only the name for this solar term, but gradually it has become a festival to cherish the memory of one’s ancestors. Together with the Dragon Boat Festival, the Spring Festival and the Mid-Autumn Festival, it constitutes one of China’s four traditional festivals.
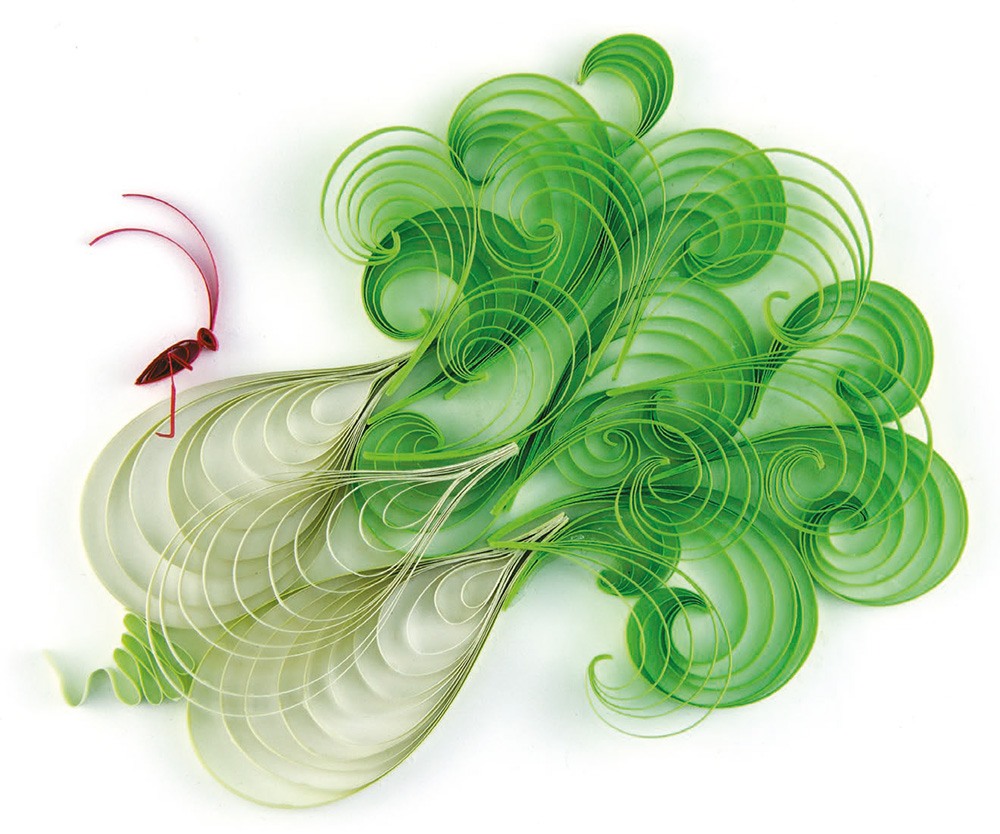
Adopting the green and white colors of a Chinese cabbage, this work embodies the characteristics of spring ploughing. The cabbage is vivid-looking, consisting of only wave and teardrop crescents. The grasshopper on it symbolizes motion and the recovery of all things on earth. They contrast finely with each other.
Materials and Elements
Cabbage stems:  loop: raindrop loop
Cabbage leaves:  crescent: wave crescent
Cabbage root:  line: curved line
Grasshopper:  coil: tight coil; loop: raindrop loop; line: curved line, broken line
Background: white watercolor paper (suggested size: 27 by 27 centimeters)
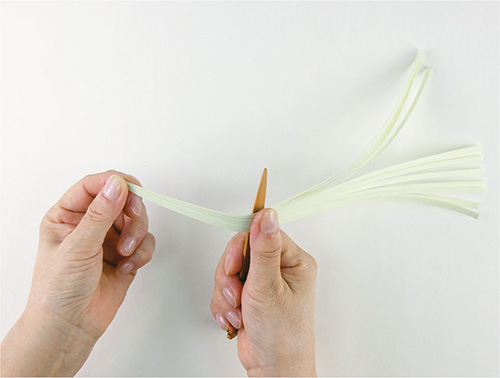
1 Paste 15 pink-green paper slips together at the beginning end with white latex. Scrape the end forcibly with a bamboo knife for several times until it bends naturally.
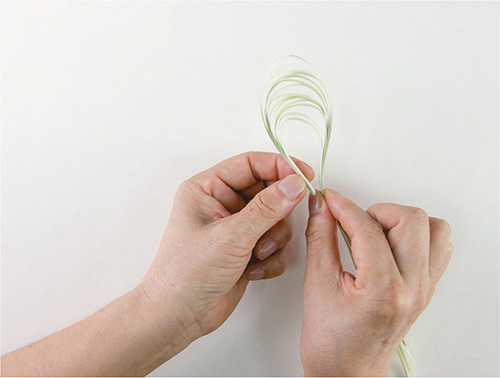
2 Hold the beginning end with one hand, and use another hand to draw the paper slips out with different lengths, thus leaving some space between the paper slips. Cut the redundant slips and fix them at the tail end with latex, forming a big raindrop loop.
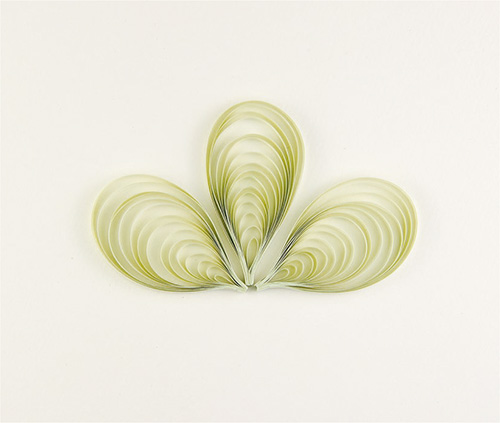
3 Paste both ends of the raindrop loop together. Follow this method and make three pink-green raindrop loops, which will serve as the stems of the cabbage.
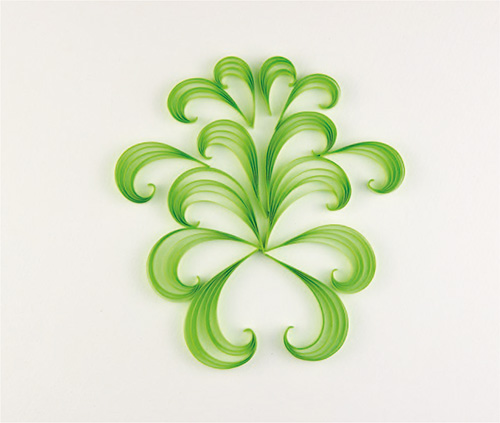
4 Make more than 10 wave crescents of different sizes with the grass-green paper slips, each consisting of five layers. These will serve as the cabbage leaves.
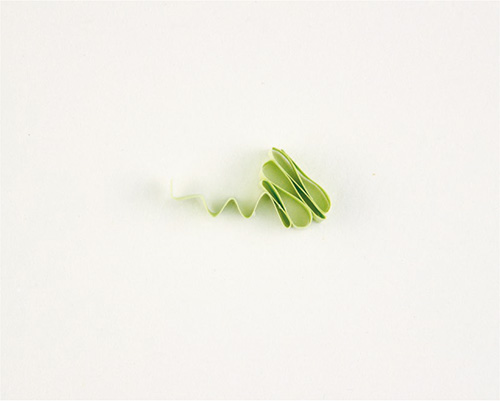
5 Make a continuous curved element in the form of “8” with the light-green paper slips. The curved lines are arranged from big to small, with some of them remaining loose at the end. This will serve as the cabbage’s root.
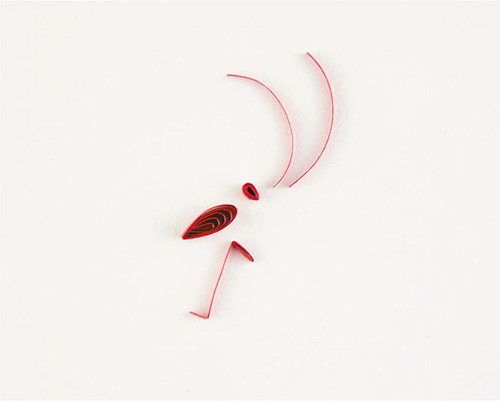
6 Make the body parts of the grasshopper with the deep-red paper slips. Make a tight coil as its head and thigh, a raindrop loop as its body, curved lines as its feelers, and broken lines as its calf and feet.

7 Pile up the cabbage stems on the lower-left corner of the background paper. Place one raindrop loop in between the two raindrop loops.
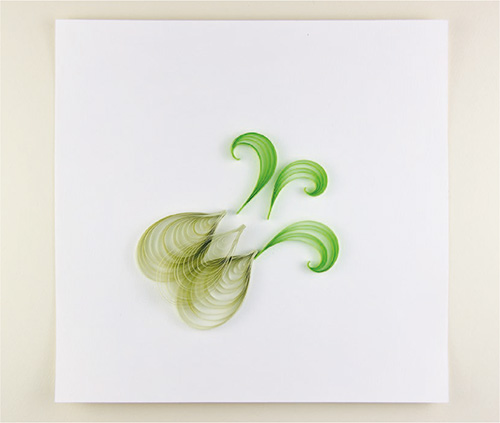
8 Place three grass-green wave crescents on the upper right of the cabbage stems to serve as cabbage leaves.
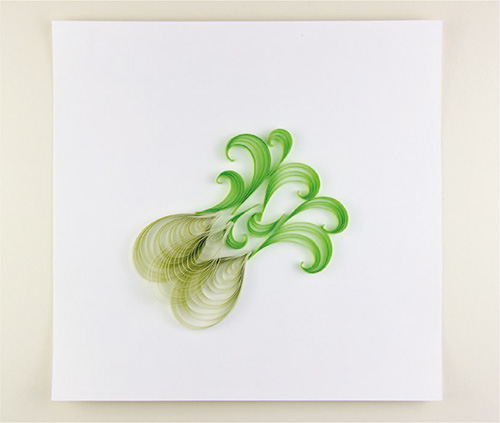
9 Add more grass-green wave crescents around the cabbage leaves.
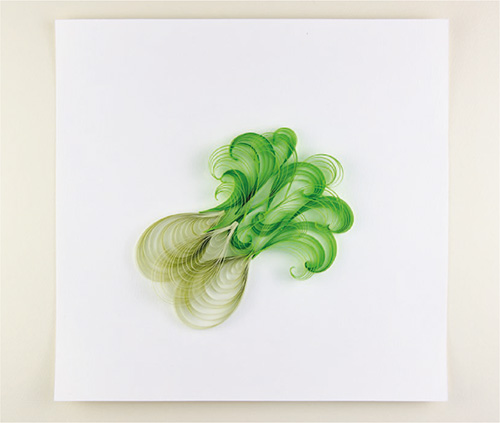
10 Pile up the second layer of grass-green wave crescents above the cabbage leaves to make the leaves look more three-dimensional and fuller.
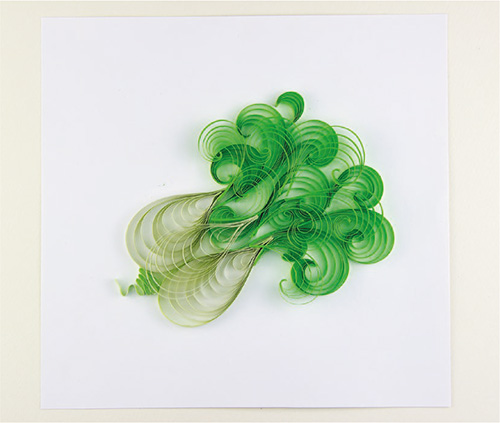
11 Add root to the cabbage.

12 Join the body parts of the grasshopper together and place it on the cabbage stem. Complete the work by adjusting and fixing its contents with white latex.
6. Grain Rain
Grain Rain (guyu) normally falls on Apr. 19 to 21. It is the last solar term in spring, meaning the rain gives birth to all grains. By then, the cold weather is almost over and the temperature rises rapidly with a lot of rainfall, which benefits the growth of grains and other crops. In China, this is a fine time for tealeaf picking, as the tealeaves are plump and tender, freshly green, fragrant and nutritious.
This work consists mainly of green leaves and teardrops. The supplementary white flowers show a drizzling spring scene during this period. Many green loose coils are piled up, resembling both raindrops and paddy kernels. The whole work is elegant, fresh and vigorous.
Materials and Elements
Raindrops:  coil: loose coil
Smaller leaves:  coil: half-circle coil, marquise coil
Bigger leaves:  crescent: ruyi scepter-shaped crescent
Plant stems:  crescent: S crescent, basic crescent
Flower petals:  coil: teardrop coil
Background: white watercolor paper (suggested size: 27 by 27 centimeters), yellow-gray embossed paper (suggested size: 21 by 21 centimeters)
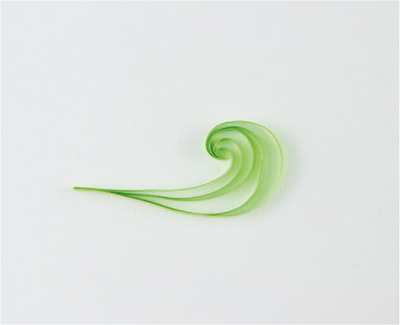
1 Make a wave crescent with the grass-green paper slips.
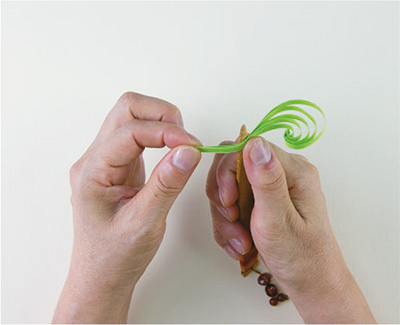
2 Scrape the tail of the wave crescent with a small bamboo knife until it bends toward the opposite of the crescent.
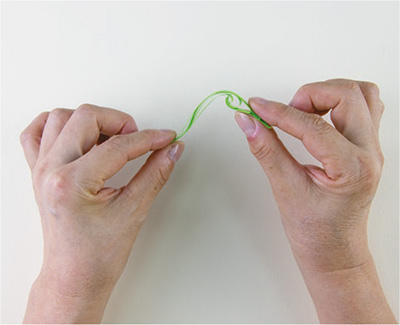
3 Hold the tail end of the crescent with one hand, and pinch another end with the other hand to make it an acute angle.
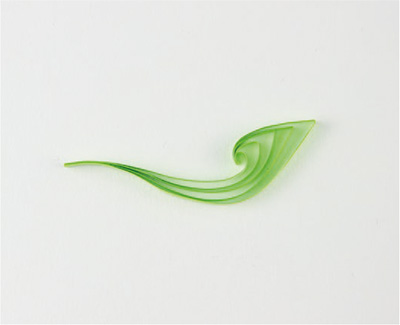
4 The ruyi scepter-shaped crescent is completed.
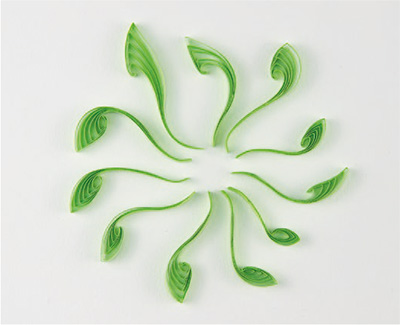
5 Make more than 10 ruyi scepter-shaped crescents of different layers and sizes to serve as bigger leaves.
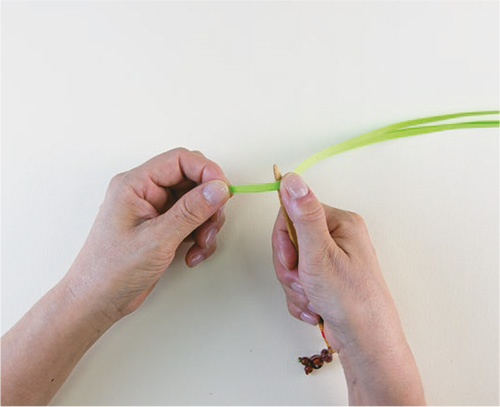
6 Paste three grass-green paper slips at the beginning end. Scrape the end with a small bamboo knife to make it bend.
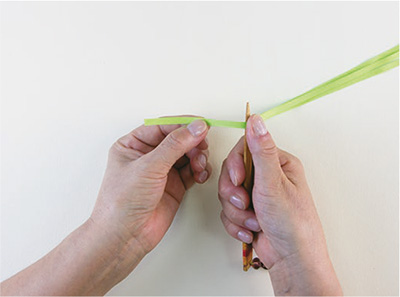
7 About 3 centimeters away from the beginning end, scrape the slip with a small bamboo knife in the opposite direction to make the paper slip bend in the shape of an S.
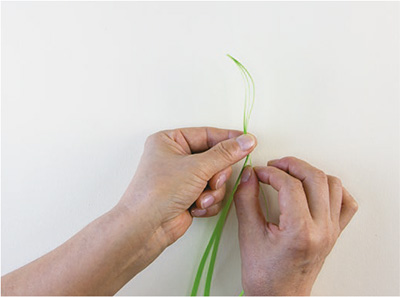
8 Pull the paper slips downward into different lengths.
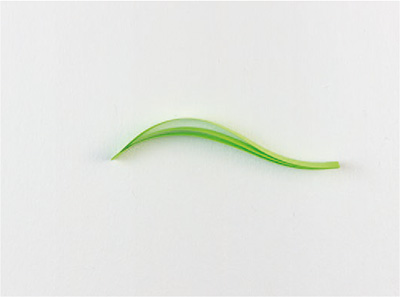
9 Cut the redundant slips and paste the tail end with white latex. The S crescent is completed.
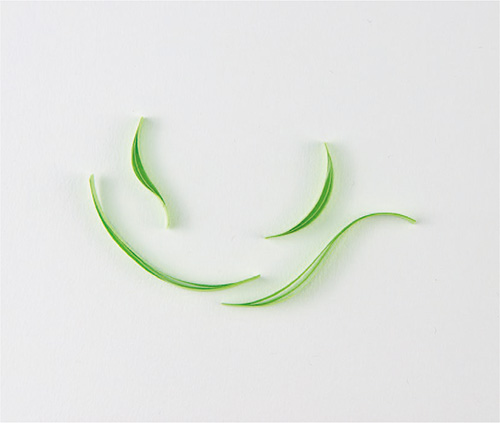
10 Make two basic crescents and two S crescents with the grass-green paper slips. Each crescent consists of three to four paper slips. They will serve as the stems of the plants.
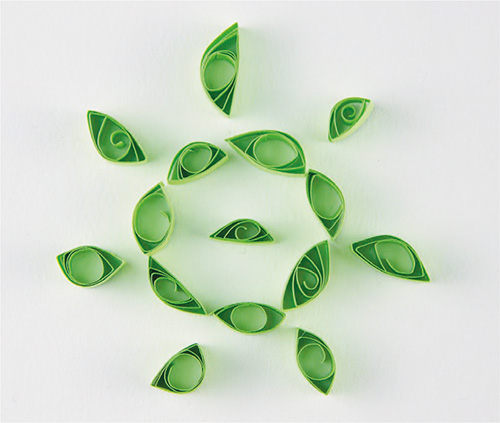
11 Make more than 10 half-circle coils and marquise coils with the grass-green paper slips by pinching; these will serve as smaller leaves.
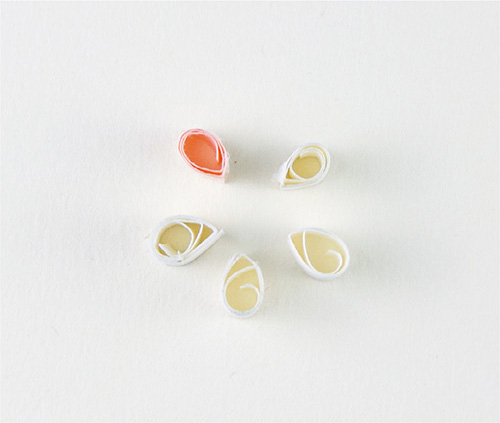
12 Make four to five white teardrop coils and one pink teardrop coil with the white and pink paper slips; these will serve as flower petals.
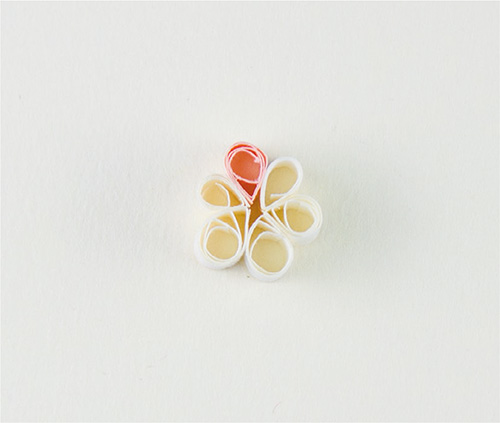
13 Put the petals together to form a flower.
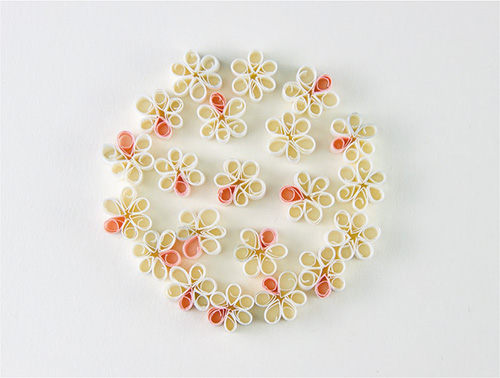
14 Make more than 20 flowers with the white and pink paper slips. More teardrop coils can be made as petals for later use.

15 Make a lot of loose coils with paper slips in various shades of green and white paper slips to serve as raindrops. The white loose coils used in this work are made with two specifications of paper slips: 5 millimeters and 3 millimeters.

16 Paste the yellow-gray embossed paper onto the center of the background paper.
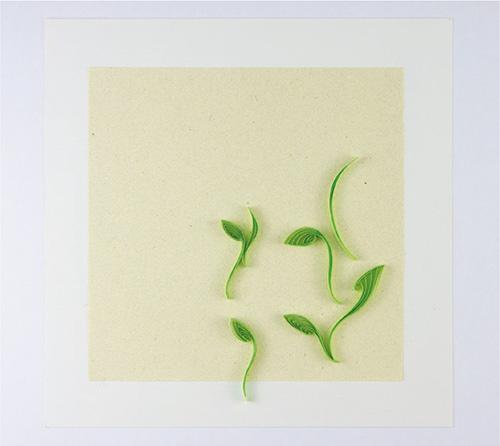
17 Add some bigger leaves and stems to the lower-right corner of the picture.
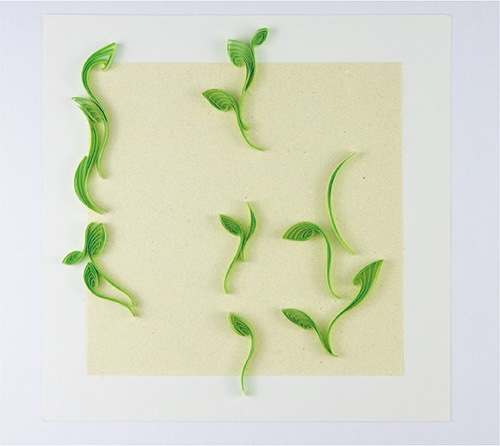
18 Keep adding bigger leaves and stems to the upper left of the picture.
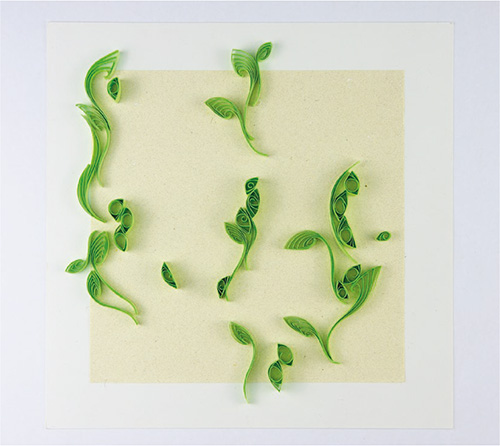
19 Add smaller leaves among bigger leaves.

20 Add flowers on the left side of the picture.
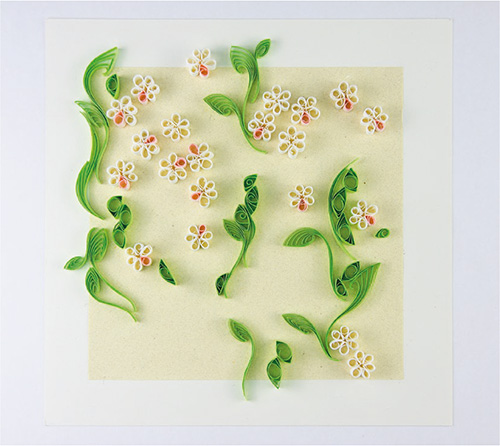
21 Add flowers on the right side of the picture.
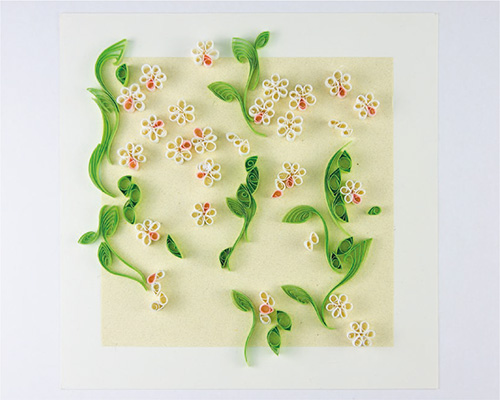
22 Add some more petals, which can be placed on the flowers to make the picture look more three-dimensional.
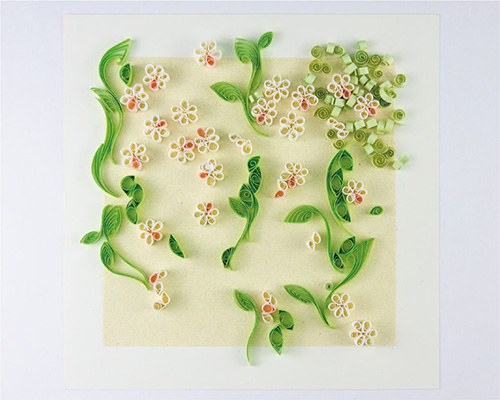
23 Place some pink-green loose coils on the upper-right corner of the picture. The coils can be arranged head-on or sideways or upon each other. Adjust them so they look naturally piled up.
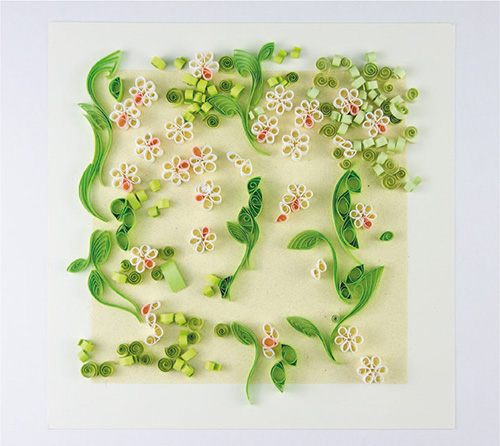
24 Arrange some light-green and grass-green loose coils on the upper-left and lower-left corners of the picture.
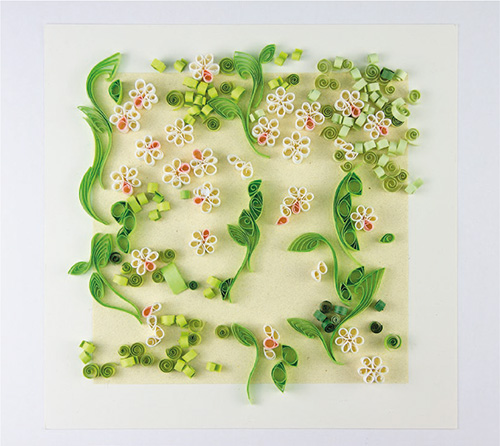
25 Add some olive-green and grass-green loose coils onto the picture.
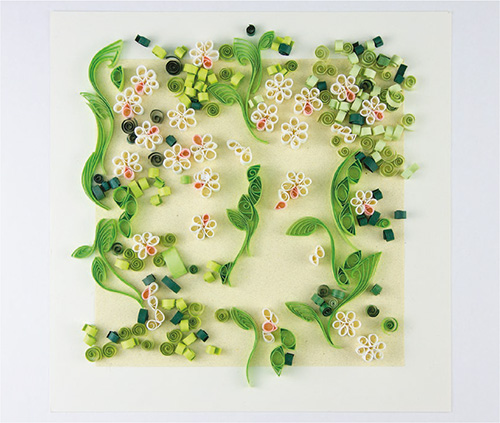
26 Keep adding some dark-green loose coils here and there in the picture.

27 Add some white loose coils on the upper half of the picture. Complete the work by adjusting its contents and fixing with white latex.
7. Beginning of Summer
Beginning of Summer (lixia) normally falls on May 5 to 7 each year. It is the first solar term in summer, symbolizing the end of the spring and the official start of the hot summer. By then, there are more thunderstorms and crops have been growing rapidly. On this day in ancient times, Chinese emperors, accompanied by their officials and officers, would host a ceremony to greet the advent of summer. The ordinary people, on the other hand, will hang eggs, eat eggs and weigh themselves.
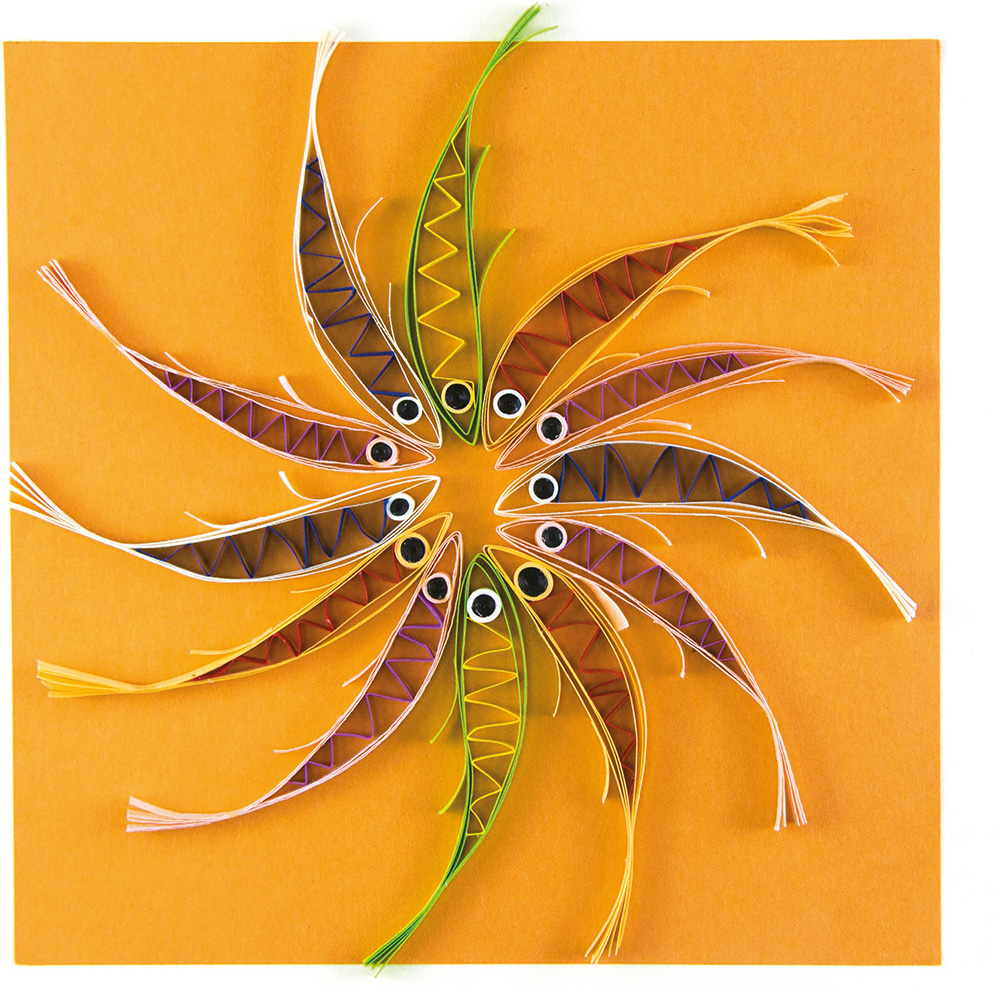
In this work, a school of little fishes vie with each other in surfacing the water to breathe the fresh air due to the reduced air pressure caused by the thunderstorm. There are all together 12 fishes in the picture, symbolizing the transmigration of the 12 months in a year. The whole work is concise in composition and bright in color, active and lovely.
Materials and Elements
Fish bodies:  loop: basic loop; line: curved line
Fish scales:  line: zigzag line
Fish eyes:  coil: tight coil
Background: white watercolor paper (suggested size: 27 by 27 centimeters), orange-yellow embossed paper (suggested size: 21 by 21 centimeters)
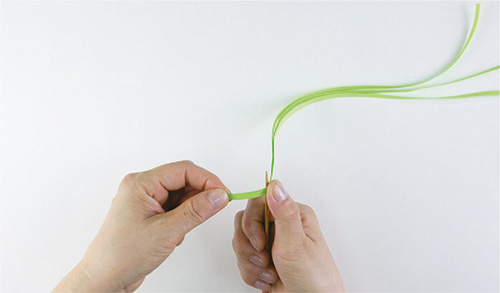
1 Paste three grass-green paper slips at the beginning end with white latex. Scrape them with a small bamboo knife to make them bend.

2 Hold the beginning end and the point at about 10 centimeters from the beginning end with one hand and pull out three paper slips of different lengths with another hand, thus leaving some space between the three slips.

3 Cut the redundant part, leaving only about 1 centimeter as the fish tail. Fix it with white latex. Then hold the fish tail with one hand and pinch to form a sharp fish head with the other hand.
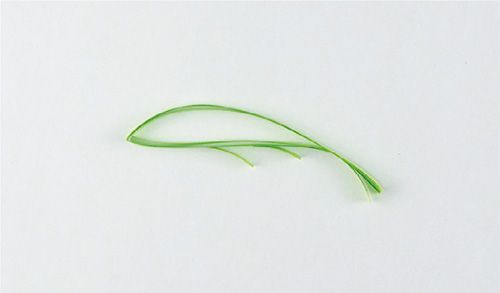
4 Add two curved lines of 1 centimeter in length onto the belly of the fish as the fins. This completes the body of the fish.

5 Make a tight coil with the black and light-yellow paper slips to serve as the fish eye.

6 Make a section of zigzag line with the lemon-yellow paper slip to serve as the fish scale.

7 Place the eyes and scales into the fish bodies. Then make a total of 12 small fishes with paper slips of different colors.

8 Paste the orange-yellow embossed paper onto the center of the white watercolor paper.

9 Add two grass-green fishes in the 12 o’clock and 6 o’clock directions.

10 Add two white fishes in the 3 o’clock and 9 o’clock directions.
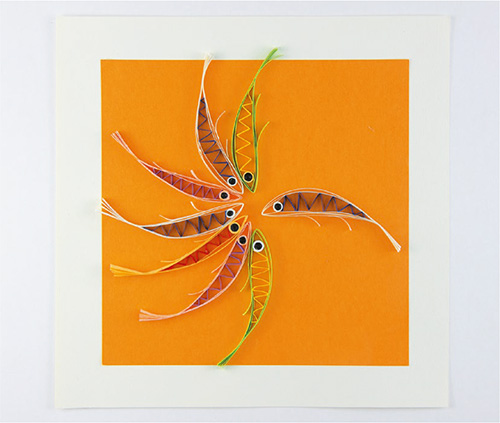
11 Add four fishes on the left side of the picture, with their colors crisscrossing each other.

12 Add the remaining fishes on the right side of the picture, with their colors crisscrossing each other. Complete the work by adjusting its contents and fixing with white latex.
8. Grain Budding
Grain Budding (xiaoman) normally falls on May 20 to 22 each year. By then, the crops in northern China, like wheat, have started to grow fuller, but not yet ripened. Legend has it that this day is the birthday of the God of Silkworms. Therefore, in southern China, such as Jiangsu and Zhejiang provinces, people have made that day a festival to worship the Silkworm God. As the earliest country to plant mulberry trees and raise silkworms, China has long focused on the silk weaving industry. For this reason, in old times, both the ruling class and the ordinary people showed great respect to the God of Silkworms.
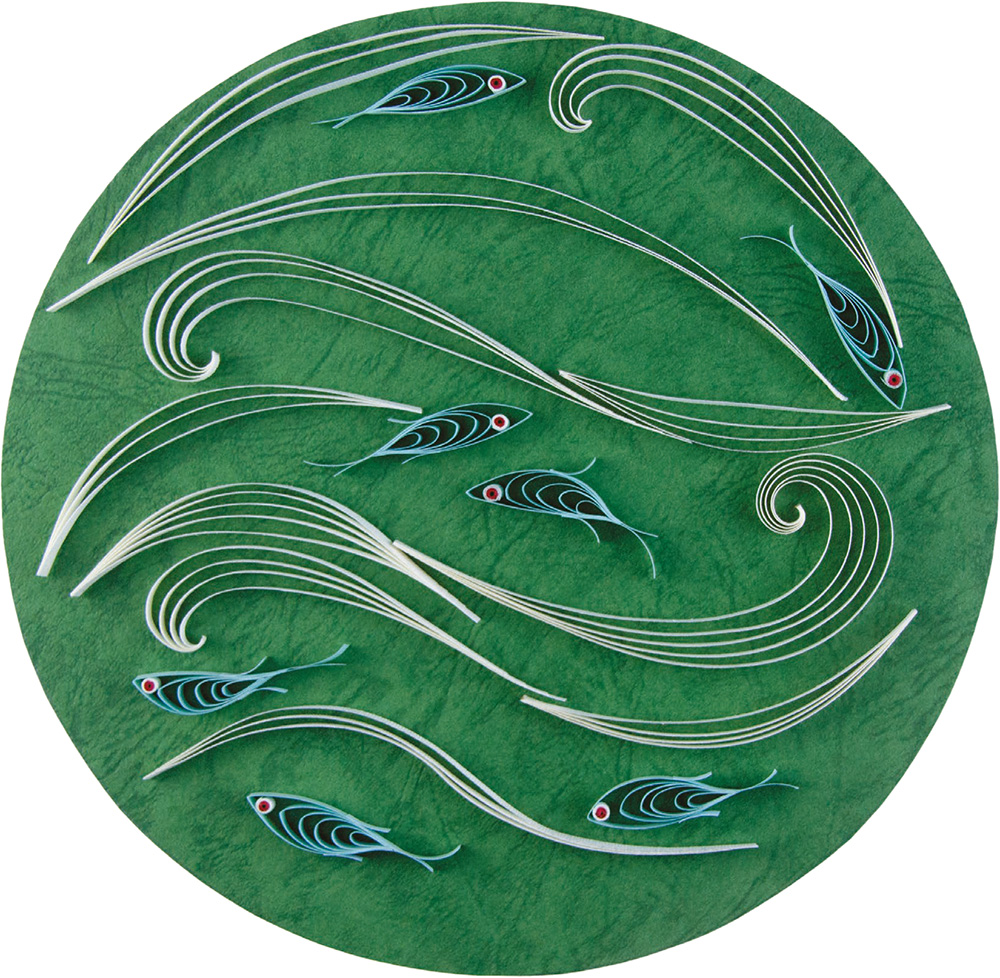
This period is perfect for growing rice, as the abundant rainfall has filled the farming land with water. This work depicts the scene of fishes swimming in an overflowing river. The whole work is round in composition, connoting complete happiness.
Materials and Elements
Waves:  crescent: basic crescent, S crescent, wave crescent
Fishes:  loop: raindrop loop; line: curved line
Fish eyes:  coil: tight coil
Background: White watercolor paper (suggested size: 27 by 27 centimeters), deep-green embossed paper (suggested size: a piece of round paper with a diameter of 22 centimeters)
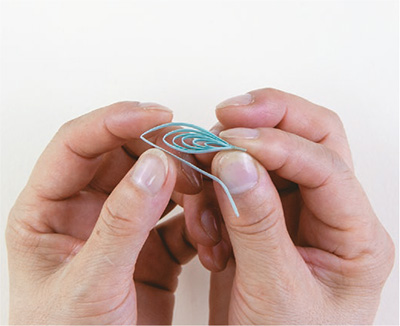
1 Make a small five-layer raindrop loop with the light-blue paper slips. Then wrap it with another light-blue paper slip, leaving some length on both ends of the slip. Be careful to leave some space between the loop and the outermost paper slip that wraps it.
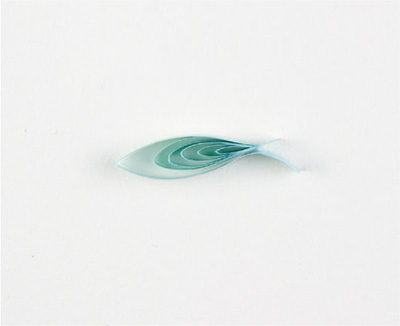
2 Stick the outermost paper slip and the raindrop loop together with white latex. The two small sections of paper slips on both ends will serve as the tail of the fish.
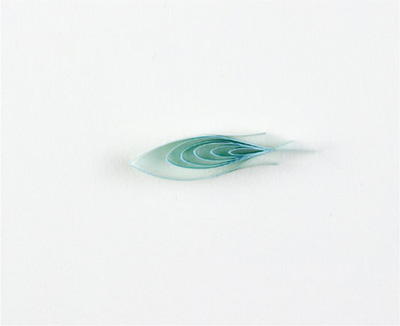
3 Cut two sections of the light-blue paper slip of about 1 centimeter in length, and paste them onto each side of the fish as fins.
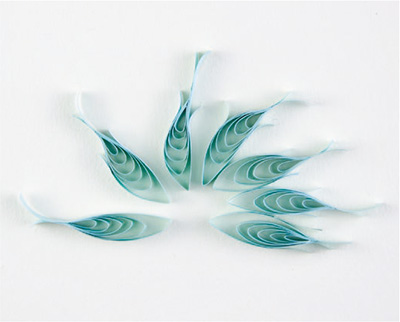
4 Make seven fishes using the same method.
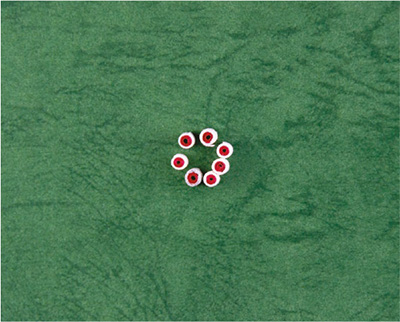
5 Make seven tight coils with the deep-red and white paper slips as the fish eyes.
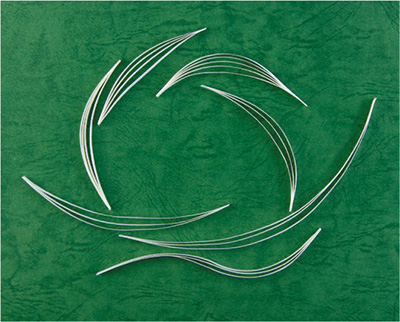
6 Make some basic crescents and S crescents of different lengths, shapes and layers with the white paper slips.
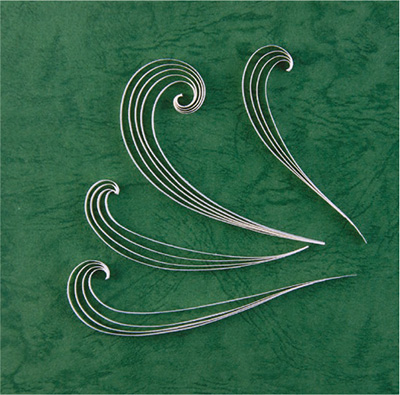
7 Make more wave crescents of different shapes with the white paper slips.
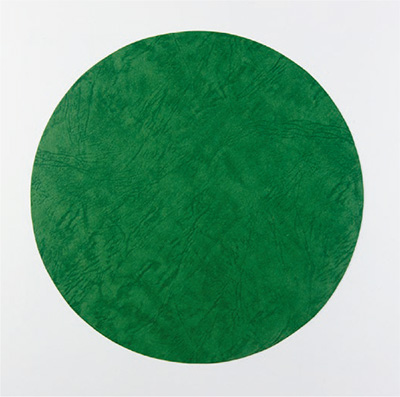
8 Paste the round deep-green embossed paper onto the center of the white background paper.
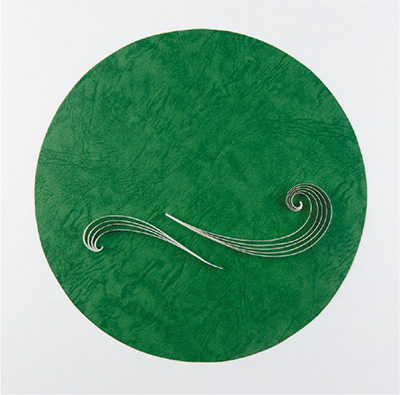
9 Add two wave crescents in the center of the picture.
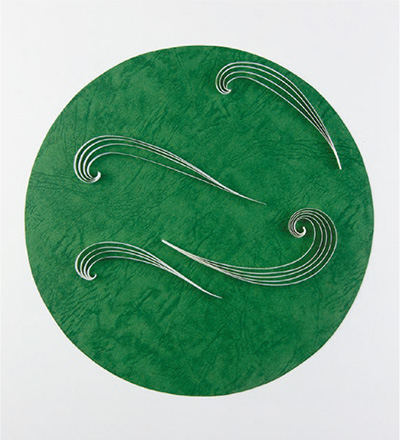
10 Add two more wave crescents on the upper part of the picture.

11 Add several longer crescents and S crescents among the wave crescents.
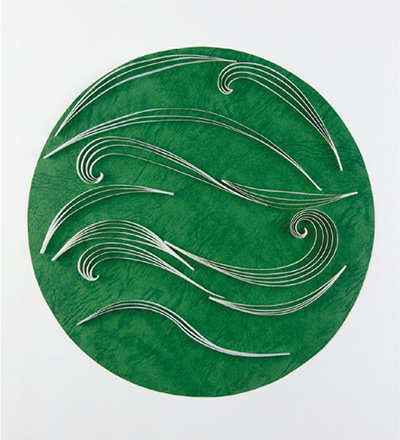
12 Keep adding crescents until they fill the whole picture.
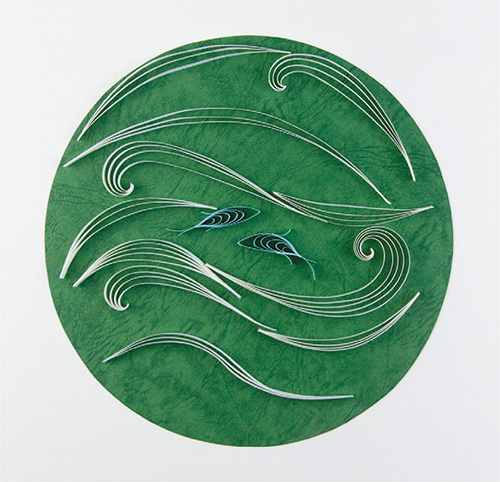
13 Add two small fishes with their heads facing each other in the center of the picture.
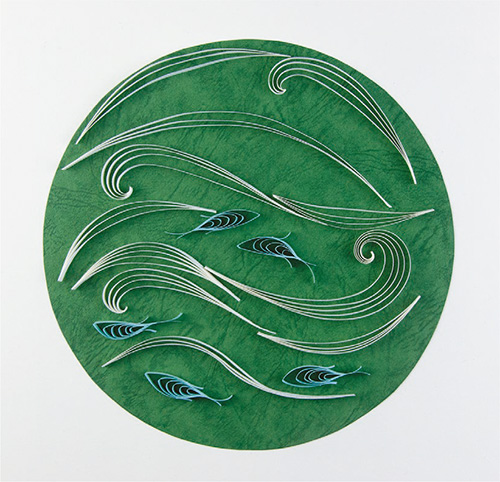
14 Add three small fishes at the bottom of the picture, with their heads facing left.
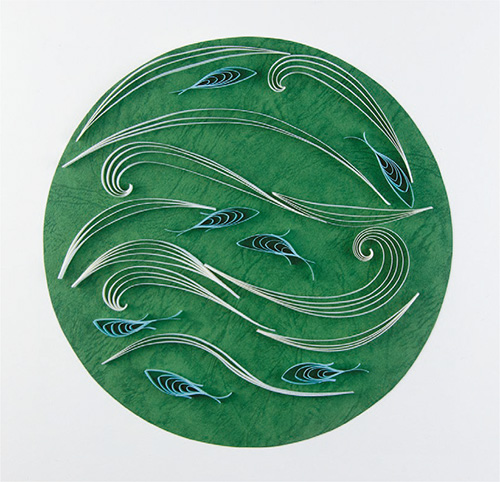
15 Add two small fishes on the top of the picture, with their heads facing right.

16 Add eyes to the fishes. Complete the work by adjusting its contents and fixing with white latex.
9. Grain in Ear
Grain in Ear (mangzhong) normally falls on Jun. 5 to 7 each year. It literally means harvesting crops with awns on them and sowing seeds for autumn crops. Therefore, it is the busiest time of the year for farmers. During this period, such activities as bidding farewell to the Goddess of Flowers and making plum drinks are popular.
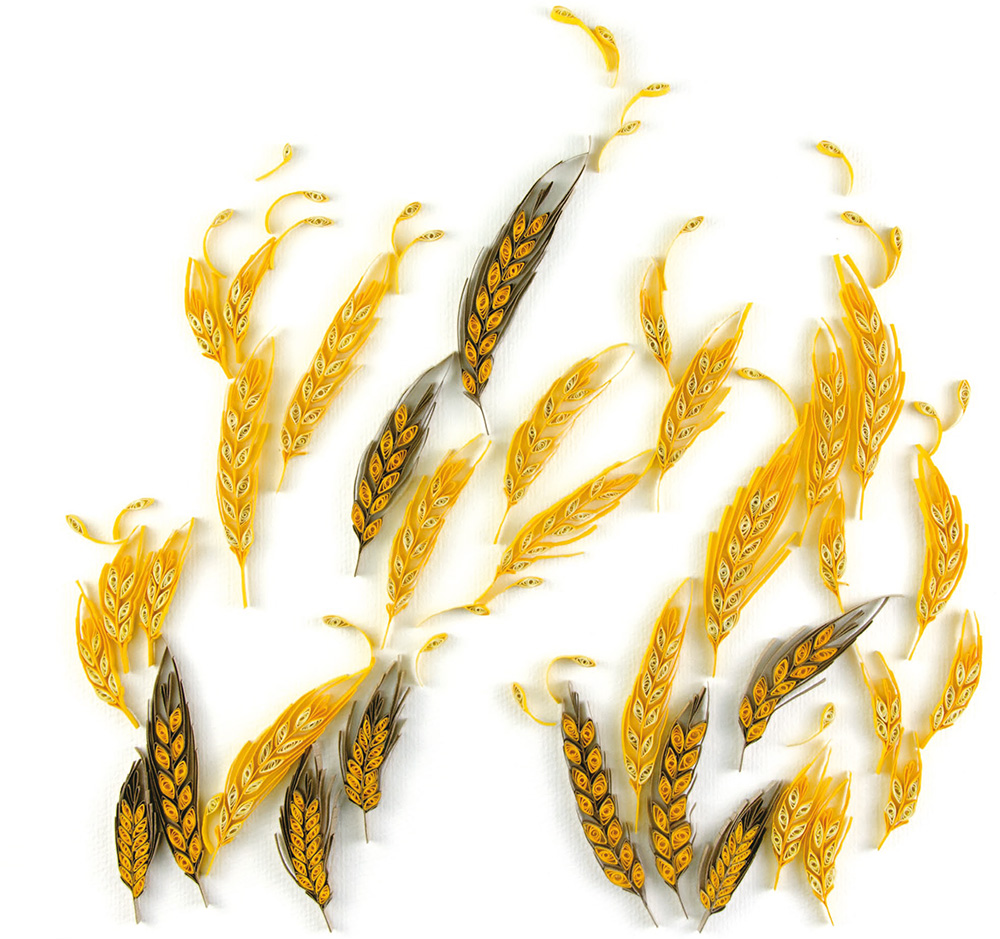
This work depicts this solar term with wheat to be harvested. The golden ears of wheat containing perfect kernels look vivid and real. The many ears form a stretch of wheat land, reminding people of waves of wheat in the wind. The whole work, well-spaced and complete in composition, expresses the author’s respect of farmers for their hard work and the wish for a bumper harvest.
Materials and Elements
Wheat kernels:  coil: marquise coil
Wheat ears:  line: broken line, curved line; coil: marquise coil
Wheat awns:  line: curved line
Background: white watercolor paper (suggested size: 27 by 27 centimeters)
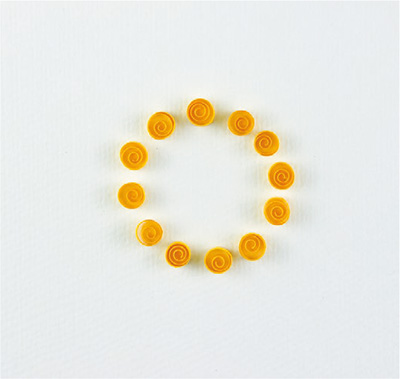
1 Make 12 smaller loose coils with the medium-yellow paper slips.
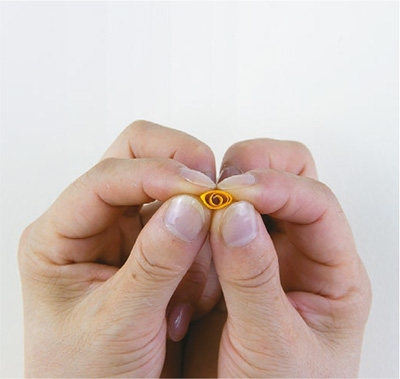
2 Pinch the loose coils into a spindle shape with both hands to form a marquise coil, which will serve as the wheat kernels.
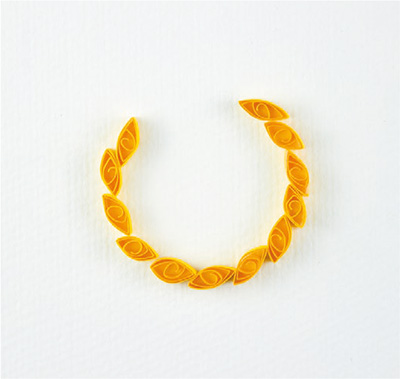
3 Treat the 12 loose coils in step 1 in the same way.
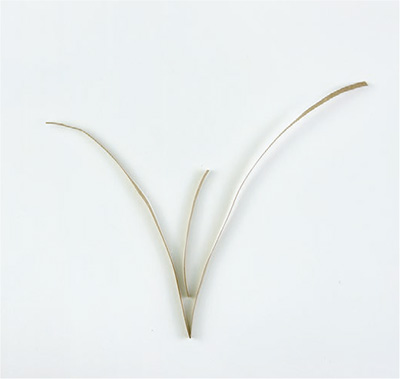
4 Take out two light-brown paper slips of different lengths. Fold the longer one in half and wrap the shorter one with it.
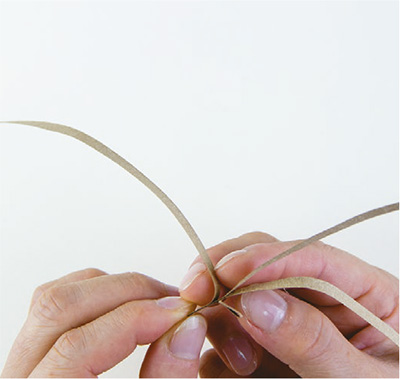
5 Fold a small section of the longer paper slip on the right along the shorter paper slip. Paste this section with white latex.
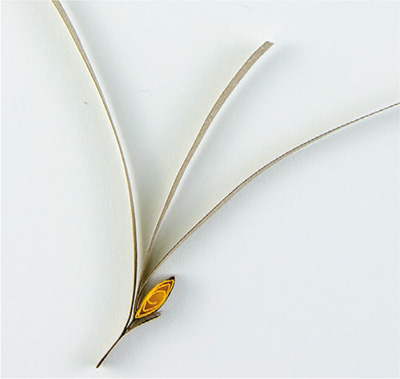
6 Add a kernel onto the small section and wrap the kernel with the longer paper slip on the right. Fix the kernel with white latex.
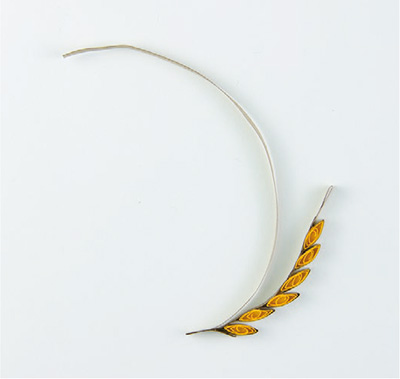
7 Add six kernels following steps 5 and 6 to complete the right half of the wheat ear. Follow the same method to make the left side of the ear.
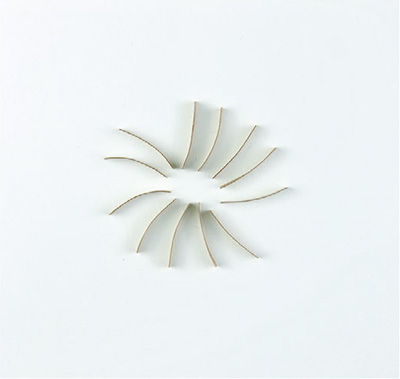
8 Cut twelve sections of curved lines, each about 2 centimeters long, out of the light-brown paper slips; these will serve as the awns of wheat.
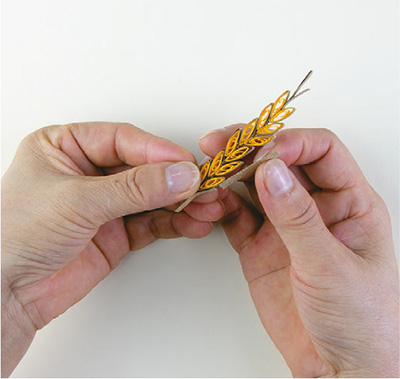
9 Paste the 12 awns onto the 12 wheat kernels.
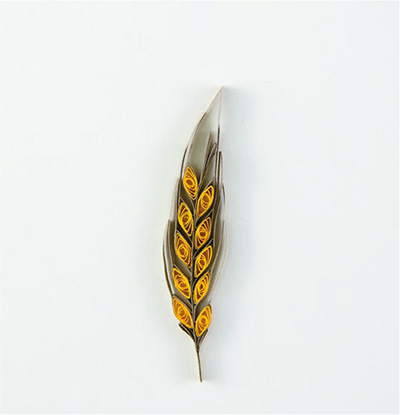
10 The wheat ear is finished.
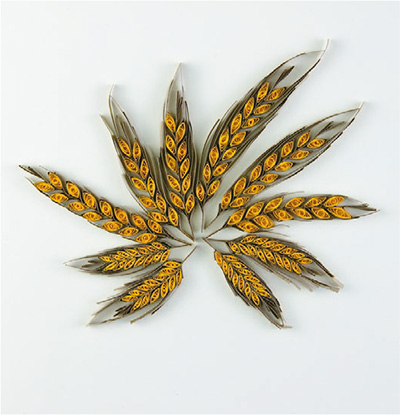
11 Follow the same method to make 10 wheat ears of different sizes.
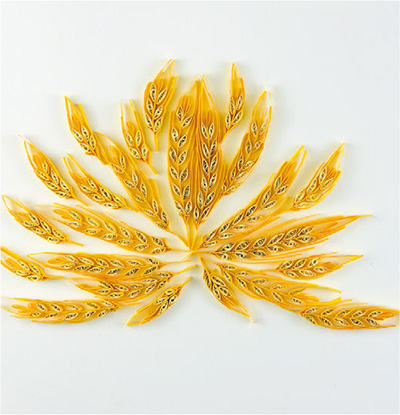
12 Continue to make more than 20 wheat ears of different sizes with light yellow and medium yellow as the supplementary colors.
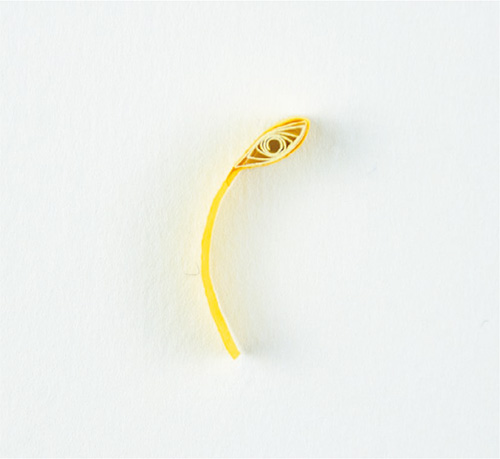
13 Wrap a kernel made of the light-yellow paper slip with the medium-yellow paper slip to form a single group of kernel and awn.
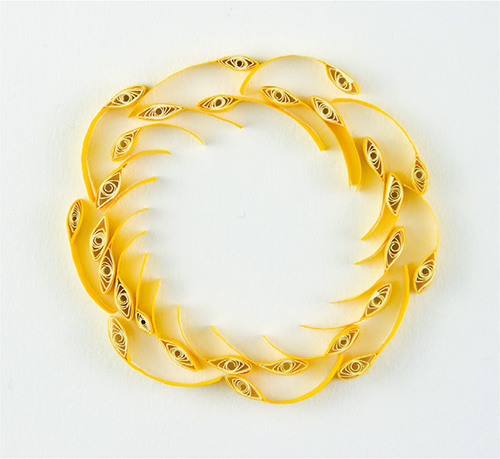
14 Make more than 20 independent wheat kernels and awns following the same method.
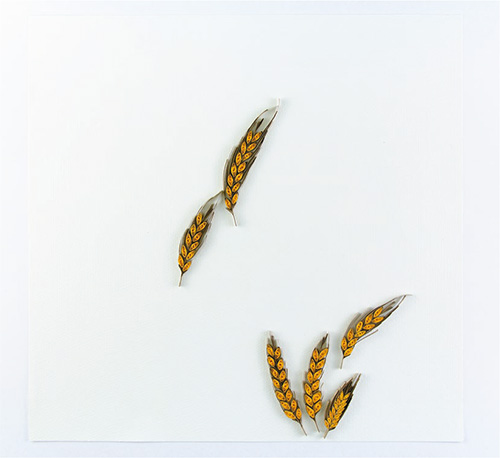
15 Add two light-brown wheat ears in the center of the picture. Add four light-brown wheat ears to the lower-right corner of the picture to form a group.
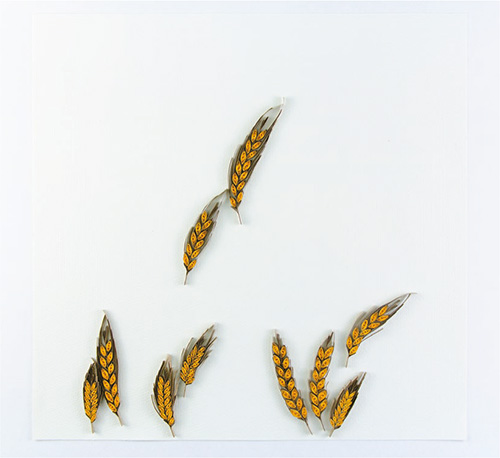
16 Add two groups of light-brown ears to the lower-left corner of the picture, two in one group.
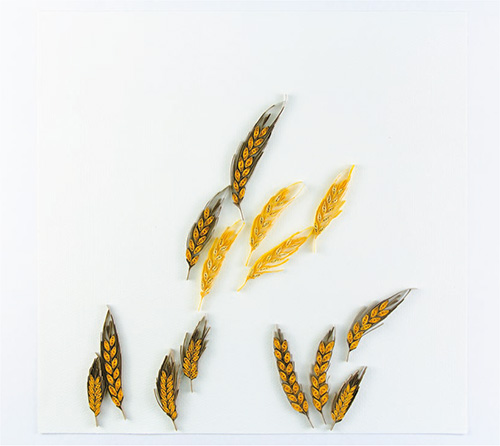
17 Add some medium-yellow ears in the center of the picture.

18 Keep adding medium-yellow ears on the right side of the picture.
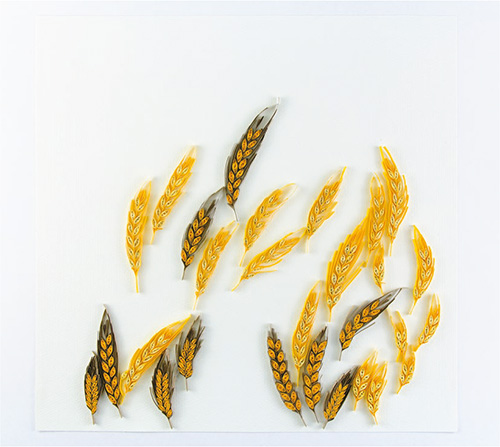
19 Add more medium-yellow ears on the right and left sides of the picture.
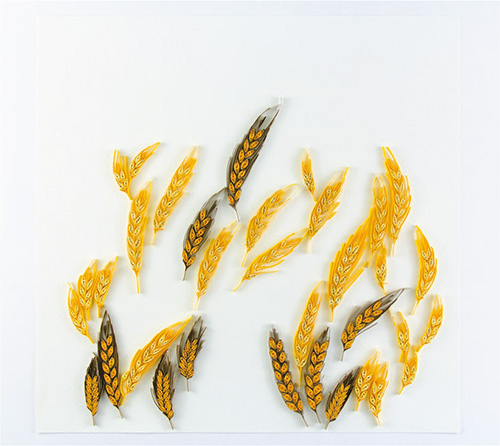
20 Add some smaller medium-yellow ears into the gaps in the picture.
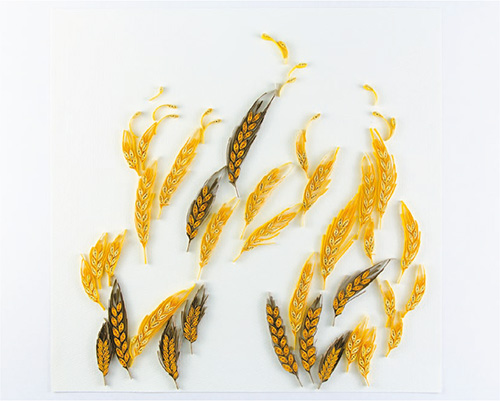
21 Add some independent wheat kernels and awns above the wheat ears on top of the picture.
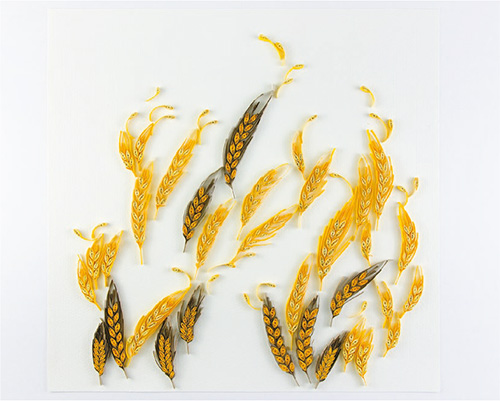
22 Add some independent wheat ears and awns in the center of the picture, in imitation of wheat kernels scattered on the ground. Complete the work by adjusting its contents and fixing with white latex.
10. Summer Solstice
Like Winter Solstice, Summer Solstice (xiazhi), which normally falls on Jun. 21 to 22 each year, is a solar term reflecting seasonal changes. It is the earliest of the 24 solar terms that has been designated as such. As far back as the seventh century BC, Chinese ancestors have established Summer Solstice by way of measuring sun shadows with an ancient time-recording instrument. On this day, the sun’s rays are directly overhead along the Tropic of Cancer and the daytime in the Northern Hemisphere is the longest of the year. This period coincides with wheat harvesting and popular customs include celebrating a good harvest and offering sacrifices to one’s ancestors.
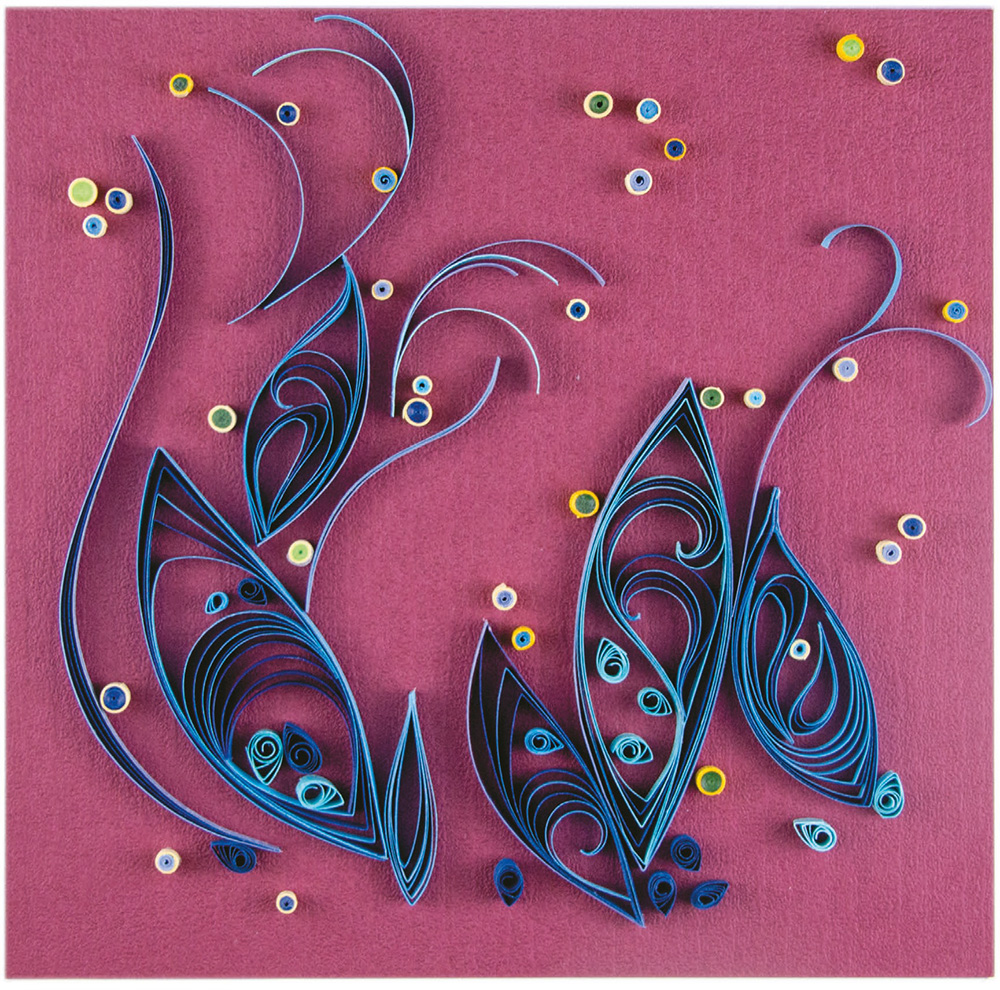
This work shows the characteristics of this solar term with a scene at dusk. The trees are luxuriant and vigorous. The sun still hangs in the sky casting colorful afterglow down on the earth, even though it is toward evening.
Materials and Elements
Bigger leaves:  loop: raindrop loop; coil: teardrop coil; crescent: basic crescent, wave crescent
Smaller leaves:  coil: teardrop coil
Tree branches:  line: curved line; crescent: S crescent
Sunlight:  coil: tight coil
Background: white watercolor paper (suggested size: 27 by 27 centimeters), magenta embossed paper (suggested size: 21 by 21 centimeters)

1 Make tight coils of different sizes with papers slips in various shades of blue and green. Wrap each coil with paper slips in various shades of yellow in imitation of sunlight.
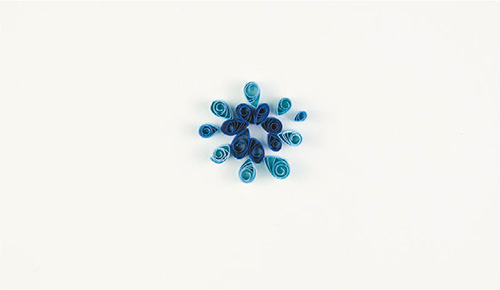
2 Make more than 10 teardrop coils of different sizes with the paper slips in various shades of blue, which will serve as the smaller leaves.
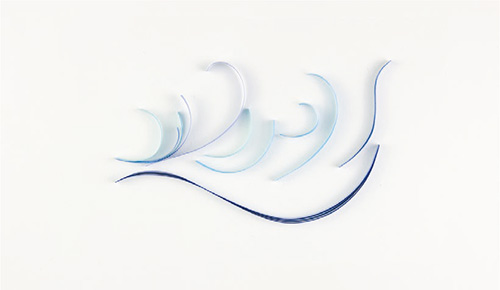
3 Make two S crescents and some curved lines with paper slips in various shades of blue, which will serve as the tree branches.

4 Make two teardrop coils with paper slips in various shades of blue, which will serve as the bigger leaves.
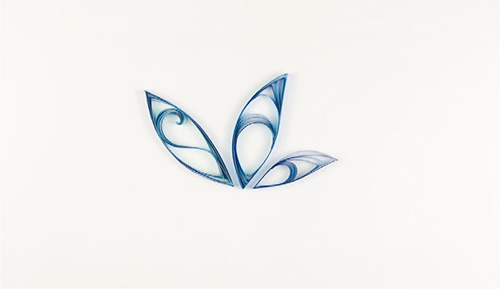
5 Make three teardrop coils with paper slips in shades of blue. Here the remaining paper slips can still be used to make basic crescents and wave crescents inside the teardrop coils. In the picture are three other bigger leaves. You can also give full play to your own creativity in producing elements you like.
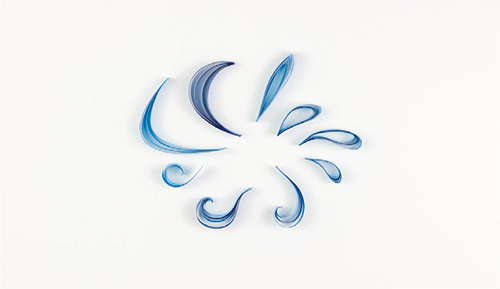
6 Make some basic crescents and teardrop coils with paper slips in various shades of blue to serve as fillers inside the bigger leaves.
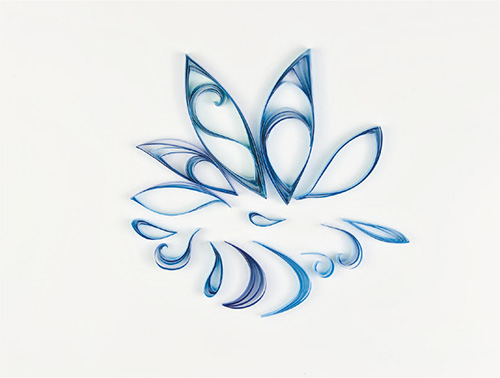
7 After the five bigger leaves and filler are all done, the next step is to put the fillers into the bigger leaves.
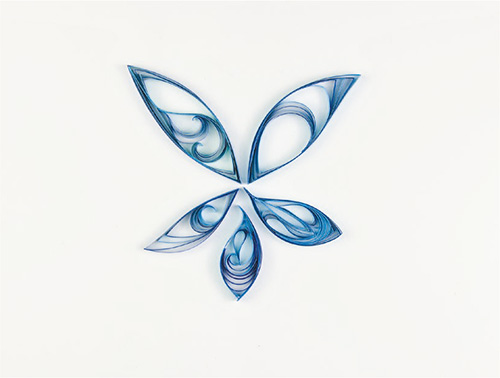
8 Put the fillers inside the bigger leaves. The technique the author uses here is not normally found in other places of this book. By superimposing the elements and using smaller elements to fill in the bigger elements, the author shows the flexibility in the production of Chinese paper quilling works.
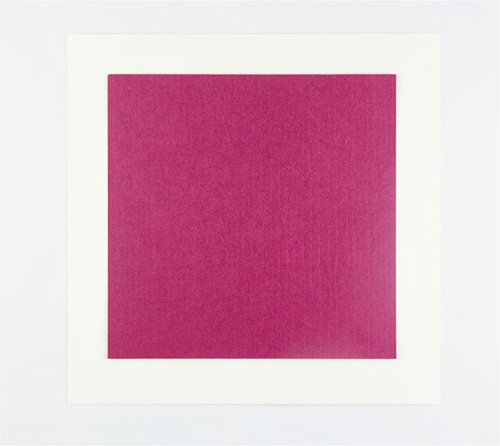
9 Stick the magenta embossed paper onto the center of the white background paper.
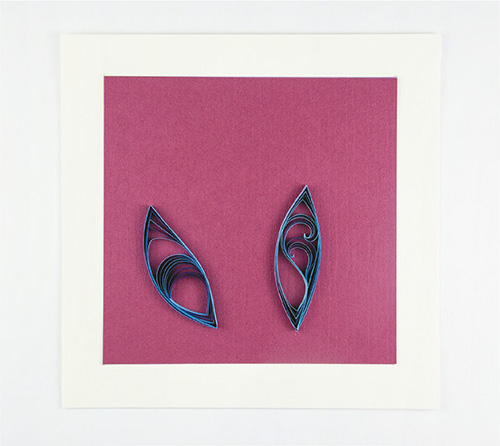
10 Add two bigger leaves on the bottom of the picture.
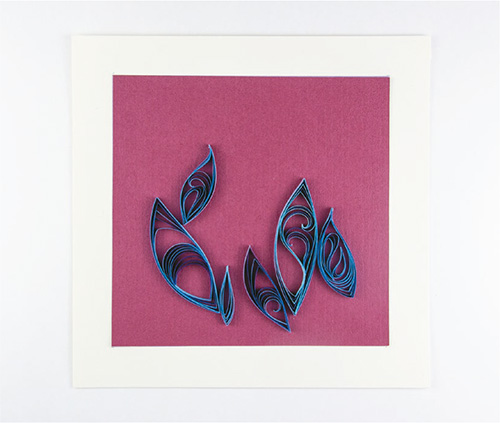
11 Keep adding the remaining three bigger leaves. You can also add a teardrop coil on the right side of the bigger tree on the lower left of the picture to enrich the whole picture.
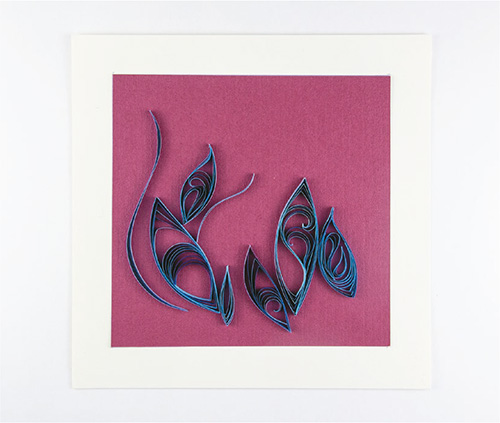
12 Add a longer S crescent to the leftmost side of the picture and a shorter S crescent on the right side of the bigger leaf on the left.
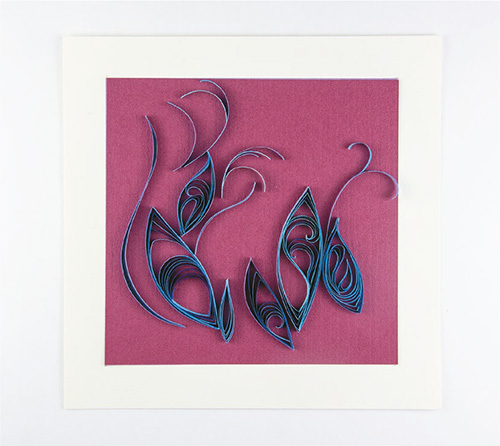
13 Arrange three groups of curved lines above the bigger leaves.
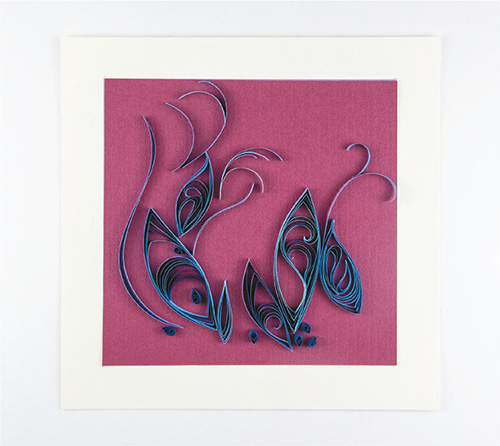
14 Add darker-blue teardrop coils at the bottom of the picture.
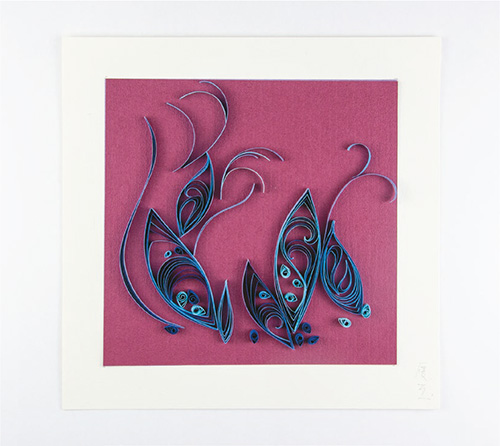
15 Keep adding lighter-blue teardrop coils.
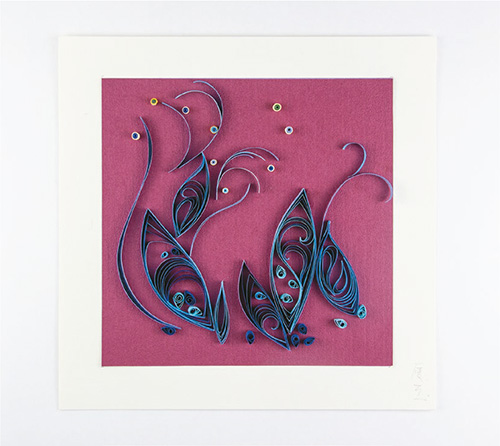
16 Add some tight coils on the upper-left corner of the picture in imitation of the afterglow.
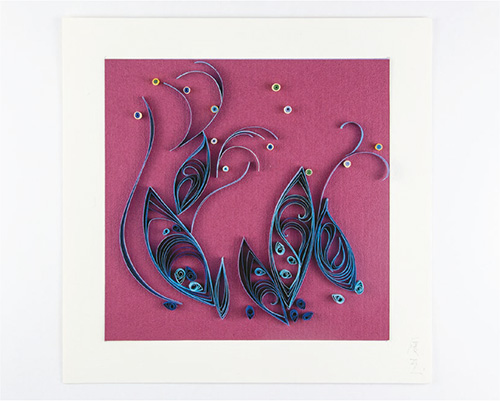
17 Add some tight coils on the upper-right corner of the picture.
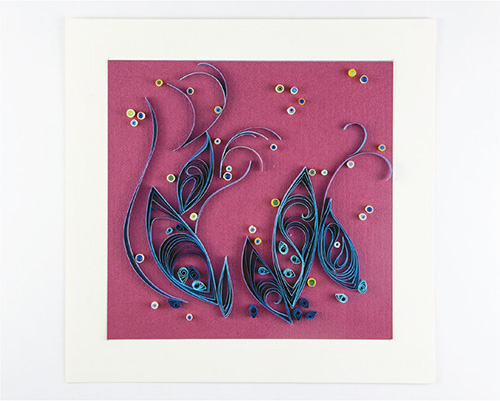
18 Keep adding tight coils of assorted colors here and there in the picture and arrange them in a picturesque disorder. Complete the work by adjusting its contents and fixing with white latex.
11. Slight Heat
Slight Heat (xiaoshu) normally falls on Jul. 6 to 8 each year, meaning the weather is becoming hotter, but still not the hottest. By then, the temperature has risen, the trees make pleasant shade, and the crops grow robustly as the midsummer starts. In southern China, the rainy season is over and the summer drought begins. In northern China, however, the rainy season has started and people are busy preventing waterlogging.
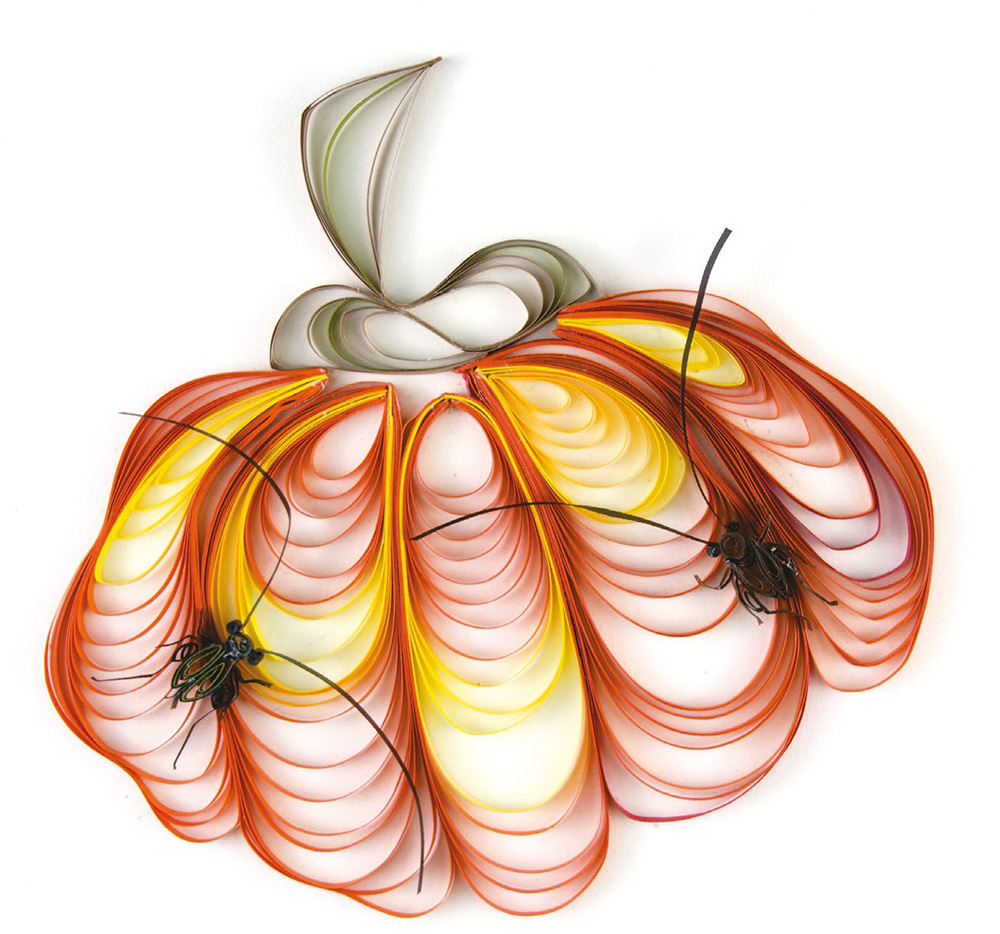
In ancient China, Slight Heat was divided into three periods and the second period was known as “crickets living in the house,” which means that the cricket hides itself in the corner of the yard to get away from the heat. This work depicts such a special scene: Two crickets lie on a big pumpkin to avoid the summer heat. The orange pumpkin resembles the scorching sun in color and shape.
Materials and Elements
Pumpkin sections:  loop: irregular raindrop loop
Pumpkin stem:  crescent: irregular crescent
Crickets:  coil: tight coil, loose coil, triangular coil, marquise coil, irregular coil; line: curved line
Background: white watercolor paper (suggested size: 27 by 27 centimeters)

1 Make five big raindrop loops with the lemon-yellow, deep-red and orange-red paper slips. Each of them consists of more than 10 layers.
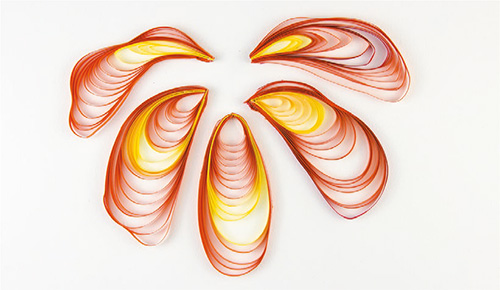
2 Make the five raindrop loops irregular in shape as is shown in the picture by pinching and pasting; these will serve as the different sections of the pumpkin.
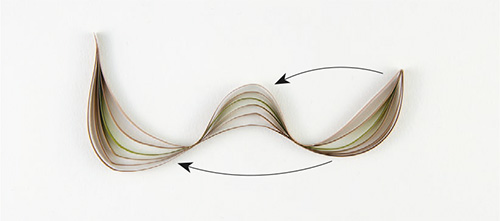
3 Arrange an olive-green paper slip in the middle of the five light-brown paper slips. Make three continuous basic crescents as is shown in the picture. Paste both ends of the continuous crescents, as well as the conjunctions where the crescents meet.
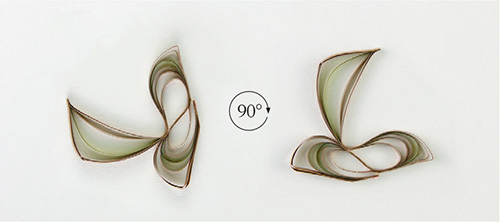
4 Make the three continuous crescents into the shape of a stem using the techniques of bending, pinching, and pasting by referring to the arrows shown in step 3. The two conjunctions are pasted together.
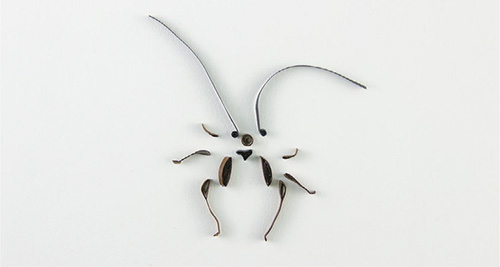
5 Make different body parts of the cricket with the black and burnt umber paper slips. Use tight coil and curved line for the feeler, loose coil for the head, triangular coil for the thorax, marquise coil for the wing, and comma-shaped irregular coil for the six feet.
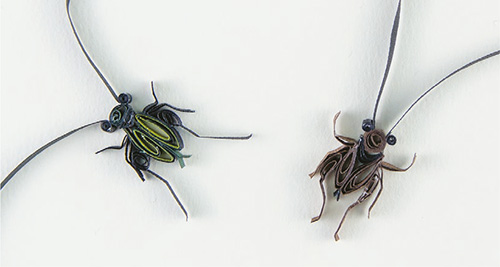
6 Piece together the parts of the first cricket and get it fixed. Use the same method to make the second cricket with the black, olive-green and dark-green paper slips.
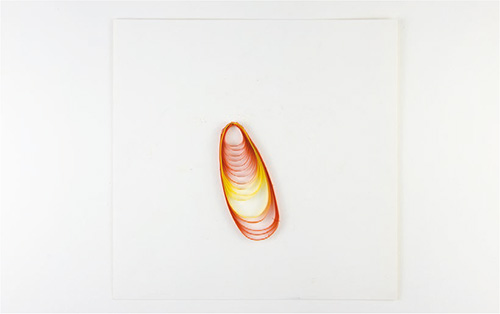
7 Place the middle section of the pumpkin in the center of the picture.
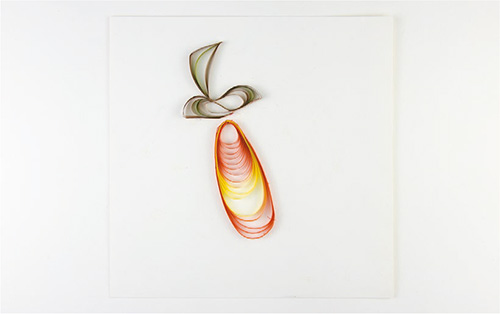
8 Add the stem onto the top of this section.

9 Add the second section of the pumpkin to the left of the first section.
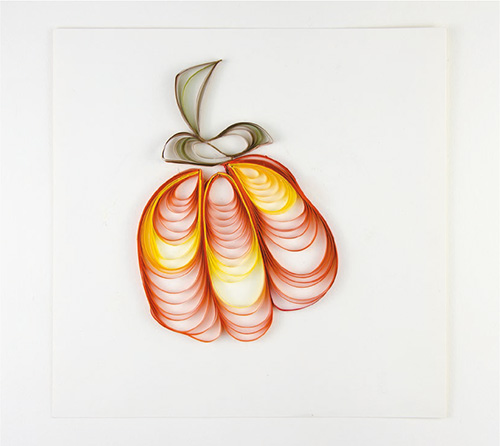
10 Add the third section to the right of the first section.

11 Add another section to the far left.

12 Add another section to the far right, completing the pumpkin.
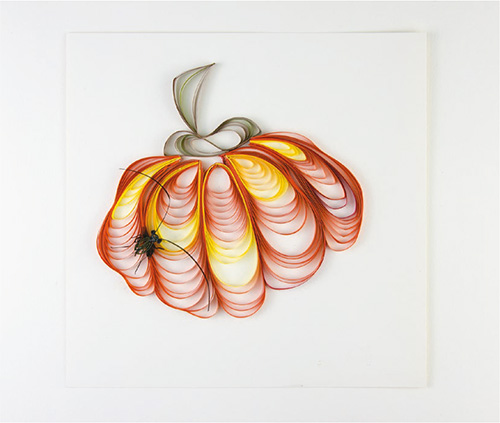
13 Place a cricket on the left half of the pumpkin.

14 Place the other cricket on the right half of the pumpkin. Complete the work by adjusting its contents and fixing with white latex.
12. Great Heat
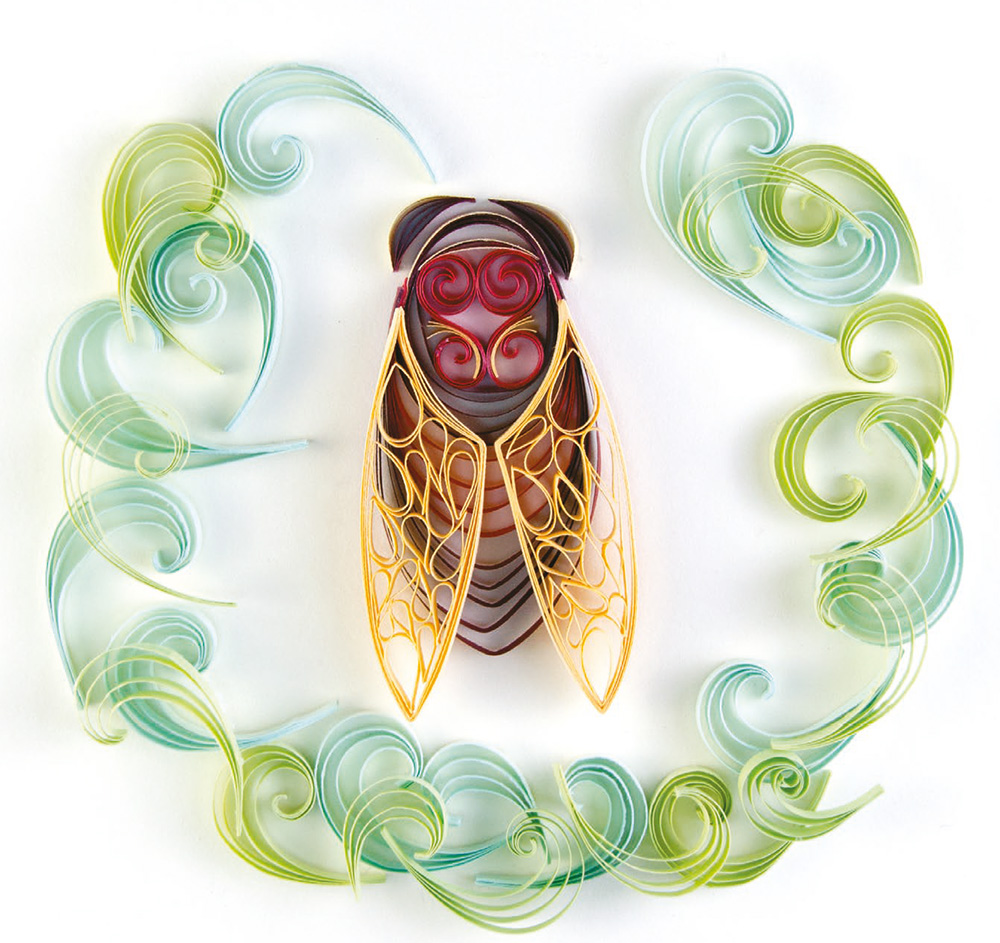
Great Heat (dashu) refers to the hottest days in a year. This solar term normally falls on Jul. 22 to 24 each year. By then, the temperature is the highest and the crops grow the fastest. However, it is also a period most frequently visited by natural disasters. The popular customs include drinking medical herb tea, drying gingers and burning incense to pray for a good harvest, etc.
This work uses the cicada, one of the most common insects in summer, to represent this solar term. Cicadas singing in forests is a major symbol of a hot summer. Using simple elements, the author creates a vivid-looking cicada, reminding viewers of the boisterous chirping in great summer heat.
Materials and Elements
Cicada body:  crescent: basic crescent
Cicada head:  loop: oval loop
Cicada eyes:  crescent: basic crescent
Designs on cicada’s head:  crescent: spiral crescent; line: curved line
Cicada’s wings:  loop: irregular loop, raindrop loop
Tree leaves:  crescent: wave crescent
Background: white watercolor paper (suggested size: 27 by 27 centimeters)

1 Arrange four scarlet paper slips inside five dark-red paper slips. Make a nine-layer crescent with them.
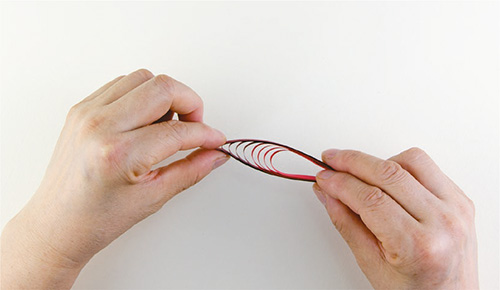
2 Hold the open end of the crescent with one hand, and pinch the arc on the other end with fingers to form a sharp angle, which will serve as the body of the cicada.
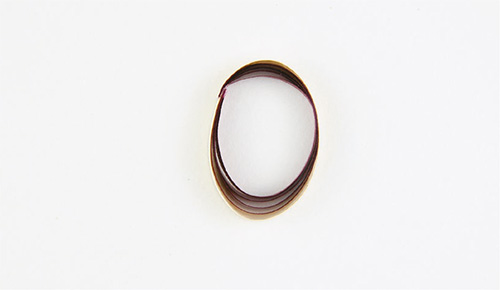
3 Arrange four dark-red paper slips inside one light-yellow paper slip. Make a five-layer oval loop with them as the head of the cicada.
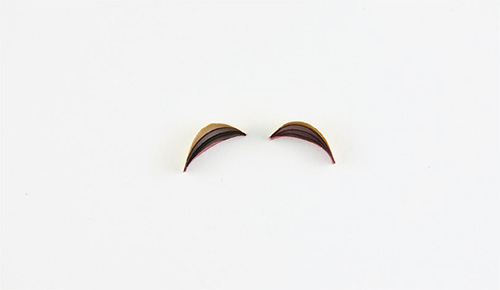
4 Arrange four dark-red paper slips inside one light-yellow paper slip. Make two smaller crescents with them to serve as the eyes of the cicada.
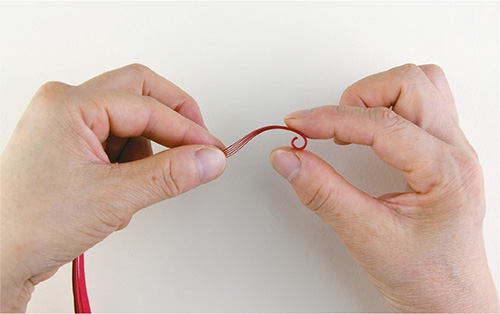
5 Superimpose five scarlet paper slips, paste their beginning ends together with white latex, and then roll the end up.

6 Draw the five paper slips one by one and make them curve proportionately, leaving some space between them.

7 Leave about 2 centimeters and cut the redundant part. Paste the tail end with white latex and roll it in the opposite direction of the beginning end.

8 This is the finished spiral crescent.
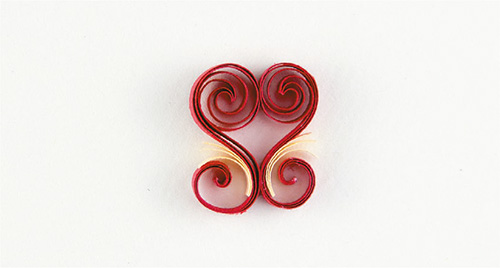
9 Follow steps 5 through 8 and make another similar spiral crescent. Add the curved lines made with the light-yellow paper slips as shown in the picture. These are the designs on the cicada’s head.
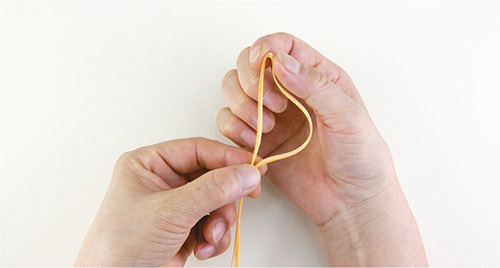
10 Superimpose four light-yellow paper slips. Paste their beginning ends together with white latex. Pinch it at about 10 centimeters from the beginning end.
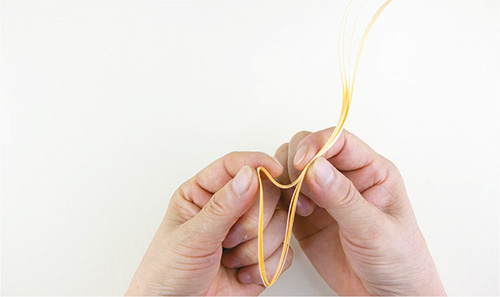
11 Pinch the shape three centimeters from the beginning end.
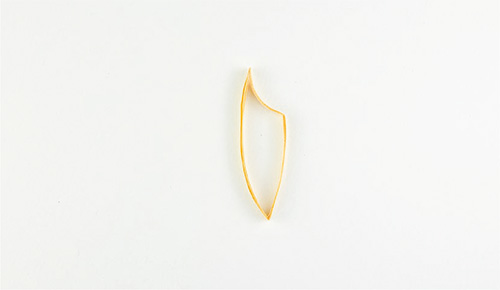
12 Cut the redundant part as is shown in the picture to form an irregular loop. This will serve as the outline of the cicada wing.

13 Make some raindrop loops with the light-yellow paper slips.
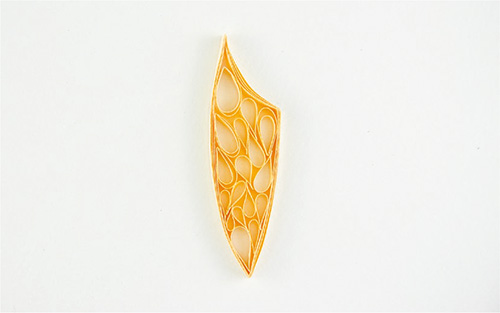
14 Place the raindrop loops inside the cicada wing.
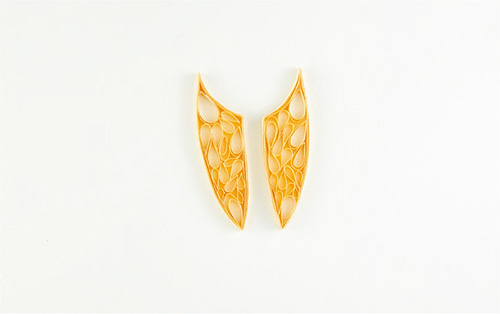
15 Follow steps 10 to 14 and make another similar cicada wing with the light-yellow paper slips.

16 Make more than 10 four-layer wave crescents with the light-green paper slips.
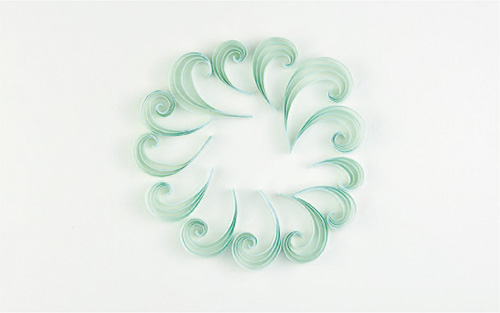
17 Make more than 10 four-layer wave crescents with the light-blue paper slips.
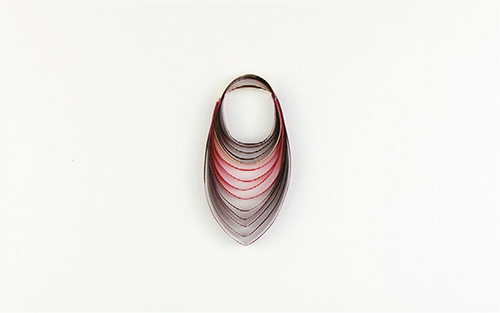
18 Put together the cicada’s head and body as is shown in the picture.
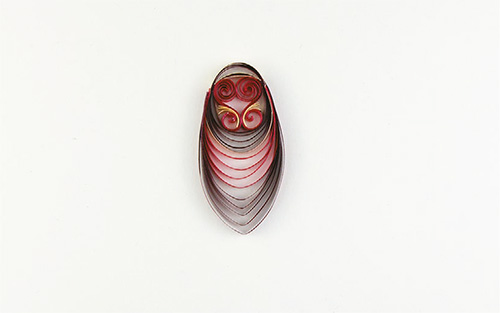
19 Fill the outline of the cicada’s head with the spiral crescents.
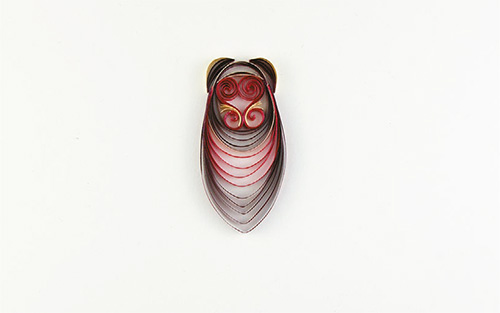
20 Add two eyes on the cicada’s head.
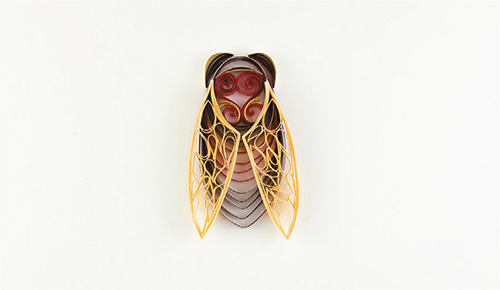
21 Add a pair of wings to the cicada’s body.
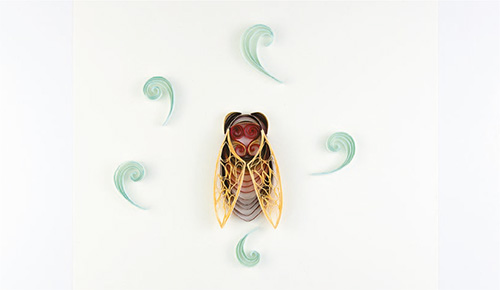
22 Add several light-blue wave crescents around the cicada to serve as leaves. Be careful that these crescents face different directions.
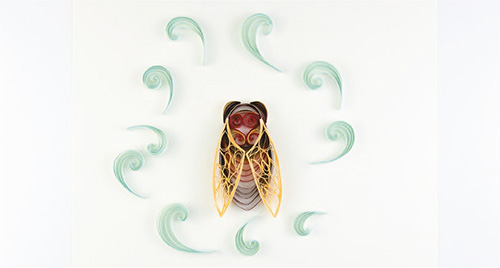
23 Keep adding light-blue wave crescents.
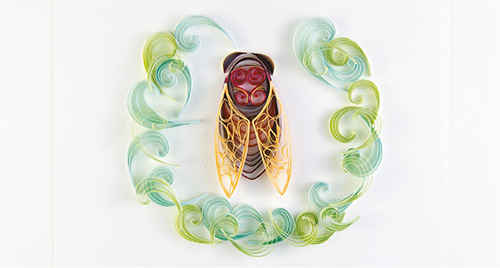
24 Between the light-blue leaves add some light-green leaves. The leaves can superimpose on each other. Complete the work by adjusting its contents and fixing with white latex.
13. Beginning of Autumn
Beginning of Autumn (liqiu) normally falls on Aug. 7 to 9 each year. By then, the west wind has blown away the summer heat. It is getting cooler every day and leaves start to fall from the Chinese parasol tree. In ancient time, the emperors, together with their officials and officers, would offer sacrifices to greet autumn and the people would celebrate this solar term as a festival. The Chinese people usually weigh themselves on this day and then compare the result with their weights on the Beginning of Summer. Autumn is considered an ideal time for them to make up for their weight losses in summer.
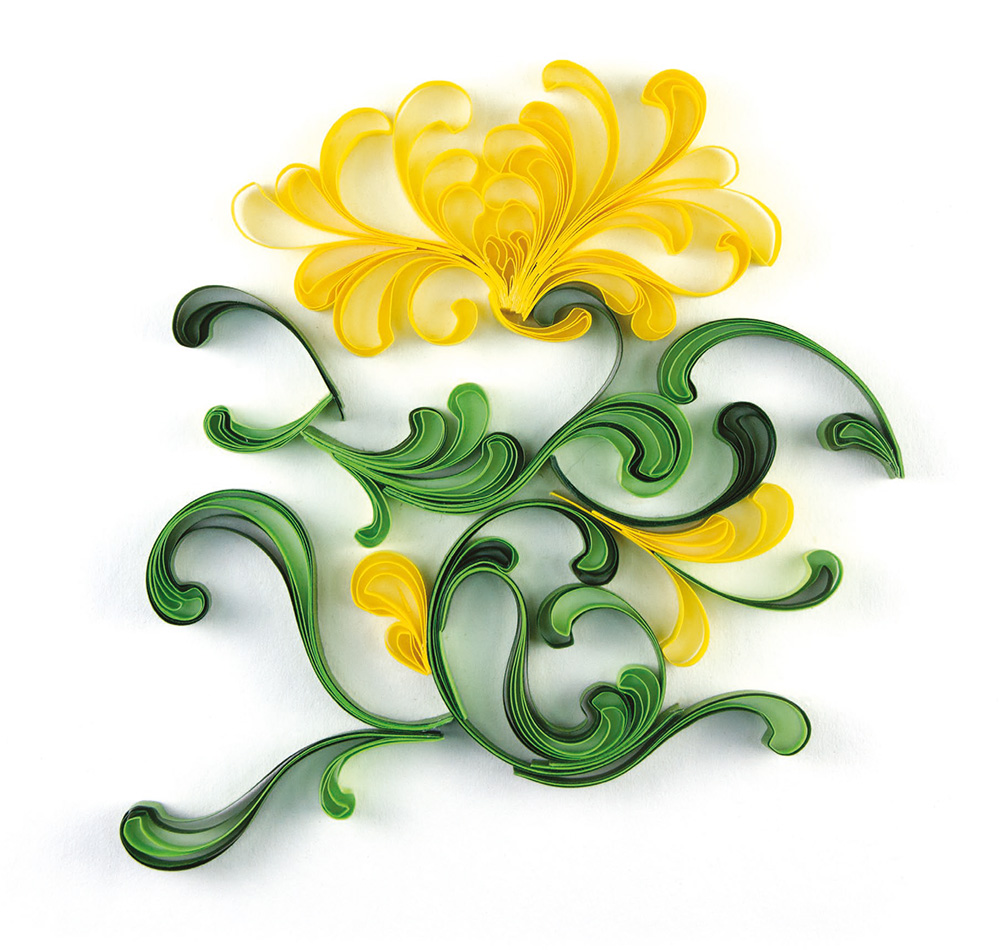
This work presents this solar term with the chrysanthemum, a flower unique of autumn. In traditional Chinese culture, the chrysanthemum is regarded as a hermit, as it blooms alone in autumn, instead of competing with other flowers in spring and summer. Using basic loops and their variations alone, this work displays a vivid-looking chrysanthemum in full blossom.
Materials and Elements
Chrysanthemum petals:  loop: irregular loop
Chrysanthemum stems and leaves:  loop: irregular loop
Background: white watercolor paper (suggested size: 27 by 27 centimeters)
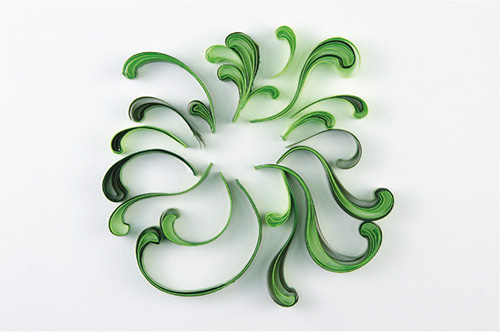
1 Make some basic loops of assorted sizes and layers with the dark-green and grass-green paper slips. Use such techniques as rolling, scraping, pinching and pressing to produce different shapes. They will serve as the stems and leaves of the chrysanthemum.
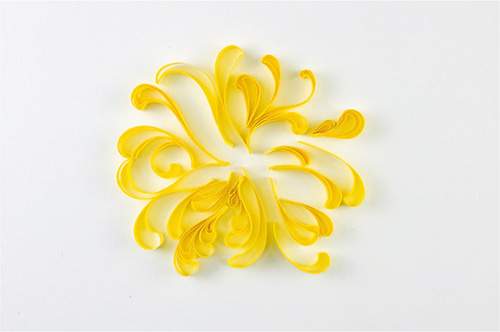
2 Follow the methods in step 1 and make the petals of the chrysanthemum with the lemon-yellow paper slips.
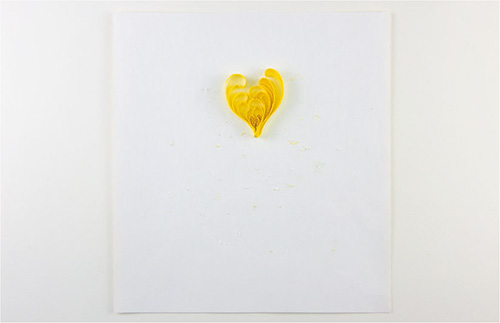
3 Arrange some smaller petals on the upper-middle area of the picture in the form of a heart. This will serve as the central part of the chrysanthemum.
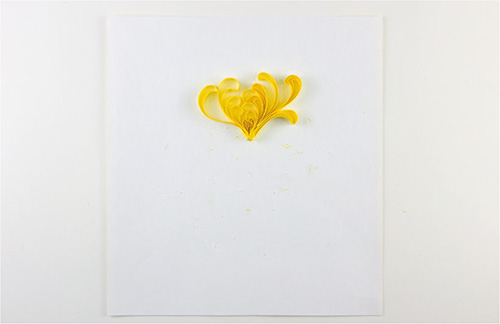
4 Add longer petals on both sides of the heart.
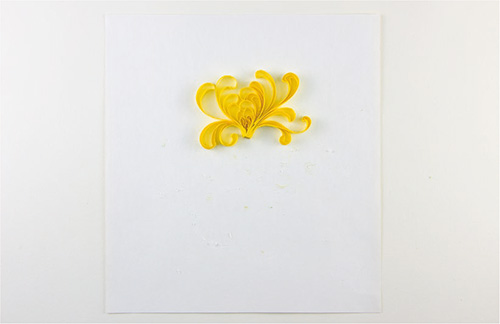
5 Keep adding petals that grow downward. Be careful to make the petals roll in different directions to create a more natural effect.

6 Then fill the blank space with petals to make the flower look fuller, completing the chrysanthemum.
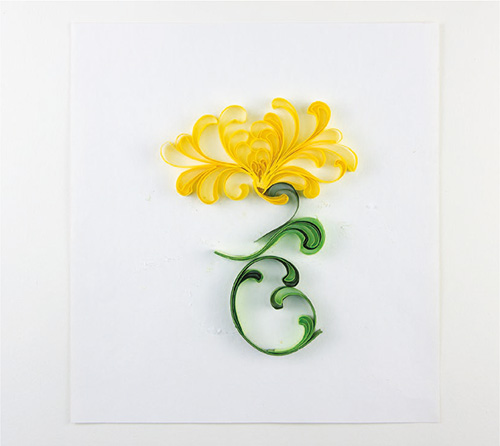
7 Add green stems and leaves right beneath the chrysanthemum as is shown in the picture.
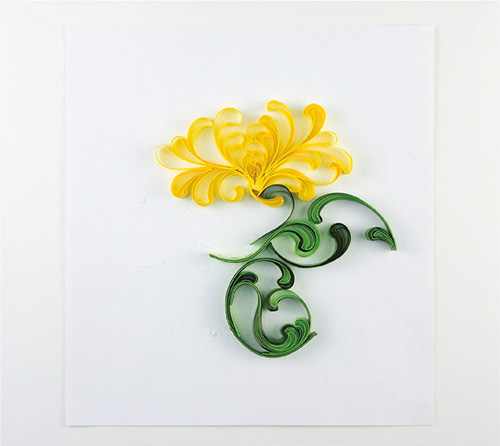
8 Add stems and leaves on the right side of the picture.
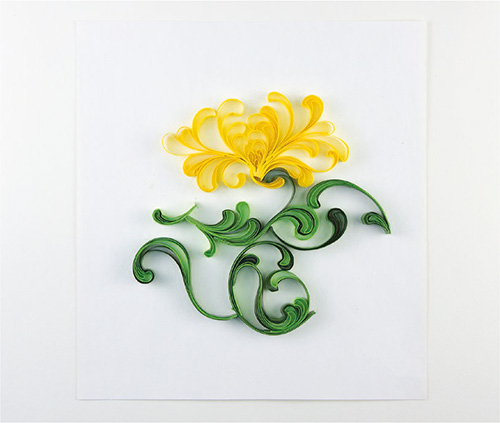
9 Continue to add stems and leaves on the left side of the picture.
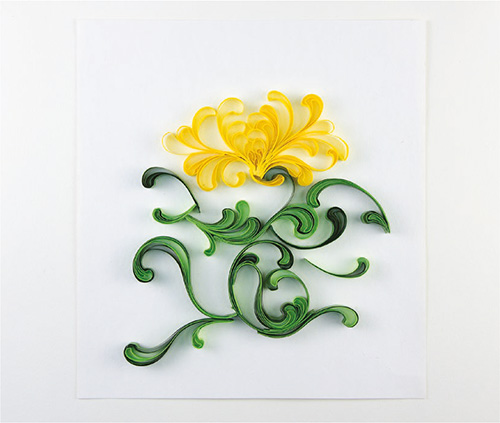
10 Add some outreaching stems and leaves in appropriate places in the picture so that the whole work looks complete and fuller.
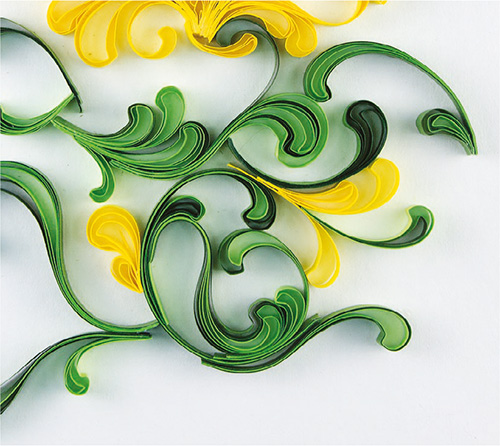
11 Add two groups of petals between the stems and leaves as decoration.
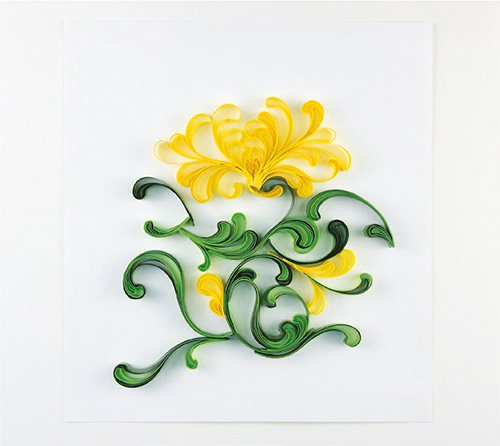
12 Complete the work by adjusting its contents and fixing with white latex.
14. Limit of Heat
Meaning the termination of summer heat, Limit of Heat (chushu) normally falls on Aug. 22 to 24 each year. It is a solar term that reflects temperature changes and marks the end of summer. By then, the weather turns cooler every day and people begin to appreciate the beauty of autumn in outings and travels.
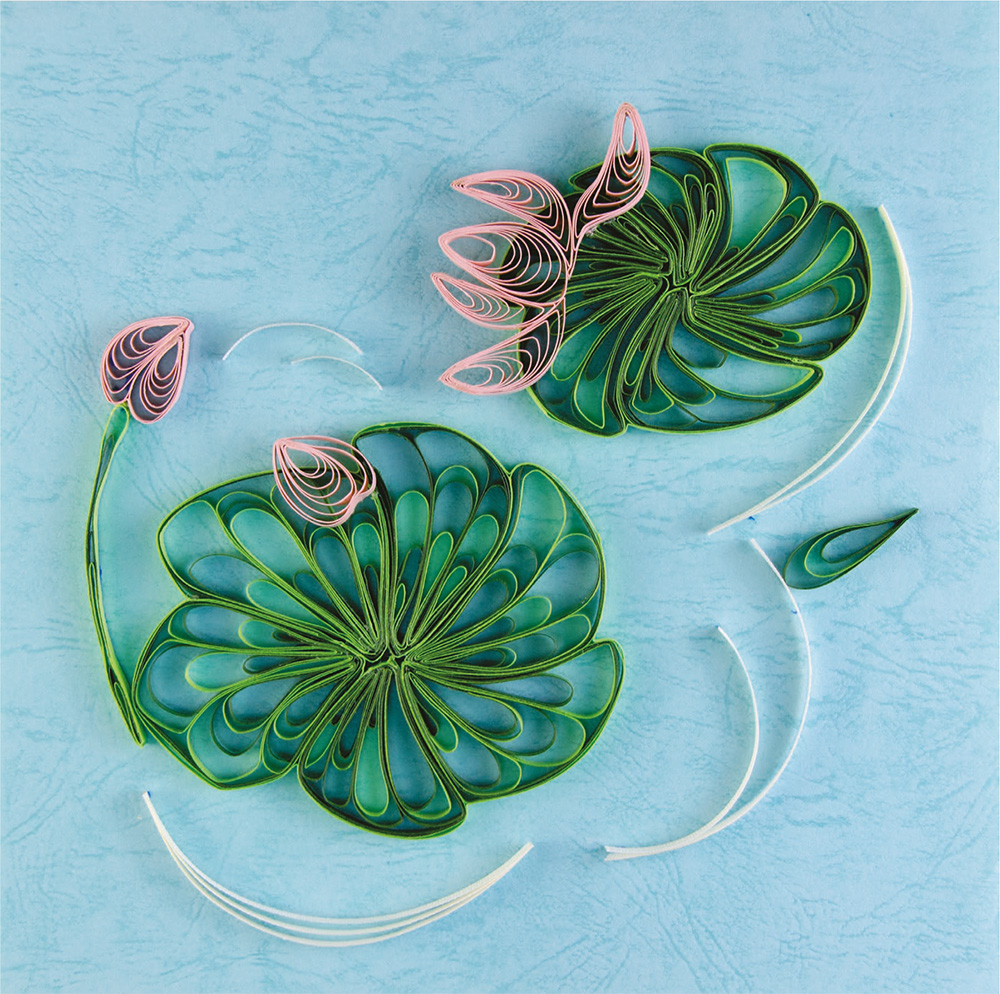
This work depicts this solar term with the lotus flower, a bloom one cannot fail to appreciate in midsummer. The budding flowers on the left and the blooming flowers on the right show that everything starts to fall after it has reached zenith. It is a rule of nature that flowers, once in full bloom, will then start to wither. And this is exactly what happens after Limit of Heat.
Materials and Elements
Lotus flowers:  loop: half-circle loop, raindrop loop, heart-shaped loop
Lotus leaves and stems:  loop: raindrop loop; line: curved line
Waves:  crescent: basic crescent; line: curved line
Background: white watercolor paper (suggested size: 27 by 27 centimeters), sky-blue embossed paper (suggested size: 21 by 21 centimeters)
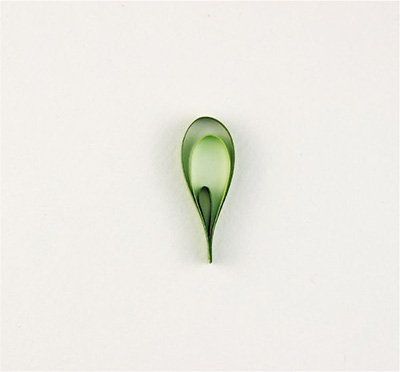
1 Make a raindrop loop with one grass-green and two dark-green paper slips.
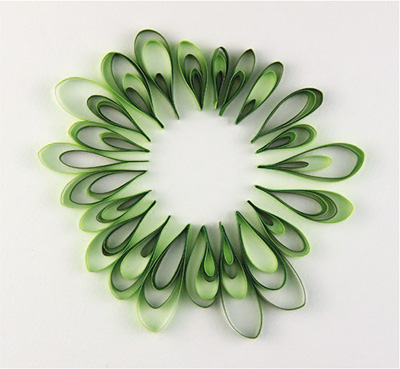
2 Follow the same method and make more than 20 raindrop loops of different sizes to serve as the components of the lotus leaf.
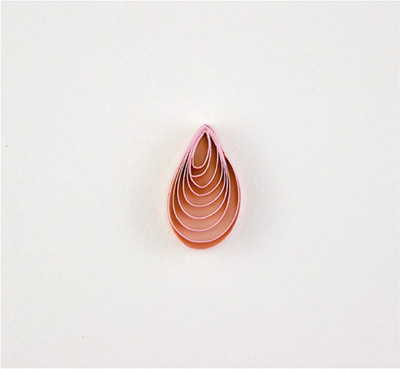
3 Make a nine-layer raindrop loop with nine pink paper slips.
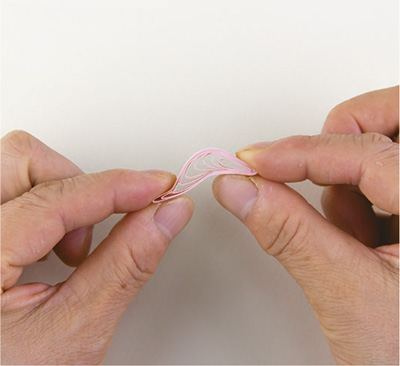
4 Pinch both ends of the pink raindrop loop with your fingers and make it into a shape like curved marquise coil.
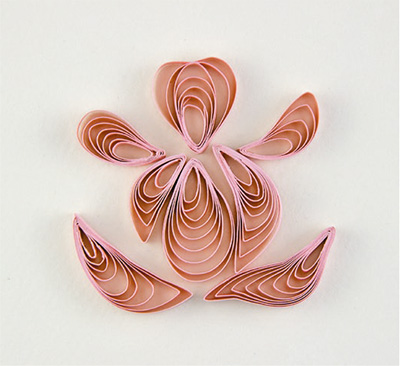
5 Make more pink raindrop loops of varied sizes and pinch them into half circles or hearts. They will be used as the petals of the lotus flowers.
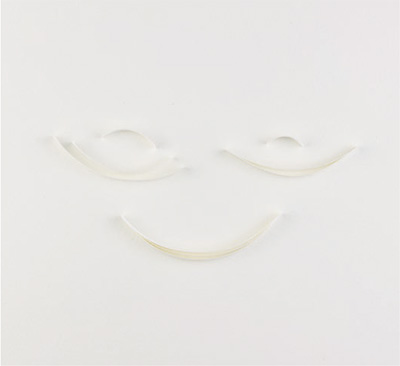
6 Make some curved lines and basic crescent as waves with the white paper slips.
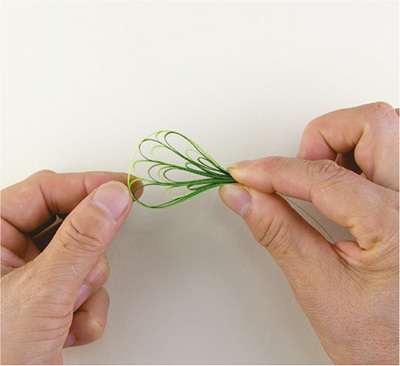
7 Wrap four green raindrop loops with a grass-green paper slip, which will serve as the lotus leave.
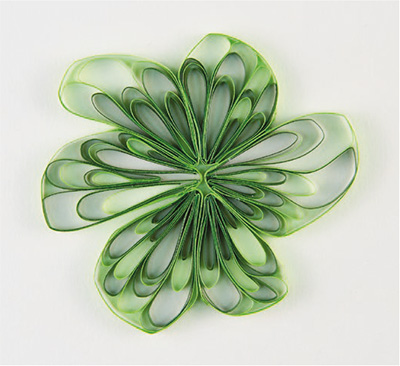
8 Treat other raindrop loops in the same way and put them together to form a complete lotus leaf.

9 Stick together a grass-green and a dark-green paper slip. Then enclose these lotus leaf components with the double-layered slip.

10 Paste the enclosure with white latex and adjust it to form a whole piece of lotus leaf. Arrange it on the lower-left corner of the sky-blue embossed paper.

11 Follow steps 7 to 10 to make another smaller lotus leaf and arrange it on the upper-right corner of the sky-blue embossed paper.
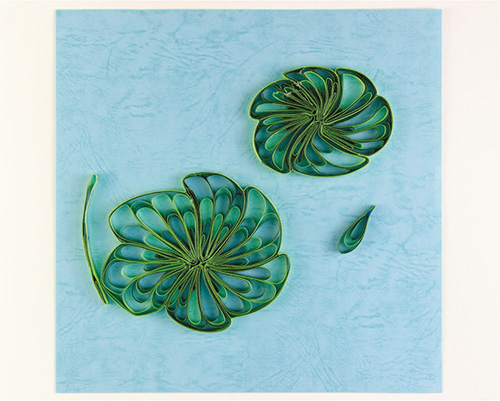
12 Bend the grass-green and dark-green paper slips and use them as the stem of the lotus flower. Arrange it onto the lower-left corner of the lotus leaf. Add a green raindrop loop to the lower-right corner of the picture.
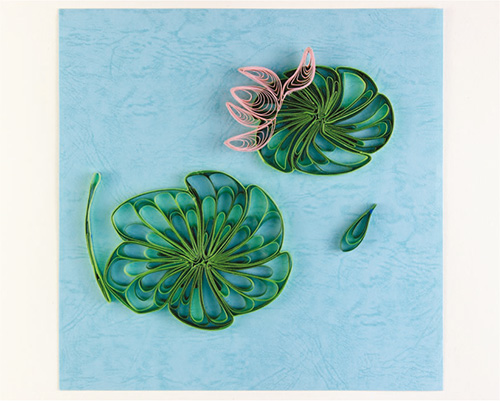
13 Make a blooming lotus flower with the pink loops already completed. Arrange it on the lotus leaf on the upper-right corner.

14 Add a withering lotus flower onto the stem on the lower-left corner and a falling petal on the lotus leaf.

15 Arrange the white waves here and there in the picture and fix them with white latex to finish the piece.
15. White Dew
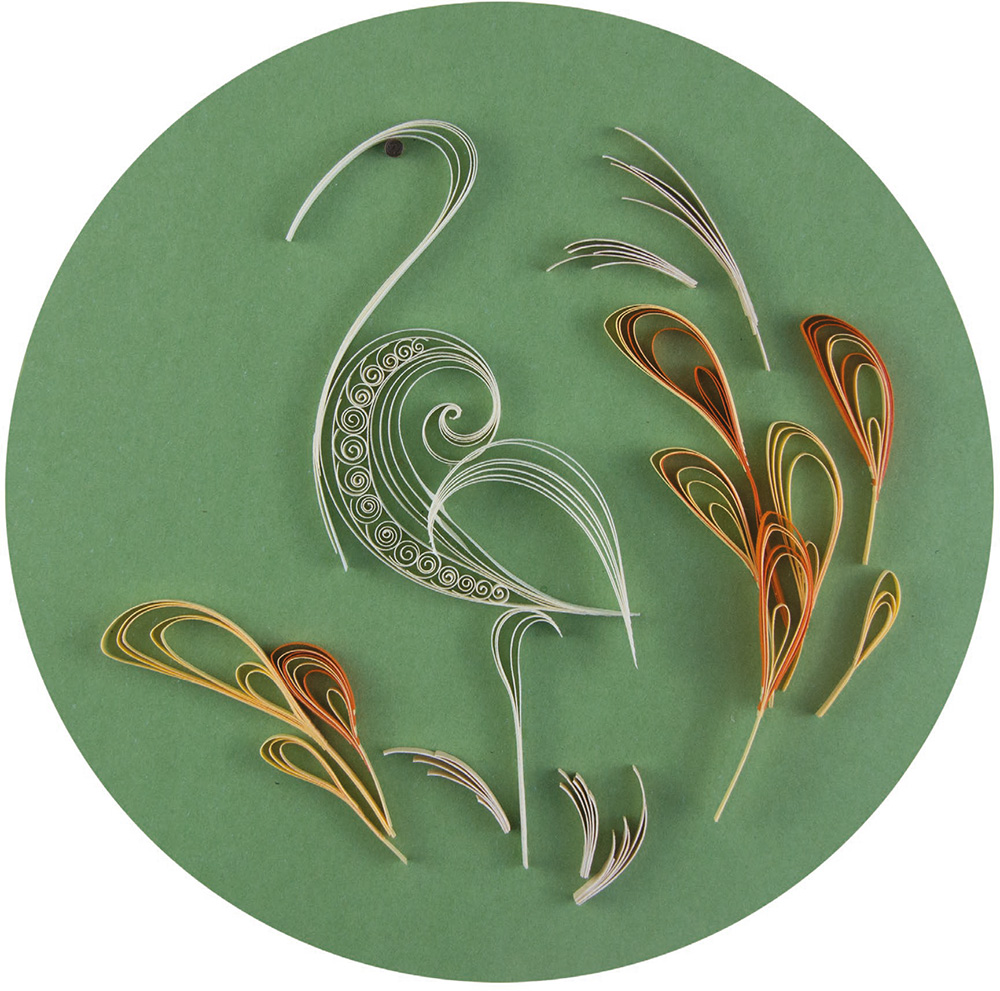
White Dew (bailu) is a solar term that reflects temperature changes in nature. It normally falls on Sept. 7 to 9 each year. By then, the autumn chill is gradually taking hold. The moisture in the night air condenses due to the morning cold, forming dense little dews on grass and leaves, which, reflecting the morning sunshine, look crystal clear. This is known as “White Dew.”
The author uses the image of a white egret, which is homophonic to this solar term in Chinese, for embodiment. Together with some reeds that flower in September, this creates a vivid-looking picture of a white egret standing in the chill of autumn. The egret, consisting only of several elements, looks neat and concise.
Materials and Elements
Egret:  crescent: wave crescent, basic crescent
Feathers of the egret:  coil: loose coil
Eye of the egret:  coil: tight coil
Reed stalks:  loop: raindrop loop
Reed catkins and underbrush:  line: curved line
Background: white watercolor paper (suggested size: 27 by 27 centimeters), grass-green embossed paper (suggested size: a piece of round paper with a diameter of 21 centimeters)

1 Make basic crescents and wave crescents with the white paper slips according to the picture to form the body of the egret. Leave a relatively long section of the paper slip on both ends of the basic crescent at the top and on one end of the basic crescent at the bottom.
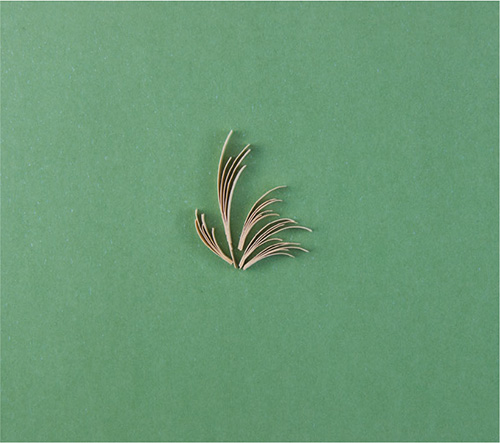
2 Make curving reed catkins with the pink paper slips. Paste one end together while leaving the other end in its naturally irregular form.
3 Make a number of raindrop loops with the flesh color and orange-red paper slips, leaving a section of the slip on one end to serve as the reed stalk.
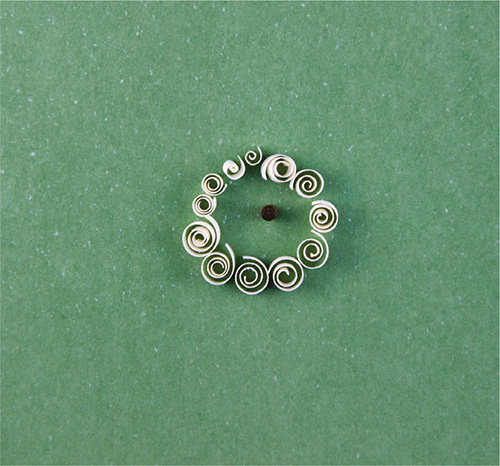
4 Make more than 10 loose coils of different sizes with the white paper slips, which serve as the egret’s feathers. Make a tight coil with a black paper slip, which serves as the egret’s eye.
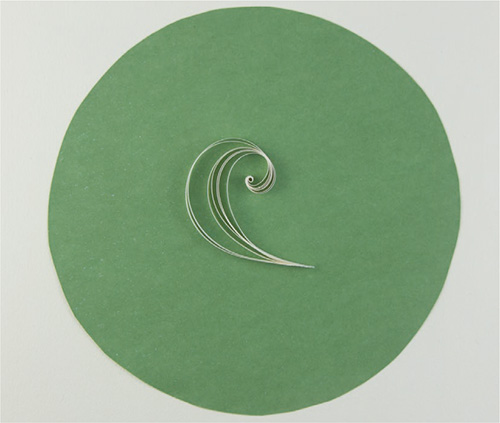
5 Paste the round grass-green embossed paper onto the center of the white background. Then arrange the body of the egret in its center.
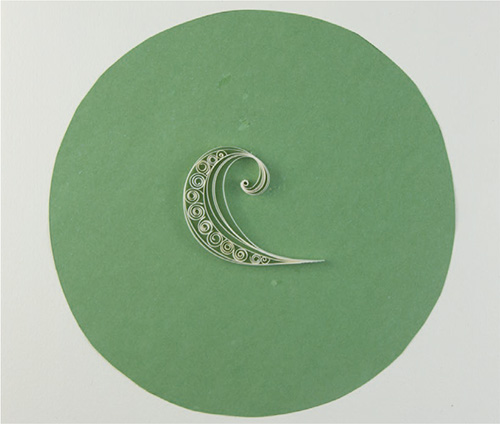
6 Arrange the white loose coils inside the egret’s body as the feathers, with the bigger ones in the middle and smaller ones on both sides.
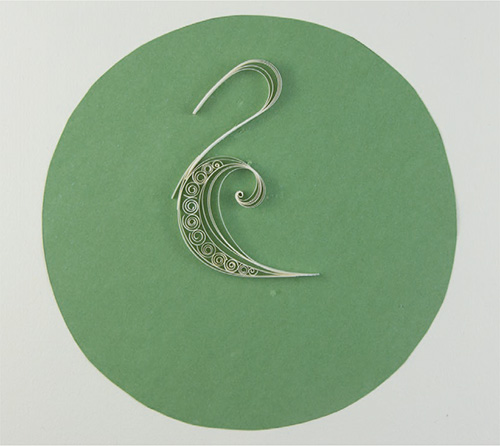
7 Arrange the crescent with longer ends onto the top of the egret’s body as its head and neck.
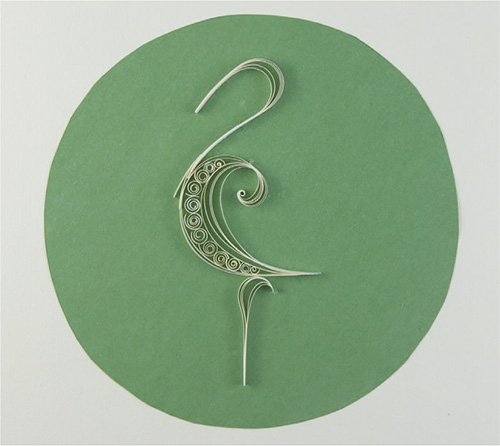
8 Add the crescent with one longer end below the body to imitate the erect foot of the egret.
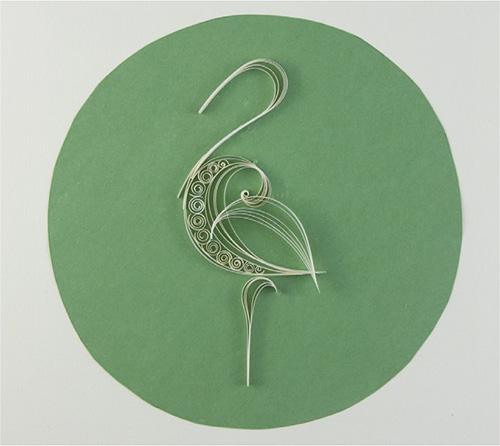
9 Add a crescent to the body to form the egret’s wing.

10 Add three raindrop loops to the left side of the egret.
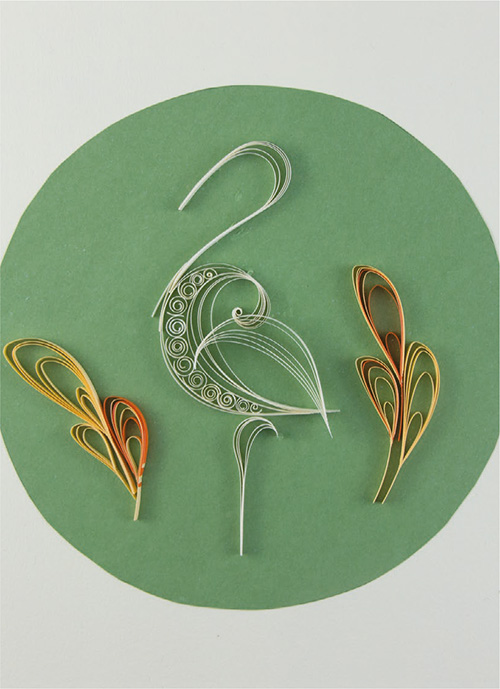
11 Add three raindrop loops to the right side of the egret.
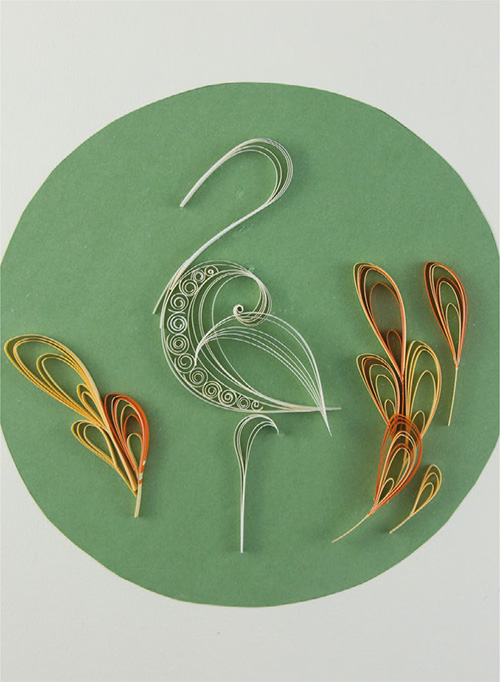
12 Keep adding raindrop loops to the right side of the egret to form luxuriant reeds. The rings can be partially overlapping.
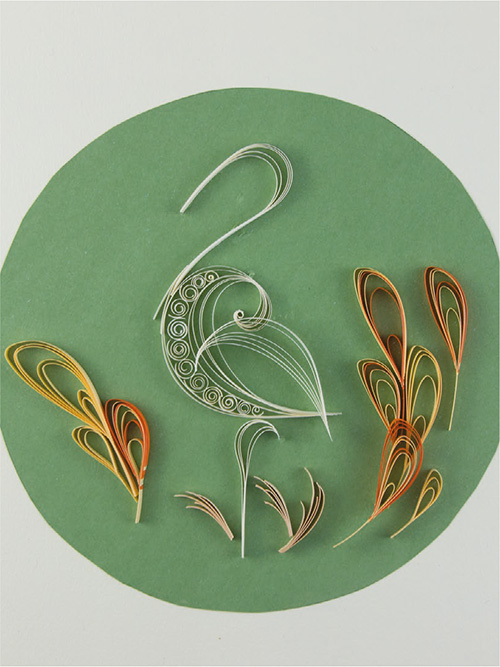
13 Add some pink curved lines at the foot of the egret as underbrush.
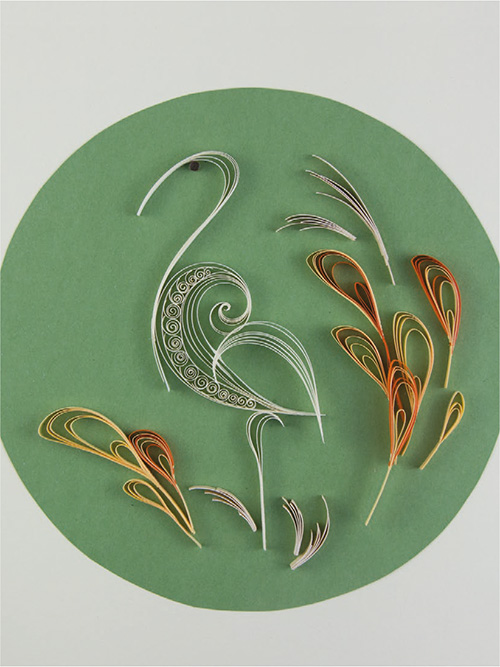
14 Add the remaining pink curved lines on top of the reeds on the right as reed catkins to enhance the autumn atmosphere. Complete the work by adjusting the contents and fixing with white latex.
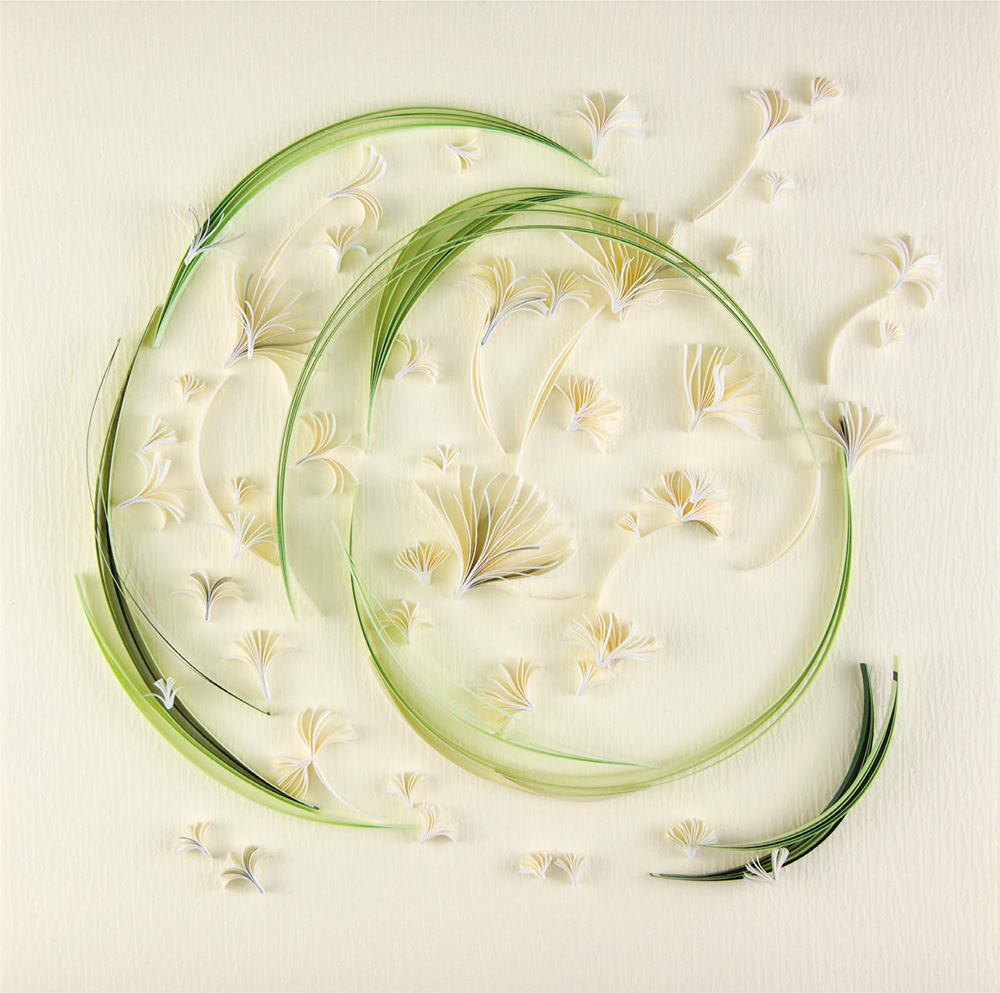
16. Autumnal Equinox
Autumnal Equinox (qiufen) normally falls on Sept. 23 to 24 each year, meaning mid-autumn. On that day, the center of the sun spends a roughly equal amount of time above and below the horizon at every location on the earth, so night and day are about the same length. The customs related to this solar term include offering sacrifices to the moon, eating autumn vegetables for health, having dumplings and flying kites.
This work presents this solar term with blooming dandelions and their flowers dancing in the autumn air. The green stems and leaves of the dandelions are in the form of an arc, resembling the bright moon in the sky and metaphorically referring to the custom of offering sacrifices to the moon. The whole work is ingenious in composition, fresh in color and graceful in posture.
Materials and Elements
Dandelion petals:  line: curved line
Dandelion receptacles:  loop: basic loop
Dandelion stems and leaves:  crescent: basic crescent
Background: white watercolor paper (suggested size: 27 by 27 centimeters)
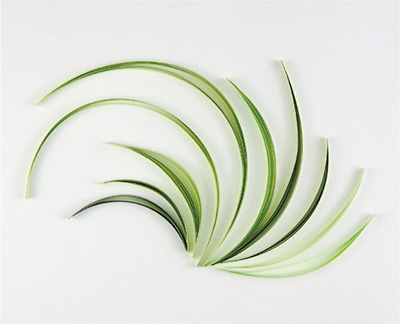
1 Make 10 basic crescents of different lengths, layers and radians with paper slips in various shades of green.
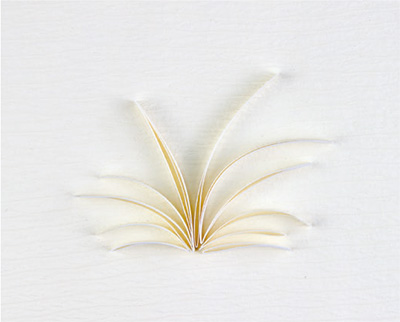
2 Make slender loops with the white paper slips as the receptacles of the dandelions.
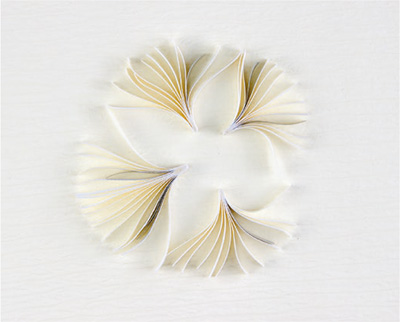
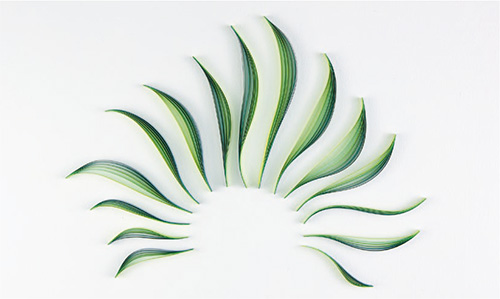
3 Cut the white and gray paper slips into sections. Fold the sections in half and paste the folding places with white latex. Scrape each of the paper slips until they form an arc and spread like a fan. They will serve as the petals of the dandelions. Make four big dandelion petals.
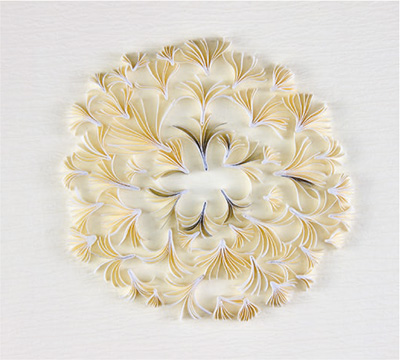
4 Follow the method in step 3 and make a large number of smaller dandelion petals with the white and gray paper slips.
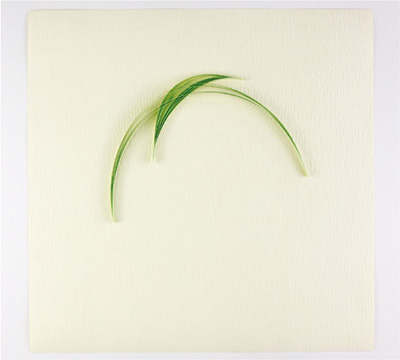
5 Add green crescents to the top of the picture as the stem and leaves of the dandelions.
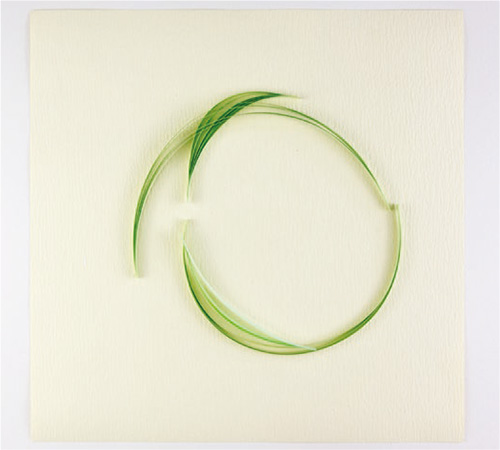
6 Continue to add crescents at the bottom of the picture, forming a cycle with the crescents on top.
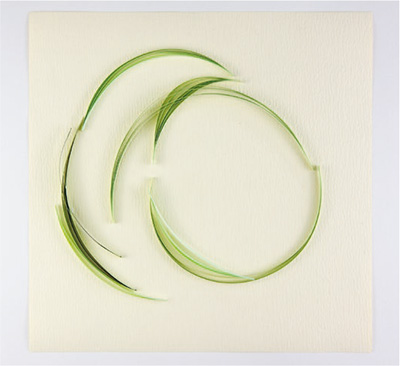
7 Add crescents on the left side of the picture to form bigger arcs.
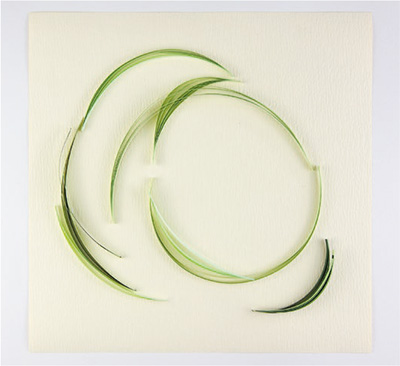
8 Add some dandelion stems and leaves to the lower-right corner of the picture.
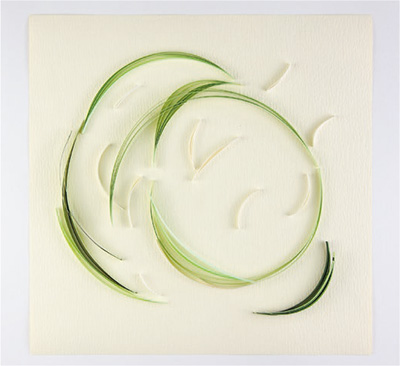
9 Add dandelion receptacles here and there in the picture.
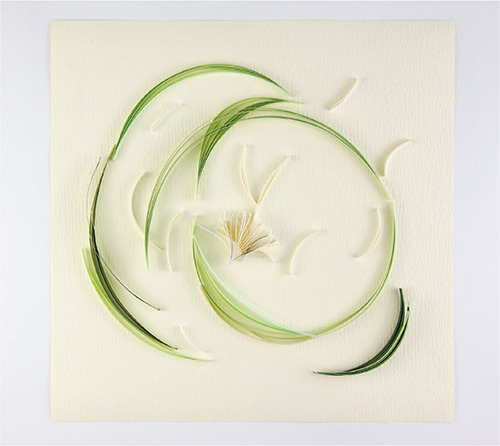
10 Add two bigger dandelion petals to the center of the picture, with one partially overlapping the other.
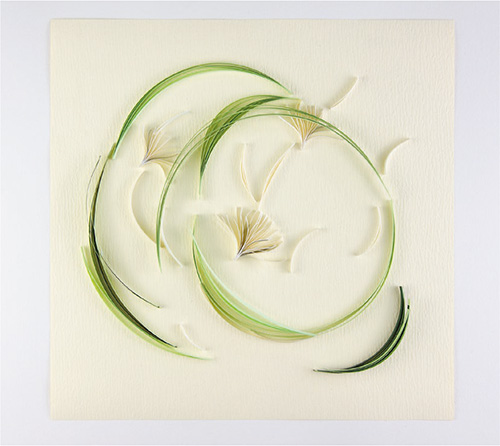
11 Add the remaining two bigger petals beneath the green stems and leaves to create a three-dimensional effect.
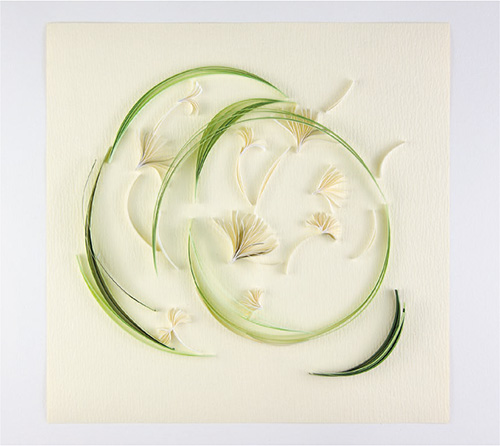
12 Add some smaller dandelion petals onto the receptacles.
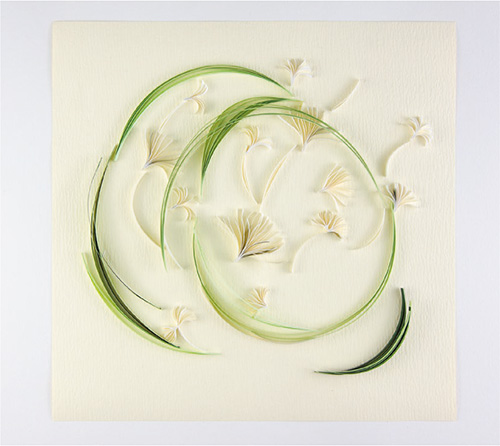
13 Continue to add dandelion petals here and there in the picture.
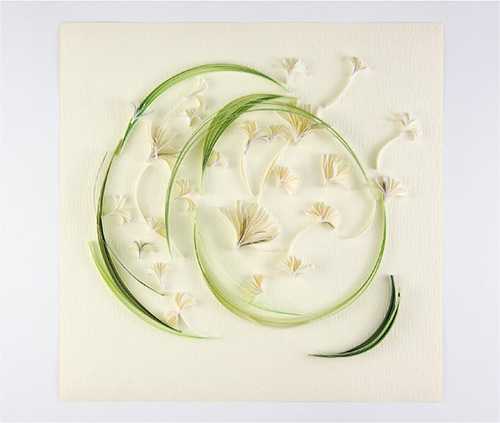
14 When adding petals of different sizes, try to make some petals overlap each other to create a hierarchical effect.
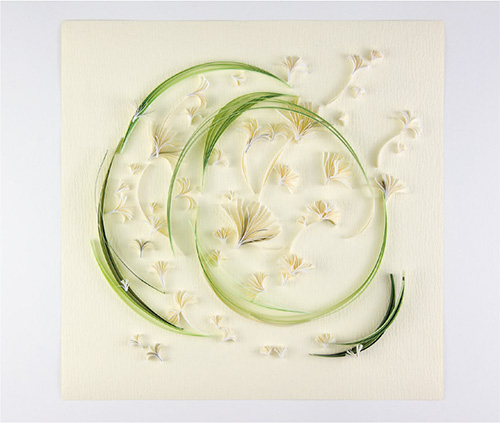
15 Add the smallest petals here and there in the picture. Complete the whole work by adjusting its contents and fixing with white latex.
17. Cold Dew
Cold Dew (hanlu) normally falls on Oct. 8 to 9 each year. By then, it is already the depth of autumn. The temperature becomes even lower than that in White Dew and the dews on the ground are going to frost. Although White Dew, Cold Dew and Frost Descent are all indicative of moisture condensation, Cold Dew means the transition from being cool to cold. Plants on earth begin to die out and it is time to enter a severe winter.
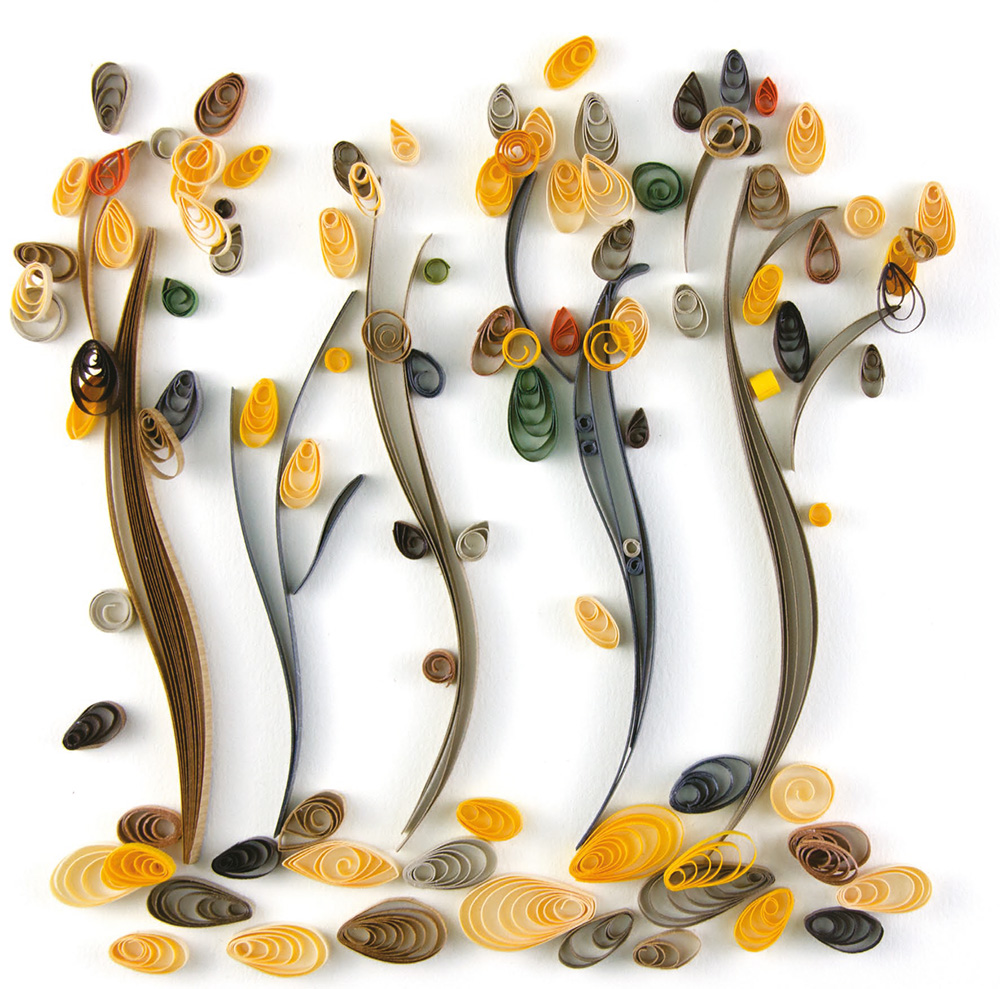
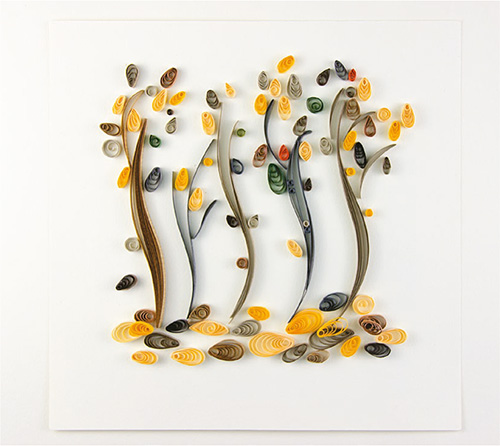
This work presents this solar term with several trees shedding leaves. The leaves on the branches are no longer as dense as in summer and the falling leaves are gradually covering the ground. Dew hangs between leaves, ready to frost, which presents a desolate scene of late autumn.
Materials and Elements
Tree trunks and branches:  crescent: basic crescent, S crescent
Leaves:  coil: teardrop coil
Dew:  coil: loose coil
Background: white watercolor paper (suggested size: 27 by 27 centimeters)

1 Make a long S crescent with the deep-gray paper slips.

2 This long S crescent will be used as tree trunk.

3 Make altogether five long and multi-layered S crescents with the deep-gray, earth-yellow, light-brown and burnt-umber paper slips. They will serve as the tree trunks. Make some shorter basic crescents and S crescents with fewer layers to serves as tree branches. Loop elements can also be used as tree branches.
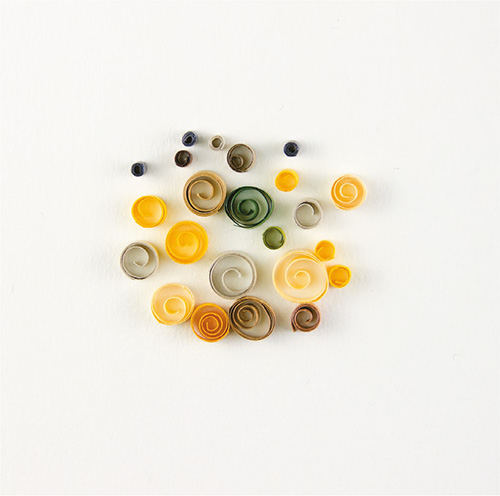
4 Make some loose coils of varied sizes with paper slips of different colors. They will serve as dew.
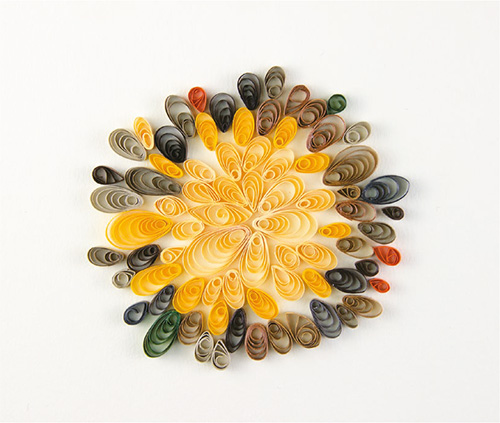
5 Make a large number of teardrop coils with paper slips in various shades of yellow, brown and gray. They will serve as leaves.
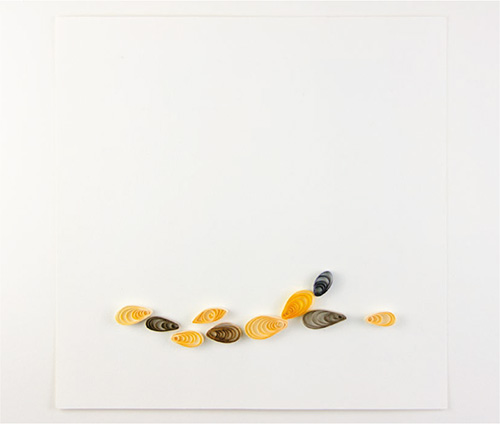
6 Lay some teardrop coils at the bottom of the picture as falling leaves. Be careful that the colors match each other and the locations are well-arranged.
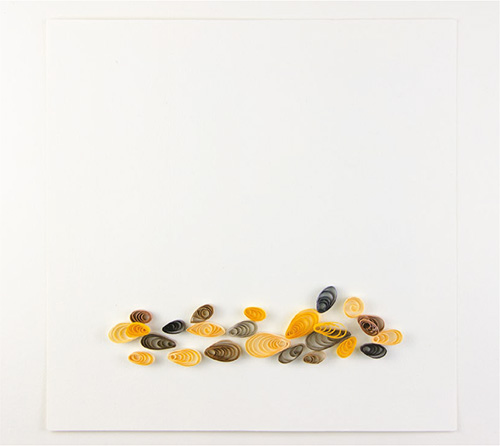
7 Continue to add teardrop coils to show the abundance of the falling leaves.

8 Add S crescents on top of the falling leaves to serve as three tree trunks.
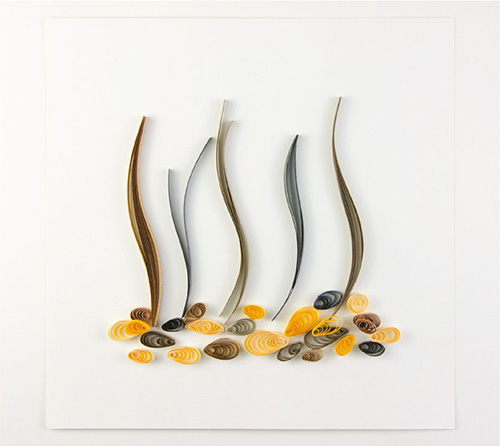
9 Continue to add the other two trunks between the first ones.
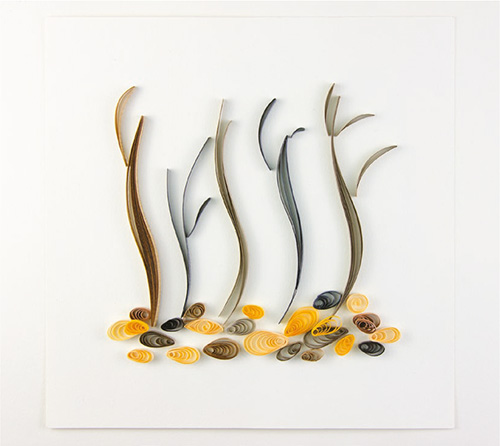
10 Add branches to the trunks.
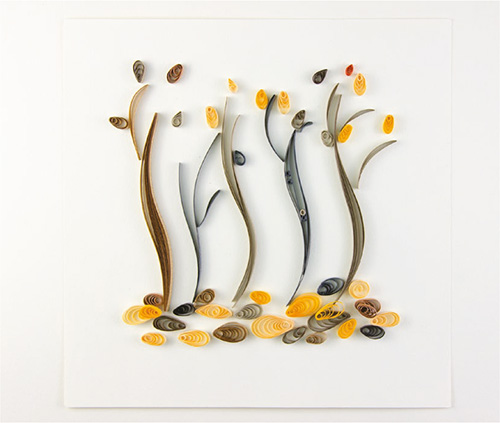
11 Add leaves of different colors onto the branches. Add some small loose coils between the trunks to serve as dew.
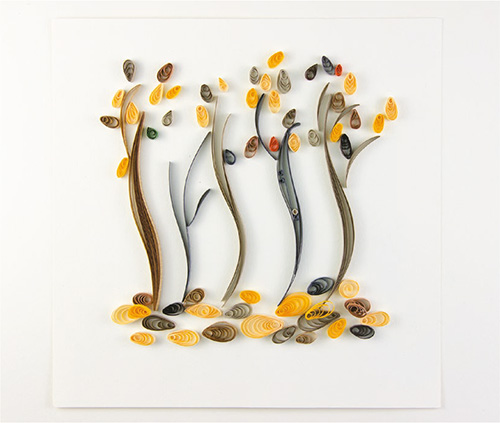
12 Keep adding leaves onto the branches. Make sure that the leaves are not too crowded, but in picturesque disorder.

13 Add some teardrop coils among the trunks to mimic falling leaves.
14 Add some loose coils of different sizes between the leaves, which will serve as dew.
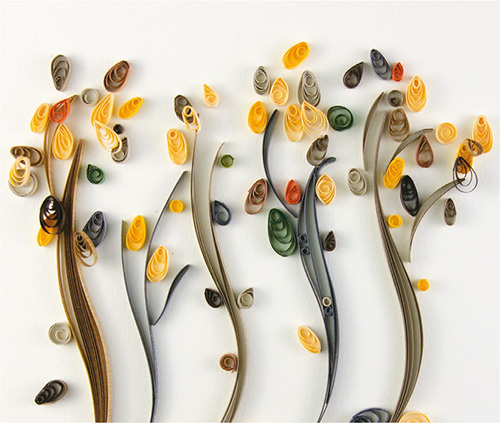
15 Pile a small number of leaves upon the leaves in the upper part of the picture to create a three-dimensional effect.

16 Continue to add dewdrops of varied sizes onto the leaves and branches. Complete the work by adjusting its contents and fixing with white latex.
18. Frost’s Descent
Frost’s Descent (shuangjiang), which normally falls on Oct. 23 to 24 each year, is the last solar term in autumn, meaning that winter will soon come. By then, it begins to become cold and dew turns into frost. Farmers start to plough the land and grow spring crops. Health care then becomes very important. According to some Chinese customs, on this day people should eat persimmons, which will help them keep out the cold and prevent illnesses.
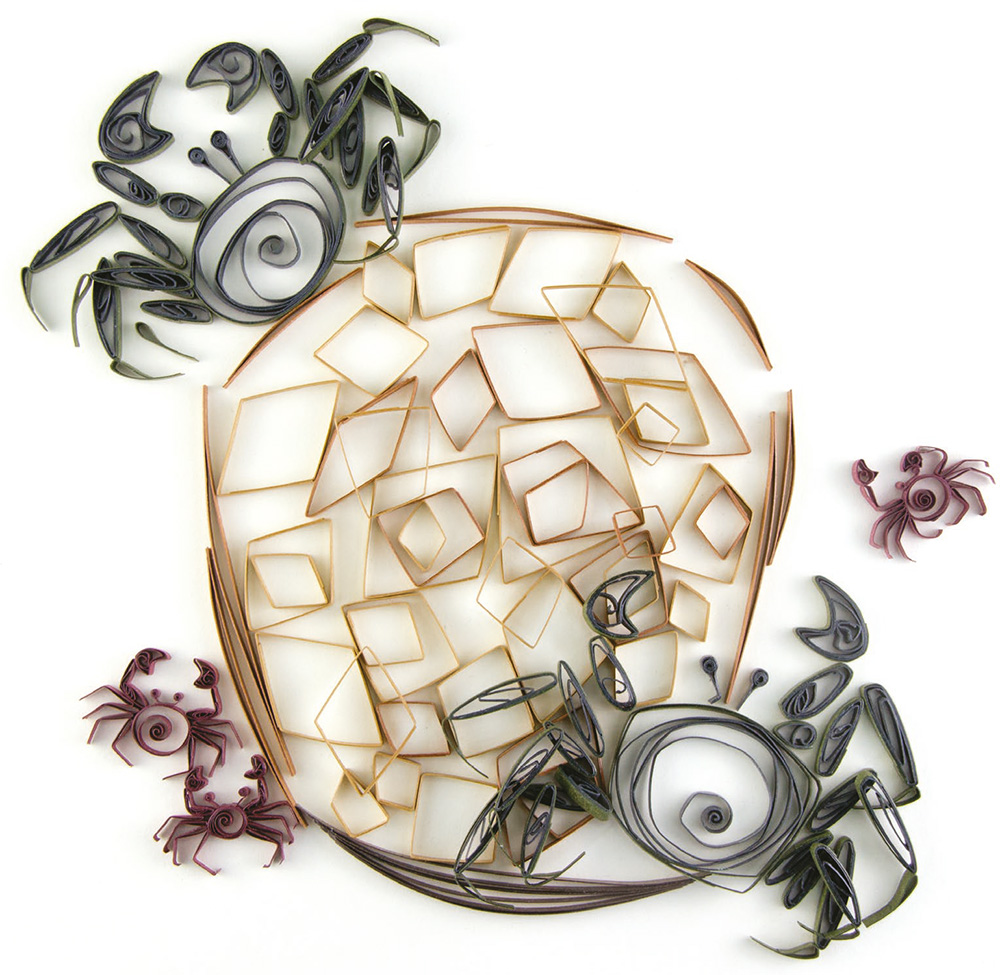
This work presents this solar term with hairy crabs, a Chinese delicacy that has long enjoyed a good reputation. Hairy crabs are the most delicious during this time, as they have been storing nutrition in their bodies for an entire year and now begin to mate. The crab basket and several crabs in this work are the best interpretation of this solar term. The crab in the lower-right corner is making threatening gestures like a beast of prey, and the one in the upper-left corner is struggling out of the basket, showing strength and vitality. The three smaller crabs outside the basket enrich the whole picture and suggest that this is the mating season for hairy crabs. The whole work is ingenious in composition and full of vitality.
Materials and Elements
Crab basket:  coil: quadrangular coil; crescent: basic crescent
Big crabs:  coil: loose coil, bamboo-leaf coil, tight coil, irregular coil
Small crabs:  coil: loose coil, tight coil
Background: white watercolor paper (suggested size: 27 by 27 centimeters)

1 Make a six-layer crescent with the burnt-umber paper slips. Make several two-layer crescents of different lengths with the earth-yellow paper slips.

2 Make more than 20 single-layer paper coils with the earth-yellow and chocolate paper slips and pinch them into quadrilaterals consisting of straight lines.
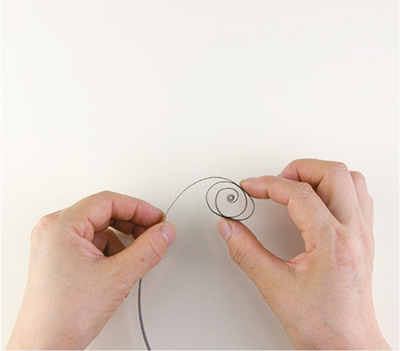
3 Roll a dark-green paper slip from one end.
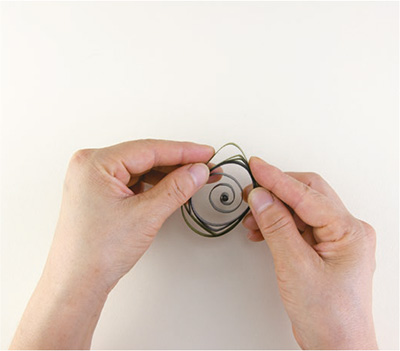
4 Roll up the whole slip to make a bigger loose coil. Fix it with white latex.
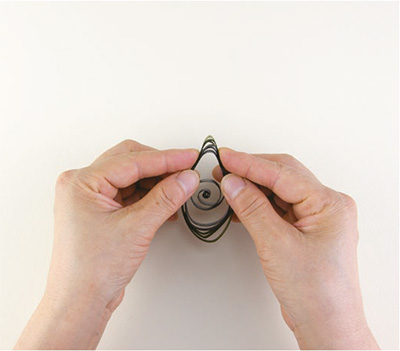
5 Gather the outer layers of the loose coil and make an angle out of it with both hands.
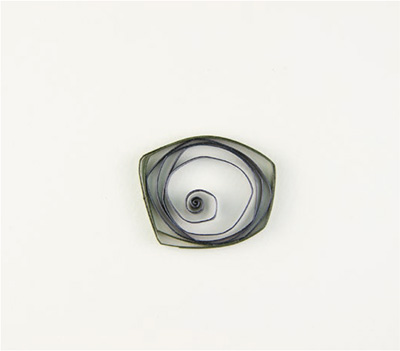
6 Make three more angles using the same method. Let the loose coil unroll naturally to get an irregular loose coil, which will serve as the body of the crab.
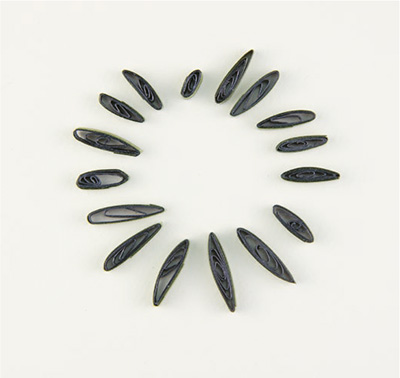
7 Make more than 10 loose coils with the dark-green paper slips and then pinch them into bamboo-leaf coils, which will serve as the crab’s feet.

8 Make eight coils in the shape of comma with the dark-green paper slips to serve as the final sections of the crab’s feet.
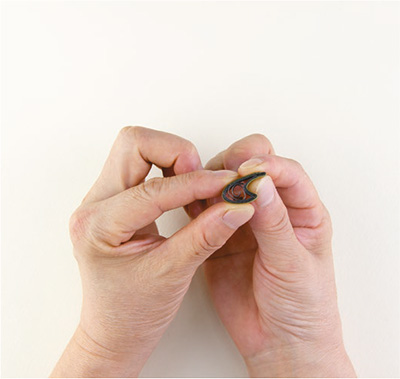
9 Make a loose coil with the dark-green paper slip. Use your thumb and forefinger to cave in one side to form the shape of the crab claw.

10 Use the same method to make one more crab’s claw of slightly different size.

11 Make two tight coils with the dark-green paper slips and two coils in the shape of comma. Place the tight coils into the comma coils to serve as the eyes of the crab. Put together the different body parts of the crab.
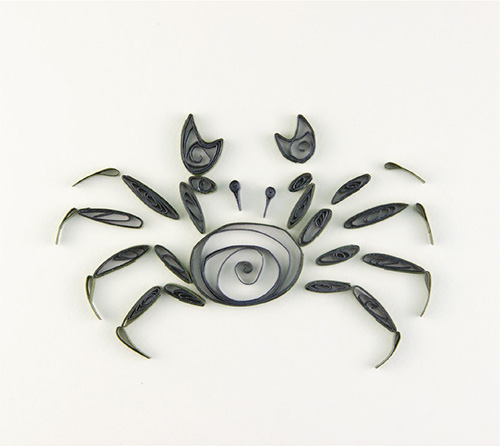
12 Make another big crab with the dark-green paper slips following steps 3 to 11.

13 Make three smaller crabs with the dark-red paper slips following the same method.
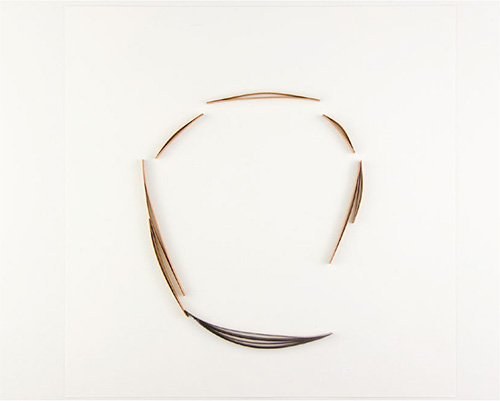
14 Place the burnt-umber crescent at the bottom of the picture, and then make the outline of the crab basket with the earth-yellow crescents, leaving an opening in the lower-right corner. Fix the outline with white latex.
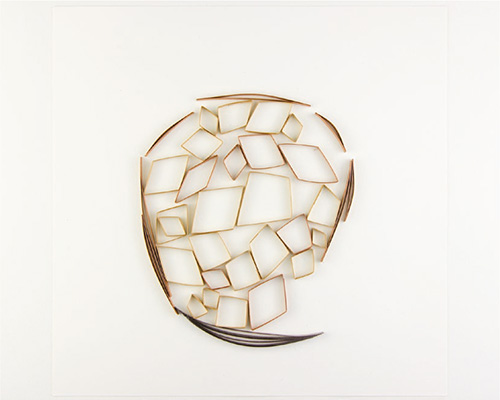
15 Fill the earth-yellow and chocolate quadrilaterals into the outline.
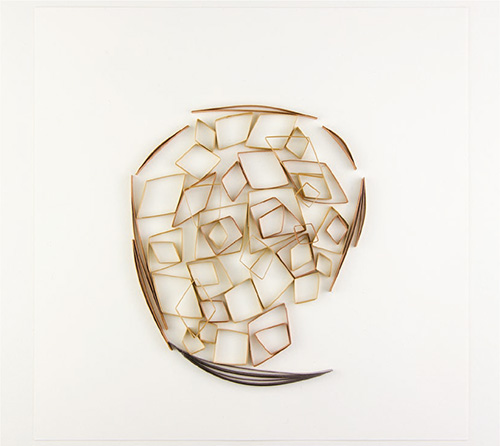
16 Keep adding quadrilaterals, superimposing them atop the first layer of quadrilaterals.

17 Add the body and eyes of the big crab to the opening in the lower-right corner of the basket.
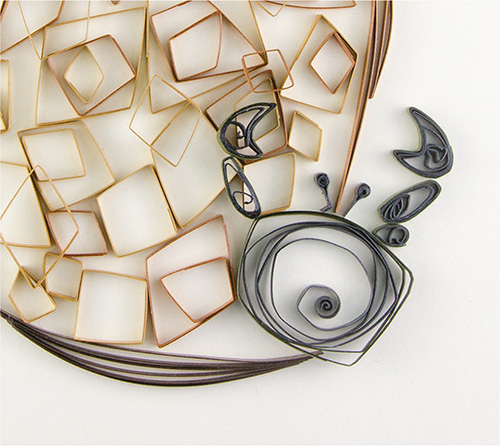
18 Add a pair of claws to the upper part of the crab, with the claw on the left grabbing the basket.

19 Add the feet to the right of the crab.

20 Add the second layer of feet on the first layer, making the feet overlap with each other. Be sure that each crab has a pair of claws and four pairs of feet.
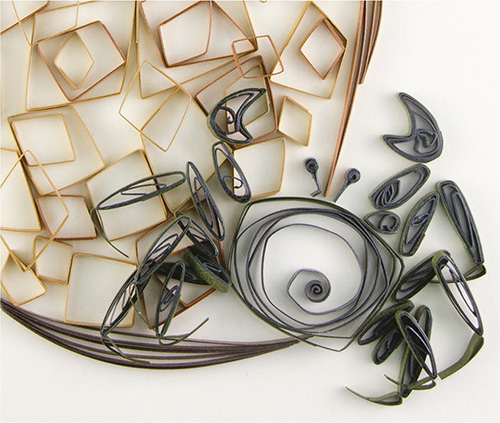
21 Add four feet on the left side of the crab. The feet can overlap each other.

22 Add the body of the second hairy crab on the upper-left side of the basket.
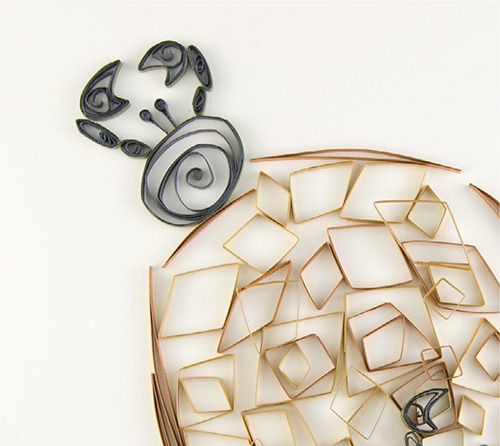
23 Add eyes and claws to this crab.
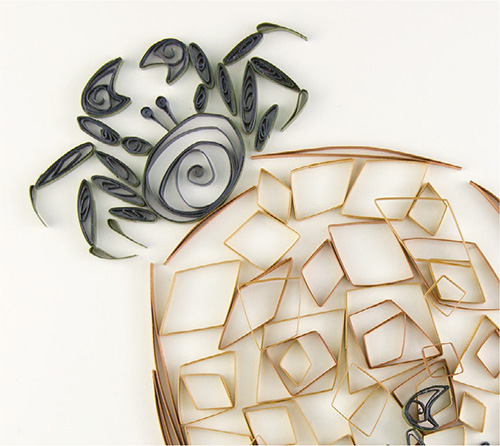
24 Add the first layer of feet to this crab.
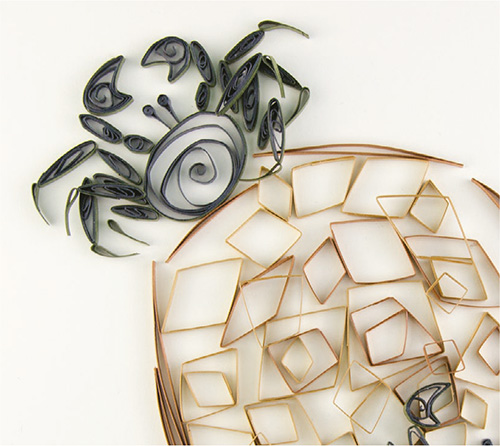
25 Add the second layer of feet.

26 Add a small crab on the right side of the picture.
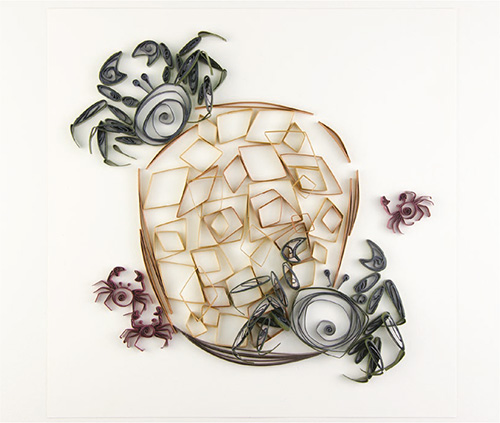
27 Add two small crabs to the lower-left corner of the picture. Complete the whole work by adjusting the contents and fixing with white latex.
19. Beginning of Winter
Beginning of Winter (lidong) normally falls on Nov. 7 to 8 each year. By that time, water has begun to ice, farmers have reaped their harvests and gotten them well-stored, and animals have hidden themselves underground for hibernation. In ancient China, on this day, the emperor would host a ceremony to greet the coming of winter and the ordinary people would also exchange greetings.
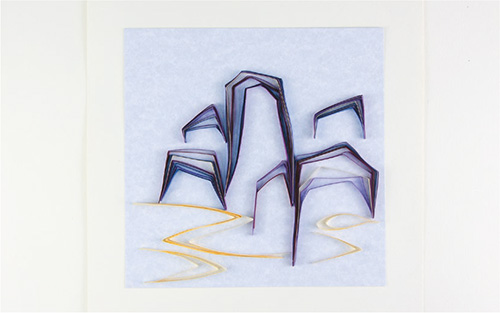
This work depicts the scene of “pheasants transforming into big clams,” which is typical of Beginning of Winter. Legend has it that, after Beginning of Winter, bigger birds like pheasants disappear suddenly. However, on the seaside emerge big clams whose colors and designs resemble those of the pheasants. Therefore, Chinese people in ancient times considered that the pheasants had transformed themselves into clams. The mountains, river and pheasants in the picture give the viewers a sense of desolation.
Materials and Elements
Mountains:  crescent: irregular crescent
Water:  line: broken line; loop: basic loop
Pheasants:  line: curved line; coil: tight coil, marquise coil
Background: white watercolor paper (suggested size: 27 by 27 centimeters), light-blue embossed paper (suggested size: 21 by 21 centimeters)

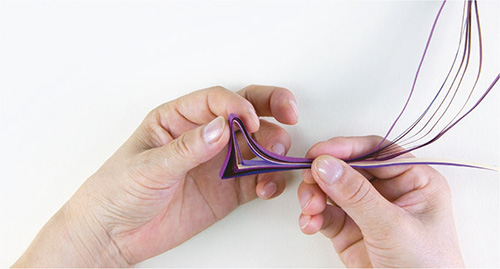
1 Paste the violet, Prussian-blue, deep-red and flesh color paper slips together at the beginning ends following the method of making a crescent. Fold it in half and then pull out different lengths of the slips from the tail end, leaving some space between the slips at the folding place. Pinch the folding place with your fingers to form an angle.
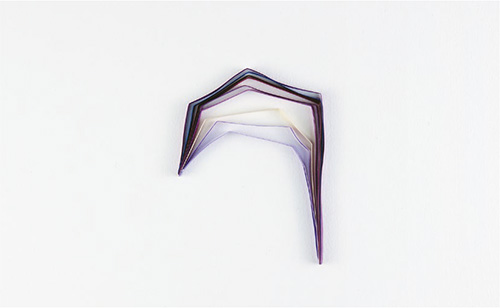
2 Move a small distance from the folding place to the tail end. Repeat step 1 and make the second angle.
3 Move still farther toward the tail end and make the third angle with the same method. Cut the redundant slips at the tail end and then fix the end with white latex to form an irregular crescent. This is the first peak.
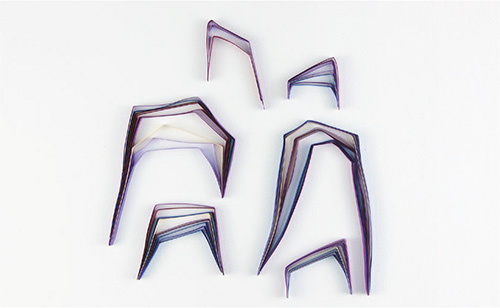
4 Make two big and four smaller peaks of different patterns using the above method. The big peaks have three sharp angels each and the small peaks have two.

5 Make broken lines and basic loops with the flesh color paper slips to serve as river water.

6 Make three flying pheasants with the Prussian-blue and deep-red paper slips. Make the body with curved lines, the heads with tight coils, and the wings with marquise coils.

7 Arrange a piece of light-blue embossed paper in the center of the white watercolor paper. Place a big peak in the middle of the embossed paper.
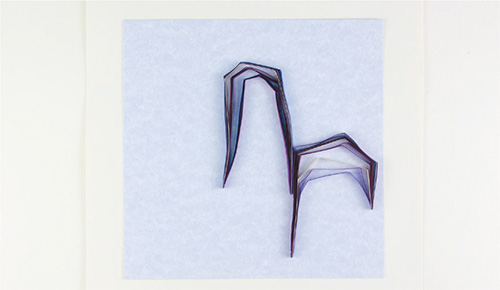
8 Add the second big peak to the lower-right side of the central peak.
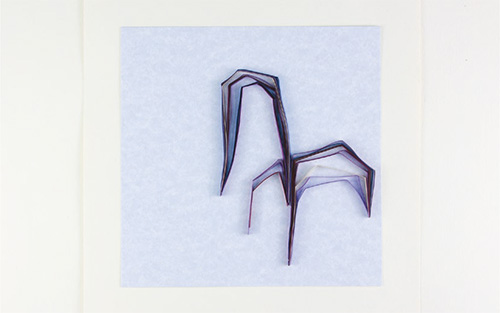
9 Add a small peak beneath the central peak.
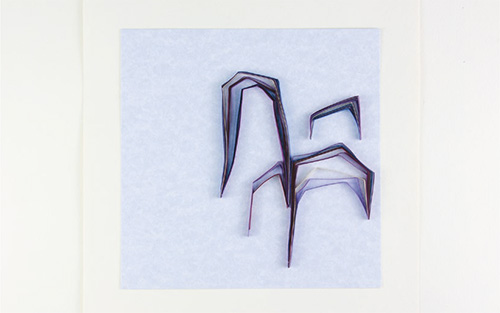
10 Add a small peak onto the top of the second big peak.
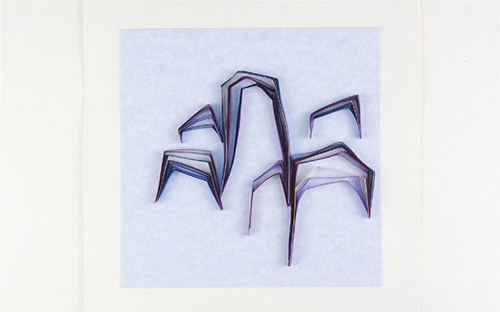
11 Add two small peaks to the left side of the big central peak, one upon the other.
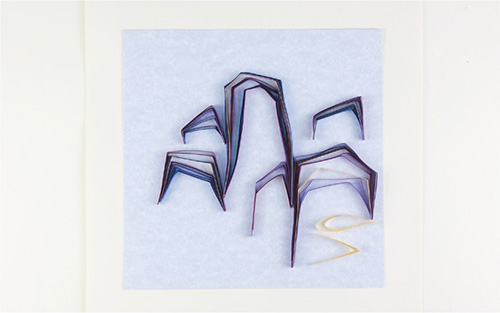
12 Add river water to the lower-right corner of the picture.
13 Add river water to the lower-left corner of the picture.

14 Add three pheasants in the sky. Complete the work by adjusting its contents and fixing with white latex.
20. Lesser Snow
Lesser Snow (xiaoxue) normally falls on Nov. 22 to 23 each year. By then, it has become cold and it may also snow in some places, though not heavily, and hence the name Lesser Snow. Everything on earth turn sluggish and lose vitality. Thus, the severe winter begins.
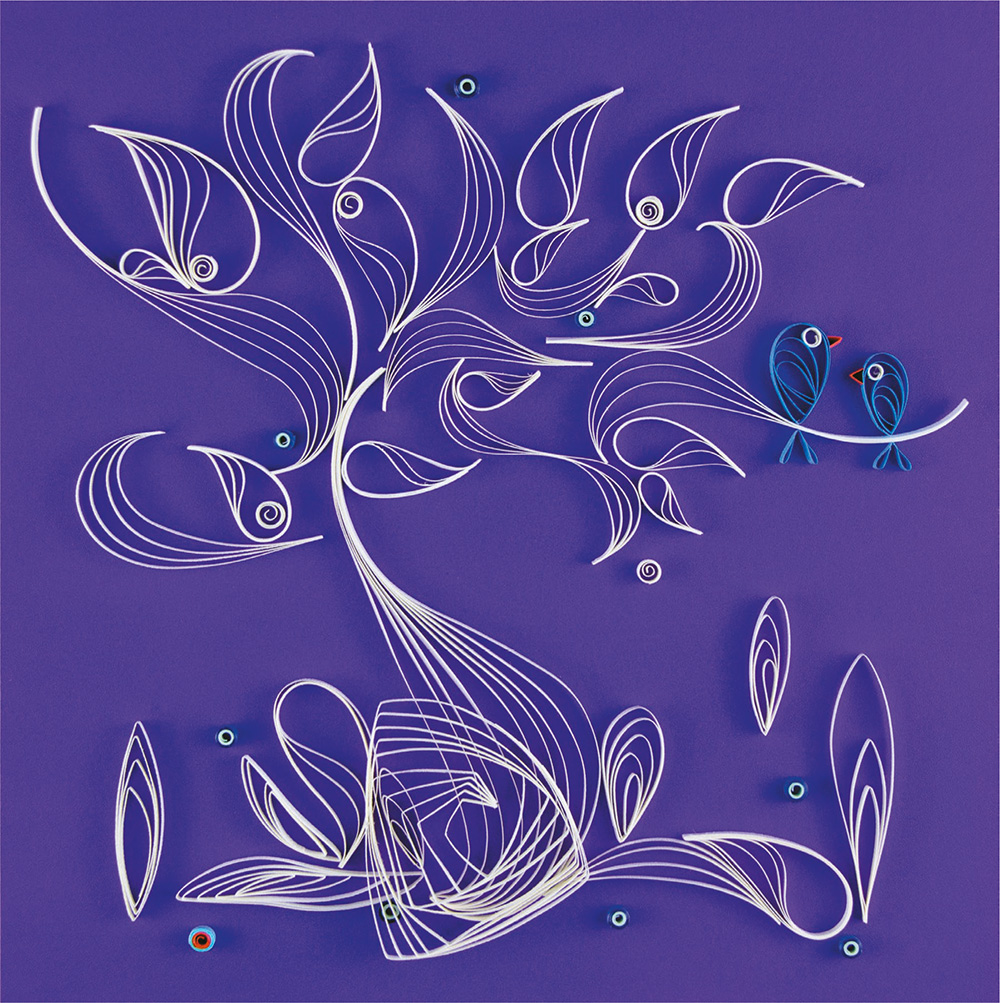
This work uses the white paper slips to display trees covered with snow. A leafless tree stands in the snow; two birds perch on a branch. Are they forgetting to migrate? How will they survive the ice and snow?
Materials and Elements
Tree trunk and branches:  crescent: basic crescent, raindrop crescent, S crescent, harp crescent; loop: leaf loop, raindrop loop, half-circle loop, irregular loop
Stone:  coil: irregular coil
Birds:  coil: teardrop coil, ring coil; line: broken line
Fog:  coil: tight coil
Snowflakes:  coil: loose coil
Ground:  loop: irregular loop; crescent: basic crescent
Background: white watercolor paper (suggested size: 27 by 27 centimeters), violet embossed paper (suggested size: 21 by 21 centimeters)
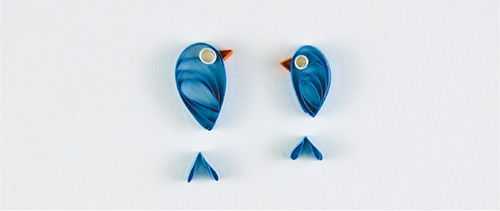
1 Make some teardrop coils with the lake-blue paper slips to serve as the bodies and tails of the birds. Make some broken lines out of the orange-yellow paper slips to serve as the birds’ beaks. Make two ring coils with the white paper slips to serve as the eyes of the birds.

2 Make some tight coils with the light-blue and Prussian-blue paper slips, with the light-blue color inside and the Prussian-blue color outside. They will serve as the diffuse fog on the ground and create the atmosphere of a cold winter.

3 Put five white paper slips together. Treat one end the same way you make a basic crescent.

4 After a basic crescent is made, bend it towards the opposite direction so that it is encircled inside a raindrop loop.

5 Cut the redundant part and paste both ends with white latex. The raindrop crescent is complete.

6 Make more than 10 raindrop crescents of different sizes and layers.
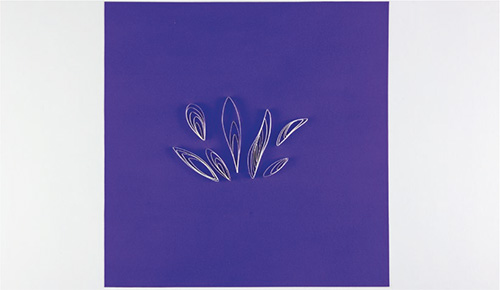
7 Make some loops with the white paper slips. Then pinch them into leaf loops, raindrop loops, and half-circle loops and irregular loops.

8 Make more than 10 basic crescents, S crescents and harp crescents of different patterns with the white paper slips.
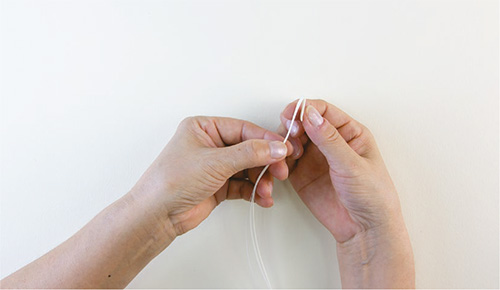
9 Now let’s make a stone. Take out five white paper slips and paste them together at the beginning ends. Then fold them at 1 centimeter away from the beginning end.
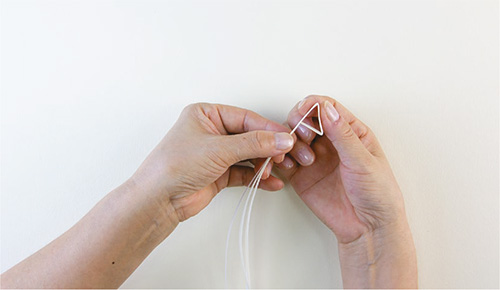
10 Fold them again at 1.5 centimeters away from the first folding place.
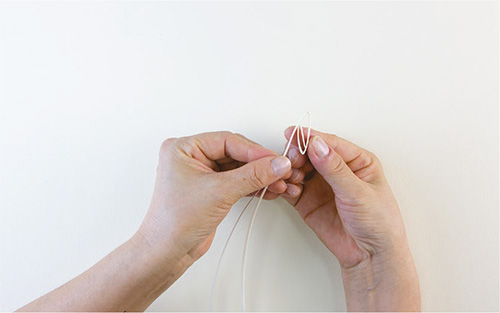
11 Fold them again at 2 centimeters away from the second folding place.

12 Follow the above method and make five folds in ascending distance.

13 Pull out different lengths of paper slips at tail ends.
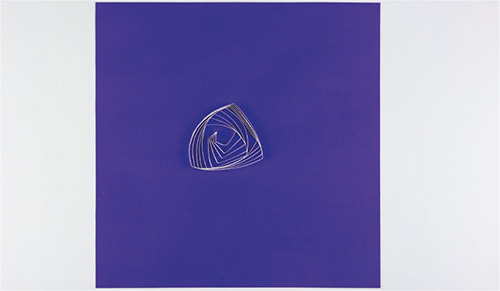
14 Roll it into a triangle-shaped irregular coil just as you do to make a loose coil. Fix the tail end with white latex to serve as the stone.
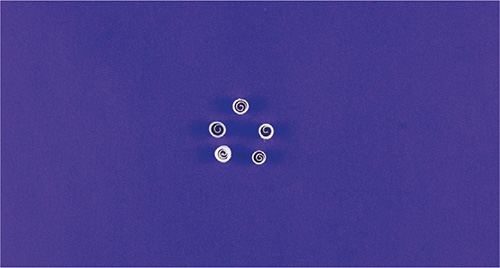
15 Make several loose coils with the white paper slips to serve as snowflakes.
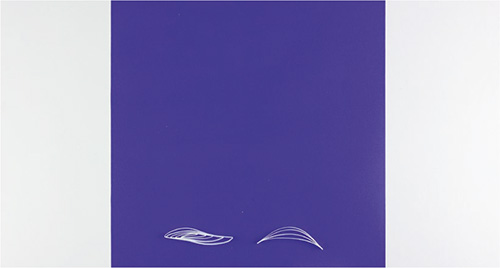
16 Paste the violet embossed paper in the center of the white background paper. Arrange a basic crescent and an irregular loop at the bottom of the picture to serve as the ground.

17 Add a harp crescent as the tree trunk.

18 Add basic crescent branches and S crescent branches to the top of the trunk that bends towards right.

19 Continue to add crescent branches to form the main branches of the tree.

20 Add some crescents on the main branches to serve as forks.

21 Add two raindrop crescents on the ground in imitation of fallen branches.

22 Add some raindrop crescents to the branches.
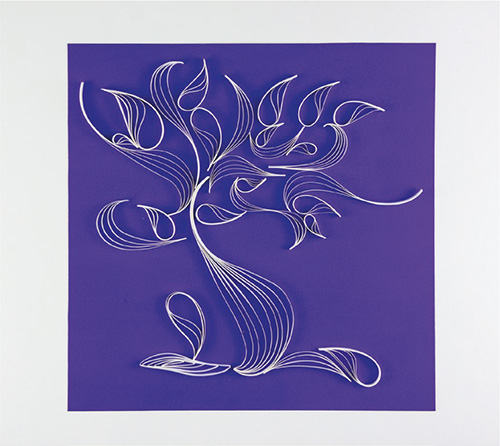
23 Continue to add raindrop crescents between the branches to make the picture look fuller.

24 Add various types of loops on the ground in imitation of trees in the distance.
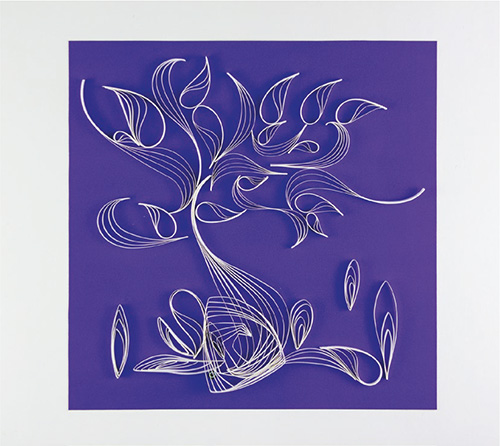
25 Add the stone to the bottom of the trunk.

26 Add loose coils between the branches in imitation of falling snowflakes.
27 Add blue tight coils here and there in the picture to create a foggy effect.

28 Finally, add two small birds that face each other onto the branch on the right. Complete the work by adjusting its contents and fixing with white latex.
21. Great Snow
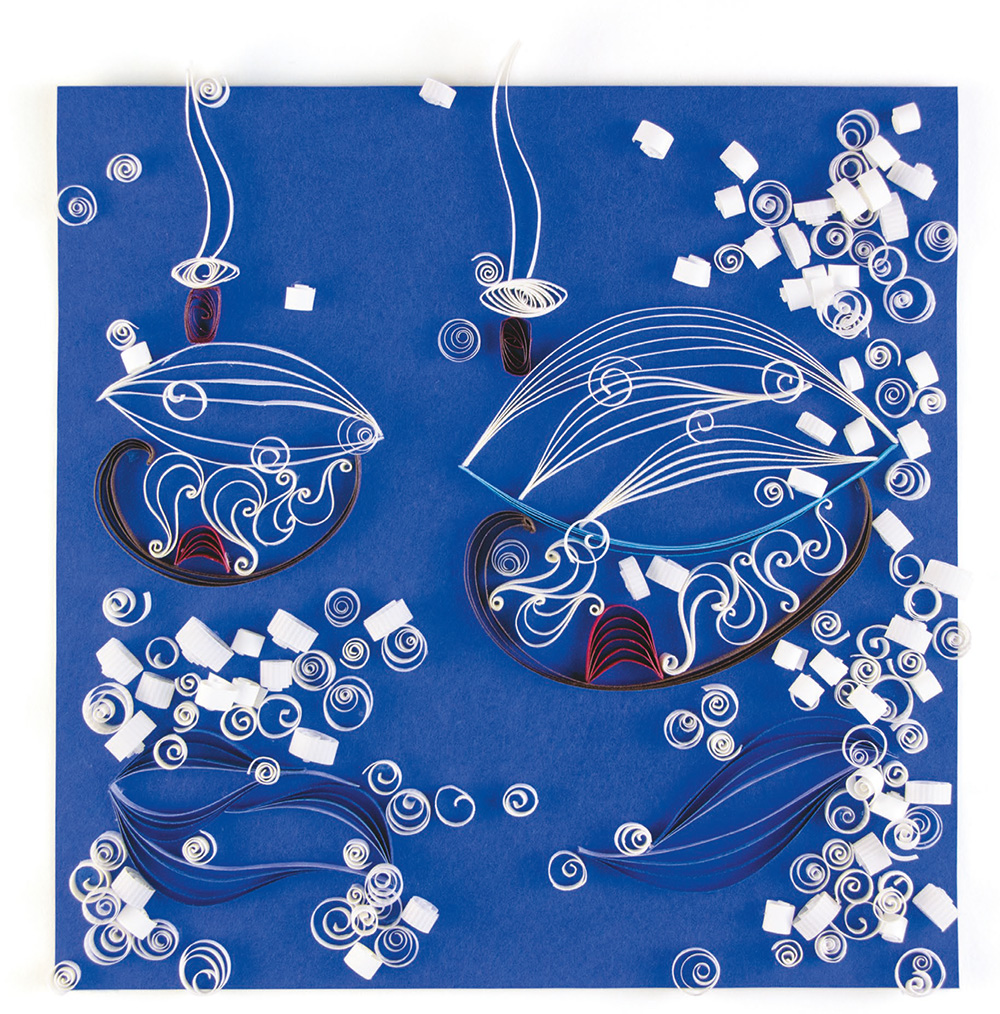
Great Snow (daxue), which means heavy snow literally, normally falls on Dec. 6 to 8 each year. Different from Lesser Snow, Great Snow has a higher chance of snowing. And the snow is heavier, lasts longer and has a wider coverage. As a saying goes: “During Lesser Snow, the ground is covered with snow, but during Great Snow, the rivers are frozen all over.” By this time, the weather is very cold, the rivers are covered with ice and snow, and the whole earth is dressed in white.
This work presents the solar term of Great Snow with the snow-swept grassland in China’s northern Inner Mongolia. Two yurts stand lonely in the whirling snow, showing the boundlessness of nature. The white smoke rising from the chimneys of the yurts adds “human” taste, as well as warmth to the picture.
Materials and Elements
Main body of the yurts:  crescent: basic crescent
Yurt doors:  crescent: basic crescent
Yurt chimneys:  coil: rectangular coil, teardrop coil; line: curved line
Decorative patterns on the yurts:  crescent: spiral crescent
Small sand dunes:  crescent: basic crescent
Snowflakes:  coil: loose coil
Background: white watercolor paper (suggested size: 27 by 27 centimeters), lake-blue embossed paper (suggested size: 21 by 21 centimeters)
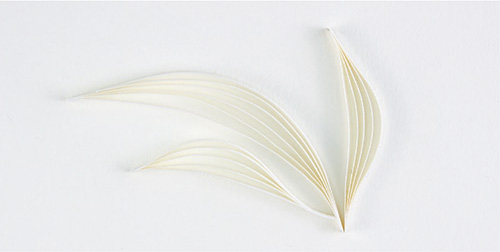
1 Make three basic crescents of different sizes with the white paper slips to serve as the yurt’s roof.

2 Make two long and thin basic crescents with the lake-blue and burnt-umber paper slips to serve as the top and bottom of the yurt.
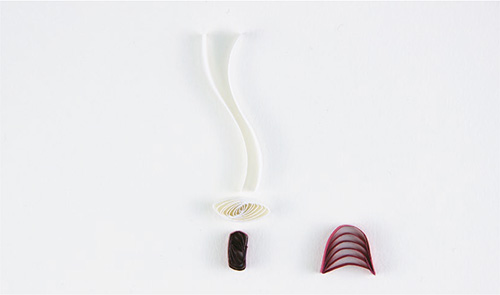
3 Make a basic crescent door and a rectangular coil chimney with the deep-red paper slips. Make a teardrop coil chimney and curved smoke with the white paper slips.

4 The component parts of a yurt are basically finished.
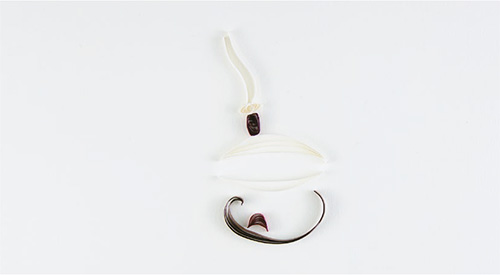
5 Follow the same method to make a smaller yurt.
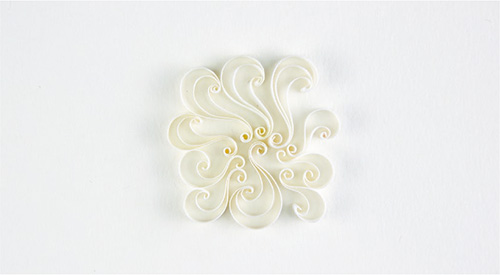
6 Make more than 10 spiral crescents with the white paper slips to serve as the decorative patterns on the yurt.

7 Make six basic crescents with the Prussian-blue paper slips to serve as the small sand dunes.
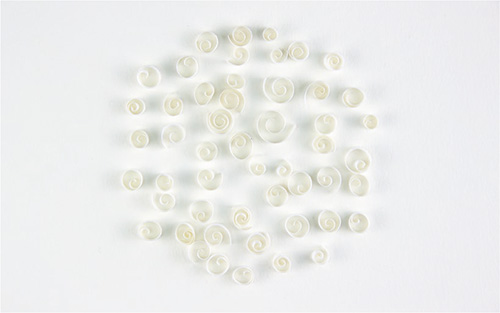
8 Make many loose coils with the white paper slips to serve as snowflakes.
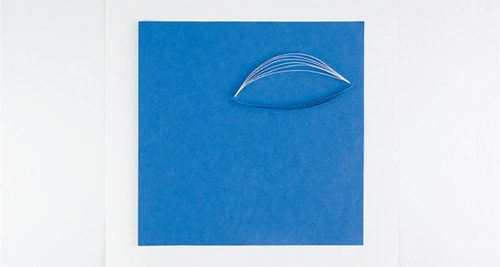
9 Paste the lake-blue embossed paper in the center of the white watercolor paper. Place the white and lake-blue crescents on the upper-right corner of the embossed paper to set up the top of the bigger yurt.
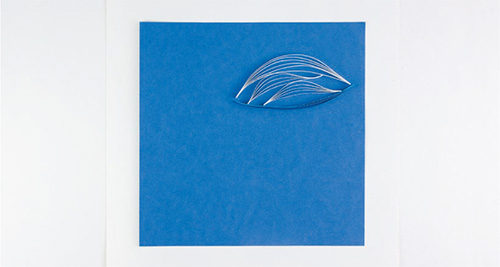
10 Fill the top of the yurt with two small white crescents.
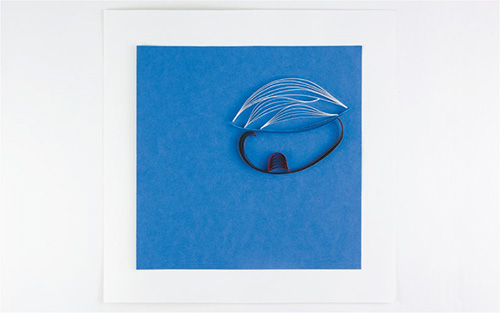
11 Add the bottom and door to the yurt below the top.
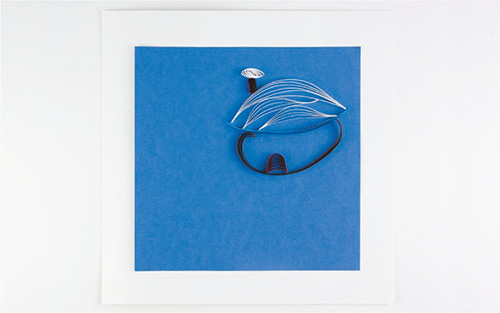
12 Add a chimney to the top of the yurt.
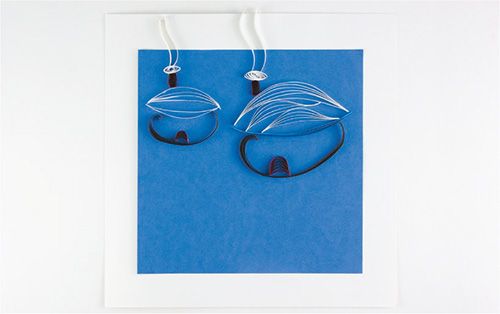
13 Add a smaller yurt to the left of the bigger yurt. Add white smokes to the chimneys of the two yurts.
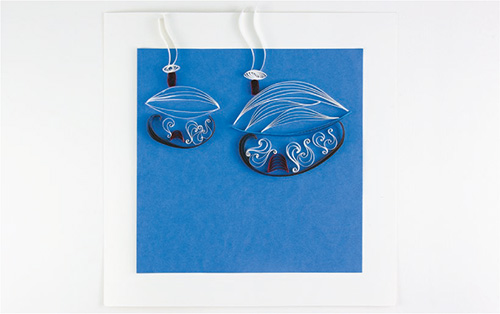
14 Add the white spiral crescents to the yurts as decorative patterns.
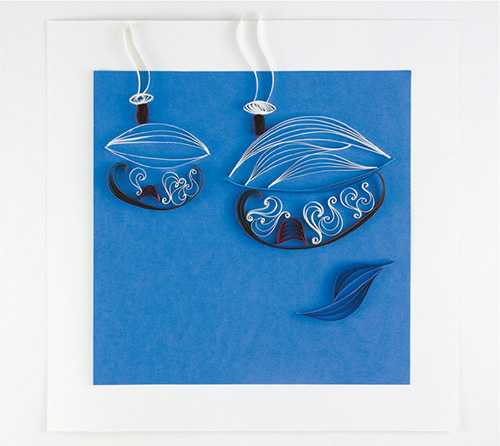
15 Add a small sand dune made of the Prussian-blue basic crescents to the lower-right corner of the picture.

16 Add another small sand dune to the lower-left corner of the picture.
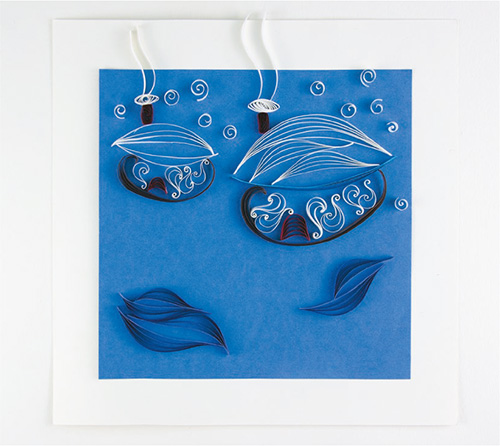
17 Add snowflakes made of white loose coils above the yurts.
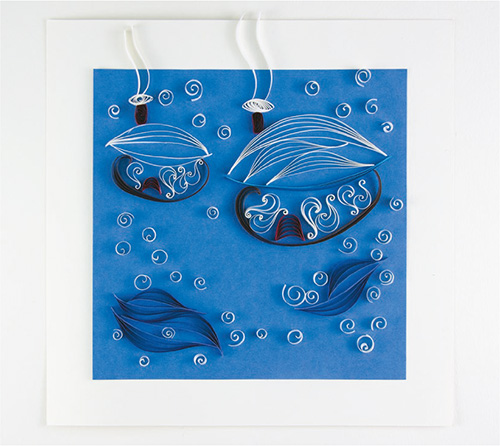
18 Cover the picture with snowflakes. Pay attention that the snowflakes are arranged in proper density.
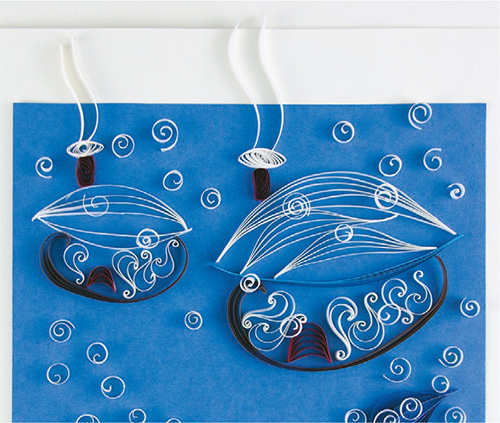
19 Add some snowflakes on the yurts.
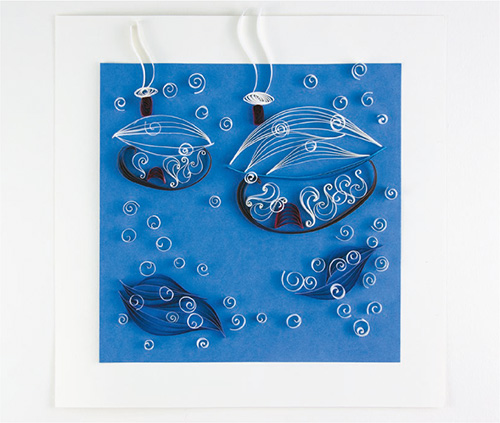
20 Add snowflakes on the small dunes and complete the work by adjusting its contents and fixing with white latex.
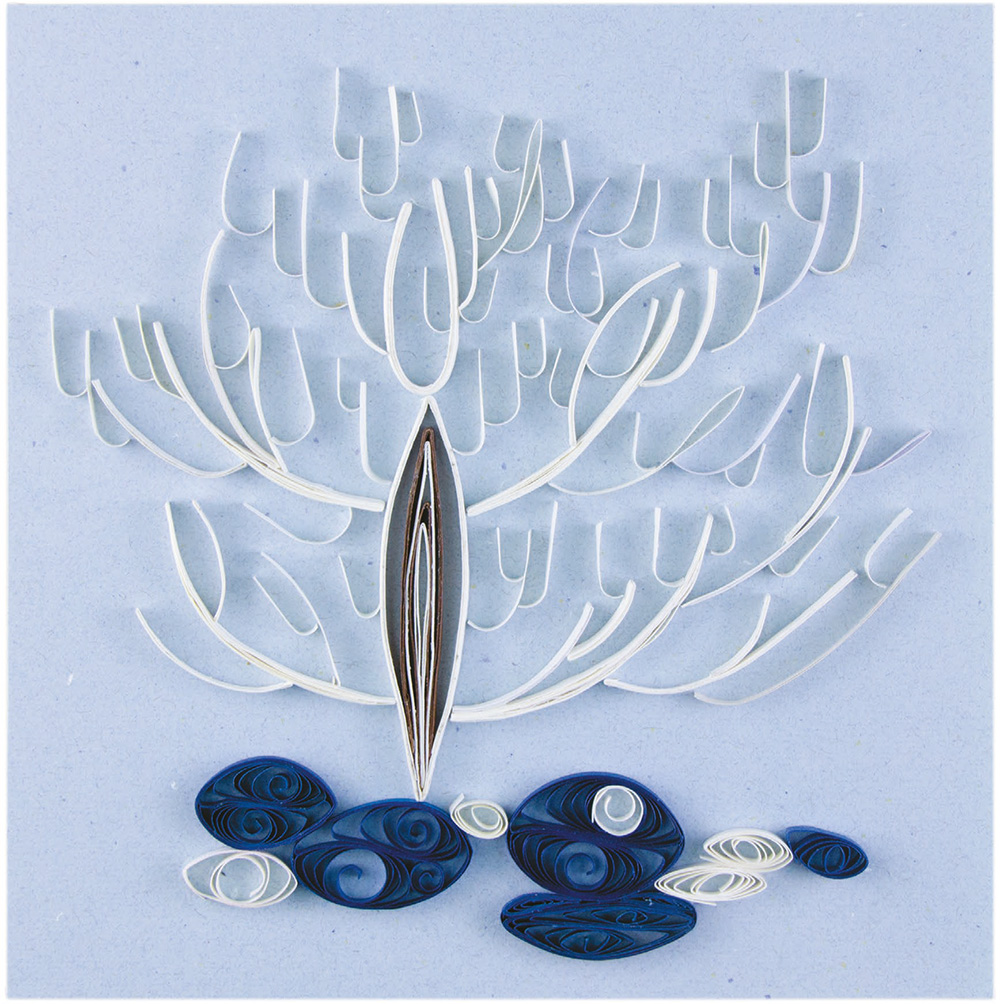
22. Winter Solstice
Winter Solstice (dongzhi) normally falls on Dec. 21 to 23 each year. Like Summer Solstice, it is also one of the earliest confirmed solar terms. On that day, the sun’s rays reach the southernmost end of the Earth and are almost directly over the Tropic of Capricorn. The daytime in the Northern Hemisphere is the shortest of the year. Before the Han Dynasty (202–220 BC), Winter Solstice was celebrated as the New Year. It was not until the time of Emperor Wu (156–87 BC) that Winter Solstice became a festival independent of the Spring Festival. Moreover, Winter Solstice is also a traditional date to offer sacrifices to heaven and ancestors. In ancient times, on this day, the emperors would host a grand ceremony to offer sacrifices to heaven while ordinary people would worship their ancestors.
Compared with other works in this book, this work adopts a more “realistic” method to make elements and present scenes. Every branch is made of multi-layered paper slips and thus looks thick and strong. It may seem to be a little bit “clumsy,” but can still be considered a unique mode of representation and creation. The pale-looking and leafless branches reveal the harshness of winter and the withering of all things on earth. The twigs are in a jumble, but they show the vitality hidden in the tree trunk, which might burst out at any time through the tender buds. This tree makes us feel the alternation between yin and yang.
Materials and Elements
Stones:  coil: half-circle coil, marquise coil
Tree trunk:  line: curved line
Branches and twigs:  line: curved line
Snow:  coil: marquise coil, loose coil
Background: white watercolor paper (suggested size: 27 by 27 centimeters), light-blue embossed paper (suggested size: 21 by 21 centimeters)
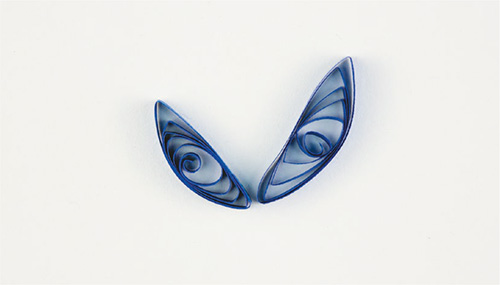
1 Make two half-circle coils with the ultramarine-blue paper slips.

2 Put the two half-circles together and wrap them with a layer of paper slip with the same color in imitation of a stone.
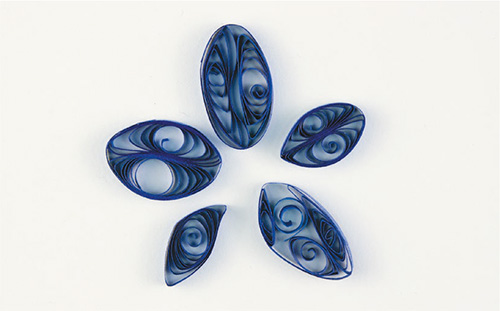
3 Make several stones of different sizes and shapes with the half-circle coils and marquise coils. The shape can be more various with the appropriate transformation of these elements.
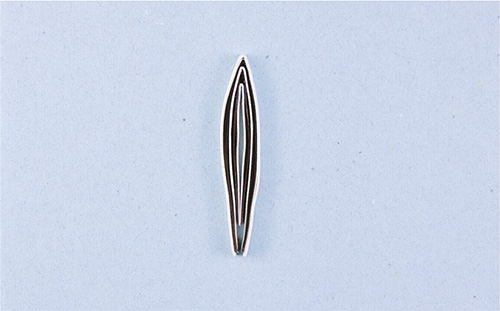
4 Take out some white and burnt-umber paper slips. Fold them in half and paste more layers of paper slips onto it to make a thick tree trunk. Pay attention that the white and burnt-umber paper slips are arranged in good intervals to produce a hierarchical effect.

5 Superimpose white paper slips and make some curved lines of varied lengths to serve as tree branches.
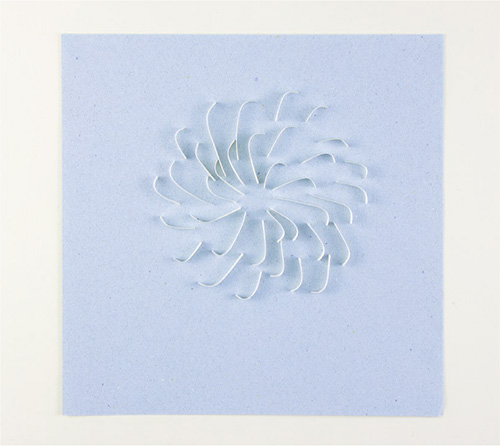
6 Make some more curved lines with the white paper slips to serve as thinner twigs.
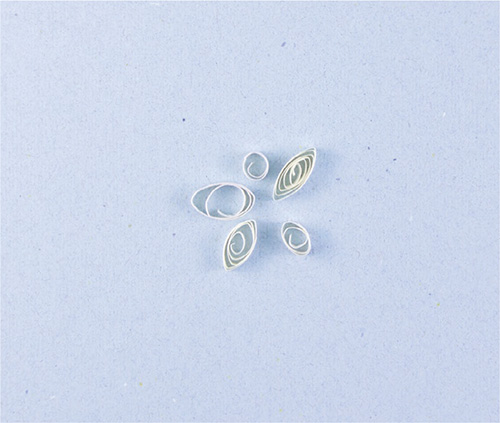
7 Make several marquise coils and loose coils of varied sizes and shapes with the white paper slips to serve as snow on the ground.
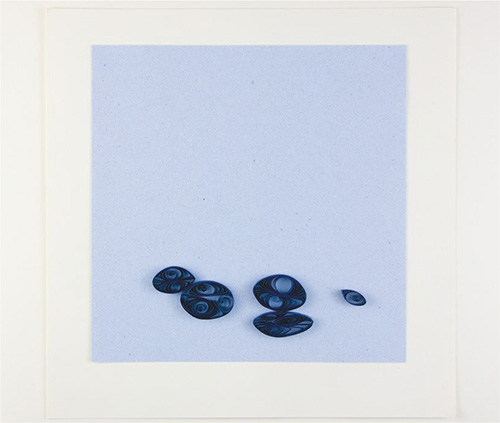
8 Paste the light-blue embossed paper onto the center of the white background paper, and then pave the ultramarine-blue stones at the bottom of the picture.
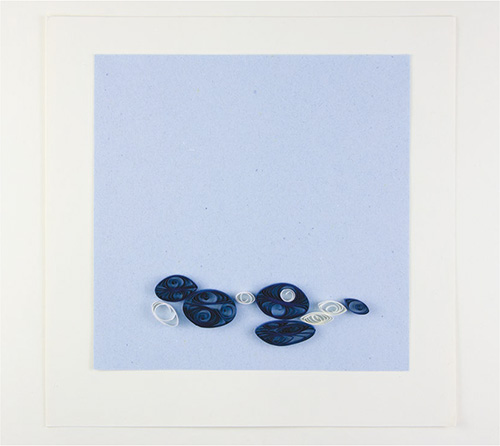
9 Add white marquise coils between the stones as white snow.
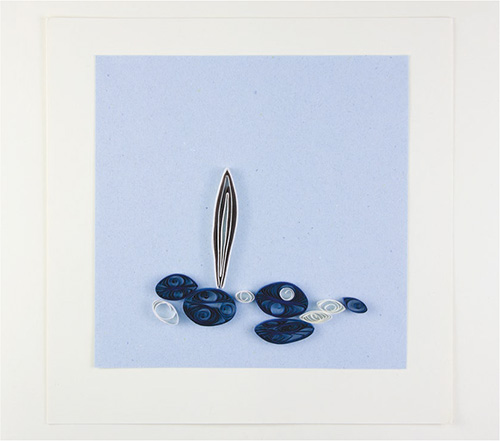
10 Add the vertical tree trunk on the stone.

11 Add some thicker white branches on the top and the right side of the trunk. The branches on the top are generally U-shaped.
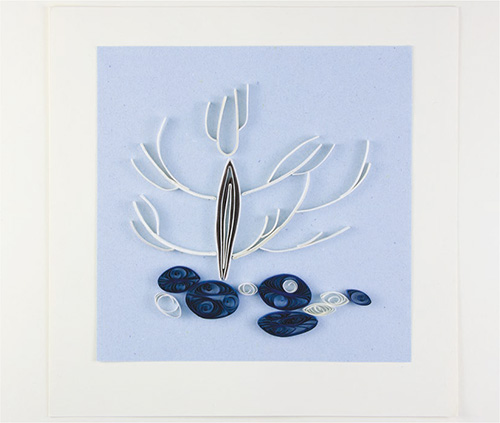
12 Add thicker white branches on the left side of the tree trunk.
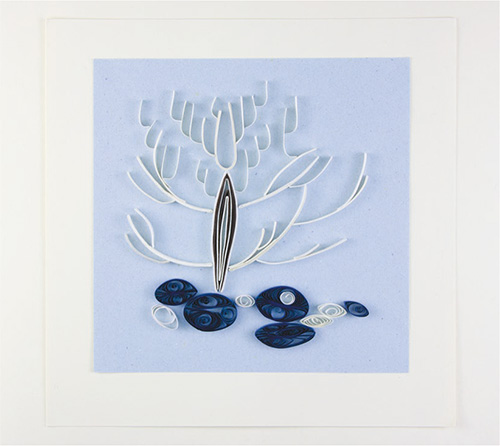
13 Add thinner twigs onto the trunk and branches in the upper half of the picture.

14 Add twigs onto the branches on the left side of the trunk.
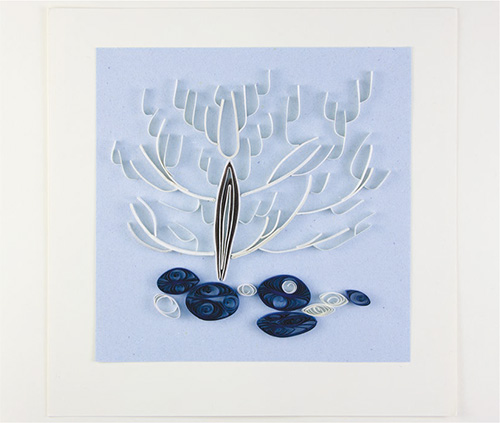
15 Add some twigs also onto the branches on the right side. To help it look more natural, avoid making the twigs on both sides symmetrical.

16 Finally, add some more twigs to the gaps between branches to create a luxuriant effect. Complete the work by adjusting its contents and fixing with white latex.
23. Slight Cold
Slight Cold (xiaohan) normally falls on Jan. 5 to 7 each year, meaning the weather is cold, but yet not the coldest. However, in China, it is often colder in Slight Cold than in Great Cold, and the former is the coldest of all the 24 solar terms. Therefore, Sight Cold really symbolizes the advent of severe cold.
This work uses daffodils to present this solar term. A cluster of daffodils in a small porcelain pot with some pebbles beneath is a common scene in many Chinese families. Using green paper slips for the stem, white and yellow paper slips for the flowers, interspersed with dark-colored pebbles, the author has rendered the elegant and pure daffodils perfectly.
Materials and Elements
Daffodil petals:  coil: teardrop coil
Daffodil stamens:  coil: tight coil, ring coil
Daffodil stems:  crescent: S crescent
Pebbles:  coil: loose coil, teardrop coil
Background: white watercolor paper (suggested size: 27 by 27 centimeters), cobalt-blue embossed paper (suggested size: 21 by 21 centimeters)
1 Make more than 10 S crescents of assorted sizes and patterns with six layers of paper slips arranged from light to dark green, which will serve as the stems of the daffodils.
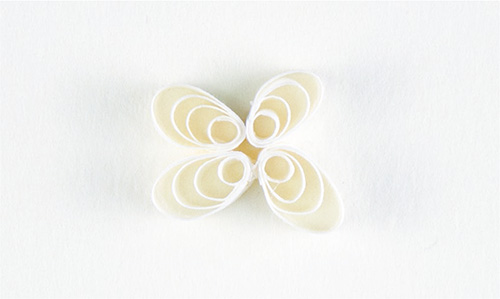
2 Make four teardrop coils with the white paper slips to serve as four flower petals. Put them together to form a daffodil.
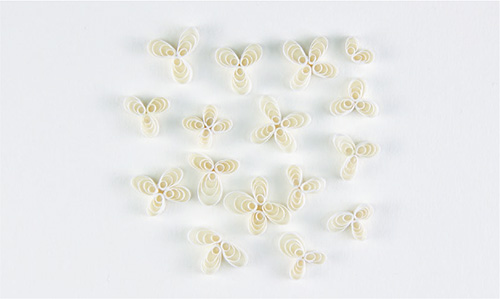
3 Make more than 10 daffodils, some with four petals, some three or two.
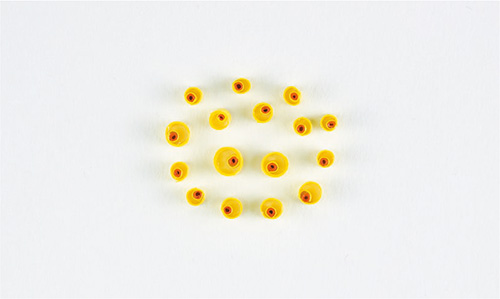
4 Make some tight coils with the orange-red paper slips. Wrap them with medium-yellow ring coils, which will serve as the stamens of the daffodils.
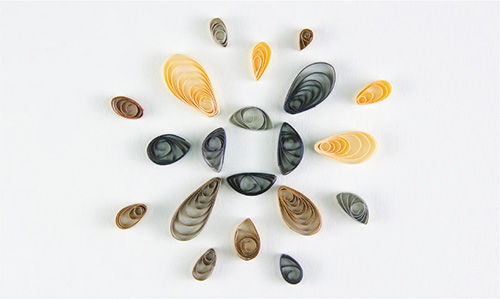
5 Make more than 20 teardrop coils of different sizes and shapes to serve as pebbles with paper slips in various shades of brown, gray and flesh color.

6 Make several more loose coils to serve as pebbles with paper slips of the colors shown in the picture. This is to enrich the composition of the pebbles.

7 Paste the cobalt-blue embossed paper onto the center of the white watercolor paper.
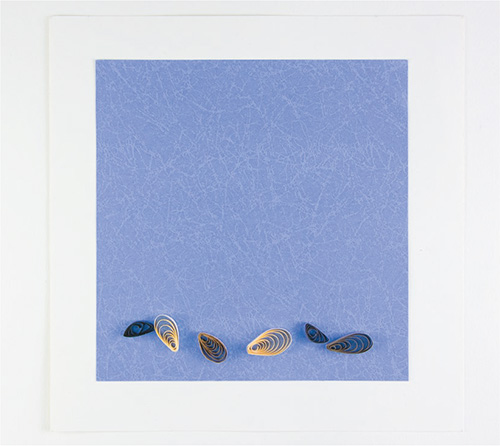
8 Place teardrop coil pebbles at the bottom of the picture.
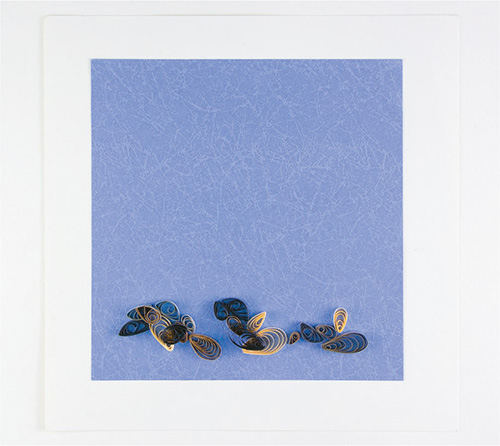
9 Continue to pile up pebbles of various colors.
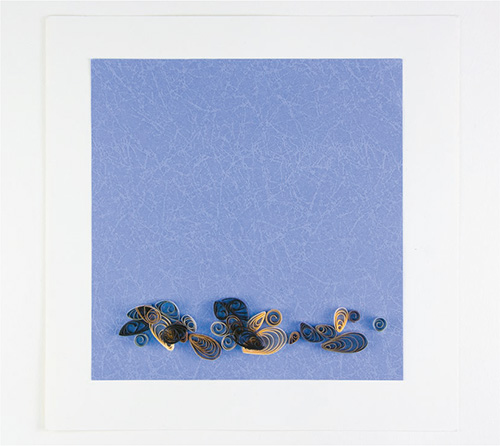
10 Add loose coil pebbles between the teardrop coil pebbles.

11 Add several longer daffodil stems above the pebbles. Pay attention that these stems face different directions so that they look more natural.
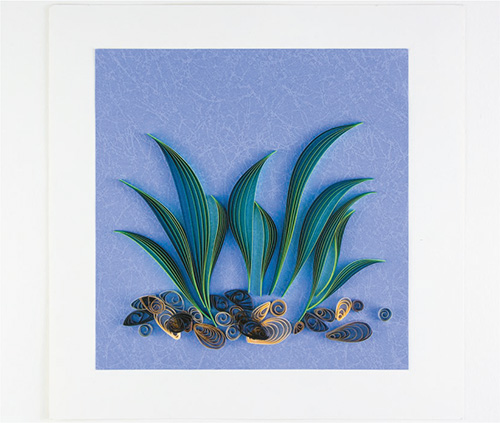
12 Add shorter stems between the longer ones.

13 Pile up more stems to create a luxuriant and three-dimensional effect.
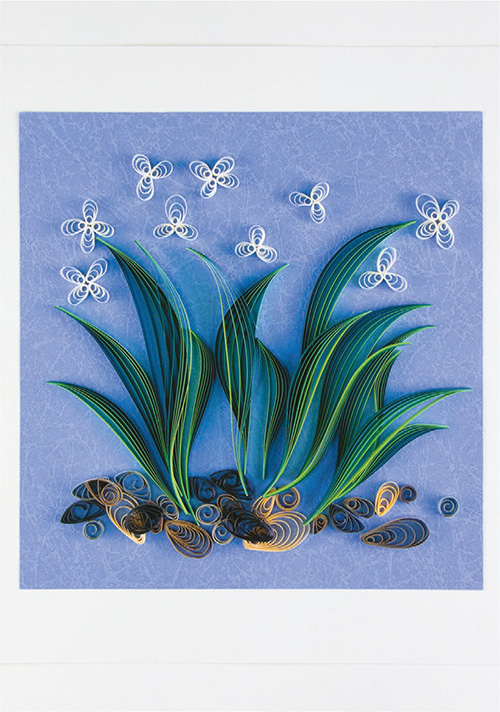
14 Add daffodil flowers above the stems.
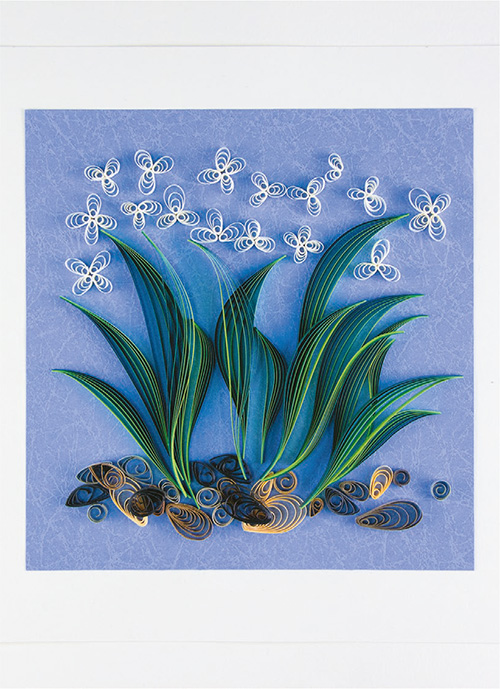
15 Continue to add flowers to create a luxuriant and leafy effect.
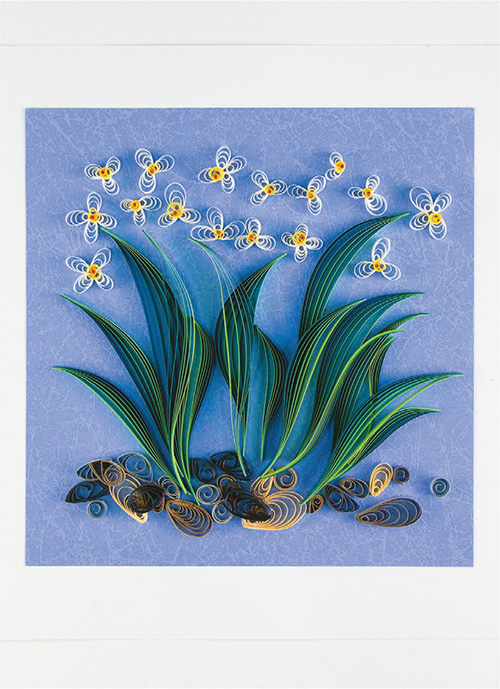
16 Decorate the flowers with yellow stamens. Complete the work by adjusting its contents and fixing with white latex.
24. Great Cold
Great Cold (dahan) means the weather is extremely cold. It is the last of the 24 solar terms in a year falling normally on Jan. 20 to 21 each year. By then, it is very cold and the ground is frozen and everything on earth has dried up. However, after a whole year’s hard work, the Chinese begin to prepare for the coming new year’s celebration, the Spring Festival, the most important festival of the Chinese people. Therefore, this period is cold but filled with festival joy and happiness.
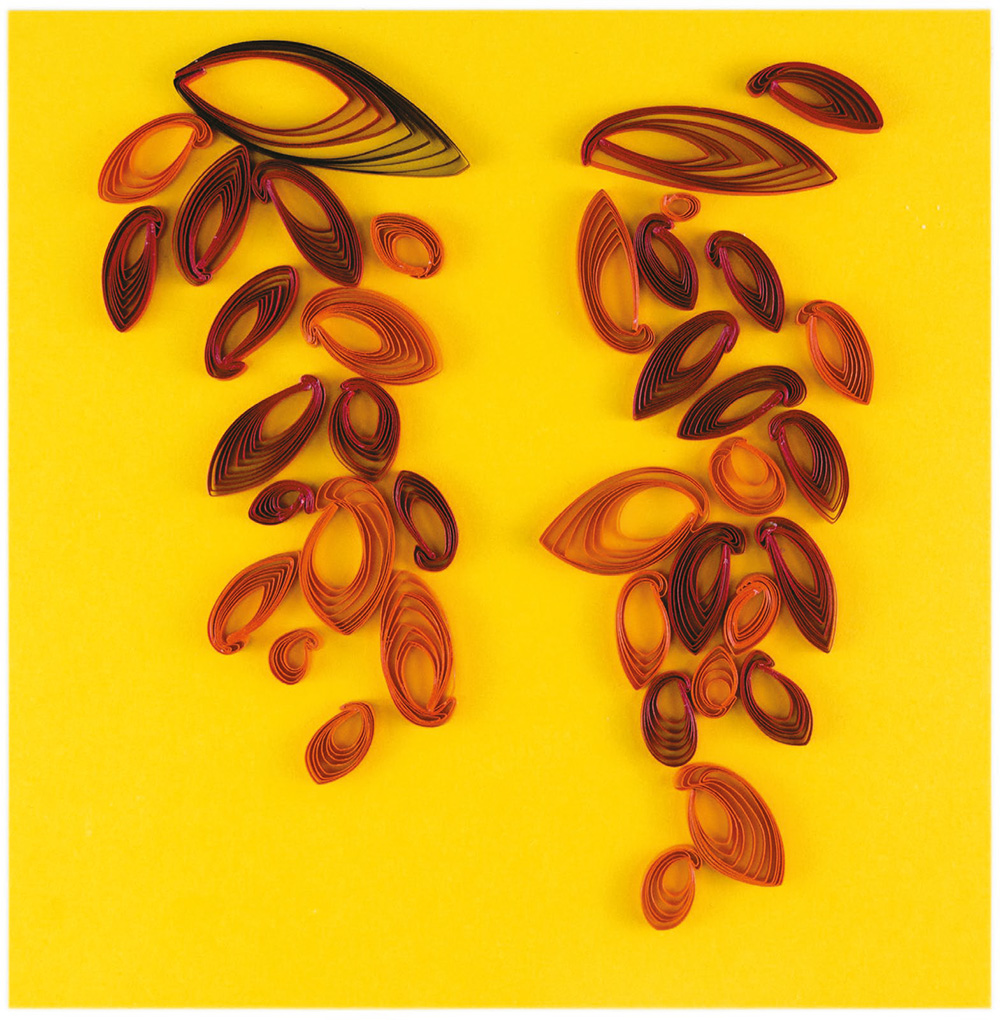
Instead of depicting the severe cold in winter, this work, quite unexpectedly, resorts to warm colors to display this solar term. The medium-yellow background, supplemented by two strings of red peppers, shows the flourishing scene of the Chinese people celebrating the new year in cold. Meanwhile, the peppers, like firecrackers being set off in the Spring Festival, look delightfully attractive.
Materials and Elements
Red peppers:  crescent: cicada-wing crescent
Background: white watercolor paper (suggested size: 27 by 27 centimeters), medium-yellow embossed paper (suggested size: 21 by 21 centimeters)
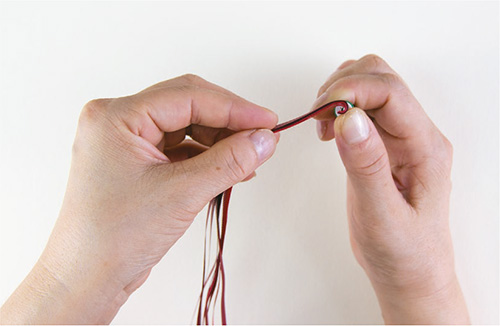
1 Put five dark-red and four deep-red paper slips together, with the dark-red ones above and deep-red ones below. Paste them together at the beginning end and then roll up the beginning end with a slotted tool.
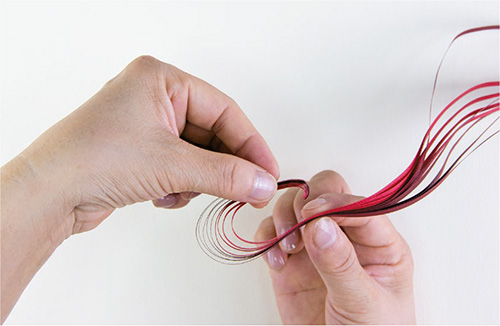
2 Follow the method of making crescents. Hold the beginning end with one hand, and pull out different lengths of paper slips with another hand, so the paper slips have different radians.
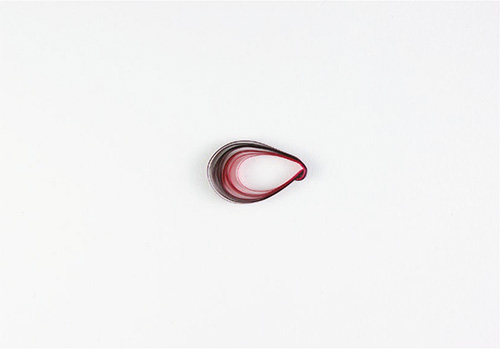
3 Cut the redundant paper slips and paste together the tail end. Wrap the tail end with the beginning end and fix with white latex. This element is a variation of the crescent.
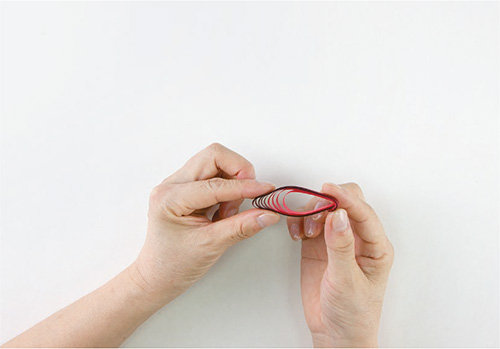
4 Hold the beginning and tail ends at where they meet with one hand, and pinch the other side to form a sharp angle.
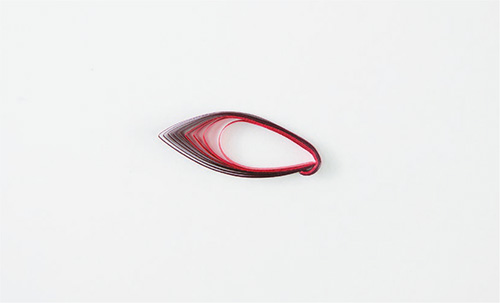
5 As the element thus made resembles the cicada’s wing, we name it cicada-wing crescent, which embodies the flexibility of Chinese paper quilling. You can also give full play to your imagination in the making process and create some unique elements.
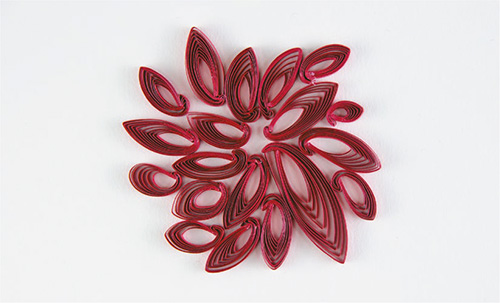
6 Make many cicada-wing crescents of different sizes and layers with the deep-red and dark-red paper slips, which will be used as red peppers.

7 Make some cicada-wing crescents of different sizes and shapes with the vermilion paper slips.

8 Paste the medium-yellow embossed paper onto the center of the white background paper.

9 Add the first double-color cicada-wing crescent to the upper left of the picture. Add two deep-red cicada-wing crescents on its right as the red peppers on the top.
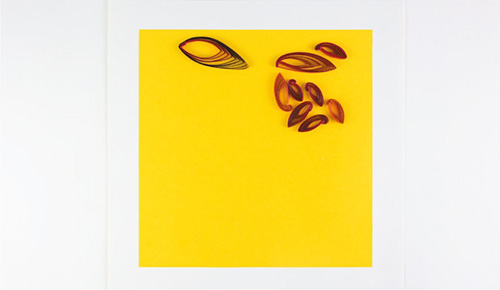
10 Add some cicada-wing crescents of assorted colors below the red peppers on the right side.
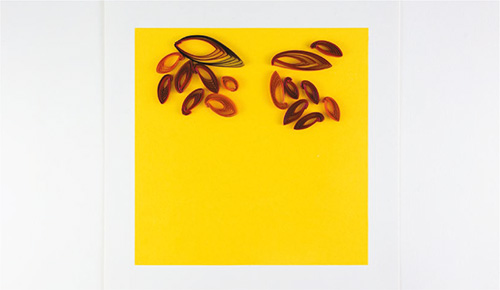
11 Add some cicada-wing crescents blow the red peppers on the left side.

12 Continue to add red peppers on the lower part of the picture. The two strings of red peppers can be arranged more casually for a natural effect.

13 Add red peppers to the ends of the strings, making the strings look wide at top and narrow at bottom.
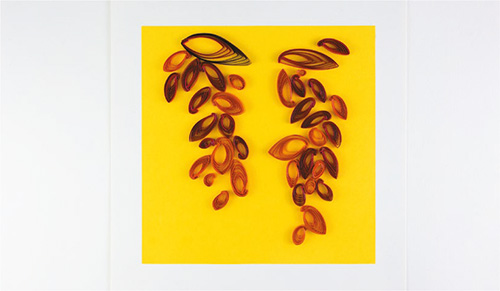
14 Add smaller red peppers here and there in the picture so that the strings look denser and fuller. Complete the work by adjusting its contents and fixing with white latex.