4 BUILDING
PROCESSES
OPTIONS
The notion that you should not burn bridges behind you is a serviceable nostrum for many activities in life (except possibly strategic retreat in war). Applied to cabinetmaking it means, leave your options open; or, don’t cut a board until you have to. When planning the steps in building a piece of furniture, particularly a complex piece, finding the proper sequence can make the difference between success and failure. In building a house one proceeds with the foundation, subfloor, walls, ceiling beams, roof, outside finish, and, finally, inside finish. The same is true with certain classes of furniture, only one doesn’t start from the bottom and work up. In building case pieces, a four-sided carcass (two sides, top, bottom) is built first, then backs, fronts, legs, and trim are added. In building a table, the legs are built first, then the apron or stretchers, and finally the top is fitted to the base. In building a drawer, it is front first, then sides and back, and finally, almost as an afterthought, the bottom is added.
In each situation considerable effort is saved by following a sequence. However, at every step, succeeding steps must be taken into account and prepared for. Even though a case carcass consists of only six parts, these, particularly the sides, must be fitted with the various dado, rabbet, and dovetail cuts necessary for sliding in shelves and drawer dividers, and backs and fronts, and so on. If one waits until after the carcass is put together his task will be manifestly more difficult. Similarly, in building a stretcher-based table it is possible to fit the stretchers to the legs after the legs are permanently joined to the apron, but at considerable effort and usually with marginal results.
A fitting analogy here might be to the Cadillac dashboard light-replacement scandal. Whether apocryphal or not, the story goes that according to a labor manual put out by General Motors many years ago the standard charge for replacing a particular dashboard light bulb in a then new Cadillac was $40.00. Fifteen cents for the bulb and $39.85 for labor. Four hours work is required to change the bulb. Even automotive engineers don’t always think ahead.
Always keep your options open. Never cut a piece of wood until you have to. Do not study one of the following plans and proceed to cut out all 172 parts and then expect them all to fit together. If you do rough out your parts, always leave them an inch or two longer and wider than necessary. You can always trim a little off but you cannot add to the length of a piece of wood. Panels can be glued up and made as wide as you please, but until some genius invents the lineal board stretcher, boards, once cut off, cannot be lengthened.
The most important consideration in laying out parts is wood color and grain characteristics. If the material is on hand, drawer fronts should be cut from the same board. Stiles and rails should have the same color and graining patterns. Remember, a simple wipe with a cloth dampened in paint thinner will show the finished color.
GLUING UP PANELS
There are three or four variables that affect how individual boards are placed within a glued-up panel. Once ripped and joined and matched for color, and after sapwood and other gross imperfections are cut away, the clearest sides are placed face up on the clamps resting on the gluing rack. Small, tight knots and other minor imperfections can be left on an outside surface and can be repaired later. If only 100 percent clear wood is used, the proportion of waste would be simply too great. Besides, small knots and crotch grain add interest and character. To minimize future cupping, the ideal arrangement is to alternate grain patterns. If this unduly affects color and clarity of grain, it need not be performed.
White glue, Titebond, or liquid hide glue should be liberally applied to all inside joints. Bar clamps are placed eight inches to twelve inches apart, alternating top and bottom. If they are all placed on one side, under sufficient pressure the whole panel will buckle up out of the rack. To make sure the bottom of the panel is flat, bring all the pieces flush to the bar clamps by using a mallet or C-clamp before the final tightening of the bar clamps. Never glue up in temperatures below 60°F and always leave your work in the clamps for at least a couple of hours. In humid conditions more time might be necessary. Although the clamp pressure will bring almost anything together, the tighter the joint at the outset, before pressure is applied, the better. If properly done this panel may break under force, but not at the glue joints. When dry, the excess glue should be scraped off and the panel smoothed with jack plane or surface planer and sanded, both sides, to120 grit (120 is satisfactory for finished interior and secondary surfaces). The panel is now ready for dressing to exact dimensions and other joint preparation and should be clamped in a flat position until ready for assembly. If a number of panels are stacked, stickers should be placed between them to maintain flatness.
GLUING PANELS
Bar clamps must alternate top and bottom. Boards should alternate, growth rings up and down

JOINT CONSTRUCTION
Marking and Scribing: For general marking a medium-fine pencil is satisfactory, though some persons recommend the flat carpenter’s pencil. When extreme accuracy is required, a scribing knife or awl should be used. It is also wise to mark on the work which side the saw or chisel is to cut. Even professionals forget and cut out the wrong material on a set of dovetails or put a dado on the wrong side of a scribe line. When permanently numbering joints that are designed to come apart, such as on bedposts or knockdown tables, a set of Roman numerals cut carefully with a ⅜” chisel makes a permanent mark. Drawers of the same dimensions should also be so numbered, possibly on their undersides.

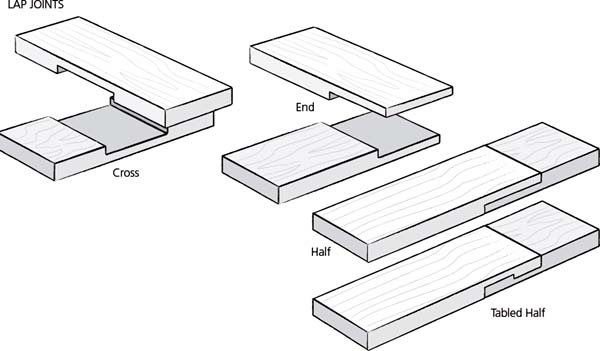
Butt Joint: The least effective, though certainly the quickest, the butt joint gains its strength by nails or screws with a minimum of glued surface. The greater the surface area of contact the stronger will be the joint, especially if glue is used. The butt joint is occasionally used in secondary joints and often in applying trim which is nonstructural.


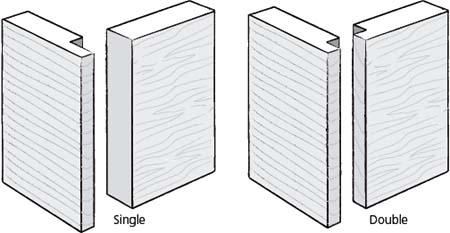
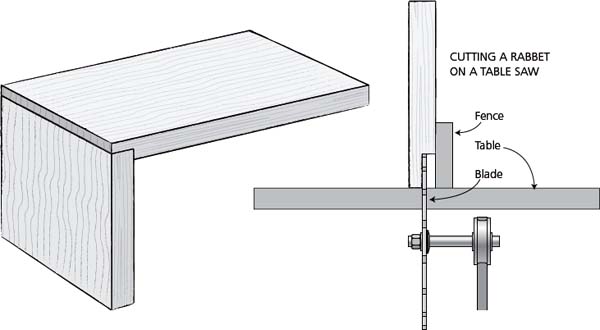
Rabbet Joint: An excellent joint for fitting cases together and for insetting backs is the rabbet joint. When properly glued and clamped, the seams can be made tight; but clamping is awkward since pressure has to be applied in two directions. This joint is best made on the table saw. Using the parallel fence, first make one cut, then the other. Notice that the strip to be cut out is between blade and fence, making it impossible to overcut the joint.
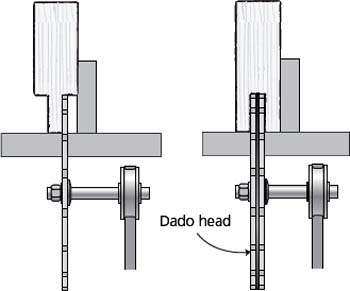
Tongue and Groove: Used widely in house construction (matched floors, wall and roof sheathing, and so on), the tongue and groove is used in furniture principally to fit together the back of a case. If extremely accurate machining is available, this joint can be used in a glued-up panel. The tongue is cut as though it were two rabbets, while the groove is cut by multiple passes over the saw blade or by using a dado head. To cut these joints by hand, you would use a rabbet plane and moulding plane or backsaw.
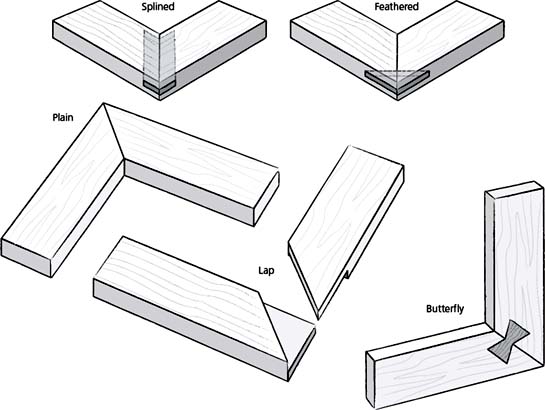
Spline: Preferred over the tongue and groove, since board width is not diminished when used, the spline joint is an excellent means of joining two members. With a floating spline in place, the wood is allowed to swell and shrink without having daylight pass through. The spline itself, made of scrap wood, should be slightly thinner than dado cuts and should be finished (stained, painted, or whatever) before being slipped into the slot.

Dovetail: The dovetail joint achieves its beauty by piercing a flat surface with darker end grain. Considerable strength is achieved, and the joint can only be pulled apart in one direction. When glued, this joint is almost impossible to break. Full dovetails are used on corners, whereas some drawer fronts, rails, and stiles usually take half-blind dovetails.
Both pieces are cut to full length, or possibly a sixteenth-inch longer than necessary, and fully squared. With the scribing gauge both sides of each piece are marked to indicate the depth of the impending cuts. Using a bevel square or a marking template the female slots are marked out on the edge of the top. These should be evenly spaced and located so as to conceal rabbet or dadoes. A simple, equal-interval spacing method is to use a stick graduated at equal intervals from one to four inches. Lay this on a diagonal across the work so that the marks are equal in number to the desired number of dovetails. Transfer the marks to the work and, using either a try square or framing square, draw parallel lines from these marks to the edge. No matter what width you are dealing with, the marks will have equal intervals. A try square is then used to drop a straight line to meet the scribe line. Using a backsaw, or a bandsaw if one is available, cuts are made on the inside of these marks to the scribe line. Finally, using an appropriate chisel, waste is removed.
Having completed the females, the matching male section is marked out by using the finished female as a template. A knife or sharp hard pencil is used, and again the sections to be cut out are marked with an X. Vertical lines are again dropped to the scribe line and the process of sawing and chiseling is repeated. Cut on the outside of knife marks in order to achieve a tight fit. It is always possible to trim away if it’s too tight, but hard to add wood once it is cut. Occasionally, a miscut can be repaired by forcing a sliver taken from the same board into the gap, but this should only be done on a joint not readily seen.


Mortise and Tenon: Doors, windows, drawer dividers, table bases, breadboarded tabletops, bed joints, and a host of other components are built with the mortise and tenon (think: mortise = mouth, tenon = tongue). When the tongue passes completely through the mortise stock, it is called a revealed, or through, tenon, which is usually further tightened by one or more wedges for additional strength. (Note: Never drive a wedge running parallel to the grain in the mortise stock or splitting will result.) Tenons can be square, rectangular, round, or any other shape – they are still tenons. Commonly, tenons are fitted, glued, and pinned as an extra precaution. Most eighteenth- and early nineteenth-century joiners did not glue these joints, and even today most door stiles and rails are not glued.


After deciding on how much depth the joint should have, or indeed, whether it should be revealed, the shoulders of the tenon are laid out with a try square and cut either with backsaw or on the table saw. A clean, square cut is necessary if the joint is to be tight. The tongue itself should be fairly smooth and of equal width and thickness along its length.
The tongue can then be positioned on the mortise stock and marked. This, in turn, is bored by auger and cleaned out and squared with a chisel. The tenon should fit snugly into its socket. If a drill press and hollow mortise chisel are used, all tenons are cut to standard thicknesses (¼”, ⅜” and 1∕2”).
When the mortise is quite long, more than six inches, as in the case of a breadboard or the deep apron of the standing desk, it can be cut on a table saw, with a dado head, and the ends cleaned out by chisel.
Doweled Joint: In the modern factory almost all joints are made with specially fluted dowels. The result is a slightly improved butt joint, which in time will come apart. To conceal this economy, some manufacturers add a false peg to make it look as though the joint is really a pinned mortise and tenon. Sadly, this usually isn’t discovered until after the dowel has shrunk – as it most certainly will in time – and the piece has fallen apart. I can only recommend the use of the dowel joint to give added strength to panel glue joints, particularly for table leaves.
These are only a few of the many joints available for woodworking. The other illustrations on these two pages cover some others woodworking joints, though most of their uses are obvious so I’ve not discussed them in detail.

BUILDING CASE PIECES
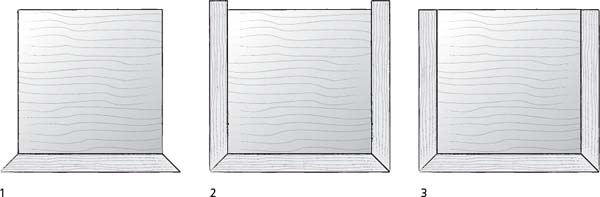
A case is a six-sided box. Whether it is a tall clock, a cupboard, or a chest of drawers, it is, in its fundamental form, a box. Sides and top should be laid out so that the grain direction is consistent, allowing the inevitable shrinking and swelling to take place without breaking joints or splitting panels.
Before assembling the case, sides should be dadoed for shelves and dividers. Also, the interior rear inside edges should be rabbeted in preparation for inserting the back boards. If drawer frames are to be used, at least the lower frame should be fitted with a dust panel.
The top, bottom, and, in most cases, the shelves or dividers should be assembled at one time. Placed on its front, on a pair of saw horses or other flat surface, the case should be squared by diagonal measurements from corner to corner and the back attached with nails or screws. It should then be turned over and front work can be done knowing that the carcass is square. If squareness is lost at any point during this process, every step beyond this, including the making of drawers, front frames, and hanging doors, will be made more difficult, since nothing will ever be square.
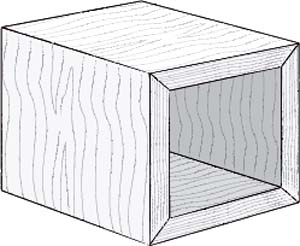
Grain running around case causes shrinkage and expansion front to back.
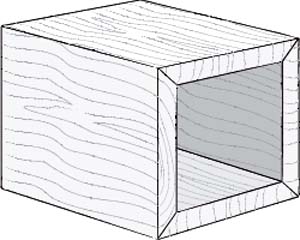
Grain running front to back causes face to shrink and expand. Problems with door and drawer fit.
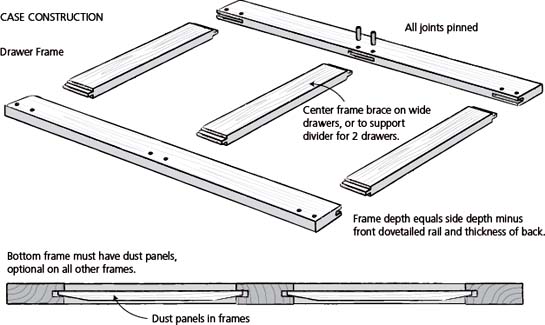

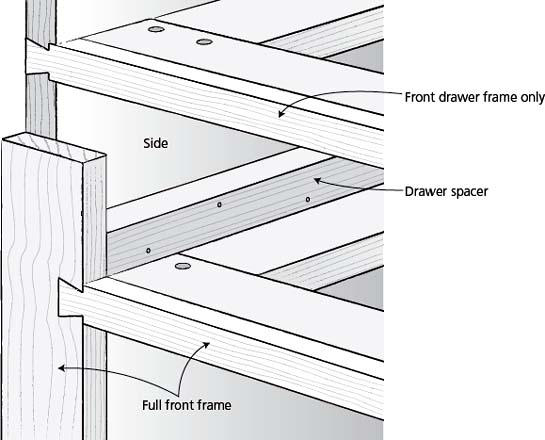
Apply any front framing and front drawers frame rails. Dovetail into sides. Apply any drawer spacers, dividers and/or door stops.

Apply any moulding. On sides glue only first few inches, nail the rest. Make and fit doors and drawers. Apply finish.

Sand exterior of case
BUILDING TABLES
Most modern table and desk heights are 29” to 30” from floor to surface. There should be a minimum of 26” between floor and apron to accommodate legs and knees, and a generous place setting is 24” wide and 16” deep. These are universal dimensions and apply to all manner of designs. In addition, chair size and seating capacity are important. With a properly designed table one should never have to straddle a leg.
The construction sequence for the base begins with the legs, then apron, and finally stretchers. After all mortise and tenon joints are cut, the entire base is assembled at once. Here again the same rules for holding square apply. Prior to assembling the base, the method for applying it to the top must be determined and holes should be bored or mounting cleats should be fixed to the upper interior aprons. Since a tabletop will swell and shrink, it should never be fixed too firmly lest it split.
Tabletops are either fixed or expandable. In their fixed form they can be round, ovoid, square, or rectangular; in their expandable form they can have drop leaves or insert leaves or, I suppose, both. Having built a hundred dining tables, I would like to share certain generalizations that I have developed.
A round top with a diameter of greater than 52” is unworkable even if everyone present has a “boarding-house reach.” When seated, even a tall man encounters difficulty in reaching beyond 38”, therefore 52” seems to be the logical limit. Our round dining table at home is 60” across, and although it works well for crowds, it isn’t peaceful to eat at, since something is forever being passed.

Oval tables have great looking tops when long and narrow. However, if four legs are used, they are always awkwardly placed in this lean model. To broaden the stance of the base, the top must be made wider relative to its length, and one soon passes the aesthetic mean which defines an oval. Furthermore, if the oval table is designed to receive an inserted leaf, the leaf must be rectangular; and when the leaf is in place, the oval loses its unbroken curve. A well-executed oval table is a wonderful thing, but it is very easy to ruin a fine design with bad proportions.
Square tabletops are great on night stands and tables built for four people (36” by 36” minimum size). One built for eight or twelve would have to come equipped with a small crane for reaching the center. Rectangular tops, on the other hand, offer limitless possibilities and always seem to work, providing the narrow dimension does not exceed 44” to 48”. Length, of course, is limited only by the size of the room. The Shakers made a group of communal dining tables 20’ long and 34” wide for a dining hall in New Lebanon, New Hampshire.
Drop leaves are generally the most satisfactory, in that storage is no problem: they’re always at hand and can be added or taken away with absolute ease. Numerous period antiques have drop leaves which extend almost to the floor. From an aesthetic point of view these are atrocious; they look a little like the maxi-dress that covers everything of interest above the ankle. The intermediate leaf, 16” or 18” wide, looks better, but has the drawback of falling below the level of a chair seat. Therefore, when not in the up position, the table does not permit any chairs to be placed under it, save possibly at the ends. The only truly workable leaf, then, is a 9”- or 10”- leaf which when up or down will receive a chair under it. Hence, the advent of the harvest table – a workable form.
Tables with insert leaves can be made to banquet hall proportions. By installing expandable sliders, as many as five 20” leaves can be added to a 6’ table, converting it to a 14’ behemoth. The disadvantages of this form are (1) storing the leaves when not in use, (2) preventing the leaves from warping or twisting over the years with no longitudinal support, (3) installing and removing the multiple leaves, which can require not only patience but also a degree in mechanical engineering.

DRAWER CONSTRUCTION
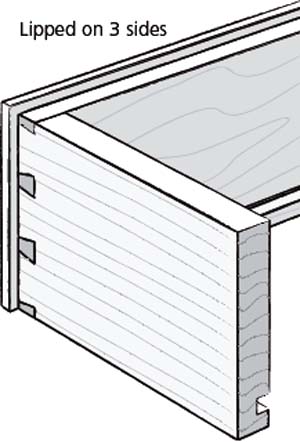
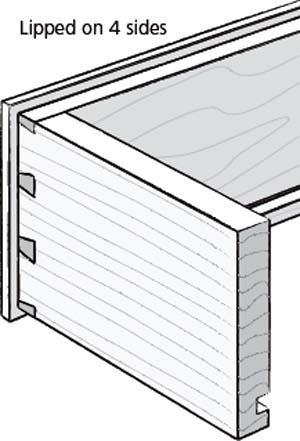
A properly fitted flush drawer should fit a carcass forwards, backwards, or upside down with equal clearance on all four sides. However, without a perfectly-square opening to begin with it is doubtful that this can be achieved. Two kinds of drawers are found in our designs, one having a flush front, the other having a lipped front. While requiring a little more work in cutting the rabbets and edge moulding, the lipped drawer is easier to install since its quarter-inch overhang covers the opening and conceals any minor gaps that might otherwise appear. The flush drawer is easier to build but takes longer to fit to the case since absolute accuracy must be achieved. From an aesthetic point of view, the lipped drawer adds visual activity to a front, whereas the other achieves a surface flatness broken only by the pulls.
The front is first fitted to the case opening, then sides and back are cut to exact size. Planing and sanding usually reduces these by ⅛” in width, and this is a correct tolerance to guarantee ease of operation. If the drawer is particularly large, this tolerance should be increased to 3∕16” in order to accommodate seasonal expansion and contraction. Next, a dado is cut on the lower insides of the sides and front. Since most bottoms are ⅝” thick, the top of this dado should be about ¾” up the side to allow clearance between the drawer bottom and the chest rail.
The dovetails are cut and fit, and lastly the bottom is sized and feathered either on the table saw or with a block plane and slid into place. The direction of grain on a drawer bottom should conform to the direction of the grain in the carcass. By making the drawer back narrower than the sides, the bottom can be slipped in from the rear after the drawer is assembled, and this is a considerable advantage. Once the drawer has been adjusted to operate smoothly, several finish nails can be driven through the bottom and into the back to hold the panel in place and keep the drawer square.
In a large chest the graduation of drawer sizes can help to give the piece a quality of stability while also providing for greater storage possibilities (deep drawers for sweaters and shallow ones for handkerchiefs). Using a long wooden straight edge or a clean bench top, lay out the front, taking into account stile thickness and 1∕16” clearances. Determine the desired depth of the bottom drawer, say nine inches, or the depth of the top drawer, say 31∕2”, then through trial and error lay out the rest of the drawers in as close to one-inch graduations as possible.


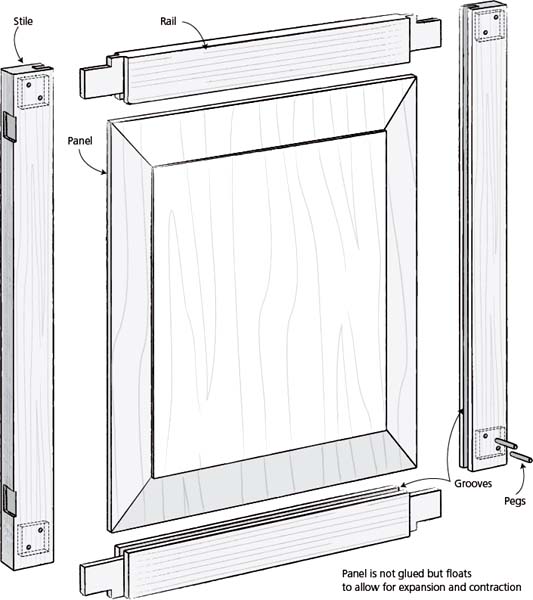
MAKING AND HANGING DOORS
Door stiles and rails are cut first. For a better appearance the lower rail is usually wider, by 1∕2” to 1”, than the top rail, while the top rail and both stiles are of equal width. Next, all four members receive a ¼” dado cut about ⅜” deep and centered in the stile and rail edge. Using this trench as a guide, mortise and tenon joints are made. If a moulding is to appear on the door stiles and rails, it should be cut before the mortise and tenon joints. Once the frame is assembled, but before it is glued and pegged, the center panel is made to slide into the waiting dado slots. For a cupboard door of average size, the panel edge should penetrate all stiles and rails by about ¼"; on a larger door (more than 18” wide), the penetration should be closer to ⅜” in all directions.
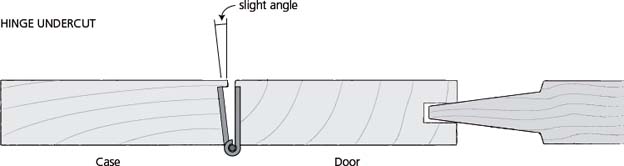
One of the most frustrating steps in building a case can be hanging doors; such great labor is expended for apparently miniscule results. To avoid frustration, begin by fitting the door snugly on all four sides, it can later be planed down to the “nickel fit” (a properly hung door should have gaps on four sides just wide enough for one to pass a nickel between door and case in Winter, and a dime in Summer). A hinge leaf is then scribed onto the edge of the door 3” to 5” from top and bottom. Using a chisel and/or backsaw the hinge is inlet into the door stile. Once flush, the leaf is attached with only one screw (remember options: the hinge may have to be shifted slightly and a new hole drilled). When both hinges are in place, hold the door to the case and carefully mark where the hinge is to fit the case. Again, the hinge leaf is used in scribing the case stile. Rather than flush mounting, this leaf should be undercut in an effort to avoid later hinge binding.
After both hinges are in place and the door has been trimmed, the rest of the screws can be driven home. In trimming, it’s a good idea to be mindful of the season. In the spring and summer we make tight fitting doors, in fall and winter, they are looser by as much as ⅛”, particularly if they are solid rather than panel doors.
MOULDINGS
There are countless ways to make mouldings, most of which were discussed in Chapter 3. Yet another method is to trace the intended moulding profile on the end grain of the rough stock. Then, by making multiple passes with a rip blade on the table saw, adjusting both fence and saw height each time, a complicated moulding can be roughed out. With scrapers, moulding planes, and sandpaper on curved blocks the moulding can be dressed and smoothed.
A simple way to make a cove is to clamp a board diagonally across the saw table just in front of the dado blade. By making repeated passes each time raising the blade slightly, a perfect ovoid flute can be cut which, when split in half, makes an excellent cove moulding.
In fitting mouldings to cases it is best not to cut all pieces at once and expect them to produce tight miter fits. By cutting and attaching one piece at a time, options are kept open, and the cuts are made only at the last moment.
FINISHING TECHNIQUES
The key to success in applying a hand-rubbed finish is surface preparation. Most modern manufacturers process inadequately sanded wood by spraying a heavily pigmented, quick-drying synthetic finish over it. This hides surface imperfections and produces a finish smooth to the touch and water resistant. In time the finish will chip and crack with use, particularly if it is applied to a softwood such as pine. In producing a hand-rubbed finish more time and effort goes into sanding and surface preparation. Before a piece goes to the finishing room it should be machine-sanded to 120 grit and all marks made by earlier sanding grades should be completely removed on all exterior surfaces. Then with a slightly padded hand-sanding block all surfaces are further polished to 220 grit and edges and sharp corners are gently softened. Minor surface abrasions are filled with either tinted wood putty or, better yet, tinted stick shellac, which is melted into the cavity. Dents can be swollen back to the original surface level by placing a bead of hot water on the spot, or better, steam. As a last step, important surfaces can be lightly wiped with a water-soaked rag. This will raise minute surface wood fibers. When dry, the surface is sanded with 220 grit paper and the entire piece is dusted and vacuumed and is finally ready for finish.
Oil Finish: The most natural looking finish, and the one most complimentary to wood, is the oiled finish. By heating the oil it becomes less viscous and penetrates deeper. (Turpentine and vinegar mixed with the oil will do the same thing, but this technique is less desirable since it dilutes the oil, making more applications necessary, and it is odorous.) Place an open container of boiled linseed oil on a hot plate and heat it to the point where it just begins to smoke. Remove it from the heat and apply it liberally to the prepared surface. Do not use a brush, since the bristles will curl. Rather, use a swab made of discarded cloth. After half-an-hour wipe all surfaces completely dry. It is essential that all excess oil be wiped off, since failure to do so will result in a permanently sticky condition: linseed oil never really hardens. If gumming does occur, a brisk rubbing of fine steel wool soaked in lacquer thinner will help. In a day or two, depending on drying conditions, sand with 220 grit or finer, and repeat. For most woods, Four to six applications of oil are sufficient to give a build-up that will shine to a soft luster. After the last coat of oil has dried, apply a good quality wax (carnuba is best) using a 0000 steel wool pad as an applicator, let it dry half an hour and buff. Repeat this once or twice more for a satin-smooth, hand-rubbed oil finish capable of shedding water. This oiled finish is maintained by semiannual paste waxings. Even with periodic waxings the finish in time will pale and lose its vibrancy. When this occurs, perhaps every two years, a coat of hot linseed oil will break right through the wax and replenish the wood. Again, this oil should be wiped up thoroughly before rewaxing.
Although an oil finish brings out the best natural wood graining and accelerates the oxidation that causes the beautiful patina that comes with time, it is not a good finish to apply over heavily stained wood since, under these circumstances, the finish will tend to become milky. For covering stained wood and for sealing out water a better finish is varnish. Remember: Burn oil rags – they can self-combust.
Varnish: Natural and synthetic varnishes (polyurethane) are used when a highly shined and sealed surface is desired. After preparing the surface (as already described), the work is wiped completely with a tack cloth (treated cheesecloth) or a rag lightly dampened in paint thinner to remove all lint. The varnish, whether gloss or satin finish, should be stirred and passed through a fine paint sieve into a small can. Never brush varnish directly from the can it comes in lest you contaminate it with lint particles. And never use a varnish stain; they always look fake. If coloring must be done, a wiping stain should be applied to the raw wood. When the stain is fully dry, the varnishing process can begin. If you rush it, the stain will pull and mix with the varnish, particularly if the varnish is synthetic.
Using a natural bristle brush, apply an even coat. When dry, sand it vigorously with 220 production paper. After the second or third coat sand with 400 grit wet and dry paper, using either linseed oil or water as a lubricant. When completely smooth to the touch and free of all lint particles, the finish is ready to be rubbed out. Using 0000 steel wool, buff in the direction of the grain until an even luster appears. Now the piece can be waxed as already described. One caution is in order. Whenever buffing, either with steel wool or wet and dry paper, stay away from all edges lest you break through the membrane that has been building.
French Polish; A French polish is performed with shellac and linseed oil and applied to the prepared wood in a single pass. A cheesecloth pad is first soaked in boiled linseed oil, then lightly dipped into an open pan of orange or clear shellac. It is then applied to the wood by briskly rubbing back and forth. The oil works to lubricate the pad and a thin even coat of shellac is thus applied. With sufficient rubbing the shellac will dry almost immediately. The key is to get an even sheen, and this is very difficult to do on large flat surfaces. A French polish imbues the wood with a soft glow, but it is not water resistant (shellac turns chalky white if water-soaked). It takes considerable practice to apply this finish well.
Paint: The texture of buttermilk paint can be achieved by using a water-based acrylic latex paint. If applied directly on a wood surface, especially a softwood, the water in the paint will cause the grain to raise slightly, producing that old-looking texture. If a second coat is desired, sand lightly with 220 grit and apply the second coat. Again, all brush strokes should follow the wood’s grain, especially on stiles and rails and drawer fronts. When the paint has hardened, in a day or two, it can be waxed with paste wax for a dull, deep sheen. If steel wool is used in applying the wax, the surface will appear slightly metallic and might enhance certain dark blues and greens. For earth tone colors this translucence can be achieved by using a pigmented wax. A drop or two of universal colorant, sienna or umber, added to clear paste wax will work well. In buffing wax from a painted surface, a lint-free cloth should be used, and all excess wax should be removed. If a harder surface is desired, a painted finish can be varnished and steel-wooled following the method already described.
In working with Shaker forms it is unwise to over finish. High-gloss, slick finishes might be appropriate to Chippendale or certain modern forms, but they don’t seem appropriate to the simplicity that is inherent in these designs. Therefore I strongly recommend paint or rubbed oil as a finish. I also recommend that heavy staining be avoided. In time the sun and air will color the wood with a subtlety unmatched by anything that comes from a can.
LIVING WITH SHAKER FURNITURE
There is an art to living with these creations. They won’t behave like Formica, but will swell and move from time to time. And they certainly will need occasional attention. Because we are dealing with solid wood, every effort should be made to place furnishings away from direct heat sources, such as radiators and, especially, hot air outlets. Also, large cases should not be pushed against baseboard heating elements since, in addition to producing split wood, this will result in inadequate heat circulation. If at all possible, the house should be equipped with a humidifier in winter to keep the humidity close to 50 percent. Remember, one reason two-hundred-year-old antiques have survived is that they were used in houses without central heating for the first one hundred and seventy five years. Extremes in temperature and humidity will wreak havoc with wood.
If your carefully finished table shows the marks of use, do not despair. A wear mark here, a slight burn there, a dent where one of the kids dropped a toy, surface scratches left by a pencil used in doing homework, the vestige of a telltale ring made two New Year’s Eves ago-all these emboss a tabletop giving it warmth and charm and attesting to the life cycle of a family.

At left, a craftsman at the Pleasant Hill Shaker Community demonstrates the 19th Century use of a spokeshave.