5 MEASURED DRAWINGS
The following 45 pieces of furniture are designed to be made in a small home shop environment. What links all of these designs together, relative to their construction, are that they all would be of utility in most homes and their designs have grown out of the aesthetics of the Shaker communities of the mid-19th century. In most cases, hardwoods, which are commonly available, should be used for the sake of permanence, while pine might be substituted in some of the casework. We indicate on each piece the number of board feet it takes to build. Every effort has been made to create furniture objects using solid wood joinery, avoiding plastic hardware, fixtures and other contemporary shortcuts. The person crafting these pieces should bear in mind that these are recommendations and they aren’t necessarily sacrosanct. What is important to adhere to is proportion. In the case of tables and chairs there isn’t much room for customization.
When this book was first written in the 1970s, every piece was made in our shop pretty much by hand using some portable power tools and a few stationary machines. As the years have passed, these designs haven’t necessarily changed, but the means of producing them has stayed abreast of 21st century technology. Good design should not be made subservient to the means of production, but rather the means of production should accommodate the design.
In updating this book, I have added thoughts and comments to many of the projects. You will see these in italics with Tom’s Notes. I hope the widsom that comes with time proves beneficial.
In updating the projects with color photography there were a number of cases were color photos were simply not available. In those cases we have found like, or very similar furniture pieces that may have slight constructions differences from those pictured in the original book, and in the accompanying illustrations. I see the positive in this, giving us an opportunity to show possible design variations, which I support whole-heartedly.
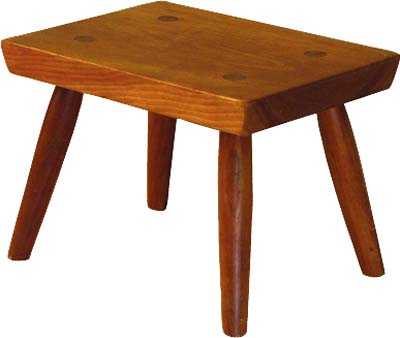
Small Handy Stool
The Shakers were fond of making small, portable stools to be used with rocking chairs, high bed mattresses, reaching tall cupboards and any place else where additional elevation is required. The early Shakers upholstered these stools using discarded carpeting. Dimensions can be changed, but keep the proportions in scaling up or down. Legs should be trimmed after wedges and glue has set.
MATERIALS
4 board feet of primary wood.

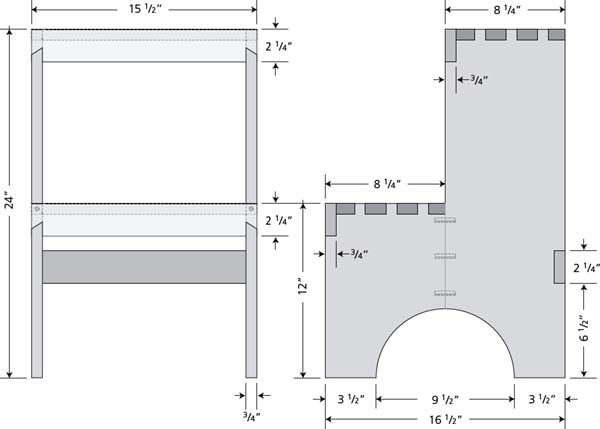
Two-Stepper
The Shakers built one-, two-, three-, and even four-steppers for use wherever a shelf, pegboard or niche was too high to reach. This design began as a copy of an old one, but it underwent dimensional changes to give it greater stability. It makes an excellent library or kitchen step and doubles as a plant stand and even mini-bookcase. This is a good design for trying out dovetails and it assembles fairly easily.
TOM’S NOTES: To gain stability we now add 2” to the depth of the sides (16 ½”) and reduce the overall height to 24”. To make the dovetailing easier, split the side panel in two, execute the dovetailing then glue the two pieces together at the top of the arch using glue and dowels or biscuits for added strength.
MATERIALS
7 board feet of primary wood.


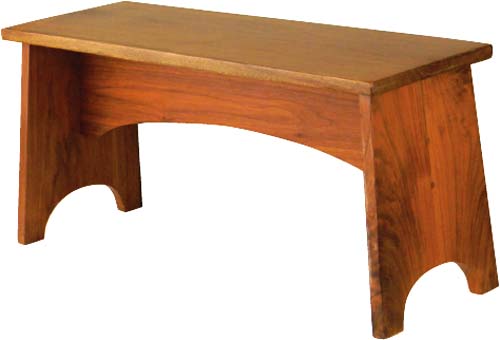
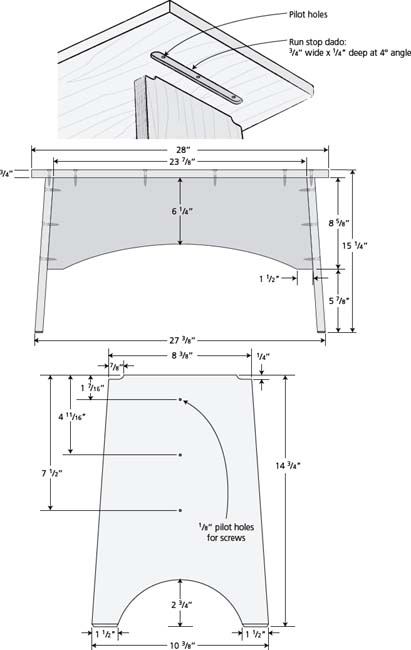
Boyker Bench
Ed Boyker worked his whole life as a finish carpenter in Portland, Maine. We worked together for fifteen years. He taught us about the economy of movement only a true journeyman understands. This was his work stool.
MATERIALS
10 board feet of primary wood, all ¾” thick.
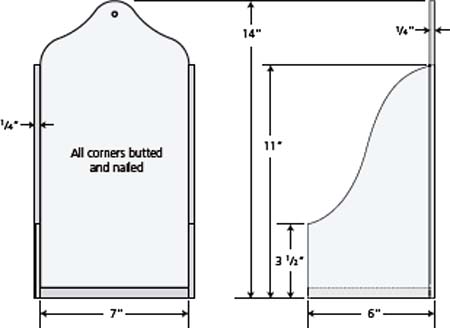
Candle Shelf
A number of these shelf designs were used by Shakers to hold everything from candles to clay pipes to matches. This one is ideal for a “hog scraper” candlestick.
TOM’S NOTES: If it is to be used to hold matches or other small objects add a simple front panel to the 31∕2” front or change that plane by lengthening or shortening the cyma curve on the sides. Gluing the sides to the back can be adequate and needn’t be nailed, however, the end grain of the bottom shelf should be glued and reinforced with brads. The back should be fitted to a slat at the rear of the shelf and should be glued and screwed by countersinking #2 screws.
MATERIALS
1 board feet of primary wood.

PHOTO BY NICOLE MARIE DESJARDINS/COLLECTION OF HANCOCK SHAKER VILLAGE.
Hanging Shelves
This simple set of shelves can be hung from a horizontal pegboard or mounted directly on a wall. It is simple to build and should provide an excellent opportunity to cut rabbet and dado joints.
TOM’S NOTES: At 26” wide, these shelves should neither rock nor sag, however, if made much larger, ¾” wood should be used and a 2” horizontal slat should be attached under each inner shelf (as shown in the photo). The mounting strip at the top should be thin metal and should be finished at the top in a workman-like fashion. Remember, if these shelves are to carry a lot of weight they should be screwed to wall studs behind the plaster (these are 16” on center in most houses).
MATERIALS
6 board feet of primary wood.


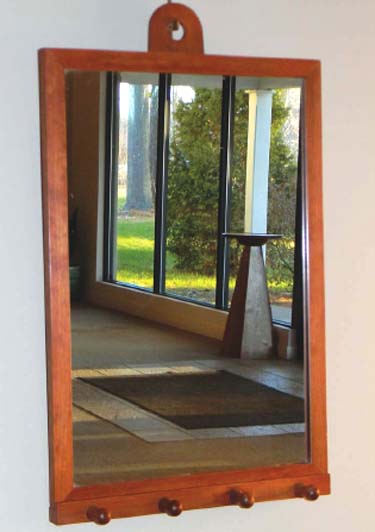
Mirror
Designed to be suspended from the Shaker pegboard, this mirror has the added advantage of being adjustable. By lengthening or shortening the string in the hanger’s slot, the mirror can be focused down or up. For an unblemished reflection, a plate glass mirror should be used. If single strength glass is used, add ⅛” to the wooden back. In fitting the back, leave space from swelling and shrinkage. The miter joint can be feathered, splined or lapped.
TOM’S NOTES: If the Shakers had plywood they would have used it on the back – go ahead, be adaptive.
MATERIALS
3 board feet of primary wood
2 board feet secondary wood
plate glass mirror, 123∕8" × 21⅜

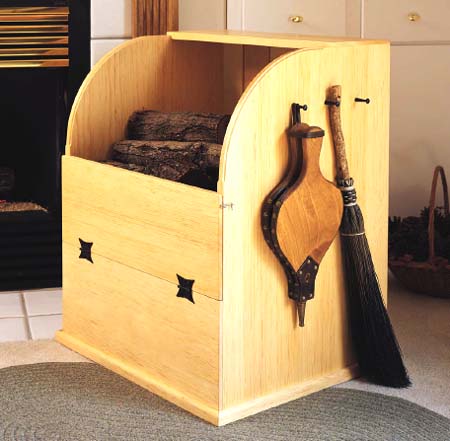
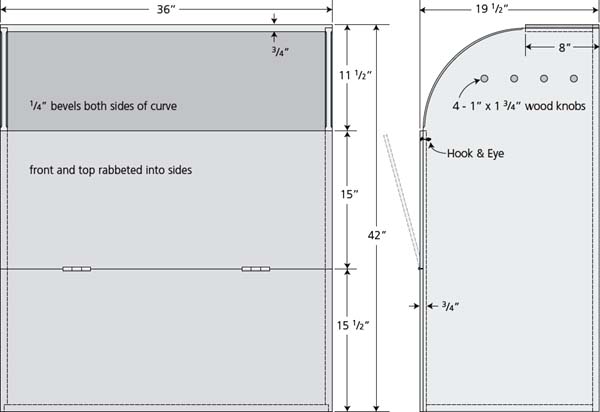
Wood Box
The clean lines of this box should make it at home wherever a wood stove or fireplace is used. The 15” hinged portion in front can be dropped when the level of the contents is sufficiently reduced, making access to the lower portion all the easier. This box is designed to take 18” or 36” logs. If your log dimensions differ considerably, you may wish to alter the size of the box. No rabbet joints in this box need be glued since the grain of the front panel runs at right angles to the sides.
TOM’S NOTES: Remember, the expansion coefficient of wood is considerable – boards get wider and narrower with changes in humidity and temperature, they don’t get much longer or shorter. Movement occurs when members are attached perpendicular to one another.
MATERIALS
36 board feet of primary wood,
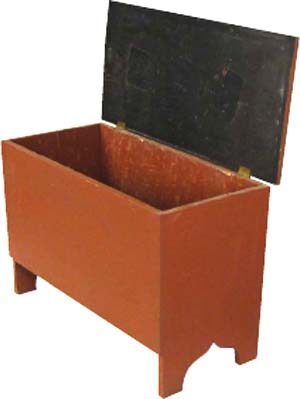
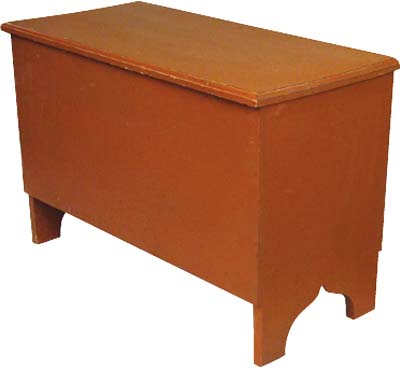
Six-Board Blanket Chest
Americans of the nineteenth century would have called this a six-board chest; we say blanket box. Their term is more descriptive, since the box is literally made of six wide boards. Today, of course, these boards have to be glued up to achieve the necessary widths. No glue should be used at the joints in building the box. The grain directions are at right angles and the joint will only crack if glued. If pine is used, the end cleat supporting the top should be made of hardwood.
TOM’S NOTES: These dimensions are somewhat arbitrary and can be lengthened or shortened. A box using this architecture, but made much wider, was used to hold grain. Even though lined in tin they all exhibit joints chewed by mice. The plank sides are elevated and can sport legs by employing a variety of cutout “arches” (half round, oval, cyma, “s” curves or even a Gothic arch).
MATERIALS
45 board feet of primary wood


Common Bench
Strictly for utility, the bench in the illustration offers no back support and is less than comfortable. Benches of this type were used at the dining table and often found in workrooms. Ours is painted and is placed out front next to the walkway in summer and used for holding potted geraniums in our bedroom in winter. It can be reduced to a 4' length without upsetting the proportions.
A smaller example (shown in the photograph) is outfitted with a back and is in the collection of Shaker Community, Inc., Hancock, Massachusetts.
TOM’S NOTES: The center stretcher supports the nearly 5 foot span. To help reduce the chance of a “sag”, put a slight camber (a convex curve) on this member. To further overcome sag resulting from extended use, or when adding over all length, use a milled 2x4 or heavier stock.
MATERIALS
13 board feet of primary wood

PHOTO BY NICOLE MARIE DESJARDINS/COLLECTION OF HANCOCK SHAKER VILLAGE

Lap Desk
Long before computers the laptop desk had many uses, both stationary and portable. It’s a perfect companion on a modern kitchen counter. Note the use of a piano hinge – an interesting touch.
MATERIALS
5 board feet using 4/4 wood dressed down to 1∕2” thickness (all components on this piece are designed to be a 1∕2” thick).


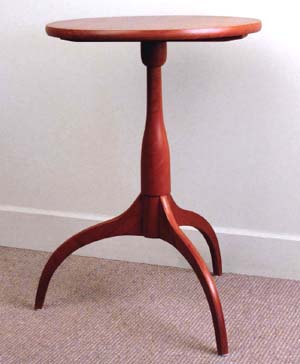
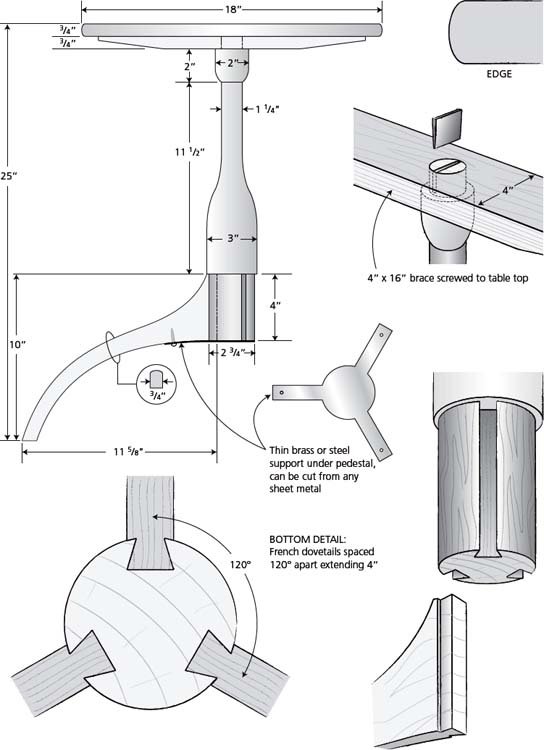
Large Round Stand
The feet on this stand extend slightly beyond the edge of the top to give it a stability not usually found in pedestal tables. For greatest strength, mark out the legs on the raw stock so that the grain runs from one extreme point to another. The legs should be attached by careful gluing. When placing the top on the brace, make sure the grain of the top is at right angles to the grain of the brace.
TOM’S NOTES: We’ve been making this table for nearly 40 years and have discovered that adding a thin brass plate under the post at the intersection of the legs adds great strength to the French dovetails.
MATERIALS
7 board feet of primary wood
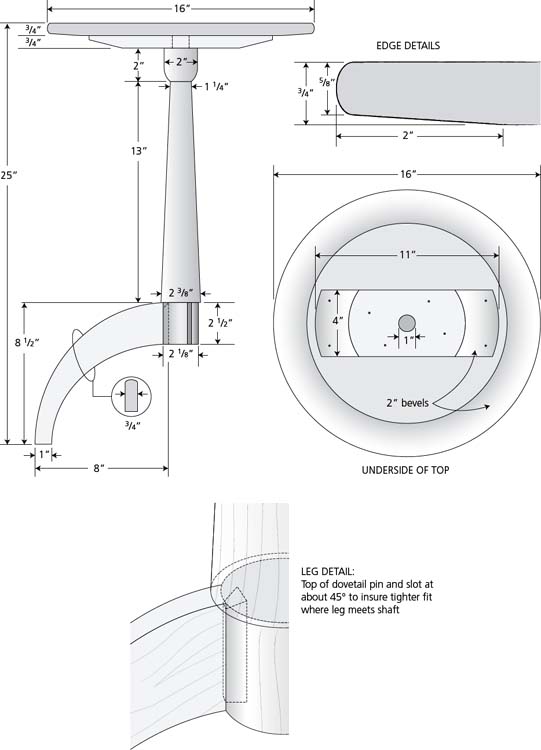
Small Round Stand
Everything about this pedestal table suggests twentieth-century authorship, yet one very much like it was built around 1830. Fitting the legs to the shaft is done by first cutting the male portion of the dovetail joint. This is then scribed onto the bottom of the pedestal and the slot is cut with backsaw and chisel. Proceed slowly to achieve a close fit. If a leg is too loose in the slot, a new one should be made with a slightly heavier dovetail.
TOM’S NOTES: The same metal plate as described in the previous project can be used here as well. Maintaining these proportions is essential when changing scales. This lovely design can easily morph into a clumsy iteration.
MATERIALS
6 board feet of primary wood

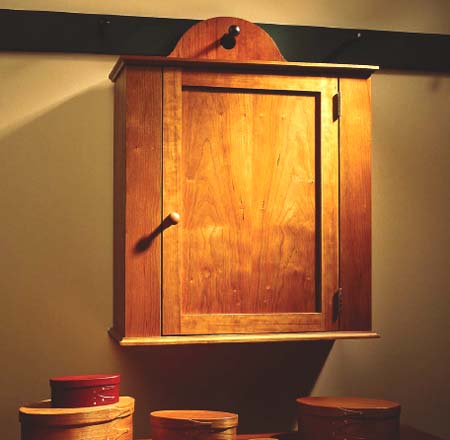
Hanging Cupboard
This design started out half the size and with a single board door. Improvements have resulted in this set of shelves that will be useful in a bathroom or in the kitchen to hold anything from soap to soup. It, too, can be hung on a pegboard or simply on a finish nail almost any place. Note that the photo offers an image of a flat-panel door, while the illustration offers a raised panel.
TOM’S NOTES: A nail or screw should be driven into the wall on the hinged side to prevent tilting when the door opens. The top and bottom should mirror one another. As in most frame-and-panel design the side stiles should run from top to bottom while the horizontal rail is fitted between.
MATERIALS
9 board feet of primary wood

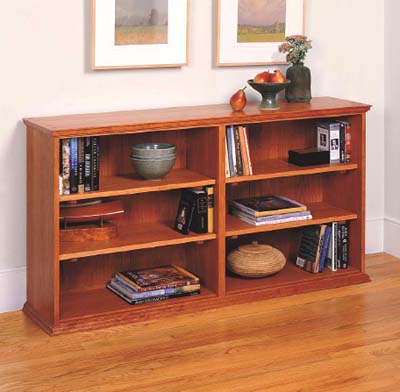
Long Bookcase
In dimensioning a low bookcase, check window sill heights. We build these with a floating panel back but solid slats will work fine. All four interior shelves are adjustable using ⅛” shelf pins. The top and bottom moulding should be a mirror image of one another.
MATERIALS
45 board feet of primary wood

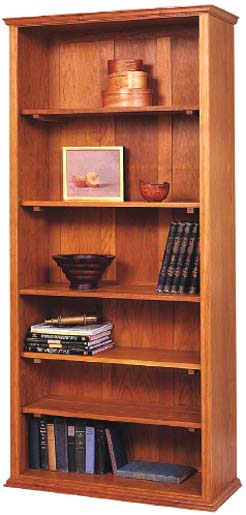
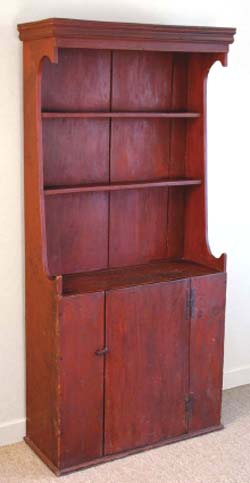
Vertical Bookcase
Where floor space is at a premium, a vertical bookcase offers great storage. To a three-year-old, this case has all the aspects of a ladder and he/she may be inclined to climb it. Therefore, I urge that the back be screwed to a wall stud, which is established typically 16” on center. Note: For structural reasons, the waist shelf is not moveable.
MATERIALS
45 board feet of primary wood


Four-Door & Drawer Side Chest
Where more free-standing cupboard space and less drawer space are required, this low chest may well be the answer. In an apartment or other setting, having limited space makes this a superb side piece. If desired, the interior shelf can be made adjustable by adding extra cleats.
TOM’S NOTES: All three 60” side chests shown on the following pages embrace the same case architecture (dovetailed corners supporting mitered mouldings). We use French dovetails where the female runs the length of the side moulding and three short males are screwed to the case side. A simpler solution would be to glue and screw the moulding at the miter and “loosely” brad the rest without glue. Remember expansion/contraction.
MATERIALS
38 board feet of primary wood
40 board feet of secondary wood


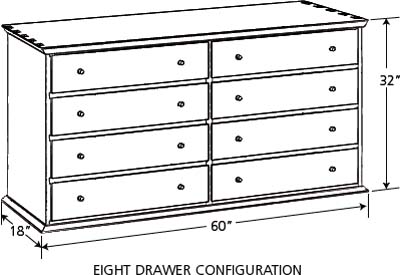
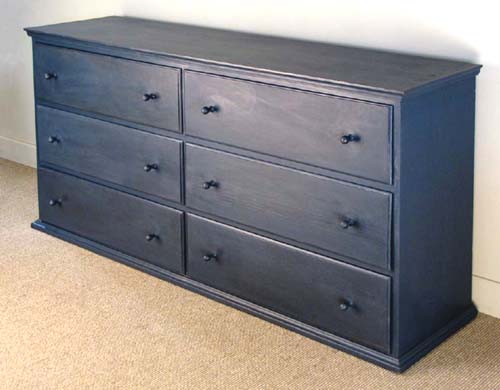
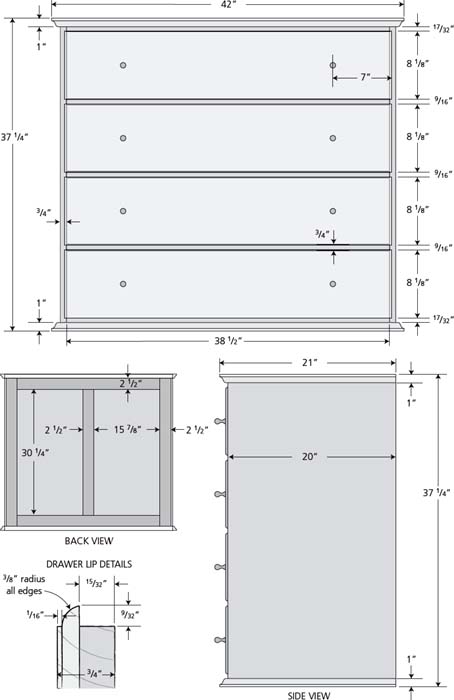
Six-Drawer Side Chest
What we call the side chest had its origin in the work counter of a weaving room in New Lebanon. By slightly changing a few dimensions this six-drawer chest emerged. Since these dimensions resulted in such a useful and usually satisfying cabinet space, we decided to experiment with different drawer configurations and even added a door. Hence, the following side chest combination. If relatively deep drawer space is required, then the six-drawer side chest is the answer.
TOM’S NOTES: All case backs should either be vertical shiplap or tongue and grooved. Do not glue the backs, but rather allow for expansion/contraction.
MATERIALS
36 board feet of primary wood
40 board feet of secondary wood

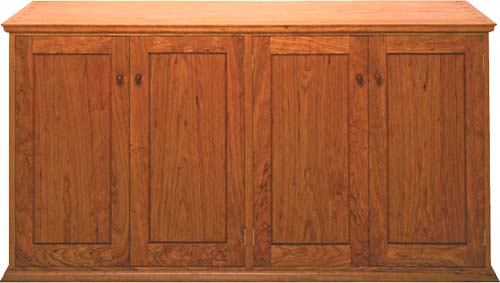
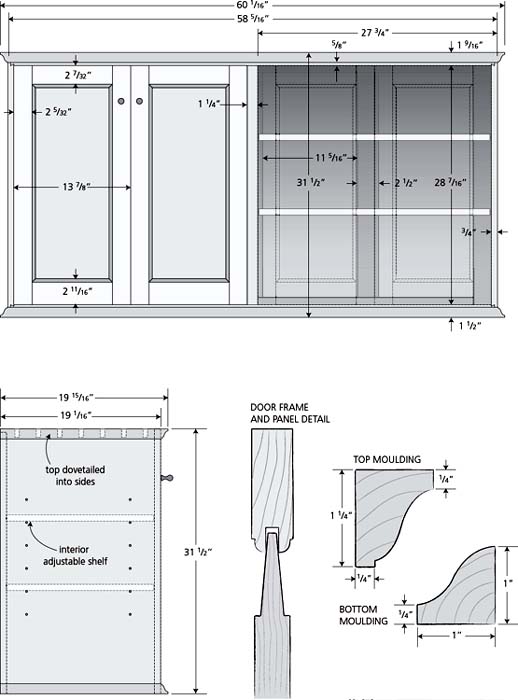
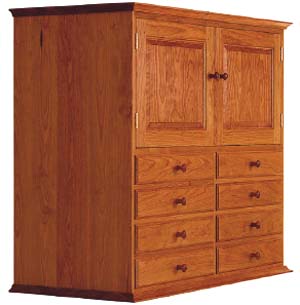
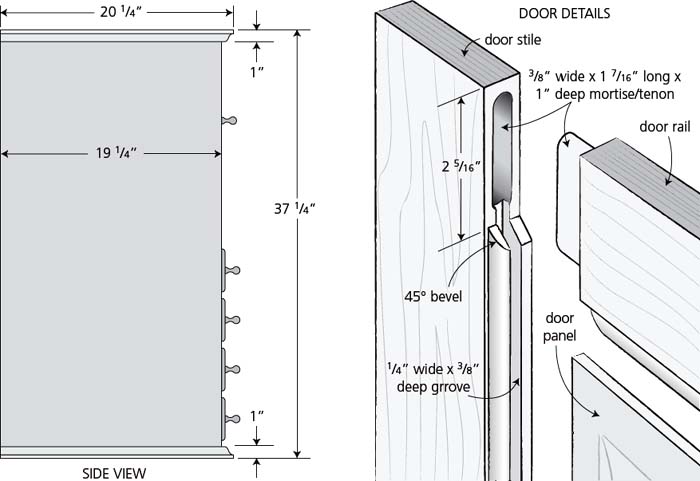
Four-Door Side Chest
When used as a sideboard in a dining room, the four-door side chest provides ample space for storing tablecloths, napkins, flatware or all sorts of dining items, and by removing a shelf it still provides space for storing fairly tall objects which would not comfortably fit in a drawer. We know of several that are used to house beverage bottles, mixers and sundry items. As a bedroom chest the uses are limitless. Hats, shoes, even ski boots can go into the taller portion.
MATERIALS
41 board feet of primary wood
76 board feet of secondary wood
Pewter Cupboard
No doubt eyebrows will raise because this pewter cupboard is pictured in a book on Shaker style. Strictly speaking, it does not belong in this genre since it is designed to display china, pewter and glassware – and “display” was categorically disapproved of in Shaker doctrine. Nevertheless, we encourage this slight frivolity and include the design anyway. A cupboard very much like this is included in the Sturbridge collection and another in Springfield, Massachusetts. The C-scroll seems to have been popular with the early New Englanders and has found a delightful expression in this piece. The cupboard door is shown with the raised panel (in the illustration), and also in the simple board-and-batten style and is entirely optional. This piece looks best in dark red, blue or green and also in natural pine or cherry. If you haven’t enough wide boards to build the back in three pieces, glue them up so as to use only two beaded joints. Also, note the use of butterfly hinges and base moulding.
TOM’S NOTES: The base moulding shown in the photo is optional but the upper cove is essential and can be made more robust. Back boards should not reach the floor but terminate at the lower inside bottom shelf.
MATERIALS
70 board feet of primary wood


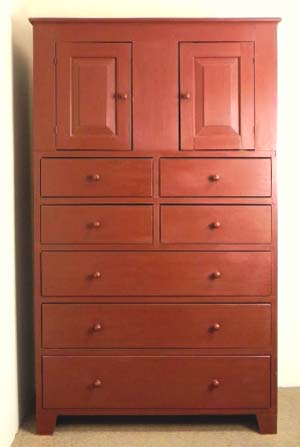
Dr. White’s Chest
If I could only have one piece of furniture to hold all my belongings, this would be my choice. Between the seven drawers and cupboard shelves there is adequate space to house everything I could ever need. If it couldn’t fit in Dr. White’s Chest, I wouldn’t need it. This is the heaviest piece in the collection. We build this chest with an optional hidden compartment – but if we drew it, then it would no longer be hidden.
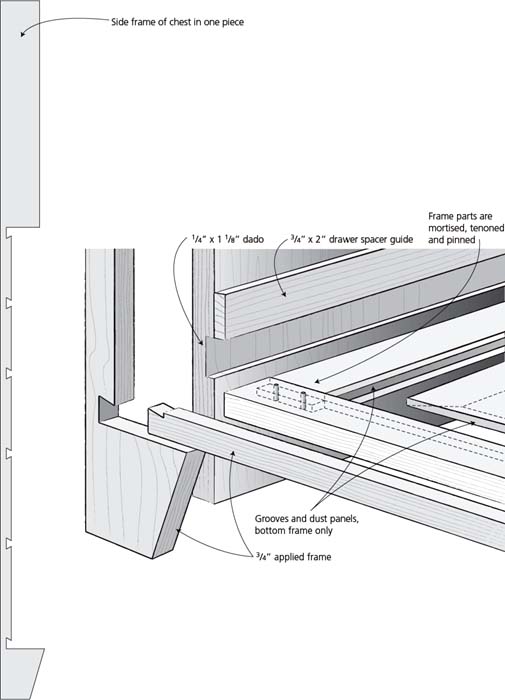
TOM’S NOTES: Experience has taught us that the supporting drawer dividers should slide into the case sides from the rear. Once in place half dovetails can be inlet into the edges of the face frame and glued to the leading edges of the drawer dividers. A hint on the secret compartment: why do you suppose the board separating the doors is so wide? Look closely at the illustration on page 117.
MATERIALS
70 board feet of primary wood
150 board feet of secondary wood


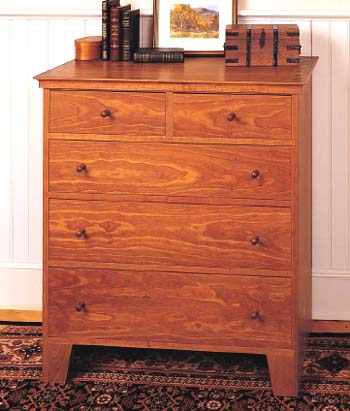
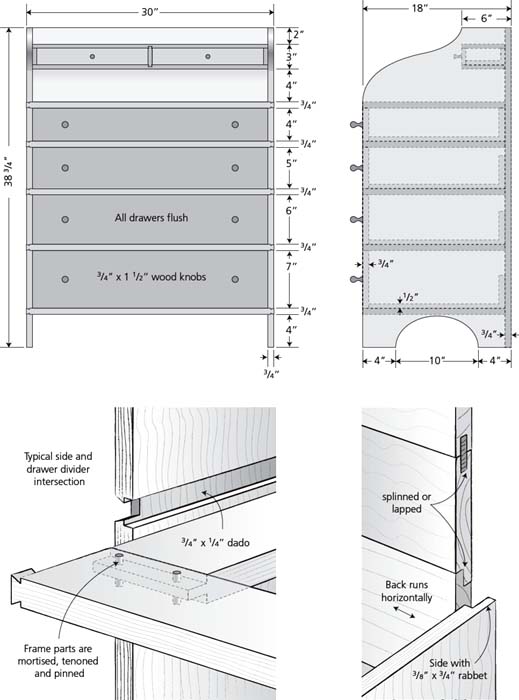
Five-Drawer Chest
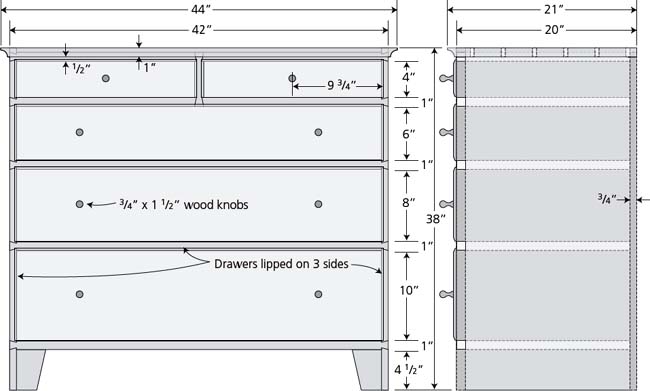
Having experimented with a number of sizes and proportions, we feel that this chest of drawers represents an ideal form. The lower drawer can take bulky sweaters, even a coat in storage, while the top drawers are not so deep as to lose small items in dark recesses. Notice that the chest is designed without an applied face, which greatly simplifies construction. Remember, do not firmly glue drawer dividers or mouldings to sides; rather, use brads to avoid checking in winter. The plain lines of this piece accentuate the activity of the top dovetails, which make a delightful visual discovery.
TOM’S NOTES: The chests drawn on the following pages show lipped drawer fronts. By extending the lip on three edges, one covers the seams and hides loose fitting drawers. Flush fronts, (as shown in the photo below) appear cleaner in line, but must be fit with greater care to allow for a nickel fit in winter and a dime fit in summer. The choice is yours.
MATERIALS
30 board feet of primary wood
40 board feet of primary wood
The chest pictures at left is a slimmed-down, vertical option to that drawn at right, showing that this piece can be adapted to fit your space needs.

Ten-Drawer Chest
Most people who see the ten-drawer chest for the first time think it’s made for a basketball player. It isn’t really. With a step stool the average adult can get to the top of things, while the child will view the top drawers as totally inaccessible. And this is one reason for its design – the top drawers are private spaces. If you like cutting dovetails, you’ll love building this chest with it’s two hundred or so dovetails.
TOM’S NOTES: These drawers are graduated in 1∕2” intervals, while the preceding Five-drawer chest is laid out in two-inch graduations. When a 6, 7, 8 or 9 drawer chest is desired, decide which interval is most appropriate – the only requirement is that they be equal in dimension.
MATERIALS
60 board feet of primary wood
124 board feet of primary wood

PHOTO COURTESY OF SHARON NEWTON AT NEWTONWOODWORK.COM

Canterbury Cupboard
The Shakers were masters at dividing space and repeating patterns. They fashioned rhythm, musical rest and crescendo in two-dimensional space. This elaborate set of drawers is exuberant in its simplicity. It is comprised of an upper and lower section, that can be separated and used independently. The photo below shows both pieces in use. The illustrations at right are for the lower section. The next page includes illustrations for the upper section.
MATERIALS (Lower Section)
50 board feet of primary wood
10 board feet of secondary wood

Canterbury Three-Quarter Cupboard
The upper cabinet of the Canterbury Cupboard is shown here with lipped drawers, this case can also sport flush drawers for a more contemporary look.
MATERIALS (Upper Section)
50 board feet of primary wood
10 board feet of secondary wood

Trestle Table
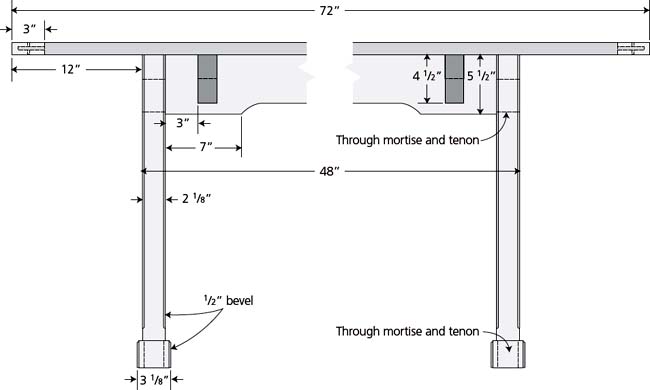
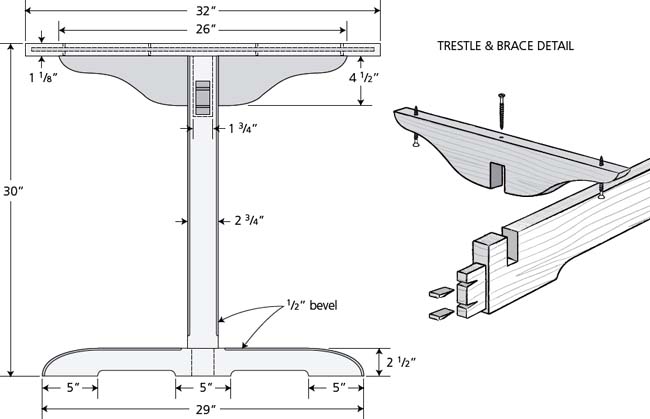
The oldest known American-made table in the United States is a one-board, sixteen-inch-wide trestle table now housed in the American Wing of the Metropolitan Museum in New York. This concept of a removable board on a double or triple pedestal base has its origin in medieval times. The trestle dining table is clearly one of the oldest and simplest furniture forms in existence. It was the Shakers who, with a number of trestle designs, brought this form to the level of an art. Ours, a composite of several designs, has proven popular in both the dining room and kitchen. The table can be extended to eight feet by adding two feet in length to the top and center stretcher. If more width is needed, as much as three or four inches can be added, but no more, since the brace and leg components cannot take too great a stress. Furthermore, the table looks best with a long, slender top.
TOM’S NOTES: One advantage to building the same piece many times over the years is that one learns where design weaknesses are revealed through sustained use. Both the upper and lower leg post joints are under considerable stress due the “moment” forced upon them. Therefore, it would be wise to fox wedge the tenons if they are to be blind or better yet, through-tenon them and add horizontal wedges to tighten them in the mortise. In time they may loosen and can be re-wedged like a hammer or axe handle.
MATERIALS
42 board feet of primary wood
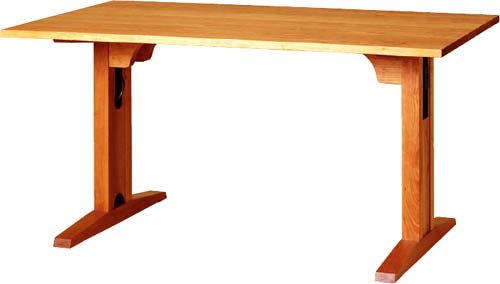
The trestle table shown here is a more contemporary adaptation we offer that includes wiring access through the leg columns.
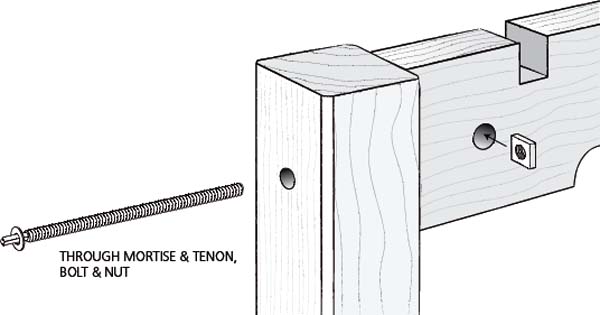
Trestle Table Mortise and Tenon Options
A six-foot trestle table can be moved from room to room and up and down stairs with little effort. It can be made in one monolithic form using a through mortise-and-tenon with glue and wedges at the upper leg joint. If, however, one extends the table to eight feet, or wishes greater mobility, removable legs can be made by using either the keyed tenon or a pair of common bed bolts. If properly done, all three systems will result in a stable base which should not tip or rock with reasonable use.

THROUGH MORTISE & TENON, GLUED & WEDGED
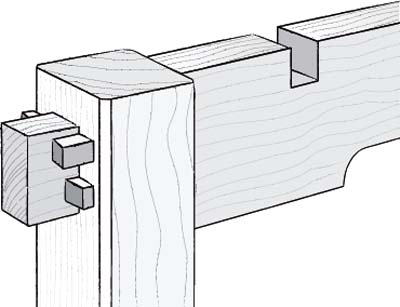
THROUGH MORTISE & TENON, KEYED
Trestle Coffee Table
There were no low coffee tables in the eighteenth and nineteenth centuries. The tea tables that did exist were quite high and not intended for use in front of a couch or in the center of a living room conversation area. This design is a miniature trestle table, altogether at home as a low table for serving coffee, cheese, or whatever. The height can be adjusted up or down by a few inches to best match the seating it is intended for.
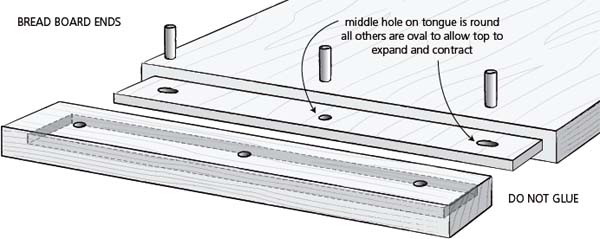
TOM’S NOTES: Because this table top is only two feet wide it need not have breadboard ends although they add a certain charm to the form.
MATERIALS
24 board feet of primary wood
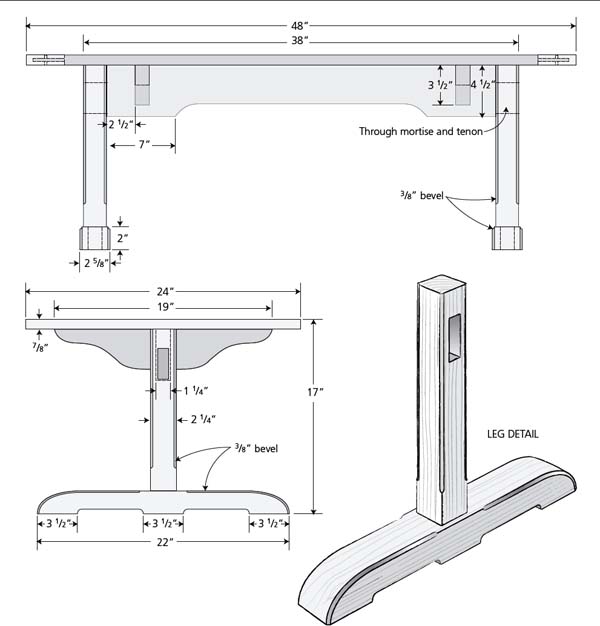
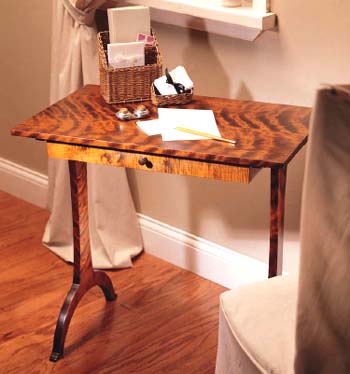
Trestle Table Desk
A desk need not be a massive, cumbersome affair with tiers of drawers. If storage can be arranged in filing cabinets or elsewhere, the trestle table form makes a light, informal, totally useful working table or desk. The two shallow drawers in the desk illustrated at right offer sufficient room for a small assortment of paper and writing materials. We use this table in our kitchen where the drawers house napkins and several sets of place mats. Lest you think we’re stretching the concept of the trestle table too far, the smaller table shown below is a reproduction of a desk attributed to the Shaker community at Harvard, Massachusetts, and is believed to have been used as a work table, side table or writing desk.
TOM’S NOTES: The shallow drawers should slide easily – if they bind, loosen them and add bees wax or paraffin to the side grooves. Also, when screwing the top to the mounting boards, ovalize holes to allow for expansion/contraction.
MATERIALS
44 board feet of primary wood
16 board feet of secondary wood


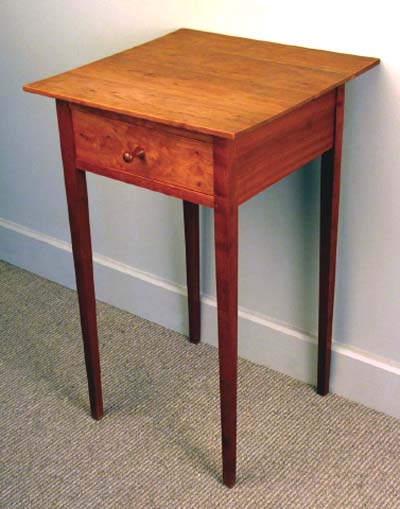
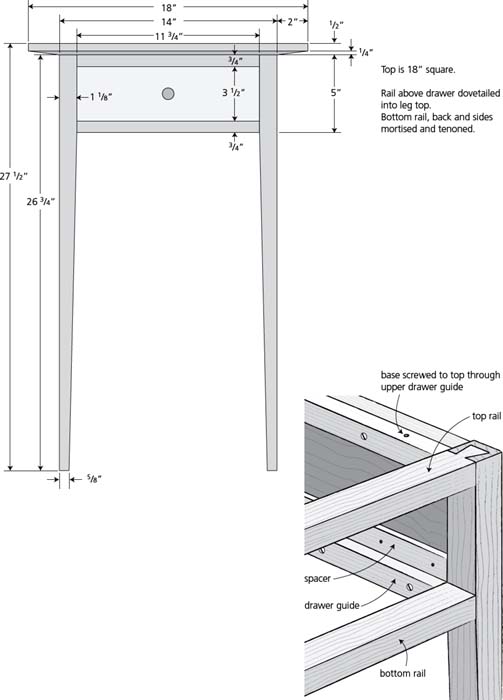
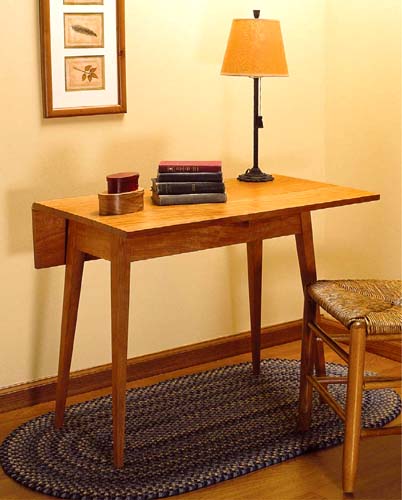
Square End Table
The graceful tapered leg terminating in a ⅝” tip gives this table a lightness quite remarkable. It makes a perfect reading stand or a useful table next to a bed. This project offers a good excercise in the use of mortise-and-tenon joinery, as well as drawer construction.
TOM’S NOTES: The 271∕2” height is a perfect match for a reading chair or a posted bed.
MATERIALS
8 board feet of primary wood.
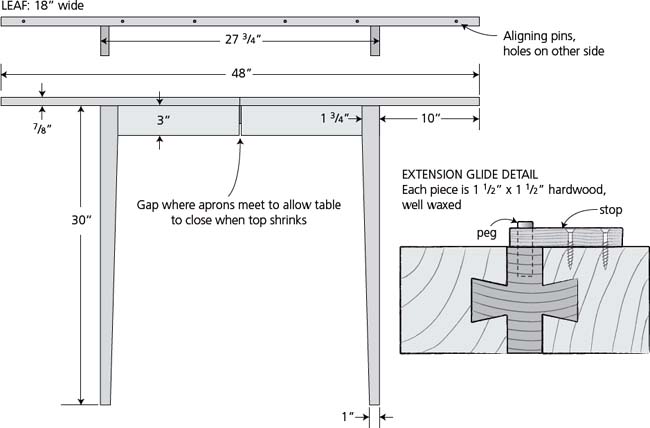
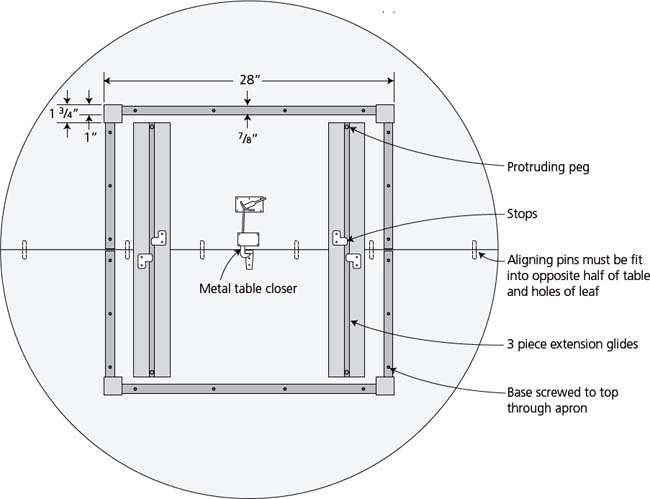
Round Extension Table
The Shakers did not build an extension table, so far as I know. They didn’t live in apartments as many of us do today, and they usually dined at much larger, permanently situated tables. This table is ideal for four people, and six can squeeze in without the leaf. With the eighteen-inch leaf in place the table opens to five-and-a-half feet overall and is perfect for six, but it can accommodate seven or eight in a pinch. The only difficult part in this design is the extension glide, which must be built so that it slides open and closes without undue friction. Paraffin wax or, better, silicone spray will facilitate a free movement.
TOM’S NOTES: If you don’t want to make the extension glides they can be purchased from Osborne Wood Products (www.osbornewood.com). Table closers are now available in other styles as well. We now add 11∕2” thick corner blocks to reinforce the apron/leg joint (two screws into each apron – it’s not necessary to screw into the leg).
MATERIALS
38 board feet of primary wood
4 board feet of secondary wood
1 adjustable table leaf lock


Harvest Table
Of all dropleaf designs, this one is clearly the most serviceable, for it is designed to take side chairs under the table with the leaves down. This makes it possible to store the table and eight chairs within a space measuring 28" × 88" – perfect where space is at a premium. The design is one of simlicity and grace and can be made from four- to eight-feet long. Remember, however, that for a table setting you should allow 24”.
TOM’S NOTES: It would be wise to build a test hinge joint making sure the leaf is tight when either up or down, then transfer the
dimensions to the actual table.
MATERIALS
38 board feet of primary wood
6 –11∕2” table leaf hinges


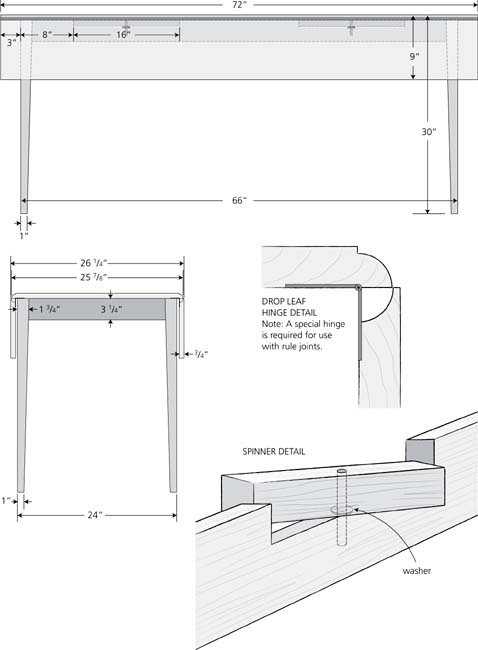
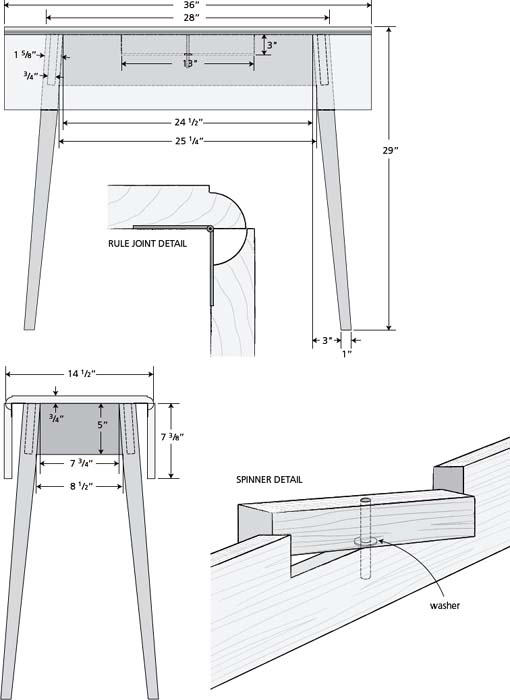
Splay-Leg Dropleaf Table
As an occasional table which can also be used to seat four (in something less than luxury), this table is ideal. The splay is achieved by cutting tenon shoulders at a slight angle. This same angle must be repeated in cutting the leaf-support spinner slot so that the support swings out in a horizontal position. The spinner, too, is pinned at a slight angle.
TOM’S NOTES: Made longer, this table can be used as a “Parsons Table” to sit behind a couch or as a glove table in an entry hall.
MATERIALS
22 board feet of primary wood
4 - 11∕2” steel table hinges
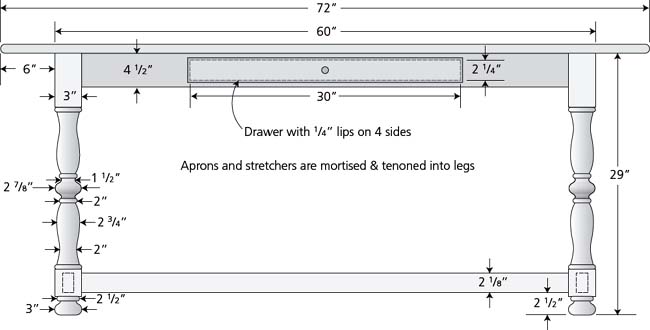
Stretcher Table
The double urn and rings on the legs may place this table outside of Shaker form. Also called a tavern table, this design offers stability and pleasant proportions. As a desk it is ideal. Most tables of this sort had four stretchers running from leg-to-leg. Althought this adds strength, it precludes passing a chair beneath the table on all four sides. By replacing the two side stretchers with a single center stretcher, side chairs can be accommodated.
TOM’S NOTES: An alternate leg shape would be a straight four sided 3” x 3” with 1∕2” chamfers on all four sides. They can be stopped at the upper and lower sections where apron and stretcher are fitted.
MATERIALS
35 board feet of primary wood
5 board feet of secondary wood


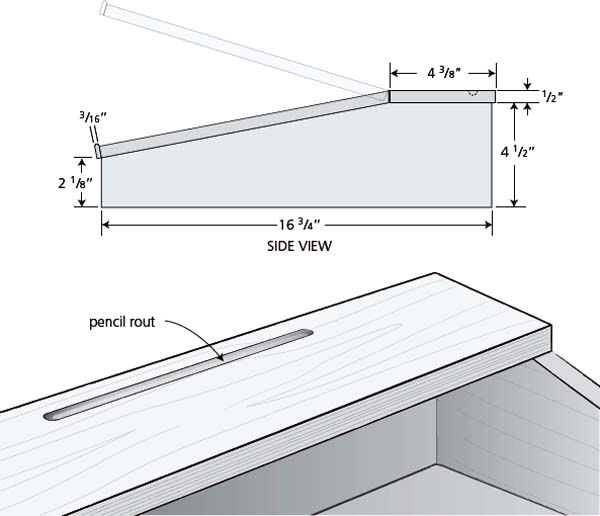
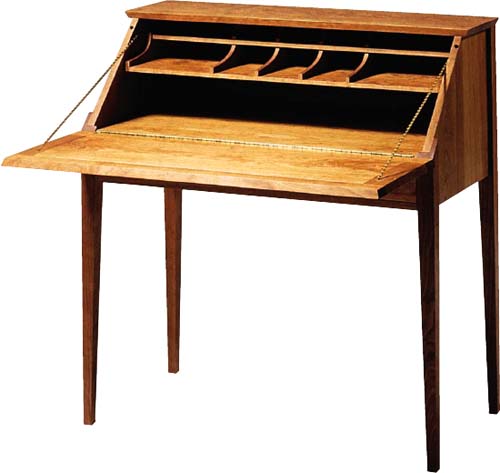
Small Writing Desk
Also known as a slant-top desk, this design incorporates the best elements of a slant-top desk with the best elements of a writing table. It is altogether practical and pleasing to the eye. The most difficult aspect is building and installing the hinged writing surface. Care must be taken in breadboarding and leveling, since any warp will result in a less-than-even fit on the case. Although intricate in detail, this piece, when finished, is well worth the effort.
TOM’S NOTES: We used to call this the Lady’s Desk, but we have since corrected our linguistic insensitivity.
MATERIALS
50 board feet of primary wood
9 board feet of secondary wood
Polished brass hinges and lock


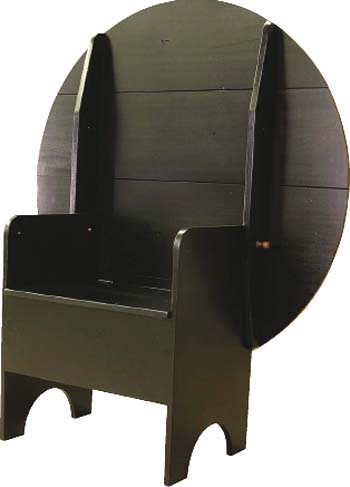
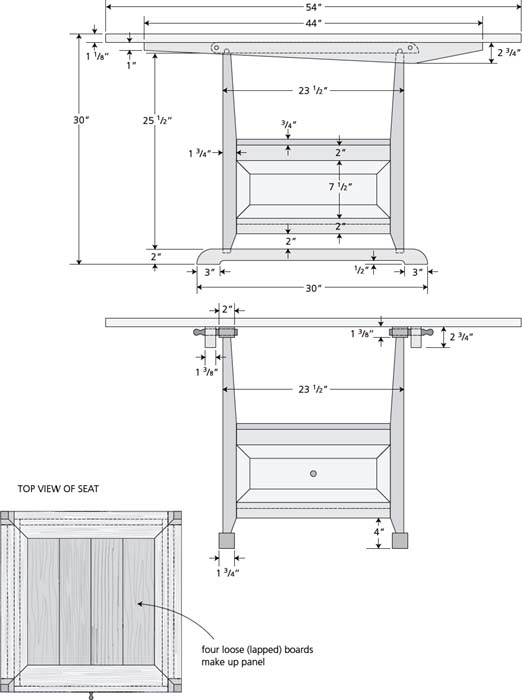
Chair Table
Chair tables were a popular form in the nineteenth century, and it appears that the Shakers not only were familiar with them but also built them for their own use. The great advantage of this style is the ability to store it when not in use. With the top tilted up, the base becomes a functional, if uncomfortable, chair with drawer included.
The chair shown below is a version simplified from that in the illustrations by using slab sides rather than the frame and raised-panel sides.
TOM’S NOTES: A round top exceeding five feet in diameter is pushing the design a bit far. Remember also to ovalize the screw holes in the supporting battens to allow for movement in the top.
MATERIALS
58 board feet of primary wood
9 board feet of secondary wood
Sewing Desk
Almost a miniature, the sewing desk offers six drawers for a wide range of uses. It is actually a set of flush-front drawers with an open work shelf at the top. The version shown in the photo below was built from butternut, with black walnut knobs by Andrew Hunt of Sudbury, Ontario in Canada.
MATERIALS
28 board feet of primary wood
35 board feet of secondary wood

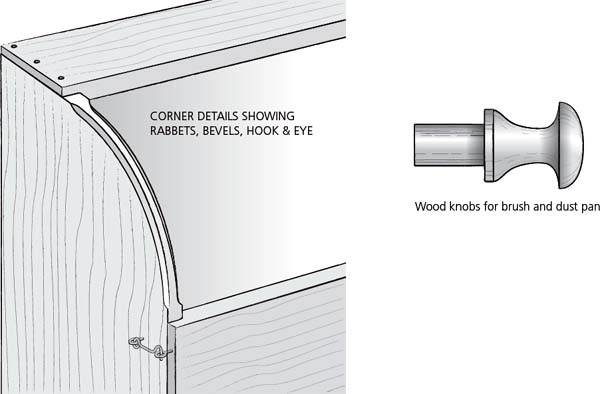
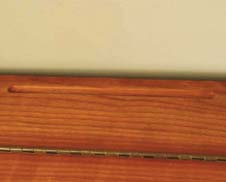
Blanket Box with Drawers
The use of rabbeted joints makes this a fairly easy case to build. The drawer construction is the same as in the other case pieces and should present no obstacle. Notice that the grain direction of the front and back boards runs at right angles to the grain direction in the side boards. This will result in dimensional change as great as 3∕16” from winter to summer. Do not glue these joints, use either finish nails, old-fashioned rosehead nails, or screws.
TOM’S NOTES: The sides are rabbeted at the rear joint to cover the back boards, while the front is cut to receive the side boards leaving it extended uninterrupted from side to side. We line the bottom of our blanket chests with aromatic cedar.
MATERIALS
34 board feet of primary wood
32 board feet of secondary wood


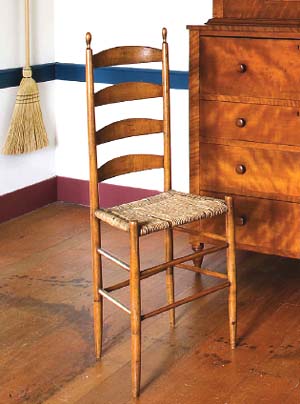
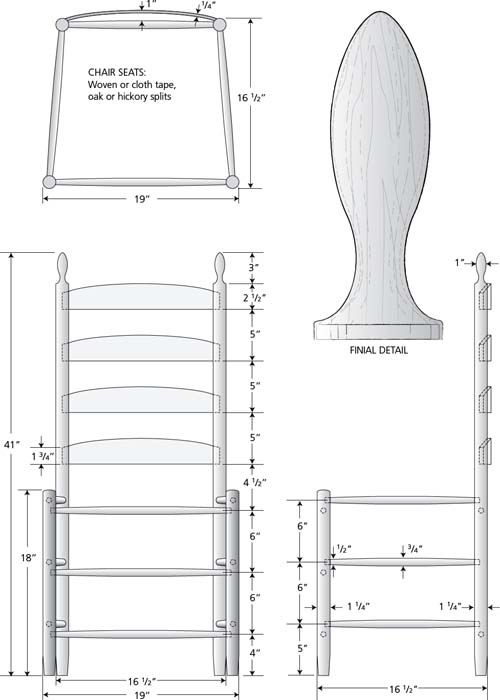
Four-Slat Ladderback Chair
For lightness 1¼” hardwood dowels are used in the legs. To turn the back legs, chuck a 42” length into a lathe and tape one end from about 18” in toward the end and turn the finial (see full-size detail). When the legs are turned, cut four 1¾” slots in line, entering about ¾”. Front and rear legs are then bored from 1∕2 stretchers at a depth of ⅝”. The back slats are cut to shape and steamed in a steambox and bent on a clamping jig using two C-clamps. When dry, they are fitted to the slots in the rear legs. All sockets are glued and pegged with ⅛” dowels. The version shown below is from the Pleasant Hill Shaker Community in Kentucky.
Chair seats can be made of cloth fabric, splint or rush. Chair rush and directions for weaving can be ordered from many woodworking supply locations. Fabric tape can be obtained from Shaker Workshops (shakerworkshops.com). Tenons should be shaped into the ends of these slightly bulbous rungs.
MATERIALS
3 - 48" × 11∕4” dowels
6 - 36" × ¾” dowels
1 board foot hardwood of choice
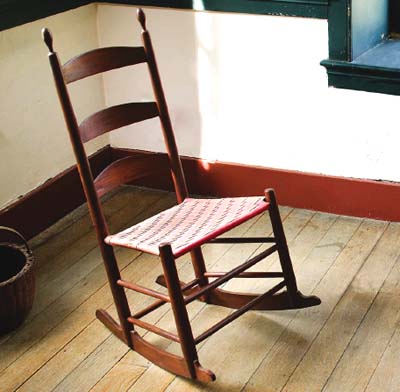
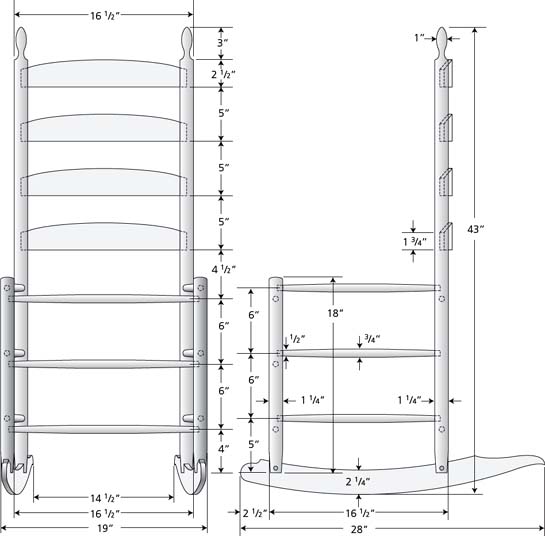
Armless Rocking Chair
The armless rocker was popular with Shakers, and many can be found in museum collections today. A hundred and fifty years ago this rocker, called a slipper chair, was used in the bedroom for dressing. To guarantee a good alignment, slots for the ash rockers should be cut after the chair is assembled. The rockers should be fitted so that the chair sets fairly straight when not in use. The rocker shown below is a three-slat version from the Pleasant Hill Shaker Community in Kentucky.
Chair seat fabric tape and directions for weaving can be ordered from Shaker Workshops (shakerworkshops.com).
MATERIALS
3 - 48" × 11∕4” hardwood dowels
6 - 36" × ¾” dowels
1 board foot hardwood of choice
2 board feet white ash

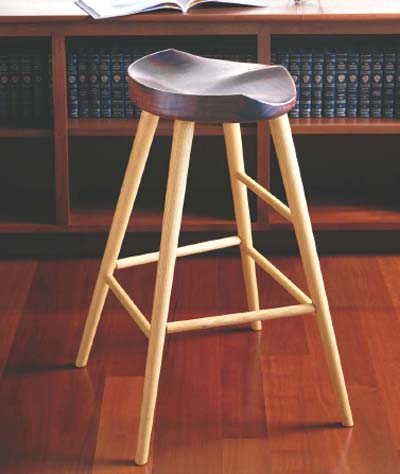
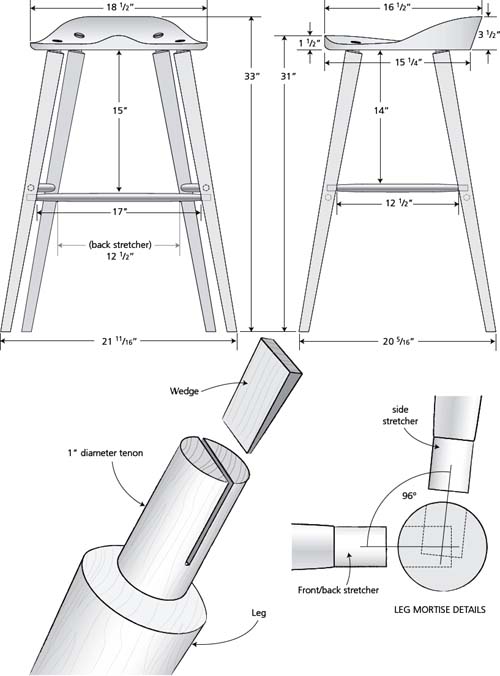
Studio Stool
Commonly called a tractor seat, this stool performs well at any work surface. The following heights should be followed:
42” Transaction counter – 31” stool
36” Kitchen counter – 27” stool
32” Bathroom vanity – 24” stool
30” Desk – 18” stool
24” Milk cow – 12” stool
In changing overall stool seat heights, do not change position of rungs.
MATERIALS
6 board feet of primary wood for the seat
10 linear feet of 7∕8” ash dowels,
or 4 pieces of 2" × 2" × 36” ash
MATERIALS
12 board feet of 8/4 primary wood
8 board feet of 4/4 primary wood
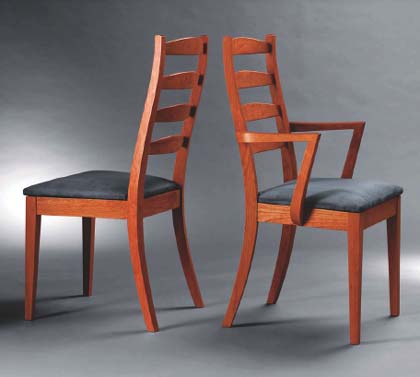
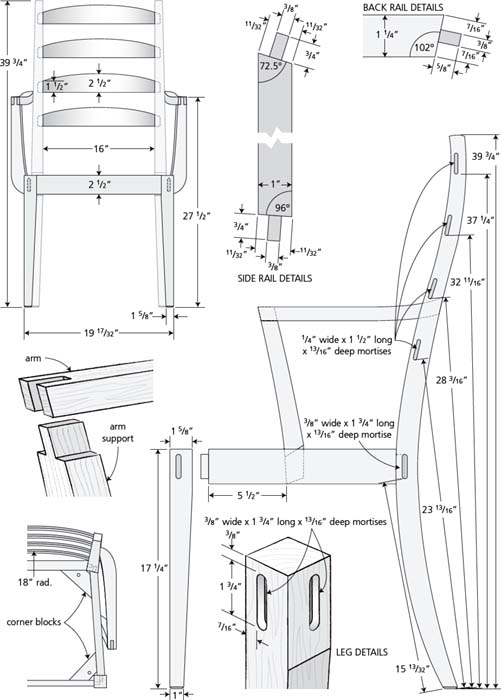
Katahdin Chairs
You know, of course, Shaker chairs are beautiful to look at but less than comfortable. To spend more than fifteen minutes at the table, I suggest offering lumbar support and the shift of the center of gravity as shown in these chairs. For the side-chair variation, simply leave the arms off.
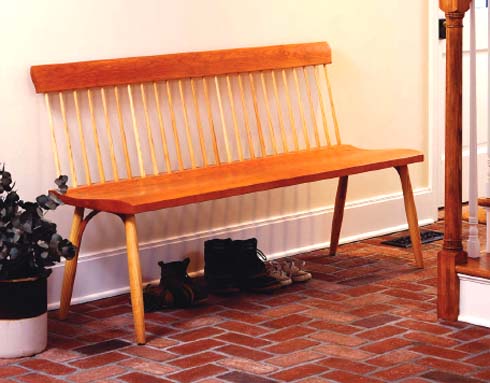
Deacon’s Bench
What distinguishes this bench from the Shaker settee of the nineteenth century is the use of the arched leg supports. The inspiration for the supports is the ship’s knee, a diagonal support made from a naturally-bent tree member (usually where a limb grows out of the trunk). Made of hackmatack or oak, ship’s knees gave considerable support to crucial joints. Our “knee” derives its strength from wood lamination. Five pieces glued under pressure in a form provide unbelievable strength. Two forms, a male and female, are cut in the shape of an arch and five ⅛” × ¾” × 24” strips are glued together using five or six clamps for pressure. Once set up, this becomes almost unbreakable. Notice, too, that the legs are fastened to the seat with glue and wedged similarly to an ax handle. Use maple in the legs and hickory or ash in the back spindles.
As you will have noted, the length is adjustable, and a longer bench is made possible with the addition of a third pair of legs.
TOM’S NOTES: The spindles can be shouldered at their thick end and driven into sockets that do not go all the way through the seat or they can be 1∕2” or ⅝” cylinder-shaped and can be driven through the hole from the underside of the seat. If you elect this approach you should glue the socket and drive a wedge flush into the spindle to tighten the joint. The upper end of the spindles can be left to “float”. If the bench is to sport only four legs, they should be splayed out on each side about 3° from vertical.
MATERIALS
21 board feet of primary wood
4 board feet of rock maple
30 lineal feet of 1∕2” square ash stock

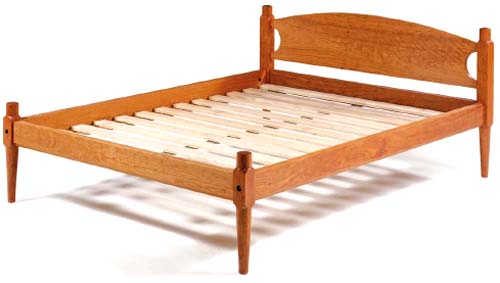
Low-Post Bed
This design can be used for queen- full-, and twin-size mattresses and box springs. Mattresses and springs come standard sized (twin: 39” × 74”, full: 54” × 74”, queen: 60” × 80”), but since they vary according to manufacturer, they should be measured before cutting the rails. The footboard and headboard are permanently joined with pegged mortise and tenons while the side rails are removable. The bed can be taken down by simply removing the four bed bolts. The mattress hangers are cut from ¼” × 4” angle iron and should be attached to the inside of the side rails in order to hold the box springs. Since most modern mattresses and box springs combine to a 14”-height overall, the hangers are placed at the very lowest edge of the rail. If your mattress and springs are shallow, then obviously the hanger should be raised accordingly.
TOM’S NOTES: Also called the Hired Hands’ Bed, this low posted bed fit under the eaves in the attic. Originally they consisted of a simple mattress on a woven rope foundation. The version in the photo has replaced that foundation with a slatted platform more common today. Other differences between the drawn and photographed versions include the shape of the posts, the design of the headboard, and the traditional casters shown in the illustrations. The casters can be oriented to allow the bed to roll either sideways or front-to-back.
MATERIALS
28 board feet of primary wood
4 – 7” bed bolts
6 – ¼” × 4” × 2” angle irons


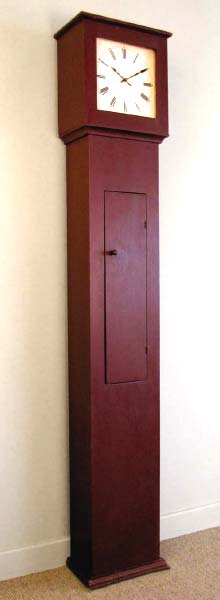
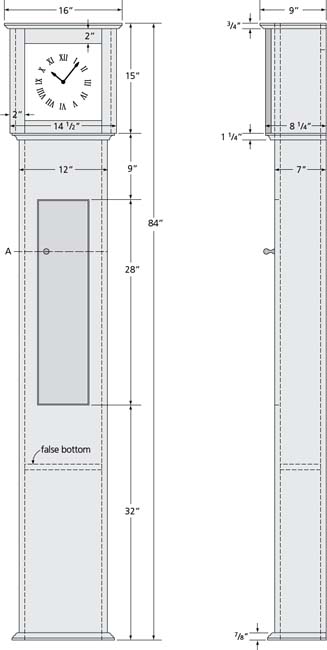
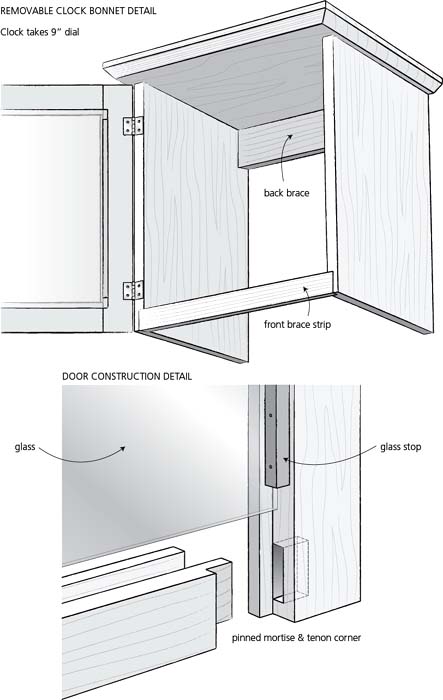
Tall Clock
The term, “tall clock” was used throughout the eighteenth and early nineteenth centuries to describe this class of standing clocks. It was not until a song of 1850 or so, titled, “My Grandfather’s Clock,” became popular that the clock was renamed. To the shakers, and particularly to Brother Benjamin Youngs, the tall case clock was an excellent form, in that it provided adequate room for a heavy weight to drop a sufficient distance to drive the clock a full week. Most Shaker tall clocks were extremely clean in design, having absolutely no ornament. This clock design is based on one pictured in an Edward and Faith Andrews photograph shown in their book Shaker Furniture (1937). It is built in pine and painted a dark red. It has an eight-day weight-driven silent movement.
TOM’S NOTES: Since building our first tall clock, the Twenty-first Century has brought us the quartz movement. Though lacking purity, an inexpensive quartz movement is easily attached to the back of the clock’s dial. Even a faux pendulum movement that actually ticks can be obtained from a number of sources. If the clock is to stand on carpeting, it should be attached to the wall for safety’s sake.
MATERIALS
27 board feet of primary wood
10 board feet of secondary wood
9” paper dial
8-day, weight-driven, 29” pendulum, silent movement with plain hands
Clock movements available through Clockworks:
800-381-7458

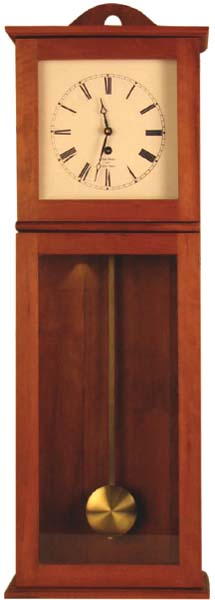
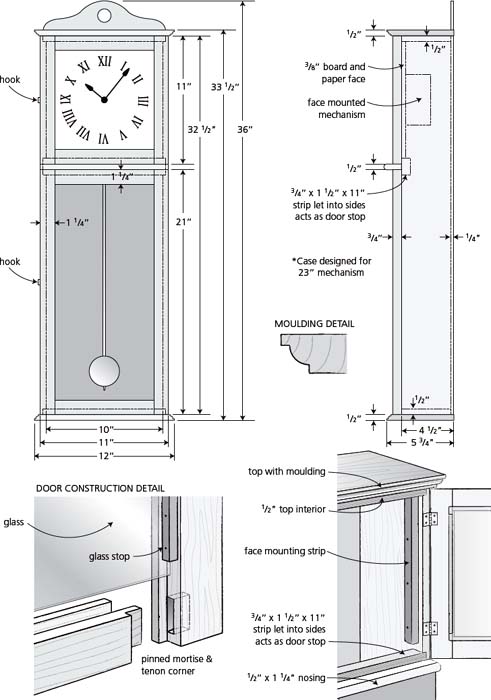
Square-Face
Wall Clock
Being time-conscious people, the Shakers had a keen interest in clocks of all sorts, though personal watches were frowned upon. Among the most inventive clockmakers were Benjamin and Isaac Youngs, and their clocks are true collector’s items today. This wall clock is designed from a prototype built by Isaac Youngs and used in the Canterbury Community in New Hampshire. Like the tall clock, the dial is made of ⅜” plywood covered in a good-quality coated paper upon which the numerals have been drawn in India ink.
MATERIALS
9 board feet of primary wood
2 small brass hooks
1 - 7” paper dial
1 - eight-day, spring driven, pendulum movement
Clock movements available through Clockworks:
800-381-7458
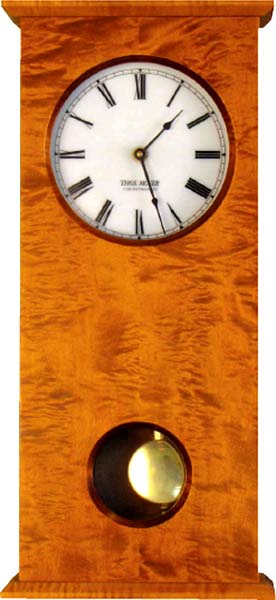
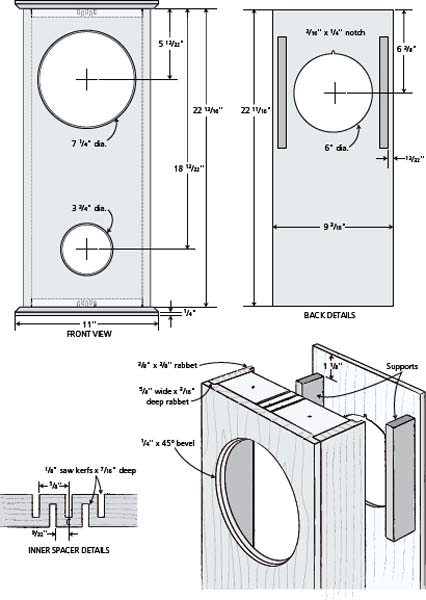
Round-Face Wall Clock
We designed this clock as a simple version of the Shaker wall unit. It is with some embarrassment that we admit to employing a battery powered quartz movement with faux pendulum. It even ticks! The version here is in tiger maple, but the piece can be built from any number of figured woods to complement the simple design. The kerfs shown on the inner spacer in the illustration allow for the expansion and contraction of the single board face element to acclimate without cracking. The clock front and sides are ⅝” material, the top and bottom are ¾” material and the back is ⅜”.
MATERIALS
9 board feet of primary wood
2 small brass hooks
1 - 7” paper dial
1 - eight-day, spring driven, pendulum movement
Clock movements available through Clockworks:
800-381-7458
Shaker Pegboard
In new construction, if real plaster is used, pegboards can be mounted directly on the rock lathe and be recessed as pictured in drawings 1 and 2. This method corresponds to the way horizontal pegboards and chair rails were installed years ago. If drywall construction is used, or if the board is to be applied to an existing wall, then the simplest method is surface mounting (3). It is best to paint or finish the boards before they are installed. Nail or screw holes should be filled and painted over. When possible, run the board completely around the room, even if portions will never be used. This gives the boards an architectural quality and brings together doors, windows and other openings. We usually mount the pegs before installing, and after the board has been painted. The pegs are treated in linseed oil only. Ordinarily, in a room having an eight-foot ceiling, the board should be mounted about 78” high. Remember to place pegs where clocks, mirrors and pictures are to be hung.


