 Finished quilt: 39˝ × 39˝
Bounce
Finished block: 6½˝ × 6½˝ Finished quilt: 39˝ × 39˝

39˝ × 39˝, designed and made by Tricia Maloney
Who doesn’t love brightly colored bouncing balls? These bouncing balls are really Snowball blocks in disguise, tossed and turned to give the illusion of movement. Adding the neutral shades of black and white keeps the balls from bouncing right off the quilt. This quilt would be a wonderful accent in a nursery or child’s playroom.
Construction
Seam allowances are ¼˝ unless otherwise noted. Press after each step, following the pressing suggestions.
Making the Framed Snowball Blocks
1. Place a white 1½˝ × 1½˝ square at the corner of a charm square, right sides together. On the back of the white square, draw a diagonal line from one corner to the opposite corner. Sew on the line. Trim away the excess fabric ¼˝ from the sewn line and press the triangle toward the corner of the block.
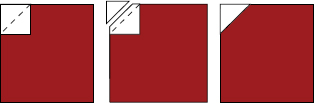
Making a snowball unit
2. Repeat Step 1 to sew a triangle to all 4 corners of the charm square, completing the snowball unit. Make 16. Press the seams toward the triangles.
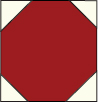
Snowball unit. Make 16.
3. Sew a white 2½˝ × 5˝ rectangle to a snowball unit. Make 16. Press the seam toward the rectangle.
4. Sew a white 2½˝ × 7˝ rectangle to a snowball unit from Step 3 to complete Block A, as shown. Make 8. Press the seam toward the rectangle.
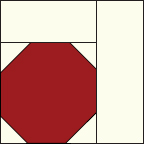
Block A. Make 8.
Shopping List
Yardage is based on 42˝-wide fabric, unless otherwise noted.
CHARM SQUARES: at least 16 squares 5˝ × 5˝
WHITE SOLID: ⅞ yard
BLACK SOLID:  yard
yard
BORDER: ¾ yard
BINDING:> ½ yard
BACKING: 2¾ yards
BATTING: 47˝ × 47˝
Cutting
WHITE SOLID
• Cut 8 strips 2½˝ × width of fabric; subcut 2 strips 2½˝ × 30½˝, 2 strips 2½˝ × 26½˝, 8 rectangles 2½˝ × 7˝, and 24 rectangles 2½˝ × 5˝.
• Cut 3 strips 1½˝ × width of fabric; subcut 64 squares 1½˝ × 1½˝.
BLACK SOLID
• Cut 1 strip 2½˝ × width of fabric; subcut 8 squares 2½˝ × 2½˝.
BORDER
• Cut 4 strips 5˝ × width of fabric; subcut 2 strips 5˝ × 39½˝ and 2 strips 5˝ × 30½˝.
BINDING
• Cut 5 strips 2½˝ × width of fabric.
5. Sew a black 2½˝ × 2½˝ square to a white 2½˝ × 5˝ rectangle. Make 8. Press the seam toward the square.
6. Sew a pieced rectangle unit from Step 5 to the 8 remaining snowball units from Step 3 to complete Block B, as shown. Make 8. Press the seam toward the rectangle.
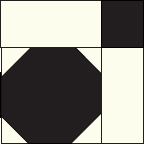
Block B. Make 8.
 To make this quilt go together a little more quickly another time, eliminate Block B completely and make 16 of Block A.
Making the Quilt
1. Referring to the quilt assembly diagram, arrange the blocks in 4 rows of 4 blocks each. Turn the blocks as shown.
2. Sew the blocks into rows. Press rows 1 and 3 to the right and rows 2 and 4 to the left, so that the seams will lock together.
3. Sew the rows together. Press the seams open to reduce bulk.
4. Sew the white 2½˝ × 26½˝ strips to the sides of the quilt. Press the seams toward the outside.
5. Sew the white 2½˝ × 30½˝ strips to the top and bottom of the quilt. Press the seams toward the outside.
6. Sew the 5˝ × 30½˝ border strips to the sides of the quilt. Press the seams toward the outside.
7. Sew the 5˝ × 39½˝ border strips to the top and bottom of the quilt. Press the seams toward the outside.

Quilt assembly
Finishing
Layer, quilt, and bind as desired.
Size OPTIONS
Love this quilt, but want to make it bigger?

• The throw, twin, and full/queen size versions use only Block A.
• To make a 52˝ × 65˝ throw or youth-sized quilt, you will need 48 charm squares, 1⅞ yards of a background fabric, and 1 yard for the border.
• To make a 65˝ × 84½˝ twin-sized quilt, you will need 88 charm squares, 3¼ yards of a background fabric, and 1⅜ yards for the border.
• To make a 91˝ × 91˝ full/queen-sized quilt, you will need 144 charm squares, 5 yards of a background fabric, and 1½ yards for the border.