 Finished quilt: 60˝ × 72˝
Spritely
Finished block: 12˝ × 12˝ Finished quilt: 60˝ × 72˝

60˝ × 72˝, designed and made by Tricia Maloney, machine quilted by Karen Shields of Karen’s Quilting Studio
I love to make quilts that look challenging but are actually simple to put together. This fun and flirty quilt is definitely easier than it looks. The block is constructed from four identical units that are cleverly turned in different directions. Setting the blocks together without sashing adds interest and motion.
Construction
Seam allowances are ¼˝ unless otherwise noted. Press after each step, following the pressing suggestions.
Making the Blocks
Press the seams toward the darker fabrics.
1. Sew a white 2½˝ × 3½˝ rectangle to a print 2½˝ × 3½˝ rectangle, short ends together. Make a total of 120.
2. Sew a unit created in Step 1 between a white 2½˝ × 6½˝ rectangle and a matching print 2½˝ × 6½˝ rectangle, as shown. Make a total of 120.

Make 4 identical units for each block.

NOTE
If you like the scrappy look, you can mix the prints within the sections and then use the assorted sections in a block.
3. Sew the 4 identical units together to make a block. Make 30 blocks.
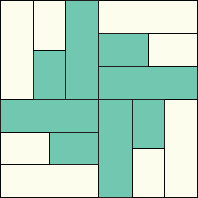
Make 30 blocks.
Shopping List
Yardage is based on 42˝-wide fabric, unless otherwise noted.
PRINT JELLY ROLL: at least 30 strips 2½˝ × 42˝
SOLID WHITE JELLY ROLL: at least 30 strips 2½˝ × 42˝
BINDING: ¾ yard
BACKING: 3⅞ yards
BATTING: 68˝ × 80˝
Cutting
PRINT JELLY ROLL
From each of the 30 jelly roll strips:
• Cut 4 rectangles 2½˝ × 6½˝.
• Cut 4 rectangles 2½˝ × 3½˝.
SOLID WHITE JELLY ROLL
From each of the 30 jelly roll strips:
• Cut 4 rectangles 2½˝ × 6½˝.
• Cut 4 rectangles 2½˝ × 3½˝.
BINDING
• Cut 8 strips 2½˝ × width of fabric.
Making the Quilt
1. Referring to the quilt assembly diagram, arrange the blocks in 6 rows, 5 blocks per row. Sew the blocks into rows. Press the seams in rows 1, 3, and 5 to the right and the seams in rows 2, 4, and 6 to the left.
2. Sew the rows together. Press the seams open to reduce bulk.
Finishing
Layer, quilt, and bind as desired.

Quilt assembly
Tricia’s CRAYON BOX
Did you know that you can completely change the look of a quilt by the fabric you choose for the background? That’s why it’s sew important to try out several different combinations when shopping to find the one that you like the best or that gives the feeling that you’re trying to achieve.
Keep in mind that this is just a glimpse into the wonderful world of color theory. These samples show only solid fabrics, but there is a whole world of prints and tonals out there, too. Want to learn more about using color? There are lots of great resources available to guide you, such as the Ultimate 3-in-1 Color Tool (C&T Publishing).
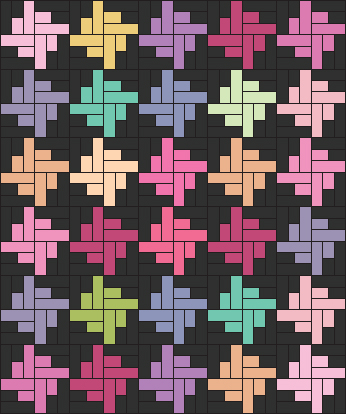
Solid black background: bold and dramatic, with high contrast
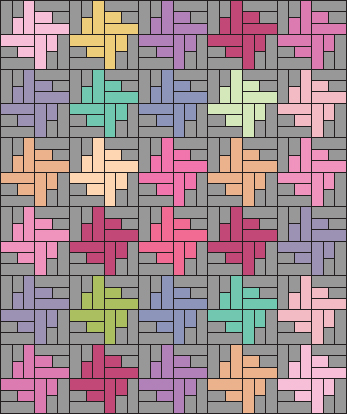
Solid gray background: more relaxed, with lower contrast