 Finished quilt: 40˝ × 40˝
Void
Finished block: 18˝ × 18˝ Finished quilt: 40˝ × 40˝
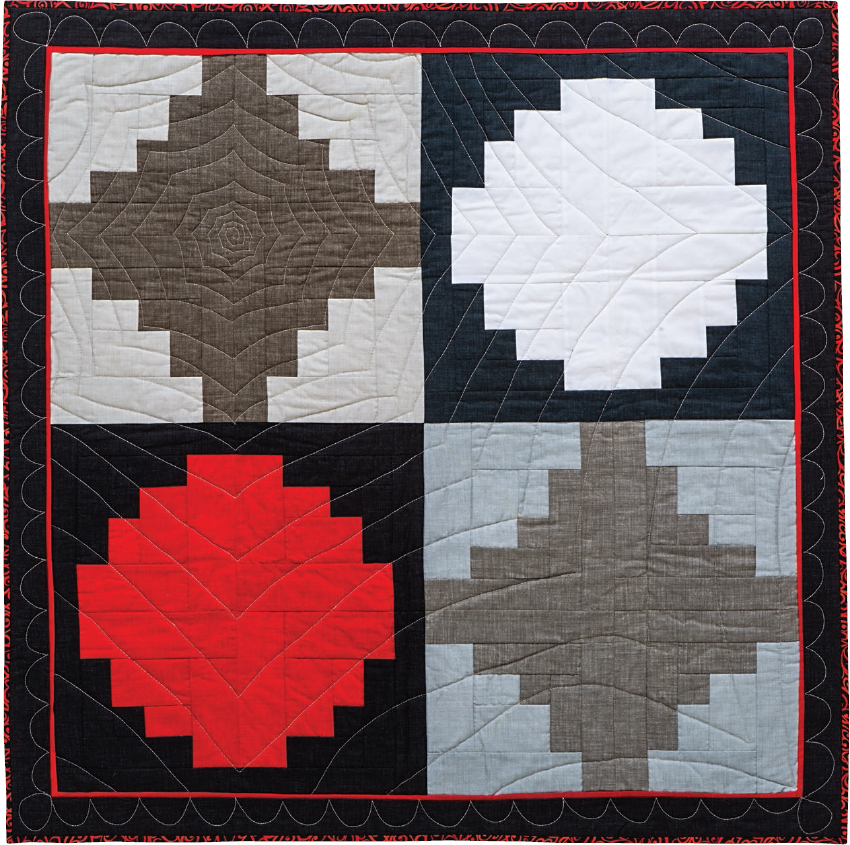
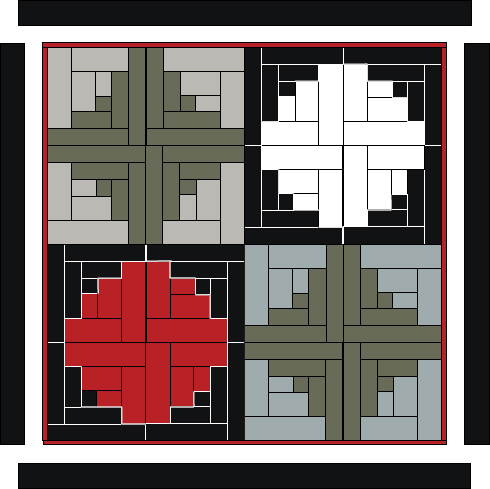
40˝ × 40˝, designed and made by Tricia Maloney
It’s important to try new things from time to time, so every now and then I challenge myself to work outside my comfort zone. The experience usually inspires me in unexpected ways. For this quilt I chose very dramatic, almost solid fabrics, manipulated the fabric placement, and turned the smaller units in two of the large blocks. These decisions changed an otherwise typical Log Cabin quilt into an artistic statement.
Shopping List
Yardage is based on 42˝-wide fabric, unless otherwise noted.
FAT QUARTERS: 8 (1 red, 1 white, 1 light gray, 1 medium gray, 2 dark gray, and 2 black)
ACCENT: ¼ yard
BORDER: ⅜ yard
BINDING: ½ yard
BACKING: 2¾ yards
BATTING: 48˝ × 48˝
Cutting
Label the pieces as indicated.
RED, WHITE, LIGHT GRAY, AND MEDIUM GRAY FAT QUARTERS
From each fat quarter:
• Cut 4 strips 2¾˝ × 21˝; subcut:
4 rectangles 2¾˝ × 8˝ (G).
4 rectangles 2¾˝ × 5¾˝ (F).
4 rectangles 2¾˝ × 4¼˝ (C).
4 rectangles 2¾˝ × 2˝ (B).
DARK GRAY AND BLACK FAT QUARTERS
From each fat quarter:
• Cut 7 strips 2˝ × 21˝; subcut:
4 rectangles 2˝ × 9½˝ (I).
4 rectangles 2˝ × 8˝ (H).
4 rectangles 2˝ × 5¾˝ (E).
4 rectangles 2˝ × 4¼˝ (D).
4 squares 2˝ × 2˝ (A).
ACCENT
• Cut 4 strips 1˝ × width of fabric; subcut 4 strips 1˝ × 36½˝.
BORDER
• Cut 4 strips 2½˝ × width of fabric; subcut 2 strips 2½˝ × 36½˝ and 2 strips 2½˝ × 40½˝.
BINDING
• Cut 5 strips 2½˝ × width of fabric.
Construction
Seam allowances are ¼˝ unless otherwise noted. Press after each step, following the pressing suggestions.
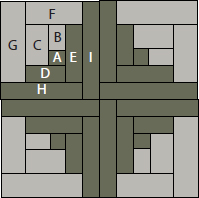
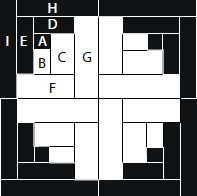
Making the Blocks
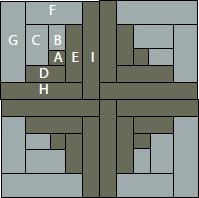
Each block is made of 4 identical Log Cabin units. Refer to the block assembly diagrams for the piecing order and fabric color placement.
Block 1
Block 1: Dark gray A, D, E, H, and I. Light gray B, C, F, and G.
Block 2
Block 2: Black A, D, E, H, and I. White B, C, F, and G.
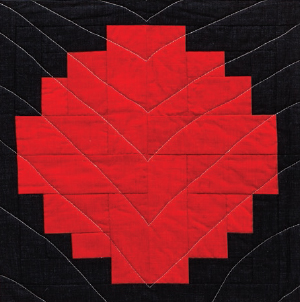
Block 3

Block 3: Black A, D, E, H, and I. Red B, C, F, and G.
Block 4
Block 4: Dark gray A, D, E, H, and I. Medium gray B, C, F, and G.
1. Refer to the block assembly diagrams (previous page) to make 4 units for each block, using the pieces indicated. Sew the pieces together in alphabetical order, A–I, moving in a counterclockwise direction around the unit. Make 4 units for each block. Press the seams toward each new log.
2. Sew the Log Cabin units together to make 1 block. Press the block seams in alternate directions so that they nestle together. Make 1 of each block.
Making the Quilt
1. Referring to the quilt assembly diagram, arrange the blocks in 2 rows of 2 blocks each. Sew the blocks into rows. Press the seams in alternate directions so that they nestle together.
2. Sew the rows together. Press.
3. Fold the 1˝ × 36½˝ accent strips in half lengthwise, wrong sides together. Press.
 Adding a narrow folded strip between the quilt center and the border can sometimes be just the thing that makes a good quilt into an awesome quilt.
4. Place an accent strip on each edge of the quilt center, aligning raw edges and overlapping corners. Pin in place. Baste the accent strips to the quilt top using a scant ⅛˝ seam. Do not press these accent strips. They will be sandwiched in the border seams in Steps 5 and 6.
5. Sew a 2½˝ × 36½˝ border strip to each side of the quilt. Press the seams toward the borders, leaving the accent strips toward the quilt center.
6. Sew a 2½˝ × 40½˝ border strip to the top and bottom of the quilt top. Press the seams toward the borders, leaving the accent strips toward the quilt center.
Quilt assembly
Finishing
Layer, quilt, and bind as desired.
Tricia’s CRAYON BOX

Explore basic principles of color theory with a study of complementary colors plus white.
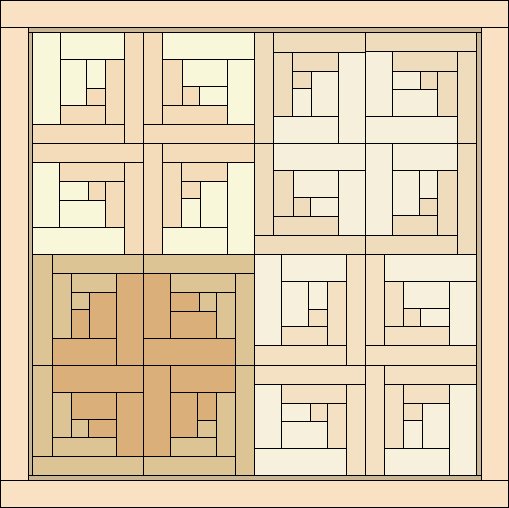
Instantly warm up any space with barely-there neutrals.