
Our six-week wonder!
Even though this reno was our second, it was twice as challenging as the first flip because the house was in OK condition and could be lived in immediately. In fact, the kitchen had been recently renovated, so adding substantial value in just six weeks was going to be a huge challenge for us.
We saw the potential in this house straight away and knew a few simple changes could be really effective. The exterior was very beige and bland with blonde brick, unloved cladding and ugly block-out shutters that looked like they hadn’t been raised in years. We saw opportunities to improve the house everywhere we turned, but especially out the back where we found a random brick room that looked like a garage but led to nowhere (according to the real estate brochure this was the ‘alfresco zone’!). We knew we could make a huge change there.
As with all our renovations, we wanted to transform ugly into beautiful, closed-off into connected, and dark into light. It’s a cliché, but we really did want to create the house of our dreams. Consequently, we agonised over every decision – from big ones like where to put the fourth bedroom, to smaller ones, like whether to have handles or knobs on the kitchen cabinets. It all paid off. Our goal was to create a house that would give people a wonderful feeling when they walked through it, and we definitely achieved that. The true test of each house we renovate is to ask ourselves one simple question: Would we want to live here? If the answer is yes, we’re happy!

Bonnie
“It’s amazing what a crisp white balustrade can do for your street appeal! It’s my absolute go-to for transforming a façade, and I usually remove unruly shrubs at the same time. Don’t get me wrong, I love greenery, but there’s a time and place for it – you don’t want it covering your house or making everything look and feel smaller and darker.”

FLIP TIP
Outdoor rugs are so useful when styling a house for sale. They’re perfect for disguising a boring (and probably cracked) concrete porch. Our MO is usually to refresh the concrete with paving paint and then throw a rug down. You can even cheat a little by using an indoor rug to style the outdoor space as you’ll only be putting it out for a few hours during the open homes.
Pass the Pimm's!
SAY YES TO SERVERIES
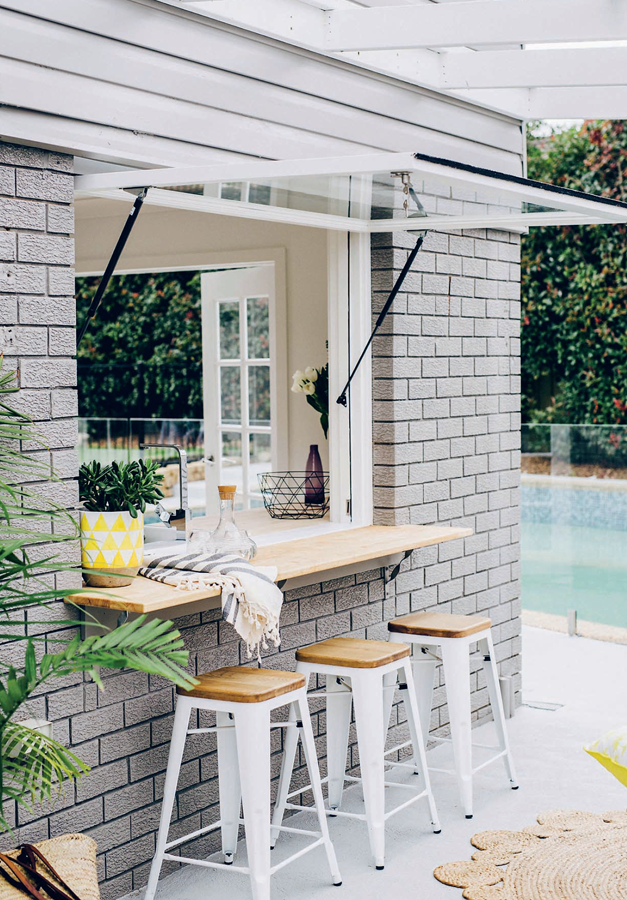
THE OUTDOOR CONNECTOR
The ideal alfresco area doesn’t just give you another liveable space outside, it connects the indoors to the outdoors. In other words, if you have options as to where to put your alfresco space (at the front, side or back of your house), first and foremost your priority should be to create a seamless flow from the main living area of the house to the outside space. We love positioning alfresco areas off the kitchen whenever we can. And, to test whether or not we’ve cracked that seamless flow we’re looking for, we use our patented (not really) Three Birds outdoor connector test: can you pass something – say, a sandwich or jug of Pimm’s – from your kitchen to someone in the alfresco space? If you can, winner! You’ve successfully completed the first important step to creating that connection.
OUTDOOR TRANSFORMATION
When we bought this house, the real estate brochure described this dark, cold space as the ‘alfresco space’. (Umm, they’re joking, right?) We were able to add major value in this area by knocking down those walls, ripping off the roof and building a simple pergola. We added a gas strut window and timber servery, and some French doors from the kitchen to really make this an outdoor area to be proud of (rather than terrified by).

PAVING PAINT TO THE RESCUE
We love paving paint! It can turn an ugly, old concrete pathway or pool surround into a fresh footway in no time. It’s super-easy to apply so you can even do it yourself. We also love using paving paint in alfresco spaces where tiling is too expensive. Just add an outdoor rug and some fresh furniture and no-one will ever notice the absence of tiles. Best of all, paving paint is easy on the wallet.
Timber touches
Kitchens can be hard and angular spaces. Leaning a couple of timber chopping or cheese boards in different shapes and sizes against the splashback introduces some texture and warmth. We love round boards for this reason.
Big results on a small budget.
THIS FLAT-PACK KITCHEN WAS A WINNER FOR US.
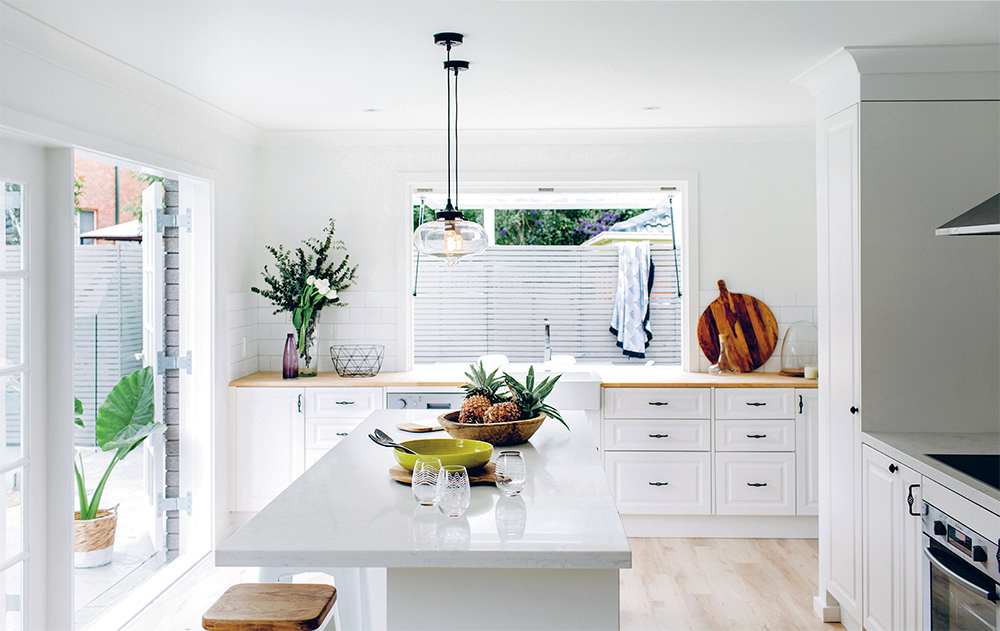
TACKLING THE HEART OF THE HOME
A kitchen reno can be one of the most challenging because it’s the heart of the home. Even if you’re not going to be a MasterChef contender any time soon, your kitchen still constitutes a major part of your overall space, so it should look good and function well. And sure, there are ways to renovate a kitchen on a small budget, but even then it’s still likely to end up being one of the most expensive rooms in your home, so you need to be happy with the end result. As if that wasn’t pressure enough, you’ve probably heard the expression ‘kitchens sell houses’ … so this is a real reno moment and a golden opportunity to add some serious value to your home. #kachingkaching
We designed this kitchen to be a destination zone within the house. It was originally located in the middle of a long room, making it more of a thoroughfare rather than a place the family wanted to spend time in. It needed to be an open, breezy space that invited people to take a seat. By relocating the entire kitchen to the end of the long room, we created a new alfresco zone directly off the kitchen. With its custom-built breakfast bar and gas-strut window, that new entertaining space was fully integrated into the kitchen. The finishing touch was a pair of French doors leading directly out to the pool, giving Mum and Dad a perfect view of the kids from the kitchen.
PICK UP A FLAT-PACK KITCHEN
Who doesn’t love a custom-made cabinet? People on a tight budget, that’s who! If you’re on a budget, flat-pack cabinetry might just be your new best friend. We’ve installed some amazing flat-pack kitchens and laundries in our houses, and saved big money in the process. This kitchen renovation was a hybrid; the previous owners had already attempted a kitchen reno using a flat-pack kit, so when we bought the property, we re-used the cabinetry already there and added to it with the same brand of flat-pack. It looked great, saved us a pretty penny and helped to make this flip one of our most profitable!
HIRE SOME HELP
Whether you’re installing a flat-pack kitchen in a flipped home or a forever home, we recommend you hire a carpenter to put it together. Yes, it’s an extra cost, but overall you’ll save loads of time (and, even better, you’ll save your sanity).
Swap old metal pool fences for glass where it counts.
AND ENJOY UNINTERRUPTED WATER VIEWS. #YESPLEASE!
If money is tight, timber benchtops can
be a great cost saver in the kitchen.
AND THEY STILL LOOK SO GOOD!

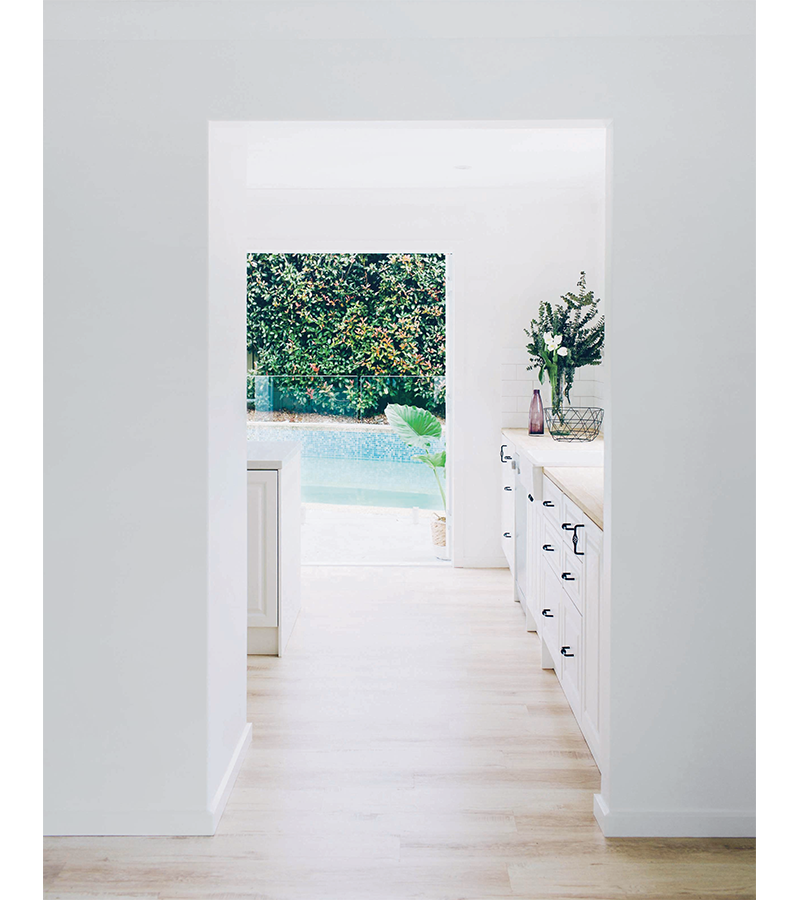
USE WHITE TO SHOWCASE THE GREEN
If you’re lucky enough to have some lush greenery outside a window, it’s probably worth showing off. And the most effective way to do this is by creating a white-out inside. If everything is light and neutral inside, the green outside will really pop.
The power of white paint!
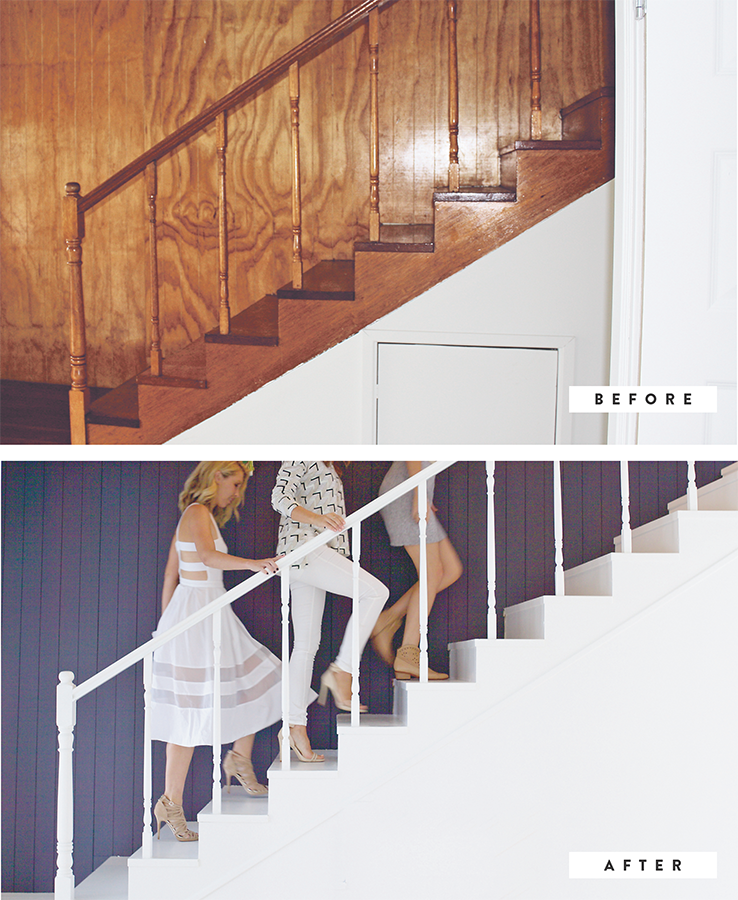
REFRESH RATHER THAN REBUILD YOUR STAIRCASE
Just because a staircase is practical, doesn’t mean it has to be boring! Stairs can have a huge impact on how your home looks, feels and functions. And just because a staircase is fabulous, doesn’t mean it has to break the bank. Before you rip out your old staircase, try refreshing it with a new coat of paint. The dark feature wall here was the perfect colour to hide that Swedish-sauna timber panelling. Once complete, that colour also provided the perfect backdrop for the pure white staircase. This was all done in one weekend.

Lana
“It’s really important to road test your new bathroom layout (or the layout of any room for that matter!). To work out what your new layout might look and feel like, try marking it on the floor using masking tape. You can also pin up bed sheets to represent new walls, or stack up boxes as a pretend bath or vanity. Move around inside your new layout to see if you like how it feels, and if the proportions seem right. Soak it all in!”
CLEANSE YOUR SOUL, NOT JUST YOUR TEETH
The smoothest bathroom renos are the ones where all the planning and design work has been done upfront – nice and early! Bathrooms are complex little beasts to renovate. Things need to be done in a very specific order, so you can’t change your mind halfway through if you come up with a better idea. (Well, technically you can, but it will cost you time, money and your tradies’ patience.) Put the hard yards in early and nut out the finer details in order to give yourself the best chance of getting what you want – tiles and grout colour, taps, toilets, vanities, bathtubs, shower screens, waste placement, lighting ... the list goes ON! Remember, if you don’t know what you want, your builder, plumber or tiler will decide for you. And take it from us, they don’t always have the best design ideas. #gulp
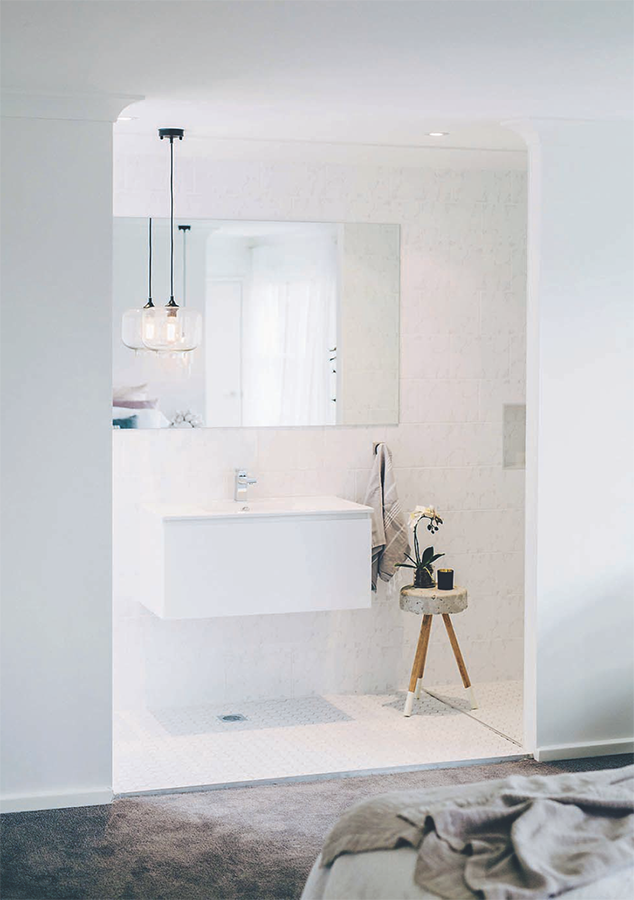
DON’T FEAR THE SKINNY ENSUITE
It can actually be a designer’s delight where the vanity can be the star of the show, with the toilet neatly hidden up one end and a deep walk-in shower at the other. It’s a nice combo, providing privacy while still feeling open. You’ll also save on glazier costs with no shower screen to deal with.
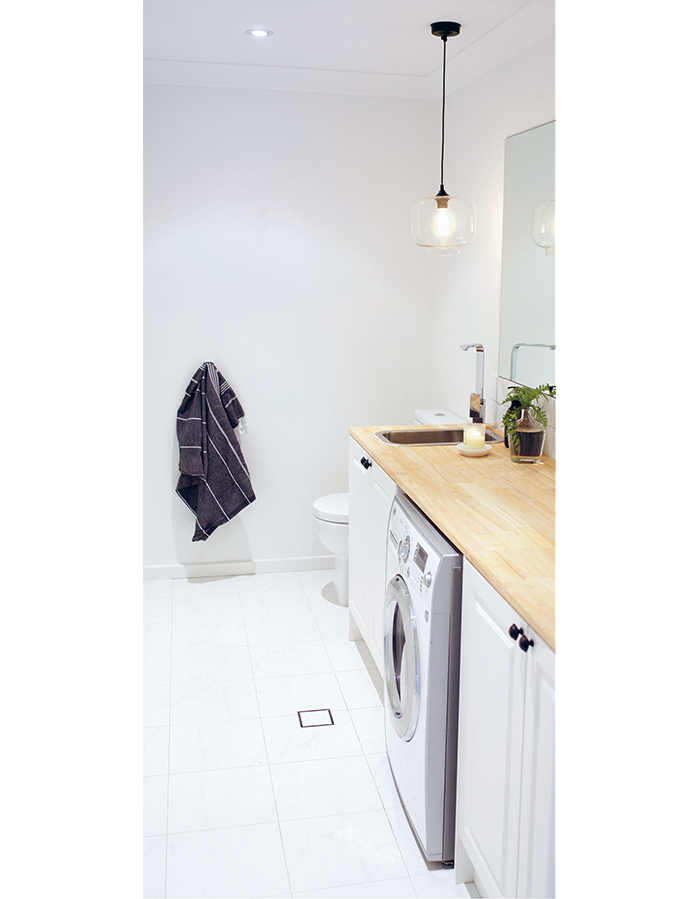
THIS PROPERTY DIDN’T HAVE SPACE FOR A POWDER ROOM
It didn’t have room for a guest bathroom either, so we turned this laundry into a dual-purpose laundry/powder room. If you decide to go this route in your home, our golden rule is to tuck the toilet behind the bench, or out of plain view so your guests feel some sense of privacy despite being in what is technically a laundry. You’ll also need to think about where to place a mirror, as this will make the room feel more like a bathroom than a laundry. A pretty sink, tapware and pendant light also go a long way to making sure your guests don’t feel they’re in a utilitarian laundry. Oh, and one more thing … make sure there’s a lock on the door!
FLIP TIP
If you’re staging an open house and want to get top dollar, it’s a good idea to showcase the laundry area at its best – that means making sure you’ve got at least a washing machine in the space. But don’t spend any money plumbing in a washing machine. In fact, it doesn’t even need to work, it just needs to be there.