WHAT IT TAKES
Time: 4 hours
Skill level: Intermediate
Base cabinets have the least convenient storage space in the entire kitchen. Rollouts solve that problem. They make organizing and accessing your cabinet contents back-friendly and frustration-free.
If you’re stuck with cabinets without rollouts, don’t despair. Here you’ll learn how to retrofit nearly any base cabinet with rollouts that’ll work as well as or better than any factory-built units.
It’s really very easy. Once you take measurements, you can build the rollout drawer (Photos 2–6), its “carrier” (Photos 7–9), and attach the drawer slides (Photos 6 and 7), all in your shop. Mounting the unit in the cabinet is simple (Photos 10–12). You’ll also learn how to construct a special rollout for recycling or trash (Photos 14–15).
The project will go faster if you have a table saw and miter saw to cut out all the pieces. A circular saw and cutting guide will work too; it’ll just take a little longer. You can build a pair of rollouts in a Saturday morning.
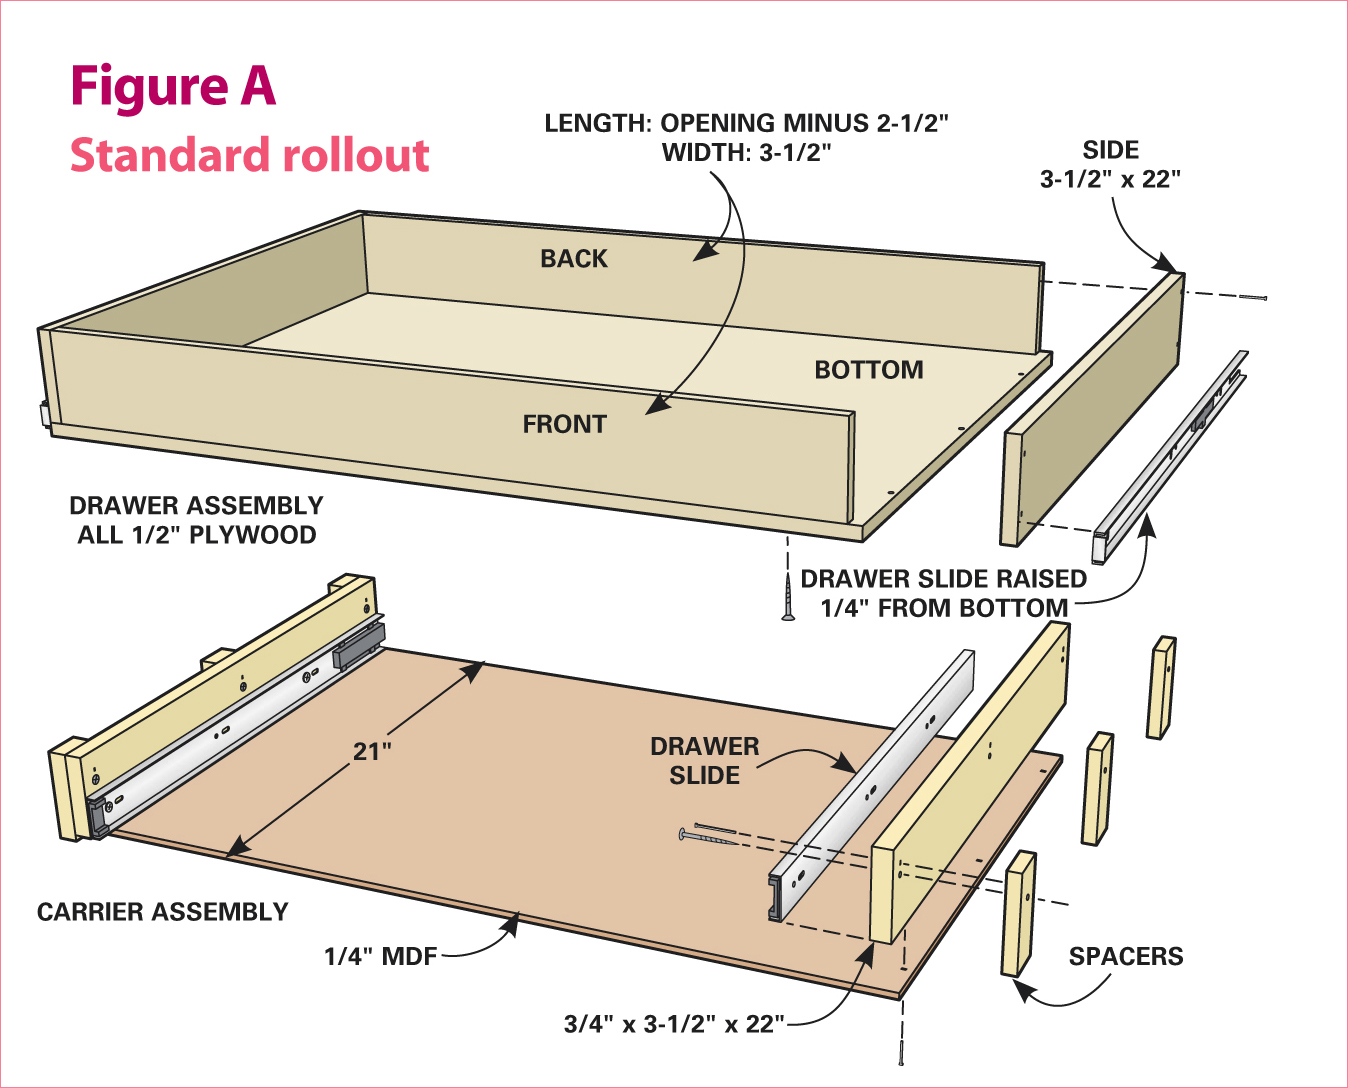
These rollout drawers are made entirely of 1/2-in. Baltic birch plywood. Baltic birch is favored by cabinetmakers because it’s “void free,” meaning that the thin veneers of the plywood core are solid wood. Therefore sanded edges will look smooth and attractive. If your local home center doesn’t stock Baltic birch, find it at any hardwood specialty store.
If you choose, you can make the sides of the rollout drawers from any 1x4 solid wood that matches your cabinets and then finish to match (use plywood for the bases). But if you use 3/4-in. material for the sides, subtract 3 in. from the opening to size the rollout (not 2-1/2 in., as described in Photo 2 and Figure A).
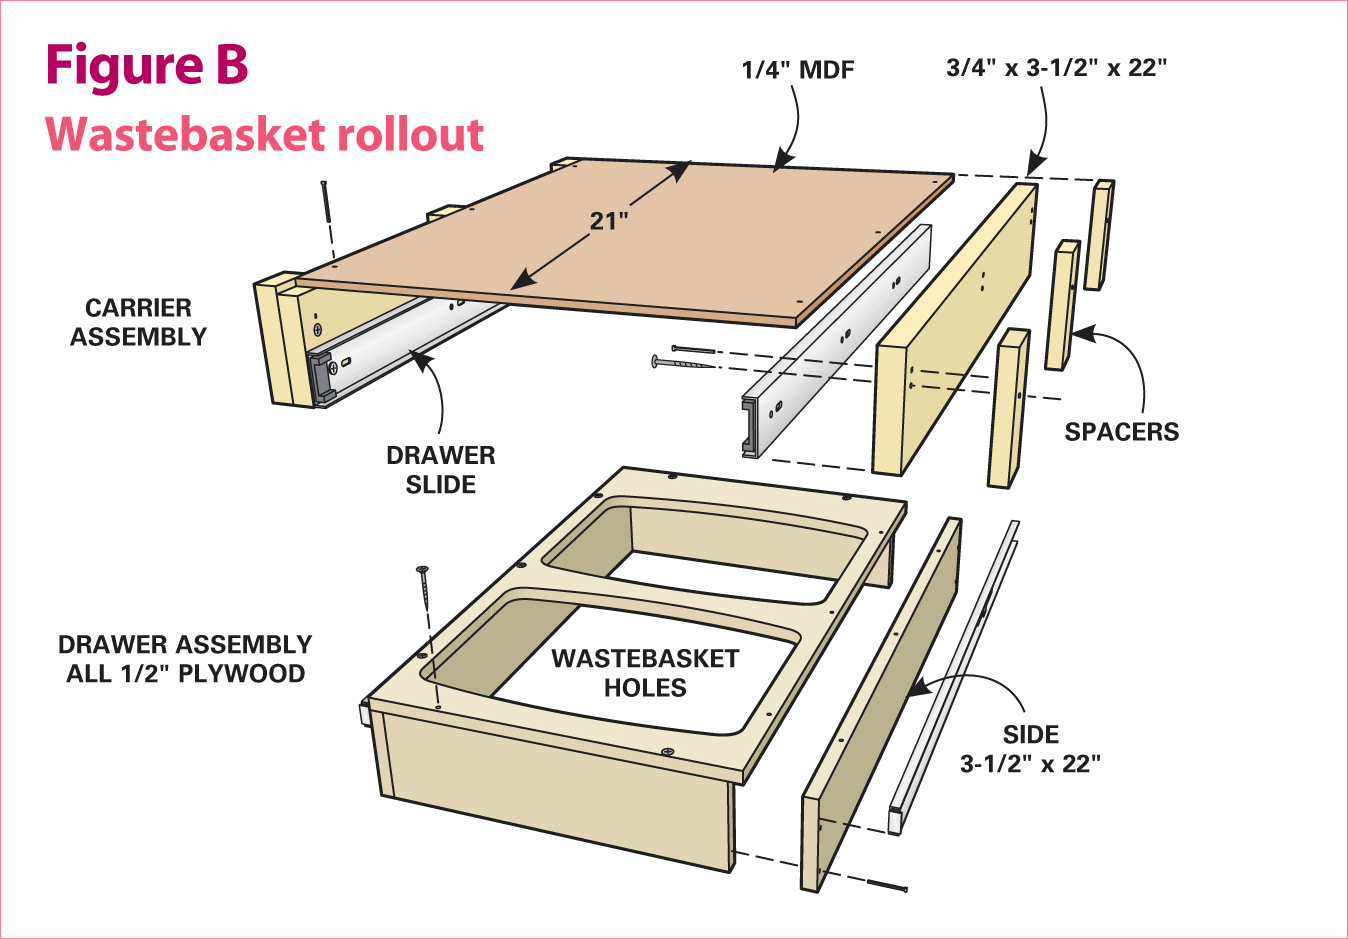
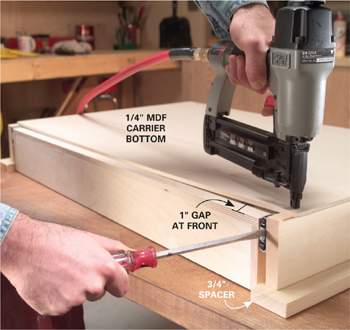
The drawer carriers (Figure A) are made from pine 1x4s for the sides (Photo 7) and 1/4-in. MDF (medium-density fiberboard) for the bottoms (Photo 9). The MDF keeps the drawer bottom spaced properly while you shim and attach it to the cabinet sides. It can be removed and reused for other carriers after installation. If MDF isn’t available, substitute any other 1/4-in. hardboard or plywood.
Side-mounted slides are the best choice among drawer slide options. Their ball-bearing mechanisms and precise fit make for smooth-operating drawers that hold 90 lbs. or more. Shown here are 22-in. full-extension side-mount drawer slides that have a 90-lb. weight rating. That means they’ll be sturdy enough even for a drawer full of canned goods. Full-extension slides allow the rollout to extend completely past the cabinet front so you can access all the contents. You can find slides at any home center or well-stocked hardware store.
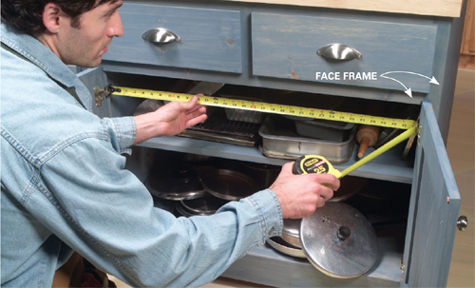
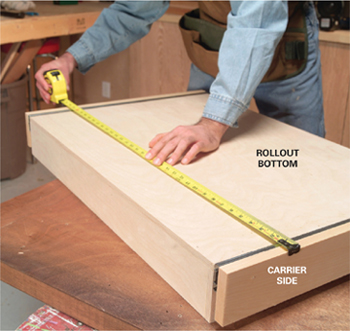
Nearly all standard base cabinets are 23-1/4 in. deep from the inside of the face frame (Photo 1) to the back of the cabinet. So in most cases, 22-in.-long rollout drawer and carrier sides will clear with room to spare. Check your cabinets to make sure that 22-in. rollouts will work. If you have shallower cabinets, subtract whatever is necessary when you build your rollouts and their carriers (see Figure A).
Then measure the cabinet width. The drawer has to clear the narrowest part of the opening (Photo 1). When taking this measurement, include hinges that protrude into the opening, the edge of the door attached to the hinges and even the doors that won’t open completely because they hit nearby appliances or other cabinets. Plan on making the drawer front and rear parts 2-1/2 in. shorter than the opening (Figure A).
Shown here are drawers with 3-1/2-in.-high sides, but you can customize your own. Plan on higher sides for lightweight plastic storage containers or other tall or tippy items, and lower sides for stable, heavier items like small appliances.
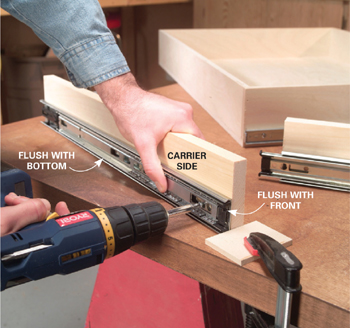
At first glance, drawer slides are pretty hard to figure out, but after you install one set, you’ll be an expert. They’re sold in pairs and each of the pairs has two parts. The “drawer part” attaches to the rollout while the “cabinet part” attaches to the carrier. To separate them for mounting, slide them out to full length and then push, pull or depress a plastic release to separate the two parts. The cabinet part, which always encloses the drawer part, is the larger of the two, and the mounting screw hole locations will be shown in the directions. (Screws are included with the drawer slides.) The oversized holes allow for some adjustment, but if you follow the instructions, you shouldn’t have to fuss with fine-tuning later. When mounting the slides, you should make sure to hold them flush with the front of the rollout drawer and carrier sides (Photos 6 and 7). The front of the drawer part usually has a bent metal stop that faces the front of the drawer.
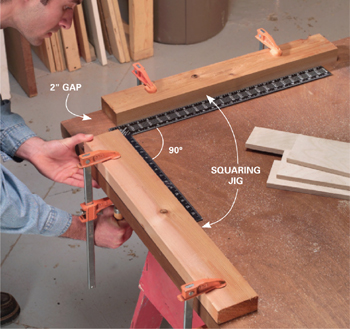
It’s important to build the rollout drawers perfectly square for them to operate properly. Photos 3 and 4 show a simple squaring jig that you can clamp to a corner of any workbench to help. Use the jig to nail the frame together, but even more important, to hold the frame square when you nail on the bottom panel. If it hangs over the sides even a little, the drawer slides won’t work smoothly.
Use 1-1/4-in. brads for all of the assembly. Glue the drawer parts together but not the bottom of the carrier. It only serves as a temporary spacer for mounting. (After mounting the carrier and drawer, you can remove it if it catches items on underlying drawers or even reuse it for other carriers.) If you’d like to finish the rollout for a richer look and easier cleaning, sand the edges with 120-grit paper and apply a couple of coats of water-based polyurethane before mounting the slides.
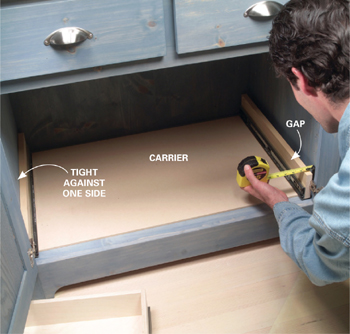
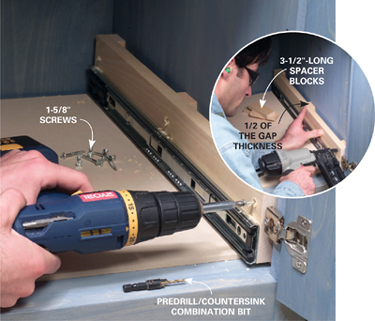
To figure the spacer thickness, rest the lower carrier on the bottom of the shelf, push it against one side of the cabinet and measure the gap on the other (Photo 10). Rip spacers to half that measurement and cut six of them to 3-1/2 in. long. Slip the spacers between both sides of the carrier to check the fit. They should slide in snugly but not tightly. Recut new spacers if needed. In out-of-square cabinets, you may have to custom-cut spacers for each of the three pairs of spacers, so check each of the three spacer positions. It’s easiest to tack the spacers to the rollouts to hold them in place before predrilling 1/8-in. holes and running the screws through the rollout frames and spacers and into the cabinet sides (Photo 11).
Slip the rollout into its carrier and check for smooth operation. If you followed the process, it should work perfectly. If it binds, it’s probably because the spacers are too wide or narrow. Pull out the carrier, remove the spacers and start the spacer process all over again.
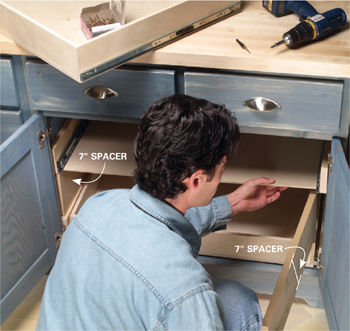
The best way to level and fasten the upper rollout is to support it on temporary plywood spacers (Photo 12). The photo shows pieces of plywood cut 7 in. high. In reality, the exact height is up to you. If, for example, you want to store tall boxes of cereal on the bottom rollout and shorter items on the top, space the top rollout higher. You can even build and install three or more rollouts in one cabinet for mega-storage of short items like cans, cutlery or beverages. (Those now-obsolete shelves you’re replacing with rollouts are good stock to use for your spacers.) Again, pin the spacers in place with a brad or two to hold them while you’re predrilling and screwing the carriers to the cabinet sides. Be sure to select screw lengths that won’t penetrate exposed cabinet sides! In most cases, 1-5/8-in. screws are the best choice. Strive for 1/2-in. penetration into the cabinet sides. Countersink the heads as far as necessary to get the proper penetration.
Wastebasket rollouts are just upside-down versions of standard rollouts. That is, the carrier is mounted on the top rather than the bottom of the rollout and the slides are positioned at the bottom edge of the carrier sides. That lets the wastebasket lip clear the MDF. Follow Figure B for the details.
This wastebasket rollout is built inside an 18-in.-wide cabinet, so it fits two plastic containers back to back. If you only have a 15-in. cabinet to work with, you may be limited to one container mounted sideways. Buy your containers ahead of time to fit your opening.
With some wastebasket rollouts, you may need to knock the MDF free from the carriers after mounting so the wastebasket lips will clear. That’s OK; it won’t affect operation.
It may not always work to center rollout assemblies in all openings with equal spacers on each side. That’s especially true with narrow single cabinets that only have one pair of hinges. It’s best to test things before permanent mounting. But if you make a mistake, it’s a simple matter to unscrew the assembly, adjust the shims and remount everything.
1
Open the cabinet doors to their widest point and measure the narrowest part of the cabinet opening (usually at the hinges).
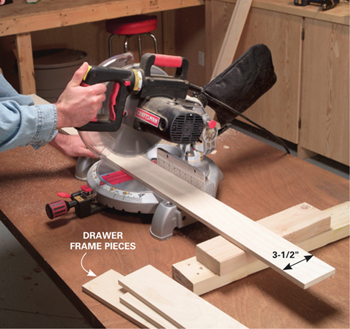
2
Rip 1/2-in. plywood down to 3-1/2 in. wide and cut two 22-in. lengths (drawer sides) and two more to the measured width minus 2-1/2 in. (drawer front and back; Figure A).
3
Clamp or screw two straight 24-in. 2x4s to the corner of a flat surface to use as a squaring jig. Use a carpenter’s square to ensure squareness. Leave a 2-in. gap at the corner.
4
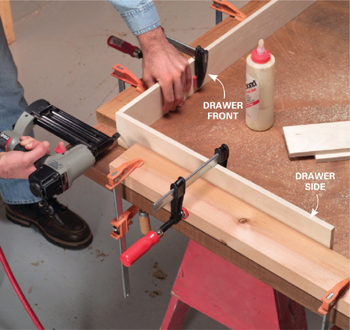
Spread wood glue on the ends and clamp a drawer side and front in place, then pin the corner together with three 1-1/4-in. brads. Repeat for the other three corners.
5
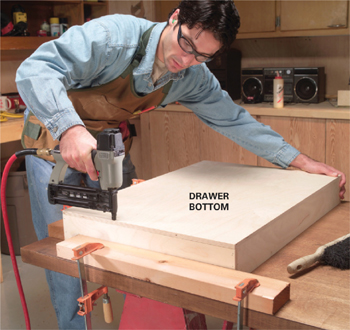
Cut a 1/2-in. plywood bottom to size. Apply a thin bead of glue to the bottom edges and nail one edge of the plywood flush with a side, spacing nails every 4 in. Then push the frame against the jig to square it and nail the other three edges.
8
Slide the drawer and carrier sides together and measure the carrier width. Cut 1/4-in. MDF to that width and 1 in. less than the carrier depth (usually 21 in.).
9
Rest the carrier assembly on 3/4-in.-thick spacers, pull the carrier sides slightly away from the drawer, then nail on the carrier bottom (no glue).
11
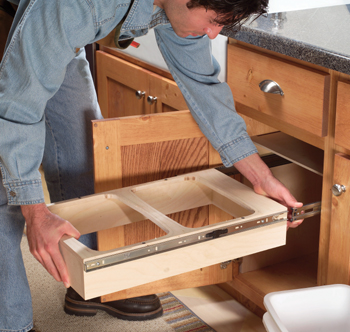
Nail the spacers to the center and each end of the carrier sides (not into the cabinet; see inset photo). Then predrill and screw the carrier sides to the cabinet in the center of each shim. Slide the drawer back into place.
12
Cut plywood spacers to temporarily support the upper rollout and set them onto the carrier below. Rest the second carrier on the spacers and install it as shown in Photo 11.
13
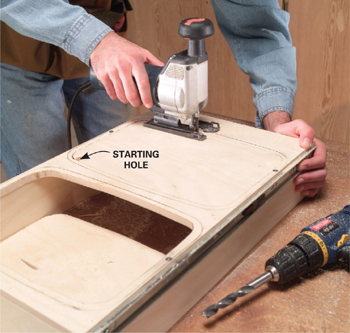
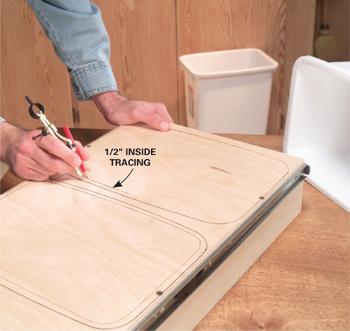
Build an upside-down version of the carrier and rollouts for the wastebasket drawer (Figure B). Center and trace around the rim of the wastebasket(s). Use a compass to mark the opening 1/2 in. smaller.
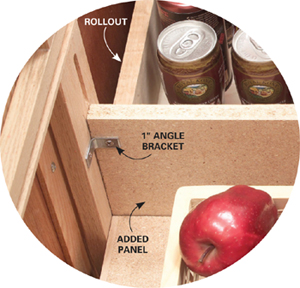
Building rollouts in cabinets with center dividers
Many two-door cabinets have a center divider (photo below), which calls for a slightly different strategy. You can still build rollouts, but they’ll be narrower versions on each side of the divider. (Check to be sure they won’t be so narrow that they’re impractical.) The key is to install a 3/4-in. plywood, particleboard or MDF panel between the center divider and the cabinet back to support the carriers.
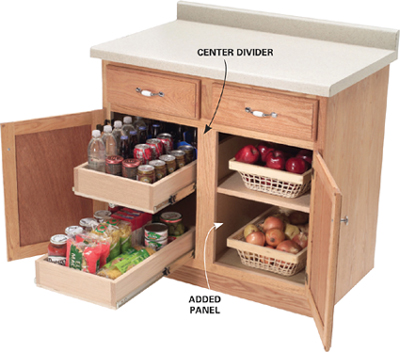
Cut the panel to fit loosely between the divider and the cabinet back and high enough to support the top rollout position. Center the panel on the back side and middle of the divider and screw it into place with 1-in. angle brackets (they’re completely out of sight). Use a carpenter’s square to position the panel perfectly centered and vertical on the cabinet back and anchor it there, again using angle brackets. Measure, build and install the rollouts as shown here.