
WHAT IT TAKES
Time: 1 weekend
Skill level: Intermediate
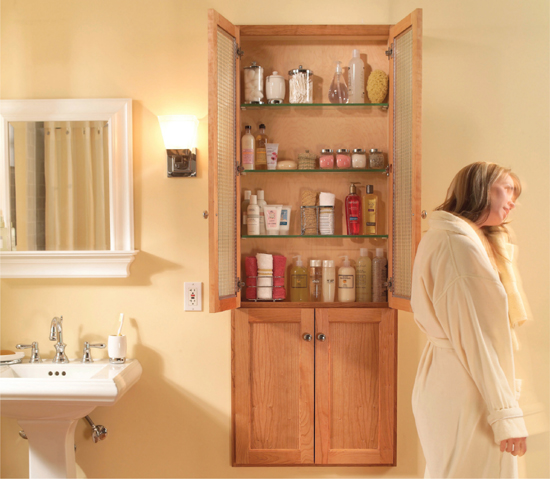
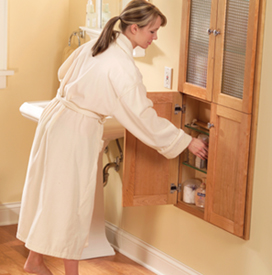
If you’re short on bathroom storage space, this built-in cabinet could be just the ticket. It’s large and spacious, yet the shallow depth allows easy viewing and access to all of the contents. No more digging around in drawers or the dark corners of linen closets to find what you need. And since it’s recessed into the wall, you won’t lose any valuable floor space.
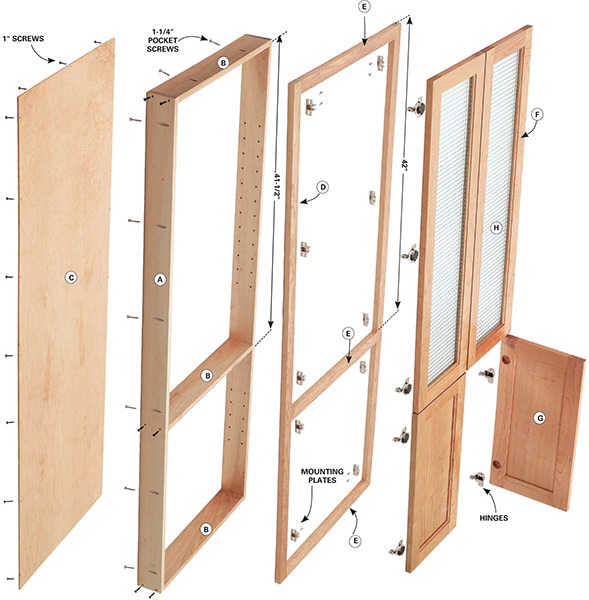
This project is a great introduction to basic cabinet-building skills. It’s a simple box with a face frame attached to the front. You buy the doors in the style that best fits your bathroom décor and mount them to the face frame. The doors shown here came complete with 35mm holes to accept the concealed Euro-style hinges. These hinges are great for novice cabinetmakers because they allow you to adjust the doors for a perfect fit.
Here you’ll learn the entire cabinet assembly process. Then you’ll see how to cut a hole in your wall and safely remove a stud to create a recessed space for the cabinet. Even with little woodworking experience, you should be able to complete the cabinet in a day. Applying the finish and installing the cabinet will take another five or six hours.
You could cut the cabinet sides and face frame parts with a circular saw and saw guide, but you’ll get tighter-fitting joints if you use a power miter saw or a table saw with a miter gauge. For the cabinet shown, a pocket hole jig and pocket screws were used to assemble the face frame pieces and attach it to the box. If you don’t own a pocket hole jig, glue and nail the face frame to the cabinet box with finish nails.
Including the doors, door glass and glass shelves, this cabinet cost about $400 to $500. If you use oak instead of cherry, you could build it for less. Patterned glass and glass shelves for the doors can be ordered from a local glass company or an online retailer. Euro-style mounting plates are available at woodworking stores and online.
Before you order doors or start building the cabinet, make sure you have a good spot to install the cabinet. Exterior walls are out. There’s likely to be insulation in them, and there may be structural issues to deal with as well. Look for a space that’s about 26 in. wide and 68 in. high. After you’ve found a potential location, use a stud finder to locate the studs, then mark them with masking tape. Position the cabinet so that you only have to remove one stud. You can put your cabinet at any height. The top of this cabinet lines up with the door, 80 in. above the floor.
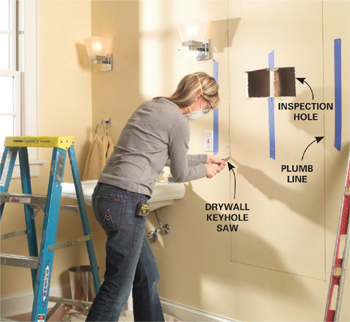
Then make sure the spot you chose doesn’t have any hidden obstructions. The easiest method is to cut two 6-in. square inspection holes in the drywall, one on each side of the stud you’ll be removing. Then look in with a flashlight to make sure there aren’t any electrical wires, plumbing pipes or heat ducts in the way. A less invasive but also less thorough method is to poke a bent clothes hanger through a hole in the wall and probe around. You’ll have to do this in several places, though. If space is tight, you may have to adjust the cabinet dimensions to fit it in. When you’ve found a location, order the doors and hinges. If the door sizes are different from those shown here, adjust the cabinet sizes to fit them. The doors overlap the face frame 3/4 in. on all sides.
Start by cutting the 1x4 cabinet sides (A), and top, center and bottom (B) to length. Then use a square to mark the location of the center divider on the sides (Photo 1). Drill 5/32-in. screw-clearance holes through the sides at these marks and at the top and bottom. Complete the side pieces by drilling the shelf pin holes. Make a drilling jig by screwing a 1x2 fence to a strip of pegboard (make sure the pegboard has 1/4-in. holes). Position the edge of the 1x2 fence 3/4 in. from the center of the first row of holes. Use a 1/4-in. brad point bit to drill the holes. Tighten a drill stop collar onto the bit to limit the depth of the holes to the thickness of the pegboard plus 1/2 in. Skip every other set of holes to create holes that are 2 in. apart. Be careful to mark the bottom of the jig and align it the same for both sides to ensure that the holes line up.
Screw the sides to the top, bottom and middle piece with 1-1/4-in. screws (Photo 2). Then cut 1/4-in. plywood for the back and attach it with 1-in. screws (Photo 3). Make sure the plywood back is perfectly square. Then align the cabinet edges with it to square the cabinet.
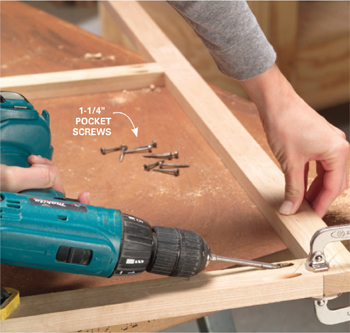
Start with 1x2s that are milled accurately with square edges. Home centers and lumberyards usually stock a few species of hardwood 1x2s, but cherry may be a little harder to find. Check hardwood lumber suppliers online or call a local cabinetmaker to find a source. Sight down the boards to make sure they’re perfectly straight. Then use a miter saw or table saw to cut the pieces to length, making sure the end cuts are perfectly square. Arrange the face frame parts with the best-looking face down and make a pencil mark on the back of each piece. Using a pocket hole jig with a stepped drill bit, drill a pair of holes in both ends of the rails (Photo 4). Drill on the back, or marked, side. Complete the face frame by clamping the joints one at a time and joining them with 1-1/4-in. pocket screws (Photo 5). If you haven’t used a pocket hole jig before, practice on scrap wood. You’ll quickly get the hang of it.
Drill pocket holes around the outside of the cabinet box and attach the face frame with pocket screws (Photo 6). The face frame is sized to overlap the interior of the cabinet box by 1/8 in. Make sure this overlap is even all the way around, then clamp it before you attach the face frame. If you don’t own a pocket hole jig, you can nail the face frame to the box with 6d finish nails and fill the holes later with putty in a matching color.
The hinges fit into the round holes bored in the doors and mount to a separate mounting plate that you’ll screw to the face frame. Positioning them is a bit tricky. The first step is to attach the mounting plates to the edge of the face frame. Start by marking the center of each hole on a piece of masking tape stuck to the door’s edge (Photo 7). Use a square to mark the center of the hinge hole on the edge of the door. Then set one upper and one lower door in place, making sure they overlap the face frame on the top and bottom by 3/4 in. Leave a 1/8-in. gap between them (use a 1/8-in. spacer). Then mark the hinge centers on the face frame (Photo 7). After marking one side, use exact measurements to duplicate the hinge center positions on the other side. Finally, center the mounting plates on these marks and screw them to the edge of the face frame (Photo 8).
Mount the hinges next. Press the hinges into the holes and use a square to make sure the screw holes are parallel to the edge of the door (Photo 9). Then drive the mounting screws.
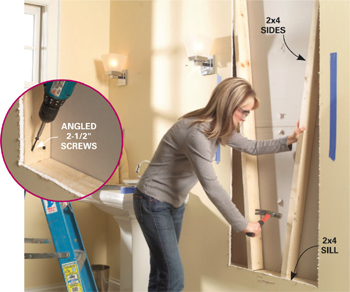
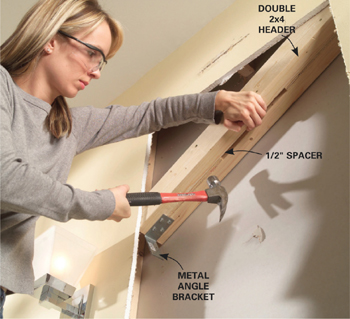
In most cases, you’ll have to remove a stud to make a wide enough opening (Photos 10–12). Photos 13 and 14 show how to add a header to support the cutoff stud. The metal angle brackets support the new header. The sill and side pieces aren’t structural but provide backing for the drywall and a place to attach the cabinet.
Use a level and pencil to mark the cutout dimensions on the wall (Photo 10). Mark the outline 1/4 in. taller and wider than the cabinet box dimensions. Cut the drywall along the lines with a drywall saw and break it out.
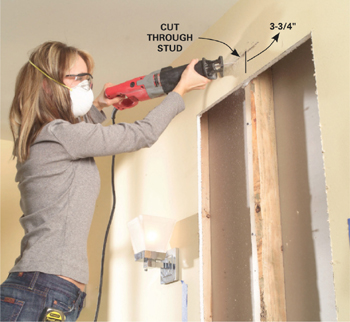
The next step is to cut out the stud to make room for the header (Photos 11 and 12). Make a short level line 3-3/4 in. above the top of the cutout opening and centered over the stud. This is where you’ll cut the stud to allow room for the header to fit under it. Make a similar line 1-1/2 in. below the bottom of the cutout. Cut through the stud at each spot (Photo 11). If you’re careful to control the depth of the blade, you may be able to cut through the stud without cutting through the drywall on the opposite side. But don’t worry. If you do cut through, the thin slot will be easy to patch.
Remove the cutout section of stud by hitting it hard with a hammer on the edge nearest you to twist the nails or screws loose from the drywall on the opposite side (Photo 12). Measure the distance between the remaining wall studs and cut two 2x4s 3/16 in. shorter than the measurement. Build the 2x4 header by sandwiching scraps of 1/2-in. plywood or 1/2-in. strips of wood between the 2x4s and nailing them together with 12d nails. Slide the header up against the cutoff stud (Photo 13) and hold it temporarily in place with a screw through the drywall. Level the header and support it by screwing metal angle brackets to the studs with 1-1/4-in. screws (Photos 13 and 14). Cut a 2x4 the same length as the header for the sill, level it and attach it to the studs with 2-1/2-in. screws driven at an angle. Complete the framing by cutting 2x4s to fit between the header and sill on each side of the cabinet and securing them with angled 2-1/2-in. screws (Photo 15). Predrill to keep the sides from slipping back too far (Photo 15 inset).
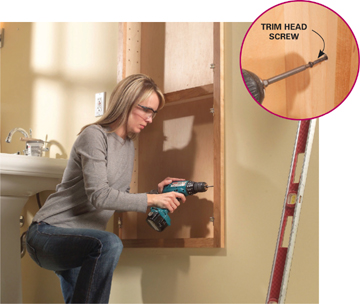
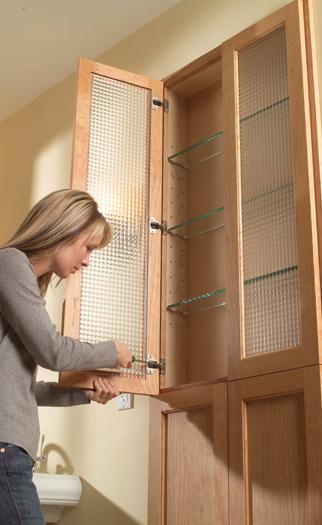
It’s easiest to sand and finish the cabinet before mounting it to the wall. Apply stain if you desire and three coats of polyurethane varnish. Then just slip the cabinet into the opening, level it and screw it into the framing on each side (Photo 16). Don’t overtighten or you’ll pull the frame out of square. Remount the doors and adjust the hinges so the space between the doors is even (Photo 17). The top doors shown here were ordered to accommodate 1/8-in. glass. They came with a clear plastic strip that slid into a slot to hold the glass in place. Make sure to get recommendations from your door supplier for securing the glass in the door you order.
Shopping list for wall opening
ITEM |
QTY. |
2x4 x 8' studs |
3 |
Metal angle brackets |
2 |
Small container of No. 8 x 1-1/4" pocket screws |
1 |
2-1/2" drywall or cabinet screws |
12 |
Joint compound for patching |
|
1/2" plywood scrap |
|
1-1/4" drywall screws |
|
Cutting list
KEY |
PCS. |
SIZE & DESCRIPTION |
A |
2 |
3/4" x 3-1/2" x 66-3/8" maple (sides) |
B |
3 |
3/4" x 3-1/2" x 22-7/8" maple (top, bottom, middle) |
C |
1 |
1/4" x 24-3/8" x 66-3/8" birch plywood (back) |
D |
2 |
3/4" x 1-1/2" x 67-5/8" cherry (face frame stiles) |
E |
3 |
3/4" x 1-1/2" x 22-5/8" cherry (face frame rails) |
F |
2 |
3/4" x 12" x 42" cherry doors |
G |
2 |
3/4" x 12" x 24" cherry doors |
H |
2 |
patterned glass inserts to fit doors |
J |
5 |
polished-edge glass shelves |
Shopping list
ITEM |
QTY. |
1x4 x 6' birch or maple (A, B) |
3 |
1x2 x 6' cherry (D, E) |
3 |
4' x 8' x 1/4" birch plywood (C) |
1 |
12" x 42" cabinet doors (F) |
2 |
12" x 24" cabinet doors (G) |
2 |
Pieces of patterned glass for doors |
2 |
Compact Euro-style face frame hinges |
10 |
3/4" overlay mounting plates |
10 |
3-3/8" x 22-3/4" x 3/8" polished-edge glass shelves |
5 |
Shelf supports |
20 |
1-1/4" drywall or cabinet screws |
12 |
1" drywall or cabinet screws |
24 |
1-1/4" pocket screws |
30 |
1-1/4" trim head screws (mount cabinet) |
4 |
Cabinet handles |
4 |
Polyurethane finish |
1 qt. |
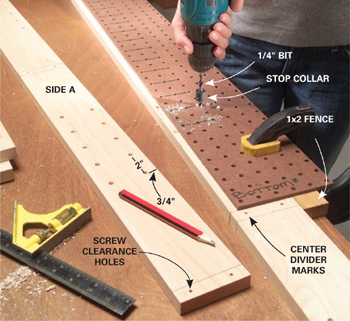
1
Cut the cabinet box pieces (A and B; Figure A) to length. Mark the location of the center divider on the side pieces and drill screw-clearance holes. Also drill holes for the adjustable shelf supports using a pegboard jig.
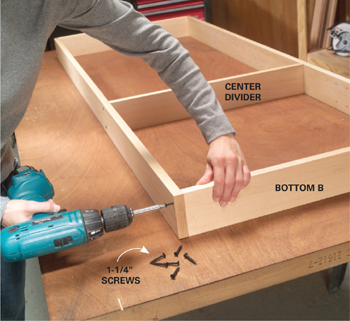
2
Screw the sides to the top and bottom through the predrilled clearance holes. Then line up the middle horizontal divider with the marks and screw it in.
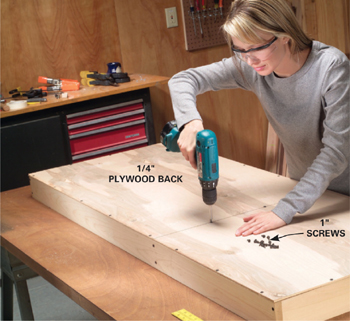
3
Align one edge of the 1/4-in. plywood back with the side of the cabinet. Predrill the screw holes and screw it into place with 1-in. screws. Then square the cabinet and screw the other three edges and center divider.
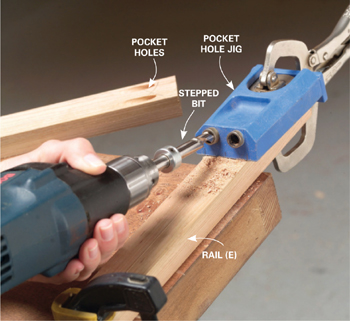
4
Cut the face frame parts to length (D and E). Drill pocket screw holes on the back side of the rails (E) with a special stepped bit and pocket hole jig.
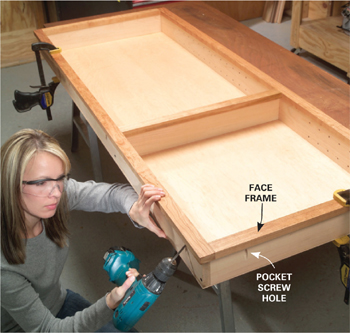
6
Drill pocket screw holes on the outside of the cabinet box (parts A and B). Center the frame on the cabinet box (it should overlap the inside 1/8 in.), clamp it and attach it with pocket screws.
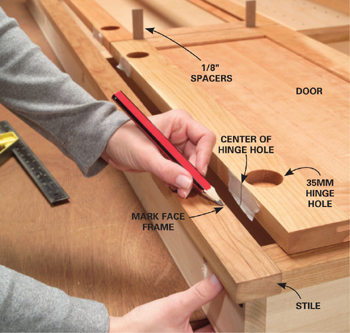
7
Mark the hinge hole centers on the edge of the doors with a combination square. Set two doors in place and transfer the hinge center locations to the face frame stile. For the other set of doors, transfer these marks to the opposite stile by measuring from the bottom of the face frame.
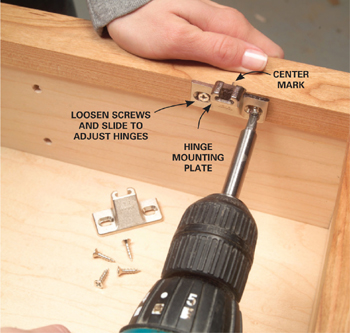
8
Center the hinge mounting plates on these marks, predrill and screw them to the face frame. Center the screws in the slots to allow adjustments up and down.

12
Pound on the corner of the cutoff stud to twist it away from the drywall. Pull it out of the opening.
13
Nail together the double 2x4 header and screw a metal angle bracket to one end. Slide it into position against the cutoff stud and level the header.

14
Screw the metal angle bracket to the stud. Screw another special angle bracket to the opposite end of the header and to the stud.