WHAT IT TAKES
Time: 1 day
Skill level: Intermediate
WHAT IT TAKES
Time: 1 day
Skill level: Intermediate
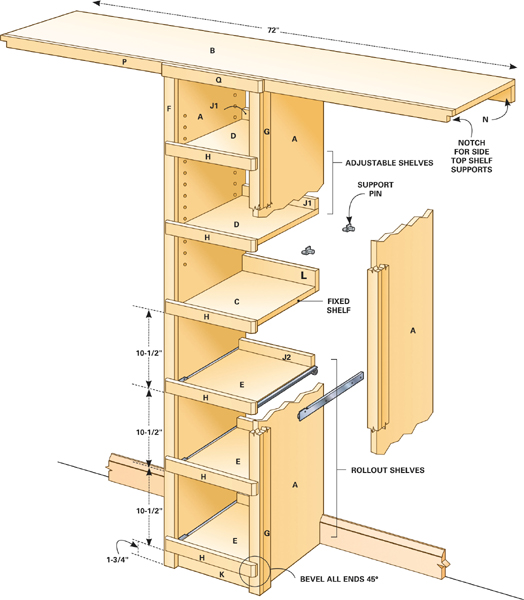
Most bedroom closets suffer from lack of organization—stuff on the floor; a long, overloaded closet rod; and a precariously stacked, sagging shelf. The simple shelving system shown here cleans up that clutter. It provides a home for shoes; several cubbies for loose clothing, folded shirts, sweaters or small items; and a deeper (16-in.-wide) top shelf to house the stuff that keeps falling off the narrow shelf. Besides the storage space it provides, the center tower stiffens the shelf above it as well as the clothes rod, since it uses two shorter rods rather than a long one.
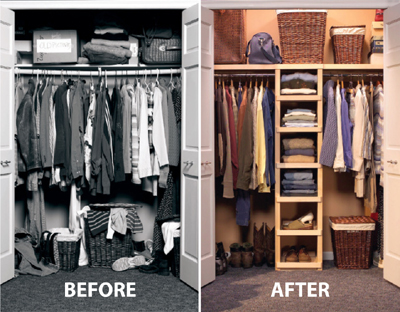
You can cut and assemble this entire shelving system from a single sheet of plywood (for a 6-ft.-wide closet). Birch plywood is used because it’s relatively inexpensive yet takes a nice finish. The edges are faced with 1x2 maple for strength and a more attractive appearance. The bottom shelves roll out for easier access.
The key tool for this project is a circular saw with a cutting guide for cutting the plywood into nice straight pieces (Photo 1). An air-powered brad nailer or finish nailer makes the assembly go much faster, and a miter saw helps produce clean cuts. But neither is absolutely necessary.
Rip the plywood into three 15-3/4-in. by 8-ft. pieces (Photo 1), then cut the sides and shelves from these with a shorter cutting guide. For an average-size closet—6 ft. wide with a 5-1/2-ft.-high top shelf—cut all the sides and shelves from one piece of 3/4-in. plywood. Making the shelving wider means settling for fewer shelves/trays or buying additional plywood. Be sure to support the plywood so the pieces won’t fall after completing a cut, and use a guide to keep the cuts perfectly straight. Use a plywood blade in a circular saw to minimize splintering. Cut slowly on the crosscuts, and make sure the good side of the plywood is down—the plywood blade makes a big difference, but the thin veneer will splinter if you rush the cut.
Mark and cut the baseboard profile on the plywood sides, using a profile gauge (Photo 2) or a trim scrap to transfer the shape, or remove the baseboard rather than cutting the plywood and reinstalling it later. Either method works fine.
Glue and nail the side 1x2s (G) to the best-looking side of the plywood (so it faces out), holding them flush with the front edge (Photo 3). Be sure to use 1-1/4-in. brads here so the nails don’t go completely through the side. Use 1-1/2-in. brads everywhere else.
TIP:
Hold the brad nailer perpendicular to the grain whenever possible so the rectangular nailheads will run with the grain instead of cutting across it. This makes them less prominent.
Then attach the front 1x2s (F). These 1x2s should be flush with the bottom of the sides, but 3/4 in. short of the top. The 1x2s will overlap the edge slightly because 3/4-in. plywood is slightly less than a full 3/4 in. thick. Keep the overlap to the inside.
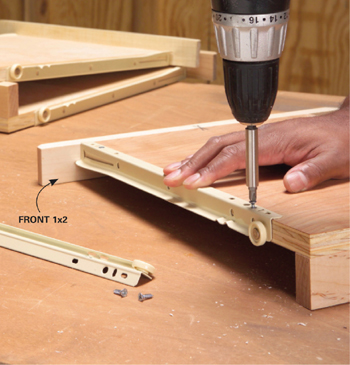
Lay out the locations for the drawer slides and the fixed center shelf before assembling the cabinet—the 12-in. width is a tight fit for a drill. Use the dimensions in Photo 4 and Figure A for spacing. Vary any of these measurements to better fit shoes or other items. Then take the drawer slides apart and mount them on the tower sides (Photo 4). Remember that one side of each pair is a mirror image of the other.
To position the shelf support pins for the two adjustable shelves, align the bottom of the 1/4-in. pegboard with the fixed shelf location, then drill mirror-image holes on the two sides (Photo 5). Mark the holes to be used on the pegboard—it’s all too easy to lose track when flipping the pegboard over to the second side. Use a brad point drill bit to prevent splintering, and place a bit stop or a piece of tape for a 5/8-in. hole depth (1/4-in. pegboard plus 3/8 in. deep in the plywood). Most support pins require a 1/4-in.-diameter hole, but measure to make sure.
TIP:
Make sure the pegboard has square sides.
Cut the bevels in all the 1x2 shelf fronts, then glue and nail them to the plywood shelves, keeping the bottoms flush (Photo 6). Nail 1x2 backs (J1 and J2) onto the adjustable and rollout shelves. Next, nail together the bracing (L) and the base piece (K), which join the cabinet. Then add the slides to the rollout shelves (Photo 7).
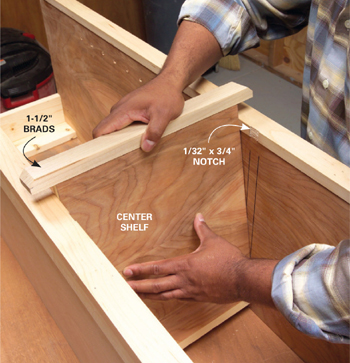
Assembling the shelving tower is straightforward (Photo 8). Position the L-shaped bracing at the top and braces at the bottom, add glue to the joints, then clamp and nail. Because of the slight lip where the 1x2 front trim (F) overlaps the plywood, it requires chiseling out a 1/32-in.-deep x 3/4-in.-wide notch so the fixed shelf will fit tightly (Photo 9).
Remove the old closet shelving and position the new cabinet. If there’s carpeting, it’s best to cut it out under the cabinet for easier carpet replacement in the future (Photo 10). For the cleanest look, pull the carpet back from the closet wall, cut out the padding and tack strip that fall under the cabinet, and nail new tack strips around the cabinet position. Then reposition the cabinet, push the carpet back against it and cut the carpet. Or, simply cut out the carpet and tack strip under the cabinet and tack the loose carpet edges to the floor (but it won’t look as nice).
Plumb and level the cabinet, then screw it to the wall. Use hollow wall anchors if the studs are hard to find. The cabinet will be firmly anchored by the upper shelf anyway.
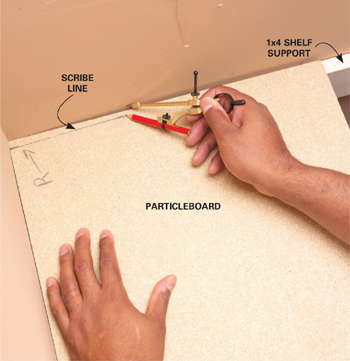
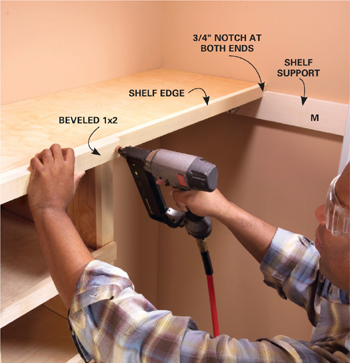
Closet shelves are tough to fit because the corners of the walls are rarely square. To cut the shelf accurately, scribe a leftover 16-in.-wide piece of particleboard or plywood in both corners (Photo 11) and use it for a template for cutting the ends of the shelf. Then the shelf will drop right into place and rest on 1x4 supports nailed to the side walls and back wall. Make sure the front of the shelf is flush with the front of the tower and nail it to the top. If the back wall is wavy, scribe the back of the shelf to the wall and trim it to make the front flush. Then cut and notch the front 1x2 and nail it to the shelf (Photo 12).
Lightly sand all the wood and apply a clear finish. When it’s dry, mix several shades of putty to get an exact match to your wood and fill the nail holes. Add another coat of finish and let it dry. Screw on the clothes rod brackets, aligning them with the bottom of the 1x4. Then pile on the clothes.
Materials list
ITEM |
QTY. |
4' x 8' x 3/4" birch plywood |
1 |
3/4" x 1-1/2" x 8' maple |
6 |
3/4" x 3-1/2" x 8' No. 2 pine |
1 |
3/4" x 3-1/2" x 12' maple |
1 |
14" bottom-mount drawer slides |
3 |
2' x 4' x 1/4" pegboard |
1 |
1/4" shelf support pins |
8 |
1-1/4" and 1-1/2" brads for a brad nailer |
|
Cutting list
KEY |
PCS. |
SIZE & DESCRIPTION |
A |
2 |
15-3/4" x 65-1/4" plywood (sides) |
B |
1 |
15-3/4" x 72" plywood (top shelf) |
C |
1 |
15-3/4" x 12" plywood (fixed shelf) |
D |
2 |
15-3/4" x 11-7/8" plywood (adjustable shelves) |
E |
3 |
15-3/4" x 11" plywood (rollout shelves) |
F |
2 |
3/4" x 1-1/2" x 64-1/2" maple (vertical front trim) |
G |
2 |
3/4" x 1-1/2" x 65-1/4" maple (vertical side trim) |
H |
6 |
3/4" x 1-1/2" x 14-1/2" maple (shelf fronts) |
J1 |
2 |
3/4" x 1-1/2" x 11-7/8" maple (shelf backs) |
J2 |
3 |
3/4" x 1-1/2" x 11" maple (rollout shelf backs) |
K |
1 |
3/4" x 1-1/2" x 12" maple (base) |
L |
5 |
3/4" x 3-1/2" x 12" pine (bracing) |
M |
2 |
3/4" x 3-1/2" x 24" maple (side top shelf supports—not shown) |
N |
2 |
3/4" x 3-1/2" x 29-1/4" maple (rear top shelf supports) |
P |
1 |
3/4" x 1-1/2" x 72" maple (top shelf edge) |
Q |
1 |
3/4" x 1-1/2" x 15-3/4" maple (top trim) |
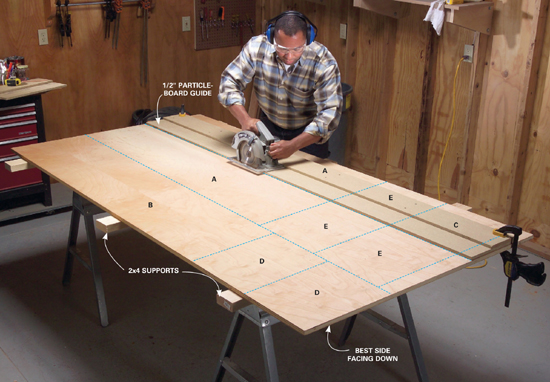
1
Cut the sheet of plywood into three equal widths using a saw guide. Then crosscut the sections into the pieces shown in Figure A using a shorter guide.
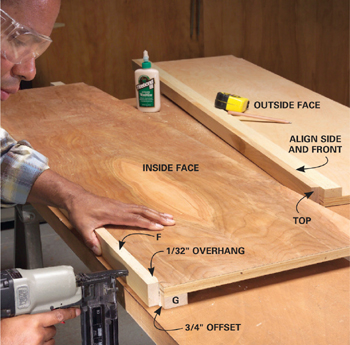
3
Cut the 1x2s to length. Then glue and nail them to the plywood sides (Figure A) with 1-1/4-in. brads. Note the slight (1/32-in.) overhang along the inside.
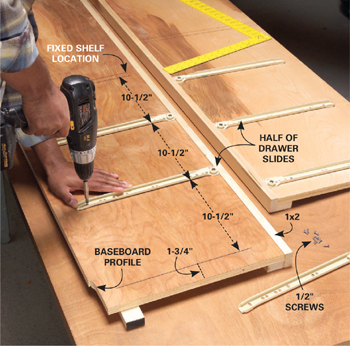
4
Mark the center and rollout shelf locations using a framing square. Then mount half of each of the two-piece drawer slides even with the 1x2 on each side.

5
Drill 1/4-in. matching holes 3/8 in. deep for the adjustable shelf pins using a pegboard template. Flip the pegboard when switching sides.
7
Attach the other halves of the slides to the rollout shelves with 1/2-in. screws. Butt them against the front 1x2.

8
Set the sides on edge, glue and clamp the braces (L) in place and nail the assembly together with 1-1/2-in. brads. Make sure the braces are square to the sides.
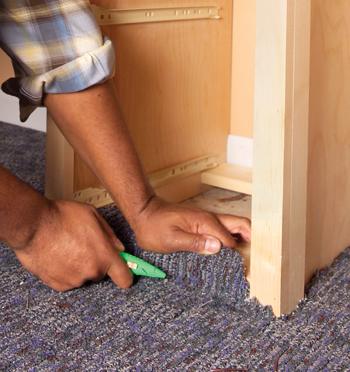
10
Center the cabinet in the closet against the back wall, mark its position and cut the carpet out around it. Tack the loose edges of carpet to the floor.