ITEM |
QTY. |
4' x 8' x 3/4" plywood |
3 |
4' x 8' x 1/2" plywood |
1 |
4' x 8' x 1/4" plywood |
1 |
8' closet rod |
1 |
Edge banding (iron-on veneer) |
2 pkgs. |
20" drawer slides |
4 prs. |
6' shelf standards |
10 |
Closet rod flanges |
10 |
Wire basket |
1 |
2-1/2" screws |
1 box |
1-5/8" trim screws |
1 box |
1-1/4" screws |
1 box |
1" screws |
1 box |
Wipe-on poly |
1 pint |
KEY |
PCS. |
SIZE & DESCRIPTION |
A |
4 |
3/4" x 11-7/8" x 52" corner box sides |
B |
4 |
3/4" x 11-7/8" x 18-1/2" corner box tops and bottom |
C |
4 |
3/4" x 2-1/2" x 18-1/2" corner box screw strips |
D |
2 |
3/4" x 13-7/8" x 34" shelf unit sides |
E |
1 |
3/4" x 13-7/8" x 22-1/2" shelf unit top |
F |
1 |
3/4" x 21" x 24" shelf unit bottom |
G |
2 |
3/4" x 2-1/2" x 22-1/2" shelf unit screw strips |
H |
2 |
3/4" x 20-3/4" x 44" drawer unit sides |
J |
1 |
3/4" x 20-3/4" x 22-1/2" drawer unit top |
K |
1 |
1/4" x 24" x 44" drawer unit back |
L |
1 |
3/4" x 2" x 22-1/2" drawer unit cleat |
M |
8 |
1/2" x 6" x 19" drawer sides |
N |
8 |
1/2" x 6" x 20" drawer fronts and backs |
P |
4 |
1/4" x 20" x 19" drawer bottoms |
Q |
4 |
3/4" x 7-3/4" x 22-1/4" drawer face |
R |
8 |
3/4" x 11-7/8" adjustable shelves, cut to length (not shown) |
S |
2 |
3/4" x 13-7/8" x 22" adjustable shelves for shelf unit |
T |
1 |
3/4" x 11-7/8" x 18" right corner box adjustable shelf |
U |
1 |
3/4" x 14-1/4" x 96" top shelf (not shown) |
2
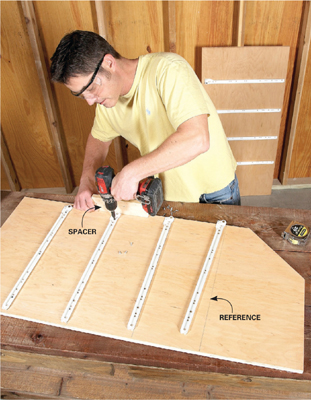
Preinstall drawer slides. Attaching slides is a lot easier before the boxes are assembled. Position the slides using reference lines and a spacer. Remember that there are left- and right-hand slides, usually marked “CL” and “CR.”
4
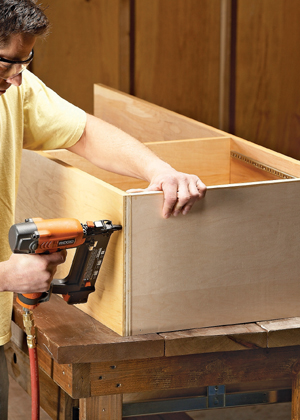
Nail first, then screw. If you have a brad nailer, tack the boxes together to hold the parts in position. Then add screws for strength.
6
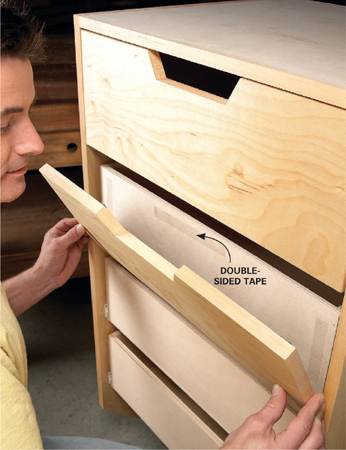
Center the drawer faces perfectly. Stick the faces to the boxes with double-sided tape. Then pull out the drawer and drive screws from inside the box.