
WHAT IT TAKES
Time: 1 day
Skill level: Beginner
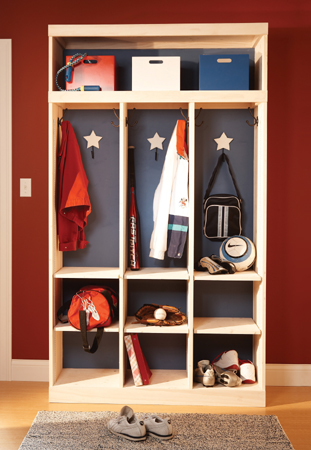
Need a home for all the coats, toys, books, shoes and other stuff that accumulates next to your entry door? Adjustable shelves and hooks make this open locker the perfect catchall. Construction is simple—just cut the pieces to length and nail them together. The total cost is several hundred dollars, but you can build it for less if you substitute plywood for the 16-in.-wide laminated pine panels shown here.
First, sand the plywood back and both sides of the pine panels with 120- or 150-grit sandpaper. Check the ends of the panels to make sure they’re square and measure the widths to make sure they’re all the same. If you want to paint the plywood back and pine panel sides and shelves different colors, as shown, paint or stain all the pieces separately before putting the locker together.
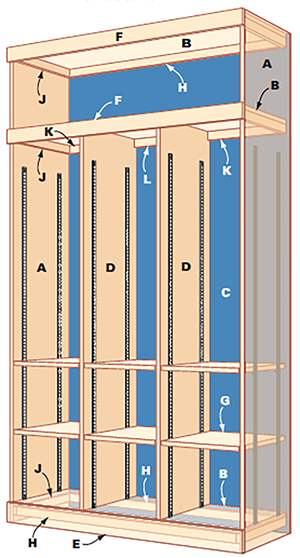
Cut all the panels and shelves to the lengths in the Cutting List. Glue and nail the top, bottom and center nailers to the sides, nailing from inside with 1-1/4-in. brad nails so the nails are hidden. Set the sides upright on a large worktable or flat area of the floor, then nail the top, bottom and center fixed shelves to the nailers. Keep the best edges of the sides facing up. Check to be sure all the edges are aligned to each other in the front as you assemble the locker.
After the shelves are nailed into place, square the locker by measuring diagonally from corner to corner, first from one side and then the other, and then pushing the corners in or out until the measurements are equal. Set the two center dividers into place, square them against the front edge, and then nail them through the top and bottom fixed shelves, using four nails at each end.
Turn the locker over so the back is facing up. Measure the location of the center dividers and shelves from the sides, then mark these locations on the back of the plywood. Set the plywood on the back of the locker with the best side facing down. Predrill and screw the plywood down at one corner, then align the rest of the framework to the plywood as you screw it down to the sides. Finally, screw the plywood to the center dividers and shelves. Use four screws for each divider and shelf and eight for each side.
Turn the locker over again and glue and nail the back shelf supports to the plywood, tight up against each shelf. Fasten the nailers to the plywood with 1-1/4-in. nails, but drive them at about a 15-degree angle so they don’t stick through the back of the plywood. You may also need to lower the air pressure on your compressor.
Nail the front trim to the front edge of the shelves and to the sides, then glue and nail the front support under the bottom shelf, into the back of the 1x4 base.
Finally, attach the shelf standards and hooks. You can make one cubby all shelves or leave the shelves out entirely and just make space for hanging coats. Locate and mark the wall studs, then move the locker into position. For a permanent installation, remove the baseboard and recut it around the locker. Shim the base of the locker, if necessary, then screw the locker to the studs just above the center shelf to prevent it from ever tipping forward.
Overall dimensions: 84" H x 48" W x 17-1/4" D
KEY |
PCS. |
SIZE & DESCRIPTION |
A |
2 |
3/4" x 16" x 7' sides |
B |
3 |
3/4" x 16" x 46-1/2" fixed shelves |
C |
1 |
48" x 84" x 1/2" plywood back |
D |
2 |
3/4" x 16" x 65-1/4" center dividers |
E |
1 |
3/4" x 3-1/2" x 48" front trim |
F |
2 |
3/4" x 2-1/2" x 48" front trim |
G |
6 |
3/4" x 16" x 14-1/2" shelves |
H |
3 |
3/4" x 1-1/2" x 45" supports |
J |
6 |
3/4" x 1-1/2" x 16" nailers |
K |
2 |
3/4" x 1-1/2" x 14-1/4" shelf supports |
L |
1 |
3/4" x 1-1/2" x 15" center shelf support |
Materials list
ITEM |
QTY. |
16" x 3/4" x 8' laminated pine panel |
6 |
4' x 8' x 1/2" finish-grade plywood |
1 |
1x2 x 8' pine |
3 |
1x3 x 10' clear pine |
1 |
1x4 x 6' clear pine |
1 |
Shelf standards (5' or 6') |
12 |
1-1/4" screws |
1 lb. |
1-1/4" brad nails |
1 lb. |
Storage above windows and doors
The empty wall space above doors and windows is organizational gold! Hang a shelf there and use it for bathroom towels, toiletries, books, files, tablecloths—the list is endless.

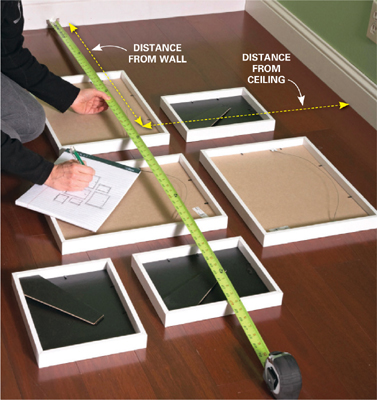
When you’re hanging a group of pictures, it can be hard to visualize exactly where everything should go. Try this next time: Lay them all out on the floor and get them arranged just how you like them. Then flip them over and make a little diagram of your grouping. Measure the distance of each picture’s hanger from the adjacent walls, and jot it down on your diagram. Transfer those hanger locations to the wall and you’ll have a perfect grouping every time.