
WHAT IT TAKES
Time: 1 day
Skill level: Intermediate
Build ’em and fill ’em. These sturdy cabinets are designed for simple assembly. Just glue and screw plywood together to make the basic box, then add a premade door—actually an inexpensive bifold door panel. Since bifolds are readily available in several styles, including louvered and paneled, it’s easy to make a wide range of practical yet handsome cabinets without the time and hassle of making the doors.
Make the cabinets big and deep to store clothing and sports gear; shallow and tall for shovels, rakes, skis or fishing rods; or shallow and short to mount on walls for tools, paint cans and other small items. Or mount them on wheels and roll the tools right to the job. The only limitation is the size of standard bifold doors.
Here you’ll learn how to build one of the smaller hanging wall cabinets. Use the same techniques and the Cutting Lists here and here to build others.
Advanced skills or special tools are not needed to build this entire set of cabinets. However, it does require cutting a lot of plywood accurately. A table saw helps here, but a circular saw with a guide works fine too. Add a drill or two, a couple of clamps and some careful advance planning, and start building!
Tip:
Most lumberyards and home centers have a large saw (called a panel saw) for cutting sheets of plywood. For a nominal fee, they will rip all of the plywood to proper widths. (Cut the pieces to length later.) It requires planning the cabinet depths in advance, but it’s quicker than ripping the plywood at home and makes hauling it a lot easier.
When planning the cabinets, begin by choosing the bifold door and build the rest of the cabinet to match its dimensions. Standard bifolds are 79 in. high and available in 24-in., 30-in., 32-in. and 36-in. widths. Keep in mind that it takes two doors for each of these widths, each approximately 12, 15, 16 or 18 in. wide. The cabinet can be any of the single-door widths or any of the double-door widths. Or cut the doors down to make shorter cabinets, as demonstrated here. Make them any depth desired.
Bifolds come in several styles and wood species. This project shows louvered pine doors and birch plywood for a handsome, natural look. You can cut the cost considerably by using less expensive plywood, bifolds and hinges.
Also save by using plywood efficiently. Decide on the door sizes, then lay out all the cabinet pieces on a scale drawing of a 4 x 8-ft. sheet of plywood (graph paper helps). Feel free to adjust the cabinet depths a bit to achieve best use. The five cabinets shown were built from four sheets of 3/4-in. plywood and two sheets of 1/4-in. plywood for the backs.
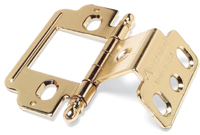
The “partial wrap-around” hinges are available at some home centers or hardware stores. Woodworking stores also carry them (see photo here). If exposed hinges are OK, simply use bifold hinges, which are available at all home centers.
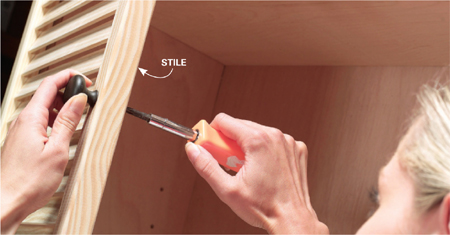
Begin by cutting the bifold doors to size (Photo 1). This will determine the exact cabinet height. Be sure to use a guide and a sharp blade for a straight, crisp cut. Center the cut on the dividing rail. Be prepared for the saw to bump up and down slightly as it crosses each stile (Photo 1). Then trim each newly created door so that the top and bottom rails are the same width.
Some bifold door manufacturers use only a single dowel to attach each rail to the stile. If that’s the case, one of the rails (after being cut in half) is no longer attached to the door. Don’t panic. Dab a little glue on each rail and stile and clamp them back together. After 20 minutes or so, they’ll be ready.
Then cut the plywood to size using a guide to keep all the cuts straight and square. If the plywood splinters a bit, score the cutting line first with a utility knife.
Assemble the box face down on a flat surface. The garage floor works well for this step.
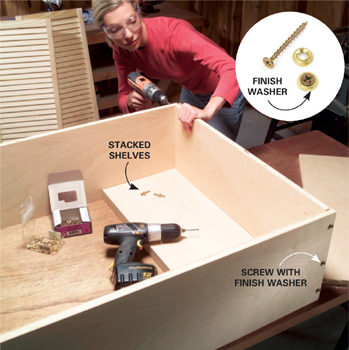
Mark and predrill screw holes through the sides for the top and bottom pieces (Photo 2).
This project uses finish washers (available at full-service hardware stores) for a more decorative look.
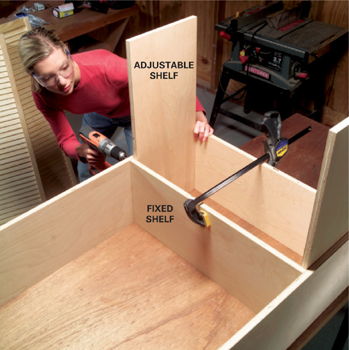
Attach the fixed shelf next to stiffen and strengthen the box (Photo 3). Use the extra shelves as guides to help position and square the shelf. Predrill and drive three screws through each side into the fixed shelf.
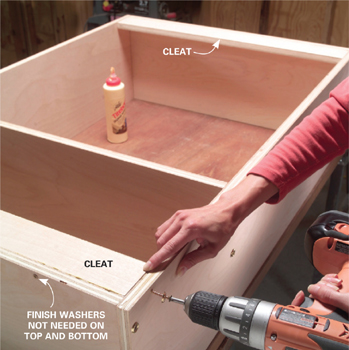
Attach cleats at the top and bottom of the cabinet to use for screwing the cabinet to a wall (Photo 4). Use three or four screws across the top and bottom. Clamp the cleat into place until the screws are driven. Because the screws won’t be visible on the top and bottom, skip the finish washers. Make sure the cleat sits flush with the side (Photo 4).
The 1/4-in. plywood back stiffens the frame and keeps it square, which is essential for the doors to fit accurately. Spread glue along the cabinet edges, including the fixed shelf and the hanging cleats (Photo 5). Carefully set the back onto the cabinet, keeping the top flush with the cabinet top. Nail in the order and direction shown in Photo 5. Align the edges carefully before nailing each side to keep the cabinet perfectly square.
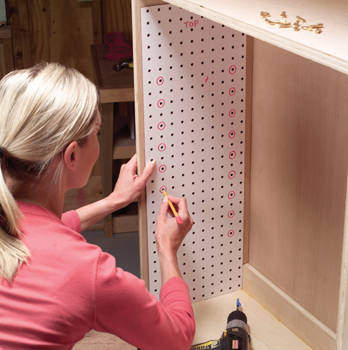
Use a scrap of pegboard to help lay out the holes evenly for the adjustable shelf support pins. Mark each hole clearly (red circles; see Photo 6) on the front and back of the pegboard. Mark each hole position on one side of the cabinet, then slide the pegboard across to the other side for marking. Don’t flip the pegboard over; it can throw the pattern off and the shelves will rock rather than lie flat.
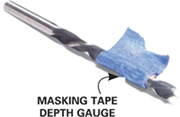
Most shelf support pins require a 1/4-in. hole, but check the pins to be sure. In addition, measure how far the pins are supposed to go into the cabinet sides. Wrap a piece of masking tape around the drill bit at this depth. This ensures that the bit won’t go completely through the side of the cabinet. Check the bit after every few holes to make sure the tape hasn’t slipped.
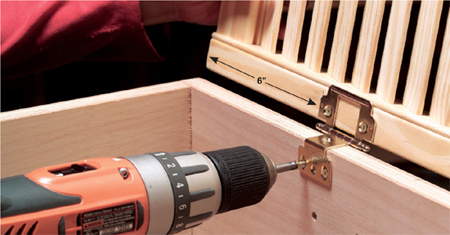
Install the door hinges 6 in. from the top and bottom of the doors (add a third hinge on taller doors). The best type is a “partial wrap-around” hinge (Photo 7). Its hinge leaves are hidden when the door is closed, and the design avoids driving screws into the weak plywood edge grain.
Begin by installing the hinges on the door (Photo 7). Keep them perfectly square to the door edge and predrill screw holes as precisely as possible. An extra set of hands will be helpful when attaching the doors to the cabinet. Have one person align the door exactly with the top or bottom of the cabinet while the second person marks, predrills and screws the hinges to the cabinet side. Repeat for the other door. Ideally the doors will meet evenly in the center with about a 1/8-in. gap between. If not, “tweak” the hinge positions slightly with paper shims, or plane the doors a bit to make them perfect.
Choose any type of knob and magnetic latch. However, bifold door stiles (the vertical edges) are narrow, so make sure the neighboring door will clear the knob when opened (Photo 8). If there’s a rail (the horizontal door frame member), mount the knobs there.
Another potential problem: Bifold stiles are usually 1 to 1-1/8 in. thick and most knobs are designed for 3/4-in. doors. Look for longer knob screws at a local hardware store. Or try this trick: With a 3/8-in. bit, drill a 1/4-in.-deep hole on the back side of the stile to recess the screwhead.
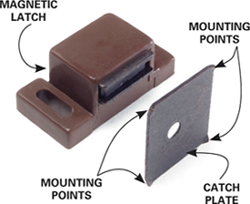
To mount a magnetic latch, first mount the magnet to the underside of the fixed shelf. Stick the catch plate to the magnet with the “mounting points” facing out (photo below). Close the door and press it tightly against the latch. The points on the catch plate will indent the door slightly and indicate where to mount the plate.
The hinges shown are available at woodworking stores and some hardware stores and home centers.
That’s about it. These cabinets are finished inside and out with two coats of clear water-based satin polyurethane. It dries quickly (one-half hour), has little or no odor, and cleans up with soap and water. The first coat raises the wood grain a bit, so sand it lightly with fine sandpaper (150 grit or finer). Whether using a clear finish, paint or stain, it’s generally faster to remove the doors and hardware first.
KEY |
PCS. |
SIZE & DESCRIPTION |
A |
2 |
14-3/4" x 43-3/4" doors (30" bifold)* |
B |
2 |
3/4" x 11-1/4" x 43-3/4" sides |
C |
2 |
3/4" x 11-1/4" x 28-1/8" top and bottom |
D |
3 |
3/4" x 11-1/4" x 28-1/8" shelves |
E |
2 |
3/4" x 3" x 28-1/8" hanging cleats |
F |
1 |
1/4" x 29-5/8" x 43-3/4" back |
*Exact door sizes vary. Measure the doors before deciding exact cabinet dimensions.
Other cabinet options (Cutting list and dimensions)
|
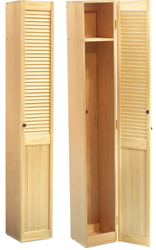
Storage locker Compact storage for long items like skis, fishing rods and long-handled tools; on the floor or wall-hung; 12-in.-wide door and one fixed shelf. |
|
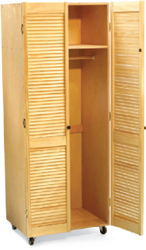
Closet on wheels Large storage capacity (about 32 in. wide and 22-1/2 in. deep); fixed shelf; closet rod; 3-in. swivel casters. |
|
Paneled wall cabinet Shorter version of cabinet above; made from the paneled portion of partial louvered doors; one adjustable shelf. |
|
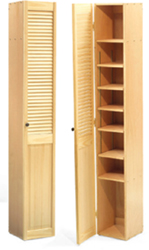
Narrow floor or wall cabinet Shelf version of storage locker (left); top and bottom shelves fixed; intermediate shelves mounted on adjustable shelf standards. |
Storage locker
KEY |
PCS. |
SIZE & DESCRIPTION |
Door |
1 |
11-3/4" x 79" (half of a 24" bifold)* |
Sides |
2 |
3/4" x 11-1/4" x 79" |
Top, bottom shelf |
3 |
3/4" x 11-1/4" x 10-1/4" |
Cleats |
2 |
3/4" x 3" x 10-1/4" |
Front cleat |
1 |
3/4" x 3" x 10-1/4" |
Back |
1 |
1/4" x 11-3/4" x 79" |
Closet on wheels
KEY |
PCS. |
SIZE & DESCRIPTION |
Doors |
2 |
15-3/4" x 79" (32" bifold)* |
Sides |
2 |
3/4" x 22-1/2" x 79" |
Top, bottom shelf |
3 |
3/4" x 22-1/2" x 30-1/8" |
Cleats |
3 |
3/4" x 3" x 30-1/8" |
Back |
1 |
1/4" x 31-5/8" x 79" |
Casters |
4 |
3" |
Paneled wall cabinet
KEY |
PCS. |
SIZE & DESCRIPTION |
Doors |
2 |
14-3/4" x 32-1/4" (30" bifold)* |
Sides |
2 |
3/4" x 11-1/4" x 32-1/4" |
Top, bottom shelves |
4 |
3/4" x 11-1/4" x 28-1/8" |
Cleats |
2 |
3/4" x 3" x 28-1/8" |
Back |
1 |
1/4" x 29-5/8" x 32-1/4"" |
Narrow floor cabinet
KEY |
PCS. |
SIZE & DESCRIPTION |
Door |
1 |
11-3/4" x 79" (half of a 24" bifold)* |
Sides |
2 |
3/4" x 11-1/4" x 79" |
Top, bottom shelves |
9 |
3/4" x 11-1/4" x 10-1/4" |
Cleats |
2 |
3/4" x 3" x 10-1/4" |
Back |
1 |
1/4" x 11-3/4" x 79" |
*Exact door sizes vary. Measure doors before deciding cabinet dimensions.

1
Mark the door length and clamp a straightedge to the door to guide the saw. Cut the other cabinet pieces using the straightedge as well.
2
Predrill screw holes through the sides 3/8 in. from the ends. Drive 1-5/8-in. screws with finish washers through the sides into the top and bottom. Stack extra shelves in the corners to keep the box square.
4
Glue and clamp hanging cleats to the top and bottom. Predrill and drive screws through the top, bottom and sides into the cleats.

5
Spread a bead of glue on all back edges. Then align the plywood back with the top and nail with 1-in. brads. Align the other sides and nail in the order shown.
6
Mark shelf pin locations on both front and back sides of a pegboard template. Mark one side of the cabinet, then slide (not flip) the pegboard to the opposite side and mark matching holes. Drill the 1/4-in. pin holes.