WHAT IT TAKES
Time: 3–4 weekends
Skill level: Advanced
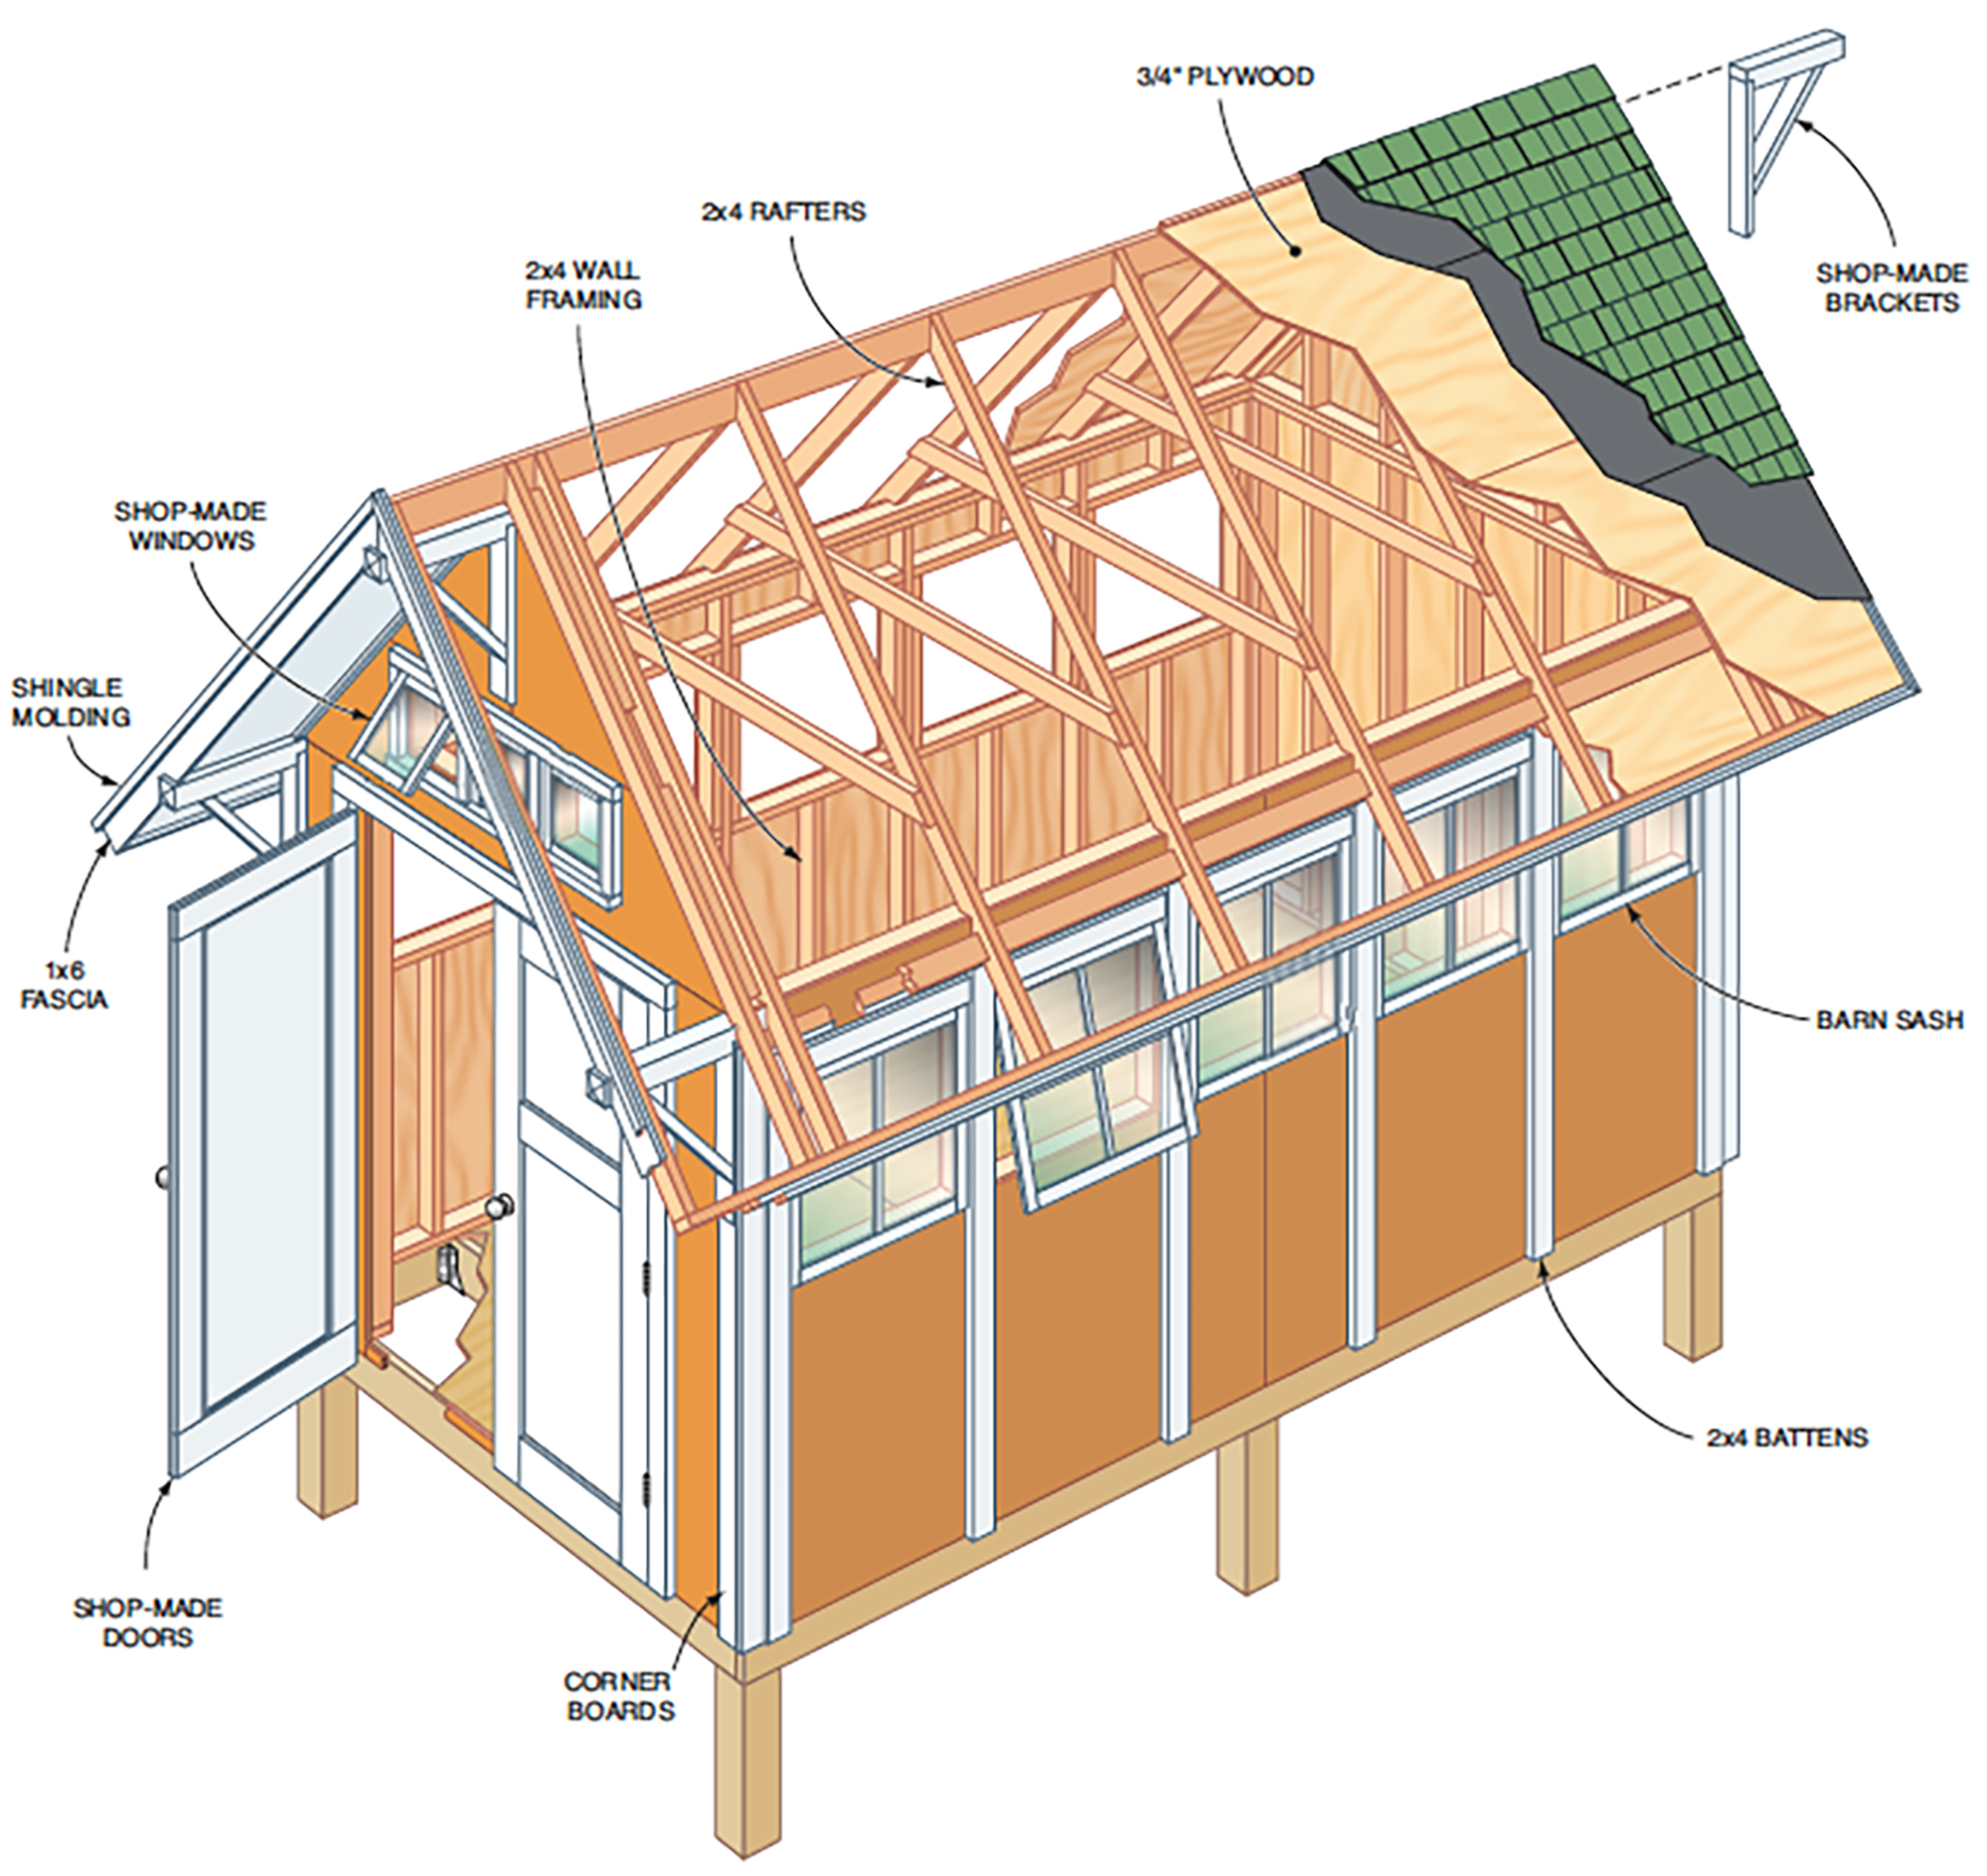
Don’t let the good looks fool you—this 8 x 14-ft. shed has a practical side as well. The bands of windows let in plenty of light and make it a good candidate for a potting shed, an artist’s studio or a small workshop. The double doors open wide for easy access to and storage of lawn tractors or other big gardening equipment. And since it’s built on a wood platform, you can put it almost anywhere, even on sloping ground or in areas that would be hard to reach with wheelbarrow loads of concrete.
While this isn’t a beginner project, if you’ve built decks or other small structures, you shouldn’t have any trouble constructing this shed. The wall and roof framing is straightforward, and the front windows and doors are engineered to be simple to build and install. In this article, we’ll show you the basics of how to build the shed and install the windows and doors. For framing, door, window and bracket details as well as a complete materials list, go to Garden shed illustrations and material list http://www.familyhandyman.com/sheds/garden-shed-illustrations-and-materials-list at familyhandyman.com.
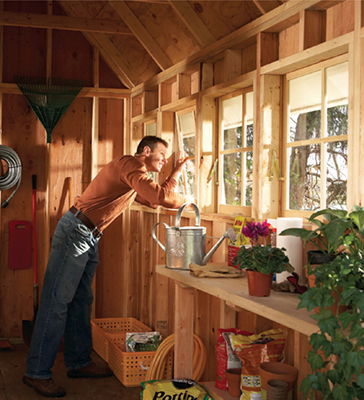
Continuous bands of windows flood this shed with light and provide great ventilation, making it a bright, airy working space. But if all you need is storage, you can easily build this spacious shed with fewer windows or no windows at all.
The materials for this shed cost about $4,000. You’ll find most of the materials in stock at home centers and lumberyards. However, a few items, like the rough-sawn cedar boards for the exterior trim and 5/8-in. rough-sawn plywood for the siding, may not be available in your area. If this is the case, ask the salesperson to suggest substitutes. The barn sash windows are available from some local window suppliers or online. You’ll need a tool belt full of standard carpentry tools as well as a circular saw to build the shed. You’ll also need a table saw and a power miter saw to cut parts for the triple-wide front window and double front doors. With a helper or two, you could have the platform and shell built in two or three days. Then expect to spend four or five more days completing the siding, trim, doors, windows and roofing.
Several weeks before you start, check with your local building department to see whether a permit is required and to find out how close to the lot lines you can build. Then call 811 for instructions on how to locate buried utility lines.
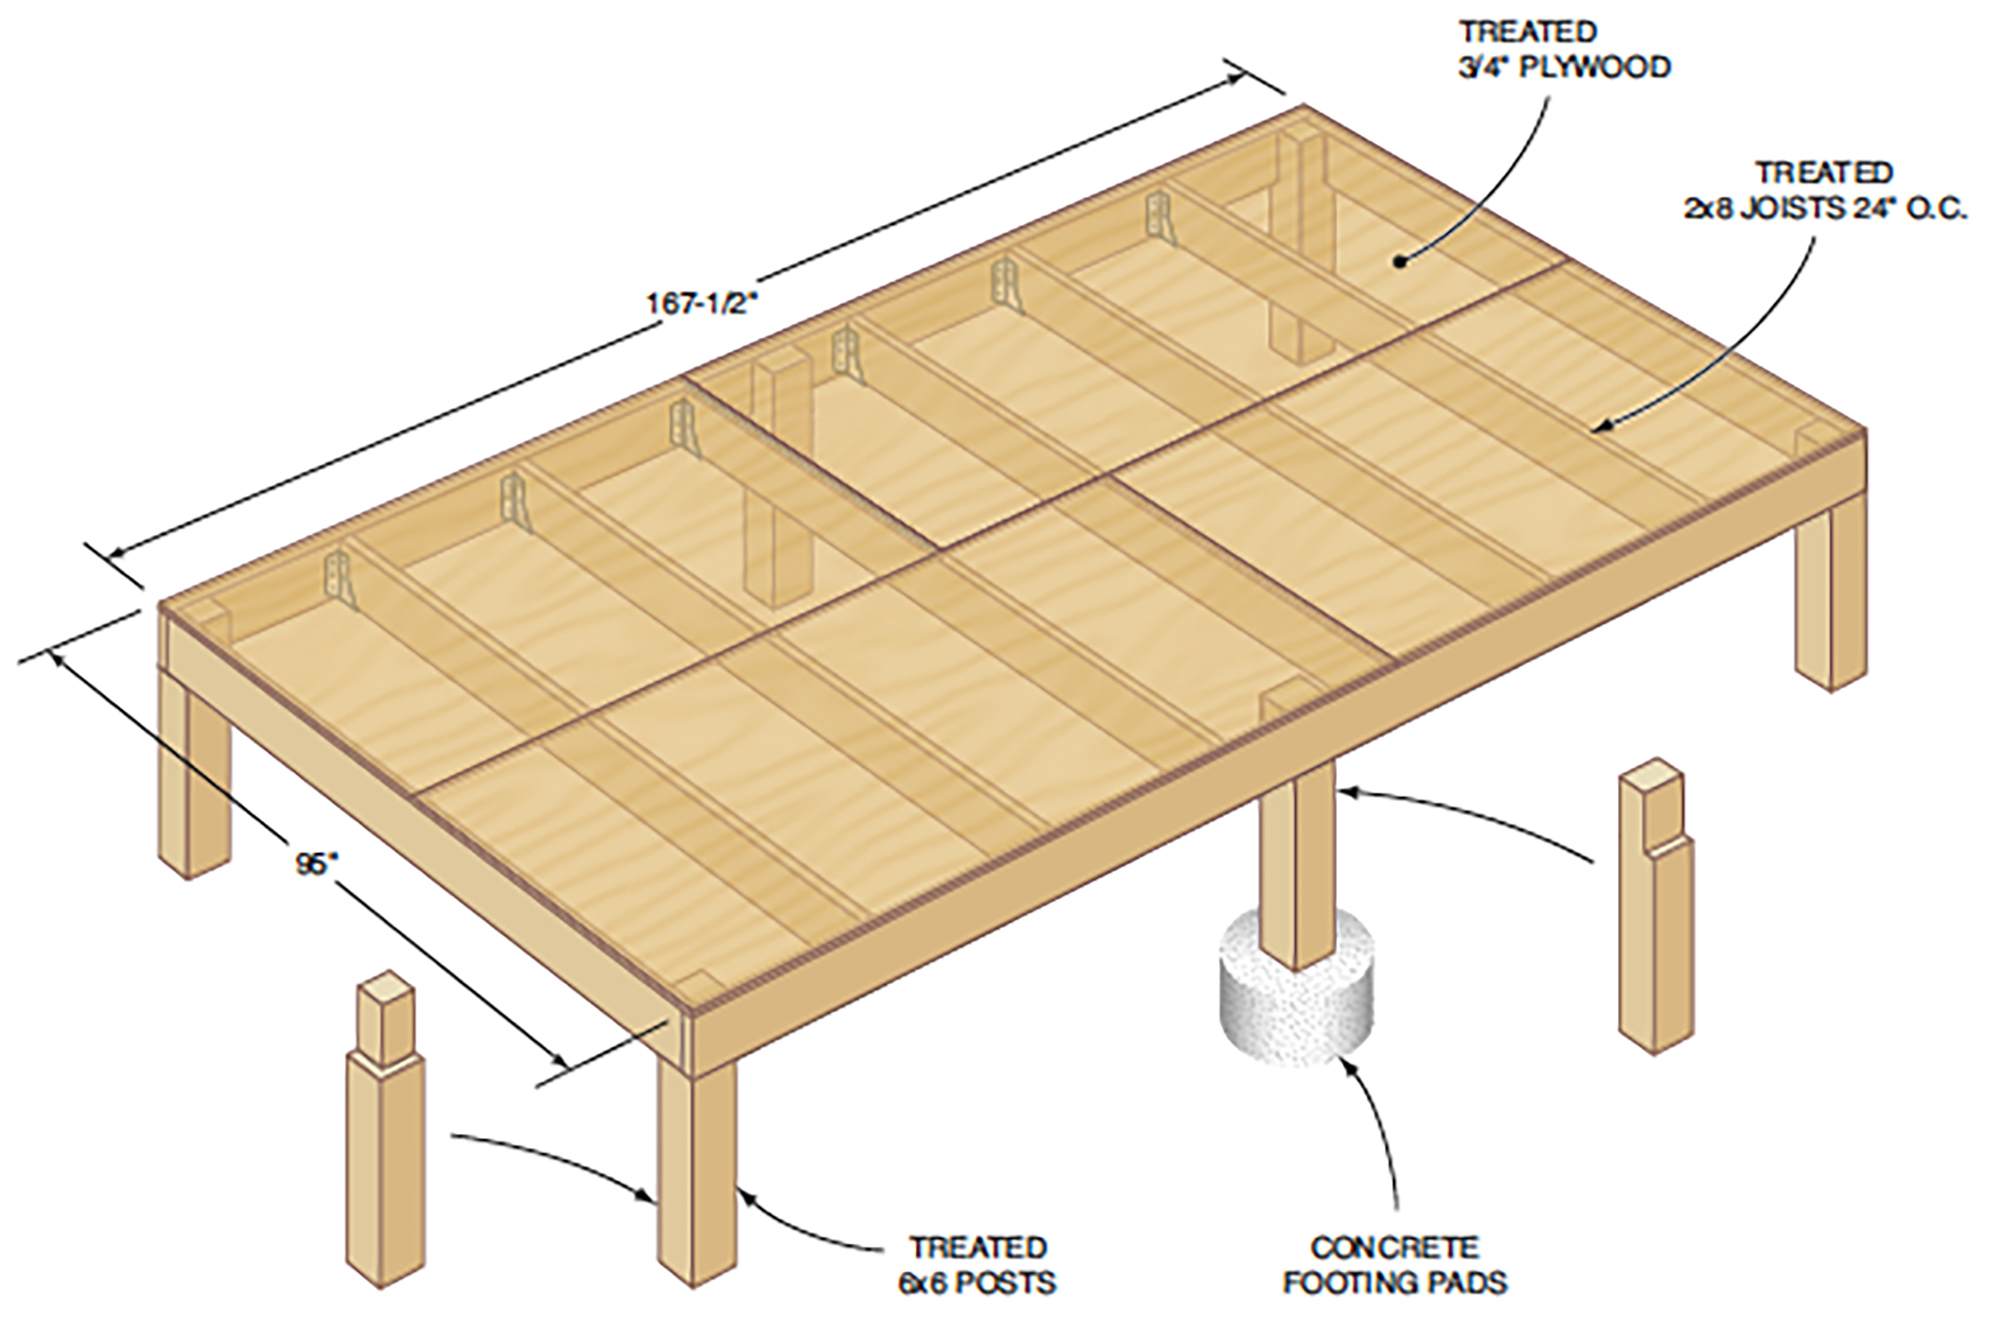
The first step is to build the jig for locating the footings and posts. Start by screwing four 2x4s together to form a rectangle with interior dimensions of 95 in. x 167-1/2 in. You’ll use this frame to position the footing holes and posts. Square the 2x4 frame by making sure the diagonal measurements from opposite corners are equal. Then screw a diagonal brace to the frame to hold it square.
Position the frame in your desired shed location and use it to mark the location of the six posts. Move the post hole centers 2-3/4 in. inside the frame. Dig the holes to the depth and diameter required in your area and pour 8-in.-deep concrete footing pads in the bottom of each hole. Let the concrete harden overnight. The next day, cut the posts to length and notch them to support the joists as shown in Figure B. Use a builder’s level, laser level or level mason’s line to mark the posts for cutting. Position the posts by toe-screwing them to the 2x4 layout frame. Be sure they’re plumb. Then pack soil around the posts. Build the platform on the posts according to Figure B.
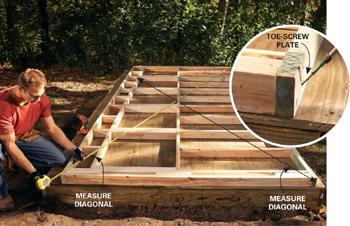
Snap chalk lines on the plywood deck, 3-1/2 in. from the edges of the platform, to indicate the inside edge of the walls. Cut the wall parts using the Web site details as a guide. Then build the first wall and align the bottom 2x4 with the chalk line so it’s straight. Hold the wall in place temporarily with toe screws through the bottom plate (Photo 1 inset). Measure diagonally to square the wall (Photo 1) and tack the top corners in place with toe screws.
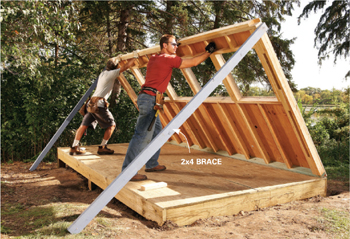
With the bottom plate secured along the chalk line and the wall held square, it’s safe to nail on the plywood siding (Photo 2). Make sure the plywood extends 1-7/8 in. past the bottom plate. The joint between the two center sheets of siding won’t be covered by a 2x4 batten, so for the best appearance, keep the nails evenly spaced and drive them carefully to avoid dents. Complete the siding, then remove the toe screws and stand the wall (Photo 3).
Line up the bottom plate with the chalk line and drive 16d nails between each stud into the rim joist. Then temporarily brace the wall with 2x4s while you build and stand the opposite wall. Build the end walls, but don’t install the plywood yet. Stand the end walls and nail them to the platform. Then nail the corners together with 16d nails and add the second top plate. Finally, use a 4-ft. level to plumb the front and back walls while you screw on diagonal braces to hold them square.
Finish the end walls by nailing on the siding. On the front wall, make sure to line up the top edge of the siding with the underside of the top wall plate to allow for the installation of the drip cap over the door (Figure D in web site). You’ll fill in the upper part of the end walls after building the roof frame.
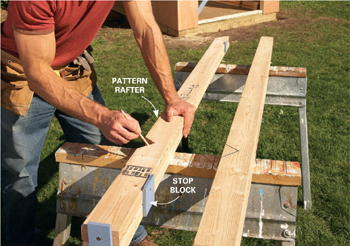
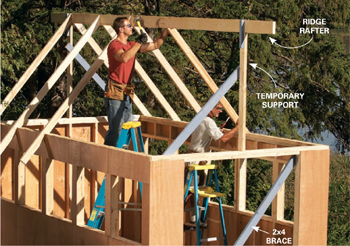
Start by cutting the ridge to length and marking the rafter locations on it. Also mark the rafter locations on the top plates of the walls. Set the ridge board on temporary posts (Photo 5). Then cut out a pair of rafters, using Figure E (online) and Photo 4 as guides. Test the fit by holding the rafters in place against the ridge. If the ridge and bird’s-mouth cuts fit tight, label one of the rafters as a pattern and use it to mark the remaining 2x4s for cutting. You’ll need 16 rafters that match the pattern and four front and back rafters with shallower bird’s-mouth cuts to accommodate the brackets. Nail pairs of rafters to the ridge with 16d nails (Photo 5). Line up the rafters with the marks on the top plates and secure them with metal framing anchors. Wait until after you’ve nailed the 2x4 subfascia to the rafter tails to install the rafters that make up the front and back overhangs. Complete the roof framing by nailing blocking between the rafters to support the soffit plywood.
Using Figure C (online) as a guide, cut 2x4s to fill in the area above the front and back walls. Start by cutting the sloped top plates and nailing them to the blocking between the rafters. Then lay out the stud location on the top plate of the lower wall and use a level to transfer the marks to the sloped top plate. Measure between the marks to find the length of the studs. Frame the window openings on the front wall using the measurements in Figure C (online). Leave the siding off until after the doors are installed to allow for the drip cap installation.
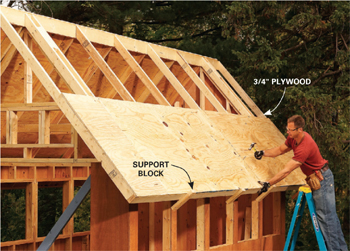
The next step is to install the roof plywood (Photo 7). But before you do, check the top section of the end walls with a level to make sure they’re plumb. If the walls aren’t plumb, the roof will be out of square.
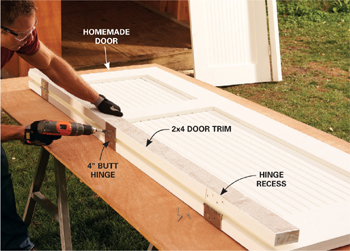
Assemble the front doors using good-quality, straight 1x6 and 1x8 boards with plywood paneling inserts (Figure H, online). We’ve simplified the door-hanging process by mounting each door to a 2x4 and then screwing them separately to the wall. An easy way to mark and cut matching hinge recesses in both the door and the 2x4 is to clamp the 2x4 alongside the door, making sure the 2x4 extends 1/8 in. above the top of the door. Then mark the hinge cutout on both the door and the 2x4 at the same time. If you have a router, use a hinge-mortising bit to cut the hinge recesses. Otherwise use a sharp chisel. Screw the hinges to the door and 2x4 (Photo 8).
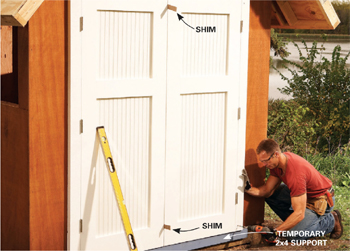
To hang the doors, line up a temporary 2x4 with the bottom of the siding and screw it to the wall. Then rest the doors on the 2x4 and use shims to create an even 1/8-in. space between them. Finally, drive 3-in. screws through the 2x4s into the framing to hold the doors in place (Photo 9). Finish the door installation by adding the top 2x4 trim piece and covering it with a metal drip cap (Figure G, online). Once the top door trim and drip cap are in place, cut and install the plywood siding that extends above the door. Stop these siding pieces 2-1/2 in. above the window opening to allow for the window drip cap.
Figure H (online) shows how to assemble the front window. Mount the window by screwing the window assembly on top of the plywood. Then install the drip cap and plywood above the window.
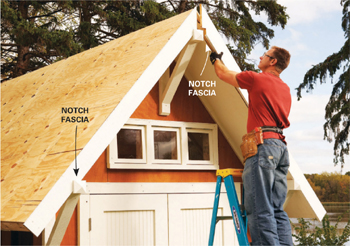
Figure A shows the exterior trim details. The tricky part is installing pieces in the correct order. Start by mounting the brackets. Fit the two lower brackets into the notched rafters and screw them to the wall. Center the top bracket on the peak and push it tight to the rafters. Next, nail soffit plywood on the sides and front. Extend the side plywood to the outermost rafters. Wrap the corners with the corner boards, making sure to overlap the side boards onto the front boards so the batten spacing works out right (Figure G, online).
Next, nail a side batten alongside each side corner board. Wait to install the remaining battens. To simplify measuring, cut the 50-degree angle on the top of the corner and batten boards but leave them a little long. Push the angled end tight to the soffit and mark the lower end at the bottom of the siding. Get ready for roofing by adding the fascia boards and shingle molding. Photo 12 shows how the fascia boards are notched around the brackets. Keep the 1x2 shingle molding flush to the top of the roof plywood.
Rip 2x4s at a 50-degree angle and nail the beveled piece to the rafters to cover the seam between the soffit and the siding and to create a flat spot for the battens to butt against. Cut the battens to length and nail them to the studs between each window opening, taking care to position them parallel and an equal distance apart.
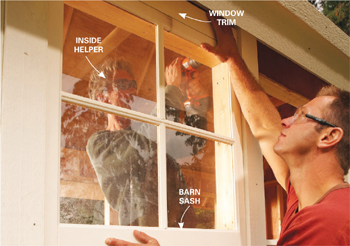
The barn sash windows fit between the battens and on top of the siding. Just as with the front door mounting system, you start by mounting the sash to a board that’s cut to fit between the battens (Photo 10). To prevent the windows from binding, make sure the edge of the board and the edge of the window are the same distance from the hinge (Photo 10, inset). Also make sure to center the window on the board. To help line up the window in the opening when you mount it, make a mark 1/2 in. from the bottom of the sash on the side that will face in. Line up the mark with the bottom of the window opening when you screw the board and window into place.
Photo 11 shows how to install the windows. You need a helper to screw the board and window from the inside because there’s not enough space for a cordless drill under the soffit. Complete the window installation by screwing lid support hardware to the sides of the windows, about 8 in. from the bottom, and adding hook-and-eye locks and pulls.
Complete the shed by installing shingles and finishing the exterior. For information on how to install shingles, go to familyhandyman.com and type “roofing” into the search box.
We stained and sealed the siding with a clear exterior stain finish. Prime and paint the trim, battens, doors and windows before installing them, then you only need to caulk and fill nail holes before rolling an additional coat of paint onto the flat surfaces.
1
Use the shed floor as a wall-framing platform. Straighten the bottom plate and screw it to the floor. Adjust the top plate until the diagonal measurements are equal. Add screws to the top plate to hold the wall square.
3
Screw braces to the tops of the walls before you raise them. Screw the lower end of the brace to the platform to support the wall temporarily.
4
Cut one rafter and use it as a pattern to mark the others. Plywood stop blocks hold the pattern in position while you mark.
5
Position the ridge on temporary posts. Installing rafters is a lot easier if you have a helper at the other end.

6
Add the subfascia before you install the outermost rafters. The subfascia supports the outermost rafters and allows you to drive shims behind it to create a perfectly straight nailing surface for the fascia board.
8
Hinge the doors to the side casings first. That way you can align the two doors easily and attach them by screwing the side casing to the shed.
9
Position the doors with a temporary ledger and shims. Then screw the side casings to the shed for a perfect fit.

10
Hang the windows using the same foolproof system you used for the doors. Cut lengths of trim to fit between the battens and attach the window to them with small butt hinges.
11
Align the barn sash between the battens while a helper screws through the siding into the top trim piece from the inside.
12
Paint the exterior trim before you put it up. It’ll save you a lot of time and allow you to protect even the back sides with primer and paint.
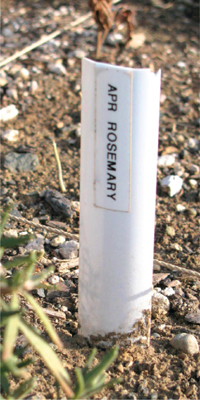
Labeling rows of plants in a garden can be difficult. Even permanent markers can't stand up to constant sun and moisture. Here's one solution: a label maker and recycled vinyl window blinds. Cut the slats into 9-in. lengths and stick on the labels. They stand up to any kind of weather without smearing, dissolving or rotting away.
Reader photo
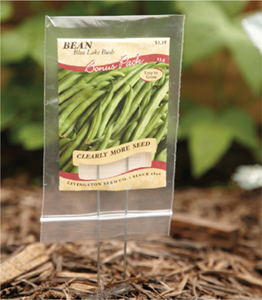
Here’s another easy way to keep a paper seed packet from getting destroyed by wind and rain out in your garden: Slip a small zipper-type plastic bag over the packet, with the bag upside down so the rain doesn’t get in.
If you spend a lot of time outdoors, it's a good idea to carry a repair kit wherever you go.
Of course, the kit varies depending on the trip, but here are a few standard items. Some are pretty obvious, like duct tape, paracord, zip ties and a multi-tool.
But the others aren’t: A piece of aluminum tube that can slide over a broken tent pole can be a trip saver. A lightweight magnifier will actually allow you to see what you’re doing when you make small repairs.
And thin wire is one of the most useful items you can carry. Wrap it, twist it, “sew” with it . . . . It’s strong, heat-proof and doesn’t stretch. You can use it to fix everything from a boot to a canoe.