
WHAT IT TAKES
Time: 2 weekends
Skill level: Intermediate
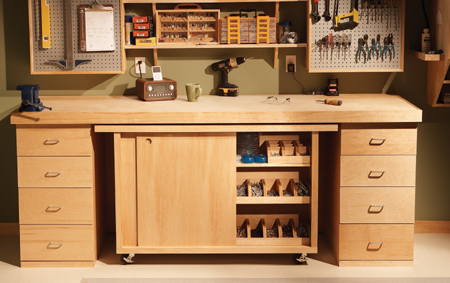
A well-organized workshop with accessible storage and plenty of work space makes any project easier, but finding that space in a small garage can be a challenge. This workbench goes a long way toward solving that problem by simply making the space you have work harder. By combining a rollout workbench with a large work table and deep drawer bases, you can almost double the available work surface, plus make it easier to get at tools and put them away when you’re done.
You can build the whole project with a circular saw and a drill, but a table saw, brad nailer, miter saw and router will make it go faster. The cost for lumber and hardware for this project is about $700 if you use maple plywood (as we did), or half that if you substitute standard BC-grade plywood. You can build the project in three to four days, with another day for applying finish.
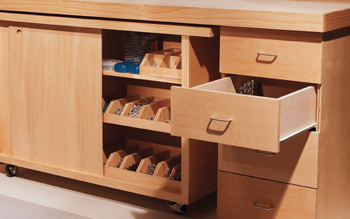
Long, deep drawers let you organize small tools, parts and hardware.
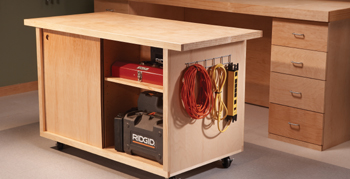
The rollout opens from both sides—one side for large tools, the other for small fasteners and supplies. Hooks at each end hold cords and hanging tools.
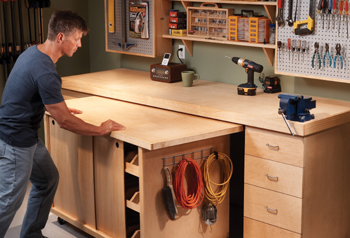
When you’re done working, just tuck the rollout bench back under the fixed bench.
The most time-consuming part of building the workbenches is ripping all the plywood parts. If you’re working by yourself on a table saw, you may want to make the long rip cuts with a circular saw and a saw guide (for tips, search for “circular saw” at familyhandyman.com). Just make the shorter cuts on the table saw—it’s difficult to muscle a 4 x 8-ft. sheet of plywood across a small saw bed without veering away from the fence. Label each piece as you cut it to avoid confusion later.
Attach the drawer slides to the drawer cabinet sides before you assemble the drawer bases (Photo 1). See Figure A for placement. We used inexpensive 24-in. self-closing drawer slides that screw to the bottom edge of the drawer box. Side-mounted drawer slides require different placement.
Glue and clamp the drawer cabinet parts together, then predrill and screw them. Glue and nail the drawer cabinet cleats from the inside with 1-1/4-in. brad nails or screws.
Glue and screw a 2x4 to the edge of the plywood subtop, then clamp the subtop to the 1/2-in. plywood back. Attach both drawer cabinets (Photo 2), aligning them with the edges of the back and subtop—that will make the table square in both directions.
Tip the bench onto the floor and add the remaining 2x4s. Clamp the front 2x4 to a straightedge to keep the top flat, then glue and screw the 2x4s down. First screw them to the drawer cabinets with 2-1/2-in. screws (Photo 3), then finish by crawling under the bench and screwing the subtop to the 2x4s from underneath.
Finally, spread more glue on the 2x4s and set the plywood top into place. Fasten the top with finish nails, pushing down as you nail to make sure the plywood lies flat on the 2x4s. After the glue sets, the 2x4s and the plywood form a rigid structure called a torsion box, which will resist bending or sagging.
Build the drawer boxes 1 in. narrower than the opening (or as specified for the drawer slides you use). Attach the other half of the drawer slides to the boxes and set them into the drawer cabinets.
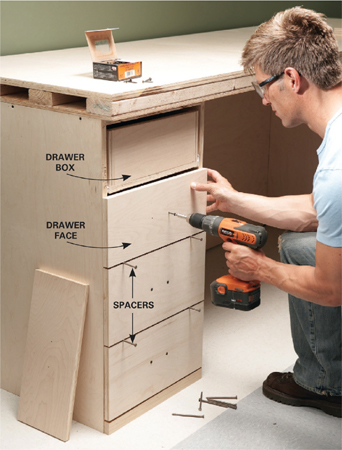
Position and fasten the drawer faces, then open the drawers and screw the faces to the drawer boxes from the inside with 1-1/4-in. screws (Photo 4). Use 16d nails or shims to create 1/8-in. gaps between the drawer faces.
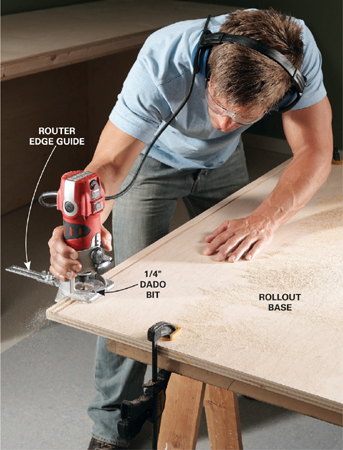
Using a router or a table saw with a dado blade, cut 1/4-in.-wide tracks for the sliding doors (Photo 5). Use an edge guide (make sure it’s fastened tight) or clamp a straightedge to the plywood as a guide for the router. Cut the dadoes in the base first, then align it with the top and mark the cuts (the top and base are different widths). Cut the tracks in the base 3/16 in. deep and the tracks in the top 7/16 in. deep to make it easy to insert the sliding doors. Make the deeper router cuts in two passes. To help the doors slide easily, wrap 120-grit sandpaper around a small piece of 1/4-in. plywood and rub it back and forth in the door tracks to eliminate rough spots.
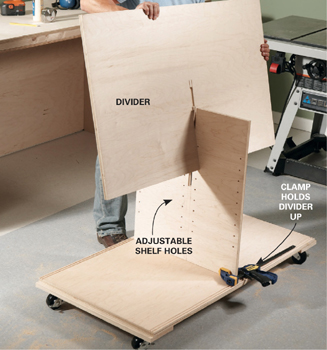
Glue and screw the 1x6 wheel supports (part X) to the edges of the base, then attach the casters with lag screws. Mark and drill matching shelf pin holes in the short center divider and the sides. Cut 3/4-in.-wide slots at the centers of the long and short dividers with the table saw (or circular saw) and jigsaw. Make the cuts 1/8 in. beyond the halfway marks so the two dividers will fit together easily and line up at the edges (Photo 6).
Position the dividers on the base as shown in Figure A, then lock them to the base with 3/4-in. cleats glued and nailed to the long divider. Set the sides into position on the 1x6 wheel supports and fasten them to the center divider and base with 1-1/2-in. brad nails (or screws if you don’t mind seeing exposed screws).
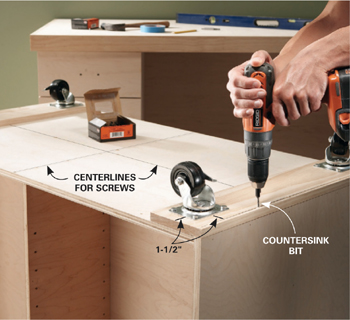
Set the bottom layer of the benchtop into position, align the sides and the center divider, then tack everything into place with a few finish nails. Mark the centers of the dividers and sides, then predrill and screw the top down (Photo 7).
Spread glue over the top and fasten the second layer of the top with a finish nail at each corner. Then drive 1-1/4-in. screws up through the bottom layer into the top to lock the two layers together.
Turn the rollout bench over and screw the base to the dividers and sides (Photo 8).
Cut the doors for the rollout bench the height of the opening plus 3/8 in. so they can fit up into the top track and then drop into the bottom track without falling out. Cut holes for handles with a 1-1/2-in. hole saw. Back the doors with scrap wood before cutting the holes so they don’t splinter. Rub hard paraffin wax (sold at hardware stores) along the bottom edges of the doors (after finish is applied) to make them slide smoothly in the tracks.
Add trim to both benches. Nail the upper and lower trim on the rollout bench to the outer edges only, to avoid nailing into the tracks. If desired, add 1/4-in. screen mold trim to finish the shelf edges. Sand all edges and rough spots on both workbenches.
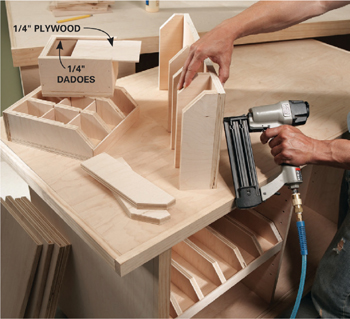
Use the small pieces of leftover plywood to create bins on the shelves and storage containers for small parts and fasteners (Photo 9).
Finish the bench with either urethane varnish (durable but time-consuming to apply) or penetrating oil (goes on quickly but doesn’t protect as well). Or leave it unfinished so you can accumulate a patina of marks and splatters from all the projects you make.
Materials list
ITEM |
QTY. |
3/4" maple plywood |
7 |
1/2" maple plywood |
1 |
1/2" BC-grade plywood |
1 |
1/4" maple plywood |
1 |
2x4 x 8' |
4 |
1x6 x 6' pine |
1 |
1x4 x 6' clear pine |
1 |
1x4 x 10' clear pine |
1 |
1x2 x 8' clear pine |
5 |
3/4" x 3/4" x 8' pine (rip from 1x2) |
2 |
1/4" x 3/4" x 8' screen mold for shelf edging |
3 |
Wood glue |
|
1-1/4" drywall screws |
|
1-5/8" drywall screws |
|
2-1/2" drywall screw |
|
1-1/4" nails for pneumatic finish nailer |
|
3" locking casters |
4 |
24" drawer slides |
8 prs. |
Adjustable shelf pins |
|
Drawer pulls |
8 |
1/4" x 1-1/4" lag screws (for wheels) |
16 |
(All materials are available from home centers or lumberyards)
KEY |
PCS. |
SIZE & DESCRIPTION |
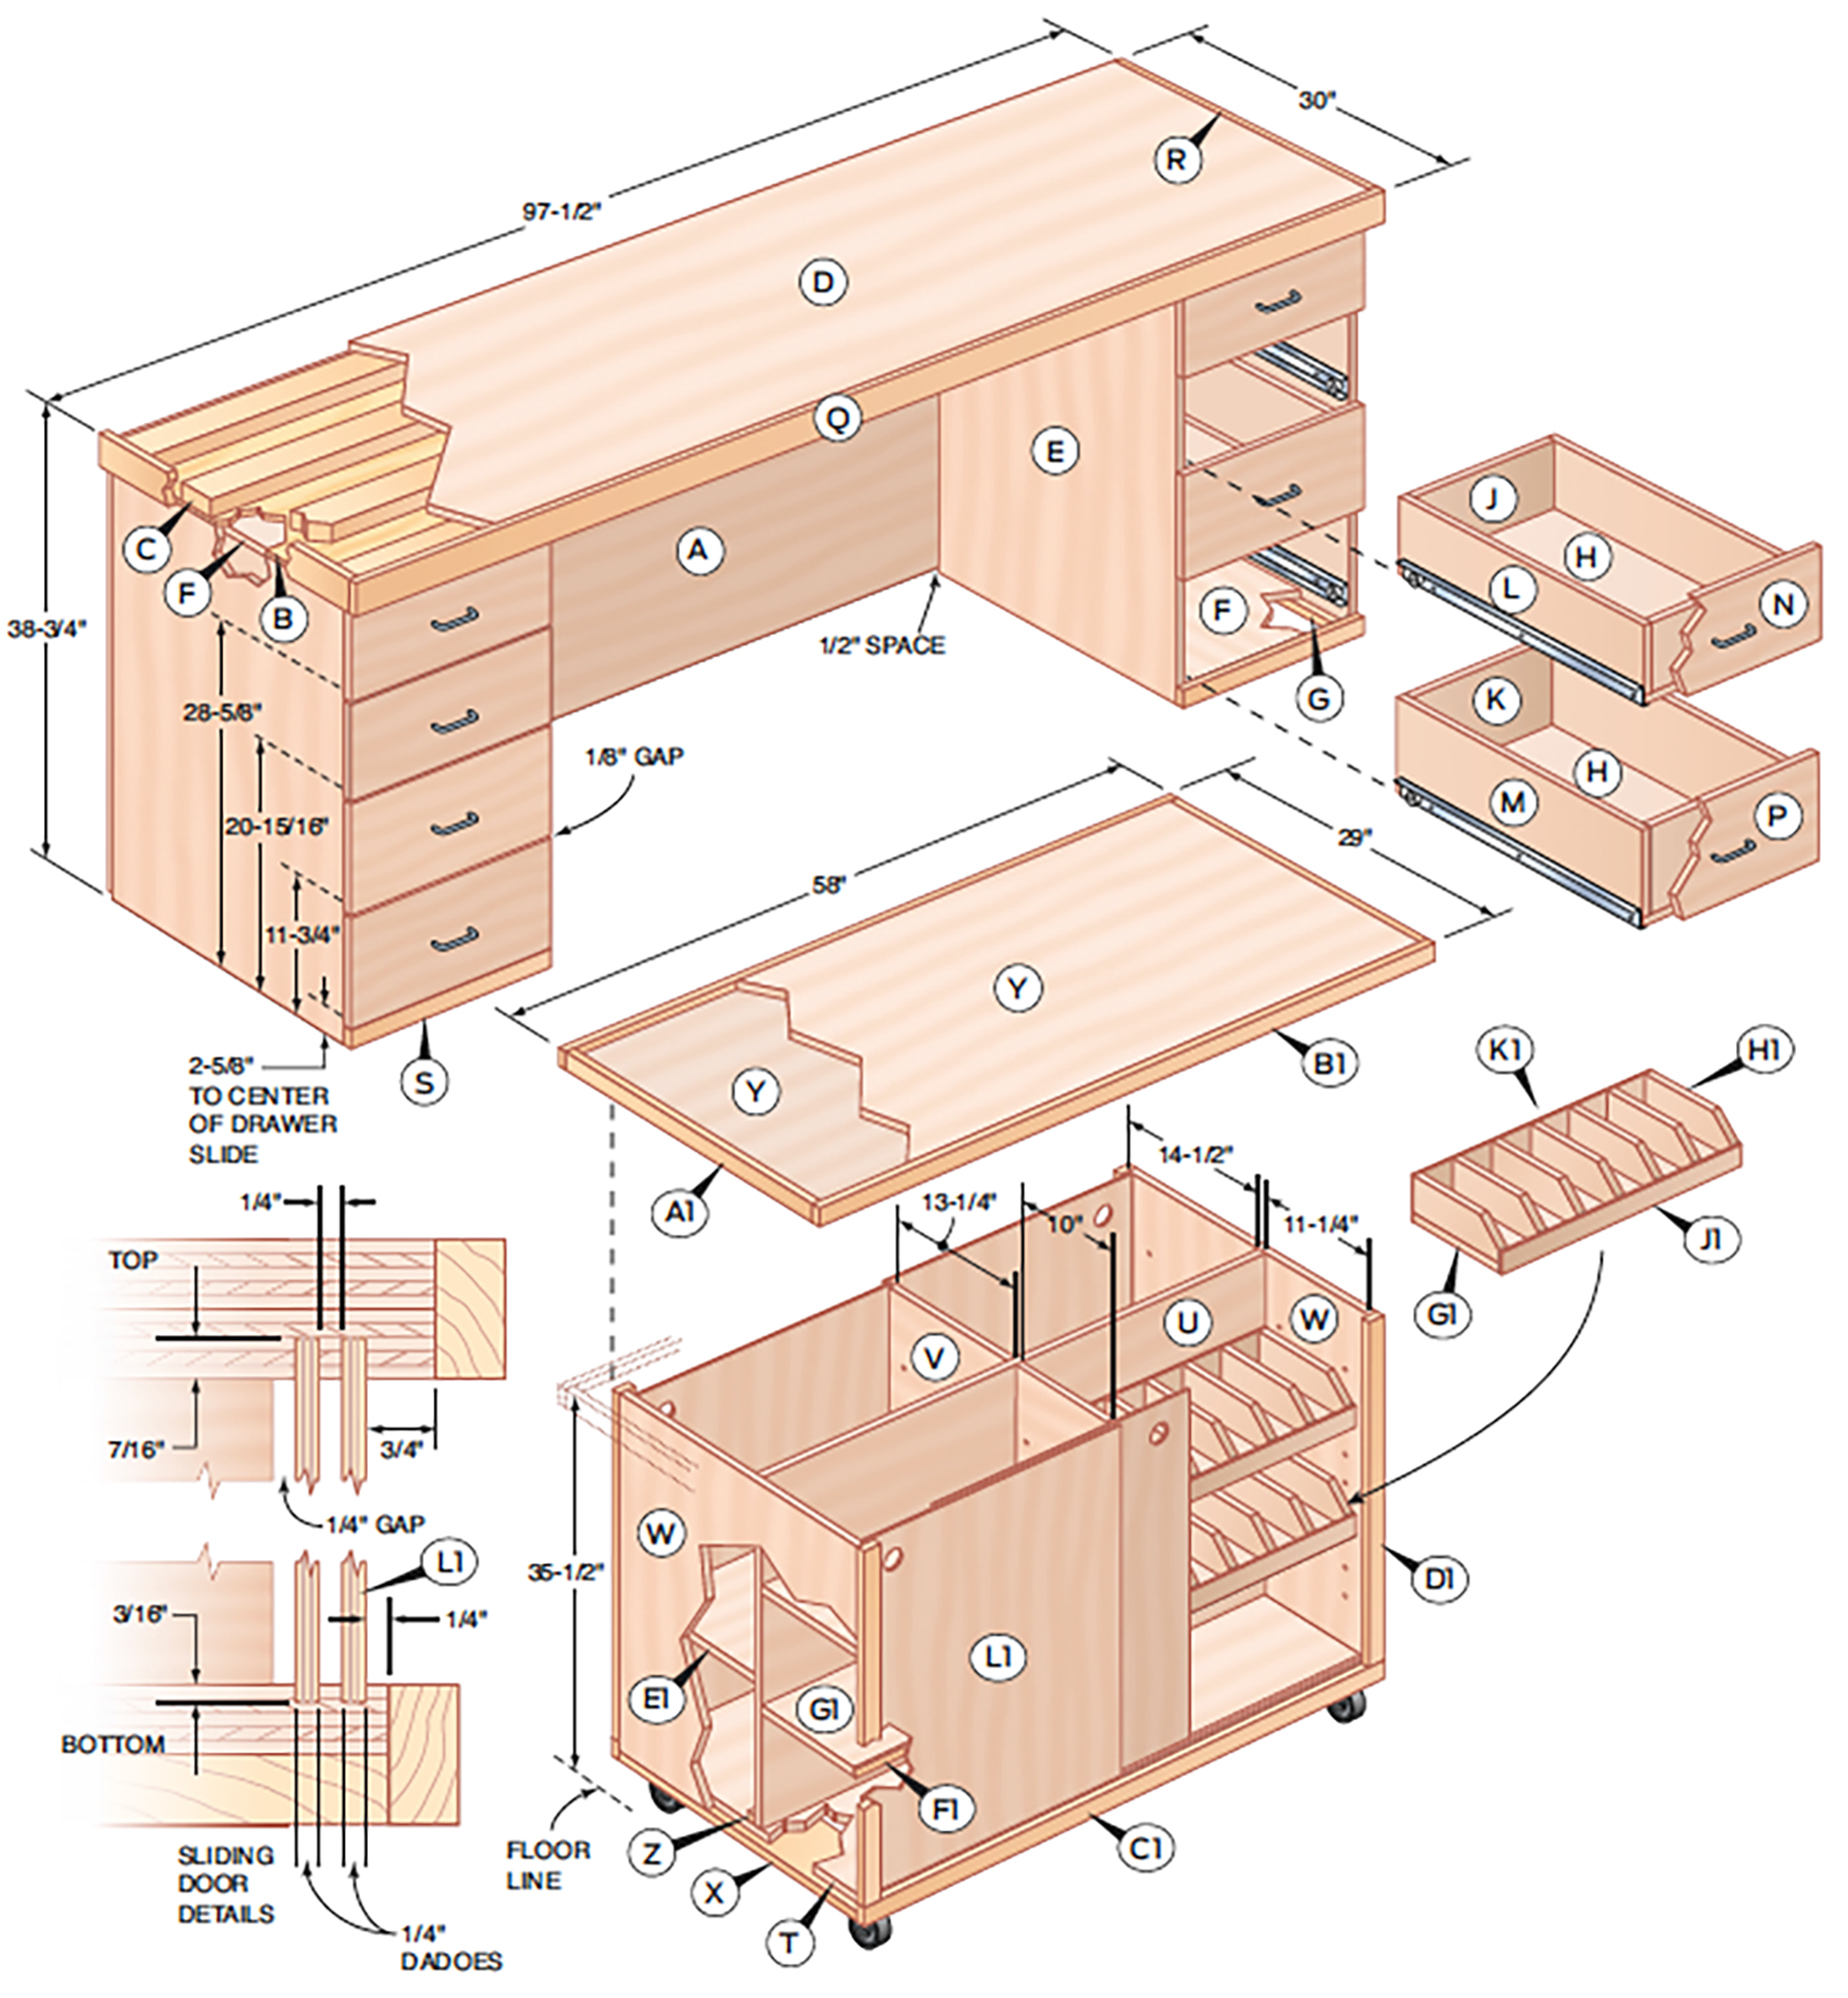
A |
1 |
37-1/2" x 96" x 1/2" back |
B |
1 |
28-3/4" x 96" x 1/2" BC plywood subtop |
C |
4 |
2x4 x 96" studs |
D |
1 |
29-1/4" x 96" x 3/4" top |
E |
4 |
27-1/4" x 36" x 3/4" drawer cabinet sides |
F |
4 |
27-1/4" x 16-1/2" x 3/4" drawer cabinet tops and bottoms |
G |
4 |
27-1/4" x 3/4" x 3/4" pine drawer cabinet cleats |
H |
8 |
26" x 15-1/2" x 3/4" drawer box bases |
J |
8 |
14" x 5-3/4" x 3/4" drawer box fronts and backs |
K |
8 |
14" x 7-1/4" x 3/4" drawer box fronts and backs |
L |
8 |
26" x 5-3/4" x 3/4" drawer box sides |
M |
8 |
26" x 7-1/4" x 3/4" drawer box sides |
N |
4 |
18" x 7-13/16" x 3/4" drawer faces (for small drawers) |
P |
4 |
18" x 9" x 3/4" drawer faces (for large drawers) |
Q |
1 |
97-1/2" x 2-3/4" x 3/4" clear pine front trim |
R |
2 |
29-1/4" x 2-3/4" x 3/4" clear pine side trim |
Cutting list: Rollout bench
KEY |
PCS. |
SIZE & DESCRIPTION |
S |
2 |
18" x 1-1/2" x 3/4" clear pine base trim |
T |
1 |
26-1/2" x 47-1/2" x 3/4" base |
U |
1 |
28-3/4" x 47-1/2" x 3/4" long center divider |
V |
1 |
28-3/4" x 24" x 3/4" short center divider |
W |
2 |
26-1/2" x 29-1/2" x 3/4" sides |
X |
2 |
26-1/2" x 3/4" x 5-1/2" pine wheel support |
Y |
2 |
27-1/2" x 56-1/2" x 3/4" top |
Z |
2 |
23-3/8" x 3/4" x 3/4" pine cleat |
A1 |
2 |
27-1/2" x 1-1/2" x 3/4" clear pine trim |
B1 |
2 |
58" x 1-1/2" x 3/4" clear pine trim |
C1 |
2 |
49" x 1-1/2" x 3/4" clear pine base trim |
D1 |
4 |
28-3/4" x 1-1/2" x 3/4" clear pine side trim |
E1 |
4 |
13" x 23" x 3/4" plywood shelves |
F1 |
6 |
23" x 1/4" x 3/4" shelf edge |
G1 |
4 |
9-1/2" x 23" x 3/4" plywood shelves |
H1 |
14 |
3" x 9-1/2" x 3/4" shelf dividers |
J1 |
2 |
1-3/4" x 23" x 1/4" shelf front |
K1 |
2 |
3-3/4" x 23" x 1/4" shelf back |
L1 |
4 |
23-15/16" x 29-1/8" x 1/4" plywood door |
(All pieces are maple plywood unless noted.)
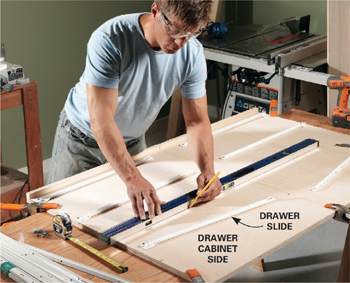
1
Save time and trouble by mounting drawer slides before assembling the cabinets. Lay the cabinet sides back-to-back, mark the slide locations and screw them into place.
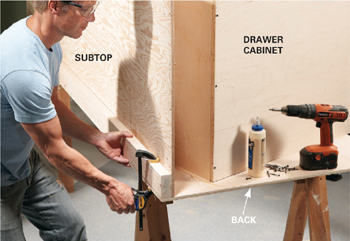
2
Join the back to the subtop with glue, screws and a 2x4, then glue and screw the drawer cabinets into place for a square, wobble-proof workbench.
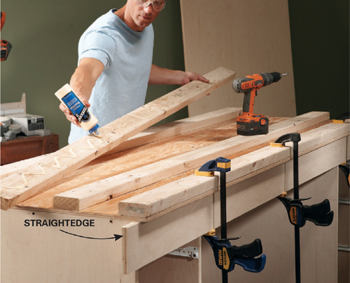
3
Assemble a “sandwich” from 2x4s and plywood to form a super-stiff benchtop. Fasten 2x4s to the subtop, using clamps and a straightedge to hold the front edge flat. Then add the top layer of plywood.
4
Position the drawer faces perfectly without guesswork by drilling holes for the handles and driving temporary screws through the holes. Then open each drawer and drive permanent screws from the inside.
5
Cut matching tracks for sliding doors in the benchtop and base before assembly. Use a straightedge or router guide to make the tracks perfectly straight.
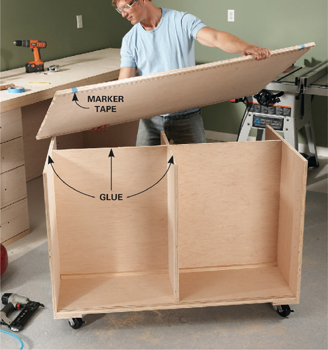
7
Mount the first layer of the benchtop, using masking tape markers to position it so you don’t smear the glue. Then add the second layer of plywood to create a rock-solid surface.