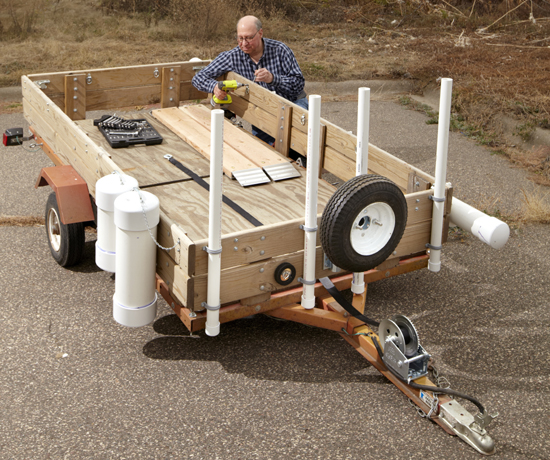
Most utility trailers come from the factory with just enough features to satisfy local safety regulations (if any) and your wallet. Sure, they work, but they’re not very user-friendly. They rarely have factory tie-downs or holders or other features to make hauling easier. But your trailer doesn’t have to stay that way. Here are some upgrades to make your trailer-hauling jobs a lot easier and safer. You can build and install most of the upgrades with just a socket set, drill, saw and screwdriver. Find the plumbing and hardware components at a home center or hardware store. Choose the upgrades you like.
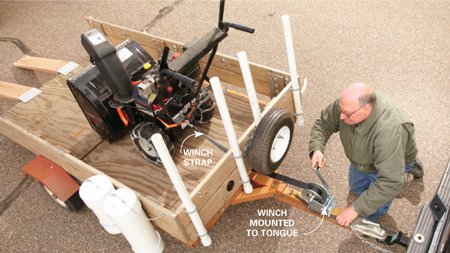
Boat owners use a winch to pull their boat onto the trailer. You can install one on a utility trailer, too. It’ll save your back and eliminate the need for a helper. Just wrap the strap around the heavy object and crank it up the ramp toward the front of the trailer. Bolt it to the trailer A-frame or tongue.
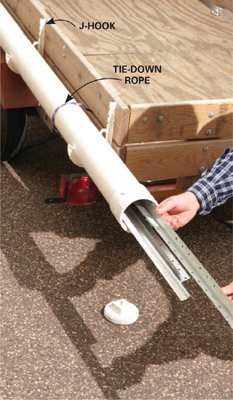
Ever tried to transport long or fragile items like pipe, drywall corner beads or drip edge? First you have to tie them in a bundle. Then you have to secure the bundle to the trailer. Forget that! Instead, build the same kind of rig a plumber uses. Then just slide in the long items, screw on the cap, secure a red flag and you’re good to go.
Buy a 10-ft. length of 4-in. PVC pipe, an end cap, a cleanout adapter, PVC cleaner and adhesive, and four J-hooks. Prime and glue the end cap and cleanout adapter. Take advantage of the wasted space on the side of your trailer and mount the tube there. Secure the four J-hooks to the side of the trailer and snap the tube into place. Tie the rig with rope for added security.
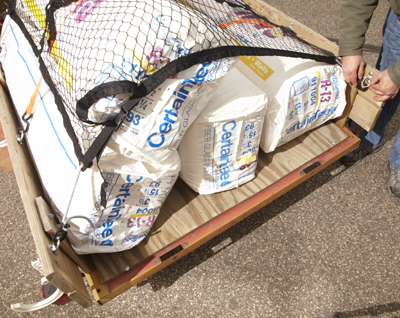
A cargo net and D-rings are great for “lighty, loosey” items
At highway speeds, light items can fly right out of your trailer. Even if they’re tied down, they can break loose and take off. So you need one final mode of protection. We recommend a cargo net. Find one in the automotive section of the home center or at any auto parts store. Install D-rings every 18 in. along the top rails. You may be tempted to screw them into place. Don’t. As the wood rails age, the screws can pull out. Instead, secure the D-rings with nuts and bolts. When you’re finished loading, just throw the net over the trailer and clip the snaps to the rings.
7 ways to prevent trailer disasters
1 TIRES: Always replace trailer tires with “Special Trailer” (ST) tires (never passenger-rated tires). ST-rated tires have stronger sidewalls and are built to handle heavier loads. ST tires have a maximum life of five years from the date of manufacture. Replace yours accordingly.
2 TIRE PRESSURE: Inflate trailer tires to the pressure shown on the tire’s sidewall. Or, if the sidewall pressure conflicts with the recommended pressure shown on the trailer manufacturer’s nameplate, follow the manufacturer’s pressure recommendation. Low tire pressure is the No. 1 cause of trailer tire failure. Overloading the trailer is No. 2.
3 LUG NUT/BOLT TORQUE: Tightening lug nuts or bolts to the proper torque is critical. If you’re not using a torque wrench, you’ll never get it right. The recommended torque should be listed on the trailer manufacturer’s nameplate, and it’s usually much higher than for cars and trucks. Never drive a loaded trailer with a missing lug nut or damaged lug bolt.
4 SAFETY CHAINS: Always cross the safety chains when you hook up to the hitch. The crossed chains catch the tongue and prevent it from hitting the pavement if it ever detaches from the receiver. Leave only enough chain slack to allow for turns. If your chain is longer than that, shorten it. Secure the coupler throw latch with a lock or clip to prevent it from popping open.
5 WHEEL BEARINGS: Failed wheel bearings are the No. 2 cause of all trailer breakdowns. Repack the bearings at least once a year (see Repacking trailer wheel bearings http://www.familyhandyman.com/automotive/utility-trailer/repacking-trailer-wheel-bearings/view-all). And don’t pack the hub with grease. Extra grease in the hub generates heat that can cause premature bearing failure.
6 LOAD PLACEMENT: Place 60 percent of the weight toward the front of the trailer to prevent sway and fishtailing.
7 LUBRICATE THE BALL: If you don’t, you’re wearing out either the ball or the coupler. And that wear can cause a sudden and dangerous disconnect. Sure, grease is messy. But it’s the only way to reduce heat and wear. Grease it or lose it.
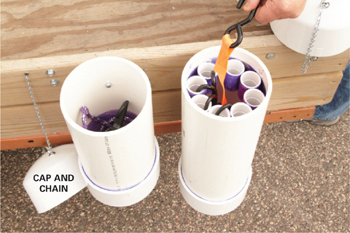
Here’s a great way to store your ratchet straps and bungee cords with the trailer, where they belong. Build vertical storage bins from 6-in. PVC pipe. Glue a cap on the bottom and drill a hole in it to overcome the suction when you pull off the lid. Then mount a handle on the top cap and attach a chain—perfect dry storage for whatever will fit inside.
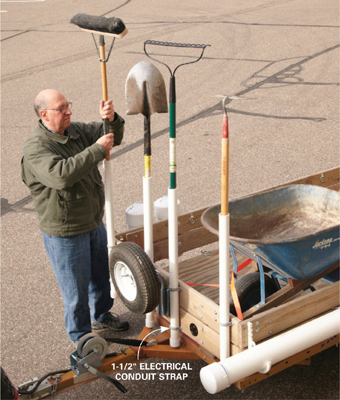
Landscapers and lawn care guys always haul around rakes, shovels, brooms and other implements by mounting vertical tubes on the front of their trailers. Here’s our version. Cut 36-in. lengths of 1-1/2-in. PVC pipe and glue on an end cap. Then drill a hole in each end cap to provide drainage. Attach the tubes using PVC electrical conduit straps and nuts. If you plan to use the tubes in winter, secure them with metal straps—PVC gets brittle in cold weather and can shatter. For added security, hook a bungee strap to each implement.
Can’t have too many tie-downs!
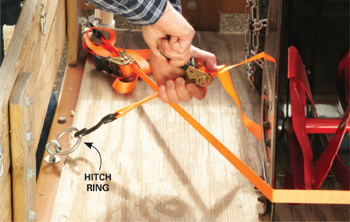
Did you know that poorly secured loads are responsible for more than 25,000 crashes and approximately 90 fatalities in this country each year? There’s simply no such thing as too many tie-down anchors. Hitching rings work great for this. You can find them at most hardware stores. Buy at least six 3/8 x 5-1/8-in. hitching rings, and mount two each in the front, middle and near the tailgate. Just drill holes in the frame (not the floorboards), insert the long bolt end and secure the threaded portion with a locknut.
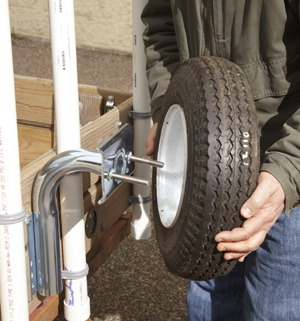
Flat tires are the No. 1 cause of trailer breakdowns. If you’re not carrying a spare tire when you get a flat, you’re in a heap of trouble. But where do you keep it—in the trailer bed where it’s in the way? This spare tire carrier doesn’t require assembly and can be mounted easily to the trailer rails. To lock the tire in place, simply run a bicycle locking cable down the tube and snap it shut.