
WHAT IT TAKES
Time: 3 weekends
Skill level: Advanced
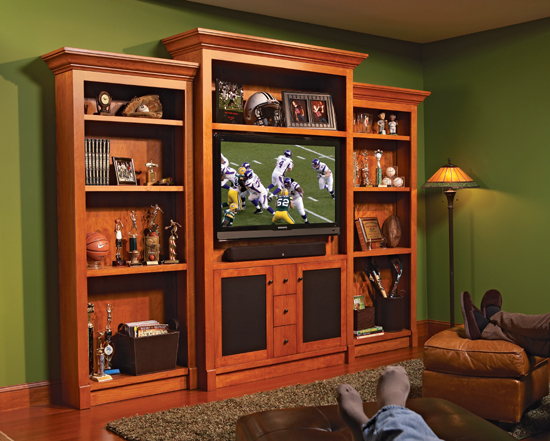
Until recently, it was hard to pack a high-quality sound system and TV into a traditional bookcase. Today’s smaller systems finally let you combine big sight and sound with classic design.
You don’t need a huge shop or industrial equipment to build this bookcase. We’ll show you how to cut and machine plywood perfectly without a pro-grade table saw. If your shop has enough open space to lay a sheet of plywood on sawhorses, then it’s big enough for this project. Plus, you won’t have to wrestle full sheets of plywood across the table saw. If you’ve been thinking about buying a new router, now is the time—this project will give it a good workout.
This bookcase will accommodate most 42-in. flat screen TVs, but not all. So make sure to measure your TV before you build. The total materials bill for this entertainment center—built from cherry—was about $1,250. Using less costly wood, such as oak, would cut the cost by about $400. This building method requires four different router bits. If you don’t already own them, expect to spend a bit more.
Rough-cut plywood with a circular saw and then clean up the cuts with a router. That makes perfectly smooth, straight, splinter-free cuts and lets you skip the struggle of steering full sheets across the table saw.
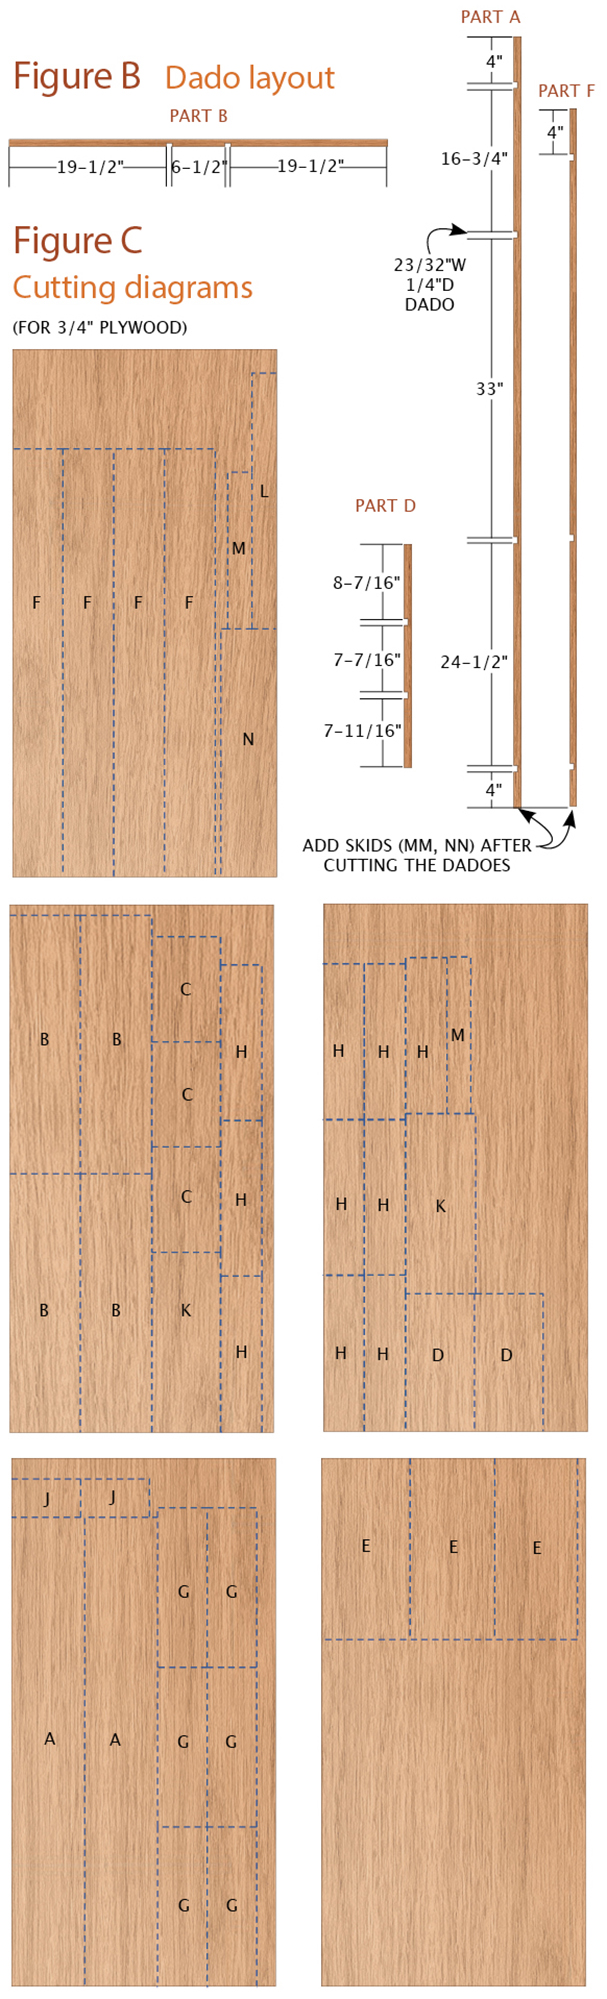
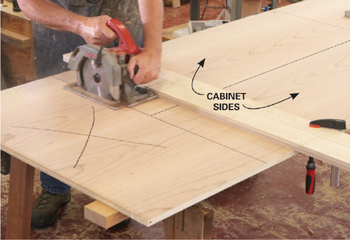
Mark out your cuts following the cutting diagrams, then rough-cut (Photo 1). Keep the rough cuts at least 1/8 in. from the cutting line. Don’t worry about getting a perfectly square cut at this point—close counts. Be sure to keep the pairs of parts A, D, B and E together so you can dado them in one pass (Photo 3) and later cut them apart. Don’t forget to leave a little extra width on these grouped sections to accommodate saw cuts.
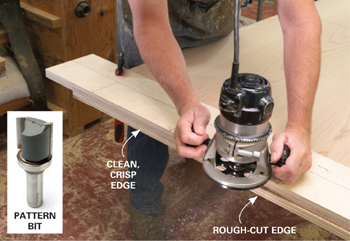
Finish the rough cuts with a router and a pattern bit (Photo 2). Set the straightedge against the line, clamp and rout. For shorter pieces such as shelves, rough-cut with the circular saw, finish the cut on one end with the router, then cut to final length on the table saw.
Plywood has a good side and a not-so-good side. Keep this in mind when you lay out your dadoes. You want the best face turned toward the outside of the cabinets.
Lay out the dadoes using a square and a straightedge. Be sure to mark an “X” or two alongside the line where the dado goes. If you forget to do this, you’ll eventually run a dado on the wrong side of the line.
You can cut the dadoes with a standard 3/4-in. bit, but it's better to use a special 23/32-in. “plywood” bit, which matches the actual thickness of so-called 3/4-in. plywood. You’ll need to add a bearing and stop collar to a plywood bit. Unfortunately, a 3/4-in. bearing is as close as you can get to the 23/32-in. plywood bit. This creates a tiny, 1/64-in. offset, an amount so slight you can ignore it. The measurements for shelf placement are not that critical.
Cut dadoes in the bookcase sides and the two dividers (Photo 3). Then split the paired parts by ripping them on the table saw. Before doing any other machining, dry-fit the lower half of the center bookcase (including the dividers, drawer runners, middle and bottom shelves and sides) to make sure all your pieces fit properly. This is a good time to cut the edging for the drawer runners and dividers. Glue and clamp these while the lower half is dry-fitted together. After the glue has set, disassemble and sand the hardwood edges flush to the veneer.
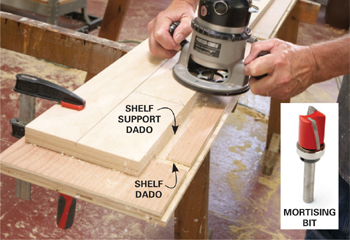
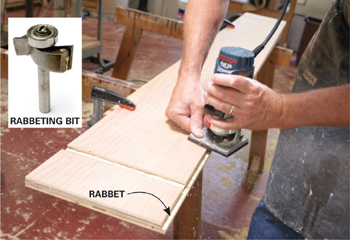
Next, cut 1/4-in. x 3/8-in. rabbets in the bookcase sides (Photo 4). These grooves create a recess for the 1/4-in. plywood backs. Finally, cut the shelf standard slots with a router and a 5/8-in. top-bearing mortise bit (Photo 5). It's better to use a router rather than a dado blade in your table saw. It’s a lot harder to get a consistent groove depth on a table saw because you’re forced to keep a long bookcase side flat on the table while feeding it over the dado blade.
Glue hardwood skids onto the bottom edge of each bookcase side and toe board. The skids protect the delicate veneer from catching and tearing when the cabinets are moved. Sand the edging flush.
Cherry is hard to stain evenly, so we skipped the stain and finished the bookcase with three coats of oil-based poly.
Apply all but the final coat on the interior (Photo 6). Prefinishing lets you work on flat horizontal surfaces. It’s much easier than brushing into the back of a cabinet with all those corners or working on the underside of a shelf. Best of all, it prevents sags and drips.
Use painter’s tape to line the dadoes and tape off the front edge where the face frame attaches. Brush on two coats of poly, sanding between coats. When you sand the second coat, skip the underside of the fixed shelves. These nonwear areas need only two coats.
Now it’s time to dry-fit the entire bookcase. The dry fit is a dress rehearsal. It lets you discover problems, work out clamping strategies and avoid disasters. (It’s no coincidence that “glue-up” rhymes with “screw-up.”) Start from the inside of the big cabinet with the drawer runners and dividers. Add the shelves on the top and bottom of the dividers and work your way out. Use screws wherever an adjoining cabinet will later hide them. Screws are easier and faster than clamps.
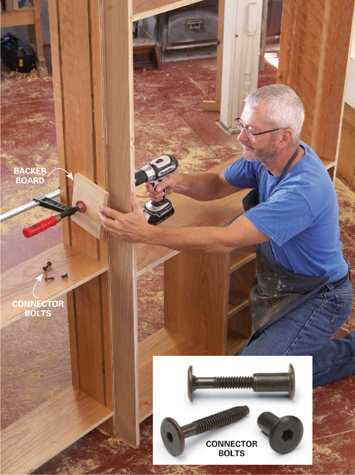
Once all three cabinets are dry-fitted, stand them up and clamp them together, making sure the backs line up flush. Bore the holes for the connector bolts (Photo 7). Use four bolts along the front edges and two in the back.
With the cabinets together, you can cut and fit the other cabinet parts, such as adjustable shelves, drawer and door parts, and the plywood caps. Double-check to make sure the cut parts fit properly on the assembled bookcases.
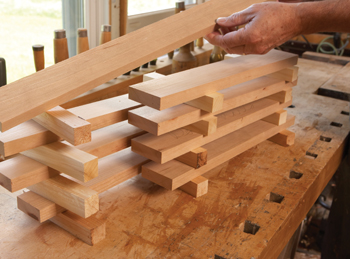
Before you start cutting up the hardwood, sort through the boards. Set aside straight-grained pieces for door frames and face frames. On narrow parts, straight grain looks the best and is more stable. You may need to harvest the straight-grained edges from several boards to get the wood you want. For the doors, look for boards with straight grain that are free of warp. Also let them stabilize for a couple of days (Photo 8). For the face frames, a little warp is OK since the cabinets will hold them flat. The center cap uses wide stock, but in the end, the crown covers most of it and the upper face is above eye level. That means it’s OK to use some less desirable wood with knots and other defects. Try to cut the drawer fronts from a single plank of wood so the grain matches.
Disassemble the cabinets and get ready for the big glue-up (Photo 10). For big jobs like this, use slow-setting glue. The extra 10 minutes of open time takes some of the pressure off complex glue-ups.
Assemble the bookcases and attach the face frames with glue. Rout and sand the face frames flush to the cabinet sides. Sand all unfinished parts to 180 grit.
Now you’re ready to fit the cap parts and install the crown. First, you need to bolt the three cabinets together. If you don’t have that kind of shop space, do one set at a time.
Align and mount the caps using countersunk screws to fasten them down. The caps have an even 3-in. overhang on the exposed sides of the cabinets. The caps on the side cabinets butt squarely into the side of the center cabinet.
Add lid stops along the bottom of the inside edge of the center cap. The stops will keep the lid from falling into the opening. Cut and fit the plywood lid for the top compartment. Mount the ring pull hardware to the lid.
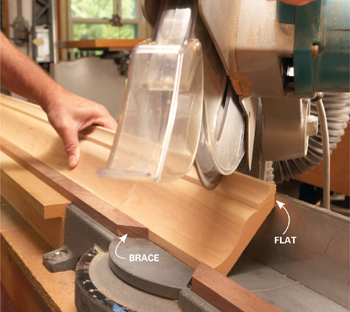
Cut the crown molding (Photo 11). Give yourself extra length for test cuts. Add braces to your saw table to hold the crown in the same position as on the bookcase and to keep the molding from sliding as it’s cut. Attach the crown with brad nails and molding glue. The heavy-bodied glue won’t run or drip as you hold the crown in place for nailing. Sand the crown smooth.
Cut the door parts to finished dimensions and assemble with biscuits. Rout a rabbet on the back of the opening. Use a wide chisel to square the inside corners. Drill holes for Euro hinges and mount the doors in the openings. Check for fit and even margins. Trim as necessary. Sand the door frames to 180 grit.
Assemble a 2x4 frame inside the TV opening. The setback of the frame depends on the depth of your TV and the mounting hardware you choose. Cover the frame with three panels. Use screws to fasten the middle panel. That makes it a removable access for wiring.
Cut and fit the drawer fronts. Use shims to position the drawer fronts, then pin-nail them to the boxes. Next, pull the drawer out and clamp the front to the box for added security while drilling pilot holes from inside the box. Fasten the fronts with four No. 8 x 1-in. screws.
Remove the connector bolts and separate the cabinets. Remove the doors as well. Finish the bookcases with three coats of polyurethane. Give the interior its final coat when you brush on the exterior’s third coat.
Mount the shelf standards. The standards have a numbering system to help in locating the clips. Be sure you mount the standards so the numbers rise as the standards run up the cabinet. Hold the nails with a needle-nose pliers to get them started
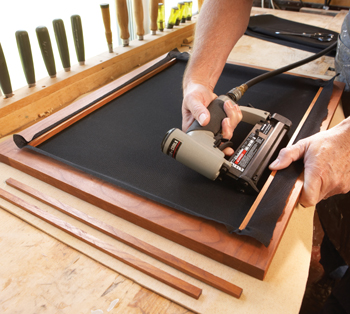
Take the finished doors and cut speaker cloth to fit over the opening with at least an inch of overhang. Press cherry cleats into place, pulling the cloth taut before you brad-nail the cleats into place (Photo 12).
TVs typically can use almost any mount, but be sure your set is not an exception. Check the owner’s manual for specific mounting bracket recommendations. Be sure to buy a mounting bracket rated to hold the weight and dimension of your TV. Mount your TV so the screen is slightly behind the face frame. Avoid the tunnel effect caused by setting the TV too far back.
Materials list
ITEM |
QTY |
4' x 8' x 3/4" cherry plywood |
5 |
4' x 8' x 1/4" cherry plywood |
3 |
4' x 8' x 1/2" multi-ply birch plywood |
1/4 |
Cherry hardwood (board feet) |
35 |
Hardware* |
|
Cast steel classic knobs |
5 |
3/4" router bearing, 1/2" I.D. |
1 |
Bearing lock ring, 1/2" I.D. |
1 |
24" brown steel standards |
16 |
48" brown steel standards |
8 |
Brown shelf clips (bags of 20) |
3 |
Brown nails (bags of 50) |
2 |
Mounting plates |
4 |
Cup hinges |
4 |
Speaker cloth (36" x 68") |
1 |
1/4'' shank rabbeting bit set (includes bearings for 5/16", 3/8", 7/16" and 1/2" rabbets) |
1 |
23/32" mortising (plywood) bit, |
1 |
Pattern flush-trim router bit, 1 3/4" diameter x 1-1/4" height, 1/2" shank |
|
5/8" x 3/4" top-bearing mortise bit, 1/4" shank |
1 |
*Available at woodworking stores and online.
3/4" cherry plywood (5 sheets)
PART |
QTY. |
DIMENSIONS |
NAME |
A |
2 |
13-1/4" x 85-1/4" |
sides |
B |
4 |
13" x 47" |
fixed shelves |
C |
3 |
12-1/2" x 19-1/8" |
component shelves |
D |
2 |
12-1/2" x 25" |
dividers; add 1/2" edge |
E |
3 |
15-1/2" x 33" |
TV mount panels |
F |
4 |
9-1/4" x 77-3/4" |
sides |
G |
6 |
9" x 29" |
fixed shelves |
H |
10 |
7-1/2" x 28-3/8" |
adjustable shelves; add 1-1/4" edges front/back |
J |
2 |
7" x 12-1/2" |
drawer runners; add 1/2" edge |
K |
2 |
12-1/4" x 32-1/4" |
cap; add 3/4" edges to front side |
L |
1 |
4" x 46-1/2" |
toe board; add 1/2" on bottom edge |
M |
2 |
4" x 28-1/2" |
toe board; add 1/2" on bottom edge |
N |
1 |
10" x 45" |
lid; add 1/2" edging |
1/4" cherry plywood (3 sheets)
PART |
QTY. |
DIMENSIONS |
NAME |
P |
1 |
47-1/4" x 85-3/4" |
back |
Q |
2 |
29-1/4" x 78-1/4" |
backs |
3/4" cherry hardwood
PART |
QTY. |
DIMENSIONS |
NAME |
R |
2 |
2-1/2" x 85-1/4" |
stiles; cut to 2-9/16" and trim flush to cabinet |
S |
4 |
2-1/2" x 77-3/4" |
stiles; cut to 2-9/16" and trim flush to cabinet |
T |
1 |
3-1/2" x 43" |
top rail |
U |
2 |
3-1/2" x 25" |
top rails |
V |
3 |
1-1/2" x 43" |
rails |
W |
4 |
1-1/2" x 25" |
middle and bottom rails |
X |
1 |
4" x 54" |
front of cap frame |
Y |
1 |
2" x 46" |
back of cap frame |
Z |
2 |
4" x 17" |
sides of cap frame |
AA |
20 |
1-1/4" x 28-3/8" |
edging for adjustable shelf |
BB |
2 |
3/4" x 33" |
front trim on cap |
CC |
2 |
3/4" x 13" |
side trim on cap |
DD |
3 |
3/4" x 19-1/8" |
component shelf trim |
EE |
3 |
7-1/4" x 7-3/4" |
drawer fronts |
FF |
4 |
2" x 23-3/4" |
door stiles |
GG |
2 |
2-1/2" x 13-7/8" |
bottom door rail |
HH |
2 |
2" x 13-7/8" |
top door rail |
1/2" cherry hardwood
PART |
QTY. |
DIMENSIONS |
NAME |
JJ |
6 |
2-1/2" x 5" |
plinth blocks |
KK |
2 |
3/4" x 25" |
divider edge |
LL |
3 |
3/4" x 6-1/2" |
drawer runner edge |
MM |
2 |
3/4" x 13-1/4" |
skid |
NN |
4 |
3/4" x 9-1/4" |
skid |
PP |
2 |
3/4" x 46" |
lid trim |
2 |
3/4" x 10" |
lid trim |
Crown molding
PART |
QTY. |
DIMENSIONS |
NAME |
RR |
1 |
4" x 18' |
cut to length for front and sides |
1/2" Baltic birch plywood
PART |
QTY. |
DIMENSIONS |
NAME |
SS |
6 |
7-3/8" x 12-1/2" |
drawer sides |
TT |
3 |
7-3/8" x 6" |
drawer fronts |
UU |
3 |
6-7/8" x 6" |
drawer backs |
1/4" Baltic birch plywood (could use leftover cherry plywood)
PART |
QTY. |
DIMENSIONS |
NAME |
VV |
3 |
5-15/16" x 12" |
drawer bottoms |
1
Rough-cut the plywood. Keep the saw blade at least 1/8 in. from the cutting line so you can trim the plywood to final size later. Don’t cut the cabinet sides apart until you’ve cut the dadoes (Photo 3).
2
Trim rough edges smooth. Clean up the saw cuts with a pattern bit and a straightedge. Take your time to position the straightedge for a perfectly square cut.

3
Dado two sides at once. Cut the shelf dadoes with a plywood bit, which matches the thickness of the plywood. Then cut the cabinet sides apart and you’ll have perfectly matched dadoes.
4
Rabbet the back edges. Cut the rabbets for the backs with a rabbeting bit. There’s no need for a straightedge here; the bearing rides right on the plywood edge.
6
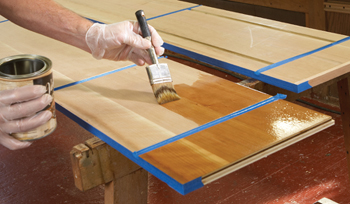
Start your finish. Finishing the insides of the cabinets is a lot easier before assembly. Keep the polyurethane off the surfaces that will be glued later. Glue won’t stick to poly.
7
Bolt the cabinets together. Clamp the cabinets together and drill holes for the connector bolts. Be sure the backs line up flush and use a backer board to prevent blowout where the bit exits.
8
Air out your door parts. A couple of days of air circulation allows fresh-cut wood to stabilize. If any of the parts warp, you can cut new parts and avoid door warp after assembly.
9
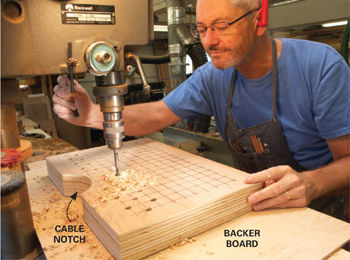
Gang-drill the vent holes. Stack up the shelves that will hold your electronics and tack them together with a couple of nails. Set a backer board under the stack to reduce blowout. Also cut notches for cords and cables.
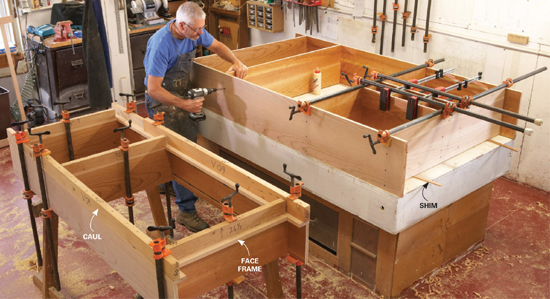
10
Put it all together. Assemble in stages. Start with the plywood cabinet boxes. When the glue has dried, add the face frames. Use 2x4 “cauls” to apply even clamping pressure to the face frames.