I created a memorial piece of my own honoring my husband’s great-grandparents. While I never had the honor of meeting them, their stories have been passed on to me through tales and photos. As with all families, our histories are not full of beauty each day. This piece honors that truth as well as the lives of those pictured. Perhaps there is a tale you wish to tell through a piece of art. Whatever it might be, I hope this inspires you to create it.
1" (25mm) flat
acrylic paint, assorted colors
adhesive
baby wipes
bone folder
bubble wrap
chipboard or cardboard, 9" × 9" (23cm × 23cm)
ecru embroidery floss
gel medium
gesso
heat gun
hot pot and wax
ink-jet printer
lace scraps
masking tape
Midnight Blue colored pencil
needle
paintbrushes
pencil
photocopied photo
printed text
resin paper
rubber or metal stamp
spiral paper scrap
spray bottle
velvet ribbon
vintage floral image
assorted watercolor crayons
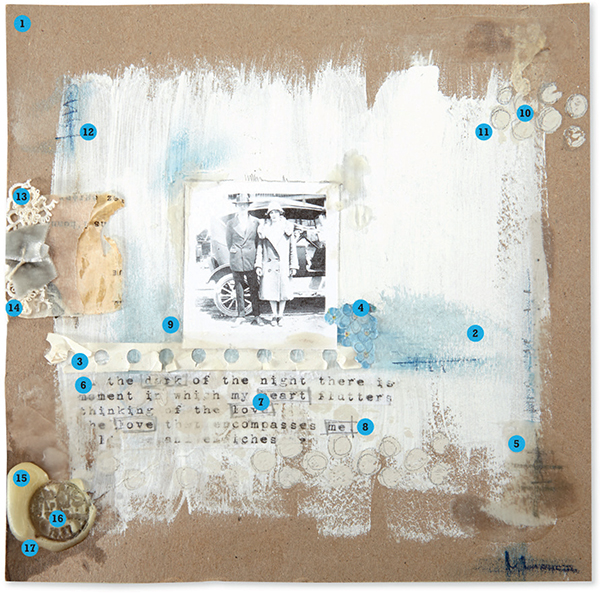
With a dry 1" (25mm) flat brush apply a layer of gesso to the chipboard, leaving approximately a 1" (3cm) border around the painted gesso. Allow to dry.
With a dry brush add Titanium Buff paint to the gesso in a random manner. Do not paint the entire surface. Allow to dry.
Adhere the spiral scrap approximately one-third up from the bottom using gel medium.
With a dry brush and blue patina paint, create a line in the center of the chipboard. The line should vary in height to create depth.
Create a coffee stain and apply.
Print an image of text using an ink-jet printer. Trim the text down to just a paragraph of written words.
Place a liberal amount of gel medium onto the text and board. Smooth down the transfer with a bone folder. Allow to dry. Once dry, spray water onto the back of paper. With your finger tips, remove the paper by rubbing in a circular motion.
With a graphite pencil, highlight words by creating a box around them.
Add a photo and, with a Prussian Blue watercolor crayon, create lines around the perimeter of the photo as well as the perimeter of the chipboard.
With taupe acrylic paint and bubble wrap create circles in the upper corner as well as at the bottom of the transferred text. Allow to dry.
Trace around the painted circles with a graphite pencil. Continue adding markings by tracing around the perimeter of the photo.
With a Midnight Blue colored pencil, create personal markings within the blue patina paint and watercolor crayon painting.
Layer one piece of resin paper, followed by 1" (3cm) of masking tape. Then create layers in this order, starting from the bottom: one 11⁄2" (4cm) piece of lace followed by a 1" (3cm) piece of lace and 1⁄2" (1cm) scrap of velvet ribbon. Place ribbon embellishment on top of the masking tape and resin paper.
With ecru embroidery floss and a needle, create a simple stitch through the ribbon and paper embellishment.
Dip a natural bristle brush into hot wax, and in a random fashion apply hot wax to the corners of the collage. In the bottom left corner create a pool of wax.
While the pooled wax is still hot, stamp into it with a rubber or metal stamp. Allow the wax to cool prior to removing the stamp.
With a heat gun, heat the wax slightly to smooth it out.