Body-weight squat
THERE MAY NOT BE AN EXERCISE that works more muscles in a more functional movement pattern. The squat hits all the major muscles in your hips and thighs, and the advanced variations also force your lower-back muscles to work hard. It’s one of the first coordinated movements in human development—babies learn to squat before they learn to stand—and it’s one that the elderly miss the most when they can no longer get up from a chair.
It’s also a movement that most adults have to relearn when they begin a strength-training program. A full squat requires core stability as well as mobility in the hips and ankles. Moreover, it requires these qualities while the body is moving, which presents a coordination challenge as your body’s biggest, strongest muscles shorten and lengthen. As Gray Cook notes in Athletic Body in Balance, if you can’t squat well, you can’t really do anything well. It’s the key to fluid movement, to athleticism itself.
Body-weight squat
Set down the book and get out of your chair. (Come on, you know you’ve been sitting too long.) Stand with your feet shoulder-width apart. Extend your arms out in front of you for balance. Push your hips back and sit back as far as you can while keeping your feet flat on your floor. Don’t worry about your knees; just let them bend whenever they need to. The key is to start the movement with your hips, and descend until your upper thighs are parallel to the floor, if not lower.

If you have a full-length mirror, look at yourself first from the side. This is what you should see:
From that position, you should be able to stand straight up. Now turn 90 degrees, squat down again, and look at yourself from the front. Check for symmetry. Are your toes either straight ahead or turned out slightly at the exact same angle? Are your knees and feet equidistant from the midline of your torso?

Next question: Can you perform 15 of these body-weight squats with perfect form? If so, you’re cleared to move ahead to Level 2.
If not, can you at least achieve good form on multiple body-weight squats? If the answer is yes, then this is the exercise you’ll start with in Phase One of Alwyn’s NROL for Life program. Your goal is to work your way up to two sets of 15 repetitions.
But what if you can’t yet do multiple body-weight squats?
Supported body-weight squat
Stand next to something sturdy—a pole or the edge of a solid piece of furniture work equally well. Rest one hand lightly on the support. Set the other hand on your chest or alongside your ear. Push your hips back and descend into a squat as described above, then return to the starting position, using the support as little as possible. Do as many as you can, up to 15. For your next set, switch sides and support yourself with your opposite hand.

Suspended body-weight squat
Attach the TRX (or any suspension-training system) to a chin-up bar or overhead support. Take a light grip on the handles and stand with your feet shoulder-width apart, leaving some slack in the straps. Push your hips back and descend into a squat, then return to the starting position. If you can do a few reps without using the straps to pull yourself up, you’re ready for unsupported body-weight squats.

Goblet squat
Traditionally, the first progression from a body-weight squat is a squat holding dumbbells at your sides. But there are two problems with the dumbbell squat: First, the weights start low to the ground, below your center of gravity, so they have to be pretty heavy to present any kind of challenge. Holding heavy weights outside your legs is awkward. Second, if you do try holding heavy dumbbells outside your legs, you might find that your grip gives out before your lower-body muscles do. Even if you can handle the weights for the required number of reps, the gripping muscles in your hands and forearms will be exhausted, leading to compromised performance in subsequent exercises.
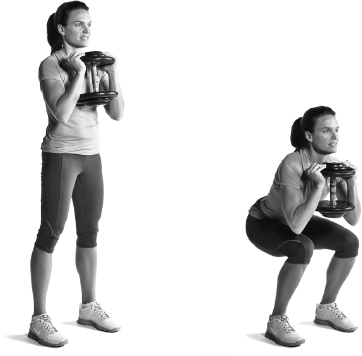
The goblet squat is the perfect alternative. You’ll get more from holding a lighter weight above your center of gravity than you will with heavier weights at arm’s length.
Grab a dumbbell or weight plate and hold it with both hands against your chest, just below your chin. (It’s called a goblet squat because if the weight were a cup, you could drink out of it.) Stand with your feet shoulder-width apart, push your hips back, and squat as described above. Keep your eyes focused forward and your torso as upright as possible.
Front squat
This is an easy and important progression from the goblet squat. You have to hold the weight higher, which means farther from your center of gravity. That increases the challenge to your core. (It’s also an example of a self-limiting exercise, which I explain in the sidebar.)

Dumbbell front squat

My high school weight room in the early seventies had two pieces of equipment. The first was a Universal multistation gym, the presence of which supported the crazy idea that machines were better than free weights. America was still an industrial power, and we put our faith in chrome. Plus, the Universal machine was efficient. Six or eight guys could work out in the space you’d need for a single squat rack and a bench.
The second was an ancient chin-up bar embedded in the doorway.
Strange as it sounds, I used to do pull-ups to prepare my body for lat pulldowns on the machine. At my peak I would do two sets of 15. If I’d known anything about lifting back then I would’ve found a way to add resistance and made those pull-ups the highlight of my workouts. It was by far the best strength- and muscle-building exercise I did, and probably accounted for most of the modest results I attributed to the Universal machine.
Pull-ups and chin-ups are perfect examples of a self-limiting exercise, a category I didn’t know existed until Alwyn told me about it shortly before we started working on this book. You can’t pull your chest up to the bar without using the right muscles in the right way. (Okay, you can, but you’d have to try pretty hard to mess it up.) Contrast them with lat pulldowns, the exercise that most people do instead. A beginner will often use a light weight and try to pull the bar down to her belly button, engaging small rotator-cuff muscles instead of the big latissimus dorsi muscles—which, after all, are the target of the exercise; it’s right there in the name. A musclehead might do the old-school version of the lat pulldown, when you pull the bar down to the back of your neck. It puts your shoulder and neck joints into their most vulnerable position, and then forces them to strain against a heavy load.
The front squat is also a self-limiting exercise: not always easy to do right, but nearly impossible to do wrong. If you don’t keep your torso upright and head up, you’ll drop the bar. You need near-perfect form on every rep.
The hallmarks of a self-limiting exercise are the hallmarks of any good exercise. The basic movement is natural—squatting, pushing, pulling, or bending—and includes a challenge to your strength, stability, and balance. Your form and strength are co-equal partners. When you reach the limit of one or the other, you’re forced to stop.
Most exercises are not self-limiting, including many in this book, or any other. Take, for example, the barbell back squat. As I said in Chapter 3, I had to concede sometime after my fiftieth birthday that I simply couldn’t do it anymore. It hurt to hold the bar behind my shoulders, and my knees ached for days after doing heavy squats. But that’s not to say it’s a “bad” exercise, or one that none of you can or should do. It’s an exercise that stopped working for me, probably because I did it long enough that I learned to lift heavy loads while injuring myself.
Common sense remains your best defense against injury in the weight room. If you’re doing something that hurts while you’re doing it, don’t. If it leads to excessive aches and pains in the days after you do it, move on to another exercise variation, and see if the problem is the exercise or the movement pattern. If it’s the latter, you need professional guidance. An experienced trainer may be able to identify flaws in your form. A physical therapist might be able to free up restricted muscles or connective tissues that affect your performance. Trainers and PTs can also tell you if you have a bigger problem that requires medical intervention.
LEVEL 4
Back squat
Alwyn has changed his view of the back squat in the past few years. We used it as the default exercise for this movement pattern in earlier books, for good reason: No other squat variation allows you to use as much weight, making it ideal for both strength and size development. But as you get older, the fact that you have to support that weight on your back becomes increasingly problematic. There’s a high risk to the structures of your cervical spine, which have direct pressure from the barbell. The stronger you get, the greater the load on the discs in your lower back.
All that said, if you can handle the back squat without pain—immediate or post-exercise—it’s a terrific exercise for rapid strength gains and muscle growth. Here’s how to do it:

COOL OPTION FOR ADVANCED LIFTERS
Hex-bar deadlift
Gyms set up for serious lifting often will have a barbell that’s shaped like a hexagon in the middle. (It’s also known as a trap bar, since the original design, patented by Al Gerard, used a trapezoid-shaped frame.) You stand in the center and lift the bar by grabbing the handles just outside your legs, with your palms facing each other. It’s probably the safest position for heavy lifting. There’s no barbell pressing down on your upper spine, and your lower back stays in a strong, stable position.
The open question is whether the exercise should be included with the squats, or if we should honor its name and put it with the other deadlifts in Chapter 9. Alwyn thinks it’s more of a squat, as you have a lot of knee bend at the start of the movement and thus use your quadriceps more than you would on a traditional deadlift. It most resembles the dumbbell squat, only without the awkwardness of trying to hold heavy dumbbells outside your legs.
That said, you can use it as a heavy-duty alternative for either squats or deadlifts, and you won’t miss out on any benefits of Alwyn’s program. For accounting purposes, keep in mind that there’s no standard weight for this piece of equipment. The original trap bar weighed 30 pounds, while newer versions, such as the hex bar sold at per formbetter.com, are typically 45 pounds. But the one in your gym could weigh more or less.

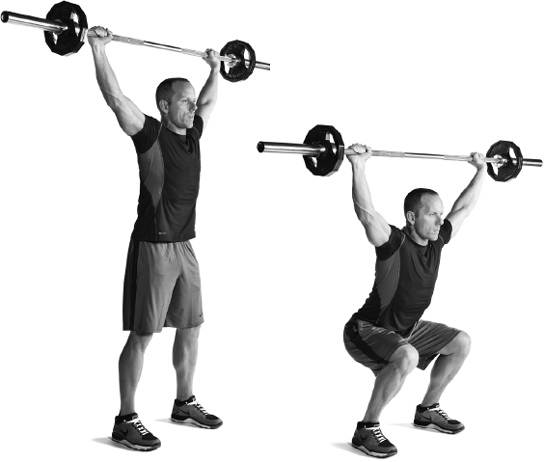
Overhead squat