THESE EXERCISES ARE VARIATIONS on the squats, deadlifts, and lunges from the previous three chapters. But because you do them with one leg at a time, your balance and coordination are challenged in unique and useful ways. Single-leg balance is something we need, and something we lose rapidly with age and inactivity. Life is filled with situations in which we find ourselves suddenly teetering on one leg. Maybe one foot hits a patch of ice, oil, or mud. Maybe a foothold gives way. Maybe we’re negotiating a narrow path, or climbing unusually steep steps. If you’re an athlete in a sport like basketball or soccer, you may get very good at balancing and pushing off from the nondominant leg (the left if you’re right-handed), but without corresponding balance and stability on the dominant leg.
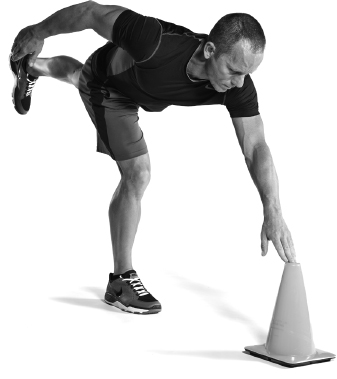
Let’s start with a very simple test of single-leg balance. Find a cone or something else that’s about 12 inches high. Stand about 36 inches in front of it. Balancing first on your nondominant leg, reach forward and touch it with your dominant hand. Extend your dominant leg behind you for balance. Now, without touching the ground with your dominant foot, return to the starting position, and repeat for as many reps as you can without losing your balance. Do the same thing with the opposite leg.
If you’re able to touch the cone at least 10 times with each hand without touching the floor with the foot that’s in motion, consider yourself qualified for Level 3. But even if you pass, you may want to start with the Level 1 exercise, as I’ll explain.
LEVEL 1
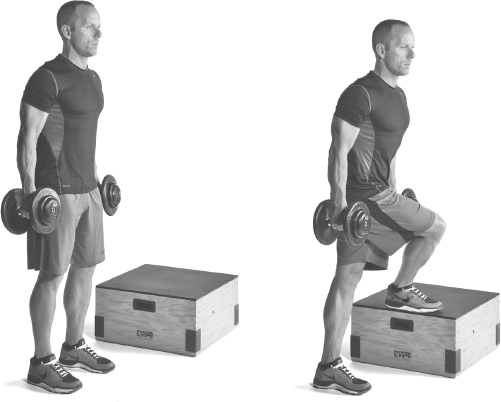
 Step-up
Did you ever see the movie Vision Quest? It’s about a high school wrestler who decides to drop several weight classes so he can take on Brian Shute, a three-time state champion. There’s also some sex and stuff, and a trivia-question scene in which a then unknown Madonna sings “Crazy for You,” a song that was way more successful than the movie back in 1985. I vaguely remember those things. The only part I remember vividly is when Brian Shute works out by climbing stadium stairs with a sawed-off telephone pole across his shoulders. You can keep your Rocky III and G.I. Jane workout montages. For me, that’s the most startling workout scene ever filmed.
It also demonstrates that the step-up, Alwyn’s Level 1 exercise, can be the hardest exercise in this chapter, if you make it so. I used to do my own version of Shute’s Ladder with a barbell on my back, stepping up onto a 12-inch box. With enough weight, it was a brutally effective exercise.
But forget weight for now. Let’s get the form right first:

DIAL IT BACK? NO.
If you’re at Level 1, just find a low enough step to complete the reps with each leg. Knee-challenged lifters who can use a low step pain-free should increase the weights as needed to make it challenging.
LEVEL 2
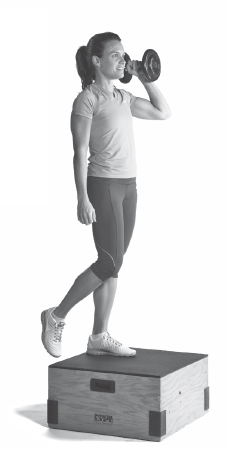
Offset-loaded step-up
This was my go-to exercise for Phase Two. It adds a core challenge and also takes away one of the main drawbacks of the conventional step-up with two dumbbells, during which your gripping muscles may give out before your leg muscles have worked to a desired level of exhaustion. Execution is simple: Hold a single dumbbell or kettlebell at shoulder height on the side of your working leg—your left when you’re stepping up with your left.
Single-leg Romanian deadlift

In my gym, a lot of the senior lifters do this exercise with support. I don’t like it. I’ve never seen a senior advance to the unsupported version of the exercise. In fact, the tendency is to try to do it with heavier weight over time, which makes them more reliant on the support. If you qualified for the single-leg RDL by passing the balance test at the beginning of this chapter, you should have no problem doing it without support. Sure, you’ll wobble a bit and land on your nonworking leg. It happens to everybody, and it’s not a reason to rely on a support. The entire point of the exercise is to develop balance in a single-leg position.
Single-leg squat
Not only do I suck at this exercise, I once injured my knee trying to get better at it. The problem isn’t with the exercise. It’s with the fact that I can do it pain-free to a certain range of motion, but risk injury when I go beyond that. So let’s be clear about this: On single-leg squats, there’s no defined range of motion that is ideal or attainable for everyone. Some people can go glute-to-heel with the working leg while the nonworking leg extends straight out in front of them, a few inches off the floor. It’s one of the most impressive-looking exercises I’ve seen, and I’d love to be able to do it, just as I’d love to be able to dunk a basketball or ski a black diamond. None of those things will happen in this lifetime, and I’m okay with that.
Supported single-leg squat
Don’t have a suspension-training system? Anything that supports your body weight will do, even if it’s just a rope thrown over a tree limb.

Kettlebell single-leg squat
If the single-leg squat off the step feels easy, then do the exercise standing on the floor, without the step. You can use dumbbells, but a single kettlebell, held with both hands, seems to allow better balance and range of motion. Again, you want to increase reps and squat depth before increasing the weight you use as a counterbalance.

Single-leg deadlift
For the single-leg squat, whatever weight you hold is a counterbalance to make the exercise easier, rather than a form of resistance to make it harder. Now, if you qualify for this level by mastering the single-leg squat, you’re going to use weights to make it harder.

Higher steps
Earlier, I noted that the step-up can be the toughest exercise in the single-leg category. Here are three versions that add new challenges to a familiar movement.
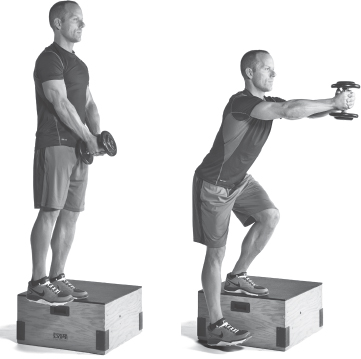
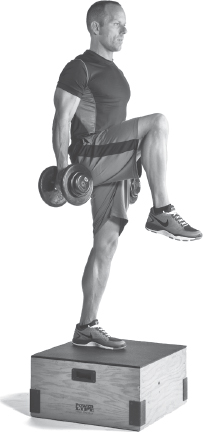
Crossover step-up
Set up as you would for a conventional step-up. Here, though, once you are up on the box, bring the knee of the nonworking leg up toward your chest. Once you get the hang of it, try to bring the knee up explosively. For advanced lifters this is a terrific Phase Three exercise. You develop power and create a high level of metabolic fatigue, which is the best tool we have for rapid fat loss.
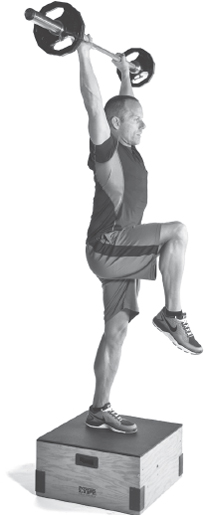
Overhead sprinter step-up
Hold a light barbell overhead while doing the sprinter step-up described above. For advanced lifters with really good balance who want a challenge, this is the best step-up variation I’ve come across.