Chapter 1
Getting in Touch with Windows 8
Get ready to . . .
⇒ Tell Your Computer What to Do
⇒ Move the Mouse
⇒ Touch the Screen
⇒ Use a Keyboard
⇒ View the Virtual Keyboard
⇒ Turn On Your Computer
⇒ Check Out the Start Screen
⇒ Shut Down Your Computer
⇒ Start Again on the Lock Screen
With Windows 8, Microsoft created a grand version of Windows, its flagship operating system (the master program for any computer). You can use Windows 8 on a wide range of devices, from a smartphone to a big-screen TV entertainment system: one size fits most. You can not only use the same programs with a range of hardware but also access the documents you create (such as photos and e-mail — files and data, to nerds) from any Windows-based computer, giving you extraordinary freedom of choice and mobility.
Although countless companies create programs you may use, Microsoft attempts to make similar functions consistent across different programs. For example, opening a document or e-mailing a photo to a friend involves the same steps regardless of the programs you use. You don’t have to learn a different way of doing common tasks in each program. This consistency will serve you well when using Windows 8 and other new programs.
In this chapter, you start your computer and work with the Start screen, the dashboard for Windows 8. You explore options for using the Start screen with your hardware (the computer and related devices). Then you exit Windows 8 and go right back in for more.
Tell Your Computer What to Do
How do you get Windows 8 to do what you want it to do? You can command a computer in many ways, depending on your equipment (hardware). For example, a desktop computer has different options from a handheld phone. You may have any or all of these choices:
⇒ Mouse
⇒ Touchscreen
⇒ Keyboard
Another device for controlling Windows is a touchpad, which is commonly found on a laptop keyboard. You move your finger on the touchpad to move the pointer on the screen. You may also be able to control Windows using speech and a microphone. Microsoft Kinect is a device that enables you to control your computer with a wave of your hand. Welcome to the future!
If you have a computer with more than one of these devices, you might use one device exclusively or, more likely, vary your choice according to the task. Use whichever technique is easiest for you, but don’t be afraid to experiment. In the next few sections, you discover the ins and outs of using all these methods of controlling Windows 8. Then you’re ready to turn on your computer and use these methods.
Move the Mouse
For many years, computers have had a mouse, which is a soap-bar-sized device that you move across a desk with your hand. Move the mouse and note how the arrow called a mouse pointer moves across the computer screen. A mouse has two or more buttons; some also have a scroll wheel between the buttons.
The following terms describe methods for using a mouse with Windows 8. In each, move the mouse first to position the pointer over a specified item before proceeding:
⇒ Click: Move the on-screen arrow-shaped mouse pointer over a specified item and press and release the left mouse button: that’s a click (sometimes called a left-click to distinguish it from a right-click).
⇒ Right-click: Press and release the right mouse button to display available functions. Note that the word click by itself means use the left mouse button.
⇒ Drag: Press and hold down the left mouse button, and then move the mouse pointer across the screen. When you want to move an object, you drag it. Release the mouse button to release the object.
Touch the Screen
A touchscreen, as the name says, enables you to touch the screen to tell your computer what to do. You typically use one finger or two, although touchscreens may allow you to use all ten digits. In some cases, you can also use a special pen called a stylus instead of your finger. Tablet computers and some smartphones have touchscreens. Touchscreens are less common on desktop or laptop computers, but that situation is changing. Not sure what type of screen you have? When you have Windows 8 running, give the screen a poke with your index finger to see what happens.
The following terms refer to ways you interact with a touchscreen:
⇒ Tap: Briefly touch the screen. You select an object, such as a button, by tapping it.
⇒ Drag: Touch and hold your finger on the screen, then move your finger across the screen. You move an object, such as an onscreen playing card, by dragging it.
⇒ Swipe: Touch and move your finger more quickly than with drag. You can swipe your finger across the screen from any of the four sides of the screen to display options and commands. You swipe pages to move forward or back. You may see the word flick instead of swipe. Some people insist that a flick is faster or shorter than a swipe, but let’s not get caught up in that.
⇒ Pinch and unpinch: Touch a finger and thumb or two fingers on the screen. Move your fingers closer to each other to pinch and away from each other to unpinch. Generally, a pinch reduces the size of something on the screen or shows more content on the screen. An unpinch (an ugly word) zooms in, increasing the size of something on-screen to show more detail.
Use a Keyboard
A typewriter-like keyboard is a traditional device for controlling a computer and is especially useful when you must enter a lot of text. Special key combinations, called shortcut keys, are often the quickest way to do anything (though they require some memorization).
The following keys are particularly noteworthy. No offense intended to fans of keys not noted here. Although you won’t use all these keys immediately, locate each one on your keyboard.
⇒  : Called the Windows key, this key is usually located on either side of the spacebar, which is the largest key.
  works by itself, as you’ll soon see, and also in combination with many other keys. Throughout the book, I specify these combinations where you might use them. There will be a quiz later. (Kidding! No quizzes.)
⇒ Tab: Press the Tab key to highlight an item. Press Tab repeatedly to skip items you don’t intend to select.
⇒ Arrow keys: Press the arrow keys to move the cursor or selection of an object in the direction the keys point (left, right, up, or down). In some contexts, Tab and the right arrow do the same thing. Sorry to be vague, but context matters, at times.
⇒ Enter: In most cases, the Enter key on the keyboard chooses a selection, much as clicking or tapping do. However, you may need to use the Tab key or an arrow key to select an item before pressing the Enter key.
⇒ Ctrl, Alt, and Shift keys: These keys are used with other keys for commands. For example, press Ctrl+C to copy selected text or an object. (That is, while pressing and holding down the Ctrl key, press the C key — no need to press Shift for an uppercase C. Then release both keys.) The Shift key is used with another key for uppercase.
⇒ Backspace: As you enter text, each press of Backspace erases the character to the left of the cursor.
⇒ Delete: As you enter text, each press of the Delete key erases the character to the right of the cursor. On some keyboards, this key is labeled Del.
⇒ Function keys: All keys function, but Function keys are labeled F1 through F12. You don’t use these much in this book, but locate them. Laptops often have a separate Function Lock key to turn these keys on or off.
⇒ Page keys: Locate the Home, End, Page Up, and Page Down keys for future reference. Use these to move the screen, a page, or the cursor.
View the Virtual Keyboard
Windows 8 can display a virtual keyboard on-screen. This feature is vital for devices that have a touchscreen and no physical keyboard. With a touchscreen, the virtual keyboard appears automatically when the cursor (a blinking vertical bar) indicates that you can enter text in a box. If the virtual keyboard doesn’t appear automatically, you may also see a separate box floating above or below the text box. Tap that floating box to display the keyboard. To type using the keyboard, simply tap or click a letter, number, or symbol key.
Different types of virtual keyboards:
⇒ The standard layout (also called QWERTY) appears automatically (see Figure 1-1). The Enter key changes depending on the context.
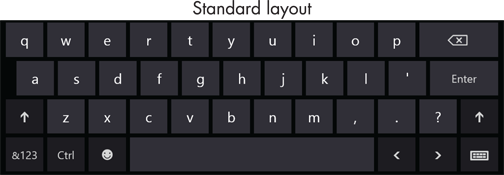
Figure 1-1
⇒ The uppercase layout, shown in Figure 1-2, appears when you tap the Shift key on the standard layout.
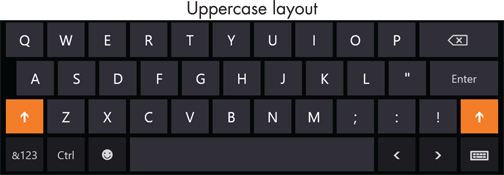
Figure 1-2
⇒ The numbers and symbols layout, shown in Figure 1-3, appears when you tap the &123 key on the standard layout. Tap the &123 key again to return to the standard layout.
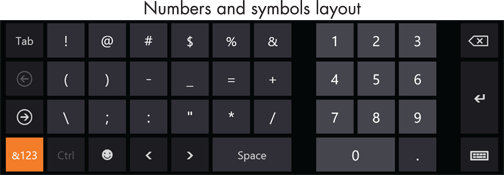
Figure 1-3
⇒ The control keys overlay (see Figure 1-4) appears on five keys on the standard layout when you tap the Ctrl key. The Ctrl keys are used in common tasks, such as copying (Ctrl+C) or moving (Ctrl+X) selected text. The overlay disappears automatically after you tap one of the control keys (A, Z, X, C, or V).
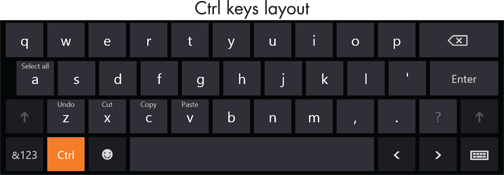
Figure 1-4
⇒ The smiley layout, shown in Figure 1-5, appears when you tap the smiley face key. Tap the smiley face key again to return to the standard layout. (Smileys are also called emoticons or emoji.)
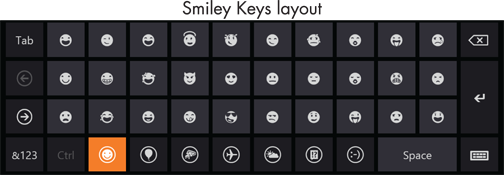
Figure 1-5
But wait! There’s more. Tap the keyboard key, which is in the lower-right corner of any layout, to display the four options shown in Figure 1-6.
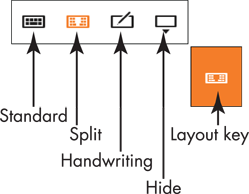
Figure 1-6
⇒ Tap the standard button (shown in Figure 1-6) to return to the standard layout from the split or handwriting layout. (More on those two layouts next.)
⇒ Tap the split button to view the split keyboard layout, shown in Figure 1-7. This layout is handy for typing with your thumbs while holding two sides of a tablet.
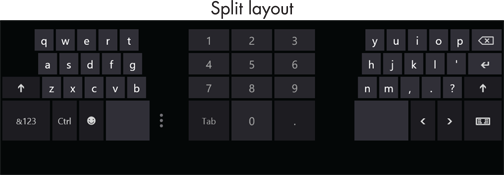
Figure 1-7
⇒ Tap the handwriting button to view the handwriting layout, shown in Figure 1-8. This layout enables you to write with a finger or a stylus (a special pen). Printing usually works better than script.
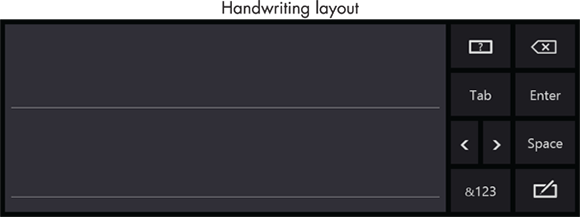
Figure 1-8
⇒ Tap the last button to dismiss or hide the virtual keyboard.
Turn On Your Computer
1. Push the power button briefly and release it. Every computer has a power button. (When we can no longer turn them off, the machines win.) If you have a desktop computer tower, the power button is probably on the front of the tower. Otherwise, you might have to feel around the front and sides of the screen or near the hinges of a laptop. Typically, your computer will beep, some buttons will light, and the screen may flash a logo or a message that disappears before you can read it. (Just let that go.) Soon, you will see the first Windows 8 screen.
2. Turn on any separate hardware (such as a monitor or a printer).
3. The first time you turn on your computer, a series of Windows Setup screens appear. On the initial screen, you select Language to Install, the Time and Currency Format, and the Keyboard or Input Method. Accept the defaults or change them appropriately, and then select the button labeled Next.
4. Select Install Now. (Note the option to Repair Your Computer, used if something goes wrong in the future.) The screen displays Setup is starting.
5. If you see a message asking you for a product key (a mix of 25 letters and numbers found on the back or bottom of your computer or on related paperwork), type those characters (hyphens are inserted automatically) and then select Next.
6. On the License Terms screen, select the check box next to I Accept the License Terms. Feel free to be the first person ever to read the terms before agreeing to them. (If you refuse to accept the terms, you can’t use Windows 8.) Then select the Next. You may see an indication of the Windows 8 installation progress. Your computer may restart during this process, as well.
7. On the Personalize screen, select a background color for the most common screens, as shown in Figure 1-9. When you make a selection, the screen background changes to reflect your choice. Preview as many choices as you like.
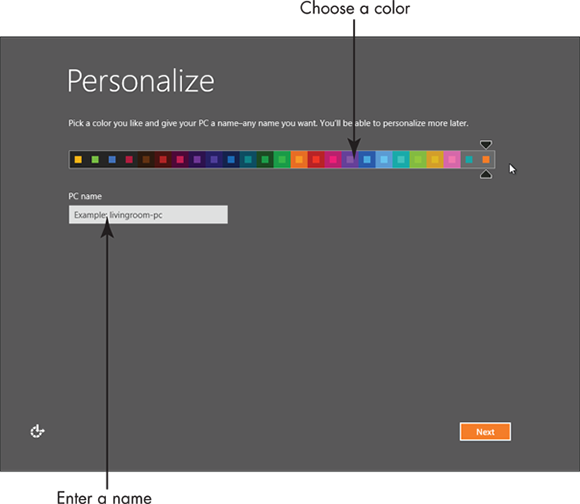
Figure 1-9
8. In the box under PC Name, type a short, simple name for your computer but don’t use spaces. The name can be based on location (such as office) or computer brand (such as Dell) or something more creative (Firefly perhaps). This name is visible on a network, if you have one. Select Next.
10. If a wireless Internet connection is available, you are prompted to select a connection and then select Connect. For now, select Connect to a Wireless Network Later. See Chapter 4 for information on connecting to a network.
11. On the Settings screen, select the Use Express Settings button for the easiest setup, as shown in Figure 1-10. If you choose the Customize button instead, you’ll have to work through several screens of options.
12. If you have an Internet connection, you see the Sign In to Your PC screen. (If you don’t have an Internet connection, skip this step.) If you see the Sign in Without a Microsoft Account option, select it. You see a screen summarizing the differences between a Microsoft account and a local account. Select the Local Account button. (You use a Microsoft account in Chapter 4.)
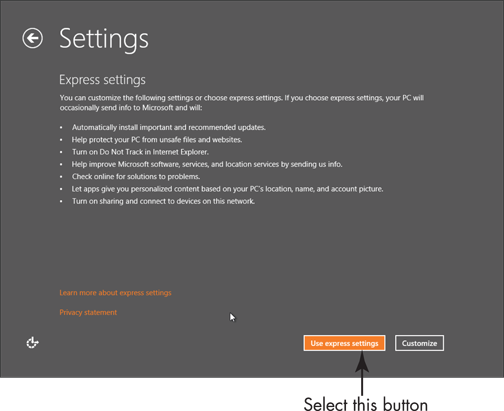
Figure 1-10
13. In the User Name box, which is shown in Figure 1-11, type a short and simple name. Your user name appears throughout the system, from the log-in screen to the Start screen to the location containing all your documents. Use a simple, clear name. Your first name is just fine.
14. In the Password box, type a password. A password is an optional security measure. If you enter a password when you create your user account, that password is required each time you start the computer. If someone other than you tries to start your computer, he or she will have to know (or guess) the password to get into your files. (Don’t put your password on a note stuck to the computer or nearby.)
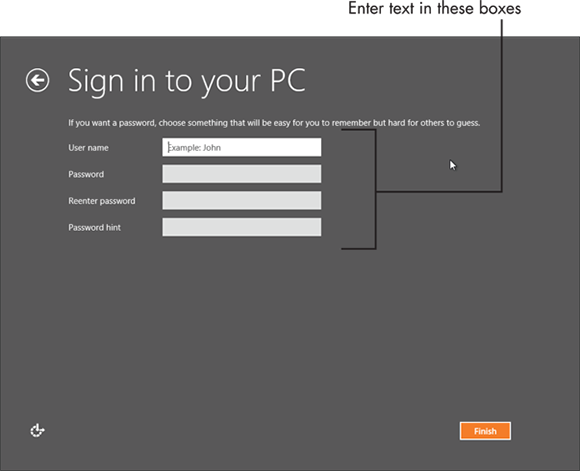
Figure 1-11
15. In the Reenter Password box, type the same password again.
16. In the Password Hint box, type a hint to remind yourself — and no one else — what your password is. Do not type the password itself here, or a hint such as my first name.
17. Select the Finish button. The screen may briefly display Finalizing your settings. An animation demonstrates that you can move your mouse to any corner or, if you have a touchscreen, swipe from any edge. That’s just the tip of the iceberg. The color of the screen and the text on-screen changes a few times to keep you mesmerized as setup finishes. Your PC will be ready in just a moment. Prepare to be awed. Behold, the Windows 8 Start screen, shown in Figure 1-12. (Your screen may be different than the one in this figure and those throughout the book.)
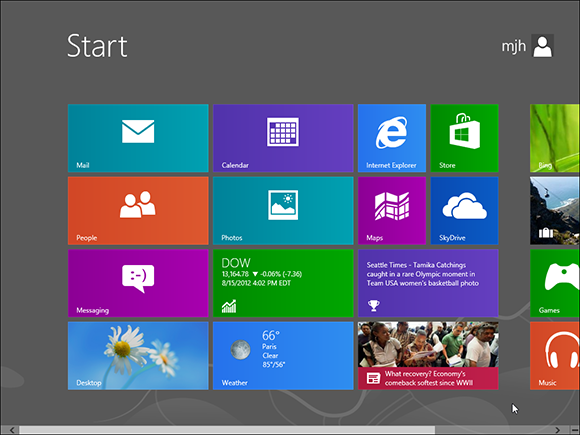
Figure 1-12
Check Out the Start Screen
1. Start your computer — if it isn’t started already — and sign in to your user account. You’ll see the Start screen, with your user name in the upper-right corner.
2. Examine the Start screen and note the colorful rectangular icons called tiles. These tiles represent available apps (short for application programs, an older term for programs or software). After you start to use the app tiles, they may display changing information, such as the current weather. (See Chapter 2 for information on using individual apps.)
3. Some tiles may extend beyond the right edge of the screen, (refer to Figure 1-12). To see the tiles that are off to the right, use one of the following methods to scroll (or move) the screen:
• Mouse: Move the mouse pointer to the right edge of the screen, far enough to see the screen move from right to left. You don’t use any mouse buttons for this action. Move the mouse pointer to the left edge of the screen to scroll left. You can also roll the mouse wheel toward you to scroll right and away from you to scroll left.
• Touchscreen: Tap and hold down a finger in the area below the tiles. Drag from right to left. To scroll back, drag from left to right.
• Keyboard: Press the Page Down key to scroll right. Press the Page Up key to scroll left.
4. Use one of the following methods to display the charms bar (see Figure 1-13), which provides access to frequently used functions:
• Mouse: Move the mouse pointer to the upper-right or lower-right corner of the screen. Then move the mouse pointer out of the corner just a little to transform the charms bar from semitransparent to solid.
• Touchscreen: Swipe from the right edge of the screen to reveal the charms bar.
• Keyboard: Press  +C. (Press and hold down the
  key, press the C key, and then release both keys.)
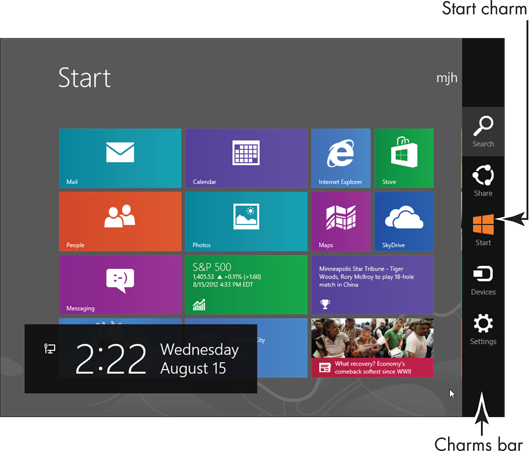
Figure 1-13
5. Take a moment to observe the following charms:
• Search: Locate apps, documents, and more.
• Share: Send photos and more to family and friends.
• Start: Display the Start screen, which is useful if you aren’t already there, which you are.
• Devices: Connect to printers and other devices such as flash drives and hard drives. See Chapter 13 for information on connecting and using a printer.
• Settings: Change the look and behavior of Windows 8 and individual apps.
 The charms bar gives you quick access to functions used in nearly every app.
6. You’ll use all the charms eventually. For now, dismiss the charms bar using one of these methods:
• Mouse: Move the mouse pointer away from the charms bar or click the Start charm.
• Touchscreen: Tap the Start charm.
• Keyboard: Press  +C.
+C.
Shut Down Your Computer
1. When you have finished using your computer for a while, you may want to shut down Windows 8. Begin by displaying the charms bar using one of these methods:
• Mouse: Move the mouse pointer to the upper-right or lower-right corner of the screen. (The charms bar appears semitransparent.) Then move the mouse pointer out of the corner just a little, until the charms bar becomes solid.
• Touchscreen: Swipe from the right edge of the screen to reveal the charms bar.
• Keyboard: Press  +C.
+C.
2. Select the Settings charm, which is at the bottom of the charms bar (refer to Figure 1-13).
3. In the Settings panel, select the Power button. Available options will appear in a pop-up box, as shown in Figure 1-14. Some or all of the following options appear:
• Shut Down: This option exits Windows 8 and saves power by turning the computer off. In exiting Windows 8, Shut Down closes any apps that are currently running.
• Sleep: This option reduces the computer’s power consumption without exiting Windows 8 or closing apps. As a result, when you wake the computer by moving the mouse or touching the screen or the keyboard, everything is exactly as you left it: apps and documents are open, if they were before Sleep.
• Hibernate: This option combines Sleep and Shut Down. Hibernate records which apps are running but also completely shuts down the computer. When you start the computer, Windows 8 opens all programs you were using, just like Sleep.
 Hibernate and Shut Down are equally green options — they save the same amount of power. Sleep is a little less green but saves time if you are returning to the middle of a task.
• Restart: Temporarily shuts down Windows 8 and turns it on again. Use Restart when Windows 8 asks you to or when Windows 8 is misbehaving.
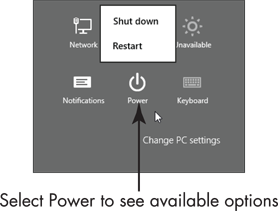
Figure 1-14
4. Choose Shut Down to turn off the computer.
Start Again on the Lock Screen
1. Turn on your computer. Every time you turn on your computer, the Lock screen appears, displaying the time, day, and date above a photo. (You change this photo in Chapter 3.) In Figure 1-15, note the badge, which is a small icon displaying bits of info about networking or an e-mail.
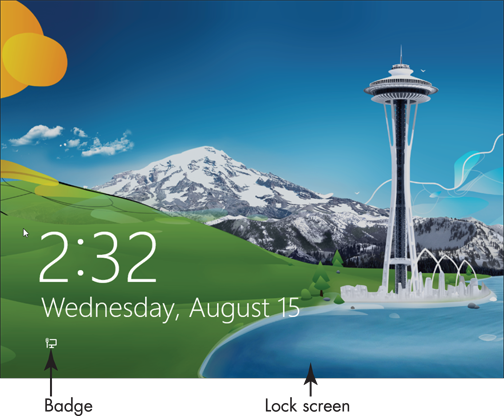
Figure 1-15
2. Dismiss the Lock screen with one of these methods:
• Mouse: Click anywhere, roll the wheel toward you, or drag the entire screen up.
• Touchscreen: Drag the entire screen up.
• Keyboard: Press any key.
3. If you don’t use a password, wait briefly for the Start screen to appear. If you use a password, enter it with a physical or virtual keyboard. Then press Enter or select the arrow next to the password box to display the Start screen.
4. Take a break before reading Chapter 2.