Chapter 4
Working with User Accounts
Get ready to . . .
⇒ Connect to the Internet
⇒ Create a New E-Mail Address for a Microsoft Account
⇒ Use an Existing E-Mail Address for a Microsoft Account
⇒ Add a New User
⇒ Create a Password
⇒ Change or Remove Your Password
⇒ Create a Picture Password
⇒ Change or Remove Your Picture Password
⇒ Create a PIN
⇒ Change or Remove Your Pin
⇒ Delete a User Account
Windows 8 seeks out an Internet connection automatically from the moment you start it. More often than not, you connect to the Internet using a wireless or Wi-Fi connection. For this reason, if you start a laptop or tablet in a coffee shop or library, you may see a notification that one or more network connections are available. That’s convenient.
A computer without an Internet connection is an island, if not a paperweight. Connecting to a network, however, opens a door to your computer — and malefactors try to push through that door to access your computer. Windows 8 has a firewall that monitors and restricts traffic in and out. Don’t be afraid of connecting to the Internet, but be aware of the risks and be careful to which networks you connect. In Chapter 1, you create a local user account. You need a Microsoft Account to take full advantage of Windows 8 features such as the Microsoft Store for apps (see Chapter 5), SkyDrive for online storage, and synchronizing settings between computers. In this chapter, you create a Microsoft Account and choose a secure method for logging into your account. To control access to your computer, you find out how to use a password, a shorter personal identification number (PIN), or even a personal photo to unlock your computer.
If other people use your computer, you may want to create more than one user account. If each person who uses the computer has a separate account, you can keep data, apps, and settings tidy and private.
Even if you’re the only one using your computer, you may want more than one account. For example, if you create a new local user account, you can experiment with the new account — changing the look and function of Windows 8 — without affecting your first account.
Connect to the Internet
1. On the Start screen, display the charms bar (shown in Figure 4-1) using one of these methods:
• Mouse: Place the mouse pointer in the lower-right corner of the screen and move the pointer up.
• Touchscreen: Drag your finger from the right edge of the screen to the left.
• Keyboard: Press  +C.
+C.
2. To the left of the time and date is a network connection icon. Refer to Table 4-1 to determine which network connection icon appears on your screen.
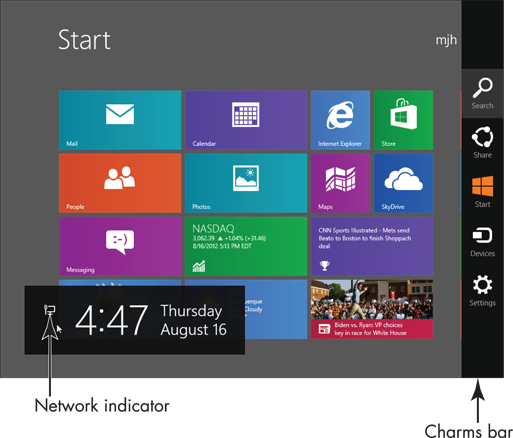
Figure 4-1
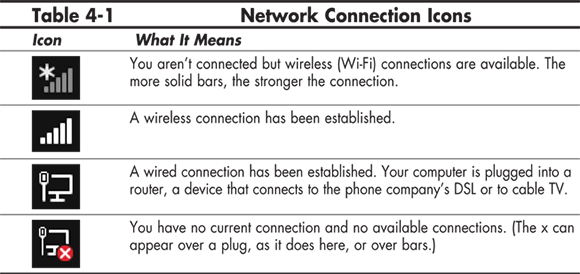
3. Select the Settings charm. In the Settings panel on the right, you see the network connection icon again. The Network icon indicates information about the current network connection, if any (refer to Table 4-1). The icon itself will indicate whether the connection is wired (a plug) or wireless (five bars). Under the icon, you may see one of the following:
• Network name: If you are connected to a wired or wireless network, the name of the network will appear below the icon. In that case, you’re all set, but keep reading.
• Available: A wireless connection that you may be able to connect to is available.
• Unavailable: No connection has been established or is available.
4. Select the Network icon. The Networks panel appears, as shown in Figure 4-2, and lists all available network connections. There may be no connections or dozens.

Figure 4-2
5. Select a connection. Note that not all displayed connections are accessible or desirable.
 6. After you select a connection, the selected tile expands and displays the Connect Automatically check box, as shown in Figure 4-3. If you trust the connection and might want to use it again, leave the check box selected. Otherwise, deselect the check box. To continue, select the Connect button.

Figure 4-3
7. You may be prompted to enter a network security key (a series of characters), which limits access to those who know the key. See Figure 4-4. The key protects that network and its users. If you’re using a hotel’s connection, you can obtain the key from the front desk. If you don’t know the key, select Cancel. Otherwise, enter the key (dots appear as you type) and select Next.
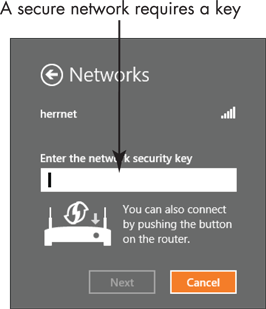
Figure 4-4
8. If you entered the correct key or none was required, you may see the message shown in Figure 4-5: Do you want to turn on sharing between PCs and connect to devices on this network? Sharing refers to allowing computers access to your files or to a device, such as a printer. You should share at home but not in a public location. Choose one of the following:
• No: This option prevents you from connecting directly with other computers and protects your computer from networks in public places. You’ll still have Internet access.
• Yes: This option enables you to share documents and devices between your computers on a home or office network.

Figure 4-5
9. When a Wi-Fi connection is established, Connected appears next to the network name in the Networks panel (Figure 4-6, left). Select the back arrow. The connection name and signal strength appear in the Settings panel (Figure 4-6, middle). Now display the charms bar (see Step 1 for help). The connection strength (but not the name) appears next to the time and date (Figure 4-6, right).

Figure 4-6
10. To turn off or disconnect the network connection, display the Networks panel again (Steps 1—4). Select the connected network (see Figure 4-7) and then select the Disconnect button. (If you disconnect this network, reconnect before continuing.)

Figure 4-7
11. In the Networks panel, right-click or tap, hold a moment, and then release to display a pop-up menu of functions related to the selected network, including the following:
• Show Estimated Data Usage is the most interesting of these functions, showing how much data has moved through the connection over time. This information is particularly important if you pay separately for data connections, as with some cell phone or mobile connections.
• Set as Metered Connection lets you put a limit on data transfer, which is useful if your bill is based on the amount of data you transfer.
• Forget This Network may be useful if you connect accidentally to a network or you want to practice connecting all over again.
• Turn Sharing On or Off switches to the desktop, where you can choose No, Don’t or you can choose Yes, Turn on Sharing and Connect to Devices. You need this only if you think you made the wrong choice in Step 8.
• View Connection Properties switches to the desktop for more technical options. You’re not likely to need this function.
Create a New E-Mail Address for a Microsoft Account
1. Follow these steps to switch your Windows 8 user account from local to a Microsoft Account with a new e-mail address. On the Start screen, select your name in the upper-right corner of the screen. In the pop-up menu that appears (see Figure 4-8), choose Change Account Picture. The PC Settings screen appears.
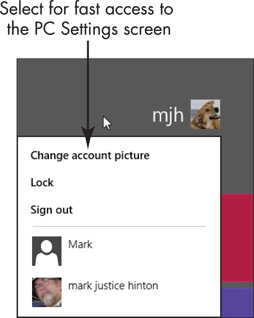
Figure 4-8
2. On the left of the PC Settings screen, select the Users category. Your account information appears with Local Account under your name, as shown in Figure 4-9.

Figure 4-9
3. Select the Switch to a Microsoft Account button. Enter your current password (if any) and select Next. The Sign in with a Microsoft Account screen appears. To create a new e-mail address, select Sign Up for a New Email Address (at the bottom of the screen).
4. On the Sign Up for a New Email Address screen (see Figure 4-10), in the Email Address box, type the name you want to use (no spaces). Common names have probably been claimed by others and are unavailable. If you type a name that is already taken, you’ll get an error message to that effect, but not until several steps later (you can change your choice then). Unusual names, especially full names, may work. Adding some numbers to your name may make it unique, such as your-firstname-lastname-12345.
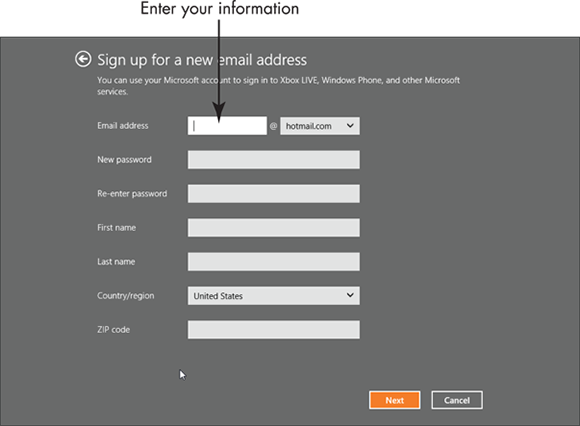
Figure 4-10
5. Next to the @ sign after your name, choose between one of the available services. I know of no specific advantage to one or the other service.
6. In the New Password box, type a password. Dots appear instead of what you type. Use between 7 and 16 characters. Mix uppercase and lowercase, numbers, and symbols such as hyphens (but no spaces).
7. As you move from the Password box, Windows 8 evaluates your password for strength (difficulty to guess or deduce). If your password is too simple (such as, password or secret), the message Choose a password that’s harder for people to guess appears next to the box. Try a more difficult password.
8. In the Re-Enter Password box, type the same password. If this password doesn’t match the one in Step 6, the message These passwords don’t match appears next to the box.
9. Type your first and last names in the appropriate boxes.
10. If your country or region is not preselected, select your country. Use any of the following methods to move through the list to your country name:
• Mouse: Click in the box. Roll the mouse wheel up or down. Click your country name.
• Touchscreen: Drag the list up or down. Tap your country name.
• Keyboard: Type the first letter of your country or use the arrow keys to move up and down the list. With your country selected, press the Enter or Tab key.
11. Type your ZIP or postal code in the appropriate box. Leave this box blank if it is not applicable to you. Review your entries. Select the Next button, and the Add Security Verification Info screen appears
12. In the Mobile Phone box, shown in Figure 4-11, select your country again (using the methods in Step 9). In the next box, enter your phone number, including area code. If you have to reset your password, Microsoft may use this number to confirm your identity.
13. If you have an alternate e-mail address, you can type it in the Alternate Email box. The alternate e-mail address enables you to receive e-mail from Microsoft if you can’t access the account you’re setting up.
14. In the box next to Secret Question, select one.
15. In the Answer box, type an answer to the selected question. Hint: The answer doesn’t have to be true, just memorable and at least 5 characters. Your answer to the selected question may be used to verify your identity. Because case and punctuation matter, remember your answer exactly as you type it. Then select Next.
16. On the Finish up screen, shown in Figure 4-12, select the month, day, and year of your birth. (You can lie, if you remember your response.) Then select your gender.

Figure 4-11
17. In the Enter These Characters box, you see some odd characters. These are a test that eliminates non-humans from creating an account (seriously). In the box below those characters, type what you see.
18. If you don’t want to receive promotional offers and surveys, select the check box to remove the check mark next to Send Me Email.
19. You can select the links to the Microsoft service agreement and privacy statement if you want to read what you’re about to agree with. Be the first.
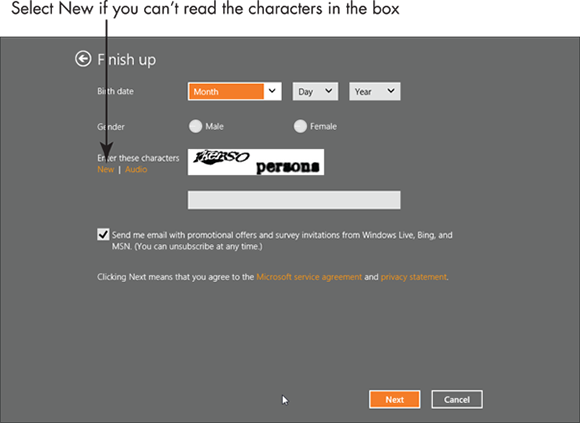
Figure 4-12
20. Select the Next button to finish creating your new Microsoft Account and new e-mail address.
21. You return to the Users category of the PC Settings screen. Note your account name and associated e-mail address (see Figure 4-13).

Figure 4-13
Use an Existing E-Mail Address for a Microsoft Account
1. Follow these steps to switch your Windows 8 user account from local to a Microsoft Account using an existing e-mail address. On the Start screen, select your name in the upper-right corner of the screen, and then choose Change Account Picture from the pop-up menu that appears (refer to Figure 4-8).
2. On the left side of the PC Settings screen, select the Users category. Your account information appears with Local Account under your name (refer to Figure 4-9).
3. Select the Switch to a Microsoft Account button. Enter your current password (if any) and select Next. The screen shown in Figure 4-14 appears. Type the e-mail address you want to associate with your Microsoft Account. Then select the Next button.
4. Microsoft checks the e-mail address you typed to see whether it is already associated with a Microsoft Account. In the unlikely event that you already have a Microsoft Account, type the password for that account, choose Next, confirm the Security verification data, and then choose Next. You return to the Users category of the PC Settings screen (refer to Figure 4-13). Note your account name and associated e-mail address. Skip to the next section.
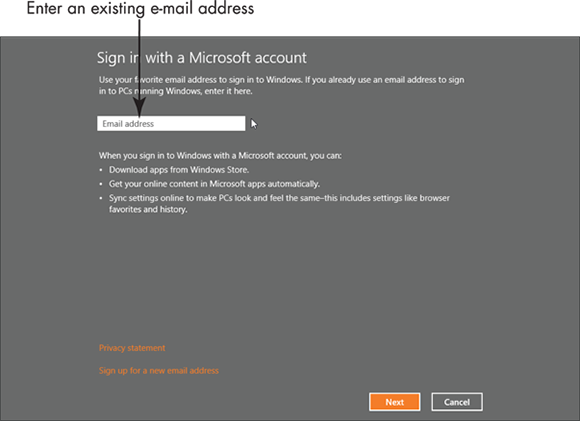
Figure 4-14
5. If the e-mail address you entered in Step 3 is not associated with a Microsoft account, you see the Set Up a Microsoft Account screen, as shown in Figure 4-15. The e-mail address you previously typed appears next to the Email Address box. You can change that address here, if appropriate.
6. Follow Steps 6–21 in the preceding section, “Create a New E-Mail Address for a Microsoft Account.”
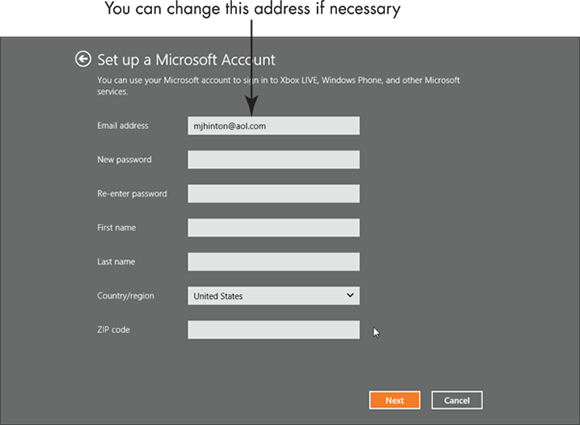
Figure 4-15
Add a New User
1. You already have the only user account you require on your computer. However, you may want to create an account for someone in your household or as a practice account. Select your name on the Start screen. Choose Change Account Picture from the menu that appears (refer to Figure 4-8). The PC Settings screen appears.
2. On the left, select the Users category. On the right, under Other Users, select Add a User. The Add a User screen appears.
3. At the bottom of the Add a User screen, choose Sign in without a Microsoft Account to create a local account.
4. On the next screen, read the explanation of your two options for signing in. Then select the Local Account button.
5. On the next screen (see Figure 4-16), enter the user name in the first box. Use the person’s first name, last name, first and last name, initials, nickname — something easy to remember and type.
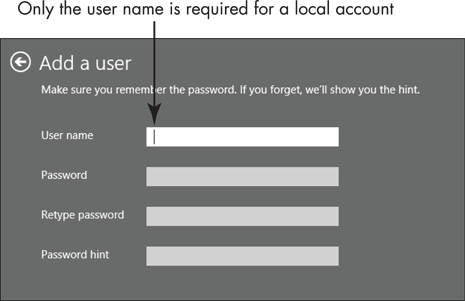
Figure 4-16
6. In the Password box, enter a password. Dots will appear for each character you type.
7. In the Retype Password box, type the same password exactly.
8. In the Password Hint box, type a reminder only you will understand.
9. After completing all the available boxes, choose the Next button. You may see an error message if you left a required field empty, your passwords don’t match, or the user name already exists on this computer. If you do see an error, correct your mistake and choose Next again.
10. On the final screen, shown in Figure 4-17, you see the new user name next to a generic user picture. Note the option to indicate that this new account belongs to a child. Select this option if you want to receive e-mail reports on the child’s computer usage. Select the Finish button. The PC Settings screen appears, with the new user name under Other Users.
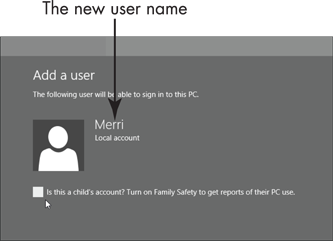
Figure 4-17
11. Return to the Start screen. In the upper-right corner of the screen, select your user name. In the drop-down menu that appears, select the new user name to switch to that account.
12. A screen appears with the new user name. If you used a password on the new user account, type that password in the box and select the on-screen right arrow or press Enter.
13. In the upper-right corner of the Start screen, choose the new user name. Note that the old user name is labeled Signed In, as shown in Figure 4-18. Both accounts are signed in. You can switch between them by selecting the user name you want to switch to. To sign out of an account, choose Sign Out.

Figure 4-18
Create a Password
1. On the Start screen, select your name. From the drop-down menu that appears, choose Change Account Picture (refer to Figure 4-8). The PC Settings screen appears.
2. On the left, select the Users category (refer to Figure 4-9).
3. If you don’t have a password but want one, select the Create a Password button under Sign-In Options.
4. In the Create a Password screen, shown in Figure 4-19, enter a password in the New Password box.
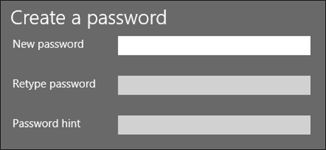
Figure 4-19
5. In the Retype Password box, enter the password again.
6. Enter a hint to remind yourself — and no one else — about your password.
7. Select Next. If any error messages appear, correct the entries and select Next again.
8. The final Create a Password screen indicates you must use your new password the next time you sign in. Select Finish.
Change or Remove Your Password
1. On the Start screen, select your name, and then choose Change Account Picture. On the left side of the PC Settings screen, select Users.
2. If you want to change your password, select the Change Your Password button Under Sign-In Options.
3. On the Change Your Password screen, enter your current password and then select the Next button.
4. On the next Change Your Password screen (see Figure 4-20), enter the new password.

Figure 4-20
5. In the Retype Password box, enter the password again.
6. Enter a hint to remind yourself — and no one else — about your password. Then select Next. If any error messages appear, correct the entries and select Next again.
7. The final screen indicates you must use your new password the next time you sign in. (This message appears even if you left the password blank, in which case you won’t need any password.) Select Finish.
Create a Picture Password
1. Intended for a touchscreen, a picture password uses a photo you select. During setup, you draw three gestures on the photo. You then sign in to your computer by drawing the same three gestures in the same areas of the picture. Some consider this method easier than entering a traditional password. On the Start screen, select your name and then choose Change Account Picture from the drop-down menu.
2. On the left side of the PC Settings screen, select Users.
3. If you don’t have a Picture Password but want one, select the Create a Picture Password button under Sign-In Options.
4. On the next screen, enter your current password. Select the OK button.
5. Read the text on the Welcome to Picture Password screen. Note that the size, position, and direction of your gestures become part of your picture password. Select the Choose Picture button.
6. On the next screen, shown in Figure 4-21, select the photo you want to use and then select the Open button.
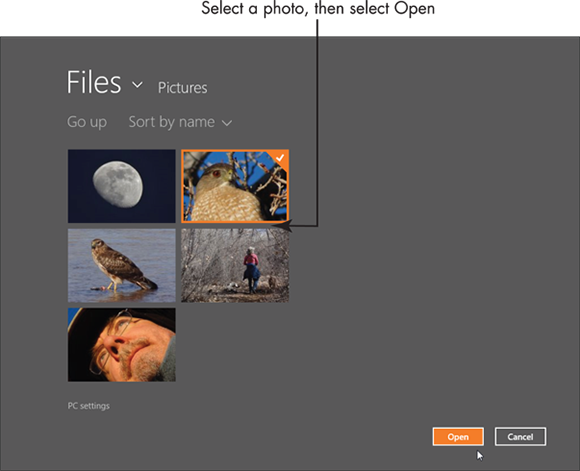
Figure 4-21
7. On the How’s This Look? screen, drag the photo if you need to position it differently. Then select the Use This Picture button. (If you want to use another picture, select the Choose New Picture button and repeat Step 6. A check mark indicates the currently selected photo.)
8. On the Set Up Your Gestures screen, shown in Figure 4-22), draw three gestures on the photo. Draw circles, straight lines, or simply tap areas. As you draw or tap, the screen shows briefly the gestures you make.
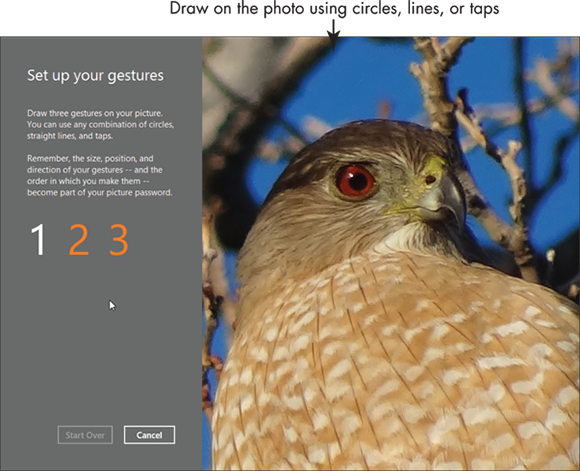
Figure 4-22
9. The Confirm Your Gestures screen appears automatically after you draw the third gesture in Step 8. Repeat the gestures, using the same position, size, and direction. If your gestures don’t match those in Step 8, the Something’s Not Right screen appears. Choose between Try Again, Start Over or Cancel.
10. When you have successfully repeated the gestures, you see a Congratulations screen. Select Finish. The next time you sign in, your password photo will appear. Make the same three gestures you made in Step 8 to sign into Windows 8. No password required.
Change or Remove Your Picture Password
1. On the Start screen, select your name and then choose Change Account Picture. On the PC Settings screen, select Users.
2. If you don’t want to use a picture password, select the Remove button under Sign-In Options. One click and your picture password is gone without further confirmation. Skip the remaining steps.
3. If you want to change your picture password, select the Change Picture Password button under Sign-In Options.
4. On the screen that displays First, confirm your current password, enter your password. Then, select OK.
5. On the Change Your Picture Password screen (shown in Figure 4-23), select one of the following options:
• Use This Picture: Select this option if you want to use the same picture with new gestures. On the next screen, draw three gestures on the photo, and then repeat those gestures on the next screen, which appears automatically. See Steps 8–10 in the section “Create a Picture Password.”
• Choose New Picture: Use this option to both select a different photo and create new gestures. See Steps 6–10 in the section “Create a Picture Password.”
• Replay: Select this option if you need to see the gestures you used for the picture password. After the gestures are replayed, you reenter the gestures twice.
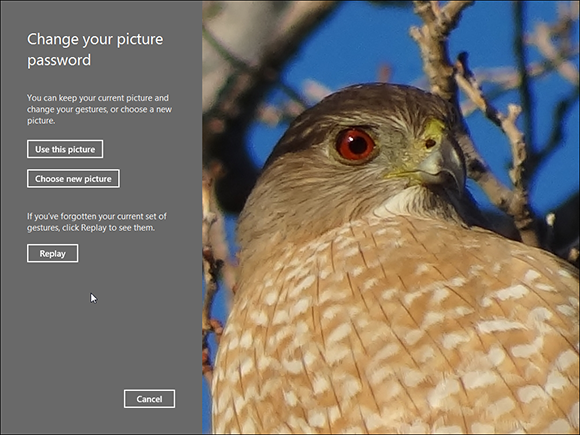
Figure 4-23
Create a PIN
1. A PIN (personal identification number) has two advantages over a password. One, a PIN consists of just four numbers, so it’s easier to remember and enter, especially with a virtual keyboard. Two, you don’t press the Enter key with a PIN, making it even faster to use. (I use a PIN on my home computer.) On the Start screen, select your user name and then choose Change Account Picture.
2. On the PC Settings screen, select Users. Under Sign-In Options, select the Create a PIN button.
3. On the next screen, enter your current password and then select OK.
4. On the Create a PIN screen, shown in Figure 4-24, enter four digits in the first box. Re-enter those four digits in the second box. Select Finish. The next time you sign in, enter your four-digit pin.
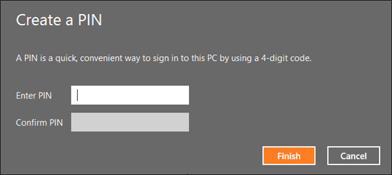
Figure 4-24
Change or Remove Your PIN
1. Select your name on the Start screen, and then choose Change account picture. On the PC Settings screen, select the Users category on the left
2. If you don’t want to use a PIN, select the Remove button under Sign-In Options. One click and the PIN is gone without further confirmation. Skip the remaining steps.
3. If you want to change your PIN, select the Change PIN button under Sign-In Options. On the verification screen, enter your current password and select OK.
4. On the Change Your PIN screen, enter a new four-digit PIN in the first box.
5. In the Confirm New PIN box, reenter your new PIN. (A message appears if the PINs don’t match.) Select Finish. The next time you sign in, enter your new four-digit pin.
Delete a User Account
1. Before you delete a user account, make sure that account is signed out. Then sign in to the administrator account, which is the one you created in Chapter 1.
2. On the Start menu, type remove user to search for matching functions. Select the Settings category on the right side of the Search screen. On the left, select Remove User Accounts (see Figure 4-25). The desktop appears on your screen. Certain functions, particularly more advanced or less common functions such as deleting a user account, run on the desktop. See Chapter 5 for information on using the desktop.
3. In the Manage Accounts window, shown in Figure 4-26, select the account you want to delete. The Change an Account window appears. On the left, select Delete the Account.

Figure 4-25
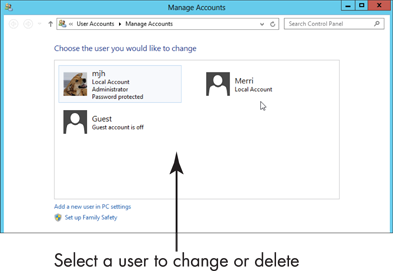
Figure 4-26
4. In the Delete Account window, you decide what to do with local documents and photos in the account you are deleting. Choose one of the following buttons:
• Delete Files: Erases all files belonging to the user.
• Keep Files: Copies files from the desktop and other user folders into a new folder on the administrator’s desktop. The folder will have the name of the deleted user.
• Cancel: Does nothing.
5. On the Confirm Deletion screen, select the Delete Account button.
6. You’re done with the desktop for now. Return to the Start screen by clicking in the lower-left corner of the screen, by swiping from the right edge to the left and tapping Start, or by pressing  .
.