Chapter 5
Getting Comfortable with the Desktop
Get ready to . . .
⇒ Check Out the Desktop
⇒ Change the Date or Time
⇒ Explore the Parts of a Window
⇒ Resize a Window
⇒ Arrange Some Windows
⇒ Snap a Window
⇒ Choose a Desktop Background
⇒ Pin Icons to the Taskbar
⇒ Stop Apps with the Task Manager
In Windows 8, the desktop is an app you access through a tile on the Start screen. Unlike other apps, the desktop is an environment for using programs that pre-date the new Windows 8 apps. The desktop enables Windows 8 users to run older programs. Microsoft takes pains not to break abruptly with the past as it paves the way for the future.
You may find yourself on the desktop as a result of choosing an app from the Start screen, Search Results screen, or All Apps screen. For that reason alone, take the time to explore the desktop-way of doing things, which is not quite the new Windows 8 way.
One key feature of the desktop is the taskbar, a strip along the bottom of the screen that shows icons for desktop programs. The taskbar can be used to run and switch between desktop programs. Most programs on the desktop run in windows, as opposed to the full-screen nature of Windows 8 apps.
In this chapter, you get acquainted with the desktop, the taskbar, and windowed apps. You change the date, time, and time zone, as needed. You resize and reposition windowed apps. You select a background for the desktop and make some desktop apps more convenient to use by pinning them to the taskbar. Finally, you work with the Task Manager, which lets you end any app — desktop or Windows 8.
Check Out the Desktop
1. On the Start screen, select the Desktop tile to display the desktop. Your desktop will have a picture in the background.
2. Examine your desktop for icons — small pictures that represent either programs, which perform functions, or documents, such as letters and photos. You select an icon to run a program or open a document. The Windows 8 desktop displays an icon for the Recycle Bin, where deleted documents go. The Recycle Bin may be the only icon on your desktop, or you may see others. See Chapter 14 for information on using the Recycle Bin.
3. The area at the bottom of the screen is the taskbar, where you see icons for some programs as shown in Figure 5-1. The first two icons, for example, are for programs that are available but not currently running (Microsoft Internet Explorer and File Explorer, respectively).

Figure 5-1
4. The right end of the taskbar is an area called the icon tray, which displays the current date and time, as well as icons for other programs that run automatically when your computer starts. Select an icon in the icon tray to open the associated program.
5. Right-click over an icon or tap and hold until a small box appears, then release. A context menu appears with options specific to the icon you selected. Select anywhere else on the desktop to dismiss this menu. Repeat this on a few different areas of the screen to see how the context menu changes.
 If you can select the item using the keyboard, you can then press the context menu key to display the menu.
Change the Date or Time
1. Select the date and time displayed in the taskbar. A calendar and clock pop up, as shown in Figure 5-2.
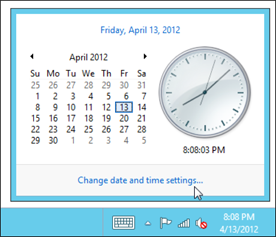
Figure 5-2
2. If the date or time is incorrect, select Change Date and Time Settings. In the Date and Time window that appears, select the Change Date and Time button.
3. In the Date and Time Settings window, shown in Figure 5-3, select the correct date in the calendar. Then change the time by using the little triangles that point up (later) or down (earlier) or by entering the specific hours and minutes. Select OK to keep your change or Cancel to ignore your change.
4. Back in the Date and Time window, select Change Time Zone.
5. In the Time Zone Settings window, shown in Figure 5-4, select the Time Zone drop-down menu and then select your time zone. Select (add a check mark) or deselect the Daylight Saving Time option as appropriate. Select OK to keep your change or Cancel to ignore your change.
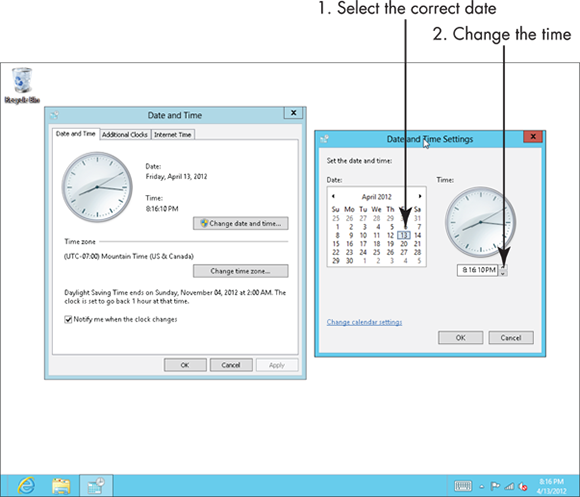
Figure 5-3
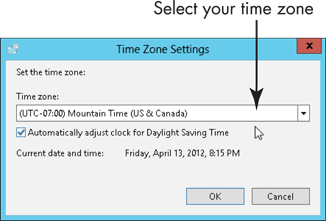
Figure 5-4
Explore the Parts of a Window
1. In the taskbar, select the second icon from the left, which looks like a folder. File Explorer opens, as shown in Figure 5-5.
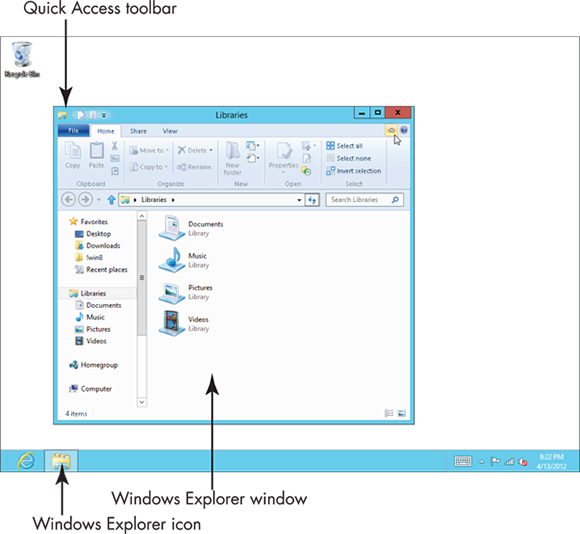
Figure 5-5
2. Explore the example window in Figure 5-5, starting at the top left:
• Quick Access toolbar: The Quick Access toolbar gives you fast access to common operations, such as saving a document. This toolbar is not present in all windows and may feature different functions, depending on the window.
• Title bar: The title bar, which is the top line of the window, contains the title of the desktop program you’re using. When you use a program to create a document, the name of the document also appears in the title bar.
 • Minimize: The Minimize button shrinks or hides the window’s contents. The program that the window contains is still running and open, but the window is out of sight. You’ll still see the program’s icon in the taskbar. Select the Minimize button when you want to ignore a particular window but aren’t actually done with it. To restore the window, select its icon in the taskbar.

 • Maximize/Restore: The Maximize button (the button with a single square) fills the screen with the contents of the window. Select the Maximize button to hide the desktop and other open windows, to concentrate on one window, and to see as much of the window’s contents as you can. The Restore button (the button with two squares) is the name of the button that appears after you select the Maximize button; it replaces the Maximize button. Select the Restore button to return the window to its previous size, which is between maximized and minimized. (Press
  +up arrow key to maximize, and
  +down arrow key to restore or minimize.)
 • Close: The Close button is the red button with the X in the top-right corner of the window. Select the Close button when you are done with the window. Close is also called Quit and Exit. (Press Alt+F4 to close the current window or the desktop itself. This keyboard shortcut works for Windows 8 apps, as well.)
• Ribbon: The ribbon is a toolbar that provides access to many functions organized as groups within tabs. The tabs appear across the top of the ribbon. The first time you run File Explorer, the ribbon is hidden (collapsed). Display the ribbon by selecting the caret symbol (^) on the far right, next to Help (the question mark). Select the caret again to hide the ribbon. You can also press Ctrl+F1 to toggle the ribbon on and off. (Leave the ribbon visible for this chapter.) The tabs remain in view and function the same. Although ribbons vary between programs, most ribbons have File, Home, and View tabs. In Figure 5-5, File Explorer has a Share tab, as well. To use a tab, select its name to display its functions, and then select the item you want to use.
• Contents: The bulk of the window contains the program or document you’re using. File Explorer displays locations on the left and objects in that location on the right.
• Status bar: Along the bottom edge of the window, some programs display information about the window or its contents in a single-line status bar. File Explorer does not have a status bar.
3. Select the Close button (the red X) to close File Explorer.
Resize a Window
1. To resize a window, open File Explorer by selecting the folder icon in the taskbar. (Refer to Figure 5-5.)
 2. If the window is maximized (fills the screen), select the Restore button to make the window smaller.
3. Use one of these methods to resize the window:
• Mouse: Move the mouse pointer to the right edge of the window, until the pointer changes to a double-headed arrow called the resize pointer. Click and drag the edge of the window, using the resize pointer. (To drag, click and hold down the mouse button while you move the mouse.)
• Touchscreen: Drag the right edge of the window.
4. Resize the window’s width and height at the same time by dragging a corner of the window (see Figure 5-6). If you want a challenge, try resizing the top-right corner without accidentally selecting the Close button.
5. Resize the window’s width or height by dragging any of the four sides.

Figure 5-6
6. Leave the window open as you go on to the next task.
Arrange Some Windows
1. On the desktop, select and open the Recycle Bin by double-clicking or double-tapping its icon. The Recycle Bin contains deleted files and folders. It appears in another File Explorer window. See Figure 5-7.
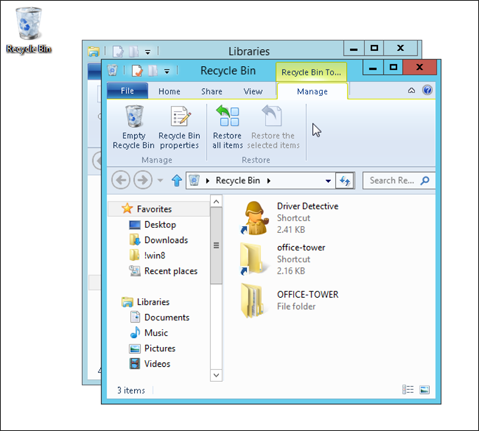
Figure 5-7
2. If File Explorer isn’t still open from the preceding section, open it by selecting the folder icon in the taskbar. You now see two overlapping windows on the desktop (refer to Figure 5-7), one titled Libraries and the other titled Recycle Bin.
3. Drag the Recycle Bin title bar (avoiding the buttons on the left and right ends) to move that window a little.
4. Drag the Libraries title bar (again, avoiding the buttons on both ends). The Libraries window moves in front of the Recycle Bin as you move it. Move both windows so that you can see a little of each, as in Figure 5-8.
5. Practice moving both windows. Arranging windows helps you see and do more than one thing at a time. Use the techniques from the section “Resize a Window” to see as much as you can of both windows at once.
6. Leave both windows open for the following task.
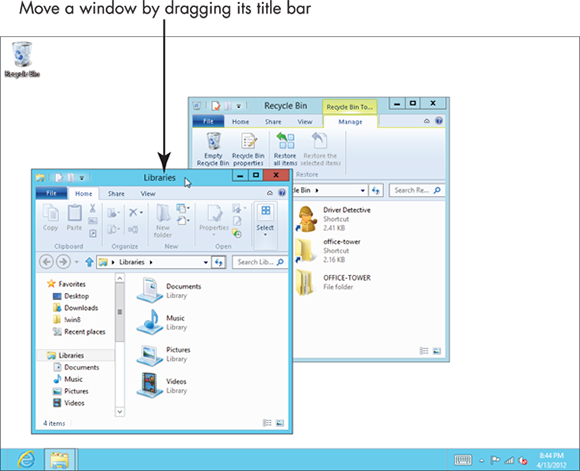
Figure 5-8
Snap a Window
1. Drag one of the windows you worked with in the preceding section to the left edge of the screen. When the mouse pointer or your finger touches the left edge of the screen, you’ll see an outline on the screen, as shown in Figure 5-9. Release the window, and it resizes automatically to fill the left half of the screen, as shown in Figure 5-10. This procedure is called snap. (To snap a window using the keyboard, press  +left arrow.)
2. Now snap the other window to the right. (To move the window using the keyboard, press  +right arrow.) It resizes and fills the right half of the screen.
3. Drag either window by the title bar away from the edge of the screen. The window returns to its previous size.
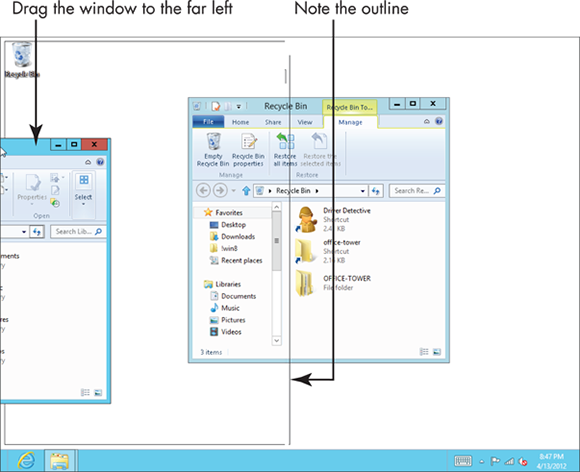
Figure 5-9

Figure 5-10
4. Drag either window to the top edge of the screen. This action maximizes the window, just as though you selected the Maximize button (see the section “Explore the Parts of a Window”).
5. Drag the title bar of the maximized window away from the top to restore it to its previous size, just as though you selected the Restore button.
6. Close or minimize both windows.
Choose a Desktop Background
1. On the desktop, display the Settings panel, shown in Figure 5-11, using one of these methods:
• Mouse: Move the mouse pointer to the top-right or bottom-right corner to display the charms bar. Click the Settings charm.
• Touchscreen: Swipe from the right edge to display the charms bar. Tap the Settings charm.
• Keyboard: Press  +I.
+I.
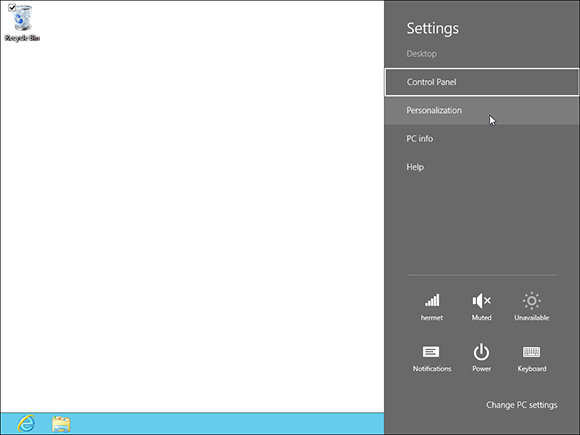
Figure 5-11
2. Select Personalization. The Personalization window opens, as shown in Figure 5-12.
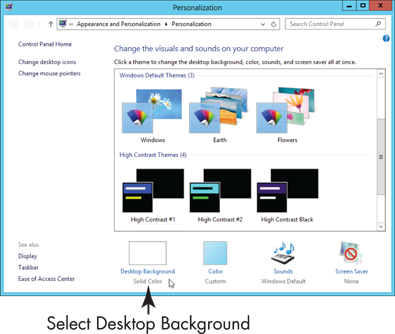
Figure 5-12
3. In the Personalization window, select the Desktop Background option (at the bottom). The Desktop Background window appears, as shown in Figure 5-13.
4. Select any photo to make that photo the desktop background. The background changes immediately. To see the entire desktop, minimize the current window. Restore the Desktop Background window by selecting its icon in the taskbar or by repeating the preceding steps.
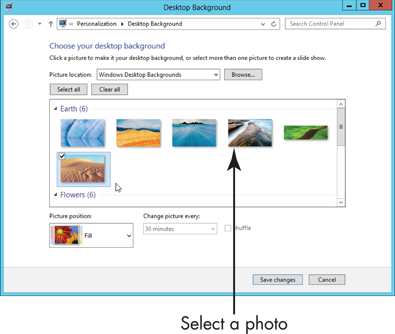
Figure 5-13
5. Select more than one photo for the background as follows:
• Select individual photos using the check box in the upper-left corner of each thumbnail. Select again to remove that check mark.
• Select all photos under a heading, such as Earth, by selecting the heading.
• Use the Select All button to select all photos. (Yeah, that was obvious.) Select the Clear All button to unselect all photos.
6. Select the Change Picture Every option to change the amount of time that passes before the next picture is displayed. Intervals range from every 10 seconds to once per day. For a quick test of this feature, choose 10 seconds.
7. If you want to mix the order in which the photos appear, select the Shuffle check box.
8. Minimize the Desktop Background window. The desktop background changes every 10 seconds (unless you chose a different frequency or chose only one photo). Restore the Desktop Background window by selecting its icon on the taskbar.
9. To keep the selections you make in the Desktop Background window, select the Save Changes button (refer to Figure 5-13). To undo those selections, select Cancel. In either case, you return to the Personalization window. Close the Personalization window when you are done with it.
Pin Icons to the Taskbar
1. On the Start screen, type calculator to search for that desktop program. Then select the Calculator tile and display the app bar, shown in Figure 5-14, using one of these methods:
• Mouse: Right-click the Calculator tile.
• Touchscreen: Swipe the Calculator tile down or up slightly.
 • Keyboard: Press the Tab key to highlight the Calculator tile. Press the context menu key, usually found to the right of the spacebar.
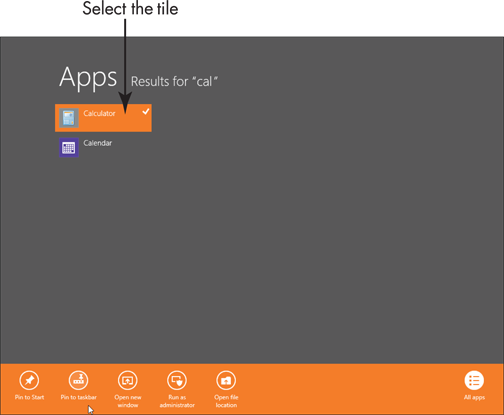
Figure 5-14
2. Select the Pin to Taskbar button. Doing so places the icon for Calculator in the desktop taskbar for easy access.
3. Switch to the Start screen. Then display the desktop by selecting the Desktop tile on the Start screen.
4. The Calculator icon appears in the taskbar, as shown in Figure 5-15.

Figure 5-15
5. Return to the Start screen. Repeat Step 1 and then select Unpin from Taskbar.
6. Switch to the desktop. The Calculator icon is gone.
Stop Apps with the Task Manager
1. On the desktop, select Task Manager from the taskbar context menu (shown in Figure 5-16) using one of these methods:
• Mouse: Right-click over an empty area of the taskbar and select Task Manager from the context menu.
• Touchscreen: Tap and hold an empty area of the taskbar until a small box appears, then release. Select Task Manager from the context menu.
• Keyboard: Press Ctrl+Shift+Esc to display the Task Manager directly.

Figure 5-16
2. The Task Manager lists any running apps — both desktop apps, such as Calculator, and Windows 8 apps, such as Weather. Select an app, also referred to as a task. Note that the End Task button is now available, as shown in Figure 5-17. You don’t have to end this task, but you could. Any of the tasks in the Task Manager window can be ended without consequences.
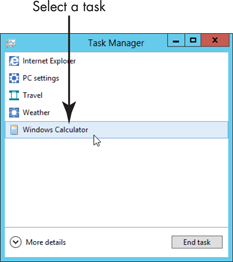
Figure 5-17
3. Select the More Details option. The Task Manager expands and displays detailed information about every process running on the computer. There’s more to Task Manager, although you may not need all of its capabilities. Select Fewer Details to return to the simpler version.
4. Close the Task Manager, and then return to the Start screen.
