Chapter 7
E-Mailing Family and Friends
Get ready to . . .
⇒ Use the Mail App
⇒ Write an E-Mail Message
⇒ Format E-Mail
⇒ Read and Respond to Incoming E-Mail
⇒ Send E-Mail from Other Apps
⇒ Change Mail Settings
⇒ Add an E-Mail Account to Mail
E-mail has largely replaced the notes and letters of previous centuries. Every day, billions of e-mail messages circle the globe, conveying greetings, news, jokes, even condolences.
E-mail also provides a way to send and receive attachments, such as documents or photos. Who needs faxes or postcards?
The Mail app gives you access to e-mail using your Microsoft Account. A glance at the Start screen can tell you whether you have unread e-mail and if so, who it is from.
Your Microsoft Account can be associated with an e-mail address from any e-mail service provider, including Microsoft’s own Hotmail (www.hotmail.com), Live (www.live.com), Outlook (www.outlook.com) or Xbox (www.xbox.com). You can also use e-mail services such as Yahoo (www.yahoo.com) and Gmail (www.gmail.com) without having a Microsoft Account. However, you have to access non Microsoft Account e-mail using a web browser. See Chapter 6 for information on browsing the Web.
In this chapter, you use the Mail app for e-mail. You compose, format, and send e-mail, as well as respond to incoming e-mail.
Use the Mail App
1. For e-mail on Windows 8, select the Mail tile on the Start screen. If you are not currently signed in using a Microsoft Account, enter your e-mail address and password on the Sign In screen that appears, and then select Sign In. (See Chapter 4 for information on creating a Microsoft Account.)
2. The first time you use the Mail app, you may not see much, if you haven’t used your Microsoft Account for e-mail on another computer. Who would have written you already? You may, however, see a message or two from Microsoft.
3. On the Inbox screen, select the back arrow in the upper-left corner. (“Back” seems odd given that you haven’t been to the screen you’re about to see. Computers aren’t as consistent as people believe.) The Mail panel slides in from the left, replacing the Inbox panel, as shown in Figure 7-1.
4. Select any of the following categories in the Mail panel, and then use the back arrow to return to the Mail panel:
• Inbox: E-mail you have received but not moved elsewhere appears here, including both read and unread e-mail.
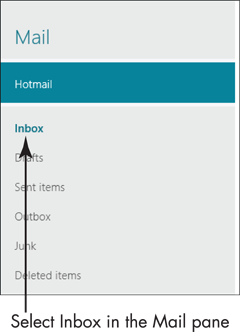
Figure 7-1
• Drafts: As you compose e-mail (next section), you can save your message as a draft until you are ready to send it.
• Sent Items: Copies of the e-mail you send are stored here, appropriately.
• Outbox: When you send e-mail, it moves to the Outbox until it has been processed, which may be instantaneously. If you’re not connected to the Internet, e-mail waits here until you establish a connection, and then it is sent.
• Junk: Messages are moved here — either automatically or by you — instead of the Inbox, if they are suspected of being, well, junk. The more common term for unwanted e-mail is spam. (It’s a long story.) You may want to check this folder occasionally to see if a message was misfiled here.
• Deleted Items: Self-explanatory? You can move messages out of Deleted Items if you change your mind.
5. Proceed to the next section, “Write an E-Mail Message.”
Write an E-Mail Message
1. To compose an e-mail message in the Mail app, select the New button (it looks like a plus sign) in the upper-right corner of the screen. (It doesn’t matter which panel appears on the left.) The Compose screen appears, as shown in Figure 7-2.
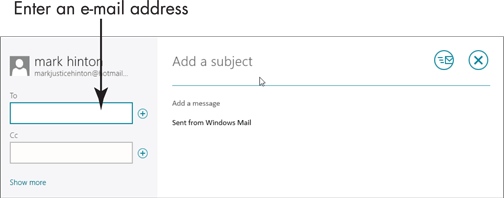
Figure 7-2
2. Note your name and e-mail address above the To box. This is the information your e-mail recipient will see in his or her e-mail app as the Sender or From line.
3. In the To box, type an e-mail address. (Feel free to write me using markjusticehinton@hotmail.com.) If the e-mail address is incomplete, it will be highlighted in a red box. Press the Tab key, touch the screen, or use the mouse to move to the next option.
4. Select the box that displays Add a Subject (that prompt disappears when you select the box). Enter a few words describing your message content or purpose. Using lowercase is fine.
5. Select below the Subject line. Type your message. Avoid all caps — purists consider caps to be SHOUTING! No need to press Enter as you approach the end of the line — this isn’t a typewriter.
6. When you’re ready to send the message, select the Send button, which looks like an envelope. If you aren’t ready to send the message, select the Close button (an X) and then choose either Save Draft or Delete, depending on whether or not you want to continue with this message at another time.
7. If you select the Send button, your message is sent and you return to the screen you were on at the beginning of Step 1.
8. Repeat from Step 1 as needed.
Format E-Mail
1. If you want to add bold, italics, even color to e-mail, select the text you want to fancy-up. If no text is selected, your formatting will apply to the word in which the cursor (the blinking vertical line in the content) is located.
• Mouse: Click and drag the mouse pointer over the text you want to select.
• Touchscreen: Tap and drag over the text you want to select.
• Keyboard: With the cursor at the beginning of the text you want to select, hold down the Shift key as you press the right or down arrow to select text. Release the Shift key only after you have completed your selection.
2. The formatting app bar appears as you make your selection, as shown in Figure 7-3. Select any of the following formatting options:
• Font: Choose a font by name and specify the size of the text. For example, the text in this book is Giovinni Book and the font size is 12.5. The older I get, the larger the font I use.
• Bold: Bold is used for emphasis to make text stand out.
• Italic: Although italic can also be used for emphasis, it may be harder to read than normal or bold text.
• Underline: Because links are usually underlined automatically, you may want to avoid underlining text that isn’t a link.
• Text Color: Choose from the colors that pop up when you select this option.
• Emoticons: This option opens a panel on the left. The top row of choices changes the emoticons (smiley faces and other small pictures or symbols) available in the panel. Choices are Recently Used, People and Faces, Activities, Food and Things, Travel, Nature, and Symbols. These options could keep you busy for days.
 See Chapter 1 for information on using the virtual keyboard’s emoticons.
• More: This button displays four more options: Bulleted List (like this one), Numbered List, Undo, and Redo.
 The keyboard shortcut for Undo is Ctrl+Z. For Redo, press Ctrl+Y.
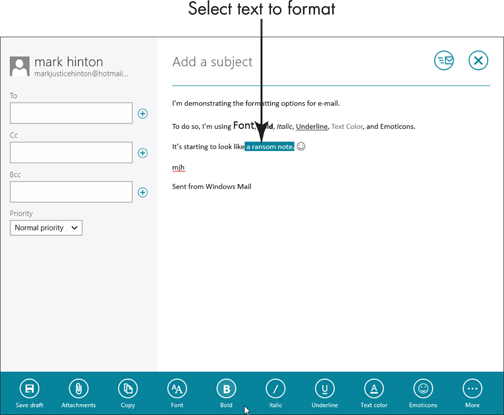
Figure 7-3
3. When you have finished formatting the text, select the Send button.
Read and Respond to Incoming E-Mail
1. On the Start screen, you may see an indication that you have received e-mail. Note that the Mail tile may display the following information:
• The wide, rectangular tile displays the sender’s address or name, the subject line, and a portion of each unread message in succession, as well as a count of unread messages.
• The small, square tile displays the unread message count.
• Small or wide, the tile doesn’t display any information if the Live Tile option is off.
2. Select the Mail tile. The Mail app opens on the last screen you viewed — not on the specific message displayed on the live tile, if any.
3. If necessary, select Inbox from the Mail panel. See the section “Use the Mail App” for the steps. Unread messages appear in bold.
4. Select a message under the Inbox heading. The content of that message appears to the right, as shown in Figure 7-4.
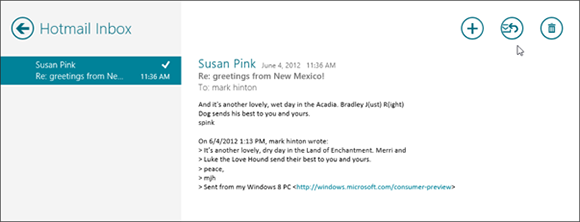
Figure 7-4
5. After you read the message, you can select one of the following options in the upper-right corner:
• The New button (the plus sign) starts a new message to anyone.
• The Respond button (with an arrow curving back on an envelope) creates a new message based on the current message.
• The Delete button (the trash can) moves the e-mail from Inbox to Deleted Items.
6. Select the Respond button, and then Select Reply from the list that appears. Reply starts a new message (refer to Figure 7-2) in response to the selected message and includes the text of the selected message. The subject line is automatically Re: [the original subject]. You’ll use this option most often. Complete your message and select the Send button.
7. Select any message in the Inbox category. Display the Mail app bar by using a right-click, by swiping up or down, or by pressing  +Z. Note the following options:
• Move: Use this option to move the selected e-mail from one category on the left to another. For example, move a message to the Junk category or from Junk to Inbox, if it’s a message you want. When you select Move, the screen appears slightly dimmed. In the Mail panel, select the category to which you want to move the selected e-mail. Categories that disappear during a move are unavailable. If you select Move but don’t want to continue, cancel by double-clicking or double-tapping in the message content area or by pressing the Esc key.
• Pin to Start: Use this option to create a new tile for the specific category on the screen (in this case, Inbox). This tile takes you directly to the selected category (not the selected message). Selecting the original Mail tile takes you to the last screen you viewed. The Pin to Start option is a good one to use with Inbox. When you select Pin to Start, a box pops up. You can change the text that will be displayed on the new tile or not, and then select the Pin to Start button.
• Mark Unread: Use this option if you want the message to appear unread (bold in Inbox). Some people do this with messages they want to deal with later.
• Sync: Mail syncs with the Web automatically. However, if you think Mail is out of sync, use this option.
Send E-Mail from Other Apps
1. You can e-mail information from other apps, such as Internet Explorer and News. On the Start screen, select the Internet Explorer tile. See Chapter 6 for information on using the web browser. Enter the web address for the book: www.win8mjh.com.
2. On any web page, display the Share panel using one of the following methods:
• Mouse: Move the mouse pointer to the upper-right corner of the screen. On the charms bar, select the Share charm.
• Touchscreen: Swipe from the right edge of the screen, and then tap the Share charm.
• Keyboard: Press  +H (think sHare) to go straight to the Share panel.
3. On the Share panel, shown in Figure 7-5, select the Mail tile.
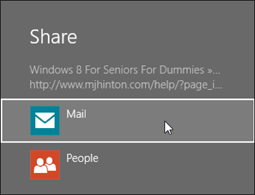
Figure 7-5
4. The Mail panel slides in from the right, as shown in Figure 7-6. Enter an e-mail address under To. The subject line is automatically the title of the web page, but you can change the subject. A thumbnail image of the web page, as well as the site name and address, appear in the content area. You can add, delete, or change any of this. When you are ready to send the message, select the Send button.
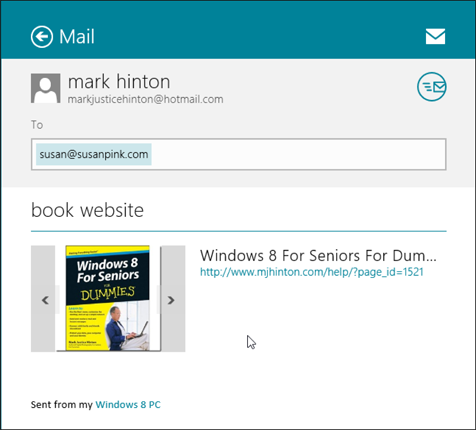
Figure 7-6
Change Mail Settings
1. In Mail, display the Settings panel, shown in Figure 7-7. Then select Accounts.
2. On the Accounts panel, select your e-mail account at the top of the panel. Note these settings, which are shown in Figure 7-8:
• Account Name: The name of the e-mail service provider. You can change this, if you want. I might use Mark’s e-mail.
• Download New Email: If you don’t want e-mail constantly streaming into Inbox, you can change this setting to every 15 or 30 minutes, Hourly, or Manual, in which case use the Sync button on the Mail app bar to check your mail.
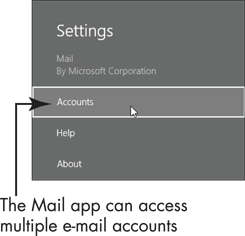
Figure 7-7
• Download Email From: You can limit how far back to download messages to your computer. This setting isn’t relevant in a new e-mail account.
• Content to Sync: Understandably, you want to sync e-mail between your service provider and your computer. However, you may see options to sync Contacts, Calendar, or other information between the service provider and your computer. Generally, you want everything in sync.
• Automatically Download External Images: By default, Mail downloads images attached to or embedded in e-mail messages. Turn off this option to avoid downloading images, if you’re paying for your Internet connection by the minute or byte.
• Use an Email Signature: Mail automatically inserts Sent from Windows Mail into each message. Enter text here that you want automatically inserted at the end of your message. For example, I use peace, mjh as my e-mail signature. If you don’t want any text inserted automatically, select the switch under this option to change it from Yes to No.
• Email Address: This setting is a reminder of your e-mail address.
• Show Email Notifications for This Account: Turn on this setting to see pop-up notifications when new e-mail arrives.
• Remove This Account or Remove All Accounts: If you don’t want to receive e-mail from a specific account, you can remove it from this computer. Doing so has no effect on the account itself, which you can still access through a web browser or by adding the account to Mail or another app.
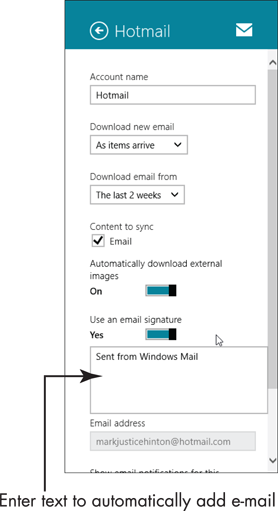
Figure 7-8
Add an E-Mail Account to Mail
1. If you have another e-mail address, you can add it to Mail. For example, follow these steps to add an existing Gmail account to Mail. In Mail, display the Settings panel (refer to Figure 7-7) and then select Accounts.
2. In the Accounts panel, select Add an Account.
3. In the Add an Account panel, select the service with which you have an e-mail account. If your service doesn’t appear here, select Other Account. If you have a Gmail address (or you just want to see what’s next), select Google.
4. On the Add Your Google Account screen, enter your Gmail address and password in the appropriate boxes. Select Include Your Google Contacts and Calendars, and then select Connect. Cancel if you don’t want to continue.
5. You may see the messages Adding your account and then Syncing. If you don’t see the account, display the Mail panel, if necessary, using the back arrow, and then select Gmail at the bottom of the Mail panel. In Figure 7-9, my Gmail Inbox has one unread message. To see that message, I would select the Inbox. I can select Hotmail rather than Gmail, depending on which I want to use.
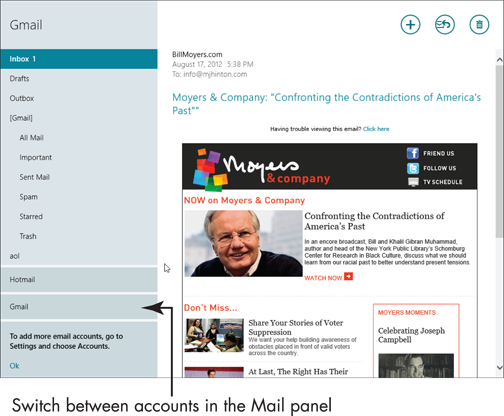
Figure 7-9