Chapter 8
Staying in Touch with People
Get ready to . . .
⇒ Explore the Social Networks
⇒ Add Contacts to the People App
⇒ Connect to Social Networks
⇒ Catch Up with People
⇒ Use the Messaging App to Chat
⇒ Add a Birthday or Anniversary to the Calendar
⇒ Tweak PC Settings for Social Apps
The Web brings people together in many ways beyond e-mail. Long ago, paleo-nerds hunkered in bulletin board systems, precursors to today’s forums. Social networks are digital neighborhoods where your neighbors include family, friends, colleagues — maybe even your real neighbors. We use social networks to share the information or entertainment we discover and to post status updates, short declarations of the moment, such as I’m feeling particularly eloquent today.
Unlike the broader Web, these social networks are gated communities that require an account name and password for full access. This suggestion of privacy and security, however, shouldn’t be completely trusted. If nothing else, the networks themselves are watching you.
A few social networks are worth noting here: Facebook, Twitter, and Flickr. You find out more about these and others shortly. For now, realize that each social network is a separate website with its own way of doing things, requiring some mental adjustment as you move between them. Furthermore, how a site works may change from one visit to the next, often to the dismay of participants. Moreover, with so many people posting so many thoughts, links, and likes, keeping up becomes a problem.
The People app comes to your rescue by pulling in contact information, status updates, and more from several services at once. Use the People app as your address book and as a window on what everyone is doing without having to navigate through each network’s website.
In this chapter, you add contacts to the People app, both manually and by connecting to Facebook or another service. You make your most important contacts stand out by pinning them to the Start screen or marking them as favorites, for prominence in the People app. You use the Messaging app to chat (in text) with contacts. (Chat, which is also called instant messaging, is a more immediate back-and-forth communication than e-mail.) Finally, you use the Calendar app to keep track of birthdays, anniversaries, appointments, and other events.
Explore the Social Networks
If you don’t have an account with Facebook or another social network, you can create an account through the People app. However, I recommend that you go to a service’s website to create a new account, and then use your new account name and password in the People app.
⇒ Facebook (www.facebook.com) is the epitome of social networks. You know about Facebook already, unless you’ve been living in a cave. (These days, even caves have Internet connections.) Billions of people and organizations have Facebook accounts and pages. Facebook popularized the verbification of friend (bow your head for the late befriend), as well as the use of like as a mere acknowledgment, a tip of the hat, if you will. (The less popular hat tip or ht is a favorite among bloggers, digital journal-keepers who stand apart from the collective.) Somehow poke as a greeting hasn’t gained the same traction as other new usages.
⇒ Twitter (www.twitter.com) pares communication down to short status updates (tweets) in an endless stream of text messages. Twitter is favored by professional journalists and bumper-sticker fans.
⇒ LinkedIn (www.linkedin.com) is popular among professionals seeking business contacts (and jobs) more than casual social interaction.
⇒ Flickr (www.flickr.com) is older than the upstarts and immensely popular among photographers and lovers of photography.
⇒ Pinterest (www.pinterest.com) has quickly collected enthusiasts who share images in shifting mosaics.
⇒ MySpace (www.myspace.com) lost the race to Facebook and serves as a reminder that, like empires, social networks do not endure. It is our need to connect that endures.
Add Contacts to the People App
1. On the Start screen, select the People app.
2. If you haven’t signed in already using your Microsoft Account, the Sign In screen appears. Enter your Microsoft Account e-mail address and password, and then select Sign In.
3. What you see first in People depends on whether the app found contact information associated with your Microsoft Account. You may see familiar names or an invitation to connect to other services. For now, add one new contact manually. (You connect to other services later.) Display the New Contact screen by selecting the New button on the People app bar (see Figure 8-1), using one of the following methods:
• Mouse: Click the right mouse button. Click the New button, which sports a plus sign.
• Touchscreen: Swipe down from the top or up from the bottom of the screen. Tap New (the plus sign).
• Keyboard: Press  +Z. Press the Tab key until New (the plus sign) is highlighted, and then press the Enter key.
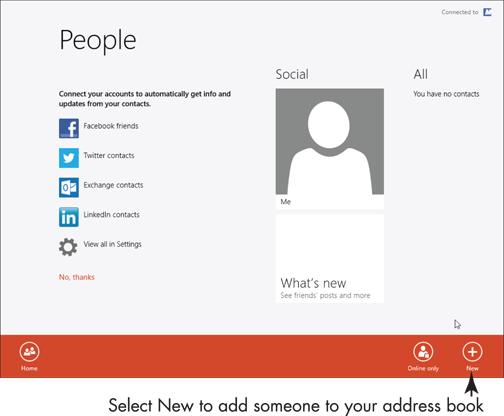
Figure 8-1
4. Much of the information on the New Contact screen (shown in Figure 8-2) is optional. Enter the information that you want access to throughout Windows 8, not just in the People app. (For example, think about what you want to access in Mail.) You can enter any person’s name and information you want, but let me suggest the following:
• Account: Ultimately, you may link multiple accounts using the People app. Which account do you want this new contact associated with? For now, only one option may be available.
• First Name: Mark.
• Last Name: Hinton.
• Company: PC Training & Consulting.
• Email: markjusticehinton@hotmail.com. (Select Personal and choose Work from the pop-up list.)
• Phone: (Leave phone blank for me.) Select Mobile and note the many categories for phone numbers.
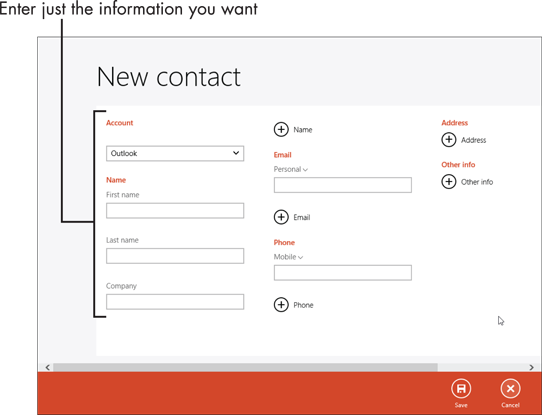
Figure 8-2
5. Note the following buttons with plus signs. Select each in turn to see the available options. Add data as you want:
• Name: You can add a middle name (Justice), nickname (mjh), title (Computerist), as well as several other names.
• Email: Add up to two more e-mail addresses.
• Phone: Add up to seven more phone numbers!
• Address: Add up to three mailing addresses.
• Other Info: Options include Job Title (Author), Significant Other (Merri), Website (www.win8mjh.com), and Notes, a box for free-form notes.
6. When you’re done, select Save to add this contact (or select Cancel to throw away the new contact). The added contact appears on-screen, as shown in Figure 8-3.

Figure 8-3
7. Select People in the app bar or select the back arrow.
Connect to Social Networks
1. In the preceding section, you added one contact. For access to all your contacts from another service, such as Facebook, display the Settings panel in the People app. See Chapter 2 for information on accessing an app’s settings.
2. On the Settings panel, select Accounts.
3. In the Accounts panel (see Figure 8-4), select Add an Account.

Figure 8-4
4. In the Add an Account panel, select Facebook, unless you don’t have a Facebook account. (Let me shake your hand, you rare creature.) You can choose another service, in which case the steps will be similar but the screens will be different.
5. The screen briefly displays Connecting to a Service, and then the Connect screen appears. If you see What Else Happens When I Connect, select that option to read everything that will happen, as shown in Figure 8-5.

Figure 8-5
6. Select the Connect button. Or select Cancel, if you prefer.
7. On the Connecting screen, shown in Figure 8-6, enter your e-mail address and password (or other account information for the selected service). Select Keep Me Logged In or Remember Me for convenience. Then select the Log In or Authorize button. (The wording of buttons varies with the service but the underlying choice is Yes or No.)
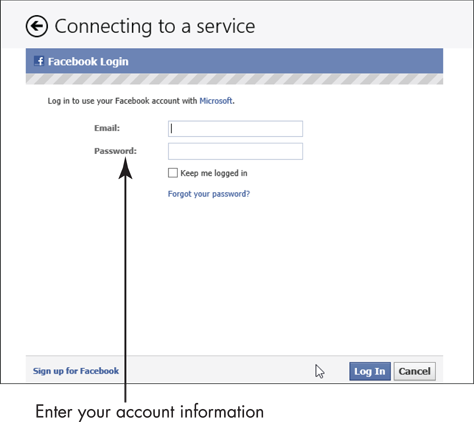
Figure 8-6
8. The service you’re connecting to may display additional forms or information. Facebook displays the Name New Device screen, which refers to your computer. The name you enter here appears in an e-mail message from Facebook as a security measure to confirm that you’re the one signing in. Enter a name you’ll recognize, and then select Save Device.
9. As the final screen says, you’re ready to go. Select Done.
10. After the People app synchronizes with your added service, the People screen displays all your contacts, including those from the added service.
Catch Up with People
1. In the People app, select one of your contacts from the People screen.
2. The contact screen for the selected person appears, as shown in Figure 8-7. That person’s name and profile photo (or a generic silhouette) appear. Note the following information may appear:
• Send Message or Send Email: Select this option to send e-mail (the screen switches to the Mail app) or a message through the service from the People app.
• Map Address: If an address is part of the contact details, select this option to see the location of that address in the Map app.
• View Profile: View the contact’s service Profile in the web browser (in this case, the contact’s Facebook page). Select the down-pointing triangle to the right of View Profile. You may see additional services that the contact uses; select a service if you want to see the contact’s profile. Select the More Details option to display in the People app the full address and phone information for the contact.
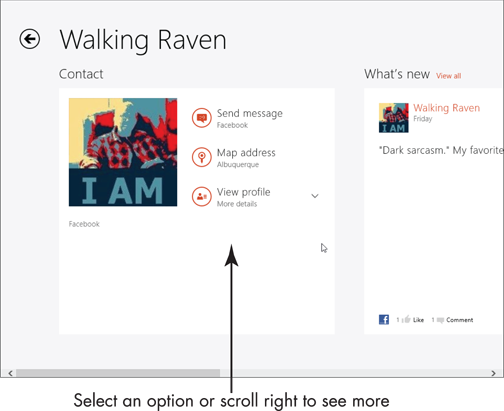
Figure 8-7
3. Scroll to the right to see additional information, such as the What’s New (also called status updates) and Photos sections.
4. Select All Updates for even more activity. Select the back arrow to return to the contact’s main screen.
5. To make this contact easier to access, display the app bar on the contact screen, and then Select Pin to Start. The Pin to Start box appears, as shown in Figure 8-8. Change the text or not. Select the Pin to Start button.

Figure 8-8
6. Switch to the Start screen. Scroll to the right to see the tile for the contact you pinned. This live tile displays the contact’s profile photo alternating with recent status updates.
7. Select the contact tile you just pinned. (If necessary, open the People app and select the contact again.) Display the app bar again. Note that the option now reads Unpin from Start.
8. Select Favorite in the app bar (refer to Figure 8-8). The app bar disappears. Return to the People screen by redisplaying the app bar and selecting Home. On the People screen, contacts you flag using Favorite appear first, with larger tiles. (You can have as many favorites as you choose.) Select the favorite contact to return to the contact’s main screen.
9. Display the app bar for the contact again. Select Edit. The Edit Contact Info screen appears and is largely the same as the New Contact screen (refer to Figure 8-2). Select Cancel, unless you change information that you want to save.
Use the Messaging App to Chat
1. On the Start screen, select the Messaging app. The most recent messages you have received or sent appear on the Messaging home screen.
2. Select the New Message button, as shown in Figure 8-9.

Figure 8-9
3. The People app opens, allowing you to select the contacts to which you want to send an instant message. Select Online Only. (Type a single letter to quickly scroll to a name starting with that letter.) Select as many contacts as you want, and then select the Choose button.
4. The Messaging screen appears with the selected contacts(s). In the message box, type the message you want to send, and then press Enter.
5. When your contact replies, the reply will appear below your original message. This sequence is called a thread. You two can go back and forth, sending and receiving messages, for quite a while, as shown in Figure 8-10.

Figure 8-10
6. Return to the Start screen. The Messaging live tile displays incoming messages. Select the tile to open the app and respond.
Add a Birthday or Anniversary to the Calendar
1. To see the calendar and add events, open the Calendar app from the Start screen. You may see events and appointments from services you connected to in People or Mail. Display the app bar, as shown in Figure 8-11, by using a right-click, by swiping up or down, or by pressing  +Z.
+Z.
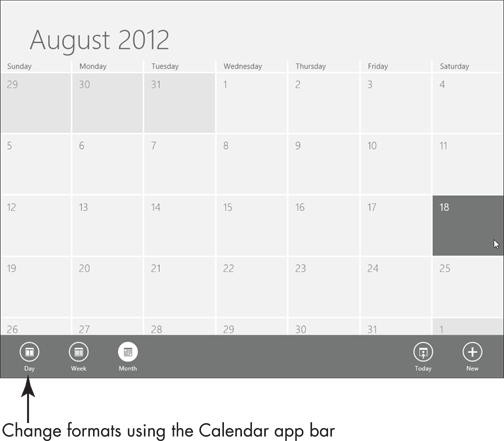
Figure 8-11
2. On the Calendar app bar, select each of the following familiar formats, redisplaying the app bar each time:
• Day: This format displays two days side by side (initially, Today and Tomorrow), with a box for each hour. Select arrows near the top of the screen to scroll back or forward one day at a time. Scroll up and down to see more hours in the day.
• Week: This week appears. As with the Day format, scroll up and down to see different hours and use the arrows to move forward or back a week at a time.
• Month: The current month appears in the classic month layout. Today is highlighted with a different color. Use arrows near the top to move forward and back a month at a time.
3. To create a new event, select any date in the month (or select any hour in the Day or Week formats). The Details screen appears, as shown in Figure 8-12.
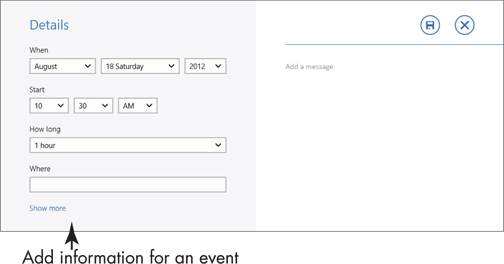
Figure 8-12
4. Change any of the following data for an event:
• When: Select the month, day, and year from pop-up lists.
• Start: Select the hour, minute, and AM or PM from pop-up lists.
• How Long: For standard blocks of time, select from 0 Minutes, 30 Minutes, 1 hour, 90 Minutes, or 2 Hours. Select All Day for events that don’t have a specific start and stop time. For an end time with the same options as Start, select Custom, and then make an appropriate selection — use this option for multiday events, such as a vacation.
• Where: The location of the event, either in general (downtown, for example) or a specific location name or address.
• How Often: Most events occur once. However, you can select Every Day, Weekday, Week, Month, or Year to create a recurring event, such as a birthday or an anniversary.
• Reminder: How far in advance of the event do you want Calendar to display a notification? Choose None, 5 Minutes, 15 Minutes, 30 Minutes, 1 Hour, 1 Day, 18 Hours, or 1 Week.
• Status: Use this option if you share your calendar with someone, such as a receptionist, who may schedule you for other events.
• Who: Enter one or more e-mail addresses. A copy of the event details will be e-mailed to these addresses. Use Who in lieu of the Share charm.
• Private: Select this option to prevent this event from appearing on a shared or public calendar. The event remains visible on your own screen.
5. On the right side of the details screen, enter the event name above the line. Add an optional message or note below the line.
6. When you’re done, select the Save button (or Send, if you entered an e-mail address in Who). Or select the Cancel button (X) if you don’t want to create an event.
7. On the calendar, your event appears on the specified date and time.
8. To edit an event, select it on the calendar. The Details screen opens. Add or change any detail.
Tweak PC Settings for Social Apps
1. Change how the apps in this chapter let you know what’s going on. On any screen, display the charms bar, select Settings, and then select Change PC Settings.
2. Select Personalize on the left, and then select Lock Screen on the right if necessary. (Lock Screen probably appears automatically.) Scroll down the right side to the Lock Screen Apps section, as shown in Figure 8-13.
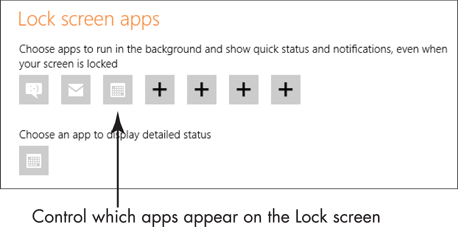
Figure 8-13
3. Some apps can display information on the Lock screen. This information can be brief (in the first row of icons) or detailed (the last icon). In Figure 8-13, the first three icons represent Messaging, Mail, and Calendar. Four more positions are available, as represented by the plus signs. To add a fourth app, select one of the plus signs. To change one of the current apps, select its icon. In either case, the Choose an App pop-up appears listing all apps capable of displaying summary information. For example, Messaging and Mail display the number of unread messages for each app, respectively. Select the app you want from the pop-up, for example, Weather. If you don’t want any app in that particular position, select Don’t Show Quick Status Here (here means this specific position). You can modify any or all of these positions.
4. In the same section, the second row contains a single button that you use for an app for which you want to display more detail. For example, if you choose the Calendar app, your next appointment and all-day events will appear on the Lock screen. Select the icon, and then select the app you want from the Choose an App pop-up. If you don’t want any detailed information on the Lock screen, select Don’t Show Detailed Status on the Lock Screen.
5. On the left, select Notifications. The screen shown in Figure 8-14 appears. If you’re bothered by notifications popping up, turn off the ones you don’t want — for all apps, with the first option, or for individual apps, in the lower section. If the sound that accompanies notifications becomes a problem, turn off the Play Notification Sounds option.
6. Return to the Start screen.

Figure 8-14
