Chapter 12
Maintaining Windows 8
Get ready to . . .
⇒ Explore System Information on the Desktop
⇒ Check the Action Center
⇒ Install Optional Updates
⇒ Get Updates for Other Microsoft Programs
⇒ Install a New Program on the Desktop
⇒ Remove Desktop Programs
The desktop originated long before Windows 8. (In fact, desktops used to be made of wood.) Now, the desktop has changed into something more than just another app but less than the Windows centerpiece it once was.
Windows 8 uses the Action Center to keep you informed of security and maintenance issues that may need attention, such as antivirus protection. The Action Center divides issues into Security and Maintenance sections. The Reliability Monitor can help you pinpoint problems with hardware and software.
As millions of people put Windows 8 to the test every single hour, Microsoft discovers glitches with how Windows 8 works. Especially important are weaknesses in security that turn up only when software is under fire in the real world. Windows Update is the process for installing patches (updates) to plug these holes in Windows 8.
If you have an always-on Internet connection, such as DSL or cable, Windows Update automatically downloads and installs the most important updates as they become available (usually, once a month). Security patches are one of the most important updates, so they’re among the updates installed automatically.
Optional updates include updates to device drivers, the programs that make Windows 8 work with specific hardware, such as your display and printer. Windows Update keeps track of optional updates but leaves the decision of whether to install — and the installation — up to you. For this reason, you need to run Windows Update on the desktop and check for optional updates every few months.
Machines such as toaster ovens aren’t getting any smarter. Your computer, however, can be programmed to do something it’s never done before. To make your computer capable of doing new things, you install new programs. On the other hand, your computer may have some programs that you’ll never use and wouldn’t miss. You don’t have to get rid of them, but doing so is easy enough and frees a little space on your computer.
In this chapter, you work with the Action Center and Windows Update. You also install a program on the desktop and, optionally, uninstall one.
Explore System Information on the Desktop
1. On the Start screen, select the Desktop tile. On the desktop, display the Settings panel using one of these techniques:
• Mouse: Move the mouse pointer into the lower-right corner of the screen. Select the Settings charm from the charms bar.
• Touchscreen: Swipe from the right edge and tap Settings.
• Keyboard: Press  +I.
+I.
2. In the Settings panel, select PC Info. The System window in Figure 12-1 appears. This screen is chockfull of information and functions. Note each of the following areas on screen:
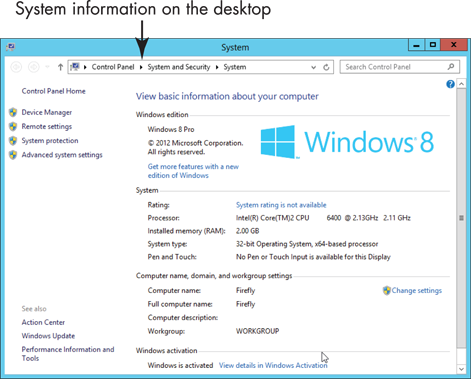
Figure 12-1
• Windows edition: Of course, you have Windows 8. However, Windows 8 comes in two primary editions: the standard edition, which you are likely to have, and the Pro edition, for computer professionals. You may find information here about so-called Service Packs, large collections of updates to Windows 8.
• System: This section displays details about your hardware, including the processor, the amount of installed memory (RAM), and other details. Values range from an anemic 1.0 to a smokin’ 9.9. The displayed rating can be used to compare two machines. Generally, a higher rating is better, although you can delve deeper into the subject by selecting Windows Experience Index (some other time).
• Computer name, domain, and workgroup settings: This information pertains to your network, if any. If a computer can’t connect to a network, the problem is often related to the name of the Workgroup (a network). The Change Settings function lets you change the Workgroup name to match other computers on the same network. See Chapter 14 for information on networks, including workgroups and homegroups.
• Windows activation: In an effort to control software piracy involving bootlegged copies of Windows 8, each copy of Windows 8 must be activated. Odds are that you activated your copy the first time you started your computer. If you don’t see Windows is activated in this section, select the adjacent link.
Check the Action Center
1. In the System window (refer to Figure 12-1), select Action Center in the lower-left corner. The Action Center window appears, as shown in Figure 12-2.
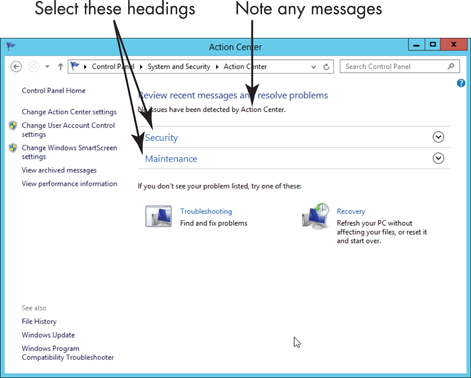
Figure 12-2
2. Note any message displayed under Review Recent Messages and Resolve Problems. Ideally, you see No issues have been detected by Action Center. If you see a message concerning a specific problem, select that message for more information.
3. Select the Security heading in the Action Center. That section expands to detail security functions. Every option but one should display On or OK. The exception is Network Access Protection, a function normally found in corporate environments. Here’s a brief description of each item under Security:
• Network Firewall: The firewall scans Internet traffic and blocks activity from programs that don’t have explicit permission to use Internet access. When you install a program that uses the Internet, you may be asked to approve the connection the first time. The safest practice is to reject online connections that you don’t initiate or recognize.
• Windows Update: See the “Install Optional Updates” section for information on Windows Update.
• Virus Protection: Having virus protection for your computer is essential. Windows Defender provides antivirus protection, although you can install some other antivirus program.
• Spyware and Unwanted Software Protection: If this service is on, you have basic protection from malicious software provided by Windows Defender.
• Internet Security Settings: These settings pertain to your browser. The default settings may be adequate. To learn more, see the following tip.
 I recommend Using the Internet Safely For Seniors For Dummies by Nancy Muir and Linda Criddle (Wiley Publishing, Inc.) as a guide for helping you deal with online security confidently.
• User Account Control (UAC): This function notifies you of programs that try to make changes to your system and requires that you confirm any such changes. In particular, UAC lets you know when a program tries to run or install software that may be malicious. When in doubt, say No or Cancel to UAC messages.
• Windows SmartScreen: This function blocks you from downloading programs, except through the Microsoft Store, as well as files capable of changing your system maliciously.
• Network Access Protection (NAP): If this service is off, that isn’t a problem, unless the computer connects to a business network. NAP protects a business network from machines that aren’t updated and secure.
• Windows Activation: Windows 8 must be activated soon after the first time you use it. The activation process connects to the Internet and exchanges information automatically with Microsoft.
4. Select the Maintenance heading to see what that section includes. Functions under Maintenance consist of the following:
• Check for solutions to problem reports: This setting is on, allowing Windows 8 to regularly check for solutions to problems it uncovers.
• Automatic Maintenance: Your computer automatically performs critical updates, security scans, and diagnostics each day.
• HomeGroup: A homegroup is network that allows you to share files and printers between two or more computers. See Chapter 14 for information on networks, including homegroups.
• File History: See Chapter 15 for information on using the File History option, which is off by default.
• Drive status: Drives refers to hard disks inside or attached to your computer. Your documents, photos, and Windows 8 itself are stored on one or more drives. Ideally, the drive status is All drives are working properly. See Chapter 15 for information on backing up and restoring files.
5. Under Check for Solutions to Problem Reports, select View Reliability History. The Reliability Monitor screen graphs your computer’s stability and indicates hardware and software problems, including those you may not be aware of. In Figure 12-3, note the critical events (crashes) on 4/12/12 and 4/19/12, as indicated by the white x in a red circle. Blue circles are information about software installation and updates. Yellow triangles are warnings about noncritical events — something that didn’t crash the computer. Select a day in the graph to display details in the lower portion of the screen. In Figure 12-3, one of the critical events involved File Explorer, which stopped responding (froze or crashed). The time of the event (12:04 PM) may be useful in determining what else was going on when File Explorer crashed.
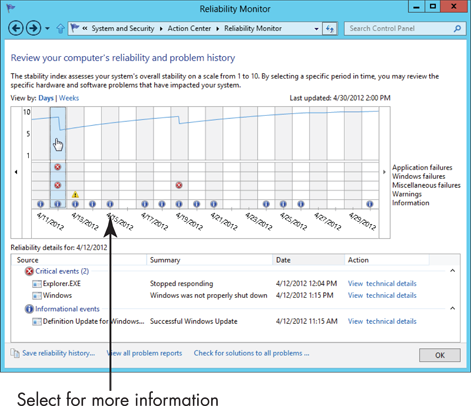
Figure 12-3
Install Optional Updates
1. In the System window (refer to Figure 12-1), select Windows Update in the lower-left corner. Windows Update appears on the desktop, as shown in Figure 12-4. (See Chapter 5 for information about working with the desktop.)
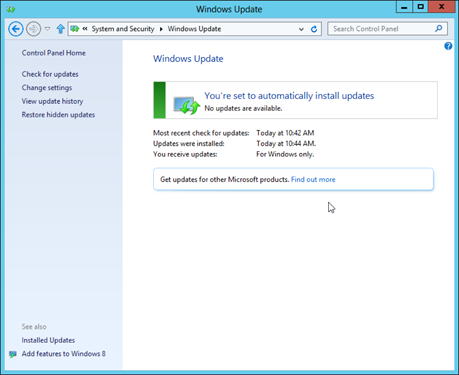
Figure 12-4
2. In Figure 12-4, no updates are available. Your results may be different. Note the following information listed on the screen:
• Most Recent Check for Updates: The date and time when Windows 8 checked for updates, which should be the current day or very recent. If the most recent check is more than a week old, select the Check for Updates link on the left.
• Updates Were Installed: The date and time when Windows 8 was last updated. If you want to know what update was performed, select View Update History.
• You Receive Updates: Initially, Windows Update is for Windows 8 only. See the section “Get Updates for Other Microsoft Programs,” later in this chapter.
3. If you see a link indicating that you have optional updates available, select that link. The Select Updates to Install window appears, as shown in Figure 12-5. To learn more about an update, select its name. The area to the right then displays information for the selected update. Select the More Information link if you want to know even more.
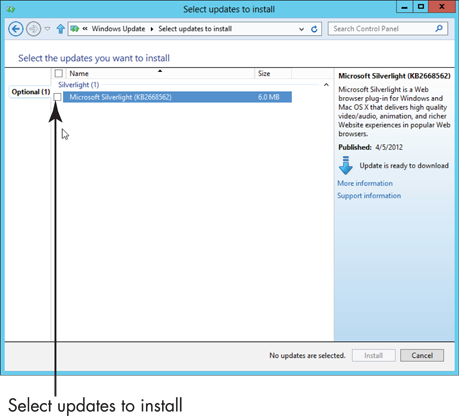
Figure 12-5
4. Select the check box next to any or all updates you want to install. Then select the Install button. You can return to the Start screen and do other things during installation, but don’t close this window or shut down your computer until the screen indicates installation is complete.
Get Updates for Other Microsoft Programs
1. If you use Microsoft software other than Windows — in particular, Word (for word processing) or Excel (spreadsheet app) — you can have Windows Update check for updates to those programs, as well. In the desktop Windows Update screen (refer to Figure 12-4), select the Find Out More link next to Get Updates for Other Microsoft Products. If you don’t see this option, the choice to check for additional updates may already be selected (see Step 5).
2. Internet Explorer launches and automatically browses the Microsoft Update site shown in Figure 12-6. Select the check box next to I Agree to the Terms of Use for Microsoft Update. (What choice do you have, really?) Then select Install.
3. If User Account Control requires you to confirm running Windows Update, select the Yes button.
4. A web page indicates that Microsoft Update was successfully installed. Select the X in the upper-right corner to close the browser window.
5. Windows Update automatically starts and searches for updates. If Windows Update doesn’t start, select Check for Updates, on the left side of the Windows Update screen. Note that the You Receive Updates option now states For Windows and Other Products from Microsoft Update.
6. If updates are found and you want to install them, continue with Steps 3 and 4 in the preceding section.
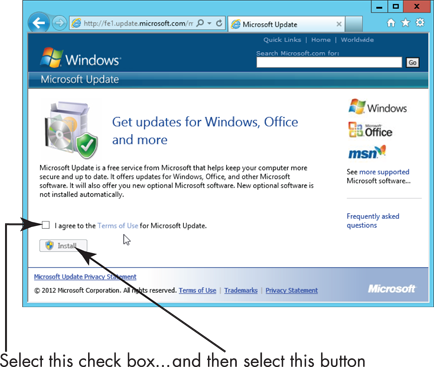
Figure 12-6
Install a New Program on the Desktop
1. You can install software that you download from the Web or from a CD or DVD for use on the desktop. (Windows 8 apps must be installed through the Microsoft Store.) In this set of steps, you install Windows Photo Gallery, my favorite free program for editing photos. To install Photo Gallery, first switch to the desktop. Select the blue e in the taskbar to run Microsoft Internet Explorer (MSIE). Enter get.live.com in the address bar. (See Chapter 6 for information on using Microsoft Internet Explorer.)
2. On the Windows Essentials web page, select Photo Gallery. On the Photo Gallery page, select Download Now.
3. Internet Explorer displays a message at the bottom of the browser window, as shown in Figure 12-7. Select the Run button.

Figure 12-7
4. Note that Internet Explorer displays a progress indicator at the bottom of the browser window. When the download is complete, Internet Explorer performs a security scan of the program. Then, the User Account Control asks for confirmation to continue with the installation. Select the Yes button.
5. The Windows Essentials screen appears. Select Choose the Programs You Want to Install. On the Select Programs to Install screen, deselect everything except Photo Gallery and Movie Maker (one option) and Microsoft SkyDrive, a useful tool for accessing storage on the Web (cloud storage). Then, select Install.
6. A moving bar indicates the progress of the installation, which should take a few minutes. On the screen that indicates installation is done, select the Close button.
7. To run Photo Gallery, switch to the Start screen and scroll to the right to find the Photo Gallery tile. Select that tile, and Photo Gallery opens on the desktop. If you see the Sign In with Your Email Address screen, enter your Microsoft Account e-mail address and password, select Remember My ID and Password, and then select Sign In. (Or select Cancel.)
8. Photo Gallery, like the Photo app, displays photos from your Photo Library. For steps on using Photo Gallery to tag, flag, rate, or edit photos, see the book’s website (www.win8mjh.com).
Remove Desktop Programs
1. Unlike Windows 8 apps from the Microsoft Store, desktop programs are installed and uninstalled directly through the desktop itself. To see which desktop programs are installed, select Control Panel Home on the System, Action Center, or Windows Update screen. See the first section in this chapter, “Explore System Information on the Desktop,” for steps.
2. In the Control Panel window (shown in Figure 12-8), under Programs, select Uninstall a Program. (You don’t have to uninstall anything; you can simply see what the option offers.)

Figure 12-8
3. The Programs and Features window lists desktop programs, not Windows 8 apps. Initially, these programs are sorted by name. You may want to see the date you last used each program because a program you haven’t used in ages may be a safe one to remove. (Otherwise, skip to Step 5.) Use one of the following techniques to display the date last used:
• Mouse: Move the mouse pointer over any column heading, such as Name. Click the right mouse button.
• Touchscreen: Tap and hold down on any column heading, such as Name. When a box appears around your fingertip, lift your finger.
4. On the context menu that appears, select More. In the Chose Details window (shown in Figure 12-9), select Last Used On, and then select the OK button. The Last Used On column appears to the right of all the other columns.
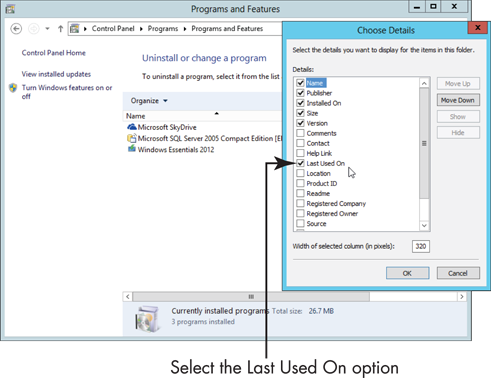
Figure 12-9
5. To change a program, select it. For this example, select Windows Essentials, as shown in Figure 12-10. You don’t have to uninstall Photo Gallery, but if you do, you can follow the steps in the preceding section to reinstall it.
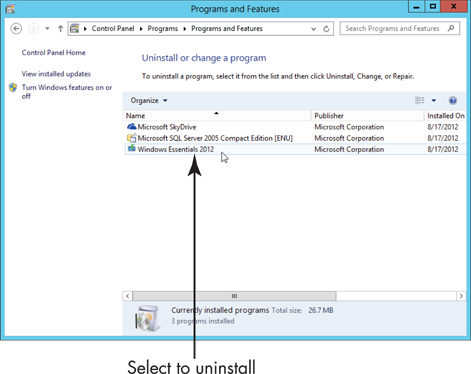
Figure 12-10
6. Select the Uninstall/Change button, if necessary. The Windows Essentials screen offers options to Remove One or More or to Repair All. Some programs will offer an option to Change the program as well. Repair or Change may be useful for a desktop program that you want to keep but isn’t running as expected. Select Remove One or More Windows Essential Programs or Cancel. If you selected Remove, select Photo Gallery on the next screen, then select Uninstall. (Your photos are not removed.)
7. If you uninstalled Photo Gallery or another program, it will no longer appear in the Programs and Features window or on the Start screen.