Chapter 14
Organizing Your Documents
Get ready to . . .
⇒ Find a Misplaced File 316
⇒ Use Libraries for Easy Access to Files
⇒ Create or Join a Homegroup
⇒ Browse for a Network
⇒ Create a Folder to Organize Your Files
⇒ Add a Location to Favorites
⇒ Use Check Boxes to Select Files
⇒ Add the Undo Button to File Explorer
⇒ Move a File from One Folder to Another
⇒ Rename a File or a Folder
⇒ Delete a File or Folder
⇒ Get Back a File or Folder You Deleted
Everything inside your computer is stored on a disk. Your computer has a primary disk, formally called the internal hard drive. You may see this disk referred to as the C: drive. (The terms drive and disk are interchangeable.)
The contents of a disk are organized into individual files. When you save a document, you create a file on a disk. Many other files on the disk belong to the programs you use, including the thousands of files that make up Windows 8.
Disks also are organized into folders, which are containers for files. For its own files, Windows 8 has a main folder that contains dozens of other folders (called subfolders). One extra-important folder has the same name as your user name, which you created the first time you turned on the computer (see Chapter 1). Inside or below that user account folder, Windows 8 creates more folders to help you organize your files by type. For example, all your photos go into the Pictures folder, and all your documents go into the Documents folder.
In this chapter, you search for files and explore your disk, folders, and documents. You work with File Explorer as you create new folders to organize documents and move files from one folder to another. You also copy files from your hard disk to other disks to take with you or give to other people. File management is much more exciting than it may sound so far.
Find a Misplaced File
1. To search for a misplaced file, begin on the Start screen. Type the name of a document or photo you have on your computer, for example, read. (In Chapter 6, you downloaded a file with read in its name.) On the search results screen, select Files, as shown in Figure 14-1.
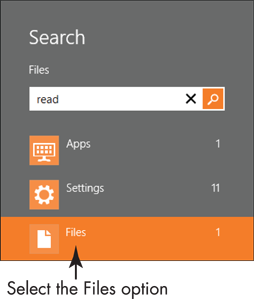
Figure 14-1
2. To open a file found in Step 1, select that file. Then, close the app that opens that file using one of these methods:
• Mouse: Move the mouse pointer to the top of the screen. When the pointer changes to a hand symbol, click and hold down the left mouse button. Drag the app down until part of the app is off the bottom of the screen. Then release the left mouse button to close the app and return to the Start screen.
• Touchscreen: Swipe down from the top of the screen until part of the app is off the bottom of the screen. Then lift your finger to close the app and return to the Start screen.
• Keyboard: Press Alt+F4.
3. On the Start screen, select the Desktop tile. On the desktop, select the File Explorer icon (the yellow folder) in the taskbar. File Explorer opens. Note the ribbon, which is the collapsible toolbar at the top of the window, as shown in Figure 14-2.
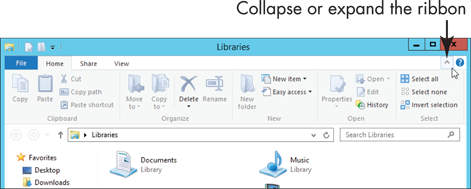
Figure 14-2
4. Select the box labeled Search (probably followed by Libraries), below the ribbon and to the right. Type read (or the name of a file you found in Step 1). As you type, File Explorer displays any matching files, highlighting the text that matches. Figure 14-3 shows the results of a search for read on my computer.
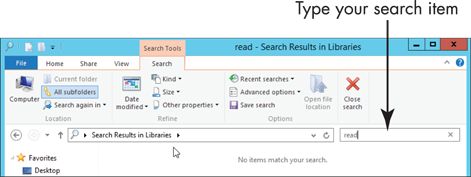
Figure 14-3
5. Note that in Figure 14-1, I found a file, but not so in Figure 14-3. This is due to focus — where File Explorer is searching, which is in the libraries. (Why does Colonel Mustard spring to mind?) Libraries are home to most of your files and are divided into four specific libraries: Documents, Music, Pictures, and Videos. Libraries contain folders and files. Visualize the organization from larger to smaller as Disks > Libraries > Folders > Files. But my read file isn’t in any of my libraries. The read file is in a folder called Downloads, because I downloaded it in Chapter 6.
6. On the left side of Explorer, select the Downloads folder under Favorites. Even if you see the file with read in its name, type read in the Search Downloads box for practice in finding a file. (Or select Recent Searches in the ribbon, and then select the file name for which you’re searching.)
Use Libraries for Easy Access to Files
1. On the desktop, select the File Explorer icon in the taskbar. The right side of Explorer is called the content area. The left side of Explorer is called the navigation pane and contains five sections. Explorer starts with its focus on the Libraries section. Under Libraries, select Documents; note any files displayed on the right.
2. On the left, select Music, then Pictures, and then Videos, while noting the files in each library on the right. Select Documents again.
3. To create a practice document you can use in later sections, select the Home tab in the ribbon. In the New section, select New Item, and then select Text Document, as shown in Figure 14-4. (If you don’t see this option, make sure that the Documents library is selected.) An empty text document is created and the words New Text Document are highlighted so you can type a new name. Type practice file. (You’ll rename this file in a later section.) Feel free to repeat this step to create additional items for practice, including Rich Text Documents or Bitmap Images.
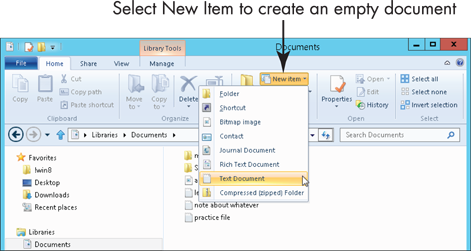
Figure 14-4
4. Select the View tab in the ribbon. In the Layout section, select each option, such as Extra Large Icons and Large, Medium, and Small Icons. If you see a downward- pointing triangle on the right edge of the Layout options, select that triangle to display even more options. Try them all, if you like.
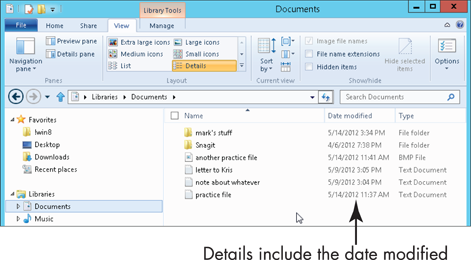
Figure 14-5
Create or Join a Homegroup
1. On the Start screen, type homegroup. On the search results screen, select Settings in the Search panel. Under Settings on the left, select HomeGroup. This opens the HomeGroup category of PC Settings.
2. If A Homegroup Is Available appears on screen, select the Enter Homegroup Password box. Type the password and select Join.
3. If you are the first person to use this function in your household or you have already joined a homegroup, the right side of the screen displays the Libraries and Devices section.
4. For each library that you want to share in the Libraries and Devices section, shown in Figure 14-6, click or tap to the right of the small black box in the rectangular slider. Separate options control the sharing of printers and devices (including disks) and allow media devices (such as the Microsoft Xbox game console) to play your music, pictures, or videos.
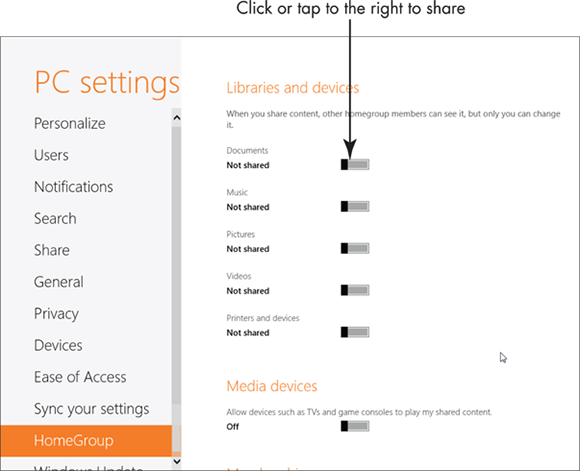
Figure 14-6
5. Scroll down, if necessary, to see the Membership section. The password required by other users to join your homegroup appears in the box.
6. Switch to the desktop and open File Explorer. On the left, select Homegroup. If you have created or joined a homegroup, you’ll see your computer and others that have joined. By selecting objects in the homegroup, you can access anything shared by others.
Browse for a Network
1. On the Start screen, type network. On the search results screen, select the Network app. The Network window opens on the desktop.
2. In the Network window, you may see icons for other computers on your network, as well as your own. My network is shown in Figure 14-7. Your screen may show only two or three computers. Select one of the other computers. Shared resources will appear in the window. (You may be asked for a user name and password, obtainable from the user of that computer.)
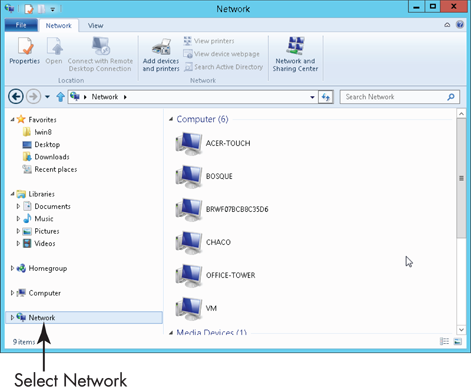
Figure 14-7
3. If you see the message Network discovery and file sharing are turned off. Network computers and devices are not visible. Click to change… just below the ribbon, select that message. Then select Turn On Network Discovery and File Sharing on the pop-up menu. This option enables your computer to find other computers and to be found by others.
4. Select the Network tab, and then select Network and Sharing Center. If Access type indicates No network access, select Troubleshoot Problems. On the Troubleshoot Problems screen, select Internet Connections. On the next screen, select Troubleshoot My Connection to the Internet. This troubleshooter runs through a series of diagnostics to resolve the problem. After a few minutes, the screen will display Troubleshooting has completed. You may then see Problems found, as well as an indication of whether those problems have been fixed.
Create a Folder to Organize Your Files
1. In the File Explorer navigation pane, select the Documents library.
2. On the Home tab, select the New Folder button. An icon for the new folder appears in the content area on the right, with the name New folder next to it and already selected (see Figure 14-8).
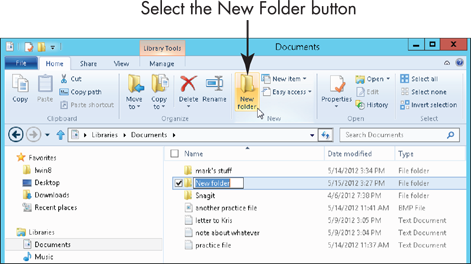
Figure 14-8
3. Type practice folder as the new name. Don’t move the cursor or mouse before you start typing. Your new text will replace the highlighted text automatically. Press the Enter key to make the new name stick. (If you have a problem naming the folder, see the “Rename a File or a Folder” section, later in this chapter.)
4. Open your new folder by double-clicking or double- tapping its icon. The content area is empty.
5. To return to the Documents folder, select Documents in the navigation pane.
Add a Location to Favorites
1. If you frequently access a specific location using File Explorer, you can add that location to the Favorites section of the navigation pane for easy access. For this exercise, select the Documents library. (These steps work for folders, not files.)
2. Select the folder you created in the preceding section (or any other folder).
3. On the Home tab, select the Easy Access button. From the drop-down list, select Add to Favorites (see Figure 14-9). A shortcut to your selected location appears at the bottom of the Favorites section.
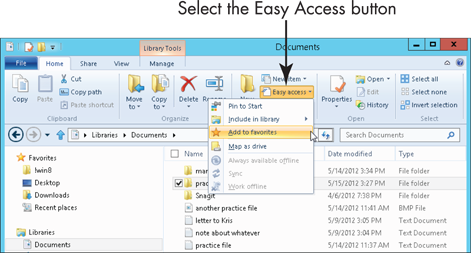
Figure 14-9
Use Check Boxes to Select Files
1. In File Explorer, you select files to move, copy, rename, or delete. You can add a check box to make selecting multiple files easier. In Explorer, select the View tab, and then select the Options button. The Folder Options window appears. Select the View tab (in the Folder Options window, not in the Explorer ribbon), as shown in Figure 14-10. Scroll through the Advanced Settings box until you see Use Check Boxes to Select Items, and then select that check box. Select the OK button.
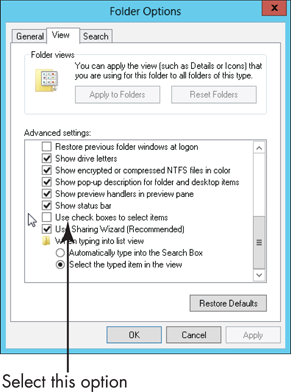
Figure 14-10
2. Select the Documents library (or any library that contains more than one file). To select a file, click or tap the area to the left of the file name. (You won’t see the check box until you select it with a tap or a click or hover over it with the mouse pointer.) Repeat to select additional files. If you want to deselect a file, select the check box again to remove the check mark. Close the window after you’ve seen how these check boxes work. Figure 14-11 shows two selected files.
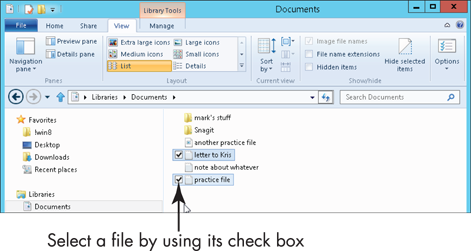
Figure 14-11
Add the Undo Button to File Explorer
1. You can add a button to File Explorer to undo an action, such as moving, renaming, or deleting a file. Above the Home tab, select the rather small down-pointing arrow to display the Customize Quick Access Toolbar list, as shown in Figure 14-12.

Figure 14-12
2. Select the Undo option from the drop-down list. The Undo button, which sports a blue arrow curving to the left, appears immediately to the left of the arrow you clicked in Step 1. You can undo most — but not all — actions in File Explorer by clicking or tapping this button immediately after the action. (Time isn’t the issue. You can do something, and then undo it a year later if you don’t do anything in the meantime.)
3. Select the Customize Quick Access Toolbar button again. Note that you can also add the Redo button, which, as you would expect, undoes the undo. All the other options appear also on larger buttons on the Home tab, so you don’t need to add them to the Quick Access toolbar.
Move a File from One Folder to Another
1. You can move files to organize them. For this exercise, select the Documents library in File Explorer. Select one of your documents.
2. On the Home tab, select the Move To button, as shown in Figure 14-13.
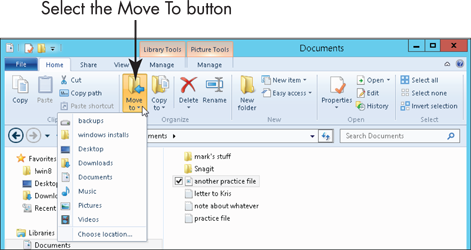
Figure 14-13
3. If you see the location you want in the drop-down list, you could select that location. However, for practice, select Choose Location. A window opens, showing every possible location. Select Libraries, then Documents, and then My Documents. Select the folder you created in the section “Create a Folder to Organize Your Files.” (Or select the Make New Folder button and name that folder.) Finally, select the Move button, as shown in Figure 14-4.
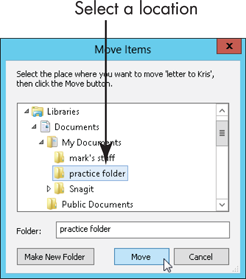
Figure 14-14
4. In Explorer, select the folder to which you moved your file. There it is!
Rename a File or a Folder
1. You can change the name of any file or folder you create. (Don’t rename files in the Windows or Program Files folders.) For this exercise, select the Documents library in File Explorer. Then select one of your files.
2. On the Home tab, select the Rename button. In the content area, the current name of the file or folder is selected, as shown in Figure 4-15. If you type anything while the text is selected, you erase the current name, which is convenient if the new name is completely different from the old name. If you want to keep most of the current name and edit it, select inside the name or press the left- or right-arrow key to move to the place in the name where you want to type new text.
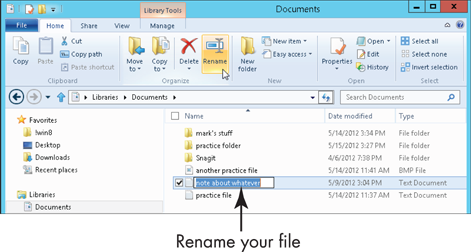
Figure 4-15
3. Type the new name, which can be more than 200 characters long (although a dozen characters may be more than enough). You can capitalize letters and use spaces and dashes, but you can’t use slashes or asterisks, which Windows 8 reserves for other purposes.
4. When you’ve typed the new name, press the Enter key to finish the process.
Delete a File or Folder
1. You can delete any of your files you no longer need. (Don’t delete files in the Windows or Program Files folders.) For this exercise, select the Documents library in File Explorer. Then select one your files.
2. On the Home tab, select the X on the Delete button.
3. By default, Windows does not provide a confirmation message — your file is gone with a click. A hundred files can be deleted as easily. Select the bottom third of the Delete button to display the drop-down list shown in Figure 14-16. Select Show Recycle Confirmation.

Figure 14-16
4. Select another file, and then select the X on the Delete button. The Delete File confirmation window appears. Select Yes to delete the file or No to cancel the operation.
Get Back a File or Folder You Deleted
1. Normally, when you delete a file or folder, Windows 8 moves the object to the Recycle Bin. Objects remain in the Recycle Bin indefinitely, allowing you to restore something you deleted long after you did so. In File Explorer, select Desktop under Favorites. To open the Recycle Bin, double-click or double-tap the Recycle Bin in the content area.
2. If many files or folders are listed in the Recycle Bin window, type the name of the item you want in the Search box in the top-right corner of the window. If any files match what you type, they will appear in the content area.
3. To restore a file or folder to its original location, select the file or folder in the Recycle Bin window. On the Manage tab, select Restore the Selected Items, as shown in Figure 14-17. The selected file or folder returns to the folder it was in before it was deleted.
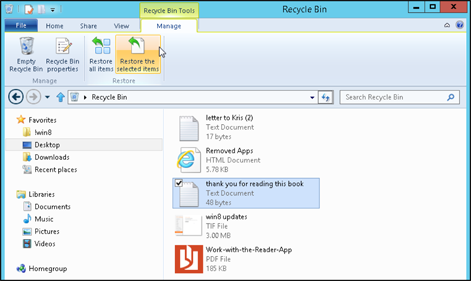
Figure 14-17

 +Q (for query).