Chapter 15
Backing Up and Restoring Files
Get ready to . . .
⇒ Add an External Hard Drive or Flash Drive
⇒ Copy Files to or from a Flash Drive
⇒ Turn On File History
⇒ Restore Files with File History
⇒ Refresh a Misbehaving Computer
⇒ Reset for a Clean Start
Some of your files — photos and documents — are priceless. If you accidentally delete a treasured file, what can you do but cry? You can insure your well-being by creating copies of your documents and photos.
The best insurance involves storing copies of files on devices separate from your computer. Such devices include the following:
⇒ Flash drive and memory card: Carry your files when you’re away from your computer by storing them on a portable storage device. For example, you can store files on a USB flash drive (also called a thumb drive), which is about the size of a disposable cigarette lighter, or a memory card, which is the size of a postage stamp and is most often used in laptop computers and digital cameras. Common capacities for flash drives and memory cards range from 2 to 32GB.
⇒ External hard drive: This type of drive has a much higher capacity than a flash drive, making it ideal for backing up all your files — the best insurance. Affordable external hard drives range from 500GB to 3TB.
⇒ Network drive: If your computer connects to a home network, you may be able to copy files to other devices on the network. For example, you could use a large capacity network drive to backup files from more than one computer.
⇒ SkyDrive: Your Microsoft Account comes with gigabytes of free storage in the cloud (on the Internet). Anything stored in SkyDrive is duplicated on additional computers you log into with the same Microsoft Account.
In this chapter, you copy files to a flash drive to transport between machines or as an ad hoc backup. You also use the File History function, which automatically copies files as a backup. Consider this scenario: You write a letter to a friend and save it to your documents folder. Later that day, you delete part of the letter and save it again, replacing the original document. The next day, you wish you still had the deleted text. File History comes to your rescue because it saves versions of files; you can recover the latest version or an earlier version of a file. As I wrote this book, I saved it hundreds of times — File History could save every version, allowing me to rollback to an earlier copy, before I made some big goof. (That’s purely hypothetical, of course.)
Finally, you explore two tools you may need if you have problems with your computer or you decide to get rid of it. The Refresh function fixes some problems. The Reset function returns your computer to an out-of-the-box condition.
Add an External Hard Drive or Flash Drive
1. Before you attach a flash drive or hard drive to your computer, consider the following options Windows 8 automatically offers for using the newly attached disk:
• Speed Up My System, also called ReadyBoost, does what its name implies on computers with 2GB of memory or less. (ReadyBoost is unrelated to copying files.)
• Configure This Drive for Backup uses the new drive for the File History function and is best suited to large-capacity drives, at least 500GB. You would select this option to back up all your files.
• Open Folder to View Files displays the contents of the disk in File Explorer on the desktop. You would select this option to copy files to or from the drive you’re attaching.
• Take No Action dismisses the notification.
2. Locate an unused USB port on your computer. A USB port is a small rectangular slot on the front or back of a desktop computer or along any edge of a laptop or tablet computer. USB ports are often marked with a symbol that looks like a trident, as shown in Figure 15-1.
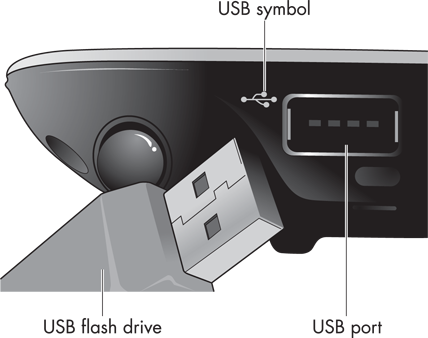
Figure 15-1
3. If you’re using a flash drive, insert it into the USB slot — USB fits one way only. If you’re using an external hard drive, plug it into a power source, if one is required, and then connect a cable to the USB port. Turn on the external drive, if it has a separate power switch. (Flash drives and some external hard drives don’t have separate power supplies or switches.)
4. Windows 8 displays a notification to Tap to choose what happens with removable drives. (You can click the mouse instead of tapping.) If you select the first notification, a list of choices appears, as shown in Figure 15-2. If you know which action you want to take, you can select that action. Otherwise, select Take No Action or wait until the notification disappears on its own.

Figure 15-2
Copy Files to or from a Flash Drive
1. To copy files or folders to a flash drive, insert the flash drive into one of your computer’s USB ports.
2. If Windows 8 displays a notification (refer to Figure 15-2) when you insert the flash drive or memory card, select Open Folder to View Files, which will open File Explorer on the desktop. If File Explorer doesn’t open automatically, select the Desktop tile on the Start screen, and then select the yellow folder icon in the taskbar.
3. In File Explorer, navigate on the left to the folder that contains the files you want to copy. See Chapter 14 for information on navigating in File Explorer. Select the folder.
4. On the right side of File Explorer, select the folder or file you want to copy. If you see a check box to the left of each object you want to copy, you can select each check box to copy multiple files at once. (If you don’t see check boxes next to files, see Chapter 14 for information on enabling this function for file selection.)
5. In the ribbon, select the Home tab, and then select the Copy To button, as shown in Figure 15-3. Select Choose Location from the menu that appears.

Figure 15-3
6. In the Copy Items window, under the Computer heading, locate the flash drive or memory card. The drive will not be Local Disk (C:), where Windows 8 resides. Select the flash drive or memory card to which you want to copy the files, as shown in Figure 15-4, and then select the Copy button. If the files copy quickly, you may not see any indication of progress; otherwise, a progress bar is displayed until copying is complete.
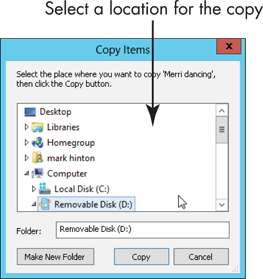
Figure 15-4
7. If you copy a file that is already on the destination disk, the Replace or Skip Files window appears, as shown in Figure 15-5. (Perhaps you’re copying a newer version of a file you copied before.) Note the available options:
• Replace the File in the Destination Folder: Selecting this option replaces one file with another. Be certain you don’t need the replaced file (as you might if you want to keep different versions of files).
• Skip This File: Selecting this option does nothing with this file.
• Choose the File to Keep in the Destination Folder: Selecting this option opens another window in which you can select files on the left to replace those on the right and select files on the right to keep. Selecting the same file on the left and right creates a second file with a number added to the name, such as my file (2). This option enables you to have the original and the new file.
Select one of the previous options. If you selected Choose the File to Keep in the Destination Folder, select the files to replace or skip, and then select the Continue button. You may or may not see a progress indicator, depending on how quickly the files are copied.
8. Confirm that the copy worked by navigating on the left to the location you selected as the destination in Step 6. If the files are there, congratulations; you’re done. If not, try Steps 4 through 6 again.
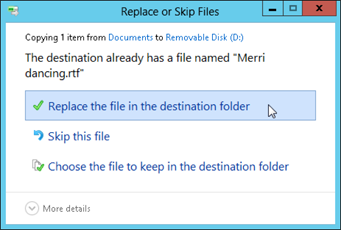
Figure 15-5
9. Remove the flash drive or memory card you inserted in Step 1. You’re good to go.
Turn On File History
1. To enable Windows 8 to create backup copies of your files, type history on the Start screen. On the search results panel, select Settings and then select File History, as shown in Figure 15-6.
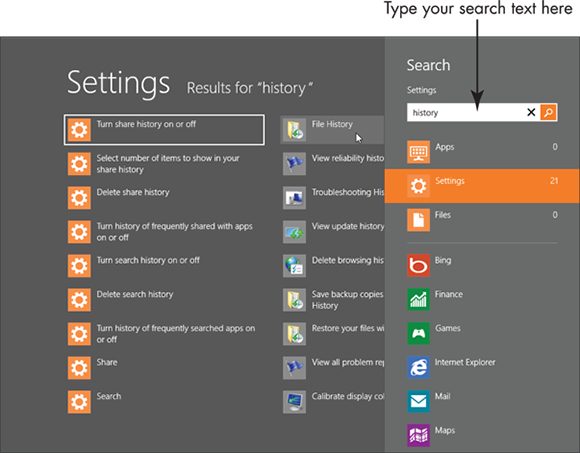
Figure 15-6
2. The File History window opens on the desktop. (See Chapter 5 for information on using the desktop.) File History is off by default. If an external drive is attached, that drive and its free space appear in the File History window, as shown in Figure 15-7. If no drive is displayed, attach one.
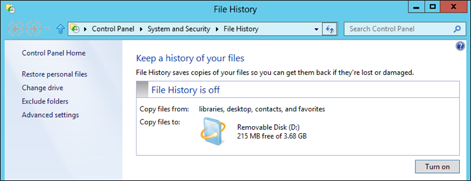
Figure 15-7
3. If the screen indicates that File History is off, select the Turn On button.
4. Select the Advanced Settings function. The screen that appears next (see Figure 15-8) provides the following options:
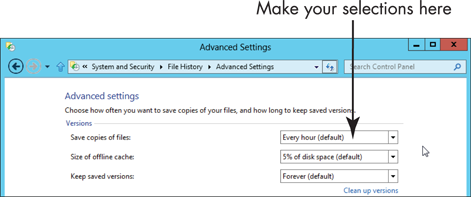
Figure 15-8
• Save Copies of Files: This option controls how frequently File History checks for new or changed files. I recommend that you select Every 10 Minutes to minimize the chances of losing new or changed documents.
• Size of Offline Cache: This option applies when you have disconnected the external drive you set up for File History. While that drive is disconnected, an offline cache temporarily stores changes on the internal hard disk. You will probably not need to change this option, especially if you usually leave the external drive attached while you work.
• Keep Saved Versions: By default, File History keeps copies of your files forever. This option allows you to limit how long copies are kept. Leave this set as Forever.
• Clean Up Versions: This function opens a window in which you select the time period to use to delete older versions of backups. Times range from older than one month to older than two years. (The Keep Saved Versions option uses the same time increments and performs automatically; this function runs only when you choose it.) The All but the Latest One option, which I do not recommend, does not save any previous versions.
5. If you made changes that you want to keep, select the Save Changes button. Otherwise, select Cancel. You return to the main File History window.
Restore Files with File History
1. On the Start screen, type restore. On the search results screen, select Settings on the right. Then select Restore Your Files with File History. File History opens on the desktop, as shown in Figure 15-9.
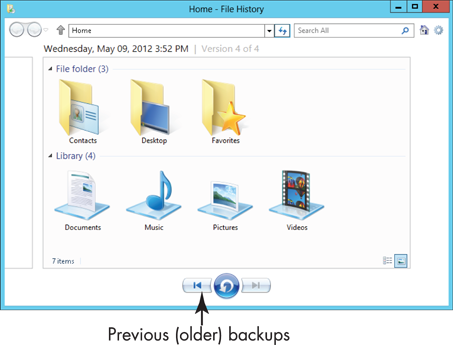
Figure 15-9
2. The most recent backup versions created by File History appear in the window. To see other versions of backups, select the left-pointing arrow at the bottom of the window. To return to the most recent backup, select the right-pointing arrow.
3. If you know the location of the file you want to restore, you can open that location with a double-click or double-tap. If you’re not sure of the location, select the search box in the upper-right corner and type the document name. Matching results appear as you type. Select the file you want to restore.
4. Select the Restore button. If you restored a file you previously deleted, you can close File History. Skip the remaining steps.
5. If the Replace or Skip Files window opens (refer to Figure 15-5) in the preceding step, a version of the file exists in the original location. If you’re sure you want to restore the previous version of the file, you could choose Replace the File in the Destination Folder. However, to see additional options, select Choose the File to Keep in the Destination Folder. The File Conflicts window appears.
6. In the File Conflicts window, consider the following selections:
• Select files on the left to replace files in the destination with the backup files. (This is the same as selecting Replace on the Replace or Skip Files screen.)
• Select files on the right to cancel restoring those files. (This is the same as selecting Skip on the Replace or Skip Files screen.)
• If you select the same files on both sides of the window, File History will leave the original as is and restore the backup version with the same name plus (2), allowing you to have both versions. (You need this option only if you’re uncertain about which version you want.)
7. Select Continue, and Windows 8 completes the operation based on your choices in Step 6. The location of the restored files opens in File Explorer.
Refresh a Misbehaving Computer
1. Glitch happens. The computer misbehaves, a program crashes, or the machine becomes unexpectedly slow. If your computer is misbehaving, try refreshing it. On the Start screen, type refresh. Select the Settings category and then select the Refresh Your PC tile.
2. On the Refresh Your PC screen, select the Next button, as shown in Figure 15-10.

Figure 15-10
3. If you see a message to Insert media, Windows 8 requires the original installation disc before proceeding. Insert the Windows 8 installation or recover disc in your CD/DVD drive or plug in a USB drive with this information. The Refresh function will proceed when you insert the required media. If you don’t have the required media, select Cancel. (Read the remaining steps.)
4. Select the Refresh button. (Or select Cancel, if you’re just exploring this feature and don’t want to continue with it.)
5. Refresh runs and your computer will restart at least once. When the refresh process is complete, the Lock screen appears. Sign in as usual. Select the Desktop tile. If you see a file named Removed Apps on the desktop, double-click or double-tap it to open that file in Internet Explorer. The removed apps are listed. If you’re aware that one of these apps created a problem, don’t reinstall it.
Reset for a Clean Start
1. You may have a reason to return your computer to its pristine out-of-the-box, never-used condition. Perhaps you’re giving or selling the computer to someone. Perhaps you like starting over from scratch, especially if something has gone terribly wrong. (Don’t worry — that never happens. [rolling eyes]) On the Start screen, type reset. Select the Settings category, and then select the Remove Everything and Reinstall Windows tile.
2. On the Reset Your PC screen, shown in Figure 15-11, select the Next button.
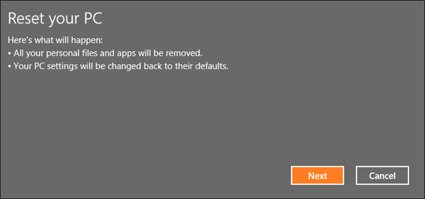
Figure 15-11
3. If you see a message to Insert media, Windows 8 requires the original installation disc before proceeding. Insert the Windows 8 installation or recover disc in your CD/DVD drive or plug in a USB drive with this information. Reset will proceed when you insert the required media. If you don’t have the required media, select Cancel here or on the next screen. (Read the remaining steps.)
4. When the computer asks how you want to remove your personal files, select Cancel if you’re just exploring this feature. To continue with Reset, select one of the options shown in Figure 15-12:
• Thoroughly, but This Can Take Several Hours: Select this option if you plan to sell the computer or give it to someone you don’t know or trust.
• Quickly, but Your Files Might Be Recoverable by Someone Else: Select this option if you’re keeping the computer or giving it to someone you know. Your files aren’t likely to be recovered by most users other than computer ninjas (like some 15-year-olds or computer science majors).

Figure 15-12
5. Reset runs and your computer will restart at least once. When the Reset process is complete, your computer will be in an unused condition. See Chapter 1 to start from scratch. I hope you enjoy the book a second time through. (Programmers call this an infinite loop.)

 +E. You don’t need to switch to the desktop before using the shortcut.