SNEAK PEEK: Making flower dolls • Muddy
miniature masterpieces • Hypertufa flower pots
• Mosaic stepping stones • and more
Through the centuries, artists from Botticelli to Monet have found inspiration in gardens. A bountiful garden is full of colors, textures, and shadows that will tantalize your senses and elicit creative expression. Amazingly, your garden can also provide many of the raw materials for making beautiful art. By using rocks for plant markers, gourds for birdhouses, and your imagination for inspiration, you and your kids can harvest much more than food from your garden.
At Life Lab, we have a garden art workshop just prior to the holidays. Parents and children come together to make flower-stamped wrapping paper, lavender dream pillows, and other gifts for those they love. We all find it deeply satisfying to make beautiful objects together in the garden. And at the end of the day, we have a handful of delightful, thoughtful gifts ready well ahead of schedule.

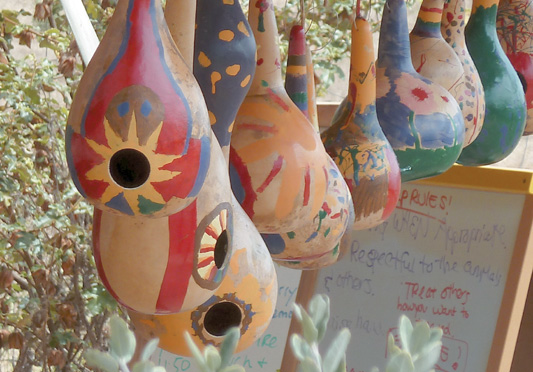
Painted gourd bird feeders hang out to dry.
PROJECT
Gourd Maracas, Pets, and Birdhouses
You and your kids can use the hard shells of gourds, along with a big dose of imagination, to create birdhouses, maracas, pets, and more.
Gourds
Newspaper
Scissors
Rubbing alcohol
Sand paper
Decorating supplies, such as markers or paint, glue, googly eyes, string, feathers, and tissue paper
A dust mask
A drill with a ⅜-inch bit and a hole-drilling attachment for your desired hole diameter (1 inch, 1 ⅛ inches, 1 ¼ inches, 1 ½ inches, or 2 inches)
For bean-filled maracas only:
Beans
Tape or a hard wax plug
For birdhouse only:
Polyurethane sealer
Wire or twine for hanging birdhouse
 If the weather permits, leave your gourds in the garden on the vine until they are dry. You can also dry them off the vine. When drying them off the vine, gently wash your gourds with soap and warm water to remove dirt, and then wipe them down with rubbing alcohol to kill any bacteria. Place the gourds on newspaper in a warm, dry, well-ventilated area to dry. Make sure they are not touching one another. Turn the gourds regularly and remove any that start to form soft spots.
 Mold may occur on the outside of the gourd during the drying process. This is normal. You can sand it off once the gourd is fully dry.
 You’ll know your gourds are fully dried when you pick them up and shake them and the seeds rattle around inside. This may take up to 6 weeks.
 Once you have a dried gourd, you can use your decorating supplies to make it into a maraca, a gourd pet, or a birdhouse.
 For a maraca, or a musical shaker, simply decorate the outside of the gourd. Hold it by the narrow neck and shake it to make music. You can also put on a dust mask, drill a hole, remove the seeds, and replace them with dry beans or grains. Then patch the hole with tape or a hard wax plug for a different sound.
 For a gourd pet, decorate the gourd to look like an animal. You might make a swan, a pig, a whale, or a mythological creature. Your imagination is the only limit to what animal your gourd might become. Make a bunch of them to create a gourd jungle or zoo.
It’s a bird, it’s a plane—it’s a whale gourd.
 For a gourd birdhouse, put on a dust mask and drill a hole just above the center of the round part of the gourd. Use a knife and spoon to break up the innards and clean out the inside. Then drill 5 holes of ⅜ inch each in the bottom of the gourd for drainage and ventilation, and 2 holes the same size on the top to put wire or rope through. Finally, seal the entire exterior with a polyurethane sealer. Hang your birdhouse in the garden, at least 6 feet off the ground, and watch to see if a bird family decides to make it a home.
Note: Different birds will enter different sized holes. A chickadee, for example, will prefer a 1 ⅛-inch hole, while a bluebird will prefer a hole that’s at least 1 ½ inches wide. To make a birdhouse for a specific kind of bird in your region, you can research the appropriate birdhouse entrance hole diameter at birds.cornell.edu. Alternately, you can just make a hole and see who comes to visit or stay awhile.
PROJECT
Making a Garden Journal
You and your kids can use sticks, flowers, and leaves from the garden to make and decorate garden journals for keeping track of seeds sown, birdcalls heard, weather patterns, and more.
3 sheets of 8½ × 11-inch watercolor paper
A rubber band
A hole punch
Colored pencils or crayons
 Cut your paper into quarters.
 Stack your 12 quarter-papers and punch 2 holes along the left side, one that is 1 inch from the top and another, 1 inch from the bottom.
 Take a walk and find a pretty 4-inch stick. You can always cut a longer stick to make it 4 inches.
 Wrap the rubber band over one end of the stick, then pass it through the top hole of the paper. Now stretch the rubber band to the bottom hole and pass it back up and through, wrapping it around the bottom end of your stick. Congratulations! You have made a garden journal.
 Make a cover for your journal using colored pencils or crayons. Give it a title, such as “Jasmine’s Garden Journal.” Then decorate it with a picture of your garden, your favorite plant, or whatever else you choose.
 Use your journal to record garden plans, ideas, and memories, like what you want to plant next spring, a picture of a bird you saw in the garden, the names of your favorite flowers, or a recipe for making pesto with basil.
PROJECT
Making Dolls from Flowers
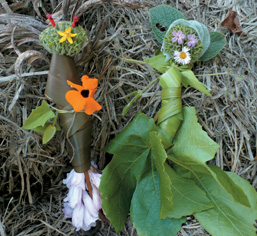
Flower dolls in all their finery.
Gather flowers with your kids and use them to make miniature fairies, farmers, animals, or anything else that comes to mind.
Toothpicks
Scissors or hand shears
 Take a walk around the garden together and look for flowers and flower parts to use for your dolls. A large petal might make a nice skirt. The stamen in the center of the flower might do for arms and legs. The sky is the limit on this.
 Harvest your flowers and flower parts.
 Use vines or long grasses to tie your flower pieces together and create flower dolls.
You can make fruit or vegetable dolls. Chives make great hair, beets can be used as faces, and celery can serve as arms and legs. Again, the possibilities are endless, so let your imagination run wild.
You can also make a simple flower doll from a flower that is ideally suited for doll-making. Snapdragons, for example, make great little faces with mouths that open and close. You can also make a hollyhock doll in just seconds. Simply pick a flower and use a paper clip or toothpick to poke a hole in the center. Turn it upside down to make the skirt. Now pick an unopened flower bud with some stem attached. Push the stem through the hole in the flower and you have a hollyhock doll.
PROJECT
Creating Fairy Houses and Critter Condos
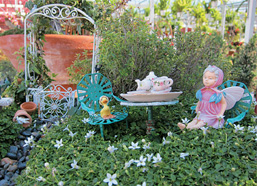
Tea time for fairy and duckie.
You and your kids can let your imaginations run wild as you use natural building materials to make miniature homes for garden fairies or critters.
Natural building materials, such as twigs, bark, moss, stones, leaves, and other garden treasures
String
Glue
Miniature fairy figures to place in and around the homes (optional)
 Building fairy homes is a brilliantly simple activity. First, collect building materials from your garden. Twigs make great beams; moss makes a lovely, plush carpet; bark can be used for walls; stones for walkways; and dry leaves for roof tiles.
 Design a home for a fairy. If you like, you can create a sign in front of the home welcoming garden fairies or other creatures passing through.
 If you are making a more permanent fairy home, in a container for example, you can select succulents, ferns, groundcover, or other plants with small leaves and flowers to grow around the house. Visit miniature-gardening.com for a list of plants that can be used to represent trees, shrubs, groundcover, and flower beds in your tiny world. You can also find fairies, bridges, small garden tools, and more here.
You may want to invite friends over and work together to create a fairy village. We have seen fairy farms, markets, parks, and flyways. Let your imagination guide you and just see what emerges. You can also use flowers to make fairies to inhabit these homes.
PROJECT
Muddy Miniature Masterpieces
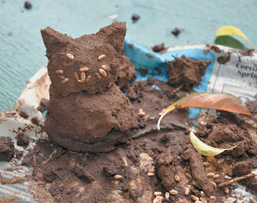
Add water and my whiskers might grow.
Use your bare feet to mix up a batch of mud, and then build sculptures with your kids and dry them in the sun. This is a great activity for a large group.
2 tarps that you don’t mind getting dirty
1 bucket of water
1 hose
A big pile of clay-like soil
A large compost sifter or a small-holed nursery tray
Pieces of cardboard cut into 1-foot squares; one for each sculpture
 Gather a pile of clay-like soil, with at least 3 heaping handfuls for each child. If your native soil is sandy rather than clay-like, you can add powdered clay purchased at a construction supply or art store.
 Sift the soil over a tarp, breaking up or removing all clods.
 Mound the sifted soil on the tarp and press a crater into the top of the mound.
 Fill the crater with water and mix up the mud by walking on it with bare feet. Continue to add water until your mud has the consistency of wet pottery clay or Play Dough. If it gets too wet, add more soil.
 When your mud is ready, have your kids clean their feet by dipping them in bucket(s) filled with water on the second tarp.
 Now have each child pick up a large handful of mud and make a sculpture. They might build an animal, a house, a pinch pot, or anything else they can think of.
 Place each sculpture on a piece of cardboard and set it in the sun to dry.
PROJECT
The Fine Art of Flower Pounding
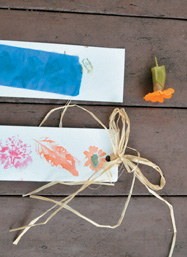
Pounded flower bookmarks make great gifts.
What kid doesn’t love hitting things with a hammer? In this activity, you will harvest flowers together and then pound them onto paper, leaving a beautiful flower print behind.
Cutting board
Dishtowel
Fresh flowers and leaves
Hammers
Wide painter’s tape
Watercolor paper cut into bookmarks or note cards
You can do this same thing with fabric. Simply place the fabric over upright flowers and pound directly on it until you see the color of the flower coming through the cloth.
 Place a cutting board on top of a dishtowel. Place a piece of watercolor paper on top of the cutting board.
 Harvest a handful of fresh flowers and leaves. Note that some flowers work better for flower pounding than others, so harvest a variety to test out.
 Cut the stems and as much of the green back off of the flowers as possible. If the flower has a large center, remove it and use only the petals.
 Place the flowers and leaves face down on the watercolor paper. For large flowers, only place the petals on the paper.
 To remove some of the tack from the painter’s tape, stick it to your pant leg a time or two.
 Now cover the flowers and leaves completely with a single layer of painter’s tape.
 Pound on the tape with a hammer, making sure to hit each section multiple times. You can place a phone book below the paper to dampen the noise.
 Carefully peel off some of the tape and peek at the paper to see if any area needs more pounding.
 When you’re satisfied with the print, peel off all of the tape. The colors should have left a print on your paper.
 Remove any flower or leaf pieces that are still stuck to the paper.
 Now allow your paper to dry and use it for a note card, bookmark, or anything else you can think of. Laminating bookmarks makes for a nice finishing touch.
Together with your kids, you can create hypertufa planters which resemble the porous tufa stone found around the world. Kids can help with every step, from choosing molds—which could be bowls, nursery pots, or boxes—to making and planting in the pots. These pots are easy to make, and they are very durable and attractive, especially if left out over time to grow moss or lichen. They look especially good planted with succulents. This is also a great activity for large groups; simply make more hypertufa by multiplying the recipe.
Tarp or newspapers
2 pot molds, 1 slightly larger than that other
Nonstick cooking spray
Face masks (to avoid breathing cement and perlite dust)
Gloves
Large tub or wheelbarrow to mix the ingredients
Large empty coffee can for measuring
1 coffee can of Portland cement
2 coffee cans of sieved coco peat (potting mix ingredient, purchased at nurseries)
1 coffee can of perlite (potting mix ingredient, purchased at nurseries)
1 coffee can of water
Sticks or small dowels
 Cover your work surface with a tarp or newspapers.
 Put on gloves and a mask and measure out 1 part cement, 2 parts coco peat, and 1 part perlite, using the coffee can. Mix the ingredients in a tub or wheelbarrow, using your gloved hands.
 Thoroughly mix the water into the dry ingredients. It should have the texture of very thick oatmeal and should hold its shape and not drip water when squeezed.
 Lightly spray the inside of the larger mold and the outside of the smaller mold with nonstick cooking spray.
 Working from the bottom up, firmly pack a 1-to 1½-inch layer of the mixture into the bottom of the bigger (outer) mold.
 If the small mold container does not have a hole in its bottom, make a few drainage holes. You will poke a stick or dowel through them to make drainage holes in the mixture.
 Center the smaller (inner) mold inside of the bigger mold so that there is an equidistant space between the outer and inner mold.
 Pack mixture into the space made between the outer and inner mold, filling it in well.
 Insert a stick or dowel through the bottom of the inner mold to create a drainage hole in the mixture.
 Lightly cover the pot with plastic and let it dry for a few days. Remove the molds, and plant.
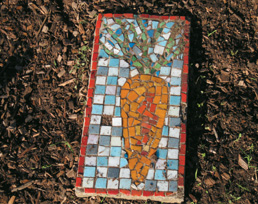
This beautiful stepping stone is made from glass tiles.
A quick and easy way to make attractive stepping stones for your garden.
Tarp or newsprint
Pie tin, disposable aluminum casserole, or other disposable tray-like container
Portland cement
Glass beads, shells, marbles, shards of ceramic dishes
Gloves
Bucket and mixing stick
Water
 Cover your workspace with tarps or newsprint.
 Mix up a batch of cement in a bucket per instructions.
 Pour or scoop cement into trays at least 1 ½ inches deep.
 Gently shake tray to level cement.
 Place decorative items in the cement so that they are stuck in the cement but still show on top. You might need to let the cement thicken up for 30 minutes or so to keep objects from sinking in the cement. Leave tray to dry overnight, and give your cement stone another couple of days before stepping on it.
A more involved process to making stepping stones involves sticking mosaic pieces to a pre-purchased paver or stepping stone with thin-set mortar. After the mosaic pieces have dried, you add a layer of grout. This is much more involved than the steps listed above and takes more patience than many kids have, but the grout makes for a very professional look. Visit making-mosaics.com/mosaic-stepping-stones.html and mosaicartsupply.com to learn more about supplies and tips for making mosaics.
PROJECT
No-Sew Potpourri Sachets
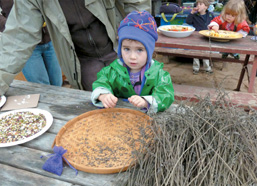
Sachets are easy for small hands to fill.
These fragrant, colorful sachets are great for freshening up drawers and closets. This no-sew version is easy for all ages to make, and it’s a great way to use up fabric remnants.
Fabric scraps cut into pieces that are 4 ½ inches square
Fabric glue
Raffia, ribbon, or twine
⅓ cup potpourri mixture for each sachet
Label with the potpourri ingredients (optional)
For the potpourri mixture, use any combination of fragrant dried plants such as allspice, bay leaves, calendula, cardamom pods, cedar, chamomile, cinnamon sticks, citrus peel, cloves, eucalyptus, lavender, lemon balm, lemon verbena, nutmeg, peppermint leaves, rose buds and petals, rosemary, or others.
 For each sachet, place 2 matching fabric squares together with the pattern facing out. Glue the edges together on 3 sides. Spread the glue close to the edges to prevent fraying. Dry several hours or overnight.
 Create the potpourri mixture.
 Once the glue is dry, fill each sachet with about ⅓ cup of potpourri mixture. Glue together the open edge and allow to dry.
 Arrange the finished sachets in a stack and tie them together with raffia, ribbon, or twine.
 Attach a label, if desired.
You can purchase small mesh or cloth bags with drawstrings to make the project even easier. In this case, just fill the bags and tie off the strings. You can also make sachets in any shape. Together with your kids, choose a fabric you like and then come up with a fun shape, like a heart, for example. Then cut, sew, and fill the pillow as described above.
PROJECT
Pressed Leaf or Flower Candles
These beautiful candles are simple to make, yet very impressive as gifts. Children of all ages can choose their favorite leaves or flowers and press them. Older kids can also help with preparing the flora and dipping the candles in the wax.
Pillar candles, at least 2 inches wide
Pressed leaves or flowers
White glue or decoupage medium
Inexpensive artists’ paintbrushes
6 cups paraffin wax, roughly chopped
Large cooking pot and water
Tin can large enough to fit the candles, such as a 28-ounce size
Pliers
Toothpick
Waxed paper
Cooled, unused paraffin wax can be kept in the can and heated again to make additional candles.
 First you’ll need to press some leaves or flowers. Walk around the garden and choose your favorites. Place each leaf or bloom between the pages of a heavy, hardbound book. Pile other heavy books on top of this one and leave for at least 2 weeks.
 Once your leaves or flowers are ready, carefully paint glue or decoupage medium onto their backs. Place them onto the candles and allow them to dry. If some parts stick up, you will be able to press them down into the wax after you dip them.
 Fill a pot halfway with water and place on medium heat. Put the chopped paraffin wax into the tin can, filling it two-thirds full. Place the can in the water and melt the wax, stirring occasionally. Remove the can from the pot once the wax is melted.
 Using pliers, pick up a candle by the wick and dip it completely into the melted wax to seal the leaves or flowers onto the candle. Slowly pull the candle out and place it on waxed paper.
 Press any lifting parts into the cooling wax with a toothpick. Dip the candle again if desired. Place on a piece of wax paper and allow candle to cool completely.
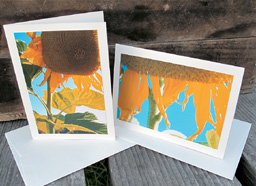
These two shots were taken by second graders in a school garden.
It is such a joy to explore a garden through the lens of a camera. Children have a particularly wonderful time and take beautiful, unexpected photographs. There are also many simple digital photo applications for phones and cameras these days that can lend a professional, artistic flair to almost any photo. Assemble several cards in a bundle and you have a lovely, practical gift.
Digital camera
Blank note cards
Double stick tape
Raffia or ribbon
Cellophane bags (optional)
 Start by showing your child how to carry and care for the camera, how to take and erase pictures, and how to change the camera settings for close-up shots.
 Explore the garden together and take pictures.
 Download and print your favorite photographs.
 Tape the photos onto the front of the blank note cards. Stack several cards and envelopes together and tie with raffia or ribbon, or enclose cards and envelopes in cellophane bags and secure with raffia or ribbon.
PROJECT
Leaf Impression Stationery
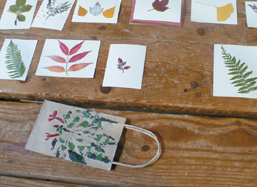
Practice makes perfect with leaf print and pressed leaf cards.
Leaf prints are a great way to dress up stationery. You can also use this technique to decorate brown kraft gift bags or wrapping paper; leaf prints are even beautiful enough to frame.
Newspaper
Flexible, sturdy leaves
Acrylic paint in bowls or cups
Sponge brush
Paper towels, cut in half
Printing brayer (available at craft supply stores) or large spoon
Thick, white paper cut slightly smaller than the note cards
Blank note cards and envelopes
Double stick tape
Raffia or ribbon
 Take a walk around the garden and collect intact, flexible, sturdy leaves with unique shapes.
 Cover a work area with newspaper.
 Using the sponge brush, apply a thin coat of acrylic paint to the underside of a leaf.
 Place the leaf, paint side down, onto the paper. Cover the leaf with a paper towel. Roll over the paper towel with a brayer or go over with the back of a spoon, pressing firmly.
 Lift the paper towel and leaf. Repeat this process, each time using a new paper towel.
 To change paint colors, rinse and dry the leaf.
 Allow the leaf prints to dry.
 Attach the leaf prints to the front of the cards with double stick tape. Stack into a bundle with envelopes and tie with raffia or ribbon.
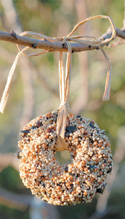
A winter feast for our feathered friends.
Kids, adults, and birds alike love these festive wreaths. They are easy to make and create terrific gifts. They look wonderful hanging in trees or in windows. Makes 12 small wreaths.
1 cup water
Measuring cup
3 cups wild birdseed
½ cup dried cranberries
½ cup raw nuts, roughly chopped
2 envelopes of gelatin
Raffia, ribbon, or twine
Waxed paper
Cellophane bags
 Bring ¾ cup of water to a boil.
 In a large bowl, sprinkle 2 envelopes of gelatin over ¼ cup of cold water. Let the mixture sit for 1 minute.
 Add the hot water to the bowl and stir for 3 minutes, or until the gelatin has completely dissolved.
 Add the birdseed, cranberries, and nuts and blend well. Let the mixture set for a few minutes, and then stir again. Repeat until the mixture is cool and workable.
 Divide the mixture into 12 balls (or fewer for larger wreaths) and place on sheets of waxed paper.
 Flatten the birdseed balls slightly, form holes in the centers and let dry overnight.
 Loop raffia, ribbon, or twine through the center of the wreaths to hang.
 Package in cellophane bags, tie with additional raffia, ribbon, or twine, and attach a label, if desired.
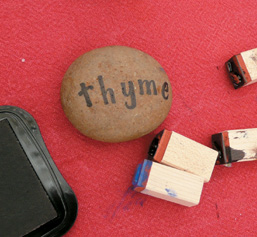
Rubber-stamped stones make great plant markers and gifts.
Help your kids paint the names of your garden plants onto rocks. Then they can place these rocks as labels throughout the garden. These plant labels are free, lovely, and sure to stay put on a windy day.
Flat rocks
Acrylic enamel paints
Inexpensive artists’ paintbrushes
 Collect some smooth flat rocks that are large enough to write across. Or purchase beach stones at a construction supply store.
 Scrub your rocks clean and then set in the sun until completely dry.
 Paint the name of a garden plant on each rock. If you like, you can also paint a picture of the plant.
 Place your rock next to those plants in your garden.
Use rubber stamps with the letters of the alphabet to write words on your stones. To keep your stamps in alphabetical order when not in use, you can stick them into a floral arrangement foam block.
Preparing dinner, from garden to table.