
Try this solution first; it’s the least likely to work, but it's the easiest. On some surfaces, the direct reflection we do not want will turn out to be polarized direct reflection. If this is the case, we can eliminate the offending reflection with a polarizing filter on the lens. If we are lucky, the direct reflection we want to keep will be unpolarized and will not be significantly affected by the filter.
More likely, however, the direct reflection will be polarized on both surfaces or on neither. So if the polarizer eliminates the undesirable reflection, it also filters out the direct reflection we do like.
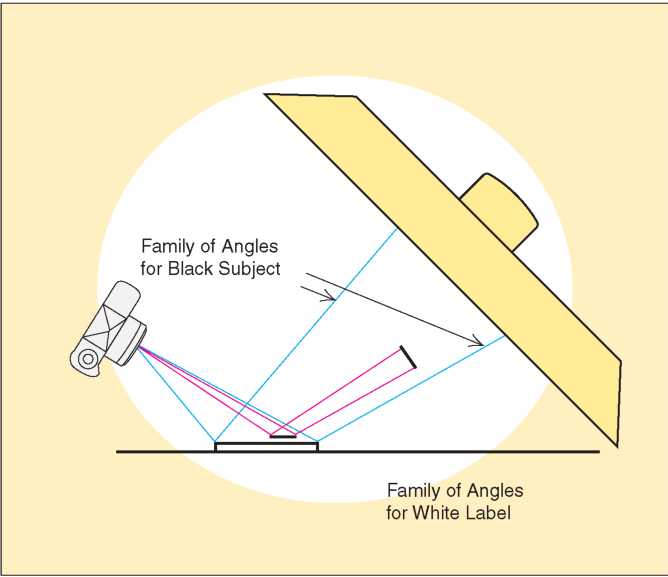
Figure 4.22 shows a light large enough to fill the family of angles causing direct reflection, plus a large range of angles that do not. The light coming from the family of angles causing direct reflection lights the
4.22 This light source is much larger than that needed to fill the family of angles that causes direct reflection.
black plastic well. The rest of the rays from this source strike the surface from angles that can only produce diffuse reflection and, therefore, light the label well.
This solution is especially effective using a light, plus an independently supported diffusion sheet, rather than a soft box. Then we can light one part of the diffusion sheet more brightly than another to place slightly more direct reflection on the black plastic than on the label.
Unfortunately, this approach is a compromise, not a complete solution. The type will not be quite as black as it was in the first photograph of this scene, and the plastics will not have as much detail as they did in the second picture. Both types of surfaces might be lit adequately but not as well as possible.
We could also combine the lighting used in Figure 4.20 with that in Figure 4.21. Such a two-light arrangement is shown in Figure 4.23. In principle, this solution is the same as using a single very large light: some

4.23 The large light produces direct reflection, whereas the small one near the camera produces only diffuse reflection. The result is a compromise.
of the rays come from angles that cause direct reflection, whereas others come from angles that can only cause diffuse reflection. Using two lights may be easier to control, however, because we can adjust the power in each light independently.
Like a single very large source, the multiple-light solution is also a compromise. It's a better compromise, but neither the diffuse reflection nor the direct reflection will look as good as it might if we had to light for only one of the two.
The size of the subject often determines whether to use multiple lights or a single very large one. All other things being equal, smart photographers do whatever requires the least work. In this case, it is easy to come up with a single source that is very large compared with the size of the subject. If the subject were larger, it might be easier to use two lights.
We have been careful to point out that the preceding techniques are compromises. They work for many, but not all, competing surfaces.
If the stick-on label is not very glossy, and if we know the photograph is going to be well reproduced, the compromise is often adequate. If the label is glossy, however, none of the lighting solutions we have seen so far will be adequate. If there is enough direct reflection for the black surfaces, there will be too much direct reflection on the label. Furthermore, if the advertisement is to be used in a newspaper or printed on other inferior paper, the defect is magnified.
The only remedy for this problem is a small gobo that fills the family of angles that causes direct reflection on the label but that is not large enough to extend into the family of angles that produces direct reflection on the rest of the subject. (Gobo is photospeak for anything that goes between the subject and the light source specifically to block part of the light.) Figure 4.24 shows the position and size of a gobo that could accomplish this.
Although the gobo is large enough to block all direct reflection on the label, notice in the diagram that it does not block much of the total surface of the light source. We still obtain a lot of light from those angles that cause diffuse reflection on the label. Therefore, the total exposure is not significantly affected.
Getting the gobo to be the right size and at the right distance is not always easy. Notice that the closer the gobo is to the light source, the larger it needs to be to fill the same family of angles; also, the larger the gobo is, the more it blocks the total illumination and the more likely it is to affect exposure. This seems to suggest that we might want the gobo as close to the subject as possible so that a smaller one will do the job.
4.24 The small gobo blocks the family of angles that causes a direct reflection on the label but not the one that causes direct reflection on the rest of the subject.
But a gobo closer to the subject is more likely to cast a visible shadow on the tabletop. This is because moving the gobo farther from the light makes the light effectively smaller compared with the gobo. Because smaller light sources produce harder shadows, we are more likely to be able to see the shadow.
So the gobo needs to be far enough from the subject to avoid casting a visible shadow, yet far enough from the light to be small enough to block as little total illumination as possible. It also needs to be exactly large enough to block the direct reflection on the label but not on the rest of the subject. This is why we saved the gobo for the last solution to the competing-surfaces exercise. It is the most effective solution, but it requires the most work and the most time. On the first occasion you attempt it, you may find positioning the gobo with precision to be a bit tedious. Fortunately, it soon gets easier with a little practice.
We can usually support the gobo on a thin wooden dowel clamped to a nearby light stand. This arrangement provides plenty of freedom to move the gobo in any direction until we get it right. However, if anything in the scene is mirror-like, then the wooden support becomes a
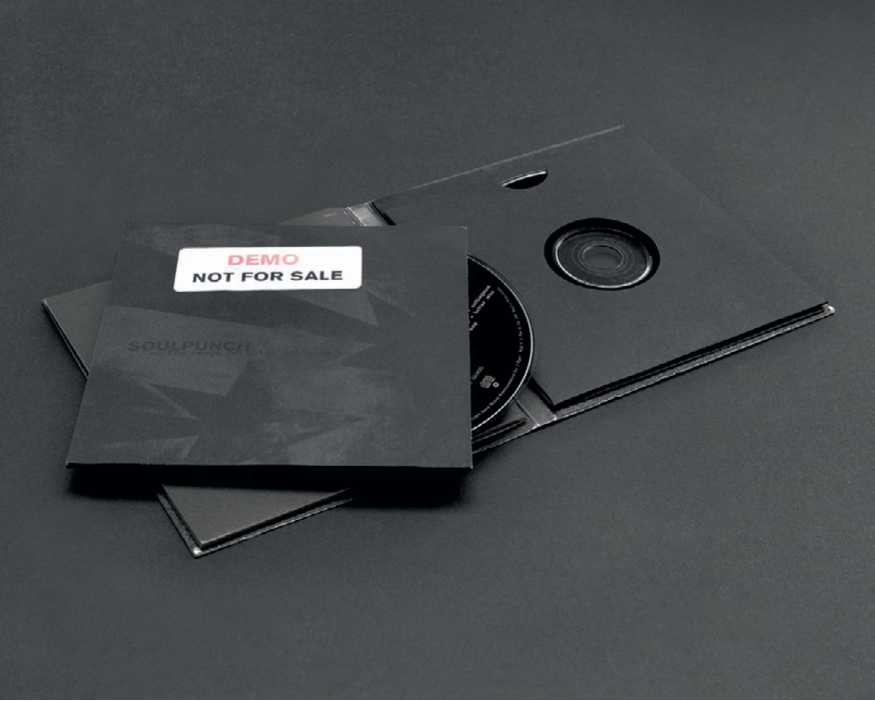
4.25 The result of the technique illustrated in Figure 4.24: detail in the blacks, plus legible type on the label.
visible reflection in the picture. In those cases, we tape the gobo directly to the diffusion material above the subject. Then we can move the light itself until the gobo is properly positioned.
Figure 4.25 is the result of this arrangement. The direct reflection is gone from the label but not from the disc or its packaging.
In this book we will use the term complex surface to mean a single surface that requires both diffuse and direct reflection to define it properly. Glossy wood is a good example. Only direct reflection can tell the viewer that the wood is glossy, but diffuse reflection is essential to reveal the color and the grain of the wood beneath the gloss.
Figure 4.26 is a piece of highly polished wood lit to produce both direct and diffuse reflection. A medium-sized light source has been

4.26 Direct reflection in the left of the scene shows the gloss, whereas diffuse reflection at the right reveals the wood grain.
positioned to reflect in the lower portion of the wooden surface to show the glossy finish. Notice that the slight physical texture in the surface is also revealed by the direct reflection.
The light was large enough that it filled the entire family of angles required to produce direct reflection over the whole surface. However, we blocked part of the light with a gobo so that the right part of the surface produces only diffuse reflection, which allows us to see the color and grain structure in the wood. Notice that the right area is the only area in which the true color of the wood would be clearly apparent. Figure 4.27 diagrams the lighting method.
Notice especially the transition zone between the areas of diffuse and direct reflection. This area has some of each type of reflection, which often reveals the surface better than either diffuse or direct
4.27 Lighting to produce both the direct and the diffuse reflections, used to illuminate the wood box in Figure 4.26.
reflection alone. If you want to capitalize on this effect, you can enlarge the transition zone to fill more of the surface. Just move the camera farther from the subject and use a longer lens to keep the subject a similar size, or move the gobo closer to the light so that it casts a softer shadow on the diffusion material.

Finally, see how much easier this exercise becomes if we do not restrict ourselves to a two-dimensional surface. Look at what happens in Figure 4.28 if we put a three-dimensional object on the wood surface. The reflection of the glasses in the wood tells the viewer that the wood is glossy. Adding a secondary subject reveals the wood better than we are likely to be able to render the wood alone.
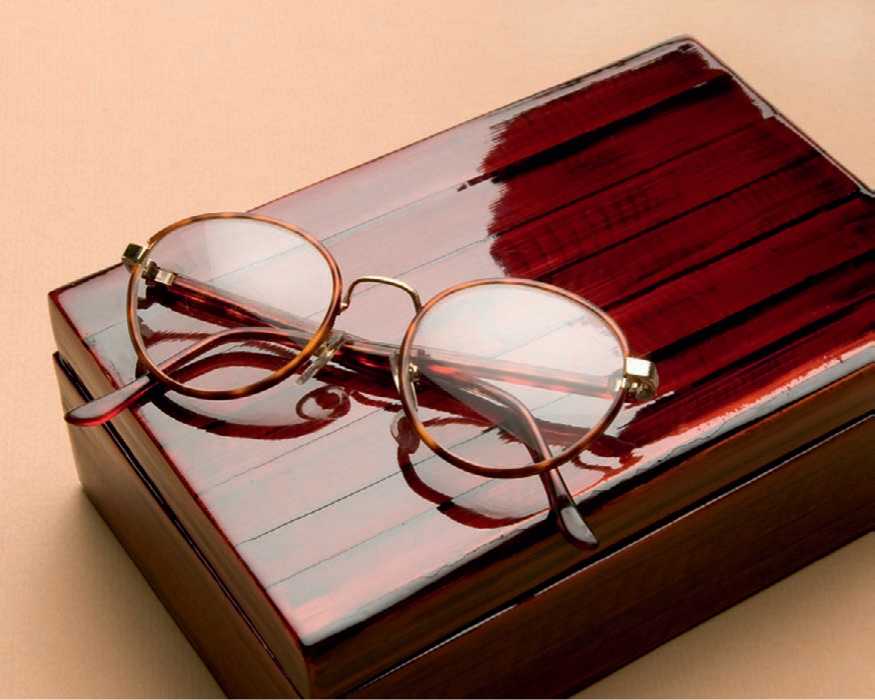
4.28 The glasses add a three-dimensional element, which provides additional visual clues (the reflection of the glasses) to prove the surface is glossy.
Adding a three-dimensional subject to this kind of scene often makes the lighting easier. We cannot pursue this approach very far, however, because we promised that this chapter would be about two-dimensional and nearly two-dimensional subjects. In the next chapter we will see what happens when those surfaces face three different directions at once.
