DEMONSTRATION
THE STARSHIP CREW
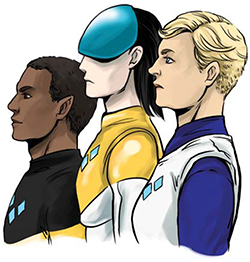
In galaxies far beyond our own, there sails a starship packed with cutting-edge technology and a group of professionals who are experts in their fields. The Starship Crew doesn’t all hail from Earth; they’re certainly not all human. They span a huge variety of personality types and appearances, but their unending search for knowledge, steadfast commitment to the pursuit of justice and dedication to their work and to each other bind them together more closely than the ties of any country.

1 SKETCH SOME FLOOR PLANS
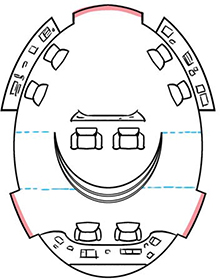
The bridge is where a lot of the action and decision making takes place, so your crew will spend a lot of time there. You’ll make your life easier later on if you have a layout design in advance. Start with a floor plan. First, decide what you need: seats for the captain and first officer, controls for the pilot and co-pilot in front and seats facing various monitors and panels for the other crew members. Mark the doorways in a different color.
2 SELECT A DESIGN
Take a look at your sketches and decide which one you like best. The size and configuration are all up to you; the layout doesn’t even have to be symmetrical, although symmetry does look more orderly. For this example, we’ll use an oval-shaped bridge.

3 MAKE IT 3-D
After deciding on the floor plan, draw a three-dimensional concept of the bridge. If you’re drawing a graphic novel, you can use this image as a reference to help visualize the possible angles to use in various scenes. This image should start to show things the floor plan did not, such as the change in elevation on the higher platform leading down to the pilot seats.
4 SKETCH THE SCENE
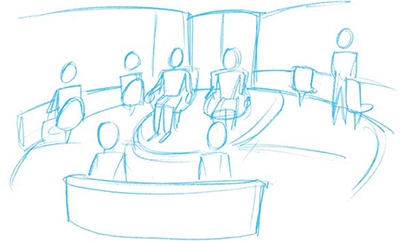
Now that your bridge is ready, sketch the scene you want to set there. For this example, we’ll show several characters and use an angle that’s a bit off-center. The perspective doesn’t have to be perfect yet; once you have the concept, you can work it out in further detail.
5 TRY SOME PERSPECTIVE
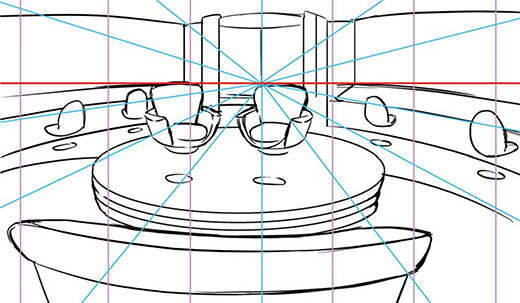
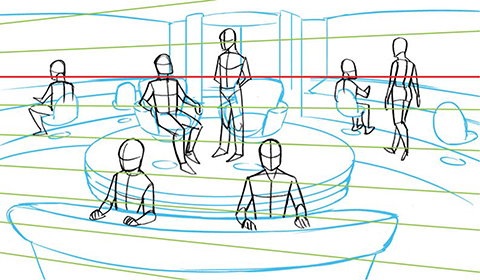
Next, you’re ready to draw the environment and make sure your perspective is in place. Set your vanishing point to a spot in the middle of the image at the line where the elevator doors close. Draw a red horizon line that follows the top part of the desks, then add a set of blue lines that radiate out to create a guide for the ship’s interior. Vertical lines in purple will help make sure the vertical lines in your ship are straight. Be sure to curve the outline of the ship itself because the room is oval.
6 FINE-TUNE THE PERSPECTIVE
Add another vanishing point to the far left of the image, off-panel, then draw the green lines that radiate out from that point. Next, start to sketch your characters. They need to interact with the environment, but make sure they aren’t displacing items that can’t move. All of the characters should look like they’re on the same plane to keep things in proper scale. The red horizon line will pass through the necks of the seated characters and the torsos of the standing characters. One of the green lines also lines up with the heads of the pilots. A lot of measuring and fine-tuning is needed to make sure the perspective looks right, but it’ll pay off in the end, and you won’t have to do a lot of corrections.

7 ADD DETAIL
After getting all the measuring done and finalizing crew locations, it’s time for the fun stuff. Start adding more detail to your crew members and the bridge. If you want to keep the ship clean and streamlined, don’t add too much; the plain lines will go a long way toward giving it a minimalist, high-tech look.

8 INK IT
Start adding your ink, but keep it simple with just a few shadows under the console and stairs. The sleek and solid look of the ship should contrast with the crew members, who have natural movement and clothes with asymmetric creases and shadows. Leave the screens and panels blank; you can fill those in later when you color.

9 ADD COLOR AND LIGHTING
Select a palette to color your bridge, primarily cool greens and blues from the bridge materials and view screens. Your characters will add an extra splash of color.
The ship interior is actually rather small, so keep it bright and well-lit to make sure the space doesn’t look cramped. Try tinting the lighting blue so it looks a little bit cold and distant, like outer space.