Chapter 6
Foundation Fundamentals
In This Chapter
 Laying down the basics on foundations
 Knowing the difference between fungus and efflorescence
 Keeping your basement dry
 Caring for brick and block foundations
T his chapter tells you how to care for one of the most important components of your home: the foundation. A sound foundation keeps the other parts of a home in good working order. Here, we show you how to keep cracks in concrete from spreading, maintain mortar that’s surrounding brick, control excess water, and keep your basement or crawlspace dry.
A Little Foundation about the Foundation
The foundation is a home’s infrastructure. It supports the floor, wall, and roof framing. Moreover, the foundation helps keep floors level, basements dry, and, believe it or not, windows and doors operating smoothly. The foundation is also an anchor of sorts, making it especially important if your home is built on anything other than flat ground or is in an area prone to earthquakes.
Interestingly, the origin of many leaks and squeaks can be traced to the foundation. A cracked or poorly waterproofed foundation, for example, can result in excess moisture in a crawlspace or basement. Without adequate ventilation, this moisture can condense and lead to, at best, musty odors, leaks, squeaks, and, at worst, rotted floor framing.
If your foundation is made of brick, be sure to read the sections of this chapter on dealing with efflorescence, moisture control, grading and drainage, and especially tuck-pointing.

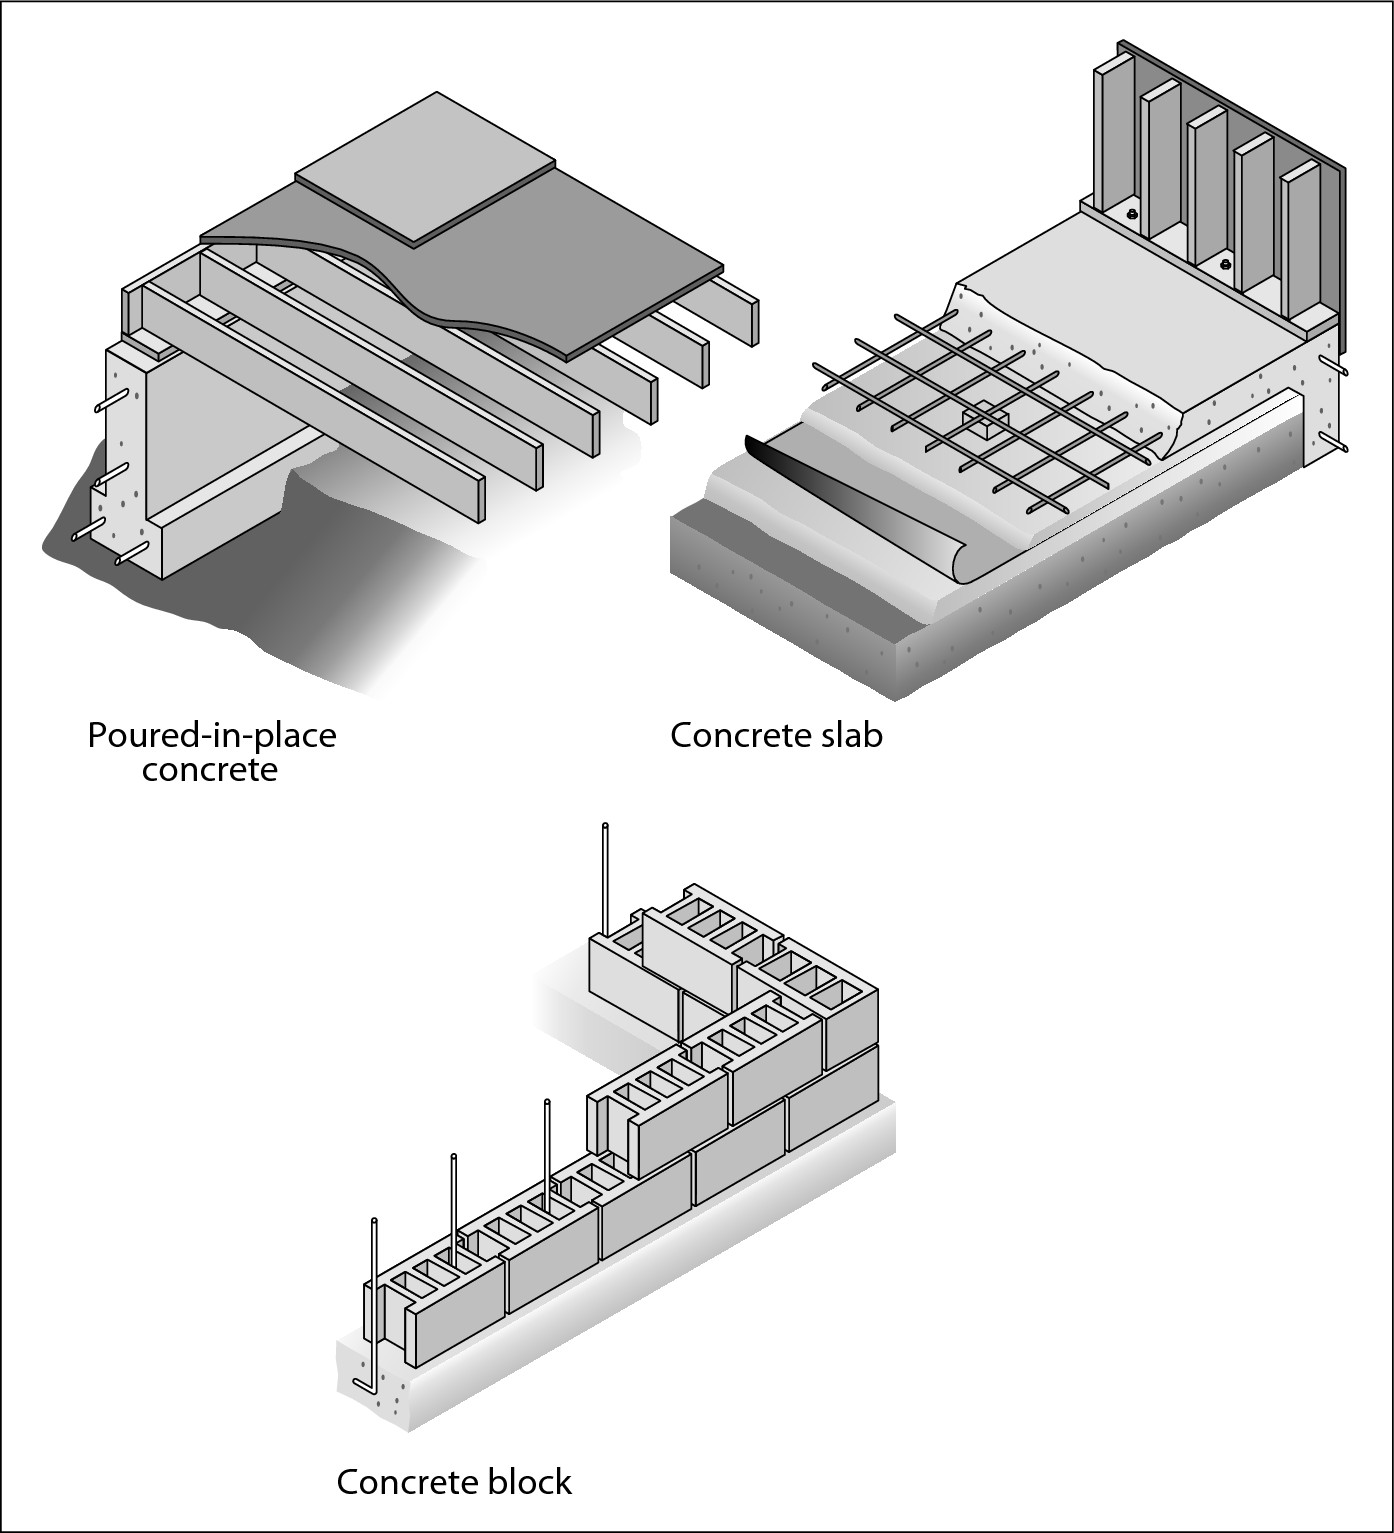
If your home was built after the 1930s, chances are high that the foundation consists either of poured-in-place concrete (grade beam), concrete block, or a concrete slab (see Figure 6-1). The latter has become especially prevalent in the last couple of decades by builders seeking to cut costs and create more affordable housing.
|
Figure 6-1: Common foundation types. |

|
Is There a Fungus Amongus?
One of the most common foundation ailments is a white powdery substance that appears on the ground under your home, on the floor framing, or on your foundation or basement walls. Although most people mistake the white powder for a fungus (fungus is typically green or black), it’s really efflorescence, which is a growth of salt crystals caused by the evaporation of salt-laden water.
Efflorescence appears when mineral salts in the concrete or mortar leak to the surface. Although efflorescence isn’t particularly destructive, it’s unsightly and can result in splintering or minor deterioration of the surface on which it grows.
The area below the main floor and within the foundation walls can consist of a concrete slab, a crawlspace, or a basement. With each of these configurations comes a host of specific maintenance routines that can safeguard your home’s integrity.
Cleaning up efflorescence
Applying a solution of 1 cup vinegar in 1 quart warm water with a nylon brush removes efflorescence in a jiffy. To clean stubborn areas, use a wire brush and a 10 percent solution of muriatic acid in water. (Muriatic acid is swimming pool acid. You find it in swimming pool supply stores as well as at many hardware stores and home centers.) After applying either the vinegar or the acid solution, rinse the area thoroughly with fresh water. More than one application may be required to achieve the desired result.
.jpg)
Preventing efflorescence
Often, you can prevent efflorescence from recurring by sealing the concrete, block, or brick with a high-quality silicone concrete and masonry sealer. These sealers are generally clear and last for six months to a year, depending on the climate.
We don’t recommend using inexpensive “water seals” because they don’t offer the high level of protection that better-quality, pricier products do. Keep in mind that you need to apply the cheaper stuff more frequently, which generally ends up costing more money in the long run.
You can apply concrete sealer with a brush, roller, or pump garden sprayer. It’s imperative that the concrete be clean before you seal it. A good power washing with a pressure washer or water blaster prior to applying the sealer offers the greatest penetration and longevity.
Preventing Moisture from Building Up under Your Home
If you see efflorescence (discussed in the preceding section) on your basement walls and/or crawlspace and your crawlspace is perpetually damp and mildewy, you’ve got a moisture problem! A natural spring, a high water table, a broken water or sewer line, poor grading and drainage, excessive irrigation, and poor ventilation are some of the most common causes of this problem.
What’s a little water under the house going to hurt, you ask? Lots! Aside from turning a trip into the crawlspace into a mud-wrestling match or your basement into a sauna, excess moisture can lead to a glut of problems, such as repulsive odors, rotted framing, structural pests, foundation movement, efflorescence, and allergy-irritating mold. We can’t stress enough the importance of doing everything you can to keep excess moisture out of this area of your home.
Rooting out the cause of moisture
A musty or pungent odor usually accompanies efflorescence and excessive moisture. Accordingly, a good sniffer proves invaluable in investigating the problem.
Start by checking for leaks in water and sewer lines under your home. A failing plumbing fitting or corroded pipe is often the culprit. Fitting a replacement or installing a repair “sleeve” around the damaged section of pipe almost always does the trick.
Believe it or not, a wet basement may be the result of a leaking toilet, tub, or valve located in the walls above. When it comes to finding the cause of a damp basement or crawlspace, leave no stone unturned.
Overwatering planters surrounding the house is another common cause of water down under. Adjusting watering time, watering less often, installing an automatic timer, and adjusting sprinkler heads are the simplest means of solving this problem. Better yet, at planters next to the house, convert the traditional sprinkler system to a drip irrigation system. Doing so not only helps dry things out under the house, but it also makes for a healthier garden.
Using gutters to reduce moisture
Rain gutters are more than a decorative element to the roofline of a home. Their primary purpose is to capture the tremendous amount of rainfall that runs off of the average roof. Without gutters, rainwater collects at the foundation and eventually ends up in the crawlspace or basement. If you don’t have gutters, install them. And if you do, keep them clean.
Make sure that your gutters and downspouts direct water a safe distance away from your house. Even worse than not having gutters and downspouts is having downspouts jettison water directly onto the foundation. We recommend piping the water 20 feet away from the foundation. You can use a length of rigid or flexible plastic drainpipe (without perforations) to carry water away from the downspout outlet to a safe location. Better yet, to avoid an eyesore and a potential tripping hazard, bury the drainpipe below the ground.
Draining water away from the house
Be sure that the soil around your home slopes away from the foundation. This setup helps divert most irrigation and rainwater away from the structure. The earth within 30 inches of the foundation should slope down and away at a rate of 1/10 inch per foot. We think that 1/4 inch per foot is better. A good general rule is “More slope equals less ponding.” Keep in mind that grading should be built up with well-packed dirt and not loose topsoil, which erodes.
If you’re having a difficult time determining the slope, use a measuring tape and a level. Rest one end of the level on the soil against the foundation and point the opposite end away in the direction the ground should slope. With the bubble centered between the level lines, use a measuring tape to measure the distance between the bottom of the level and the top of the soil. For example, if you’re using a 3-foot level and establishing a grade of 1/4 inch per foot, the distance between the level and the soil should be at least 3/4 inch.
Generally speaking, grading requires a pick, a shovel, a steel rake, and a strong back. You also need a homemade tamp that consists of a block of wood attached to a wooden post that serves as a handle. Use the pick to loosen the soil and break large clumps into smaller, more manageable soil that you can grade with a rake. Remove rocks and large clumps and replace them with clean fill dirt that can be well packed.
After you complete your grading work, use a garden hose to wet the area, which further compacts the soil. Wetting the area also gives you an opportunity to test how the soil drains.
The same holds true for paths and patios. A patio or path that slopes toward the home discharges water into the basement or crawlspace, which in turn breeds foundation problems and structural rot. Unfortunately, the only sure way to correct this problem is to remove and replace the source, and replacing a path or patio can be pricey.
Giving the problem some air
Ventilation is another effective means of controlling moisture in a crawlspace or basement. Two types of ventilation exist:
 Passive ventilation is natural ventilation that doesn’t use mechanical equipment. Foundation vents (metal screens or louvers) and daylight windows for basements are the best sources of passive ventilation.
 Active ventilation involves mechanical equipment, such as an exhaust fan.
Passive ventilation should be your first choice because it allows nature to be your workhorse and doesn’t necessitate the use of energy to drive a mechanical device. You save on your utility bill and help the environment by not relying on fossil fuel. Having said that, don’t hesitate to use active ventilation if your crawlspace or basement needs it.

All the passive ventilation in the world may not be enough to dry out some problem basements. In these cases, install an active source of ventilation, such as an exhaust fan.
Installing a vapor barrier
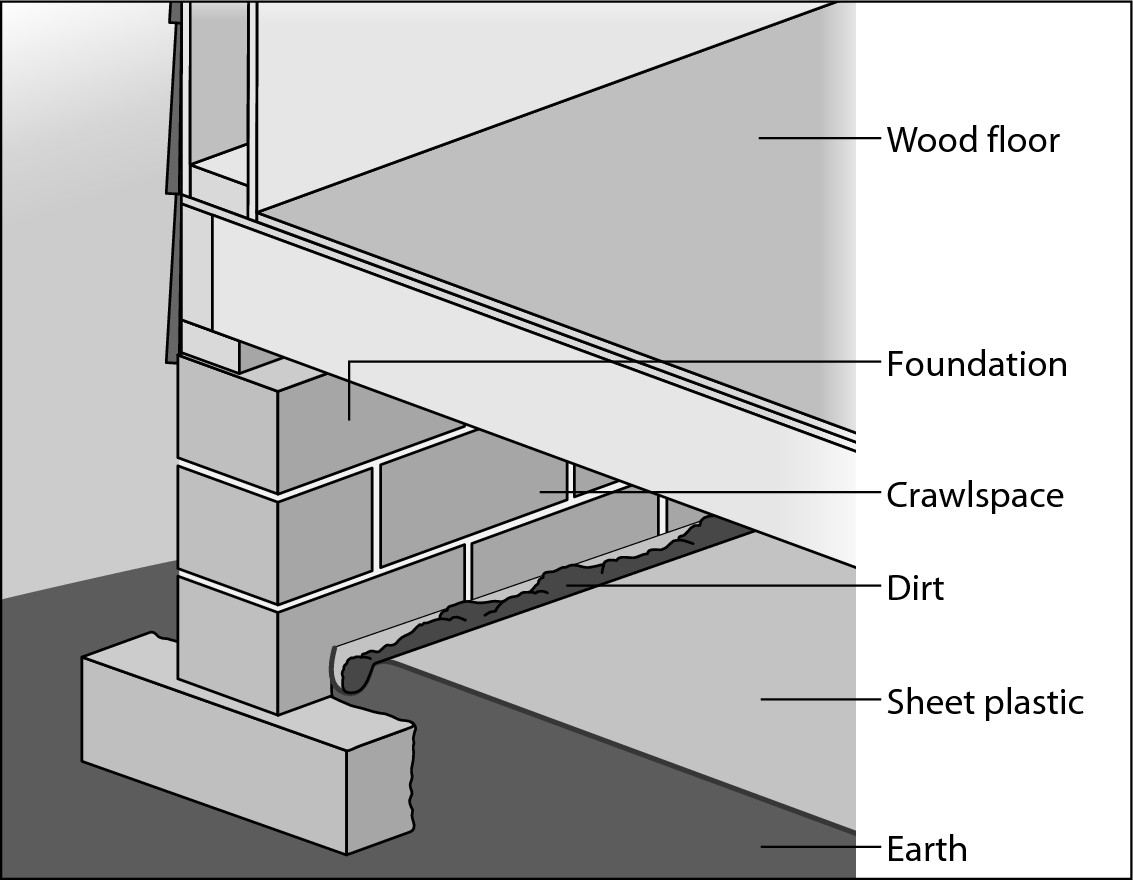
Excessive dampness in a crawlspace or basement can condense, causing floor framing to become damp, covered with fungus, efflorescence, and rot. To prevent this damage to the floor framing, install a vapor barrier consisting of one or more layers of sheet plastic (six mil visqueen) on top of the soil in the crawlspace or basement (see Figure 6-2).
|
Figure 6-2: Installing a vapor barrier. |

|
The plastic should be lapped a minimum of 6 inches and sealed with duct tape at the seams. Cut around piers and along the inside edge of the foundation. In severe cases, the plastic can run up the sides of piers and the foun-dation and be secured with duct tape or anchored with a line of soil at the perimeter.
Not so fast! Just because you installed a vapor barrier doesn’t mean that your work under the house is done. With the plastic in place, you have a nice, dry surface on which to work to remove efflorescence or mold that has propagated on wood framing. Wearing safety goggles, use a wire brush and a putty knife or paint scraper to clean the affected areas. Also see the section “Cleaning up efflorescence” earlier in this chapter.

Treat wood framing that was previously damp, but not severely damaged, with a wood preservative that contains a pesticide such as copper or zinc naphthenate. The wood preservative is a liquid that you can brush on with a throwaway paintbrush.
.jpg)
Saying “oui” to a French Drain

If you already have a French Drain, even it needs occasional maintenance. Clean the inside of the pipe once a year by using a pressure cleaner, which is a high-powered water blaster with a hose and nozzle for use within drainpipes. You can rent this equipment from a tool rental company, or you can have a plumbing contractor or sewer and drain cleaning service clean a French Drain for you.
A Few Pointers on Brick and Block Foundations
Bricks were once used extensively to construct foundations. Today, however, if a foundation doesn’t consist of concrete, it’s probably constructed of concrete block. In either case, brick and block have one thing in common: They’re joined together with mortar, a combination of sand and cement.
Unfortunately, over time, mortar tends to deteriorate. Cracked and deteriorating mortar joints aren’t only unsightly, but they also diminish the integrity of the surface and can allow water to get behind the brick or block, causing major damage. You prevent this problem by tuck-pointing the brick or block foundation, which means removing and replacing cracked or missing mortar.

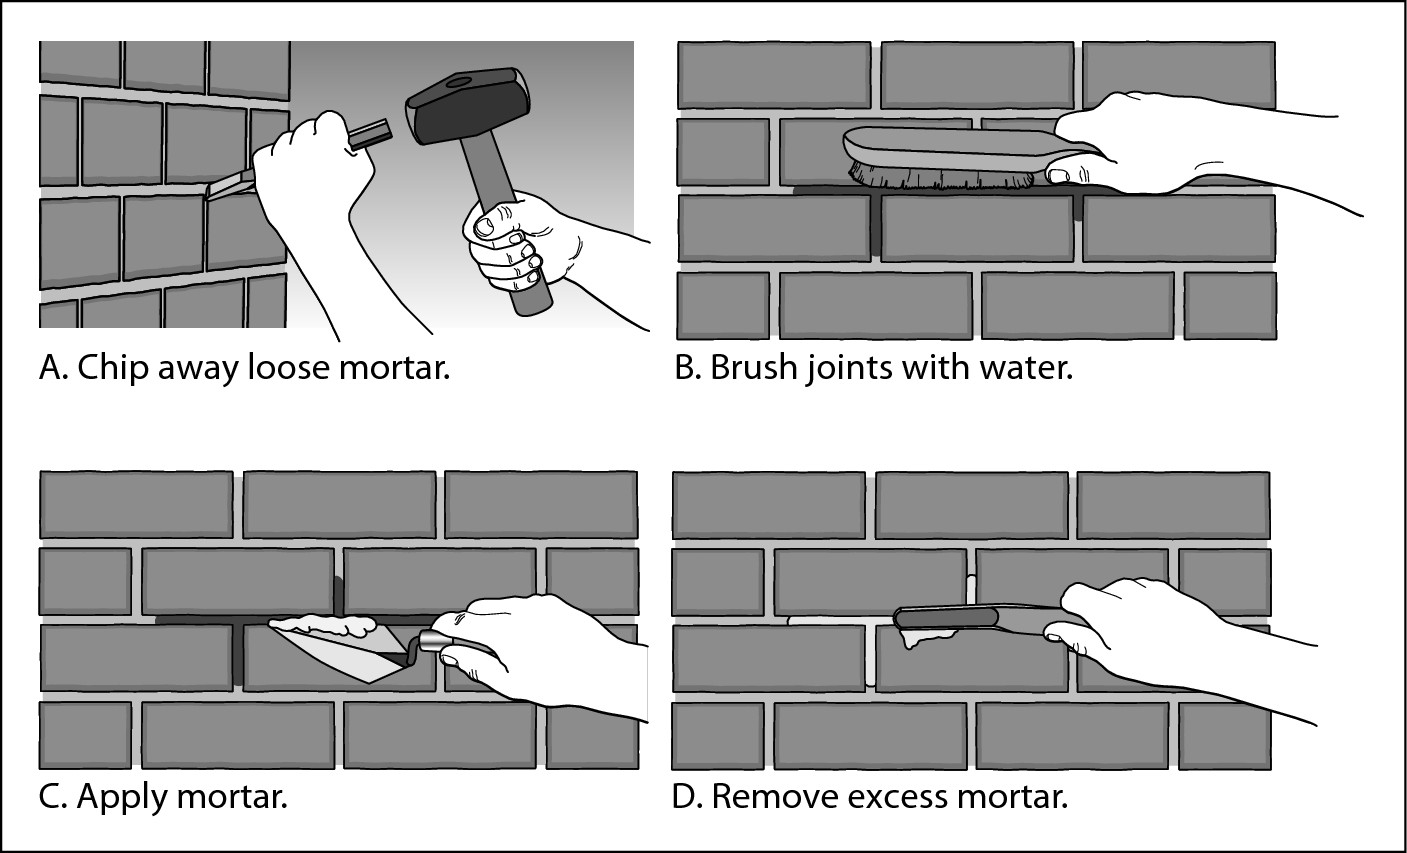
If the area is manageable, a do-it-yourselfer can easily perform the task by following these steps (see Figure 6-3):
1. Chip away cracked and loose mortar by using a slim cold chisel and a hammer. Remove the existing material to a depth of approximately 1/2 inch.
.jpg)
Wear safety goggles to avoid catching a piece of flying mortar in the eye. Use the cold chisel slowly and carefully to avoid damaging the surrounding brick. Use a brush to clean up all the loose material and dust after you finish chiseling.
2. Prepare your mortar and allow the mix to set for about five minutes.
You can purchase premixed mortar, or you can create your own batch by using one part masonry cement to three parts fine sand. In either case, you want to add enough water to create a paste — about the consistency of oatmeal. It’s best to keep the mix a touch on the dry side. If it’s too runny, it’ll be weak and will run down the wall, making it difficult to apply.
3. Brush the joints with fresh water.
Doing so removes any remaining dust and prevents the existing mortar from drawing all the moisture out of the new mortar. Otherwise, the mortar can be difficult to apply and is likely to crack.
4. Apply the mortar by using a pie-shaped trowel called a pointing trowel.
Force the mortar into the vertical joints first and remove the excess (to align with the existing adjacent mortar) by using a brick jointer. The brick jointer helps create a smooth, uniform finish. After you’ve filled in all the vertical joints, tackle the horizontal ones.
.jpg)
Avoid applying mortar in extreme weather conditions; mortar doesn’t set properly in such circumstances.
5. A week or two after the mortar has set, apply a coat of high-quality acrylic or silicone masonry sealer.
Seal the entire surface — brick, block, and mortar. The sealer prevents water damage, which is especially important if you live in an area that gets particularly cold. Unsealed brick, block, and mortar absorb water that freezes in cold weather. The water turns to ice and causes the material to expand and crack. Periodic sealing prevents this problem from occurring.
|
Figure: 6-3: Tuck-pointing mortar joints. |

|