Chapter 7
Showered with Possibilities
In This Chapter
 Choosing and installing a shower enclosure
 Adding a door to a shower enclosure
 Playing it safe with grab bars
A re you a showerhead? You know what we mean. Nothing gives you greater pleasure than standing in a shower with an invigorating spray of water that lets you shut out the world. You can’t find any other place where you have such profound thoughts and insights than when you’re mesmerized by the steady stream of refreshing water. If that’s you, get ready for some major life choices when selecting a shower for your bathroom. Sure, you find the basic enclosure in all shapes and sizes, but you also discover shower rooms and systems with body sprays and jets designed to pamper and massage, faucets and fixtures that range from simple showerheads to panels with body sprays and jets, and shower environments with lighting and audiovisual equipment. All these elements let you adjust water intensity and coverage, from relaxing to invigorating, to create a shower that’s custom-made for you.
Creating a shower oasis is not as difficult as you may think. In this chapter, we show you how to choose a shower that meets your space requirements and offers the options you want, and we show you how to install it, too.
Standing Room Only: Selecting a Shower Unit
Today’s showers range from basic enclosures to custom-designed systems that stand alone as the centerpiece of a bathroom. If you’re interested in one of the custom units, you should probably have it installed by a bathroom design firm and their fabricators, who are familiar with installing those systems. If you want to install a shower unit yourself, consider a fiberglass or acrylic enclosure, designed for do-it-yourself installations.
The two things that determine the size and shape of the shower unit you want are the floor space where you plan to install it and the features you want it to have. In a large master bath, you may have plenty of room for a separate shower and tub, but in a small guest bathroom, a corner unit, called a neo-angle unit, may be the only thing that fits. Use your bathroom’s dimensions as your guide.

Typical shower surrounds and enclosures are made of fiberglass and acrylic and come in one, three, or four pieces made up of wall surrounds, some of which include a receptor or floor pan that you stand on. Multipiece designs let one person bring the unit into a house in sections, so it’s handy for a do-it-yourselfer. You install these units in place and then seal the joints with caulk. Other shower units have wall components with a tongue-and-groove interlocking system that eliminates the need for caulk.
The advantage of a one-piece unit is that you don’t have to worry about joints — no caulking required — so no openings give mold a happy home. However, getting a large one-piecer into a house requires wide access or an open wall or window, so it isn’t the unit of choice to transport into a tight space or up a narrow stairway.
You can use one of these enclosures as a standalone shower in a wall recess or as a freestanding unit. If the bathroom design includes both a tub and a shower, you often place the shower and tub back to back so that the plumbing lines can run next to each other.
Installing a Shower Enclosure
A shower enclosure makes good use of a small space because it takes up limited floor space. For a successful installation, spend some time upfront planning the project and assessing any groundwork that you need.
Laying the groundwork
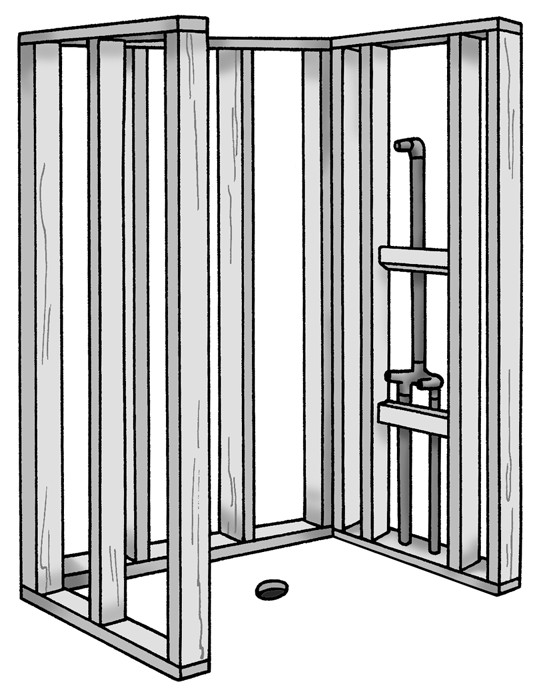
Before you begin installing a shower enclosure, you need to address a couple of points. First, the shower requires wood framing to support the walls of the enclosure (see Figure 7-1). If you place the shower in a corner, you have to construct fewer walls. In any case, the manufacturer supplies a layout plan for the enclosure. Follow it carefully. You usually place the wall studs closer together than on a standard wall.
|
Figure 7-1: Nonbearing partition walls support the shower stall wall panels. |
|
One advantage to installing this type of shower enclosure is that you mount the wall panels directly to the wall studs, so you don’t need drywall or backerboard. Before installing the shower stall, you can install wood backing for grab bars. Consult the manufacturer’s installation instructions to find out what type of backing you need to support a grab bar. In most cases, you should have solid backing of 2 x 6s nailed between the wall studs.

Installing a shower enclosure
To install a shower enclosure, you need these materials:
 2 x 4s or 2 x 6s
 2-inch masking tape
 Carpenter’s square
 Dropcloth
 Electric drill
 Hammer
 Hole saw or jigsaw with fine-tooth blade (32 teeth per inch)
 Large-head nails
 Level
Level
 Measuring tape
 Pliers
 Putty knife
 Safety glasses
 Screwdrivers
 Silicone sealant (for shower door installation)
 Utility knife
 Woodworking tools
Follow these instructions to install a shower enclosure:
1. Open the packaging and identify all the components of the enclosure.
2. Place the shower receptor in the enclosure and check that it’s level and doesn’t rock back and forth.
You may have to install shims under the receptor to level it. Put the necessary shims in place and retest the level of the shower. When the surface is stable, remove the shims one at a time, apply construction adhesive to them, and replace them.
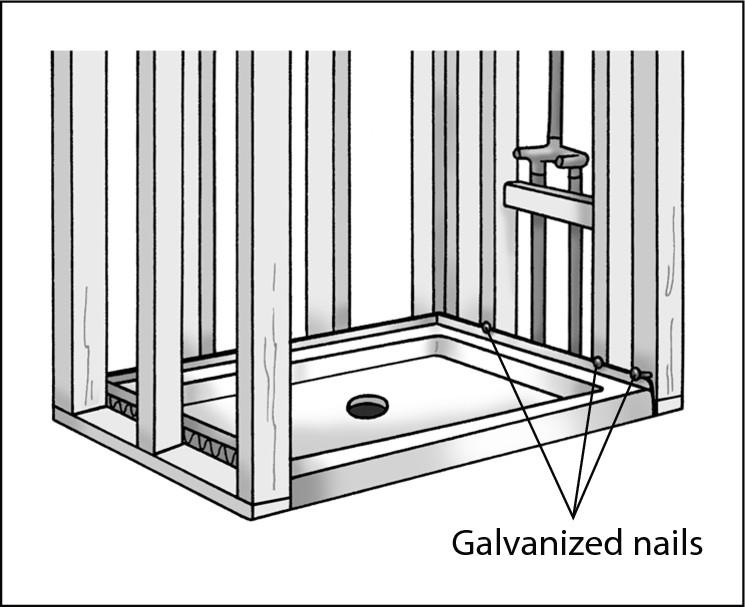
3. Use galvanized roofing nails to secure the receptor to the wall framing (see Figure 7-2).
Follow the manufacturer’s recommendations and drive the nails through the predrilled flange holes, or place the nail against the top of the flange so that the head of the nail catches the flange.
|
Figure 7-2: Secure the shower receptor to the framing with galvanized nails. |
|
4. Position the panels in the enclosure.
Some kits have wall panels that interlock to form watertight seals. In this case, follow the manufacturer’s directions and position the panels in the enclosure in the proper sequence so that they can interlock.
5. Check that the panels fit snugly against the wall framing.
You can’t place the panel at the shower valve end of the enclosure against the studs yet because of the rough-in plumbing.
6. Mark the location of the shower valve and shower riser pipe by making a cardboard template of the location of the valve and shower head pipe.
7. Place the template on the shower enclosure panel and drill a pilot hole at the center of the cutout to guide the hole saw.
Use a hole saw or jigsaw with a fine-tooth blade to make the holes for the valve controls and the shower head pipe.
8. Install the shower wall panel on which the valve is located.
Check that you have all panels properly aligned and square and that you have the shower valve and shower head pipe properly aligned.
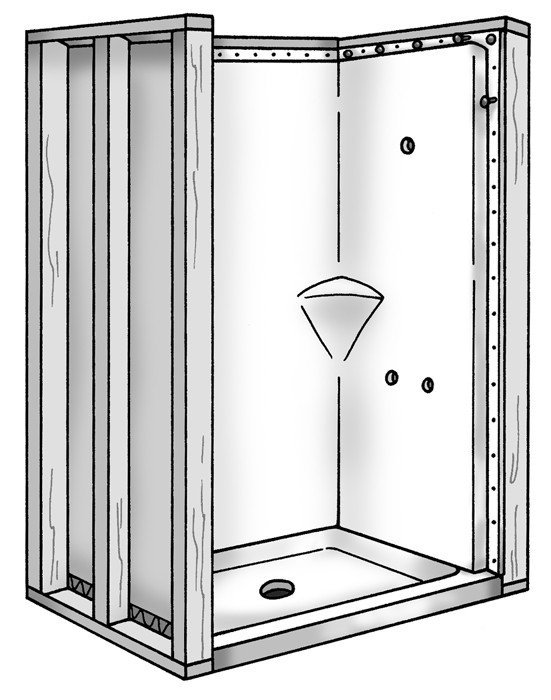
9. Fasten the panels to the wall framing with galvanized roofing nails (see Figure 7-3).
Wherever you find a gap between the wall stud and the shower wall panel, insert a wood shim before driving the nail.
10. Apply silicone caulk to all joints in the enclosure.
Follow the manufacturer’s instructions and use a top-quality caulk.
|
Figure 7-3: Fasten the wall to the wall studs with galvanized nails; shim where necessary. |
|
Your next steps are to install the wall finish that covers the flange and complete the plumbing work before moving on to installing a shower door (often sold as part of an entire shower kit), which is covered in the next section
Making your shower accessible
Shower units that comply with the Americans with Disabilities Act (ADA) are designed for people with limited physical abilities or confined to a wheelchair. The key to their design is a low threshold so that you can enter them without an obstacle or you can roll a wheelchair in. These showers are usually one-piece units with integral grab bars and a built-in or fold-up seat. A person in a wheelchair should be able to roll up next to the shower unit, adjust the controls to the right water temperature from the outside, and then use grab bars to move to the seat inside the shower unit. The faucet control should be a single-lever handle and include a hand shower that someone sitting or standing can operate.
You don’t find many examples of ADA-compliant shower units at retailers, but you can find them on manufacturers’ Web sites, such as www.kohler.com. Use Kohler’s search boxes to narrow the search by specifying “ADA compliant.” Web sites also note the cost of each unit, the installation requirements, specifications and rough-in dimensions, and the actual installation manuals — valuable planning material.
Installing a Shower (or Tub) Door
Don’t stop now! Complete your shower installation with a glass door. (Many shower kits that include a base and a surround also include a door.) Same goes for those of you that are tired of dealing with a leaky mildew-stained shower curtain on an existing shower. The installation, which is essentially the same for a stall shower or tub/shower, is a no-brainer. It involves measuring and cutting the top and bottom horizontal tracks to the width of your shower (or tub) opening, fastening the tracks with screws or adhesive caulk, and attaching a door panel(s) to the side track or inserting sliding doors, between the horizontal tracks.
Getting started
Remove your toiletries from the shower and thoroughly clean the walls and surfaces around it.
Take a look at the parts of the door assembly and identify the frame and track and hardware. Set the door panels aside and lay out the parts as you read the installation instructions supplied by the manufacturer. Most of them are installed in the same way.
Gather up the following tools, and you’ll be ready to go:
 Carpenter’s level
 Caulking gun
 Center punch
 Electric drill and bit
 Fine file
 Hacksaw
 Miterbox
 Hammer
 Masking tape
 Masonry bit for ceramic tile
 Measuring tape
 Phillips screwdriver
 Pliers
 Safety glasses
 Silicone caulk
 Slotted screwdriver
Measuring and cutting the tracks
The top and bottom tracks supplied by the manufacturer is longer than needed for many applications to allow the door to be installed in a variety of enclosures. These tracks usually must be cut slightly shorter than the width of the opening. As always, read the manufacturer’s installation instructions carefully before you do anything, and then follow these steps:
1. Use a measuring tape to find the distance from wall to wall along the top edge of the shower base (or tub) and, for the top track, at 6-feet above it.
2. Follow the manufacturer’s directions and subtract the required amount for each track from the total width of the opening.
3. Cut the both tracks to length and smooth any rough edges at the cut end with a fine file.
Use a hacksaw and a miter box to ensure a square cut. Putting a block of scrap wood in the track and clamping helps keep the track square and in place while you cut it.
Locating the bottom track
You install the bottom track on the top edge of the shower base or tub.
1. Place the bottom track on the flattest part of the shower base or tub ledge, following the manufacturer’s instructions to determine which side of the track faces out.
Make sure that the space between the wall and the ends of the track is the same on both ends.
2. Temporarily secure the track to the ledge with masking tape.
3. Make a light pencil mark on the shower base of tub along the front edge of the track to guide caulk application.
Locating the wall jambs
The wall jambs are fastened to the sidewalls and support the top track. Ideally, you will screw the wall jambs directly to the studs. You can also use sturdy metal anchors to secure the jambs.
1. Place a wall jamb against the wall and push it down over the end of the bottom track so that it’s fully engaged with the track.
2. Hold a carpenter’s level next to the wall jamb and adjust it to plumb.
3. Mark in each mounting-hole location.
4. Remove the wall jamb and drill the holes for the mounting screws or wall anchors.
If you’re drilling into ceramic tile, use a carbide-tipped masonry drill bit.
5. Repeat the drilling in the opposite wall for the other wall jamb.
Install wall anchors according to instructions where there is no stud available.

Caulking the bottom track
Lift the bottom track and apply a bead of silicone caulk into the groove on the underside. Then erase your pencil marks and reposition the bottom track in its proper place.
Installing the wall jambs
Work on one wall jamb at a time and follow these steps:
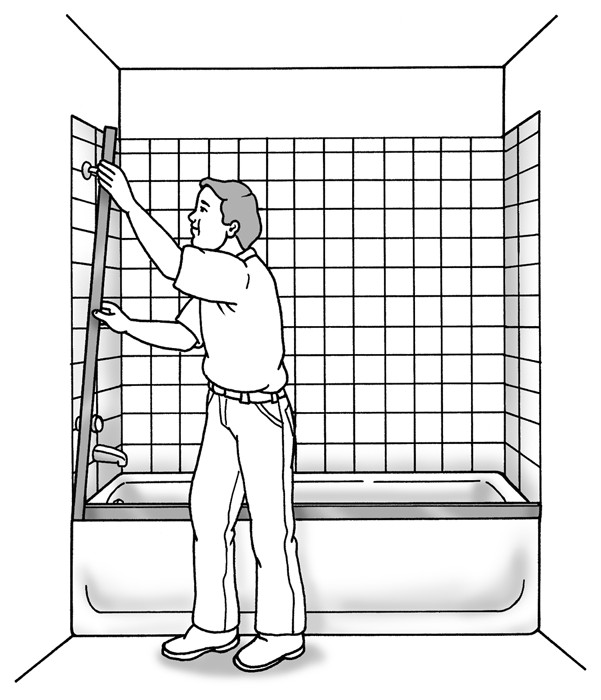
1. Place one wall jamb into or over the bottom track, depending on the design. Then align the holes in the wall jamb with the holes or screw anchors in the wall (see Figure 7-4).
|
Figure 7-4: Installing the wall jambs. |
|
2. Secure the jamb with the screws supplied by the manufacturer or the anchor.
Sliding door kits should include rubber bumpers. Install them over the screws at the top and bottom of the jamb.
3. Repeat the installation on the other jamb.
Installing sliding doors
Sliding doors hang from the top track so install it over the wall jambs as directed by the manufacturer. Prepare the doors by installing roller and, if applicable, handle/towel bar hardware. Place the rollers on the top frame flange of both door panels and secure them with lock washers and machine screws.
Hanging the door panels
Installing the door panels is easiest from outside the shower. Follow the installation instructions provided, as details may vary, but the following steps are typical:
1. Install the inside panel first. Lift it up inside the top track and bring it back to vertical as you hang the rollers on the inside rail of the top track and lower it into the bottom track.
2. Install the outside panel by lifting it up inside the top track and hanging the rollers on the outside rail of the top track.
Installing a hinged door
The bottom track and wall jambs for a hinged (pivoting) door are installed as described above, with small variations by maker or model. Usually there is no top track. With a hinged door you must determine the direction of swing. Typically the hinge is on the opposite side from the shower head, to make it easier to reach in and operate the controls.
1. Prepare the door.
Following the manufacturer’s instructions, install the seal, pivot pin or other connecting hardware, and attach the hinge expander jamb.
2. Lift the door into place and slide the hinge jamb over the wall jamb and strike expander over the other wall jamb.
Don’t attempt this task working alone or you’ll end up with some very expensive glass mosaic makings and a shower curtain.
3. Adjust the two expanders as needed for a good fit, and so they extend the wall jambs about the same on each side. Secure them with self-drilling screws as directed.
Adjust the hinge jamb so the seal on the bottom of the door meets the bottom track evenly and makes the required seal; and secure it. Adjust the strike jamb so it is parallel to the door and spaced about 3/16-inch apart; and secure it.
Some openings are too wide for a door to span so an additional glass panel is integrated into the design between the wall jamb and the strike jamb

Hanging a shower curtain rod on tile
The biggest challenge to installing a shower door track, towel bar, or curtain rod in a bathroom with ceramic tile is making a hole in the tile without cracking it. If you have a masonry bit and a roll of masking tape, however, the job’s easy.
Place the bracket in position and mark its general area on the tile. Then place a couple of strips of masking tape over the area. Place the bracket in the exact position and mark the location of the mounting screws on the tape with a felt pen. Then drill through the tape. The masking tape keeps the drill from moving off the mark until the bit starts to penetrate the tile.
Finishing up with caulk
Finish up any shower enclosure by applying beads of caulk in the specified locations on the exterior, and only those locations. Caulking on the inside, for example, may trap water that is otherwise intended to drain harmlessly into the tub or shower.

Installing Grab Bars
Getting in and out of a shower isn’t always easy even when you’re fit and able. If you have a sore knee or a sprained ankle, you may find it nearly impossible to maneuver safely without a secure handle. For safe entry and exit, install a vertical grab bar inside your shower 18 to 24 inches from the shower head end. If you’re installing a grab bar for someone with an injury or disability, have that person help you find the best location.
Inside a bathtub enclosure, position a grab bar horizontally, approximately 36 inches from the bottom of the tub, so that a bather can use the bar to help raise himself from a seated position. For stepping into and out of a tub, consider installing a vertical bar at the tub edge as a convenient handhold.
Grab bars have prevented accidents, but the early ones didn’t do much for the aesthetics of a bathroom. Today’s grab bars come in finishes and colors that make them much more appealing.

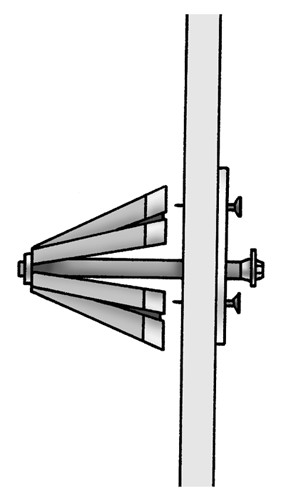
You can use a new blind fastener, the WingIts system, directly on wallboard without an attachment to structural support. The anchors flare out behind the wall to hold firmly (see Figure 7-5). You should install the fastener on a sound wall made of 5/8-inch-thick wallboard or tile over plaster, cement board, or 1/2-inch wallboard. The system exceeds all building code and ADA (Americans with Disabilities Act) specifications. The directions that follow are for installing a grab bar on a tile shower wall.
|
Figure 7-5: After it’s behind the wall, the anchor expands and locks the mounting plate in position. |
|
To install a grab bar with a WingIts grab bar system, you need the following tools:
 Electric drill with 1/8-inch masonry bit and 1 1/4-inch carbide-tipped hole saw
 Felt-tipped pen
 Measuring tape
 Rubber mallet or hammer
 Rubbing alcohol
 Screwdriver
Here’s how to install the grab bar:
1. Locate the 1 1/4-inch mounting holes so that the center of the grab bar fastener slides into the holes.
2. Measure from the inside of one bar flange to the outside of the other to find the center-to-center distance or the distance the 1 1/4-inch mounting holes should be spaced apart.
3. After making sure that the wall surface is clean, mark the location of the mounting holes with a felt-tipped pen.
4. Use a masonry bit to drill a 1/8-inch pilot hole through the surround, whether it be tile or another material, at each mark.
5. Hold the grab bar, with fasteners attached, to the wall to check that the pilot holes line up with the centers of the fasteners.
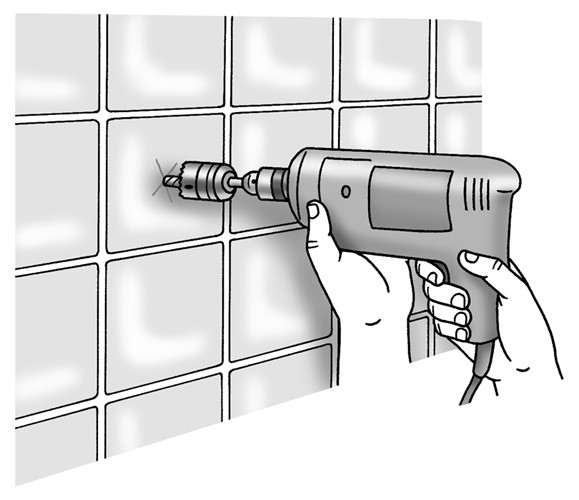
6. To cut holes in tile use a 1 1/4-inch diamond-tipped hole saw to enlarge the pilot holes (see Figure 7-6).
Diamond saws are very pricy for one-time use. Although you can use a less expensive carbide hole saw for plastic surrounds and some soft tiles, it may not cut through a hard tile.

In lieu of using a holes saw in hard tile, you can drill a series of very closely spaced holes at the perimeter with a carbide masonry bit and use a cold chisel to carefully chip out the waste. A hammer-drill, which adds a high-speed hammering action to the turning drill bit, makes that job go very quickly.
If you hit a wall stud while drilling a hole, you can mount the grab bar directly to the wall stud with 2 1/2-inch-long #12 stainless steel screws rather than the fastener.
7. Use a screwdriver to back the bolt out of the fastener until the end of it is flush with the nut at the opposite end of the fitting.
|
Figure 7-6: Use a carbide-tipped hole saw to bore the opening for a wall anchor. |
|
8. Temporarily install the fasteners to the ends of the grab bar with the stainless steel screws provided.
9. Wipe the wall surface around these holes with rubbing alcohol so that the tape sticks to it.
10. Remove the paper that covers the adhesive on the faceplate.
11. Insert the fasteners into the holes in the wall while they’re attached to the grab bar.
12. Press the grab bar tightly toward the wall for a moment so that the fasteners can adhere to the wall in the correct position.
13. Remove the grab bar from the fasteners and use a screwdriver to firmly and quickly punch the head of the bolt toward the faceplate.
You can also hit the screw gently but firmly with a rubber mallet or hammer.
14. Simultaneously pull on the bolt and tighten it by hand.
Use a screwdriver to tighten the bolt very tight.
15. Attach the grab bar to the fasteners with the stainless steel screws.

Maintaining water temperature
The best protection against scalding is a special valve called a pressure balance or anti-scald valve, which maintains a constant water temperature, even if someone in the house decides to do a super-sized load of laundry with a tub full of hot water while you are in the shower.
Some of these devices are valves that sense changes in the water pressure and adjust the mix of hot and cold water. Others are electronic systems that remember the temperature of the last shower and deliver the same level of hot water until you or someone else resets them. More elaborate systems allow you to program multiple water temperatures to suit the preferences of the different people using the shower. Whether you’re doing the bathroom yourself or hiring a contractor, arrange for a licensed plumber to take care of this particular job.
If you want an easy, inexpensive (about $20) solution for your shower head, get a scald-guard device that shuts off the water if the temperature gets too high. You just have to remove the shower head, screw in the device, and replace the shower head. If you have a bit more money to spend but don’t want to replace your existing shower valve, you can plumb a pressure-balancing valve into the supply line right before the shower valve, assuming that you have access from the back.
Incidentally, the Department of Energy suggests setting the temperature of your hot-water heater no higher than 115 degrees to provide a comfortable hot-water temperature for most uses. Dishwasher manufacturers, however, are looking for a minimum of 120 degrees, making this safety device all the more important.