Chapter 4
Understanding the Building Process
In This Chapter
 Understanding woodworking plans
 Creating and using a cut list
 Pre-milling and milling the wood for your project
 Examining the assembly procedure
A woodworking project involves a very definite process. From choosing the wood and milling it to size to assembling the piece, you need to do each step correctly, or your project won’t be successful. In fact, it may not even go together at all.
This chapter guides you through the process of building a project and shows you how the various steps along the way lead to success. You explore all the details of a project plan — the diagrams, dimensions, and procedures. You get to know the best way to choose the part of the board from which to cut each piece, and you walk through the assembly process from dry-fitting to gluing in sections.
Following Plans: Making Sense of Diagrams, Dimensions, and Procedures
Unless you build on the fly and can visualize every step of the cutting and building process, you need plans from which to work. Plans make the building process easy because they spell out exactly how much, what kind, and what size of wood to cut for each part of the project. In addition, plans tell you how to put those parts together. If you can accurately follow a set of plans, you can make any project for which you have the skills and tools.
Checking out your material list
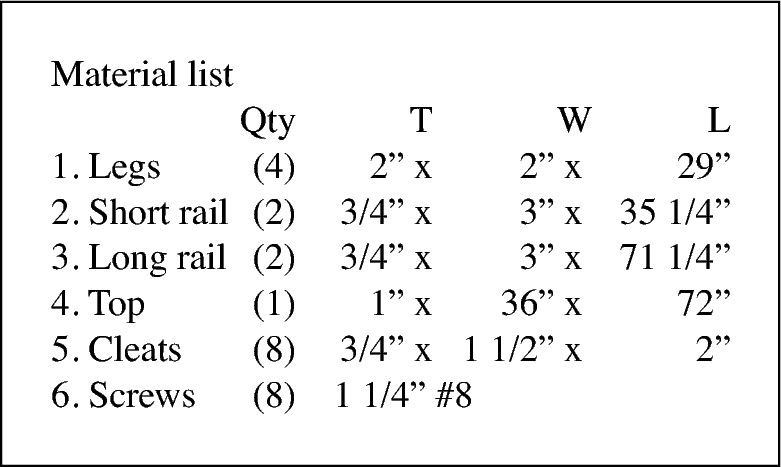
The material list gives you a rundown of all the wood, fasteners, and hardware you need to build a project. By glancing at this list, you can quickly determine what you need to buy before you get started. Figure 4-1 shows a typical material list for a table. It runs down the parts for the project, their quantity (bordered by parentheses), and their cut size in thickness (T), width (W), and length (L).
|
Figure 4-1: A material list tells you what you need to make a project. |
|
Numbers, give me numbers: Measured drawings
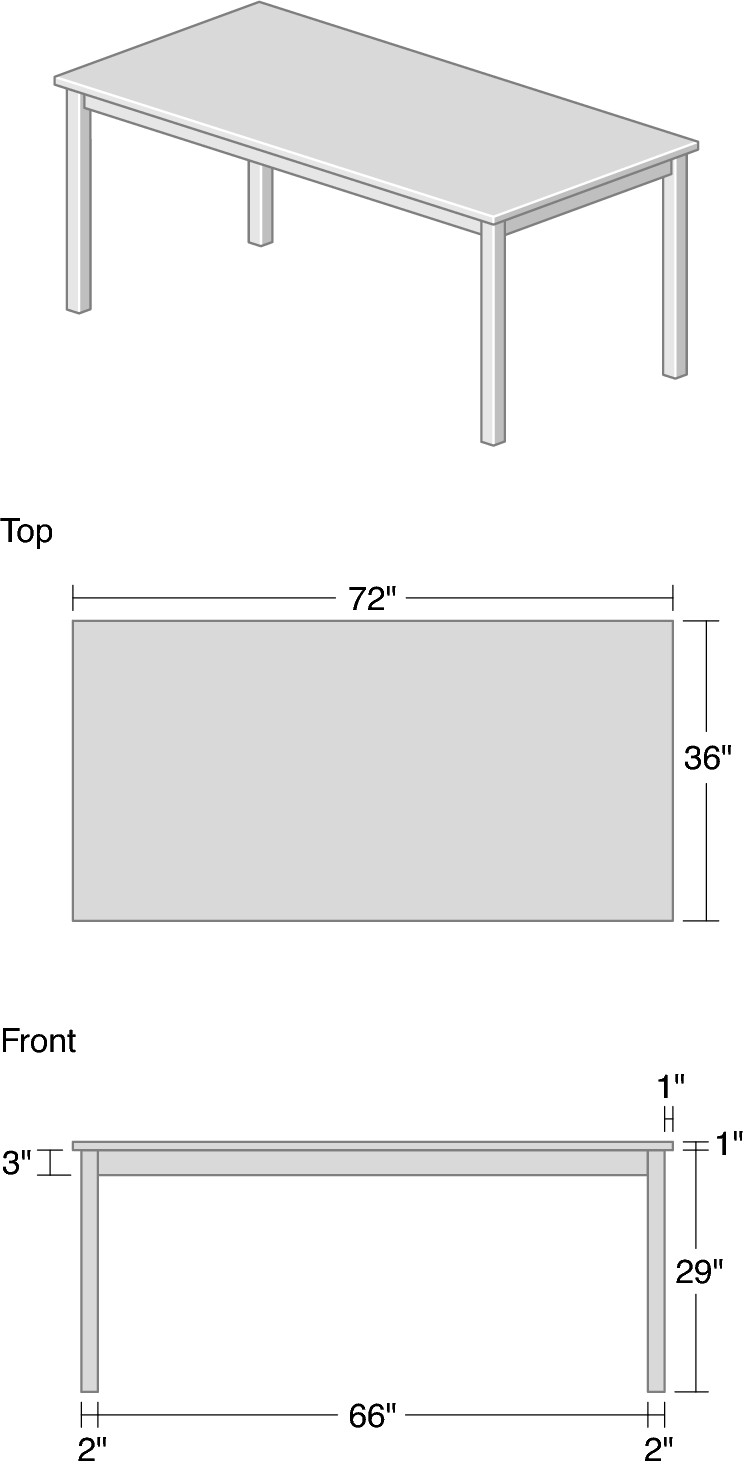
Measured drawings are the heart and soul of a project plan. A measured drawing details every board, screw, nail, and piece of hardware that goes into a project and where each object goes. With this drawing, you should be able to build a project even without the other two sections of a project plan.
You may need some time to get used to how a measured drawing organizes a project, but soon you’ll be able to glance over a measured drawing and tell right away whether you want to tackle the project. And with a little experience, you’ll likely be able to tell how much time you need to build it.
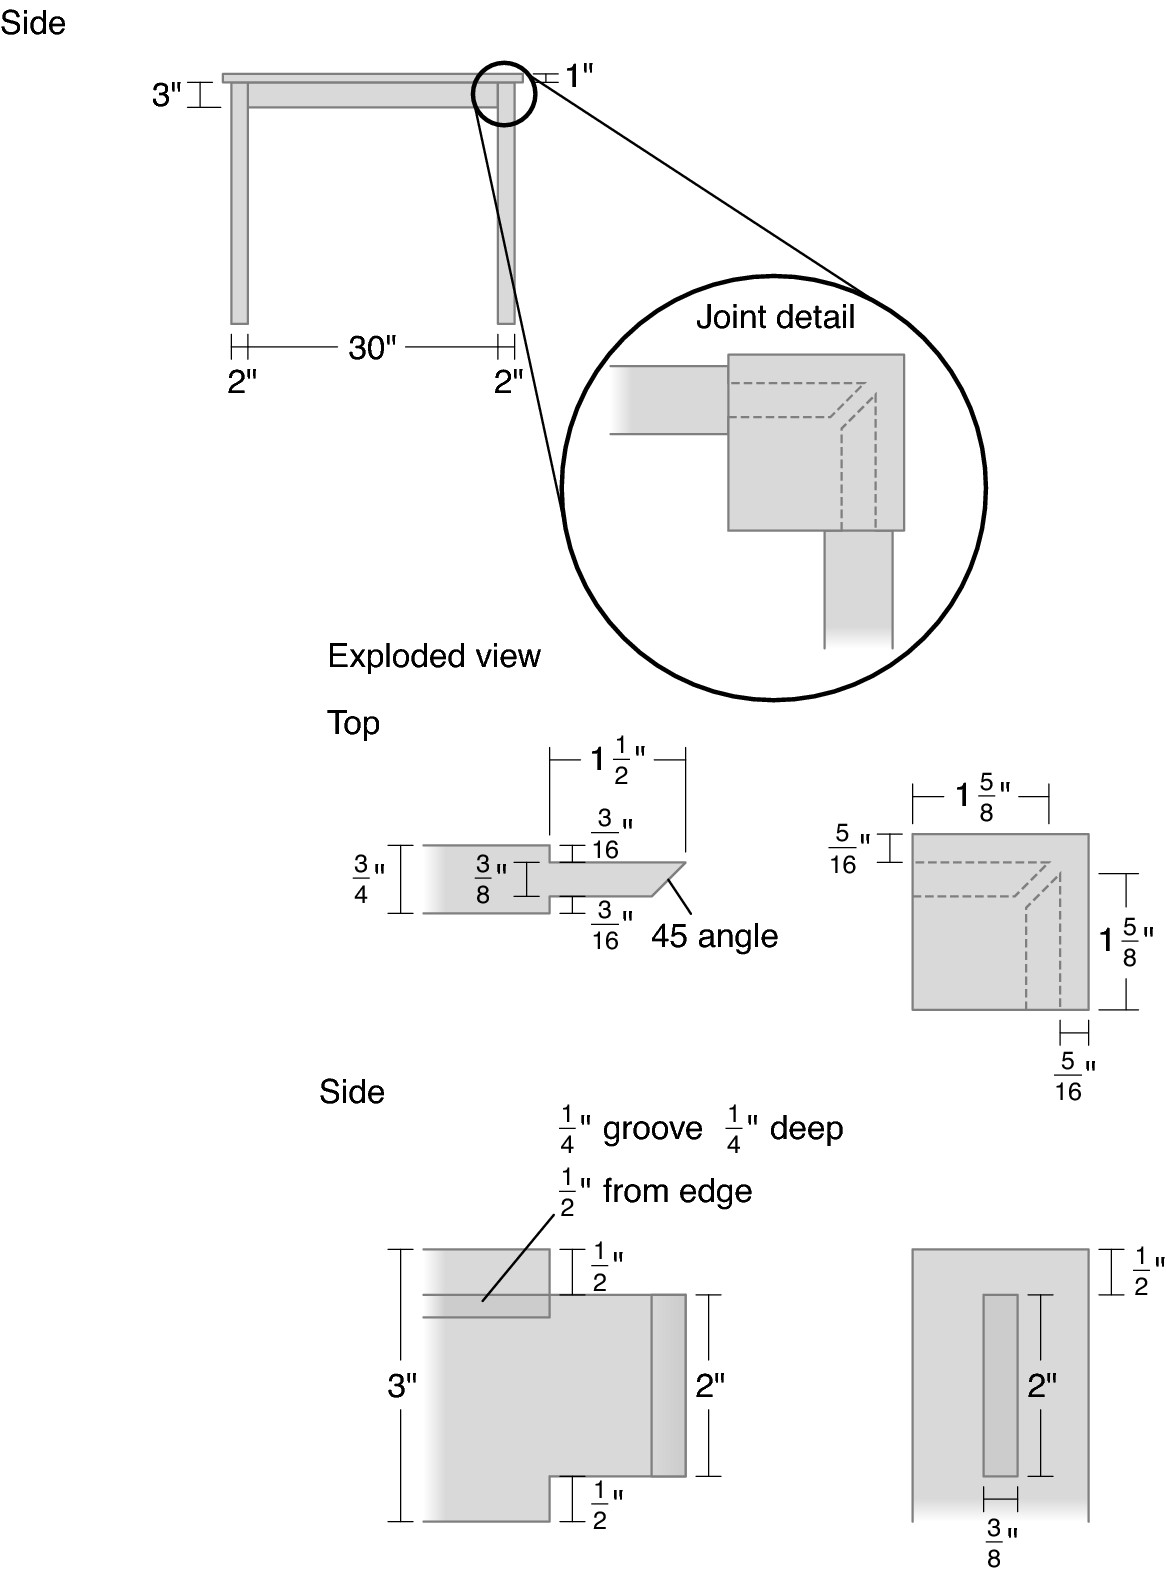
A measured drawing shows a project from several angles to give you a better idea of how the finished project looks. However, the level of detail varies depending on who created the drawing. Some designers detail everything and include full-size drawings of joints or unusually shaped parts (the back of a chair, for instance). Other designers provide simplistic drawings that show only the overall dimensions of a part, its position in the finished product, and an overall view of the project. Figures 4-2 and 4-3 show this kind of detail.

We suggest that you make a template, a pattern for the part re-created in full size that you can use again and again. Templates are generally made out of 1/4-inch plywood or Masonite. They’re really handy if you need to make more than one copy of a particular part (chairs, for example, because many people make more than one chair at a time).
|
Figure 4-2: Measured drawings show the project from several angles and generally list the dimensions of each part. |
|
|
Figure 4-3: More detailed drawings for the same project shown in Figure 4-2. |
|

Putting the pieces together: Using a procedures list
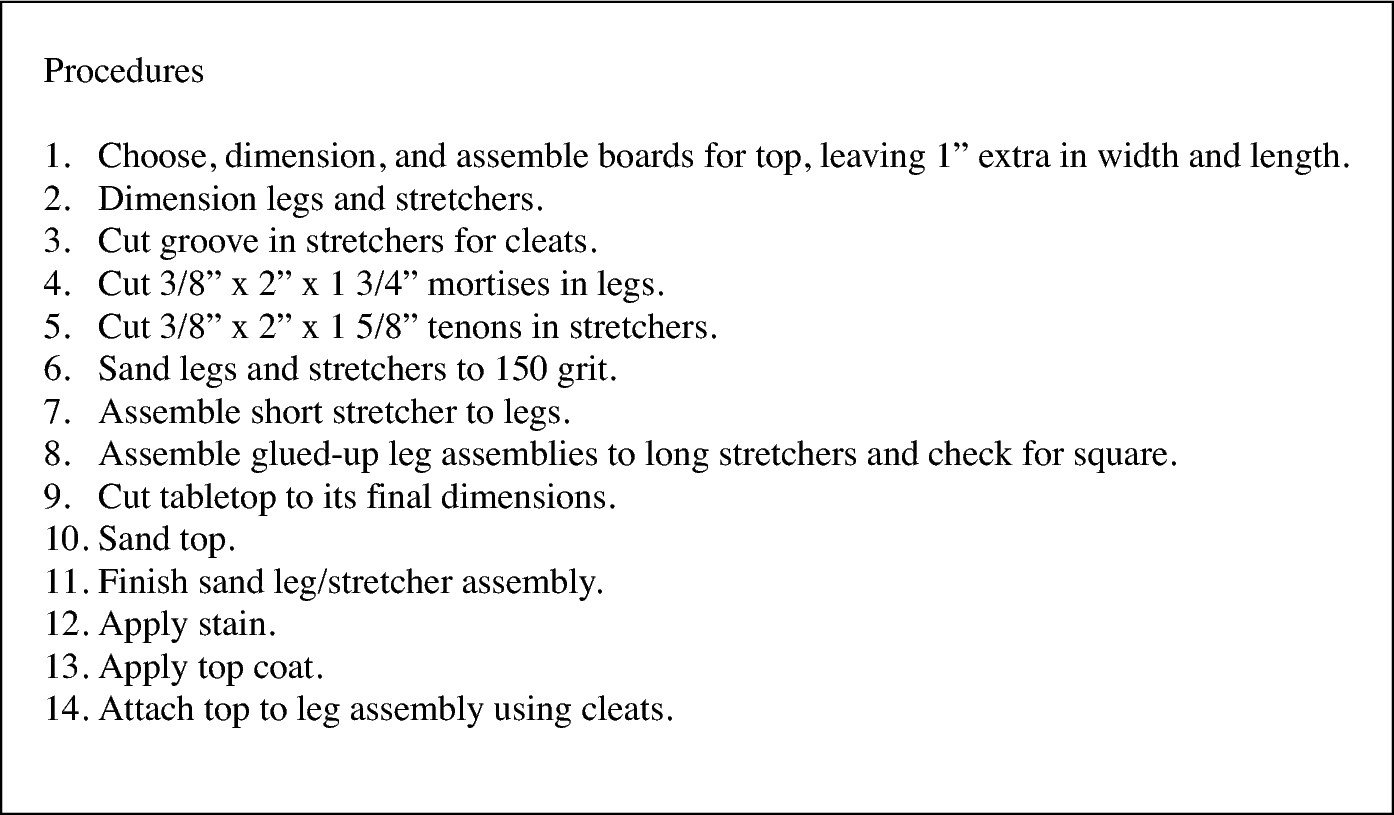
A procedures list walks you through the process of assembling your project into its final form. Not all project plans include such a list because many people assume that you can figure out the best way to put a project together just by looking at the measured drawings. Procedures lists can be really helpful for beginning woodworkers, though, so we highly recommend that you find plans with detailed procedures lists when you first start out.
Figure 4-4 shows a typical procedures list. This one’s pretty simple, but some plans have very detailed lists.
|
Figure 4-4: A proce-dures list helps you keep track of what you have to do. |
|

Creating a Cut List
Before you start building anything, take your measured drawing, pull out the wood you have on hand, and mark where each part of the project is coming from in pencil or chalk. Doing so minimizes waste and helps you plan the beauty of a project. For example, if you’re making a dresser with four drawers, you want the wood you use for the drawer fronts and the face frame (if it has one) to match. You want the color and grain patterns to create a visually pleasing arrangement. The only way to ensure that you get this aesthetic appeal is to look at each board and carefully consider where it should go. This step takes some time, and you may end up rejecting a few boards in order to find a nice composition, which is why we always recommend buying more wood than you need for a given project.
Check out Figure 4-5 for a look at a cut list. The drawing on the left shows parts cut out of a solid board, and the drawing on the right shows how the parts of a carcass (the box for a cabinet) are cut out of a sheet of plywood.
|
Figure 4-5: A cut list shows where you plan to cut your parts from a board (left) or sheet of plywood (right). |

|
Selecting the best section of the board
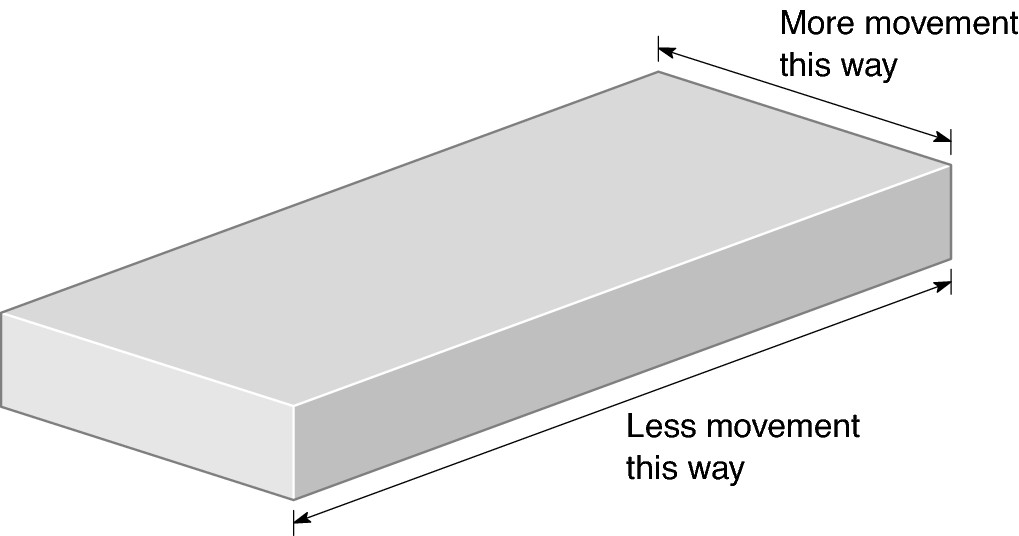
Not only do you need to consider the look of the wood you use for a given part of a project, but you also need to think about how that wood behaves in response to moisture changes. Figure 4-6 shows how a board expands and contracts with changes in moisture. You want to make sure that any boards that meet expand and contract in such a way that they won’t tear apart a joint or weaken your project.

|
Figure 4-6: Consider how wood expands and contracts when you choose it for a project. |
|
Organizing your cut list
After you’ve chosen the wood from which to cut all the parts of your project, your next step is to decide in what order you want to cut the boards. We usually organize our boards according to the type of cuts they need and what tool we’ll use to cut them. Start with the largest pieces, cut the pieces to size, and then work on the actual joints. Proceed in stages and, if you’re working on a large project, work on one section at a time.

Preparing the Board for Milling
Before you cut your wood down to size, do some preliminary cutting to prepare the wood for its final milling. This cutting is called (logically enough) pre-milling. Pre-milling means cutting the board to its near-final dimensions so that the wood can acclimate to its new size. We can’t tell you how many times we’ve had a nice, straight board twist slightly when we cut it in half. This is the nature of wood: You can’t predict what’s going to happen after you change its shape. So cut the boards almost down to size and wait to see what happens.
Pre-mill a board to its final length and width plus an inch and to its final thickness plus 1/8 inch (if possible). Then let the board rest for a day or so before you do the final milling. After the board has rested, check to see that it’s still flat and straight. If it isn’t, you know that you need to flatten it out and square it by using a jointer and a planer. In that case, follow these steps:
1. Run one of the faces of the board (the wide part) through the jointer until the board is flat.
This step may require a few light passes. Make sure that you run the stock over the jointer in the proper grain direction to avoid tear-out. If you don’t know which direction to feed the board into the jointer, use a scrap piece and run it through first in one direction and then the other to see which provides a cleaner cut.
2. Turn the board on its edge and run it through the jointer with the flat face (the one you just made) against the fence.
3. Flip the board over and do the other edge.
Again, make sure the freshly flattened face is against the fence.
4. Run the board through your planer with the flat face against the bed until it’s flat, too, paying attention to proper grain direction to avoid tear-out.
This step may take a few passes. At the end, you should have a flat, straight board.
Making the Cut
After the board is straight and flat, you can move on to the milling stage. Milling, simply an extension of the pre-milling stage, consists of doing the final cutting to the board to make the final part for your project. This process includes making all the joints, routing (like rounding over the edge of the board), and rough sanding all the parts so that they’re all ready for assembly.
Follow this process when milling a board:
1. Cut the board to width plus 1/32 inch.
2. Run the freshly cut edge through the jointer until it’s at its final width.
Set the jointer to take off 1/32 inch or less and take only one or two passes off the edge to get your final width.
3. Plane the board to its final thickness.
4. Crosscut a square edge on one end of the board.
5. Cut the board to length, measuring from the freshly squared end (the total length includes any tenons or other joints).
6. Cut out any mortises, tenons, or other joints.
7. Cut any curves or other shaping.
Do all shaping, such as rounding over the edge of a board, after all the joinery is done so that you don’t lose any straight-line references that you need at various machines against fences, jigs, and so on.

Putting It All Together
You can approach the assembly and milling process in several ways. Some people mill everything and then assemble, whereas others prefer to mill a section of the project, assemble it, mill the next section and assemble it, and so on. We usually combine the two and mill according to cut type. Depending on the size of the overall project, we sometimes assemble in sections. As you do more projects, you find the method that works best for you.
Preparing for assembly
After you mill all the parts (or at least those parts for the section you’re working on), the next step is to lay those parts out on your workbench. Doing so helps you confirm that you have all the parts that you need and visualize the assembly process. As you lay out the parts, double-check your material list and your measured drawing to see that you have everything and that all the parts are milled properly.
Next, get all your assembly materials ready:
 Clamps: Bring all the clamps you think you’ll need (plus a couple extra, just in case) to your bench and put them within easy reach.
 Damp rag and dull chisel: You use these tools to remove any extra glue that squeezes out of the joints when you add the clamps.
 Glue and glue brush: You can’t glue without glue! When you use carpenter’s glue (see Chapter 2), always use an acid brush (a small, metal- handled brush) to apply it. The acid brush helps you achieve an even coat, and it’s small enough to get into mortises and other joints.
 Rubber mallet: This tool enables you to tap any joint into place and to make adjustments to the square of the piece, if necessary.
 Straightedge: When you glue boards edge to edge (a tabletop, for example), a straightedge enables you to see whether your assembly is flat.
 Tape measure: This tool enables you to check that your work is square when it’s glued.

Dry-fitting
After you apply the glue to your parts, you have only a few minutes (about five to ten with white or yellow carpenter’s glue) to get everything to fit properly. Because of this time limit and the stress that you’ll undoubtedly feel as a result, we highly recommend that you do a dry-fit and run through the glue-up process before you break out the glue.
Walk yourself through the process of assembling the parts in front of you by putting each of the joints together, applying the clamps, and checking for square (follow the steps in the ensuing sections). Doing so ensures that all the parts fit like they’re supposed to and that you have a clear idea of what steps are involved in putting the joints together.

When you’re comfortable with the process, disassemble everything, take a few breaths, and break out the glue.
Applying the glue
If you’ve done a dry-fit of your parts, you just need to redo the process, this time using glue as you go. You shouldn’t encounter any surprises along the way. Remember that when you work with the glue, you have only a little time to get everything to fit back together again. (For more on applying adhesives, see Chapter 2.)

 Don’t use too much glue. People often use too much when they first start out. A thin coat is all you need on each part of a joint.
 When gluing veneers, apply glue only to the backing material and not to the veneer itself, or the veneer will curl and become difficult to work with.
 After you assemble a joint, push (or tap with a mallet) or clamp the joint fully in place; otherwise, the joint may lock up partway. This step is especially important with tight-fitting mortise-and-tenon joints. When joints are wet with glue, the wood swells and the joints require more clamp pressure to assemble.
 Don’t panic. Yes, gluing can be nerve-racking, but if you panic, you end up with a partially assembled piece and likely have to start over (which is why dry-fitting is so important).
Clamping
The trick to clamping is to apply just enough pressure to pull the joints tightly together, but not so much that you squeeze all the glue out. Clamps hold the joints together until the glue has a chance to dry.
Here are some other things to consider when clamping:
 Make sure that your clamps are perpendicular to the workpiece and not angling off one way or another. This precaution is especially important when doing edge-to-edge joints because angled clamps pull the boards out of alignment.
 Don’t apply so much pressure that you warp the workpiece.
 Make sure that your clamps are centered on the board, applying even pressure. If your clamps aren’t centered, they may warp the workpiece. Ideally, clamp pressure should be applied down the centerline of the joint.
 If you think that you need to use an additional clamp, use it. You can never have too many clamps (within reason, of course).
Squaring up the parts and verifying flatness
After you’ve glued and clamped everything properly, you need to make sure that all your parts are flat and square.
When you edge-glue a bunch of boards into a tabletop, you want to make sure that those boards remain flat. If you did a good job creating perfectly straight and square edges on each board, the boards will want to lay flat. The only trouble you may have is with too much clamp pressure or an uneven benchtop.
To check for flatness, run your straightedge against the top of the boards. If you see light through the straightedge as it passes over the boards, they aren’t flat. To straighten, adjust the clamps. If edges are sticking up, you may need to tap them down with a mallet.
To check that your assembled parts are square (they have 90-degree corners), you need a tape measure. This simple process involves the following steps:
1. Measure diagonally from the upper right to the lower left corner and from the upper left to the lower right corner.
If these numbers match, you’re square. If not, you need to square it up by moving on to Step 2.
2. Gently push the upper corner of the measurement that was longer than the other toward that other corner.
If this maneuver doesn’t work (it often doesn’t), move on to Step 3.
3. Take another clamp and run it diagonally from the corners that have the longer measurement and tighten the clamp until both diagonal measurements are equal.
Cleaning up your mess
Cleaning up is our least favorite part of the assembly process — and we’re sure we’re not alone. After all the stress of getting everything to fit properly, all we want to do is sit back and admire our work . . . or break for a beer. But trust us when we say this: A little work now saves you tons of work later.
Glue is much easier to remove when wet. To clean up glue spills and seepage, follow these steps:
1. Use a dull chisel or a scraper to gently scrape off the beads of glue that formed around the joints.
Go with the grain and be careful not to gouge the wood.
2. Take a damp (not wet) cloth and rub around all the joints until you’re down to bare wood.
Depending on how much glue spillage you have to deal with, you may need to rinse out your rag. We usually keep two rags available.
Don’t forget to clean up the bottoms of drawers and tabletops (or anywhere that can’t be easily seen).
3. Double-check that all the joints are completely clean before you quit.
Letting it sit
We like to assemble at the end of the day so that we’re not tempted to take the clamps off too soon. We always let the assembled parts sit in the clamps overnight before we try to remove them. Doing so minimizes any chance that the glue hasn’t cured enough before we remove the pressure.