Chapter 3
Materials and Tools
In This Chapter
 Becoming familiar with replacement parts
 Choosing the right valves and other supplies
 Figuring out what kinds of pipes and fittings you need
 Getting your hands on the right plumbing tools
A hardware store clerk can always tell when a customer has a plumbing project to tackle. The first sign is the distraught look of someone carrying a rusted pipe or an odd-shaped piece of chrome. But the glazed-over look tells it all — the homeowner is clueless about what to buy to solve his or her plumbing problem.
You can avoid being that hopeless soul by taking a look at the materials and tools that we’ve gathered in this chapter. With a basic understanding of what this stuff is and what it does, you can walk down the hardware-store aisles with an air of confidence. You still may be clueless, but at least you’ll be armed with the right vocabulary — and that’s half the battle.

Finding Replacement Parts
Many times, you visit a plumbing department to find small replacement parts rather than large, new products. Take a look at these most popular replacement parts for plumbing appliances and fixtures so that, when the need arises, you know just what to ask for. This stuff may seem ho-hum, but knowing what you’re looking for saves you countless return trips to the store.
 Washers: A variety of washers are used in plumbing applications. They generally help seal a temporary joint. Probably the most common washer is used inside the female end (the end that screws onto the faucet) of a garden hose. Washers are also used inside a faucet to seal the joint between the smooth valve seat that’s inside the faucet and the valve stem, to prevent the flow of water. When you open a faucet, the washer rises above the valve seat, which allows the water to flow.
 Aerator: An aerator is a small system of screens and a baffle that’s screwed into the end of many kitchen and bathroom faucets. Aerators introduce air into the flow of water and make it appear foamy. Aerators can become clogged with debris, so clean them regularly.
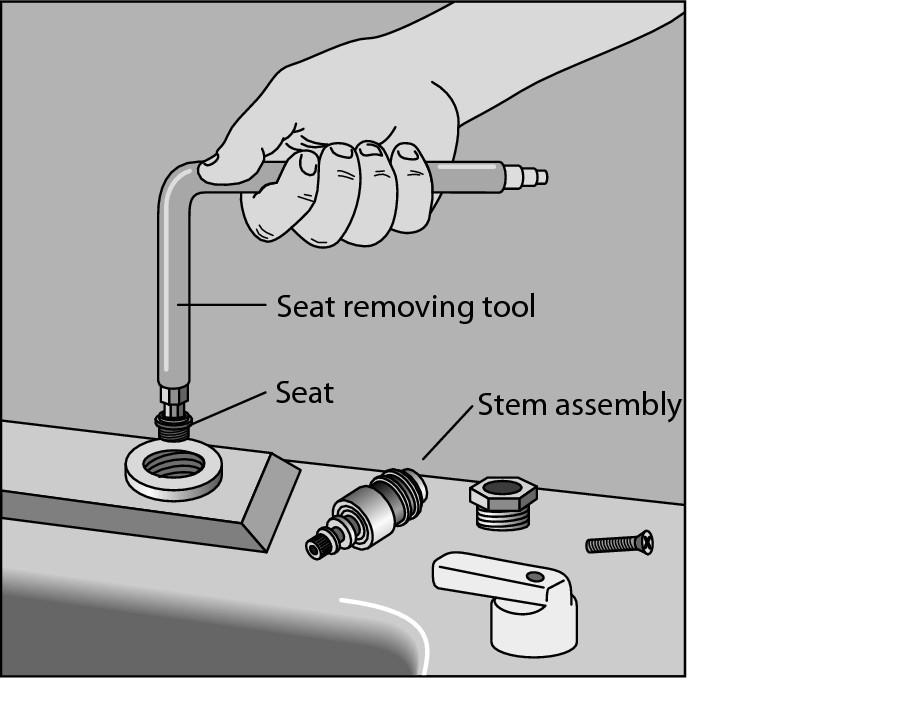
 Valve seat: A valve seat is present in the inside bottom of most faucets. These dime-sized, donut-shaped brass seals are threaded on the bottom and are screwed into place with a special seat-removing tool that’s similar to a large Allen wrench — see Figure 3-1. Because they’re made of brass, which is very soft, valve seats deteriorate over time, causing faucets to drip.
 Valve stem: A valve stem is located under the handle of both a hot- and a cold-water faucet. On the bottom of every valve stem is a washer that wears out over time. If your faucet is leaking, you want to replace this washer first. You can also find an o-ring or stem packing (which looks like string wrapped around the stem) designed to prevent water from leaking around the base of the handle (see Figure 3-1). Replace either the o-ring or the stem packing if water leaks from the faucet stem’s base.
 Washerless faucet parts: Washerless faucets don’t have valve seats, washers, or valve stems. Instead, they have a ball mechanism — the most common type being a kitchen faucet with a single lever handle. If this type of faucet starts to drip, the internal o-rings and/or ball mechanism need to be replaced. Replacement kits are widely available at home improvement and plumbing supply shops. Some washerless faucets have a cartridge-type mechanism that you can replace.
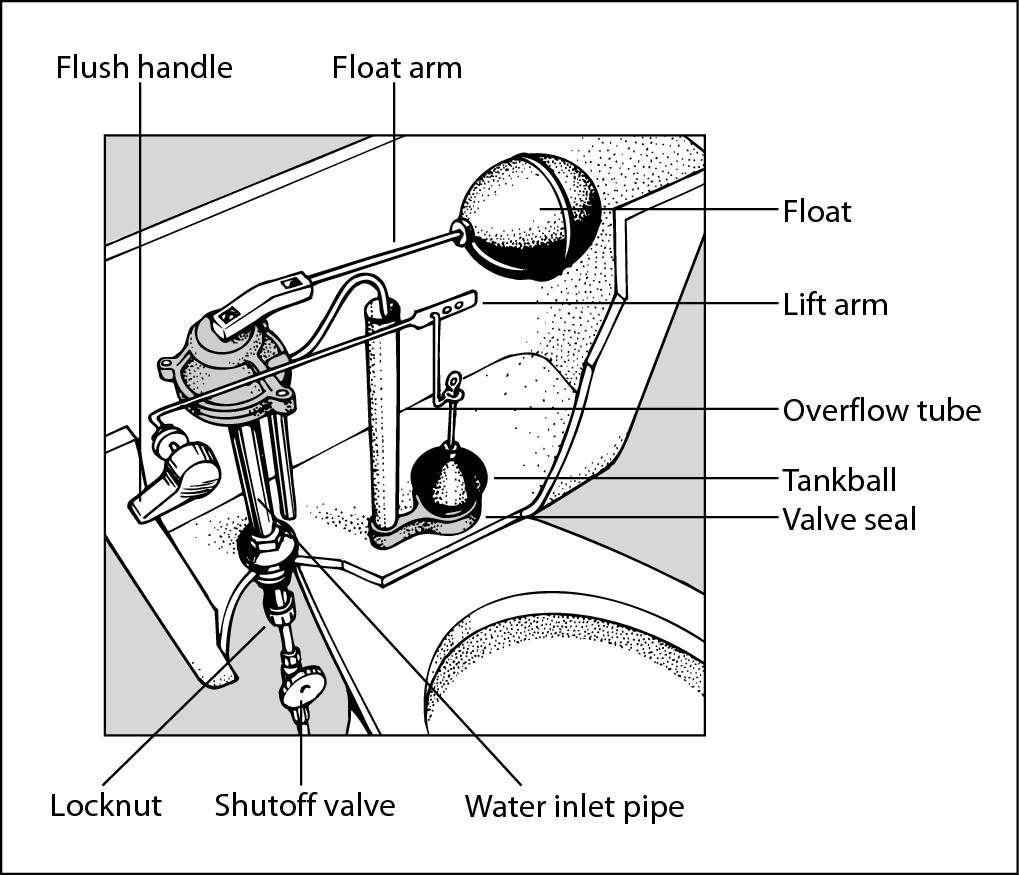
 Toilet float: A toilet float, shown in Figure 3-2, is a mechanism inside the toilet tank that turns on the water when you flush and turns off the water after the tank has refilled. Some toilets have a ball float — about the size of a softball — on the end of a metal rod; others use a can-shaped cylinder that moves up and down according to the water level in the tank. An overflow tube inside the tank prevents the tank from overfilling.
 Toilet flapper: A toilet flapper is located in the bottom of the toilet tank. When you push the flush lever down, a small chain lifts the flapper and allows the water in the tank to flow and flush the toilet.
|
Figure 3-1: A faucet showing the valve seats and stem assembly. |
|
|
Figure 3-2: The interior of a toilet tank showing the toilet float mechanism. |
|
Common Plumbing Supplies
Just like a good cook has a kitchen full of supplies to create new and exciting entrees, a do-it-yourself plumber needs a stash of stuff to work with pipes and fixtures. Here’s a rundown of the basic materials to have on hand:
 Plumber’s putty: This material looks like modeling clay and is designed to stay soft and semi-flexible for years. Use it to make a seal between plumbing fixtures and in areas that have no water pressure. When you install a new faucet, for example, apply plumber’s putty under the faucet where the faucet meets the top of the sink — this putty helps prevent water from seeping under the faucet and into the sink cabinet below. Other uses for plumber’s putty include sealing drains in sinks, bathtubs, and shower stalls; sealing frames around sinks; and sealing other fixtures and bowls.
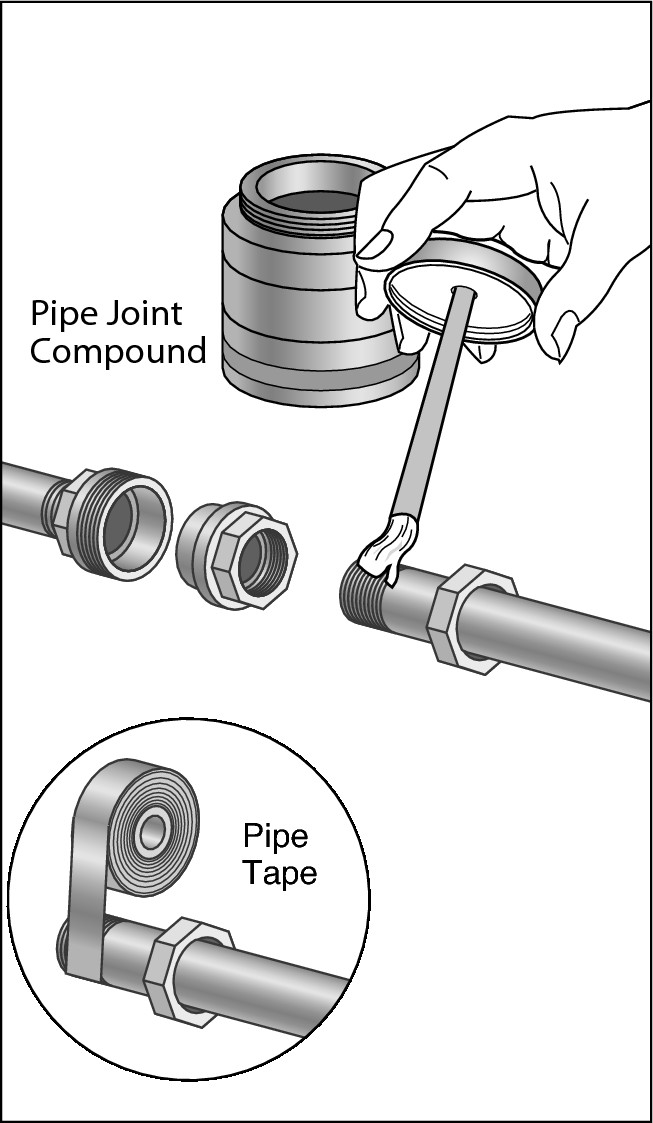
 Pipe joint compound: Pipe joint compound is sometimes referred to as pipe dope. It’s used to seal the joint between a threaded fitting and steel pipe. Always use pipe joint compound when working with gas lines; many people also use it when working with galvanized steel water lines. Pipe joint compound is typically painted onto the threads cut into the end of the pipe that’s called the male end, as shown in Figure 3-3.
 Teflon tape: You use this tape, a substitute for pipe joint compound, to seal the threads on steel pipe — see Figure 3-3. Use white Teflon tape for sealing pipe threads; use yellow Teflon tape, which is much thicker, for sealing pipe threads when working with gas lines.
|
Figure 3-3: A section of pipe with a union showing joint compound and Teflon tape. |
|
 CPVC cleaner: You use CPVC cleaner to clean CPVC pipe prior to joining it with adhesive (see “Buying Drainage Pipes and Fittings,” later in this chapter, for more on CPVC pipes). This purple liquid not only cleans PVC pipe, but it also softens the pipe slightly and makes the adhesive work better.
.jpg)
Be careful when using CPVC cleaner — it stains whatever it lands on.
 CPVC cement: You use CPVC cement to fuse joints in CPVC pipe and fittings.
.jpg)
Never use CPVC cement on ABS pipe.
 ABS cement: You use ABS cement to fuse joints on black ABS pipe and fittings (see “Buying Drainage Pipes and Fittings,” later in this chapter, for more on ABS pipes and fittings). Using a cleaner prior to using ABS cement isn’t required, but make sure you wipe the pipe and fittings with a clean cloth.
 Solder: You use solder (pronounced sodd-er) to seal joints when working with copper pipe. You heat the pipe and fitting with a propane torch until they’re hot enough to melt the solder in a process called soldering. Solder is sold in rolls — usually 1 pound — and is made from various combinations of pure lead and tin. Look for 5 0/50 and 6 0/40 for plumb-ing joints. (The first number represents the percentage of lead; the second, tin.) The addition of tin helps the solder stick to the copper.
 Leadless solder: You use leadless solder to join water supply pipes. Many building codes require it because standard lead-based solder leaks lead into the water standing in the pipe. Your best bet is to use leadless solder for all plumbing projects.
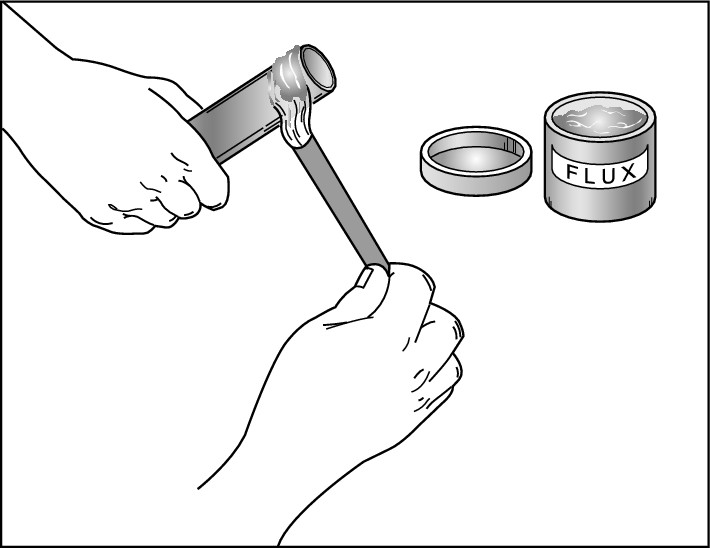
 Flux: Flux cleans copper pipe and helps solder adhere better. It’s available in paste or liquid form, but most plumbers prefer the paste type. You must use flux when soldering copper pipe; apply it with a small brush to both the end of the pipe and the inside of the fitting — see Figure 3-4.
|
Figure 3-4: Applying flux. |
|

Always wear inexpensive jersey gloves when working with solder and flux. The gloves eventually get eaten up (so use a cheap pair), but they protect your hands.
 Steel wool: You use steel wool to clean the ends of copper pipe and the insides of copper fittings prior to applying flux and soldering.
 Emery cloth: You use this cloth-backed sandpaper to clean the ends of copper pipe and the insides of copper fittings prior to applying flux and soldering.
 Copper-cleaning brush: You use this small wire brush to clean the insides of copper fittings — it cleans a fitting faster than an emery cloth does. Copper-cleaning brushes are sold in sizes to fit inside 1/2-inch and 3/4-inch fittings.
 Propane: Propane is a liquid petroleum product that’s used in a handheld torch, which you use to heat copper pipe and fittings and to melt solder to seal a joint.
 Wax bowl ring: These large, inexpensive, donut-shaped rings are made from a special wax compound that seals out gases and water when you’re installing a toilet.

Always install a new wax bowl ring when you’re working with a toilet and the original seal has been disturbed.
 Pipe thread cutting oil: You use this light oil when threading the ends of steel pipe. Pipe thread cutting oil helps lubricate the thread cutter and wash away the steel particles that are created when the pipe threads are cut.
Finding the Right Water Supply Pipe
Water supply pipes are an important part of plumbing projects, and they’re available in a variety of materials, including copper, iron, and plastic. The wide acceptance of plastic pipe by most building departments has been a boon to the do-it-yourself plumbing industry because plastic pipe is easy to cut and glue together. Most homes older than 20 years have pipes made of iron or copper.
Copper pipe
Copper pipe, used for water supply lines throughout most homes, is probably the most common type in use today. It’s widely available in two basic types: rigid and flexible. Both come in several wall thicknesses. This section gives you a basic rundown of copper pipe and its uses.
Rigid copper pipe
Rigid copper pipe is used extensively throughout modern homes for both hot and cold water supply lines. This pipe is widely sold in 1/2- and 3/4-inch diameters and in lengths of 8 to 20 feet. Most suppliers carry several grades of rigid copper pipe, each having a different wall thickness — the most readily available are types L and M. Type K is a heavy-duty grade and is usually sold only in plumbing supply outlets.
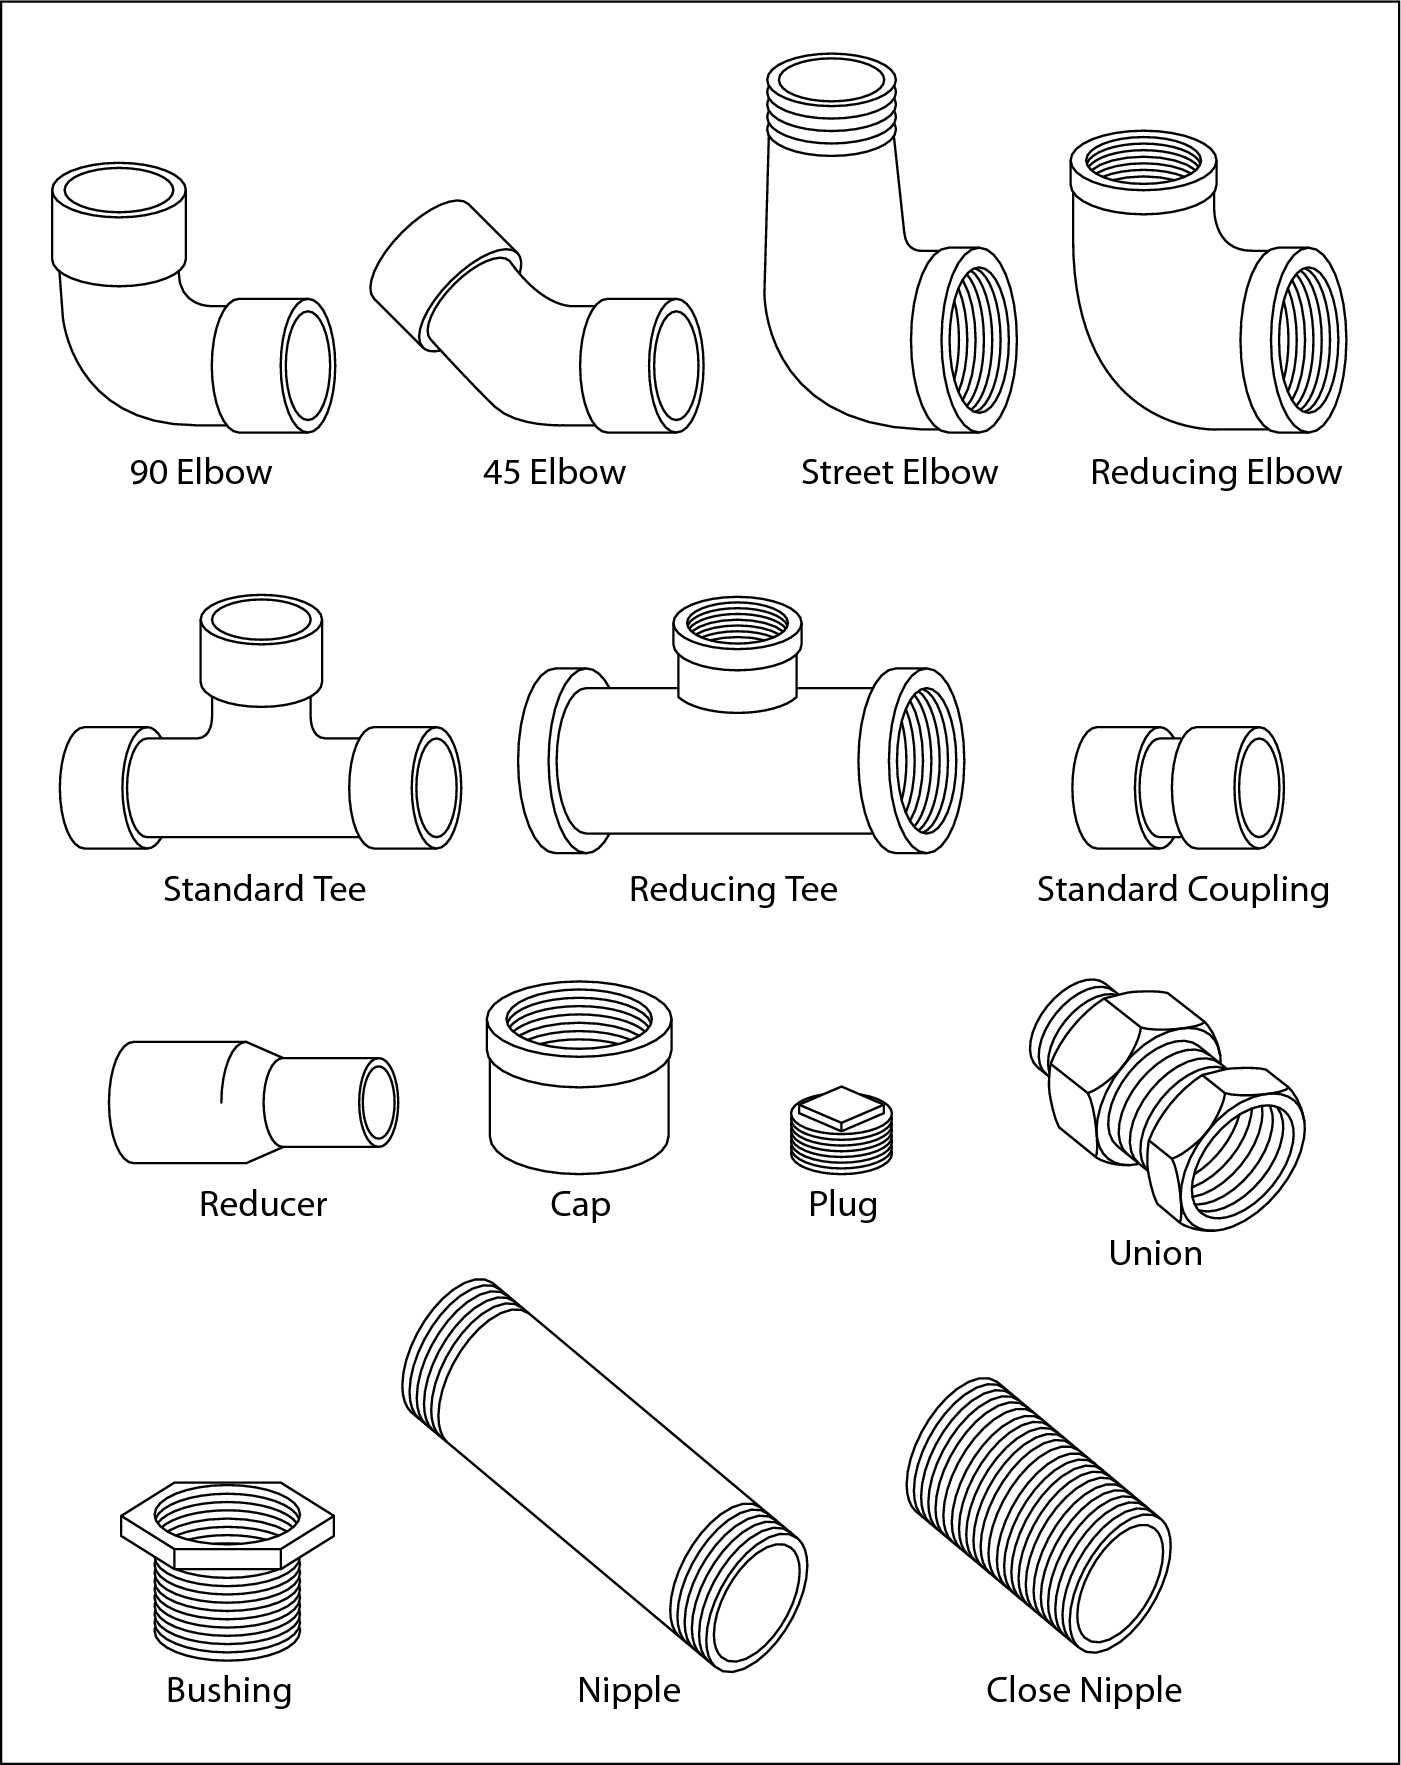
Rigid copper pipe doesn’t bend, so a variety of fittings are available to help you make the pipe go where you want it to go (see Figure 3-5):
 Elbow: Use an elbow to make copper pipe turn at an angle. Elbows (called els in the trade) come in 90-degree, 45-degree, and 22 1/2-degree angles.
 Tee: A tee enables you to run another copper line off an existing line.
 Straight connector or coupling: Use these fittings when you want to continue a straight run of consecutive copper pipes.
 Cap: Use a copper cap to end a line of copper pipe.
All fittings for rigid copper pipe are soldered in place. (Refer to the section “Common Plumbing Supplies,” earlier in this chapter, for an explanation of soldering.) Soldering involves the use of solder, flux (so that the solder sticks), and heat (usually from a propane torch).
Flexible copper pipe
Flexible copper pipe is sold in coils of various lengths and is available in two grades: K and L. Most stores stock the L grade. Common sizes of flexible copper piping include 3/8-inch, 1/2-inch, and 3/4-inch diameters. The 3/8-inch size is commonly used for hooking up water supply lines to dishwashers and some icemakers. Flexible copper pipe and tubing are commonly joined with compression fittings rather than by soldering.

|
Figure 3-5: Common fittings used to join iron, copper, and plastic pipe. |
|
Galvanized iron pipe
Years ago, galvanized iron pipe was the only type of pipe that was widely available for water supply lines. Today, other types of pipe, such as copper and plastic, are beginning to replace galvanized iron because they require less labor to install. Whether you have galvanized iron pipe depends on the age of your home and the part of the country you live in. If you have galvanized iron pipe, you’ll find two basic sizes in your walls: 1/2-inch diameter and 3/4-inch diameter.


When you need to join galvanized iron pipes together, you use the same kinds of fittings that you use for copper pipes — elbows, tees, straight connectors, and caps (see “Rigid copper pipe,” earlier in this chapter, for more information about these fittings). In addition, you use a fitting called a union, which enables two sections of iron pipe to be joined or taken apart. Because iron pipe is threaded at both ends, you can thread only one end of the pipe into a fitting at a time. You thread pipes into fittings by turning them clockwise. As you thread the pipe into a fitting, the end that’s going into the fitting is turning clockwise, but the other end of the pipe is turning counterclockwise. So you must thread pipe into fittings and fittings onto pipes in a sequential manner, which means that you have to plan ahead.
Plastic pipe
Plastic pipe is used in some parts of the United States for water supply lines, but many local building codes prohibit its use. The most common use for plastic pipe is in waste, vent, and drain lines (see Chapter 2). The second most common use is for underground sprinkling systems for lawn irrigation. Check with your local building department for specific requirements.
Two types of plastic water supply pipe are commonly used today: chlorinated polyvinyl chloride (CPVC) and polybutylene (PV) flexible tubing. Both kinds are available in 1/4-inch, 1/2-inch, 3/4-inch, and 1-inch diameters.
Plastic pipe is easy to work with because you can cut it to length with a fine-toothed saw. Joints for plastic pipes include elbows, tees, and caps (refer to Figure 3-5). Seal all the joints in plastic pipes with a liquid adhesive. Be sure to clean the joints for CPVC pipe with a special cleaner before applying a coat of adhesive.
PV tubing is joined with compression-type fittings or standard flared-type fittings that are used to join flexible copper pipe.


Do it once — and do it right
If you’re planning to replace old galvanized iron pipe with plastic, find out if plastic is allowed. You may think that it won’t make any difference because the inspector will never know. He or she won’t until you (or the person who inherits your house) sell the property. When the buyer has the house inspected and the inspector finds materials that aren’t allowed, you have to replace those materials.
An old-time remodeler gave us some great advice the first time we added a new bathroom. He told us to get a building permit and then have the plumbing plan approved by the city inspector. The inspector changed a couple parts in the plan, but when he inspected the plumbing, it passed with no sweat. Getting prior approval is the best way to avoid problems.
Buying Drainage Pipes and Fittings
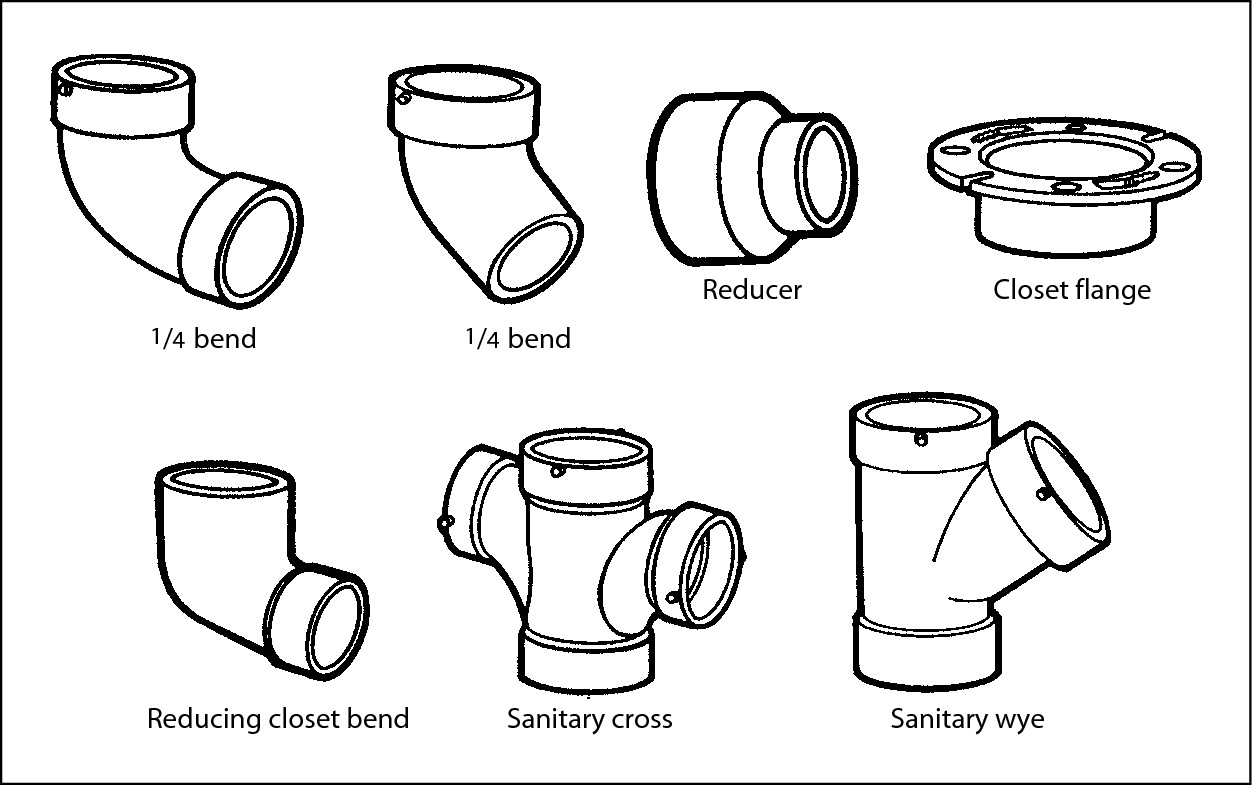
Pipes that carry water out of your home’s drainage system look different from the water supply lines that bring water into the house. Fittings designed for drainage have to make gentle turns. Standard elbows used to join pressure pipes turn abruptly at 90 degrees, but a drainage elbow has a gradual bend. Drainage tee and wye fittings have 45-degree angles.
Cast iron pipes

Plastic pipes
Plastic drainage pipes and fittings have revolutionized the plumbing industry. They’re much lighter than cast iron and are a lot easier to work with. Most building codes allow plastic drainage systems, but before you begin any plumbing project, check your local building codes to determine exactly which types of pipes are allowed in your area. (See Chapter 1 for more information about building codes and permits.)
Two basic kinds of drainage pipe are commonly used today: polyvinyl chloride (PVC) and acryaonitrile-butadiene-styrene (ABS). Both types are suitable for drainage. Plastic drainage pipe is available in several wall thicknesses; schedule 40 is the most widely available. Common diameters for these pipes include 1 1/2 inches, 2 inches, 3 inches, and 4 inches. You can also find corresponding plastic fittings to match the pipes produced in cast iron, which are helpful if you want to replace iron with plastic in your home. (See Figure 3-6.)


|
Figure 3-6: Common plastic drainage fittings. |
|
Stocking Up on Valves
Valves control the flow of water in pipes. Your home has a valve on the incoming water line so that you can stop the inflow of water (see Chapter 2).
Some valves have a round knob on top that you turn to open or close the valve, but others have a single lever that you push or pull to open or close the valve. Valves are used for all types of plumbing pipe and are available with threaded ends (for use with galvanized steel pipe) and smooth ends (for use with soldered copper joints). You can also find valves with plastic bodies for use with adhesive in a plastic pipe application.

Many different varieties of valves exist. In the following list, we introduce the kinds of valves that you’re most likely to encounter. See Figure 3-7 for examples.
|
Figure 3-7: Common valves available in both brass and plastic. |

|
 Gate valve: A gate valve allows the full flow of water through the valve and is the best kind of valve to use at the main shutoff and in pipes supplying cold water to a water heater or other device where water flow is important. Gate valves don’t have rubber compression gaskets; instead, they rely on the close fit of the parts to stop the water. Turning the handle counterclockwise raises the wedge-shaped gate, allowing the water to flow.
 Ball valve: Ball valves can provide full flow of water. A lever opens and closes them. Inside the valve is a ball with a hole through it. When the hole in the ball is aligned parallel with the pipe, water flows through the valve. When the ball is turned with the hole across the pipe, the water is blocked. The lever is aligned with the hole in the ball. To close a ball valve, push the lever perpendicular to the pipe; to open it, push the lever parallel with the pipe.
 Globe valve: Globe valves, which are less expensive than gate valves, are a good choice for general water control where full flow is not necessary. These valves have a rubber compression washer that’s pushed against a seat to squeeze the water flow.
 Stop valve: Stop valves are a variation of globe valves. They’re designed to control water running to sinks and toilets. Stop valves come in two main varieties: angle and straight stops. Angle stops are designed to control the water flow and change the direction of the flow 90 degrees. They’re mounted on the ends of pipes under sinks and toilets when the supply pipes come out of the wall. Straight stops are designed to be mounted on pipes that come out of the floor.

Choose a valve with the right kind of outlet. A valve is designed to attach to a pipe coming out of the wall or floor and to a riser tube going to the fixture. If, for example, you want a stop valve to attach to a 1/2-inch galvanized pipe and a 3/8-inch riser tube, purchase a valve with a 1/2-inch female threaded end and a 3/8-inch outlet to accept the tubing.
 Hose bib: A hose bib looks like a miniature faucet. It has a male-threaded end that’s screwed into a coupling threaded to the end of a pipe. Hose bibs are commonly used to control water running to washing machines.
 Sillcock valves: Sillcock valves are used outside the house, on the faucets that you likely use with a garden hose (called a bib faucet). For houses located in cold climates, a freeze-proof version is available (see Chapter 2).
Using Plumbing Tools
When you’re embarking on a new plumbing project, you have the upper hand if that hand is holding the tool designed for the job. Sure, a plain old screwdriver can tackle many of the jobs you need to do. We’re not talking about pouring hundreds of dollars into outfitting your toolbox with tools. We do suggest that you begin to acquire tools as you need them, based on the suggestions we offer in this section. That way, you acquire the tools you need over time rather than forking over all your cash at once, and you have them for a lifetime.
Basic woodworking tools
As with any repair work you do around the house, you need a set of basic tools. Woodworking tools are a good place to start, because if you decide to replace a kitchen sink, for example, you’ll be cutting and drilling holes in wood, driving screws, tightening bolts, and doing all kinds of jobs that at first glance seem unrelated to plumbing.
You should have these common woodworking tools in your toolbox:
 Adjustable (crescent) wrench: This wrench has a long steel handle and parallel jaws that open and close by adjusting a screw gear.
 Allen wrenches: A set will do.
 Assorted screwdrivers.
 Carpenter’s level.
 Claw hammer.
 Hacksaw.
 Locking pliers (also known as Vise-Grips): Pliers with short jaws that you can open and set to a specific size by turning a jaw-adjustment screw in the back of the handle. When you squeeze the handles, the jaws clamp together.
 Metal files: You want to have both a flat and a half-round type with shallow grooves that form teeth.
 Power drill: 3/8-inch variable-speed, reversible drill with a variety of drill bits.
 Retractable tape measure.
 Slip-joint pliers: A tool with curved-toothed jaws and a hinge that adjusts or “slips,” making the jaw opening wide or narrow.
 Staple gun.
 Torpedo level: This tool is a shorter, 8- to 10-inch version of a carpenter’s level. It’s useful for plumbing applications because it fits into restricted areas.
 Utility knife.
Tools for measuring
Accurate measuring is essential when you’re installing new water or drain lines. As we point out in “Finding the Right Water Supply Pipe,” earlier in this chapter, you need to know the diameter and length of the pipe you need. A retractable tape measure can do most of the measuring — the hook on the end of the retractable tape measure catches on the end of the pipe, making it easy for you to mark a cutting point.
For more precise measurements, use a measuring device called a steel rule, which has both English and metric graduations. Steel rules come in lengths of 12 to 48 inches. (The shorter length is easier to use for measuring plumbing-related pieces.) Place one end of the rule against an inside edge of the pipe and read the size at the opposite edge. This measurement may have little relationship to the pipe’s nominal size, or outside diameter.
Wrenches and pliers
A number of tools have been designed to help you work efficiently with different kinds of pipe. Other special tools make it easier to remove and install plumbing fixtures and associated components, such as water supply lines and drain lines.
Some of these tools, like a pipe wrench, monkey wrench, basin wrench, and groove-joint pliers, are the minimum you need for basic plumbing repairs. If you have these tools on hand, you’re ready if you ever experience a plumbing failure. Have them on hand even if you don’t plan any big plumbing projects in the near future. Besides, you can use many of them for other jobs around the house. Here’s a basic rundown of these handy-dandy tools:
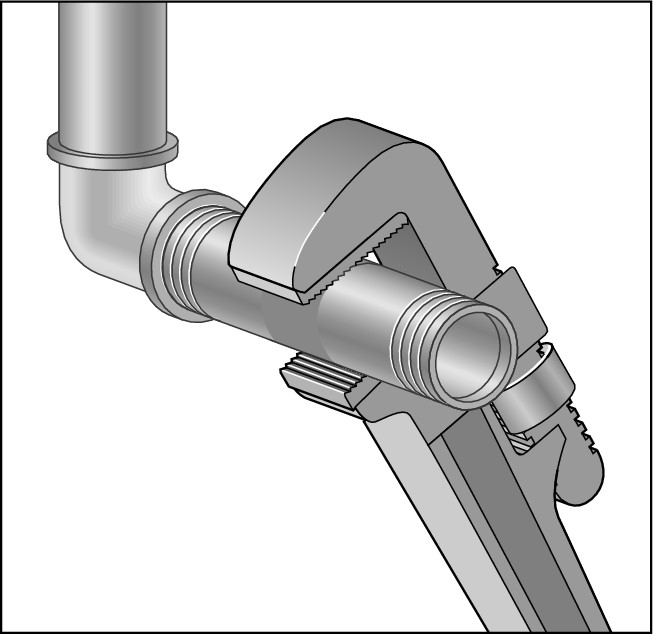
 Pipe wrench: This wrench, shown in Figure 3-8, has serrated teeth on the jaws, which are designed to grip and turn metal pipe. One jaw is adjustable, with a knurled knob. This jaw is spring-loaded and angled slightly, which enables you to release the grip and reposition the wrench without changing the adjustment. Pulling the handle against the open side of the jaws causes them to tighten against the pipe. Pipe wrenches come in different sizes, with 8-inch, 10-inch, and 14-inch being the most useful.
.jpg)
Don’t use pipe wrenches on copper or plastic pipe. You don’t have to turn a copper or plastic pipe because it’s soldered or solvent-welded (respectively) to the fitting. A pipe wrench can also crush the pipe if you apply a lot of pressure to the pipe with the wrench.
|
Figure 3-8: After the teeth on the jaws of a pipe wrench grip a pipe, they won’t let go unless you release the handle. |
|
 Monkey wrench: The jaws of a monkey wrench are parallel to each other and set 90 degrees to the handle.
 Spud or trap wrench: This wrench is an adjustable one that’s designed for handling drain trap and sink strainer fittings. The jaws are parallel and have a wide adjustment so they can grip the large-diameter lock ring that holds a sink strainer assembly in place. You set the jaws to size and then lock them in place by tightening a wing nut on the body of the wrench.
 Strap wrench: This tool has canvas webbing that wraps around pipes or plumbing fittings and enables you to tighten or loosen them without marring the finish.
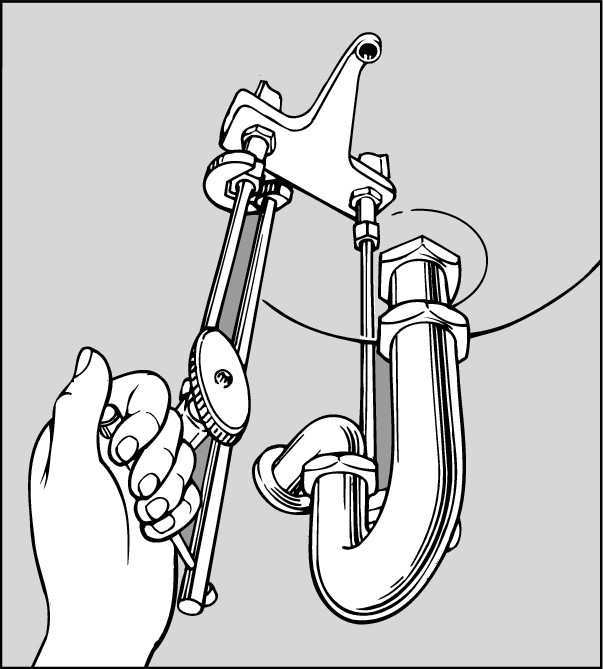
 Plastic nut basin wrench: Many faucets have easy-to-tighten plastic mounting nuts, but they’re still hard to reach. A plastic nut basin wrench (see Figure 3-9) is about 11 inches long and is designed to reach and tighten these nuts. This metal tool has notched ends that self-center on 2-, 3-, 4-, and 6-tab nuts and fit metal hex nuts.
 Groove-joint pliers: In larger sizes, these pliers are used for holding pipes. With the pliers’ long-reaching parallel jaws, you can also tighten drains and use them for a multitude of other jobs.
 Faucet spanner: A faucet spanner is a flat wrench, usually stamped from heavy metal, used for installing faucets. You may get one when you buy a new faucet. These wrenches have a variety of hex or square holes punched in them, sized specifically to fit packing nuts and other fittings on faucets.
|
Figure 3-9: A plastic nut basin wrench makes a tough job a little easier after you get the hang of using it. |
|

Pipe clamps
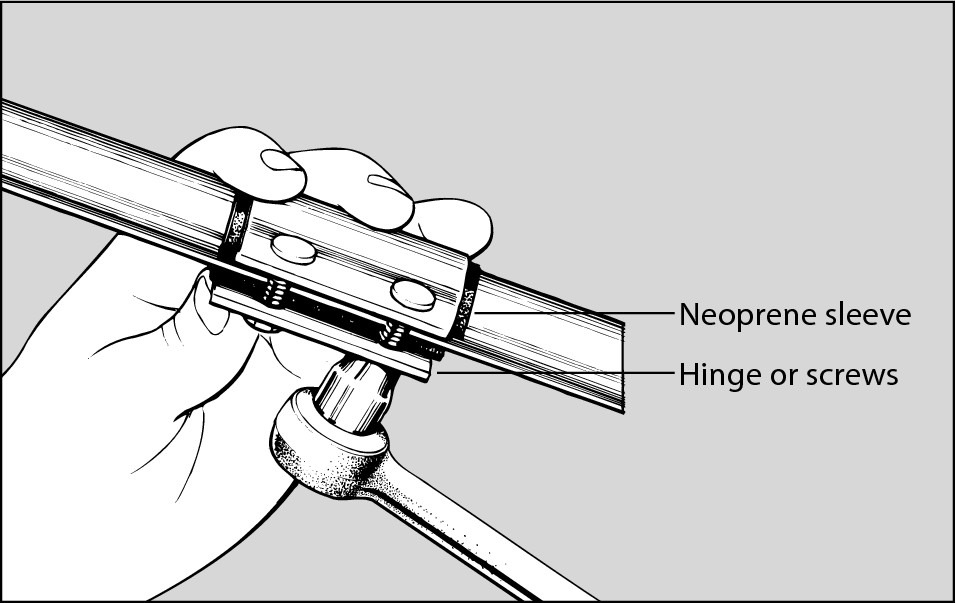
Pipe clamps come in a variety of shapes and sizes. You use them to make temporary emergency repairs on a pipe that may have frozen and burst or sprung a pinhole leak due to corrosion. Place a rubber or plastic pad over the leak and then install the clamp over the pad and tighten — see Figure 3-10. Make sure the clamp extends at least 1 inch beyond the leak.
|
Figure 3-10: After using a pipe clamp for emergency repairs, remember to make a permanent repair as soon as you can. |
|
Pipe cutting and bending tools
Some tools are made specifically to bend pipes, cut pipes, and dress the cut end. When you need one of these tools, no substitution will do. Consider renting these tools if your pipe-cutting project is a small one. But if you’ll be involved in more than one pipe-cutting job, consider investing in the tools. You’ll enjoy a smug satisfaction when you can talk authoritatively to friends and co-workers about your pipe reamer, knowing that they don’t have a clue about what you’re saying. These tools include the following:
 Tubing cutter: Tube cutters come in sizes to fit tubing of different diameters. The most convenient size for homeowners is a model that cuts tubing from 3/16-inch to 1 1/8-inch in diameter. Some models are fitted with a built-in reamer to remove burrs inside the pipe after cutting. A midget tube cutter is designed for use in tight, tiny spaces. It doesn’t have a handle, but large, knurled feed-screw knobs make it fairly easy to use.
 Pipe cutter: This large, heavy-duty cutter cuts iron pipe. It works similarly to a tubing cutter but has long handles for greater leverage.
 Plastic tubing cutter: This tool is designed for quick, clean cuts through plastic pipe and tubing. It features a compound leverage ratchet mechanism and a hardened steel blade and makes cutting pipe a one-handed operation.
 Plastic-cutting saw: This inexpensive saw is designed for cutting plastic pipe, plywood, and veneers. It has an aluminum or plastic handle and an 18-inch blade with replacements of either 12 or 18 inches long available.
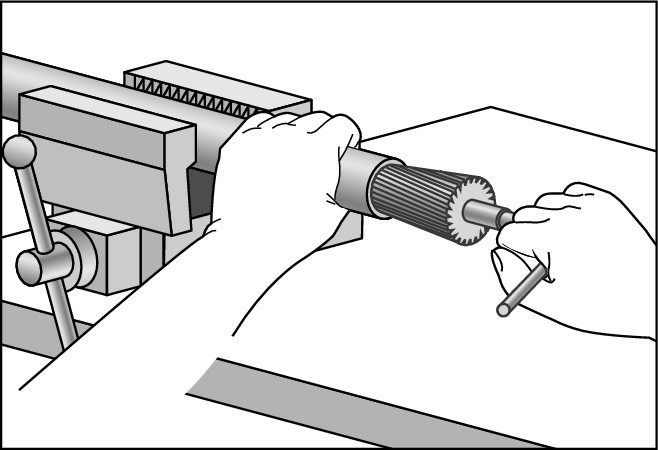
 Pipe reamer: After cutting metal pipe, you find burrs or small ridges called flanges on the inside of the pipe. If you don’t remove the burrs or flanges, they disrupt water flow, which leads to calcium buildup. Some cutters have built-in reamers, or you can use a half-round file. But a pipe reamer with a self-feeding spiral design, shown in Figure 3-11, makes the job fast and easy.
 Inside/outside reamer: This tool has a plastic housing with steel blades on the inside, which makes it handy for quick, clean, and easy inside reaming and outside beveling on 1/4- to 1 1/2-inch plastic, copper, or brass pipe. This tool isn’t for use on iron pipe, however.
 Spring-type tube bender: This tool is a tightly coiled spring that aids in bending soft copper and aluminum tubing without crimping or flattening it. The benders come in sizes to fit the tubing. To use the tool, slip the bender over the tubing with a twisting motion and then place it over your knee and bend it slowly.
 Flaring tool: This tool is used for flaring soft copper pipe when used with flare nuts. You find this kind of pipe on icemakers and humidifiers. Place the flare nut on the pipe and then clamp the pipe in the proper size hole in the vise bar. Tighten the clamp to close the two halves of the vise bar tightly around the tubing. Slide the C-shaped die clamp over the vise bar and position the cone-shaped die over the mouth of the tubing. Tighten the large screw to which the die is attached, which pushes the die into the tubing and forces the edges of the tubing outward, thus creating the flare.
|
Figure 3-11: You can use a file or sandpaper to remove burrs, but a pipe reamer is helpful if you have several joints to repair. |
|
Plungers, snakes, and augers
A true tool geek wouldn’t be without the special-use tools in this category. They give power to the weak when dislodging clogs in drains, drilling large holes, providing the oomph for bending pipes, and much more.
 Toilet plunger: Similar to old-fashioned sink plungers, the rubber cup on this type of plunger has an extension that fits tightly into the toilet bowl. You can fold back the extension when using the plunger for sinks. For the plunger to work properly, seat the ball in the bottom of the toilet, push down gently, and then pull up quickly.
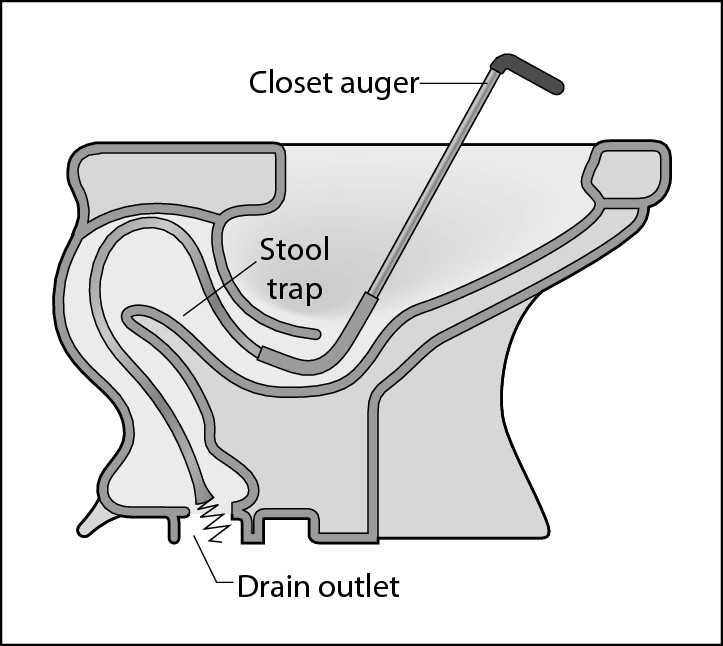
 Toilet (closet) auger: When a plunger doesn’t work, a toilet (or closet) auger, shown in Figure 3-12, is the next option. This tool is designed to fit a toilet bowl and clean out the trap. Fit the handle into the bowl and turn the crank while slowly pushing the flexible shaft through the hollow rod until it hits the blockage. (Chapter 6 offers more hints for unclogging a toilet.)
 Powered closet auger: Before you call a plumber, rent this tool to make sure that the toilet is really clean. Instead of cranking by hand, a drill-like driver powers the shaft.
|
Figure 3-12: A toilet auger is designed to reach into the trap and remove clogs. |
|