Chapter 4
Unclogging a Kitchen Sink
In This Chapter
 Unclogging the kitchen sink and faucet aerator
 Clearing stuff out of the garbage disposal
K nowing how to unclog a sink drain is one of those life skills that no one teaches in any school or university. If you’re lucky, when you were young and formidable, you watched your parent or a plumber perform this unpleasant task and paid close attention. If not, well, start reading. This chapter contains the best advice that we can give to help you dislodge the most stubborn clogs and get your sink drain flowing again. This chapter also includes tips for responding to the cry, “My ring just went down the drain!” and other drain dilemmas.
Unclogging a Sink Drain
With all the different kinds of food scraps that find their way down sink drains, it’s not surprising that these drains get stopped up from time to time. Symptoms of a clog can range from water in the sink draining slower and slower to a stagnant pond in your sink.
The easiest solution for drain clogs (but not necessarily the environmentally safest) is to use any of a wide range of chemical drain uncloggers, available in solid and liquid forms at supermarkets, hardware stores, and plumbing-supply dealers. You pour the product in, wait for it to dissolve the blockage, and then flush the drain with running water.
.jpg)

Finding lost treasure
It has happened to everyone: A treasured ring or favorite toy goes sailing down the drain, and you’re desperate to retrieve it. The best rescue tactic is to remove the trap, hoping that the object is heavy enough to settle in the lower part of the trap. Don’t run any water through the drain — water may flush it farther away.
Get a bucket and a wrench, and then follow the directions in the “Removing the trap” section. Keep the bucket under the trap to catch what’s inside it when it’s removed from the drainpipe.
Removing the trap
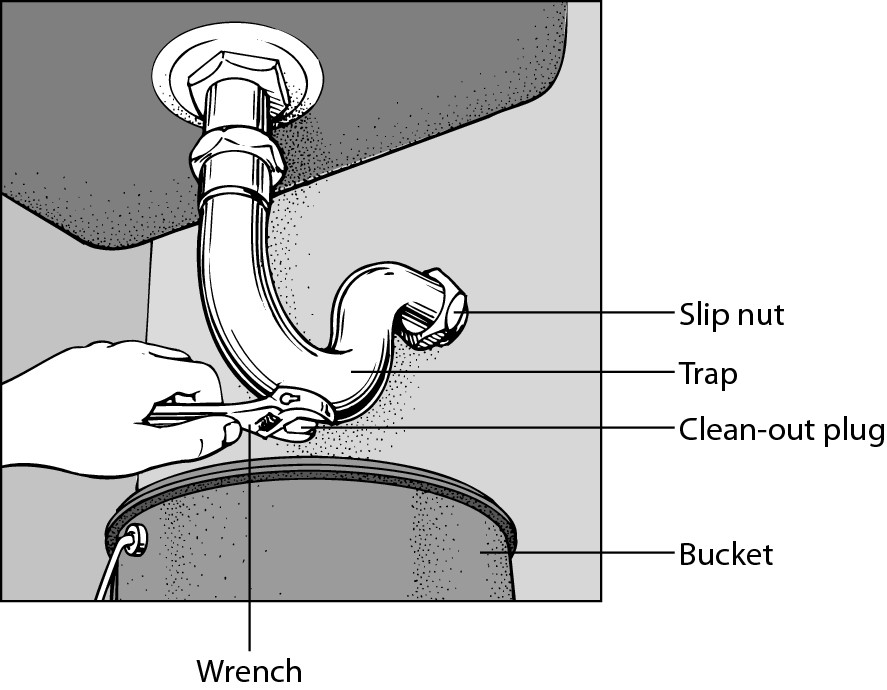
To unclog your sink drain, remove and clean the trap (the U-shaped pipe located under the sink), as shown in Figure 4-1. Removing and cleaning the trap is easy. Wear rubber gloves and eye protection to shield yourself from the sharp pieces of debris or whatever has caused the blockage.
1. Place a bucket under the trap (before taking it apart).
This way, you catch any debris or water that falls out when the trap is removed.
2. Use a wrench or slip-joint pliers to unscrew the metal slip nuts a half turn or so, so that you can loosen them by hand.
Some traps have a clean-out plug instead of slip nuts. Simply remove the plug and allow the blockage to spill out.
To protect the chrome finish on the slip nuts, wrap tape around the jaws of your wrench or pliers. Plastic traps have slip nuts that you can usually turn by hand.
3. Scrape out any blockage from the trap.
4. Tighten the slip nuts with your hands to ensure that they’re threaded on the trap correctly, and then tighten with a wrench or pliers.
Half a turn is usually all that’s necessary to stop the trap from leaking; don’t overtighten.
|
Figure 4-1: Removing the trap. |

|

Turning to a homeowner’s best friend: A plunger
A common plunger is capable of unclogging a drain that even the toughest chemicals can’t budge. Unlike chemicals, a plunger uses suction to alternately push and pull the clog within the pipe until the force dislodges the blockage. If cleaning the trap doesn’t clear the clog, try plunging the offending clog.

.jpg)
Here’s the plunger procedure:
1. If the sink has a stopper, try to remove the stopper first to give you a wider opening to the drain.
2. Pour a full kettle’s worth of boiling water down the drain to break up the clog.
3. Fill the sink with enough tap water to cover the rubber portion of a plunger, thus assuring good suction.
4. Place the plunger over the drain and vigorously push down and pull up several times.
If you’re successful, you’ll notice a sudden emptying of the sink.
Resorting to a snake
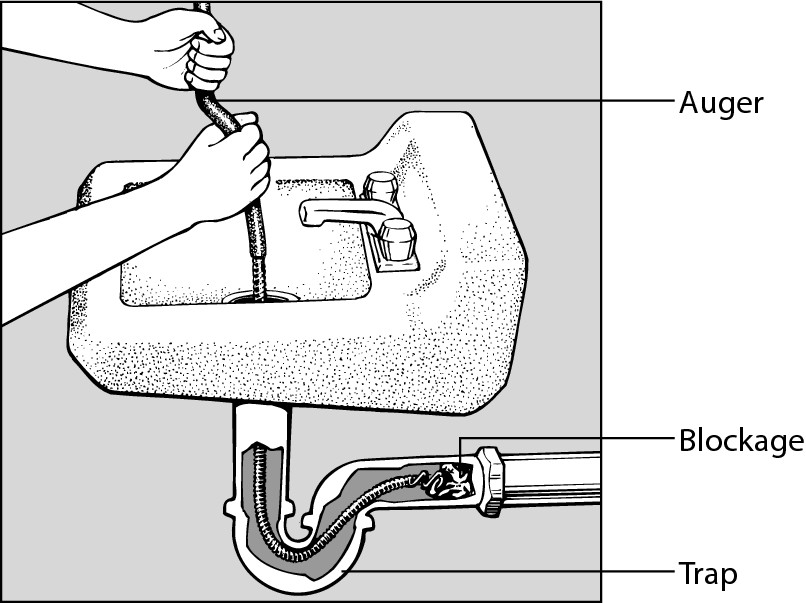
If neither cleaning the trap nor plunging clears the clog, your final weapon is a drain auger (also known as a snake ). This tool, a coiled spiral snake that’s usually about 1/4 inch thick, with a handle on one end, works the opposite way that a plunger does: You push the snake into the clog and crank it to drive the snake farther into the obstruction, as shown in Figure 4-2. While parts of the clog break up and flush through the drain, the snake helps you gain access to the clog so that you can pull it out. Some snakes can fit as an attachment on an electric drill, giving it more power to force it through the clog. Snakes are especially handy because they’re long enough to reach clogs that are deep within a drainpipe.

|
Figure 4-2: A snake and cable clear a drain. |

|
The basic process is as follows:
1. Push the end of the snake into the drain opening and turn the handle on the drum that contains the coiled-up snake.
The auger begins its journey down the drain.
2. Keep pushing more of the snake into the drain until you feel resistance.
You may have to apply pressure when cranking the handle to get it to bend around the tight curve in the trap under the sink. After turning the curve, the snake usually slides through easily until you hit the clog.
3. Rotate the snake against the blockage until you feel it feed freely into the pipe.
The rotating action enables the tip of the snake to attach to the clog and spin it away or chop it up. If the clog is a solid object, the auger head entangles the object. If you don’t feel the auger breaking through and twisting getting easier, pull the auger out of the drain — you’ll likely pull the clog out with it.
4. Run water full force for a few minutes to be sure that the drain is unclogged.
Sometimes, the clog flushes down the drain; at other times, the clog comes out attached to the snake.


An ounce of prevention . . .
We may be too late with this information, but your best defense against clogs is to avoid them in the first place. The following are some common-sense practices to use:
 Use a sink strainer. A clogged kitchen sink is usually the result of garbage or foreign objects entering the drain. Use a sink strainer to prevent garbage and small items from entering the drainpipe.
 Take care of your garbage disposer. When using a garbage disposer, run cold water at full volume while the machine is chopping up the garbage; leave the water running for a full minute after you shut off the disposer. This precaution flushes the garbage completely out of the small-diameter sink drainpipe and into the larger main drainpipe, where it’s less likely to cause a clog.
 Don’t dump materials down your drain. Do-it-yourselfers often flush building materials down the drain. The most common offender is plaster or wallboard compound, which seems innocent enough going down but can harden in the drainpipes and clog them. To prevent these clogs, never dispose of leftover building materials in sink drains.
Unclogging a Faucet Aerator
If a faucet seems to be running slower than usual, the aerator may be clogged with a build-up of mineral deposits. An aerator is a simple insert that fits inside a faucet spout’s chrome cap — most faucets come with them — to conserve water and keep it from splashing all over the place, while still providing a steady stream and enough water pressure. Tiny holes in the aerator restrict water flow by mixing air bubbles into the water stream. The minuscule holes eventually become blocked by small particles in the water.
Follow these steps to clean and unclog an aerator:
1. Place a towel or rag over the faucet cap or cover it with a bit of masking tape.
This protective barrier keeps the surface from being marred when you strong-arm the cap off.
2. Using a wrench or pliers, turn the cap in a counterclockwise motion until it separates from the faucet.
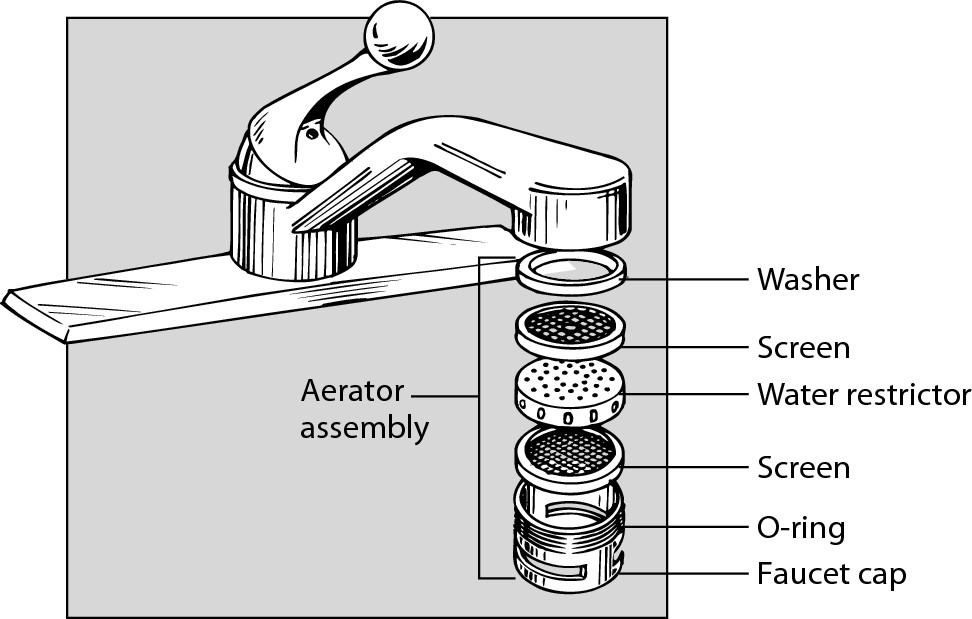
3. When the cap is off, remove the screen and water restrictor.
Pay attention to the way these small internal parts are arranged. When the time comes to put the aerator back in place, you have to replace these parts in the same sequence and position. See Figure 4-3.
|
Figure 4-3: Assembling an aerator. |

|
4. Clean the screen by flushing it with water or using a brush. Push through the tiny holes with a needle or pin to unclog them.
5. Soak the aerator in a cup of vinegar overnight to clean out the small holes and flush it with clear water before reinstalling it.
6. Reassemble the aerator in the reverse order.
You should notice a big difference in the water flow after cleaning the aerator — not gushing water but a nice, steady stream.
Unclogging a Garbage Disposal
Even a garbage disposal can be finicky, so don’t expect it to devour and digest everything. For example, don’t throw corncobs, artichokes, avocado pits, or fish and chicken bones down a disposal and expect it to continue working without a clog. Flip through the owner’s manual to find out what your disposal’s limitations are.
Clogs can and do occur, however. The following actions are what generally cause clogs in your disposal:
 Dropping a foreign object — usually a spoon or fork — into the disposal
 Feeding garbage in too rapidly
 Failing to run enough water (to completely flush out the drainpipes) while garbage is being processed
.jpg)

If the instructions in your user’s manual are no help, follow these steps to unclog a disposal:
1. Shut off the electrical power switch.
This switch is located under the cabinet, near the disposal, or on a wall nearby. If you don’t find a switch, go to the main power panel and turn off the breaker or remove the fuse that powers the disposal.
.jpg)
Never put your hand in the disposal. Remember that the switch may be defective, so keep your hands out of the disposal even when power to the machine is turned off.
2. Take a look in the disposal.
A flashlight may shed some light on the problem — you may see a large object caught in the disposal.
3. If an object caused the stoppage, use a pair of pliers to reach into the disposal and remove it.
4. Wait 15 minutes for the disposal motor to cool.
5. Turn on the power and push the reset or overload protector button.
This button is located on the bottom side of the disposal.
If the disposal is still clogged, follow these steps:
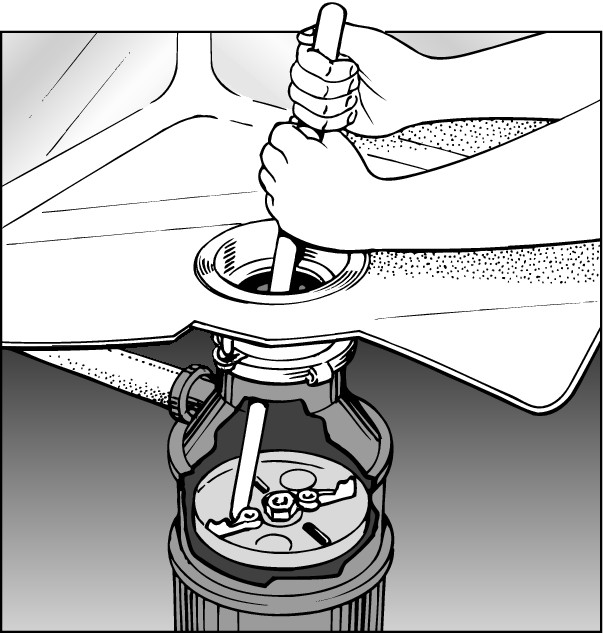
1. Turn off the power and insert a long dowel, a wooden spoon, or a broom handle — never your hand — into the drain opening.
2. Push the bottom end of the wooden probe against the impeller (the blades that grind up the garbage), as shown in Figure 4-4, and rock it back and forth to free it.
3. When the impeller moves freely, wait 15 minutes for the motor to cool, turn on the power, and push the reset button.
Some disposal models come with a large L-shaped hex wrench. If you have such a model, turn off the power, insert the hex wrench into the opening in the center of the disposal’s bottom, and turn the wrench back and forth until the impeller is freed. Again, wait until the motor has cooled, press the reset button, and then try operating the disposal.
|
Figure 4-4: Inserting a wooden stick in the disposer. |

|