Chapter 5
Unclogging a Tub or Shower Drain
In This Chapter
 Keeping your drains running freely
 Finding ways to unclog your shower or tub
 Cleaning and adjusting plunger-type and pop-up drains
A h, the luxury of taking a relaxing soak in the old bathtub or indulging in a long, hot, steamy shower — everyone has a preference, but when denied, it can be downright annoying. In most busy households, an out- of-commission tub or shower can throw a wrench in kids’ and parents’ schedules — a family nuisance to be sure.

Preventing tub and shower clogs
Tub and shower drains clog up with soap scum and hair — not a pleasant sight. As a defensive measure, fit a strainer over the drain to catch debris before it can enter and clog the drain. Keep the strainer in place and clean it after each bath or shower. If you get in this habit (and teach your kids to do the same), the nasty buildup just can’t occur.
You can find replacement strainers in the plumb- ing section of your home center. Measure the diameter of the drain to find one that fits and then simply place it in the drain.
Clearing a Clogged Bathtub or Shower Drain

Some people rely on chemicals to open a clogged drain. It’s as simple as pouring a chemical drain opener down the drain, waiting the specified amount of time, and then flushing the drain thoroughly with water. (Be sure to follow product directions carefully.) You may have to repeat this process a few times until the chemicals dissolve the blockage enough to dislodge it. With each application of chemicals, you may see incremental improvement in drainage. Chemicals are especially effective for clearing bathtub drains, because they contain protein-dissolving elements that can work wonders on the most common cause of bathtub clogs: masses of accumulated hair.
If neither hot water nor chemicals work, try using a plunger or snake. We describe how to use these tools in the following two sections.
Taking the plunge
A common plunger, also called a plumber’s helper, has a wooden broomsticklike handle attached to a cup-shaped piece of rubber. (Don’t confuse this piece of equipment with a toilet plunger, which has two cups, one inside the other.) Using a common plunger is simple. Just follow these steps:
1. Remove the stopper if there is one.
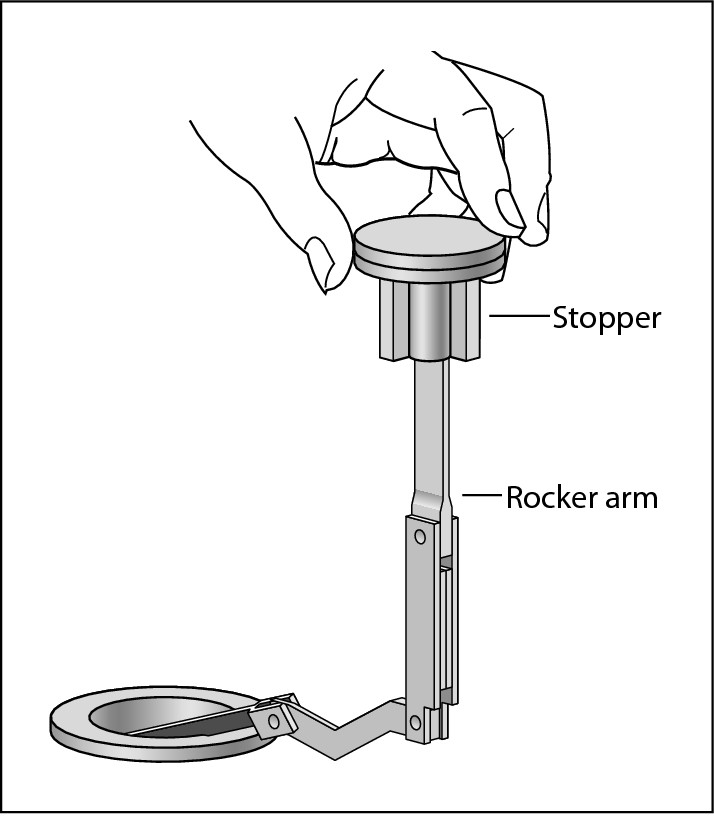
The stopper is a pop-up plug that alternately seals the opening or opens the drain — see Figure 5-1. To remove it, push and pull it up and then down until it is released. Raise the trip lever, which lifts the stopper up, and remove the entire stopper assembly.
If your drain doesn’t have a stopper, remove the drain strainer by unscrewing it or prying it up around its edges.
2. If you find an accumulation of hair and soap scum, clean the stopper by removing any debris and then flushing it in a stream of water. Reinstall the stopper assembly in the reverse order that you remove it.
3. Stuff a wet washcloth into the overflow holes to plug them up and improve suction.
4. Fill the tub with a couple inches of water, enough to partially submerge the plunger head, to assure airtight suction.
5. Push the plunger down and pull it up forcefully.
You know that the blockage has been dislodged when the water begins to drain much more quickly than it did before.

|
Figure 5-1: Remove the pop-up assembly (or drain strainer) and any hair or soap scum from the drain. |

|
Charming your tub with a snake
If using a plunger doesn’t work, try using a drain auger, or snake, to unclog the tub drain. (For more information about snakes, see Chapter 4.) Follow these steps:
1. Remove the tub stopper or strainer.
2. Push the tip of the snake into the drain opening, continuing to feed the coil through until it meets an obstacle (see Figure 5-2).
3. Push the cable into the clog and crank it further to dislodge the obstruction.
Some snakes have an attachment for an electric drill, giving it more power to force through the clog. To remove a clog that’s beyond the trap under the tub, rotate the snake while you push it into the pipe.
|
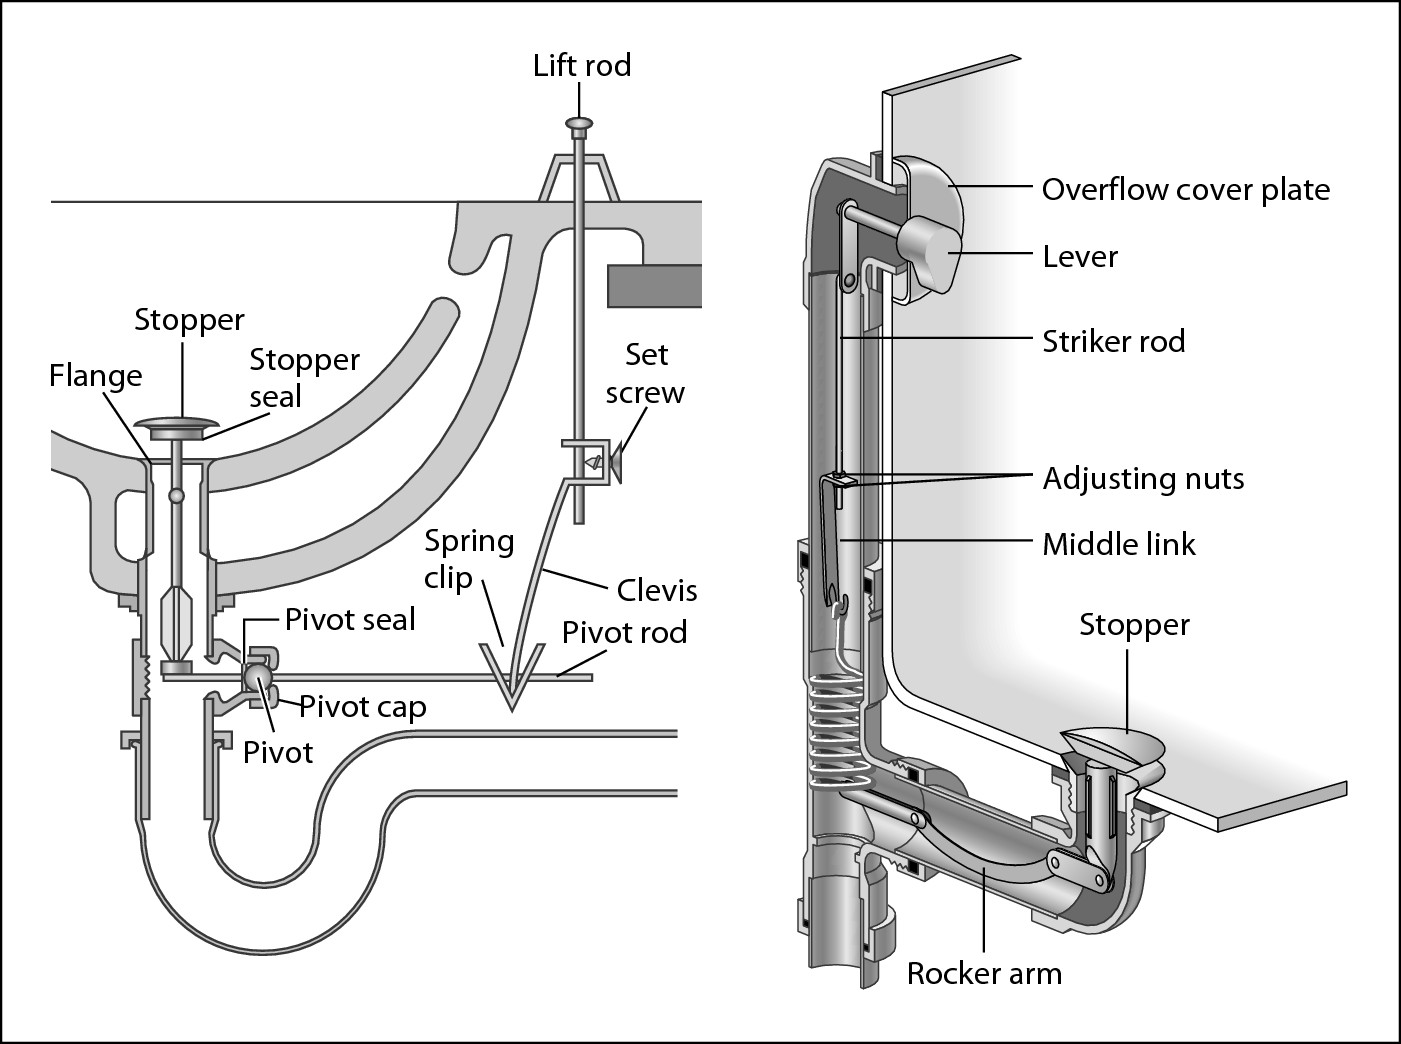
Figure 5-2: Remove the overflow cover plate and feed the auger through this opening. |

|
4. If the snake continues to resist passing through the trap, remove the overflow cover plate, usually located at the end of the tub directly above the drain and below the faucet.
As you remove the screws that hold the cover in place, be careful not to drop the screws down the drain.
5. If the drain-closing mechanism is attached to the cover, pull up on the cover; the linkage comes out of the overflow hole with the cover.
6. Push the snake directly down into the hole and through the trap.
Note that this approach doesn’t enable you to get directly to any blockage that’s stuck in the trap.
If the blockage is past the trap, somewhere down the drainpipe, reaching it may take you some time. The cable stops feeding in when it hits the blockage. You must work the snake against the blockage until the cable feeds freely into the drain — then you know that the clog is clear. Flush the drain with water to confirm that the blockage is gone.
Cleaning and Adjusting a Drain Stopper
Except for really old drains that rely on a rubber stopper to hold back the water, most sinks have a pop-up drain mechanism. Bathtubs have either the same type of pop-up stopper or a trip-lever (plunger-type) drain closure. When you’re faced with a drain that won’t hold water, you have to adjust the stopper. This section shows you how.
Trip-lever drain
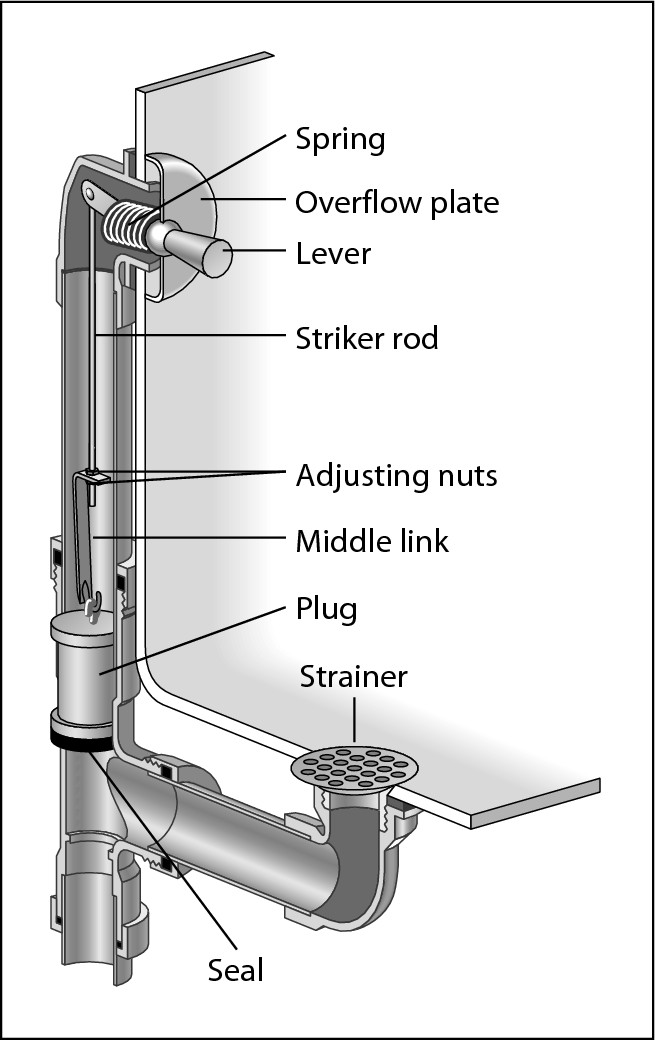
A trip-lever drain system has a strainer over the drain opening and an internal plunger mechanism that closes the drain. The plug is operated by a lever located in the overflow plate at the front of the tub. Raise the lever and it lowers a plug into the pipe at the base of the tub, blocking the flow of water out of the tub. This plug may have a rubber seal on its base that can become old and cracked. Also, debris can get into the seat where the plunger rests, causing a slow leak.
Removing the plug, cleaning it, and adjusting the control mechanism cures most problems. Here’s how:
1. Remove the overflow cover plate.
The plate is held in place by a couple of screws. Remove the screws and pull out the linkage assembly, which is made up of the striker rod, middle link, and plug (see Figure 5-3).
|
Figure 5-3: Remove the overflow plate to clean and adjust the internal parts of a trip-lever drain. |

|
2. Clean any loose hair or buildup of soap scum from the linkage assembly.
This basic design has many different renditions. The drain in your tub may not be exactly like the one illustrated in Figure 5-3, but it’ll be similar.
3. Before you reinstall the plug, inspect the rubber seal (if there is one) at the bottom of the plug. If it’s cracked or broken, take the plunger assembly to a home center or plumbing supply house and get a replacement.
4. Replace the linkage assembly.
You may have to wiggle the plunger a bit to get it to fall back into the drain.
5. Run some water into the tub.
If the tub drains but doesn’t hold water, adjust the plug so that it falls deeper into the overflow passage. Remove the assembly, loosen the adjustment nuts, and lengthen the linkage controls. A little adjustment — 1/8 inch or so — is all that’s needed.
6. Reassemble the assembly and test again.
Additional adjustments may be necessary.
Pop-up drain
The pop-up drain assembly has a drain stopper in the opening. A slow-running drain can be the result of a pop-up that isn’t opening fully. A leaky drain may be the result of a bad rubber seal on the pop-up assembly or incorrect adjustment of the control mechanism that connects the pop-up to the lever at the end of your tub, which prevents the pop-up from closing fully.
Removing the pop-up assembly, cleaning it, and adjusting the control mechanism cures most problems. Here’s how:
1. Remove the pop-up drain assembly by pulling it out of the drain (see Figure 5-4).
Grasp the stopper and wiggle it around a bit to get it out. The stopper and the rocker arm it’s attached to will come completely out of the drain. If you see a clog of hair or debris on the rocker arm, you may have to remove some of this goop before the stopper will come out of the drain.
2. Remove the tub overflow cover plate by removing the screws and pulling out the assembly.
See the section “Charming your tub with a snake,” earlier in this chapter, for more information about the tub overflow cover plate.
|
Figure 5-4: Remove the pop-up assembly or drain strainer and any hair or soap scum from the drain. |

|
3. Clean the linkage assembly of any loose hair or buildup of soap scum.
This assembly is composed of the crank lever in the overflow cover plate, striker rod, middle link, and striker spring. The spring at the bottom of the control linkage is a magnet for hair buildup.
4. Inspect the rubber seal (if there is one) on the pop-up. If it’s cracked or broken, take the pop-up assembly to your home center and purchase a replacement.
5. Put the assembly back in its place.
You may have to wiggle the spring a bit to get it to fall back into the drain.
6. Run some water into the tub.
If the tub doesn’t hold water, adjust the pop-up so that it completely closes in the drain outlet. Remove the assembly, loosen the adjustment screw, and shorten the linkage controls. A little adjustment — 1/8 inch or so — is all that’s needed.
7. Reassemble the pop-up assembly and test again.
Additional adjustments may be necessary.