Chapter 8
Fixing a Leaky Faucet
In This Chapter
 Putting an end to a compression faucet or washerless faucet leak
 Repairing a ball-type, cartridge-type, or ceramic disk-type faucet
 Fixing a leaky sink sprayer
S topping a leaking faucet is easy to do. The challenge is to determine what type of faucet you have. After you know that and have a replacement or the material to stop the leak, there isn’t much to it.
Not only do you save water by stopping the leak, but you also get a sense of satisfaction — some may even call it smugness. You did it yourself, and the next time you notice a leak, you’ll be ready and able to fix it, too.

Stopping a Compression Faucet Leak
A compression faucet is so called because a rubber washer, actually made from neoprene (a form of synthetic rubber), is forced against a metal seat to choke off the water flow. As you turn the handle, the washer is pushed against (and thus compresses) the valve seat. If the washer or valve seat becomes damaged, a seal isn’t made, and the faucet leaks.
If your compression faucet is dripping, the rubber washer has most likely worn away. Less common is a worn metal seal that the washer presses against when it’s closed. The metal (usually brass) valve seat can become damaged if you don’t change the washer before it’s too worn — metal then grinds against metal and chews up the seat. Hard foreign matter can become trapped between the valve seat and the washer. If this happens, closing and opening the faucet grinds the particles inside, damaging it beyond a simple washer replacement.
Replacing a worn washer
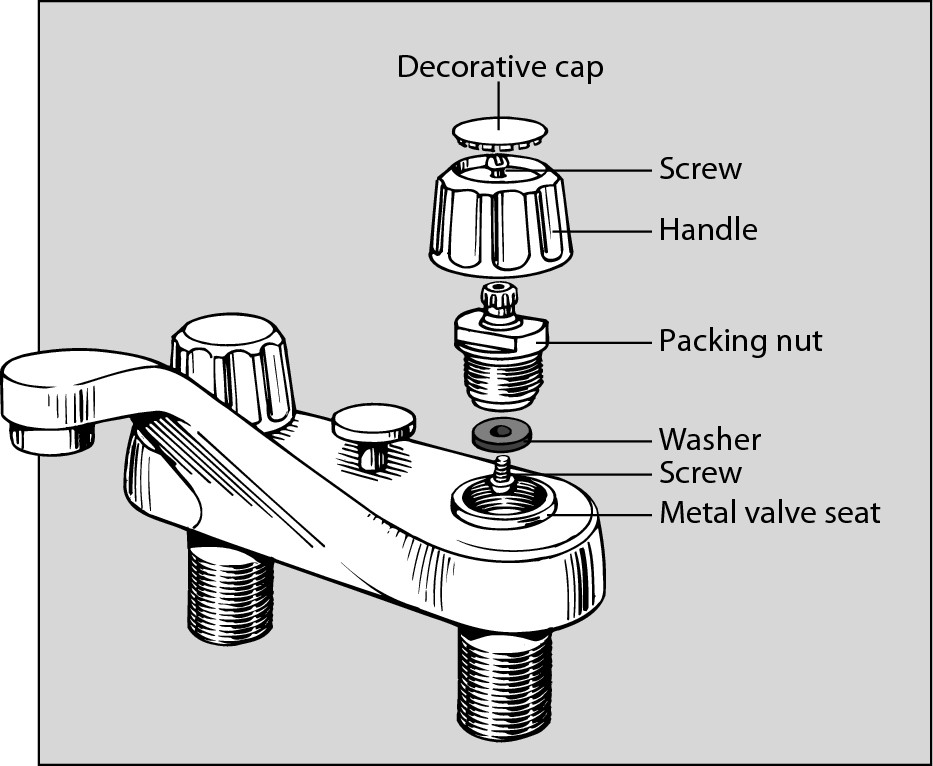
To replace a worn washer, follow these steps, using Figure 8-1 as a guide:
|
Figure 8-1: The major parts of a compres-sion faucet. |
|
1. Turn off the water to the faucet.
2. Remove the decorative cap, if there is one, on top of the faucet handle.
Depending on its design, you pull it up or unscrew it.
3. Unscrew or pull off the handle and remove it.
If the handle sticks, gently nudge it up with a screwdriver. Wrap the screwdriver edge with a rag to prevent marring the finish.
4. Remove the cover over the valve, called an escutcheon, if there is one.
Some types unscrew, while others are held in place by setscrews. Inspect the escutcheon to figure out how to remove it.
5. Unscrew the packing nut that holds the body of the valve in place, turning it counterclockwise.
The valve stem should come out of the base of the valve. You may have to twist the valve-stem body several turns after you loosen the packing nut and the valve stem. If it’s hard to unscrew, put the handle back on the stem and give it a twist. The stem then comes out of the valve.
6. Unscrew the retaining screw and remove the washer.

On the other end of the stem is a rubber washer that’s held in place by a screw. These valve washers come in many shapes and sizes, so take the valve stem to the plumbing department of your local hardware store or home center and get a washer that matches the old one. This task may be more difficult than it sounds, because the old washer is usually damaged and deformed. The best clue to the original shape of the washer is to look into the valve body and take a look at the metal opening that the washer presses against — the valve seat. If the side of the valve seat is angled, replace the washer with a cone shape; if the valve seat is flat, get a replacement washer that’s flat.
7. Replace the old washer with the new one and reassemble the faucet.
Replacing the valve seat
If the faucet still leaks after reassembly, the seat may be damaged. To replace a damaged valve seat, follow these steps:
1. Disassemble the unit.
See the preceding “Replacing a worn washer” section for instructions.
2. While the stem is out, look into the valve body and inspect the faucet seat.
Look for a brass insert inside the valve body that the rubber washer presses against to stop the flow of water. If this seat is rough, it will tear up the new washer and the valve will begin to leak again. A rough valve seat should be replaced. If the faucet doesn’t have replaceable valve seats, you can grind the seat smooth with a valve seat grinder.
3. If the valve has a removable seat, remove it.
If the seat has a hexagonal or grooved opening in its center, remove the seat with a screwdriver or an Allen wrench.
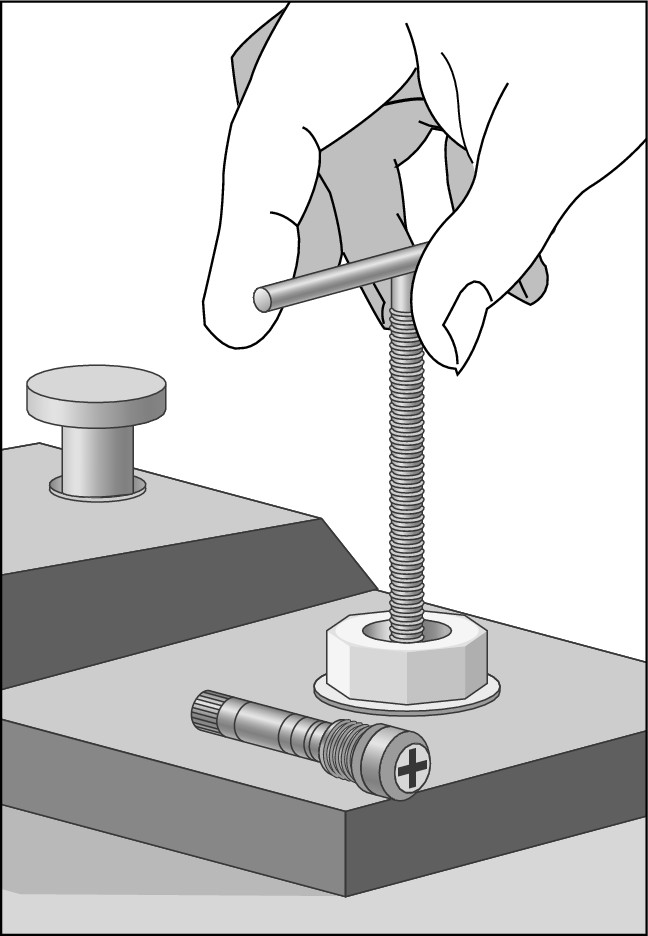
If the seat isn’t removable (it will have a round hole), you have a really old faucet. You can grind it smooth with a seat-grinding tool, found in the plumbing departments of hardware stores and home centers and shown in Figure 8-2. The tool, also known as a faucet seat reamer, comes with instructions and is easy to use. The tool fits over the valve seat (where the washer usually rests) and grinds the seat with the tool. The idea is to reshape the damaged seat to accept the new washer. When using this tool, take care to keep it perfectly aligned or the seat will be dressed unevenly.
|
Figure 8-2: Align the valve seat grinder in the center of the valve body and then press down on the handle and turn three or four times to grind it smooth. |
|
4. Take your old faucet to a well-stocked plumbing department or supplier, along with the faucet stem, and purchase the correct replacement.
Faucet seats come in many sizes and with many different thread patterns — a perfect match is critical.
5. Replace the valve seat, being careful not to cross-thread the connection.
6. Coat the washer and all moving parts — including the handle stem — with heatproof grease.
This type of grease doesn’t break down in hot water and keeps the stem and faucet working smoothly for a long time.
7. Replace the stem washer and packing as necessary.
8. Reassemble the faucet in the reverse order that you removed it.
Stopping a stem leak
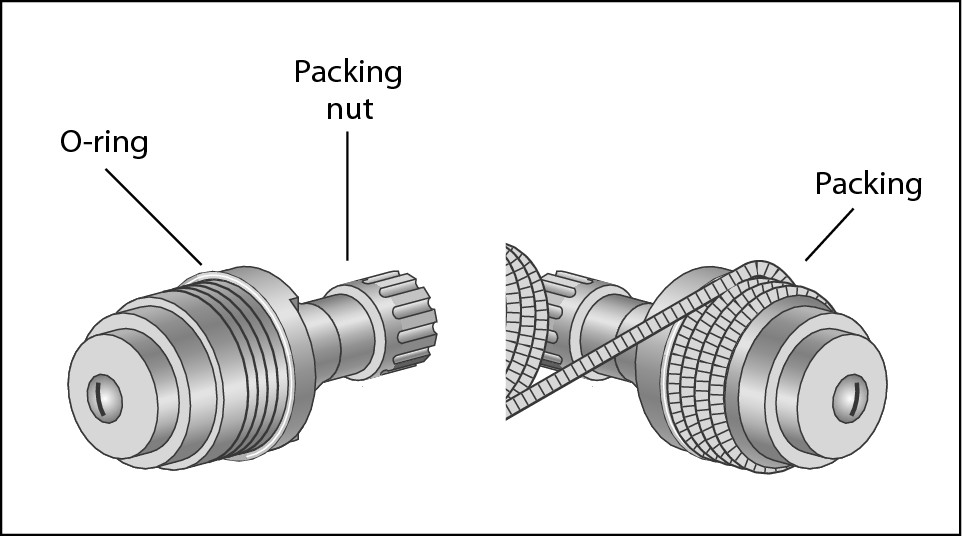
If you have a leaky handle rather than a drippy faucet, the water is leaking past the stem packing — see Figure 8-3 — or the washer. Older faucets have a stringlike substance wrapped around the handle stem to hold the water back. The packing eventually wears, and water can sneak between the stem and the packing. Newer faucets stop the water leak with an o-ring or a washer.
|
Figure 8-3: Replace the packing around the valve stem and retighten the packing washer. |
|
Older faucets with packing are more likely to leak. Here’s how to fix them:
1. Turn off the water to the faucet.
2. Remove the handle from the shaft.
3. Tighten the packing nut.
Turn it clockwise about 1/2 turn. This may be all that’s necessary to stop the leak.
4. If tightening the packing nut doesn’t work, loosen the packing nut with slip-joint pliers or a wrench and then unscrew the nut by hand and remove it.
5. Remove the old packing from around the stem.
6. Replace the old packing with new packing.
You can find new packing in the plumbing departments of hardware stores and home centers.
7. Reassemble the faucet.

Stopping a Washerless Faucet Leak
The new variety of washerless faucet is easier to fix than a compression faucet. The hardest part of this project is figuring out what type of washerless faucet you have. The three sections that follow explain how to fix the three most common types of washerless faucets currently on the market.
The best tip-off as to what type of faucet you have is how the handle that controls the water moves:
 If the control handle moves all around in an arc (generally up and down to control the water flow and sideways to control temperature), is attached to a domelike top of the faucet, and has a small setscrew in the base of the control handle, you have a ball-type faucet.
 If the handle moves directly up and down to control the water flow and directly right or left to control the temperature (but not in an arc like the ball-type), you have either a cartridge-type faucet or a ceramic disk-type faucet.
If you can find the user’s manual that came with the faucet (a small miracle!), you may find the manufacturer’s name and model number. Most manufacturers sell repair kits, which home centers and large hardware stores usually stock. These kits have all the necessary parts, including any special tools needed to take the faucet apart and repair it.
Ball-type faucet
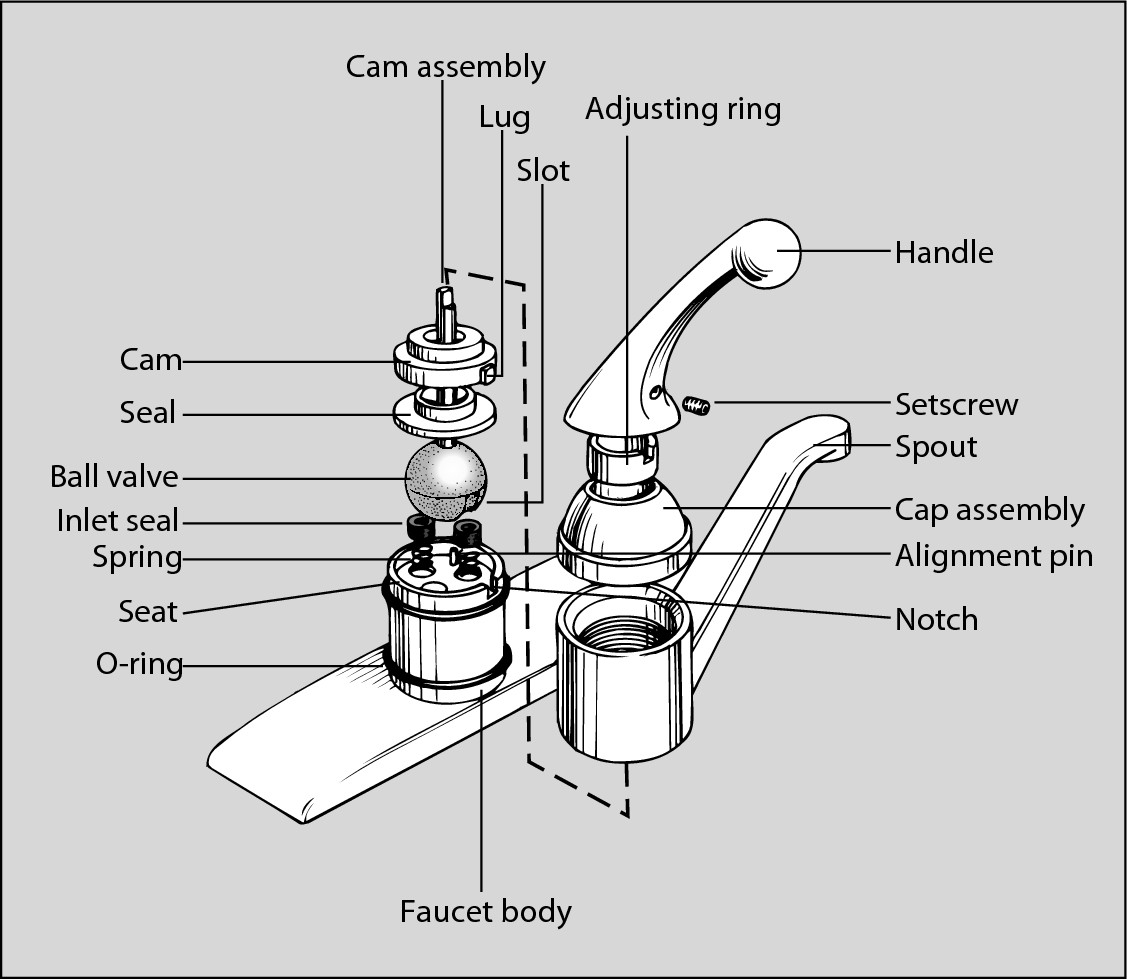
Follow these steps to fix a single-handle ball-type faucet, shown in Figure 8-4.
1. Turn off the water to the faucet (see Chapter 2).
2. Remove the handle.
Loosen the setscrew that secures the handle to the shaft coming out of the ball valve. The screw head is on the underside of the lever. This setscrew requires an Allen wrench (an L-shaped hex wrench that fits into the recessed socket in the head of the setscrew) to loosen. Some faucets are manufactured in Europe and may have metric-sized parts. If you can’t find an Allen wrench that fits the setscrew, chances are the screw has a metric head. In that case, you need to purchase a set of metric Allen wrenches, which aren’t expensive.
|
Figure 8-4: The major parts of a ball-type faucet. |
|
3. Remove the ball valve and spout.
Wrap tape around the jaws of your wrench or slip-joint pliers to protect the valve parts. Loosen the cap assembly (the dome-shaped ring at the top of the faucet) by turning the adjusting screw counterclockwise. Grab the shaft to which the handle was attached, move it back and forth to loosen the ball valve assembly, and then pull it straight up and out of the faucet body.
4. Replace the valve seats and o-rings.
When you look inside the faucet body, you see the valve seats and rubber o-rings. Behind them are springs. Remove the seats, o-rings, and springs from the faucet body and take them to a hardware store or home center to get the correct repair kit.
5. Replace the parts and reassemble the faucet in the reverse order that you took it apart (or follow the directions in the repair kit).
Make sure to reinstall the ball in the same position from which you removed it.
6. Turn the water back on to test the faucet.
7. If the faucet leaks around the handle or the spout when the water is running, turn off the water and tighten the adjusting ring.
Under the handle is an adjusting ring that screws into the valve body. Slots in the top edge of the ring enable you to insert the adjusting tool into the ring and turn it. If you can’t find the adjusting tool, use a large screwdriver or slip-joint pliers to turn the ring clockwise to tighten it. Unless the ring is very loose, tighten it only about 1/8 turn.
8. Turn on the water and slip the handle back onto the control ball’s shaft. Adjust the ring so that the leak around the ball shaft stops but the ball can be easily adjusted.
If you can’t get the leak to stop, the seal under the adjusting ring is bad and should be replaced.
9. Tighten the setscrew to secure the handle.
Cartridge-type faucet
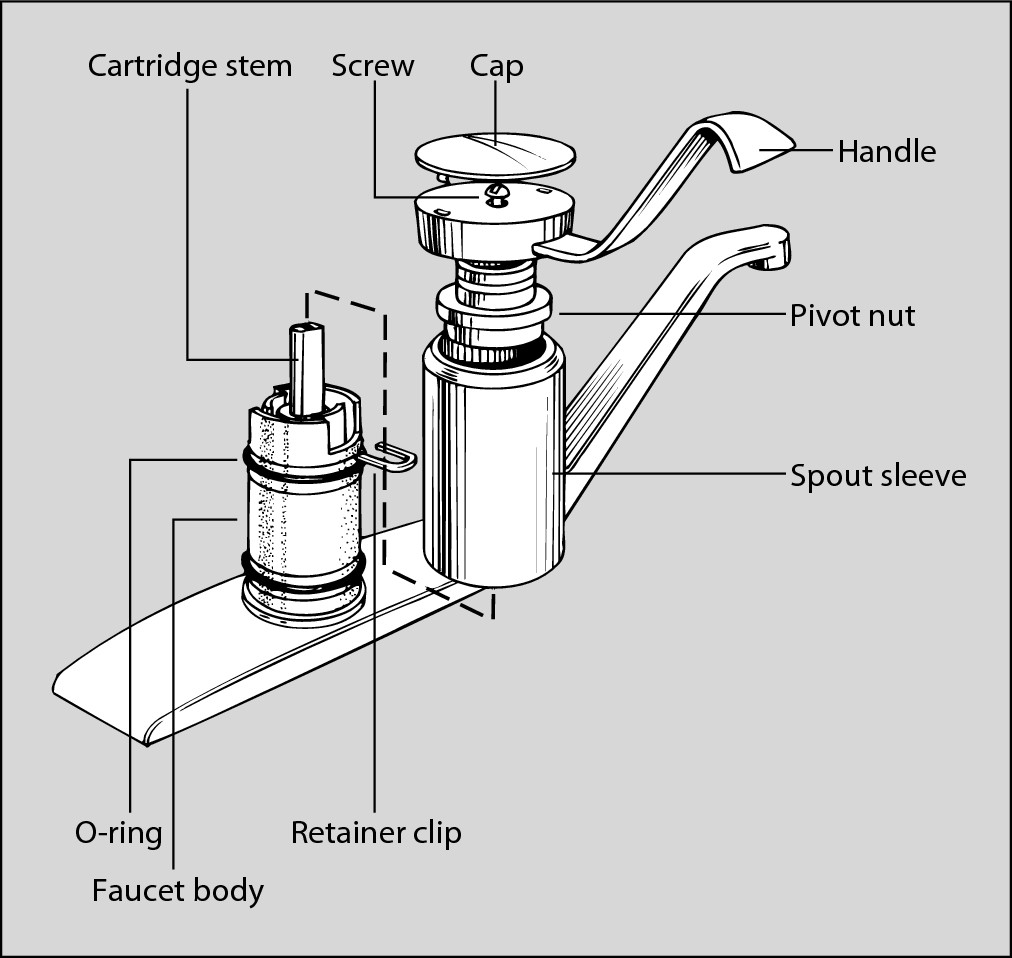
Follow these steps to fix a single-handle cartridge-type faucet, shown in Figure 8-5:
|
Figure 8-5: The major parts of a cartridge-type faucet. |
|
1. Turn off the water to the faucet (see Chapter 2).
2. Remove the handle.
Remove the cover on the top of the handle to expose the screw that holds the handle to the valve stem. Pop off the cover by placing the tip of a screwdriver between the cover and the handle housing and prying up. To remove the handle, turn the screw in the center of the cap counterclockwise; remove it and then pull the handle up and off the valve assembly. This exposes the valve stem coming out of the valve cartridge.
3. If your faucet has a movable spout, remove the pivot nut.
Use an adjustable wrench or slip-joint pliers to loosen (turning counterclockwise) to remove the pivot nut at the top of the faucet body. This nut holds the spout sleeve in place and prevents water from coming out the top of the faucet.
4. Remove the spout assembly by twisting it back and forth as you pull up.
5. Remove the cartridge clip and replace the cartridge.
To remove the cartridge, you have to pull out the small U-shaped clip that holds the valve cartridge in the faucet body. Pry the clip loose by placing the tip of your screwdriver between the faucet body and the U-section of the clip.
Twist the screwdriver, and the clip comes out. Grab the clip with your pliers and remove it. Pull up on the cartridge stem with a twisting motion. If it doesn’t twist out easily, reinstall the handle so that you can get a good grip on the shaft to pull the cartridge out. Take the old cartridge to your hardware store or home center and purchase a replacement kit.
6. Reassemble the faucet according to the directions.
.jpg)
Ceramic disk-type faucet
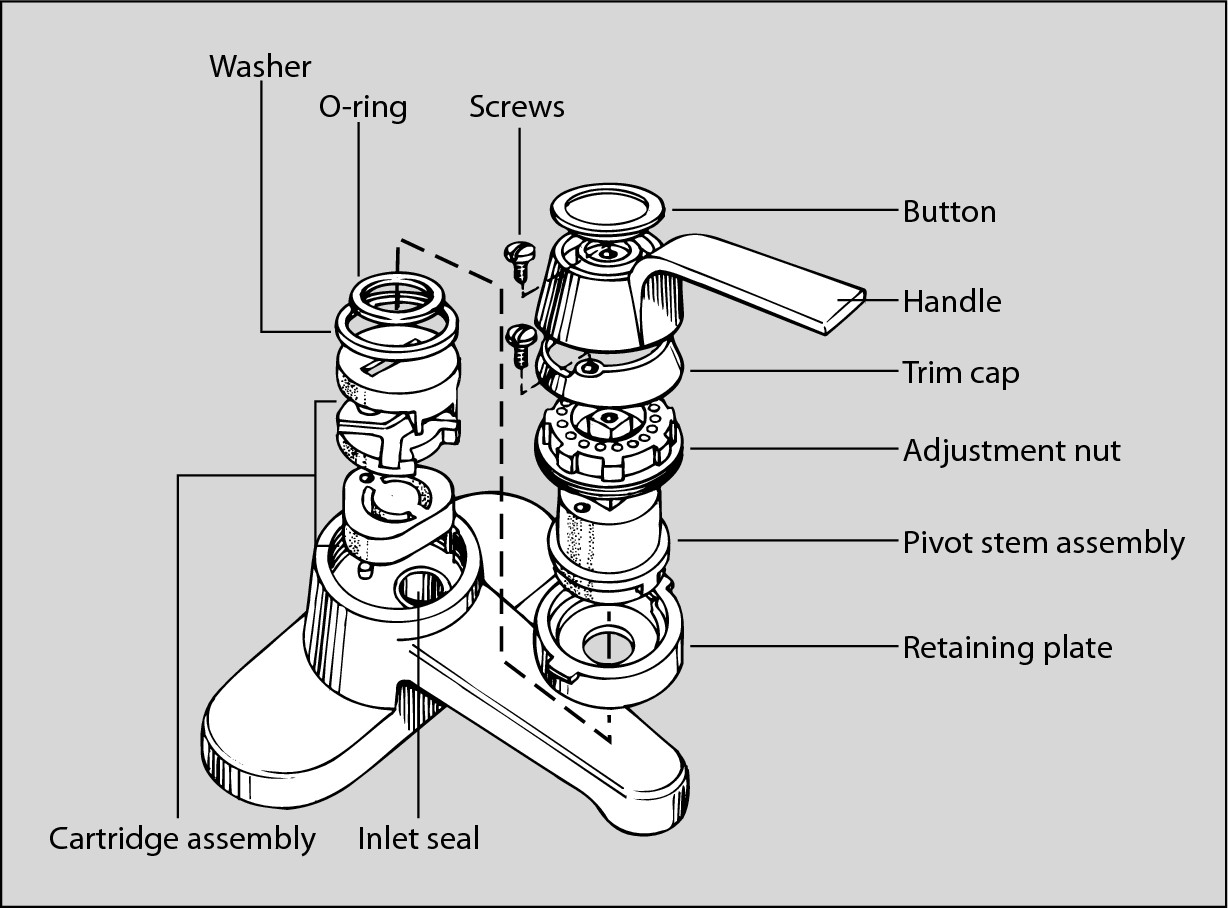
A ceramic disk-type faucet is reliable and usually doesn’t require much maintenance. If you do need to repair one, however, these faucets can be a bit tricky to take apart. Older models are held together by screws underneath the faucet, so if you can’t figure out how to get the handle off, look under the counter, and you should see a couple of brass screws. Loosen them and the whole cover and handle will come off the faucet, revealing the valve cartridge — see Figure 8-6.
|
Figure 8-6: The major parts of a ceramic disk-type faucet. |
|
1. Turn off the water to the faucet.
2. Remove the handle.
Lift the handle to its highest position to expose the setscrew holding it in place. Use an Allen wrench or a screwdriver to turn the setscrew counterclockwise and then lift off the handle.
3. With the handle off, pull the decorative trim cap up and off the cartridge body.
4. Remove the valve seals and cartridge assembly.
Loosen the two screws on the top of the valve cartridge and lift the assembly off the faucet body.
5. Replace the rubber seals.
You can find several rubber seals under the cartridge — replacing them stops most leaks. If you replace these seals and the faucet still leaks, the valve cartridge, which contains the ceramic disks, is worn and must be replaced.
6. Take the cartridge assembly to your local hardware store or home center and purchase a replacement kit.
7. Install the new cartridge according to the instructions in the kit.
The kit will contain new o-rings to seal around the faucet body. Be sure to replace these o-rings even if the old ones look like they’re in good shape.
Fixing a Dish Sprayer
If you notice that the water flow out of your kitchen sink’s dish sprayer isn’t what it used to be, you can’t use it as an excuse not to do the dishes. The fix is easy. Here’s how to clean the spray head, which is probably stopped up (see Figure 8-7):
|
Figure 8-7: Remove the spray head and clean the deposits out of the small spray holes in the head. |

|
1. Turn the water off from under the sink.
2. Remove the spray head.
Untwisting the head disassembles some models; a screw holds other types together.
3. Clean out any blockage in the small holes of the spray head.
4. Check the spray hose for kinks.
Look under the sink and check the condition of the spray hose. It may become entangled with objects stored under the sink, restricting the water flow. Replace a badly kinked hose. You can purchase replacement sprayer assemblies at most home centers, but take the hose and spray head with you when you shop for a replacement: Turn off the water supply and then unscrew the hose from the base of the faucet.
5. Check the diverter valve.
If the spray head and hose look okay, a malfunctioning diverter valve may be the problem. A diverter valve is a simple device that’s activated by water pressure. When the sprayer is off, the water is diverted to the spout. When you press the sprayer trigger, the water pressure in the hose drops, and the valve closes off the water flow to the spout and directs water to the sprayer. To do so, it must move freely. A sure sign of a bad diverter valve is that water flows from both the faucet and the dish sprayer at the same time. This valve is located in the base of the faucet behind the swivel spout, if one exists. Refer to Figure 8-7 for the location of this part. To service it, make sure that the valve moves freely and that all the rubber parts are in good shape. Replacement parts are available, including the entire spray head.
6. Reassemble the sprayer.