
PHOTO BY ANDREW BURR
Natural anchors consist of anything that the environment provides—trees, blocks, horns of rock, etc. Many times a natural anchor is stronger than anything you could arrange with store-bought gear. Like any other anchor, there are numerous considerations that affect the strength of a natural anchor.
Of the many advantages of using sound natural anchors, three stand out. First, they are typically easy and fast to arrange. You might simply loop or girth a tree or a block (or whatever) with runners. Second, a slung natural anchor is often bombproof no matter the loading direction (multidirectional). Third, natural anchors are usually the least environmentally disruptive means of protection.
Anchoring to a 50-foot oak that casts a shadow like a thundercloud is pretty straightforward work. Judgment enters the game once the trees become smaller and are located on top of the cliff, on ledges, and on shelves. I’ve seen some analyses of which trees are best suited for use as anchors; some of these go so far as to study the individual grain of the tree. But most of this—and everything else for that matter—basically boils down to common sense. Still there are several considerations worth noting.
Some climbers think anything with bark on it is bomber, and the infamous Tobin Sorrenson was one of them. It was at Granite Mountain—not the gem in Prescott, Arizona, but a scrappy little cliff outside Amboy, California, that has for years been closed to climbing. (An old rummy with a 12-gauge full of rock salt stands guard, in case you’re wondering.) Tobin was leading up one of those greasy, teetering slabs that look like you could make good time up it in flip flops, when in fact your only hope is to keep your $150 boots bicycling like Wile E. Coyote. When I clawed up to Tobin’s belay and saw the anchor, I lost my mind.
“What the hell is that, Tobin?!”
“It’s a tree. . . .”
I’d shot pool with a bigger “tree” than this one.
Natural Anchors
“That’s not a tree, it’s a twig. A dead twig.” And it was sticking out of a clump of orange moss on an angled, shaly little foothold stance. I reached over and yanked the sad thing out with about ten pounds of heft.
“Jesus! You trying to kill us or something?!” Tobin cried.
The point is that what the tree is rooted in is probably more crucial than the breadth of the tree itself. Good-size trees have pulled out; the big one atop the first pitch of a route called Catchy, at the Cookie Cliff in Yosemite, being a case in point. While there is likely no single and reliable way for a climber to know or test how well a tree is rooted, we’re left to do a thorough inspection, including shaking the tree to check for movement. While some books have suggested various forestry strategies to establish the holding power of trees, no two trees are the same. I’ve personally hooked a tractor to a tree no thicker than my arm and only managed to break a chain in trying to yard out the implacable pine. I’ve also seen trees big around as a pickle barrel come totally uprooted after a thunder shower. Nevertheless we need a few provisional guidelines to help guide our choices.
When Anchoring to a Tree . . .
• Make sure it is alive.
• Use slings or a cordelette instead of rope to tie it off.
• Tie it off as low as possible to reduce leverage.
First, you want a live tree, preferably 6 inches or more in diameter, not one that’s been chopped or burned or is rotten. Any tree rooted in shallow soil, gravel, scree, moss, or soot, or that’s burgeoning from a slim crack, should be considered suspect. If you’ve no other choice for an anchor—or even if you have— test the tree with a solid shake. Boot it, try to rip it out. If it still feels sound, it probably is. Remember, of course, that a serious leader fall can generate much more impact force than a yank on the tree.
Whenever possible, tie the tree off with slings or a cordelette instead of looping the rope around the trunk. Once you get sap on a rope, it’s like a bum rap or memories of love—you just can’t shake it. Plus, the pivoting action common when leaning off the anchor can quickly abrade the sheath of a rope. Go with runners or a nylon cordelette.
Unless the tree is truly a whopper, tie it off as low as possible to reduce leverage. Never tie off a tree with a loop of biners. Girth-hitched runners or a cordelette are both popular methods (see photos and illustrations). A cordelette is longer than most slings, negating the need to girth-hitch two slings together to reach around the tree. Although arranging a girth-hitch to connect two slings is simple as rain, a recent rappelling accident in Arizona cost a wonderful young woman (an instructor with years of experience) her life when she apparently failed to properly girth-hitch two slings together prior to looping the anchor sling around a tree. As with any knot, even one as simple as the girth-hitch, check and double-check your work. And when slinging a tree, tie all knots and get the sling configuration squared away before you rig the tree, in order to visually verify all things are “mint.” For an extra bomber and redundant setup, and one without the load multiplication of the girth-hitch, rig the tree with two slings and two locking biners. There is no question this is a more secure setup, but most climbers go with the single sling girth-hitch, providing the sling(s) are in good shape and the tree is robust. As always, it’s your call.

By tying this cordelette off with a figure eight, it essentially becomes redundant, with two loops around the tree. The doubled power point clip-in helps prevent improper loading of the biner. In all such setups, try to keep the inside angle of the cord/sling less than 90 degrees to avoid load multiplication.
The downside of keeping the inside angle less than 90 degrees is that the longer slings add slack to the system, and unless the tie-in remains under tension (by the belayer leaning off the anchor), the sling(s) can migrate down the tree trunk—not necessarily a bad thing with this atomic bombproof anchor. However as a general practice, after you arrange protection/anchors, you don’t want them to move— at all—till removal.
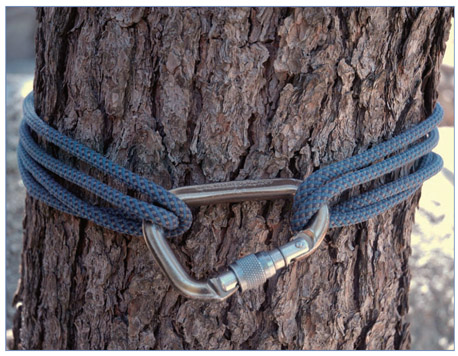
1. Not good. With so little slack in the sling, it is probable that outward force (pull) will be exerted on the gate of the biner.

2. Better. With more slack in the sling, the biner will be weighted lengthwise.

3. Girth-hitch. Fast and simple, though some tests indicate this knot compromises the strength of the rope.
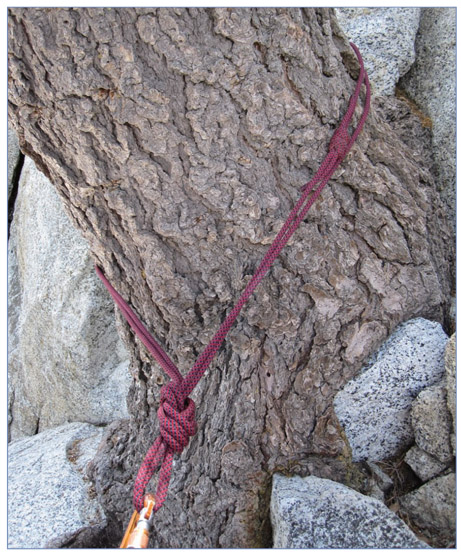
4. Tree tied off properly with a rope sling. A nice, clean setup.
Trees are generally quite durable—to a point. At Great Falls and Carder Rock, both in the Washington DC, area, and at Coopers Rock, outside of Morgantown, West Virginia, trees are used almost exclusively as toprope anchors. Owing to soil compaction and wear and tear on the tree trunks, authorities have considered closing down sections of the cliffside. Climbers have responded by adopting gentler methods of anchoring off trees, such as using scraps of carpet to protect the bark.
Anyone who has tried to clear Grandma’s backyard understands the hateful toil of uprooting healthy shrubs and bushes. Hence, they often make good anchors. As a general rule, it is easier and less time-consuming to rig a traditional anchor, providing one is readily available. But if good nuts are problematic to set, and a shrub, bush, or sapling is at hand, consider using it.
Again, you want live stuff. Nothing brittle, charred, rotten, or loose will do. And make sure the stuff is well-rooted. Most of the time a shrub or bush issues from a central root, and that’s what you want to sling. Try to get the sling around that chubby root as near to the base as possible, and cinch it down snug. It is very sketchy to trust a solitary bush or shrub, and since they tend to grow in clumps, tying off to three or four (or more) and equalizing these anchors (to be explained later) is smart rigging. More times than not you’ll have to ferret around and push sometimes-thorny limbs aside to get at the main root. Do so. Never settle for less than the best and least-leveraged tie-off you can manage. And always test the bush or shrub with a hearty yank. Unless you test it and test it good, you might be tying off something no more secure than a tumbleweed on a bridal path.
These can provide sound, quick anchors if several things check out, and you follow a few rules of thumb. First, realize that both boulders and blocks are not part of the body of the cliff. They are detached, and the only thing keeping them in place is their size, weight, and position. For a boulder or block to be any good at all, it must be both sufficiently big and positioned in a way that it cannot be moved. It should not wiggle or budge at all. Anyone who has trundled boulders off a remote slab knows that a boulder big as a house can be sent on a path of mind-boggling destruction if it’s on even the slightest grade. Following the first free ascent of the Salathe Wall in 1988, Todd Skinner and Paul Piana nearly died when a huge block they had slung (as an anchor) on the summit of El Capitan migrated several yards down toward the very brink. The duo were lucky to escape with one broken leg between them and a year of flashbacks.
For a leader rigging a belay anchor, caution must be used when tying the climbing rope itself around huge blocks. Watch out for sharp edges and pinches that can severely damage your cord. For toprope setups, most professional guides use static rope when tying off huge boulders and blocks, since it is more abrasion resistant and less likely to jam in pinches than webbing. Static rope is also somewhat handier to work with and easier to knot, and it allows you to use a wider range of knots than would work with webbing or sling material. Sometimes the best way to use a block is to encircle the mass of it, tying it off like the ribbon on a birthday gift, instead of running the sling underneath it.
Remember . . .
• Only their mass and position keep boulders and blocks in place.
• To serve as secure anchors, boulders and blocks must be sufficiently large and totally immovable.

This block is well situated, and is bomber for the direction of pull for which it is rigged. As always, appraising the integrity of a natural rock anchor involves judgment. Carefully examine for cracks in the block. And most importantly, how well is the block attached to the main rock structure? If you decide to use a detached block, how big is it: the size of your car or the size of your boom box? Does it rest on a flat platform or a sloping shelf? As a general rule, many climbers avoid rigging anchors off detached blocks and flakes.
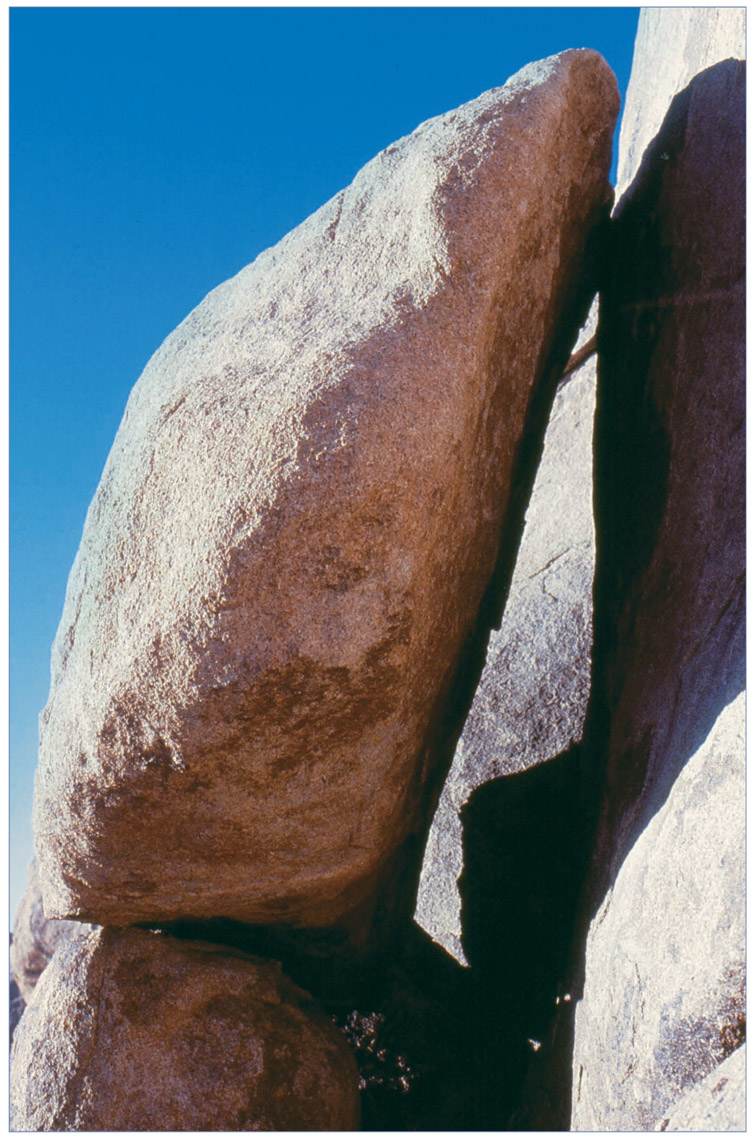
This detached block is gigantic, roughly the size of an outhouse, but is precariously perched on a pedestal slim and angled. The crack between the block and the main wall will readily accept camming devices, but remember this: When you hear about catastrophic anchor failure, the number one cause is bad rock, where someone has committed to a single crack system in dubious rock, or perhaps a tragically loose flake or a detached block. Even the best placements are no better than the rock they are set in.

Climbers at Joshua Tree toproping off an anchor set around and behind a loose block. It’s no mystery where that block is going to tumble if it comes loose, and it’s no mystery what the fate will be of anybody in its path. Although the block is conveniently situated for toproping this route, it is important never to let convenience cloud your better judgment—either find a better anchor or find a different route.
We use “horn” here to denote all kinds of protrusions that one might possibly sling for protection. The various kinds are many: flakes, horns, spikes, chickenheads, bosses, bollards, etc.
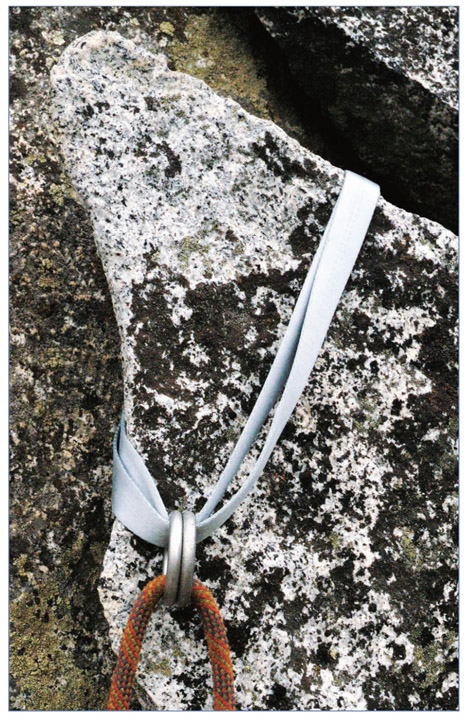
A flake slung with a double sling. If the direction of pull changes much from straight down, this sling might slide off the flake.
In this context flakes are simply fragments of rock that are partly or completely detached from the main wall. (Larger flakes might run an entire rope length or longer.) Hence, it is the position of the flake that is our first concern. If the flake is pasted on a bald wall like a flapjack on a garage door, it’s notably suspect. For a flake to be of any value as protection, it must be lodged in a manner that downward pull will only increase its security. Take the standard steps. Eyeball it. Is the quality of the rock okay? No matter how well the flake is lodged or jammed, if the rock is chossy, it may snap in half or crumble once loaded. Thump it carefully, then harder if it’s secure. Check for sharp edges. If you decide to sling it, understand that even the best-looking flakes often are unpredictable.
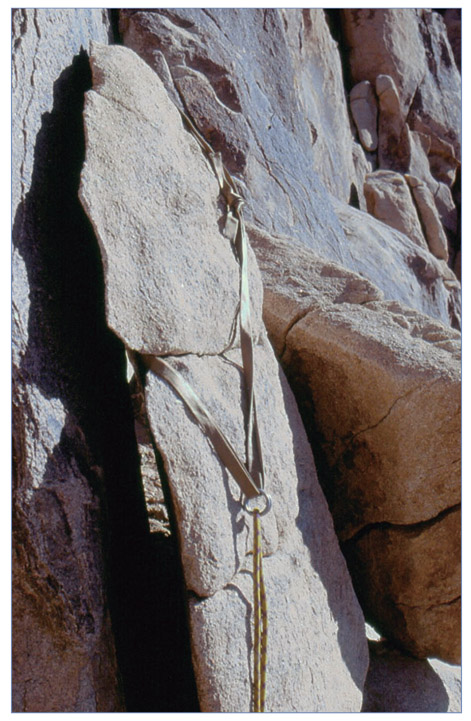
The climbers who made the decision to rap from this flake were lucky they lived to drive home. The structure is completely detached and precariously perched. Structural integrity is paramount when using natural rock anchors, and this one lacks it altogether. This is like building your house on quicksand. Remember: Slings around an “anchor” do not vouchsafe their security.
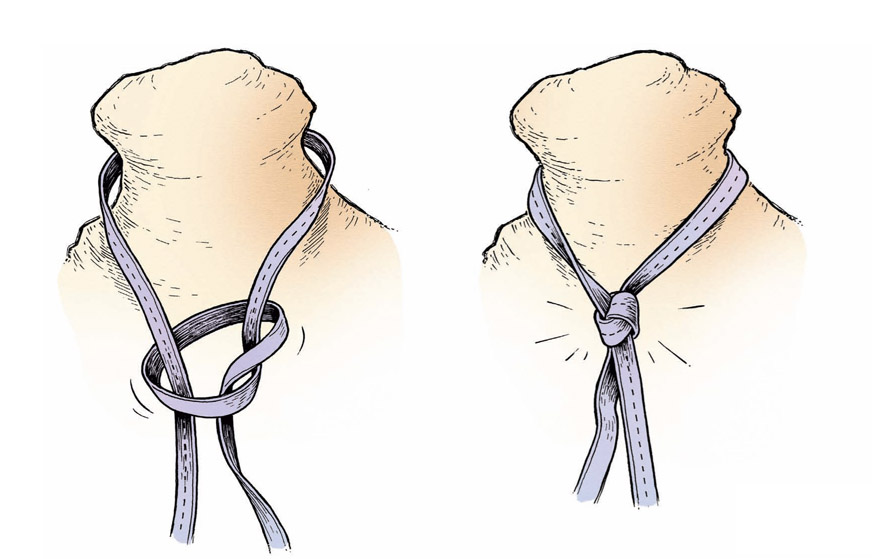
Slinging a horn with a slipknot on a runner.

Horn tied off with a girth-hitch. Unless the sling is weighted, it can easily slip off this horn. (It might anyway.)
Rock horn tied off with a slipknot, which is more secure than a girth-hitch.
Blocks present the same problems as flakes, with added danger since they are bigger. If you should topple one off, you’ve essentially sent mortar fire down the crag and possibly onto your belayer. And if you’re tied into said block, you’re probably going for the ride and the dreaded Dirt Nap. Position is crucial. Look for a block that is keyed into place by the surrounding rock—lodged in a bottleneck is best. Most loose blocks eventually slough off after a winter freeze, but for many years they can remain precariously perched, seemingly held by frozen cobwebs, ready to plummet down the cliff under tread of a piss ant.
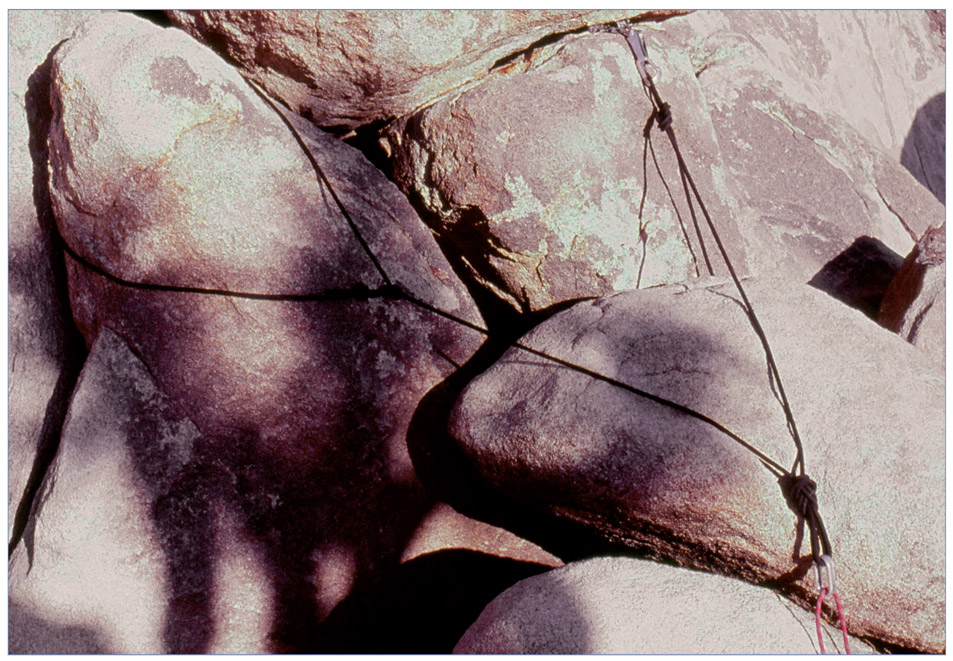
This TR rig consists of A) a natural rock bollard, and B) two camming devices in a horizontal crack. The anchor system is pre-equalized, featuring a static extension rope tied with a double-loop figure eight at the power point. The rope is attached with two oval carabiners, gates opposed and reversed.
Arranging a clean and simple anchor is sometimes tricky among such jumbled terrain. Here the climber decided where she wanted the power point and worked backward from there. The whole rig hangs nicely over the edge, and the use of the static rope is good for added abrasion resistance. The rock structure at A is beefy and well attached to the main rock structure. The two cams at B are solid placements, but if you scrutinize the structure, they are actually underneath a massive, detached block. The use of two oval carabiners opposed and reversed is adequate, but many climbing schools and outdoor programs use three oval carabiners, gates opposed and reversed, as their standard operating procedure.
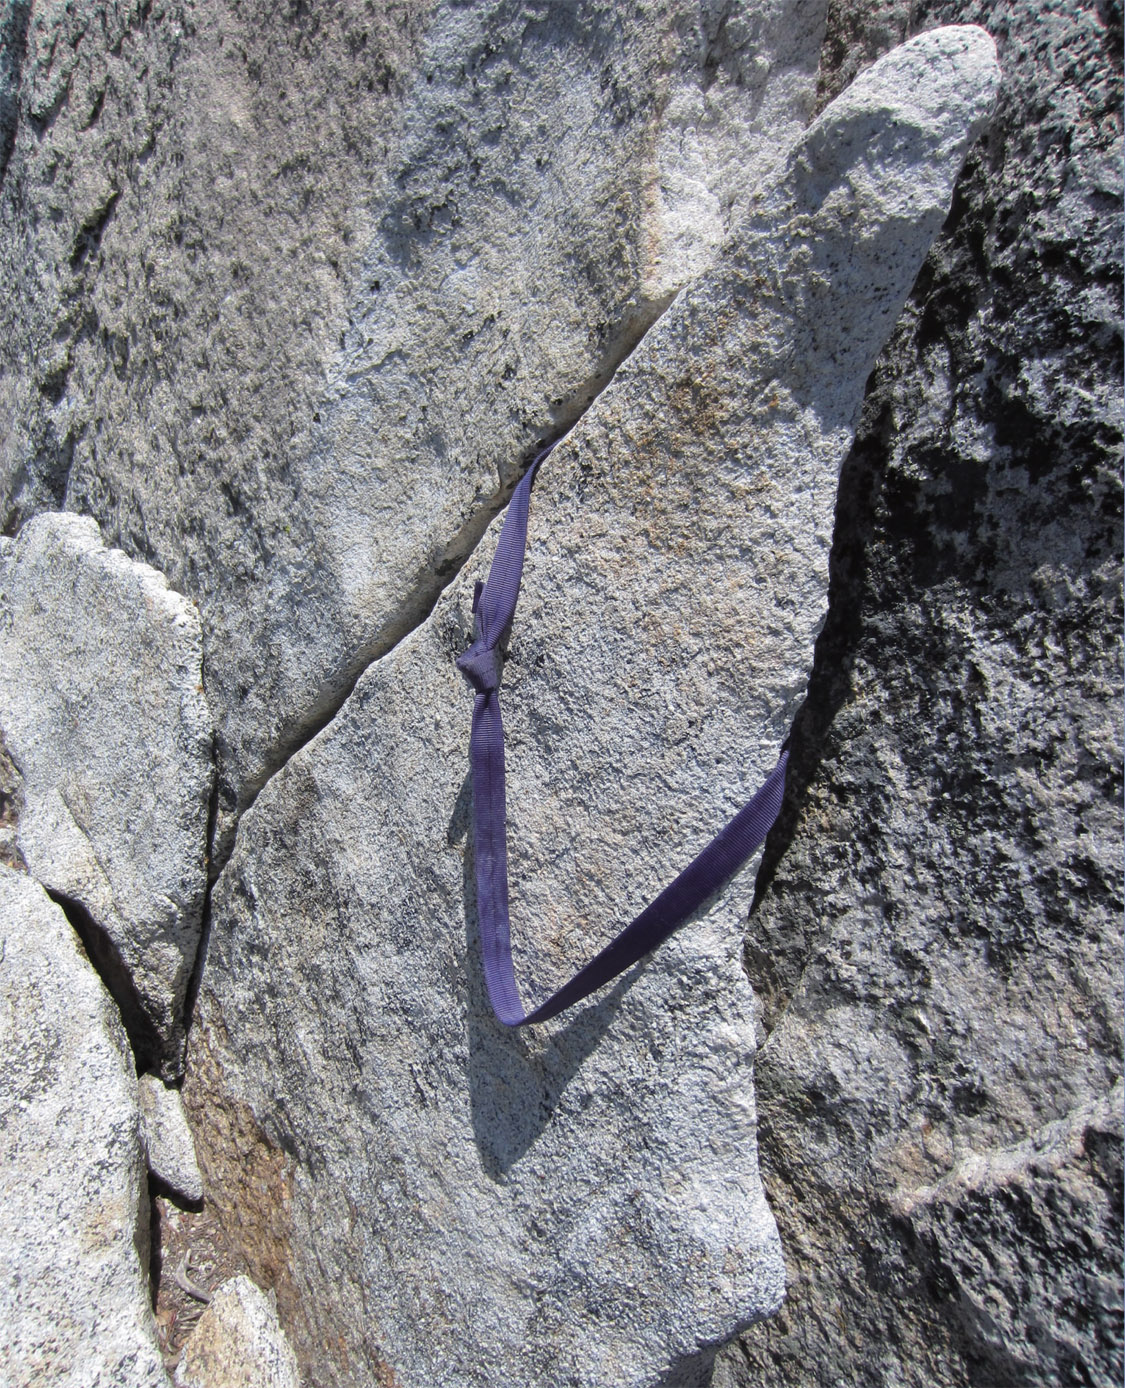
A rappel “anchor” found one pitch up Tahquitz Rock in southern California. While the sling is definitely well-situated, with no danger of being pulled over the top of this pointed, wedged flake, the problem here is twofold: one is the lack of redundancy, which by itself is not necessarily catastrophic, the sling being new with a properly tied water knot and a loop strength of over two tons; rather, the problem is with the inherently precarious nature of the rock structure itself. When committing to a single, natural rock anchor, structural integrity is paramount. A good rule of thumb is to avoid detached blocks and flakes like the plague. I like the exception to that rule used by YOSAR (Yosemite Search and Rescue) for a detached piece of rock to be used as an anchor for their SAR operations: the block must be as big as a full-size refrigerator, sitting on a flat surface.
Spikes are pointed flakes or blocks that are usually, but not always, part of the main wall. On well-traveled routes, most of the loose rock has already been stripped away by previous parties, but don’t bank on it. The first time I climbed El Cap, Ron Fawcett and I were traversing the Grey Bands on the Nose, a sketchy, nondescript section at mid-height where the rock is grainy gray diorite. I was belaying from slings, and as Ron came up, I noted a thick, 300-pound spike just above. It looked funky. I didn’t know the numbers but figured the Nose had been climbed at least twenty times by then, so all the loose stuff must have been long gone. Not so. When Ron grabbed that spike, it pivoted straight down, and I still don’t know why he and the spike didn’t land in my lap. Who knows what kept it in place before we came along. The adage is: Never trust anything outright. Always assume it’s poor, test it with caution, and only use it when you’re convinced it’s good. Guides at many trad areas report that many accidents are the result of beginners aggressively grabbing loose rock features without first cautiously testing them. Assume such features are poor, and avoid becoming a statistic.
Whatever the Rock Feature . . .
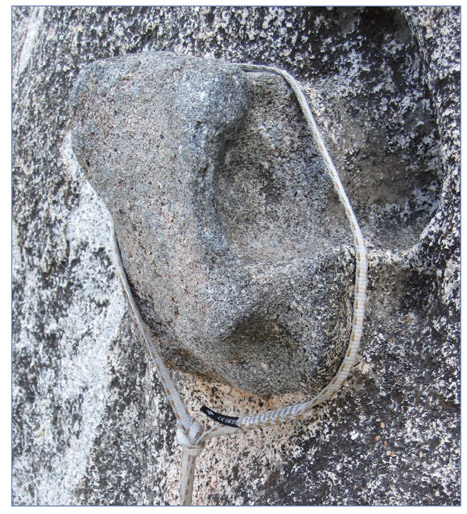
A boss is a rounded spike or knob; a chicken-head is a knob that often resembles a protruding mushroom; and a bollard is a hummock of rock. The bigger they are, the more probable it is that they are sound—but not always. Depending on the shape of the knob, the hardest part might be figuring out how to tie it off. The more rounded, the less secure. The girth-hitch is usually helpful here.
A chickenhead is as shady as a felon on bail. Approach it with wariness. They usually consist of a mineral or rock type that is more resistant to weathering than the underlying stone. Carefully inspect the base of all chickenheads because many are shot through with thin cracks. Thump them gently, then harder. I’ve had more than a few chickenheads come off in my hands, and several have popped the moment I stepped on them.

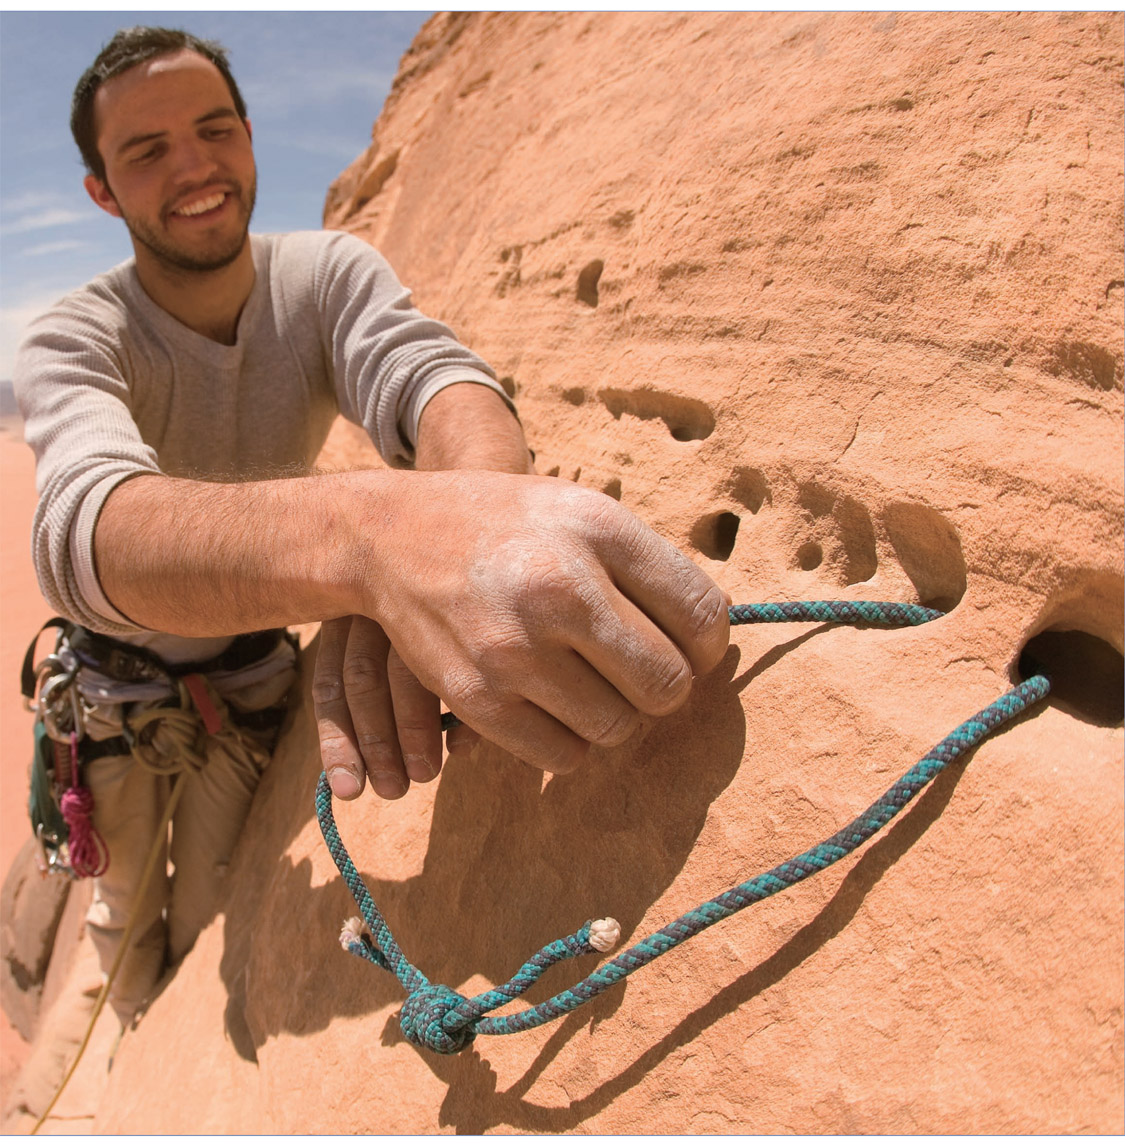
A properly threaded tunnel.
Recreational climbers rarely venture onto new or infrequently traveled routes, where the above considerations are particularly germane. As mentioned, most popular routes have long since had most of the loose rock booted away. But never count on it. It took almost forty years for a well-known rotten log to finally fall off the classic Royal Arches in Yosemite, and when that monster finally cut loose, it must have been a sight. Ultimately, common sense and a suspicious sense of judgment are your best weapons when dealing with all natural features.
When the rock weathers or cracks to form a hole in the main wall, climbers often can exploit the feature by threading a sling through the cavity. Common sense and sticking to the advice already laid down is key here. Is the feature strong? Thump it. Are there sharp edges? Is it cracked? And how big is it? Occasionally something as small as a suitcase handle can provide adequate protection. Anything less should be used cautiously, no matter how stout it appears.
Any rock lodged inside a crack is a chockstone. You appraise the security of the chockstone just as you would that of a nut—does the stone’s symmetry correspond to that of the slot? Is the stone set in a bottleneck or a constriction? Will downward loading decrease or increase its purchase? After considering these points, apply the same rules concerning horns, blocks, flakes, etc. Are there sharp edges? What is the quality of the rock? If all things look good, but the positioning is suspect, wiggle the stone around and secure a better seating if need be, but be careful not to dislodge it. This is a very real concern with bigger chockstones, and if the thing blows, it’s bombs away!
Pay close attention to how you sling the chock-stone. Often even the slightest tension can cause the chockstone to wobble or rotate inside the crack, and the sling can creep between the stone and the wall and get stuck—or sometimes even pass between the stone and the wall. Chockstones are infrequently used because they rarely meet the above requirements, and can be problematic even if they do. Getting them well slung is often the hardest part. Again the girth-hitch is usually the first option.
Though infrequent, some chockstones are clearly so bombproof that there’s no budging them nohow. In these rare situations some guides girth-hitch the chockstone with a sling, jamming the sling’s overhand knot between the main wall and the chockstone. The idea is to try to distribute any loading between the knot in the sling (which is acting like a nut) and the chockstone around which the sling is hitched. Though I’ve never see this technique used in the field, such is the improvisation common to all facets of anchor building.
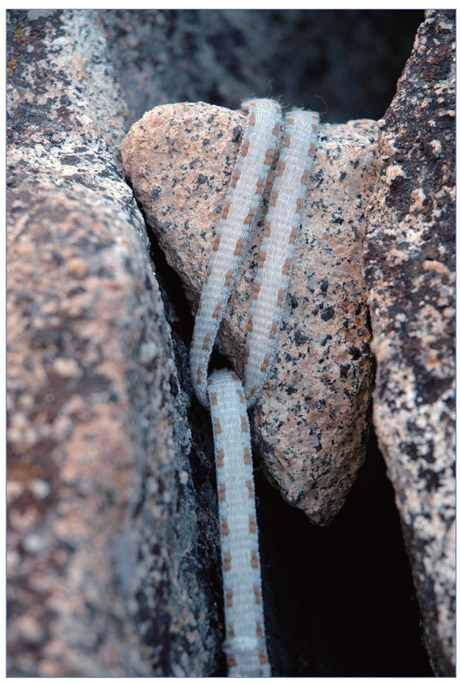
Tied-off chockstone—often a doubtful proposition. This chockstone, only caught on the top (left-hand side), looks like it might pivot free if any outward force is applied.