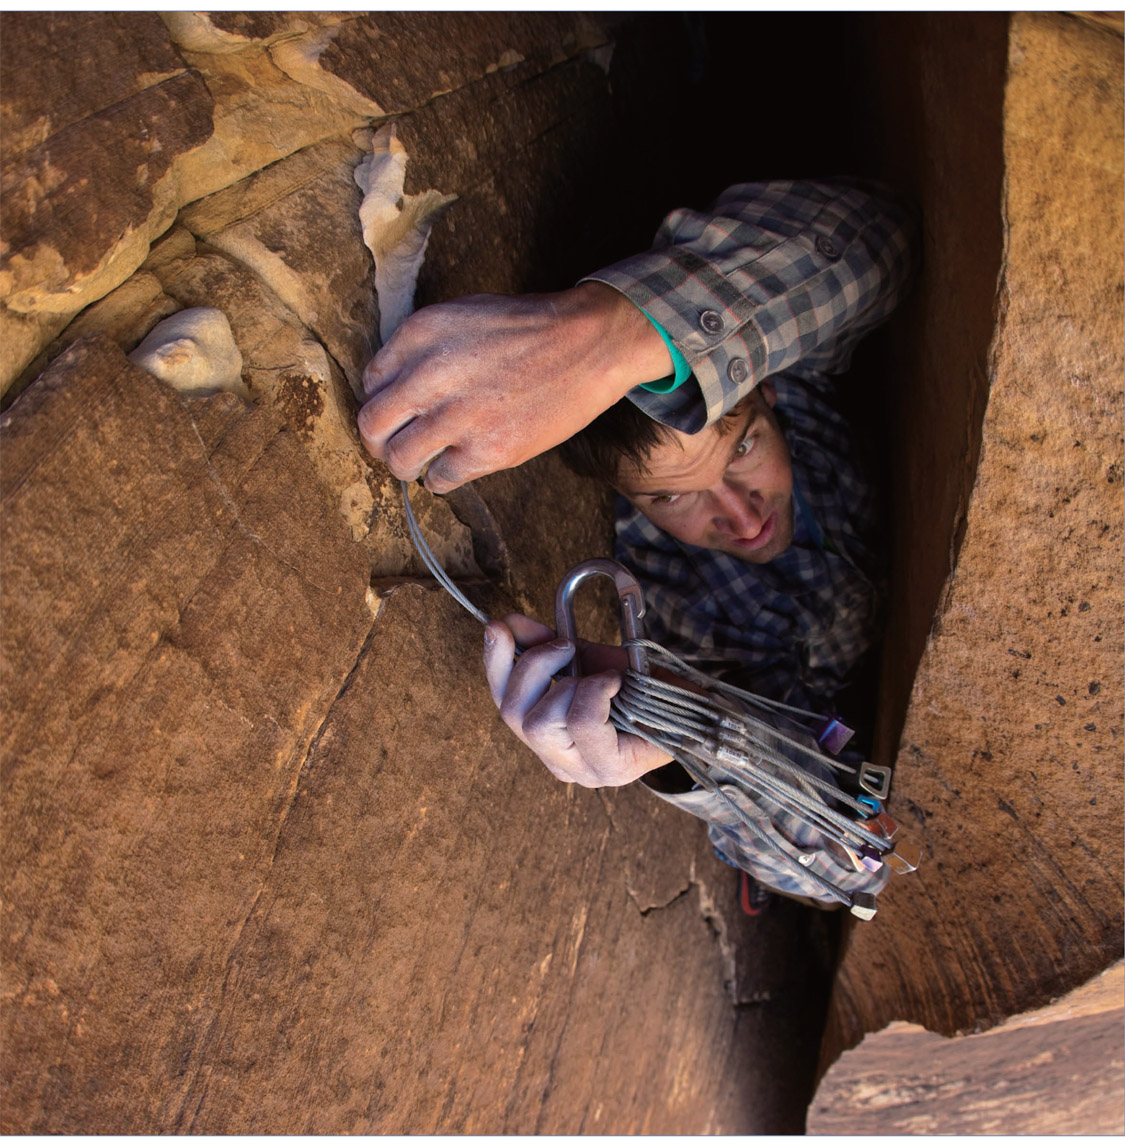

PHOTO BY ANDREW BURR
Much as I’d like to shorthand the purely verbal discussions, the fact is you need to study more than the photos and captions to fully grasp the material. It’s not enough to see a photo of an anchor and know how to construct a similar setup. You also have to know what you’re looking at, in both simple and theoretical terms, and you have to know why you do things this way or that. Much strategy goes into placing and constructing anchors, and the nuances cannot be adequately spelled out with the anchors that are already built, as they are in the photos. With this text you learn the theory; in the photos you see that theory applied. Yet it’s not enough to discuss or even to see how to make placements; you also must learn how to place pro (protection). Trial and error is not the recommended strategy. Developing good hardware-placing skills is a craft requiring diligent practice, and the best way to start is to get a grasp of the material from a guide like this, practice placing pro low to the ground (preferably with your feet on the ground), and then take an anchor-building seminar (very common these days) from a qualified guide. Such a multipronged approach increases the odds that the material will be thoroughly understood and that it will stick. For now, bear with these windy breakdowns and see the subject all the way through.
The family of climbing chocks can be split into two categories—passive chocks (or nuts), which emphasize simplicity by having no moving parts, and active chocks (spring-loaded camming devices or SLCDs), which achieve a high degree of utility through their geometry and moving parts. Passive nuts can be further divided into two categories: tapers, and all the rest. Passive nuts wedge into constrictions inside cracks, with the notable exception of Tricams, a sometimes fussy piece of specialty gear—loved by a few, never used by all the rest—that can wedge in a constriction or cam in a parallel-sided crack. The greatest asset of passive nuts is their simplicity. They have no moving parts and are light, compact, reliable, and easy to evaluate when placed.
As a primary anchor, many climbers go with the low-tech, passive nuts—when they have a choice. They require less judgment and are easier to appraise with a novice eye. For instance, if the crack narrows like a bottleneck, place a taper in the bottleneck instead of wiggling an SLCD into a parallel section of the crack. Unless the wire fails (almost unheard of in tapers of medium size or greater), or the rock shears away (very unlikely in good rock), there is virtually no way for the placement of a taper in a bottleneck to fail when set for the direction of pull. Again a low-tech approach is almost always easier, more efficient, and more secure. Like they say, you don’t row a boat with satin gloves.
Tapers are basically six-sided aluminum wedges. Smaller tapers also come in brass and steel, as we’ll soon discuss. Present-day tapers of every size are slung with a swaged cable; in years past some tapers were engineered to be slung with cord. Note that one of the recent refinements in tapers is the elimination of overkill in the size of the wire. Instead of attaching a wire the size of a ship’s cable, most manufacturers now are going with a thinner, lighter, less-expensive cable. The facts have dictated such a move—after all, given the properties of modern ropes, a normal-size climber taking the longest possible fall cannot generate an impact force exceeding 2,420 pounds, so why freight the nut with a cable good to 7,000 pounds? Wild Country has noted that for years their tapers (excepting small sizes 1 to 4) featured cable good to “only” 2,220 pounds, yet not one cable has ever failed in use.
The first tapers were much wider than they were thick. Now virtually all tapers are of a much boxier design, particularly useful for endwise placements. There are three basic variations on the original straight taper: the curved taper, the offset taper, and the micro brass or steel taper. In addition designers have altered the sides of these various tapers. Some tapers feature gouged-out teardrop cutaways, or scoops. Some have been filed or beveled this way or that, like the Metolius Curve Nut, which is tapered side to side as well as top to bottom. Some look like junior high industrial-art projects and are no good at all. The variations are many, but all are meant to be slotted in a crack whose contours approach the symmetry of the nut, with the cable or sling pointing in the anticipated direction of pull. Ironically, most manufacturers have discontinued making the straight taper in anything but the smallest sizes, having found that the curved model is far more stable when placed.
Placing Passive Gear
Tapers often are the easiest nuts to place because their design is the most basic. The crack must pinch off in the direction of loading—usually down—to accommodate the taper. Simply try to place the taper that best corresponds to the geometry of the crack where it pinches (the so-called bottleneck). Ideally you want a match fit, in which the contours of the crack are precisely those of the taper. Imagine a pea in a pod. Best of all is when the crack pinches somewhat in the outward direction as well. Here the contour of the rock will resist a slight outward tug that could be created by a falling leader, or a belayer shifting about to rubberneck the leader. The ideal placement may be as elusive as the blue moon or the perfect spouse, but good placements are generally plentiful. Dealing with anything but the most deceptive placements is basically a matter of common sense—no need for a bag of tricks.
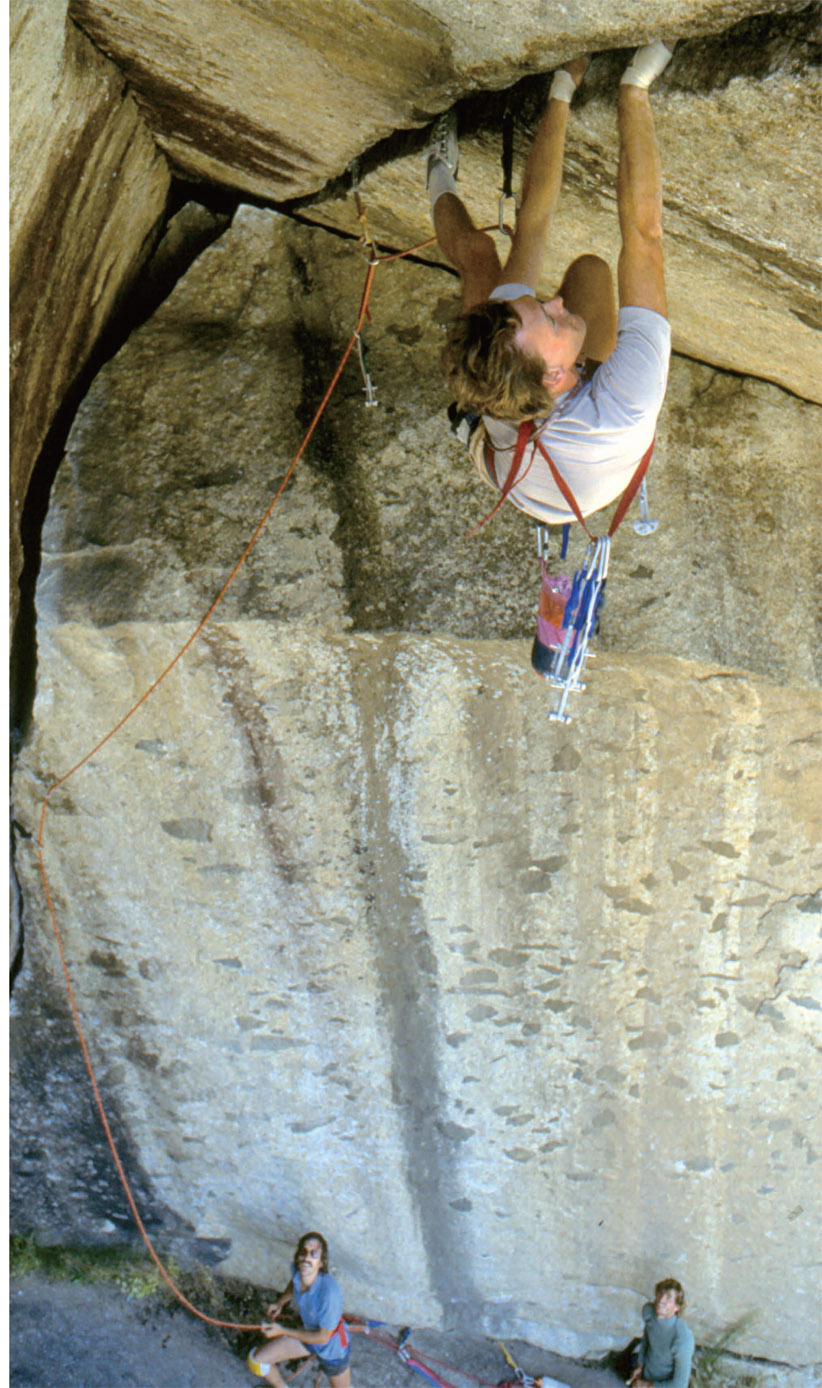
Tom Callahan on Separate Reality, Yosemite, California.
The more surface area you contact between the rock and the nut, the better. Sometimes, you will have to slot a nut deep in a strangely formed, flaring crack; but if you have a choice, place the nut where you can see exactly what it is set on. With straight tapers you go after the bottleneck placements, or placements where the nut fits like it was milled just for that slot—the proverbial “match-fit.” If neither of these placements is possible, try to firmly slot the nut in a constriction where the taper is lodged at about mid-range, or halfway up the faces. If the taper sets too low, say right above the cable, the nut is too big; if it is merely caught on the top 20 percent of the face sides, the nut is too small. Once again go with the taper that best corresponds with the contour of the crack, and try to get as much surface area as possible on the rock. Few rock climbers will ever tell you that size does not matter. And with tapers, always go with the bigger one whenever possible. The cable is probably stronger, and the larger nut will afford more surface area contact and more security. But the principal concern is the placement—be sure the taper fits the crack.
Several Rules for Setting Safe Chocks—Passive or Active
The primary rule is that no rock-climbing anchor is 100 percent reliable. Appropriate backups are essential for secure climbing.
Before setting a chock, look around to find a strong, quick placement, considering all possible directions of loading. Always go for the easiest, most obvious placement, and use a passive nut if possible. Pick a nut that you can place in an easy, straightforward manner, as opposed to making a “creative” placement with a different-size nut.
Try to slot nuts in constrictions where, in order to ever pull through, the nut would be reduced to something as thin as beer can aluminum.
Always visually inspect the placement. If the situation requires, set the piece with a tug.
Any climbing protection is only as strong as the rock it contacts. Manufacturers report that nuts pull out under frighteningly small loads during testing in poor quality rock. Chocks create a large outward force when holding a fall. Avoid setting anchors behind a shaky flake or block rather than risk pulling it down if you peel off—it’s always best to fall alone!
Try to place the gear in its primary position. Most all passive nuts can be positioned in several ways. Familiarize yourself with the primary, or preferred position, and try to go with that whenever possible. For instance, a taper can be placed endwise, but usually it is not as reliable as one placed the primary way.
Be especially careful not to dislodge the piece with your body, rack, or rope after you have placed it.
If you haven’t used a certain type of chock before, practice placing it on the ground (extensively) before thumbing it into a seam and casting off for a barn-door lieback.
No climbing gear lasts forever. Inspect your gear frequently. Retire hardware if you observe cracks or other defects in the metal, or if the cable becomes kinked.
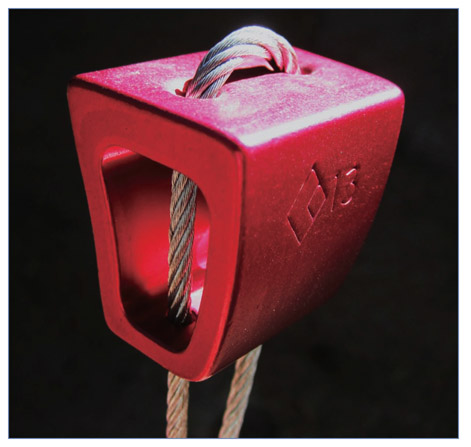
The classic designs of the Stopper have changed little since their inception in the early 1970s.
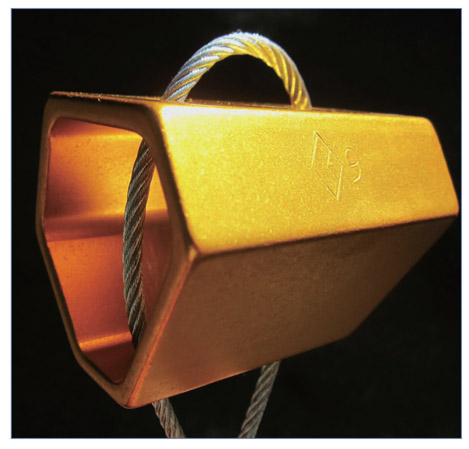
The classic designs of the Hex have changed little since their inception in the early 1970s.
In shallow or flaring cracks, even pros have to tinker around to find the best placement, and this is where endwise placements are most often used. An endwise placement offers less surface area contact with the rock, but go with it if the fit is superior. You might have to, because some cracks are too shallow to accept a normal placement. Again, when the placement is marginal, look for that section of crack where the constriction best corresponds with the geometry of the taper. At times you will have to try various tapers to find one that will fit at all, then have to jockey the nut around to locate the best placement, or any placement. On some climbs the hardest part is placing the gear.
Curved tapers are a bit trickier because they present options that straight tapers never did. A little more complicated, yes; but the fact that for twenty-five years they have replaced straight tapers almost exclusively indicates the curved design offers better stability in most placements. The actual curve is hardly radical—usually just a few degrees—and normal placement usually attains an adequately flush fit on the face sides. You should always try to get this match-fit type of placement, but accept the fact that sometimes you cannot.
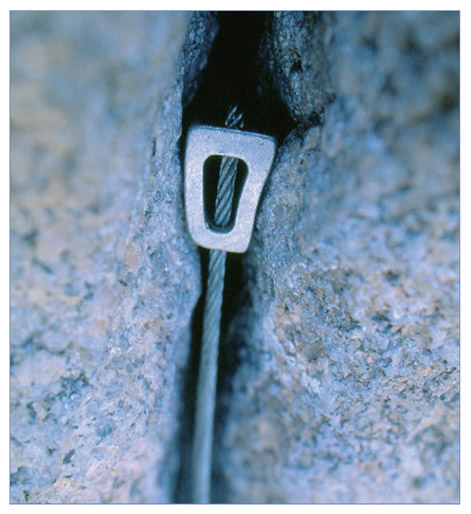
Both sides of this Stopper have great surface contact, and the constriction of the crack corresponds with the shape of the taper.
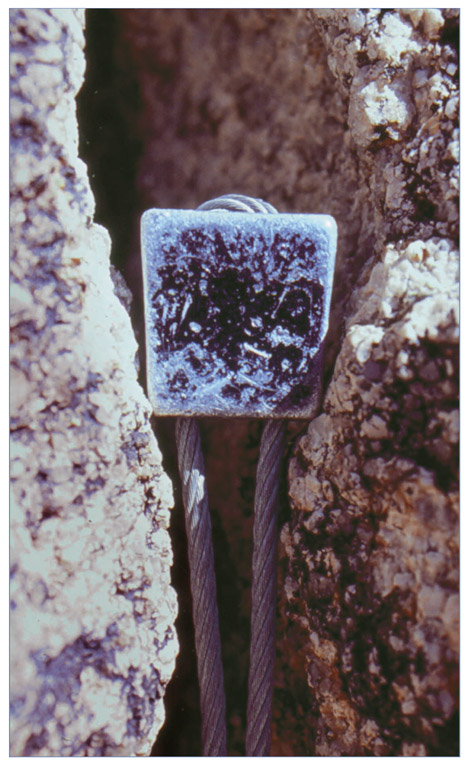
Like a man in the wrong-size trousers, this Black Diamond Stopper does not fit the slot. A desirable placement would involve a larger Stopper normally placed (rather than endwise), with the main faces of the chock flush with the walls of the crack. This nut has all the earmarks of sketchy pro: poor surface contact, susceptibility to an outward force plucking it from the crack, and instability from sitting on the flat base of the nut. On a scale of 1 to 10 (10 being bomber), this Stopper is about a 2.
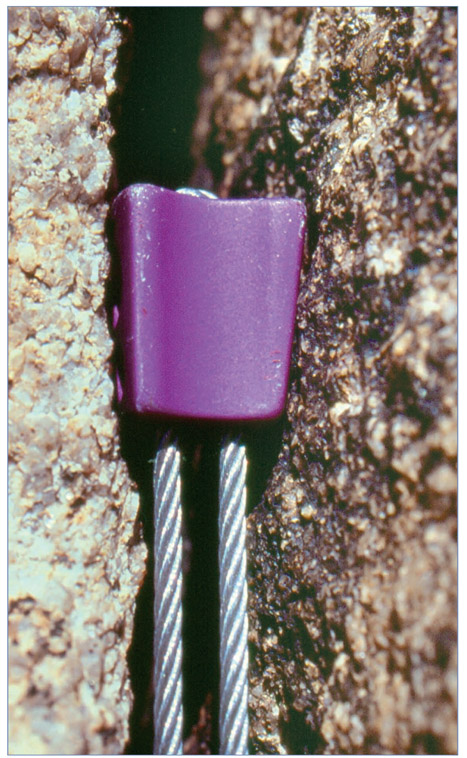
This Metolius Curve Nut has great flushness on the right wall of the crack, but the left side has negligible surface contact on gritty, grainy rock. Dicey! Because endwise placements are generally less stable, always strive to get a flush fit with as much surface contact as possible.
According to Metolius, the design of Curve Nuts, while not technically “offset,” gives them added stability in flares. If you should wiggle this nut around a bit, you’d likely find an ideal placement—that’s how it usually works. Few cracks are perfectly parallel sided, and slight repositioning can change a marginal placement to something much better—or worse.
A straight taper works much like a fist jam in a constriction, where both sides of the fist are lodged between the walls of the crack. A curved taper sets in the crack like a hand jam, with three points of contact; a downward pull achieves a rocker effect that further locks the nut in place. There are several things to understand about curved taper design. (The following discussion can best be understood if you have a curved taper on hand for reference.)
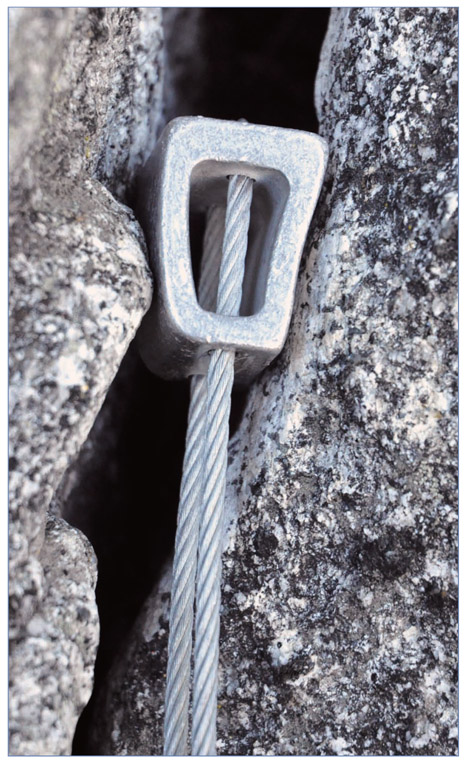
This marginal Stopper placement is in a good bottleneck, but since it lacks flush contact on the left side, a slightly outward pull will pluck it from its placement.
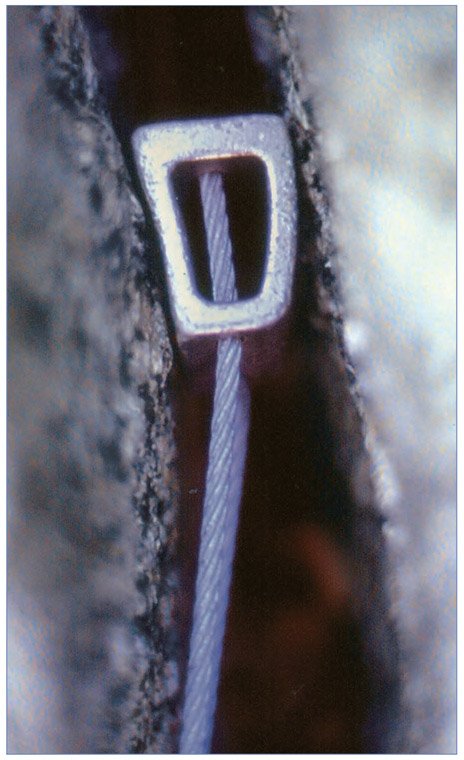
This Stopper is flush on the left side, but the right side has only about 50 percent surface contact, plus the crack opens up immediately below the placement. This placement is not bomber—maybe good enough to hang off, but if this Stopper was all that was keeping you from hitting the deck, you’d best quickly look for other placements.
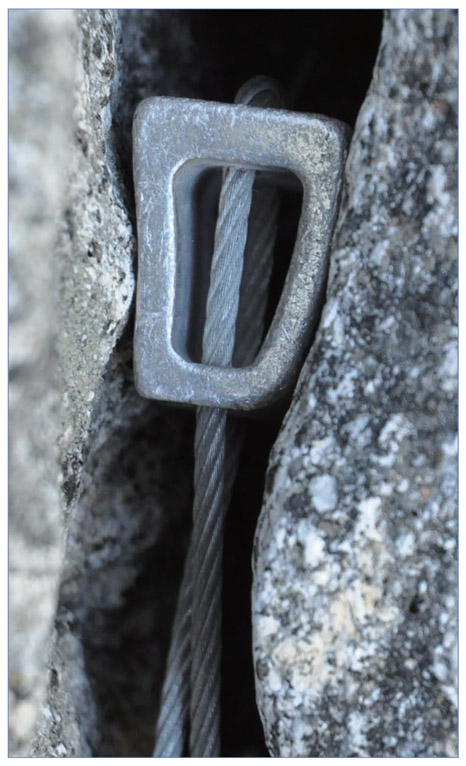
Stopper in a bottleneck placement. There is simply no way that in a downward pull the nut could be pulled through the bottleneck— something would have to give; either the rock itself or the nut or wire cable breaking.
Like a banana, you can place a curved taper two ways on the tabletop, so it curves one way or the other. You have a “left” and “right” option simply by flipping the taper over. In a V-slot, or uniform constriction, the curved taper is placed the same way as a straight one, and the curved design plays no meaningful role. Most any nut will do in a true bottleneck. If a bottleneck or pronounced constriction is unavailable, search out that section of crack that best corresponds with the taper’s curve, and place it left or right as necessary for the best fit.
Very few cracks are perfectly parallel, and even the slightest wave or jag may be sufficient to accommodate the taper’s curve. But when the crack is truly even-sided, you have to utilize the camming action of the nut. The crack still has to constrict, if only slightly, and you must go after that place where you can get a good three-point setting—a fix on the top and bottom of the concave side, and a firm lock on the convex side. You may have to try both left and right placements before you achieve the best fit. The security of the nut, however, usually is determined by how much and how well the convex face is set. If the concave side has a decent, two-point attitude, if much of the convex side is set snugly, and if the rock below the point of contact narrows even slightly, the placement is likely sound. If the convex side is barely catching, or if its point of contact is either high or low, the nut is almost certainly marginal. Often you can simply flip the nut around and get a better placement. If this doesn’t work, try another type of nut.
Beware that the crack doesn’t open up on the inside, where the chock could pull through and slip out below like so much sand through an hourglass. In horizontal cracks, try to find a spot where the crack opens in the back to accept a taper, but pinches off at the lip to hold it securely. Otherwise, place two tapers in opposition (to be covered later). Tugging on a precarious nut may set it and improve its stability, but over-tugging every piece will drive your partners to hard drink as they curse and dangle from their fingertips, trying to remove your jammed gear. That much said, one of the most common mistakes made by novice leaders is to not properly set their nuts and have them rattle out as they claw above.
The business of placing nuts in horizontal cracks requires special attention and will be dealt with shortly. For now understand that nuts are routinely placed this way, but for various reasons. Horizontal placements, alone and in groups, present special challenges and require all the judgment we can muster. Several recent anchor failures, that killed outright all involved, were owing to failed nuts in horizontal cracks.
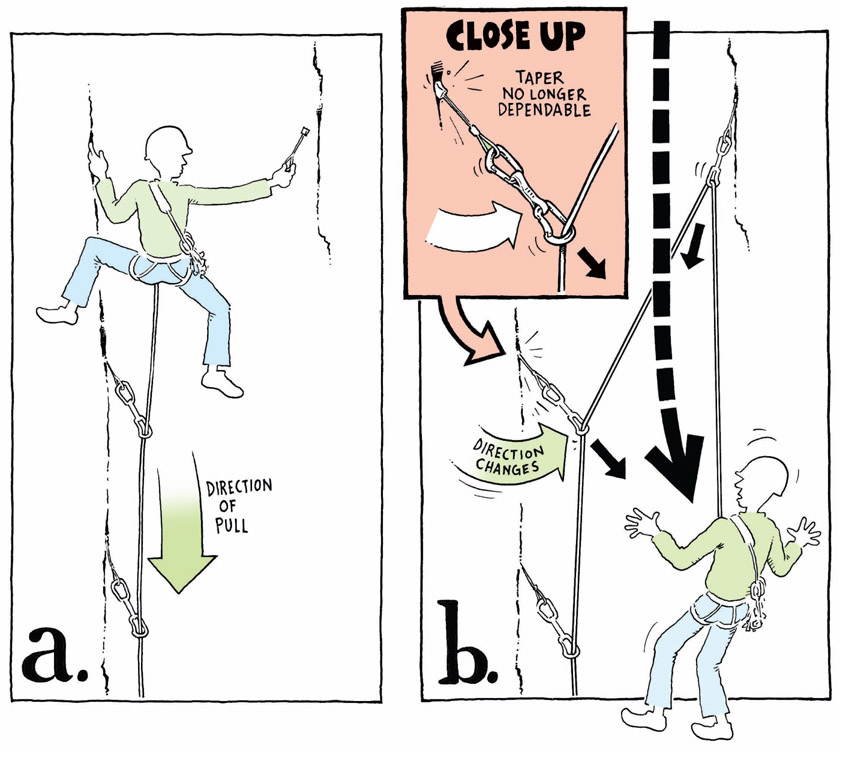
The direction of pull on protection changes with the next placement. In figure A, the falling climber will impact the protection straight down. Figure B shows how a fall on protection placed higher and out of a direct line with pieces below will change the direction of pull. Note that the falling climber will not pull straight down on the top piece because of the placement of the previous nut.
A last and utterly critical consideration concerns the direction of pull—and this is relevant to all forms of protection, not only tapers. While we are intentionally avoiding discussions that involve the art of leading, the two subjects—placing anchors and leading—naturally overlap. Direction of pull is one of those places.
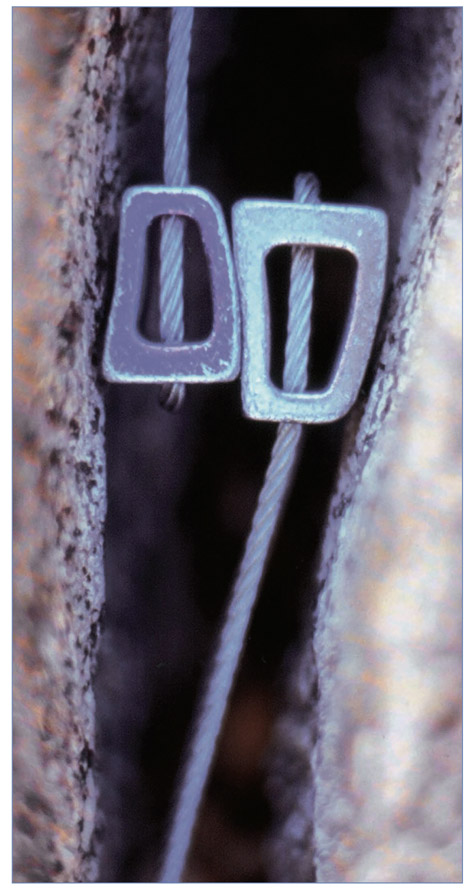
Both the ball nut and removable bolt are based upon this concept (opposition). While this configuration (“stacked” Stoppers) will work, it is rarely used. In this case these two Stoppers mate together rather well, and both have flush contact with each other and the wall of the crack.
The question you must bear in mind is: In what direction will your plummeting body, or that of your partner, impact the nut? Obviously gravity dictates that falling objects drop straight down—the proverbial fall line. But chances are, your rope is snaking through a succession of protection below, and that the protection is not in a direct, up-and-down line. Consequently in a fall, each nut is weighted by the rope, which holds the falling climber at the business end. Often a falling leader will first impact a nut with a slight outward pull, then a heavy downward pull (shock loading). Also if the nut beneath the top nut is anywhere but directly below, the direction of pull on the top nut will be downward and somewhat toward that nut (at an oblique angle). It sounds complicated, but it isn’t, and the best and only way to determine the direction of pull is to consider the rock as a geometric grid.
If you know where your protection is on the grid, you know that your lower nut is a little to the right or left of your top one, which means a fall will pull the top nut slightly to that side. After a couple of leads, you will understand this simple principle. For now it is important that you understand that protection should be placed appropriately for the anticipated direction of pull, or as close to it as possible. The cable or cord coming from the bottom of the nut should point in the direction of pull. More on this later.
Bearing these points in mind, the business of making the difficult placement simply is a matter of jockeying the taper around in an attempt to best satisfy the aforementioned points. Accomplishing difficult placements is an acquired art, but it doesn’t take a wizard to realize a taper hung on a couple of crystals, hanging well out of a rotten crack, is less than ideal.
Imagine yourself climbing up a thin flake, but presently you must traverse off right. You find a nut placement at the top of the flake, but see straightaway that the traverse will put an oblique stress—a sideways pull to the right—on the nut, which is slotted for downward pull. In short, the sideways pull could jerk the nut right out, no matter how many runners or quickdraws you attach to it. And an SLCD won’t fit the crack. The normal solution is to place an up-slotted nut and lash it tight to the down-slotted, load-bearing nut. The up-slotted nut keeps steady tension on the down-slotted nuts, keeping both securely lodged and providing a multidirectional setup. The hardest part of this operation is almost always attaching the up-slotted “keeper” nut to the other one, while still hanging on to the holds.
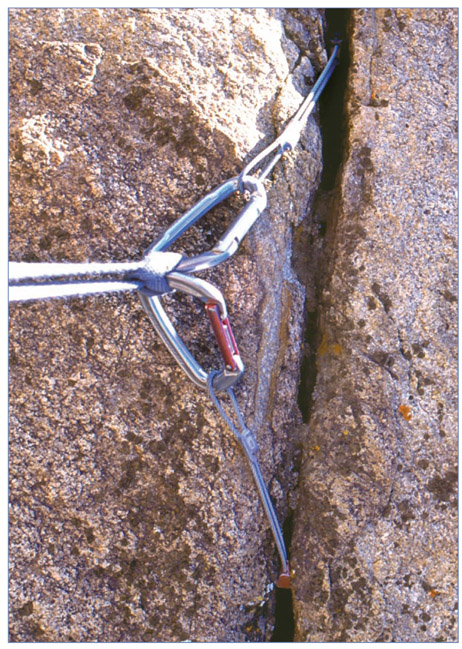
Nuts in opposition, tied together with a clove hitch on a sling, can help solve the direction-of-pull dilemma, especially when an SLCD placement is not available. See the knots chapter for a detailed description of how to tie a clove hitch. This configuration will also work for nuts opposed in a horizontal crack.
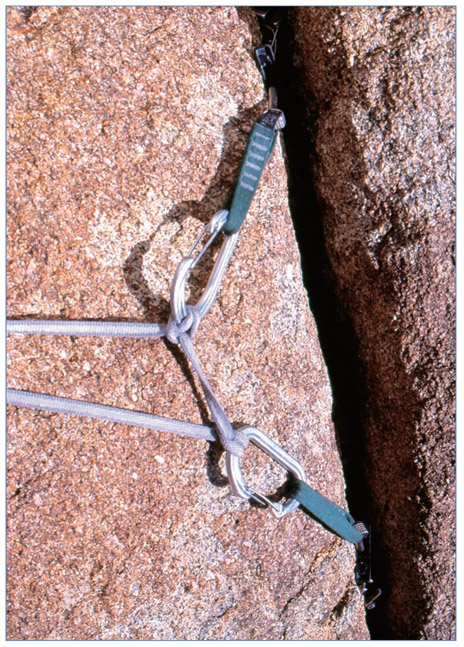
Another way to use the clove hitch on oppositional pieces. Here the pieces are set farther away, so two clove hitches are used in the sling to tension the pieces against each other.
Opposition can be rigged in vertical, horizontal, or even diagonal cracks. Essentially four situations can arise in establishing opposition:
 inch sewn sling. After rigging this setup, clip into the sewn loop or one of the pieces, whatever best suits the overall anchor setup.
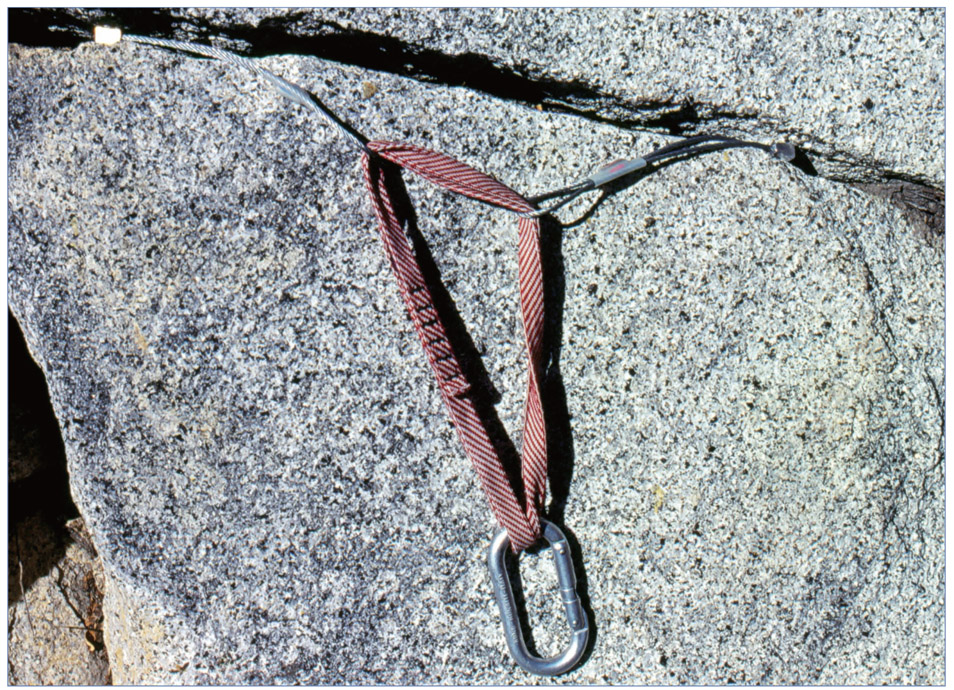
Two stoppers in opposition with a spectra sling basketed through both loops of the swaged cables. Here the placements appear to be bomber, and the sling equalizes both nuts in a good direction, pulling their vectors to the optimal angle for direction of pull on either placement, albeit in the American Triangle rigging format (see American Triangle chart on page 183). The problem here, and it’s a big problem, is sling over ⅛ inch diameter steel cable, which can slice through the sling much like a dull knife. Testing of sling over cable has revealed that it may not be as dire as once thought; however, this is a technique that should only be used as a last resort. A good rule of thumb is simply to avoid using any sling (be it nylon or spectra/Dyneema) over a wire cable.
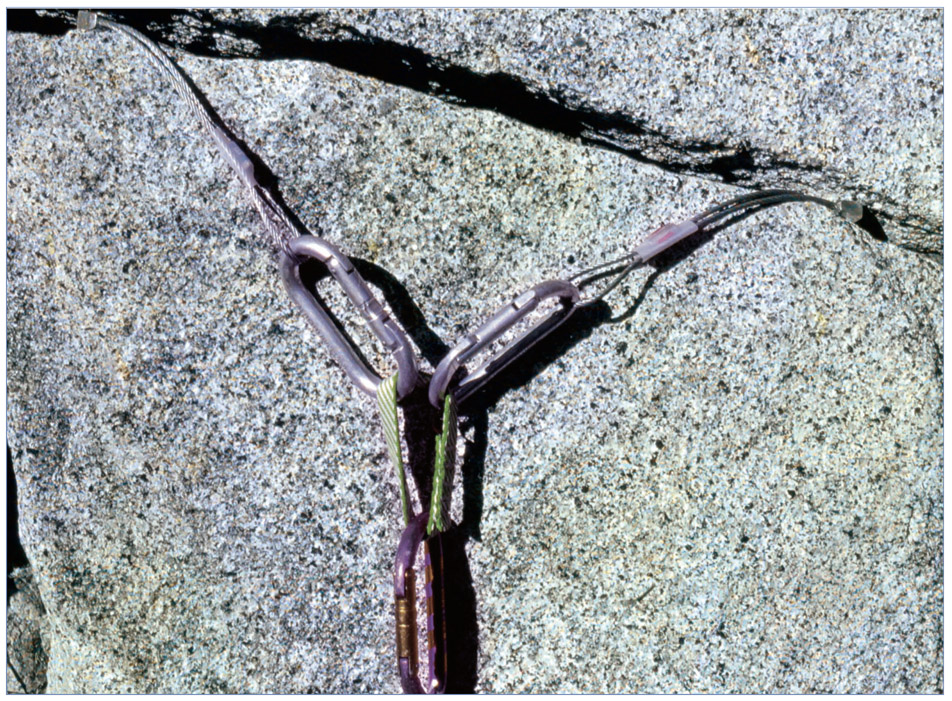
Sometimes you get lucky and two opposing nuts come together at just the right distance and just the right angle where simply clipping in with a sling maintains the direction of pull you’re looking for.
There are many other possible configurations for opposing nuts—far too many to run down here. The important thing is to understand the few rules of thumb we have laid down: opposition, tautness, and adjusting the length of slings. Exactly how you rig any anchor is ultimately your call, and is case dependent.
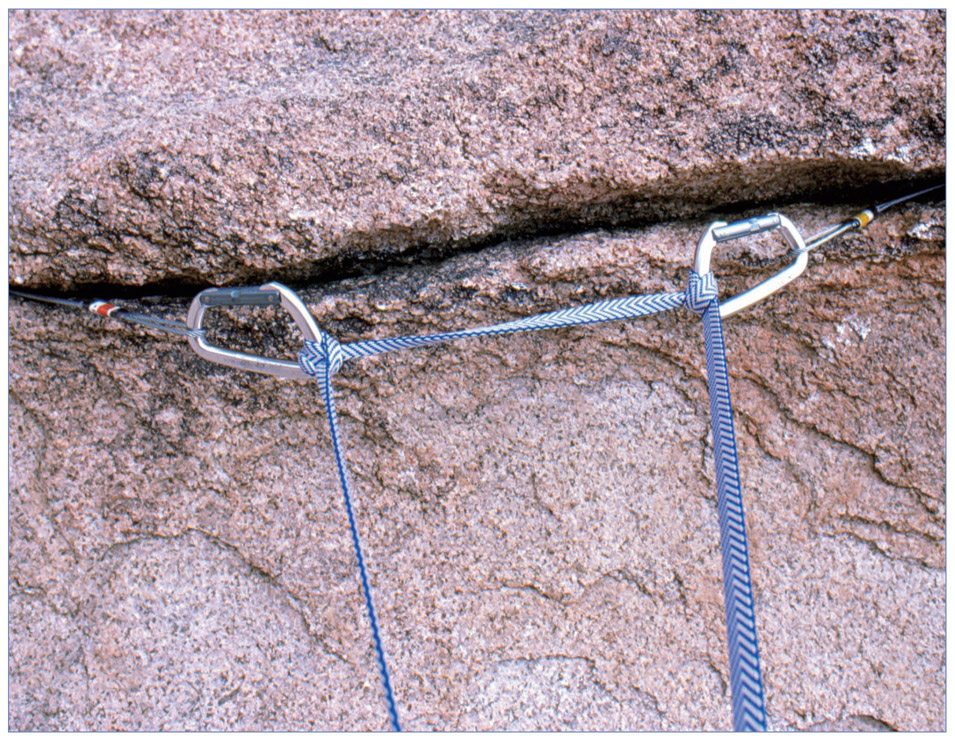
Here clove hitches on a spectra sling are used to adjust and maintain the direction of pull in these two oppositional nuts. A nylon sling is a better choice for tying clove hitches, as nylon grips much better than spectra or Dyneema, which is inherently slick. Also, any knot tied in spectra or Dyneema weakens it drastically (up to 50 percent in a simple overhand knot) whereas a knot in nylon shows no such drastic strength reduction, and in fact lessens impact forces on the piece as long as the sling is not loaded to failure.
For a nut placed in a horizontal crack to be any good, it must be capable of withstanding some downward pull on the cable or sling, which will result in an outward pull on the nut. In the majority of cases, the loading will be straight out on a nut placed in a horizontal crack. Therefore some part of the crack must taper at the lip, allowing you to wiggle a nut into place, set it with a yank, and hope it doesn’t shift around and work loose from rope drag. It’s often hard to clean these types of placements. When the crack does not taper at the lip, one option is to place oppositional nuts. This setup appears much more in climbing books and articles than it does in the field, however, because unless you have two ideal slots closely positioned, it’s exceedingly tricky (and typically time-consuming) to rig horizontally opposed nuts that are worth the hassle. The advent of SLCDs has greatly reduced the need to consider horizontal oppositional nuts but has not eliminated the technique altogether (in quirky circumstances). In over thirty years on the rock I haven’t placed horizontally opposed nuts more than a few times, and never in an anchor matrix.
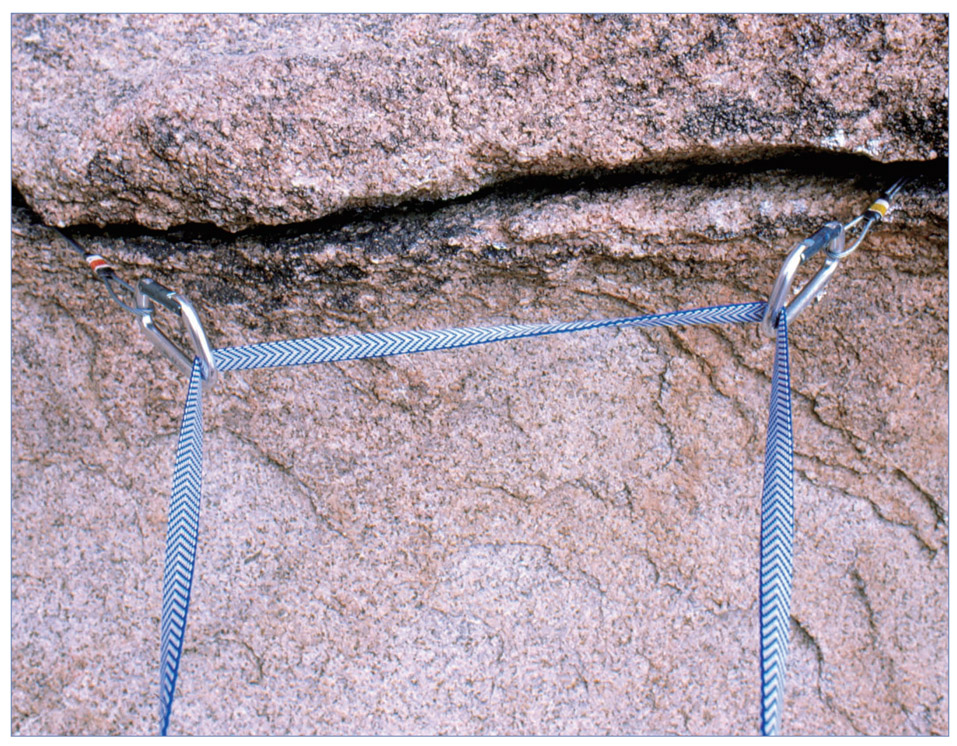
Without the clove hitches, the pull on these two placements changes to an undesirable outward pull, and the forces are increased by American Triangle rigging.
The techniques described above for normal opposition generally work well for horizontal opposition. It’s the rigging that is dicey and problematic. Somehow you must rig two opposing nuts—both good for a lateral pull—so they also are good for downward and outward loading. If you have two opposing bottleneck placements, the nuts are probably good, and their placements basic. Here it becomes a matter of rigging the tie-in so the nuts sustain enough tension to keep them well set, usually accomplished by tying the two nuts taut against each other with clove hitches on a sling, and clipping into the sling. If the sling is fairly long—so the two legs of the sling from the nuts to the tie-in carabiner form a shallow angle—then the nuts must be able to withstand a force that pulls them both inward, toward each other and down, or sometimes out, toward the load. If the pieces cannot withstand much of a downward force, using a shorter sling forces the loading more inward but also increases the magnitude of the force (load multiplication) because the pieces must work more against each other.
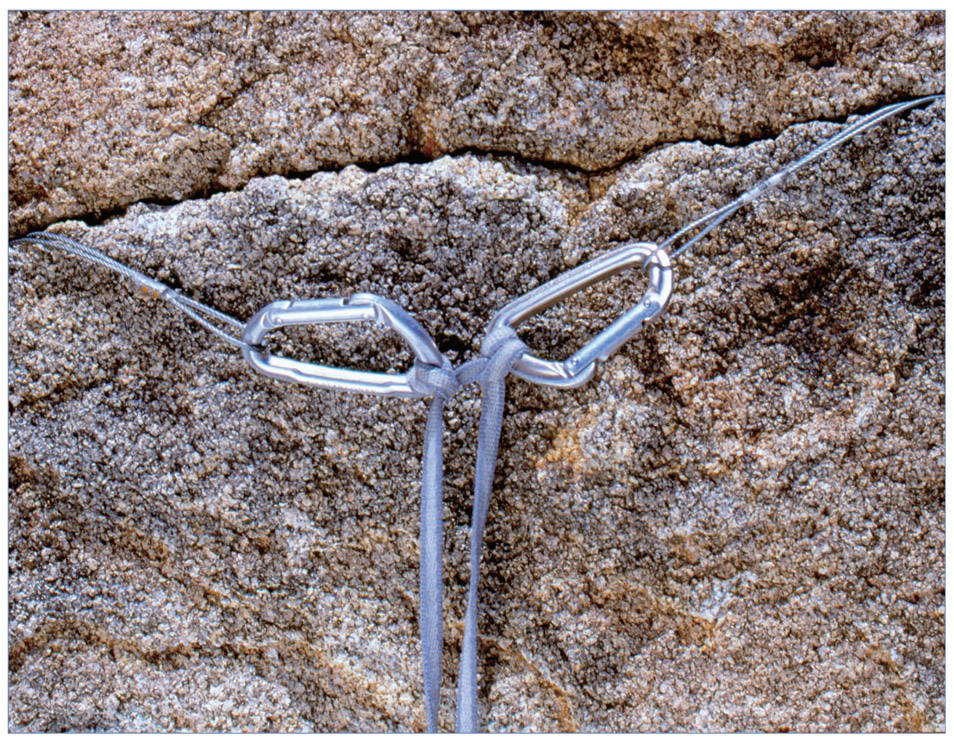
Here, clove hitches have been tied directly into the two nuts to eliminate undesirable angles of pull on the placements. Not only do the clove hitches allow the sling to maintain an optimum angle of pull on the nuts, but so long as some pressure is placed on the anchor, inward forces between the pieces keep each nut well set. This is one of the best ways to rig two opposing wired nuts in a horizontal crack, a rare scenario but not unheard of on trad climbs.
Some climbers simply connect the two nuts together with a chain of two or three carabiners. While this may be appropriate in some situations (rarely), it puts dangerous triaxial loading on the tie-in carabiner and forces the loading inward, which may be good for the stability of the pieces but also may create unnecessarily high forces on them. Furthermore, the carabiner chain does not provide the oft-needed tautness to hold the pieces in the crack when they aren’t loaded. If you must use a chain of carabiners, it’s best to use two carabiners with gates opposed at the tie-in point. That much said, try to avoid doing so if at all possible, because other, superior rigging methods exist.
Whatever the setup, horizontally opposed nuts are only as good as the weakest nut. Ultimately the only way to be sure is to test them with as violent a tug as is prudent, which, in fact, is but a mere fraction of the forces exerted by a fall. However well we explain things here, placing horizontally opposed nuts takes a lot of practice. You’re off to a reasonable start, provided you understand and heed the basics.
Offset tapers were developed several decades ago by Hugh Banner of the United Kingdom. These nuts are tapered in two directions, creating a shape that improves security in flared cracks.
The best way to understand this design is to get an offset taper and look at it. You’ll find that one edge is thicker than the other—or “offset.” Offsets are ideal for flaring cracks that narrow toward the back—like pin scars—where a normal taper would find scant purchase. Be warned, however, that though the offset will work wonderfully when properly set, it is less forgiving in marginal placements, and unless you’ve got most of the surface area firmly locked, offsets can pop faster than you can yell, “Watch me!”
Originally viewed as a specialty item for use on big aid routes, some free climbers carry a few for those “oddball” placements where nothing else works as well. They were first available only in small sizes, but a dozen or so years ago several manufacturers started offering the offsets in all sizes. The original designers are now out of the climbing business; though on a small scale, offset tapers are still made by several outfits. Offsets have their limited place in the protection game but are likely to remain a specialty item rarely used in normal climbing situations.
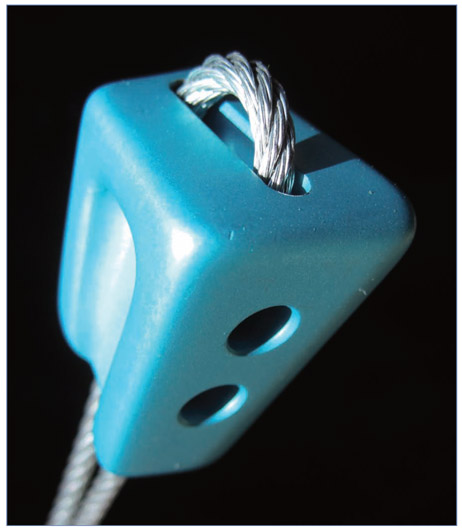
Offset nut.
Prudent use of micro-nuts hinges on knowing their limitations. Regardless of what any catalog might tell us, we know at a glance that a wee dollop of brass or steel at the end of a piano wire is, at best, a stopgap device—a last resort when the rock affords us nothing else. The limitations of micro-nuts are matters of strength—the strength of the cable, of the actual nut, and of the rock in which the micro is placed.
Basic Rules of Placing a Good Taper
Amazingly enough, cable strength is the least liability on all but the smallest micros. Cables on the puniest micros are rarely good beyond 500 pounds, if that much. Most manufacturers don’t recommend them for free climbing, as even a short fall can snap the cables like so many kite strings. But sizes beyond the smallest feature silver-soldered cables that are good beyond 1,500 pounds and are adequate to survive falls of moderate length. The cables are fragile, however; frays and kinks denote weakening and are sure indicators that the nut should be retired. The cables are particularly prone to fray just beneath the body of the nut, a consequence of the wrenching they take when cleaning them from a climb. Place and remove them gently if you want them to last.
Both nut and rock strength are the limiting factors of micros. Look in any catalog featuring micros and you’ll see many disclaimers and explanations. The language can get confusing, so let’s look at the situation in simple terms.
Regardless of type or brand, the actual nut head on any line of micros is indeed micro. When you fall—and eventually you will—your weight impacts a very small piece of stainless steel or brass. Depending on how malleable the nut is, and how hard the rock is, several things can happen. With steel micros, even when placed in diamond-hard granite, a moderate fall should not radically deform the nut’s shape, because the relative hardness of steel is quite high. However, if you place a steel micro in quartz monzonite (Joshua Tree) or sandstone, where rock is prone to shearing away, even the perfectly placed steel micro can rip out, leaving a little groove where it tore through the rock. If the rock is something less than granite or dense limestone, brass micros don’t tend to rip out, because the softer brass can deform and bite into the rock. In soft rock, brass micros tend to seat better than steel because of increased friction and bite. In diamond-hard rock, however, softer micros sometimes can’t offer enough resistance to the impact force of a stout fall, and they rip out. It’s a trade-off, and most climbers own a variety of micros for different situations.
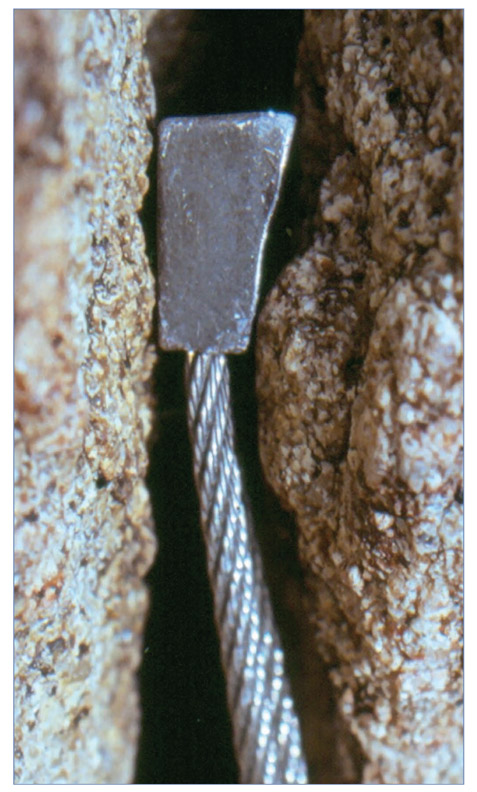
Looking sketchy there . . . This number 6 Micro Stopper (8 kN or 1,798 lbf) has honorable contact on its left side, but the right side is flush only at the base, making the nut very susceptible to displacement by outward force. Placed like this, the taper cannot be relied on to hold anywhere near its rated strength. A slightly smaller nut might better fit in the bottleneck. If this is all you have, set the nut well with several sharp, downward tugs, bearing in mind you have something on the marginal side, untrustworthy for critical situations—like holding a leader fall.
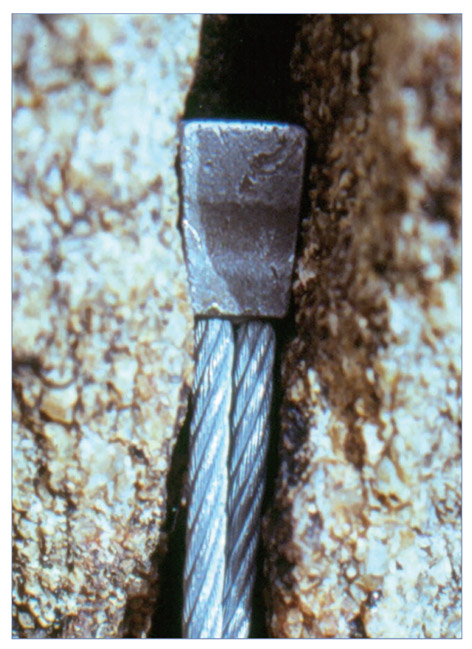
Because of micros’ boxy shape, near parallel-sided cracks often afford the best placements. Careful placement is essential, because the relative differences between a good and bad micro are small indeed. While it is tempting to slot the nut deep in the crack, it’s usually better to keep it where you can visually assess the placement. The right edge of this micro appears to make good contact with the rock, but it’s difficult to see exactly what is happening on the left edge. It’s troublesome to accurately assess many placements without getting your nose right in there and checking it out.
Whenever you have a choice between two equally secure placements, go with the bigger nut as its component strength is higher. But also understand that the quality of both the rock and the placement are typically what make the nut secure/insecure, not the strength of the cable.
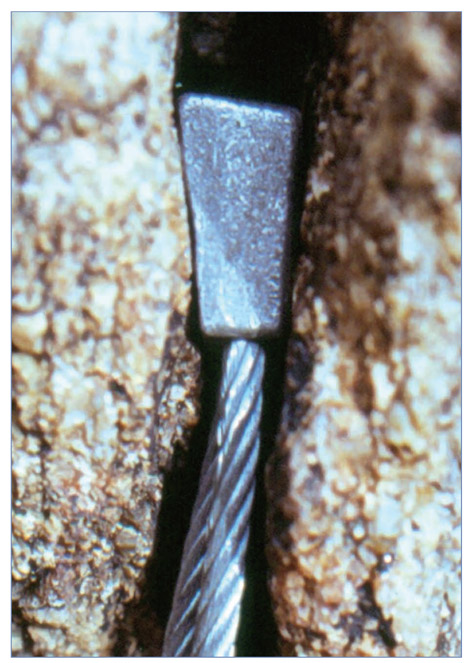
This Black Diamond Micro Stopper has great surface contact on the left side, almost 100 percent flush, and this is what you’re looking for. The right side is also nearly flush, plus the nut simply fits the slot. To secure truly bomber placements, scan the crack for the “V-slot” configuration, and place the nut that best fits the slot. Remember to set the placement with several downward tugs, and give it a test by yanking slightly out and up. A poorly seated nut may hold a ton with a straight, downward load, but may be yanked up and out with a minimal force (like rope drag). Review the breaking strengths of the nuts you buy, and take this into consideration when building your anchor. This number 3 Micro Stopper has a breaking strength of 5 kN (1,123 lbf), compared to a number 6 Stopper (10 kN or 2,248 lbf).]
A load-limiting quickdraw, such as the Yates Screamer, can increase the safety margin of micro-nuts or any other dubious gear used for lead protection. The Screamer, and various devices like it, have tear-away stitching that activates at approximately 500 pounds to help absorb and limit the impact force on your protection.
A couple things to remember when placing micros: Anything but a match-fit, where most all of the nut’s surface area is flush to the rock, should be considered marginal. The four sides of some micros are nearly symmetrical. For those that are not, endwise placements should be slotted with a prayer.
Tips for Using Micro-Nuts
Know for certain that the smaller micros are used almost exclusively for aid or artificial climbing. Whenever a small micro is used on a free climb, it’s always a provisional nut, something to get you to the next good placement—the sooner, the better. There are well-established accounts of micros holding good-sized free-climbing falls, but the reason these accounts live on is because they are so improbable, or more likely, made up. If you’re wobbling out there on bleak terrain and a micro is the only nut separating you from eternity, you’re not long for this world.
Offset micros always should be considered trick—or specialty—nuts. As mentioned, it is highly advisable to go after the match-fit. Micros have precious little surface area to begin with, and you want all of it flush to the rock. This is even more essential with offset micros. If the sides of an offset micro are not lodged fast, it will pivot out when weighted. I learned this on a practice aid route at Suicide Rock, when I took a 30-foot fall and felt like a fool.
Like the larger offset tapers, offset micros are particularly useful in pin scars, where the bottom of the hole is flared and a normal taper would be fortunate to hinge on a couple of crystals. Offsets can lock right into these placements, but you must be able to visually verify the match-fit. If you can, offsets are remarkable.
Tapers are designed specifically for small cracks and are indispensable for cracks up to about ¾ inch wide. The smallest are about ⅛ inch thick, the largest about 1¼ inch thick. Beyond these dimensions, the design becomes prohibitively heavy, and other designs—all the rest—take over.
In larger cracks SLCDs generally offer more utility than passive nuts, but the larger passive chocks, such as hexentrics (which are now manufactured by several companies), or the less-common Tricam, can be useful to complement your cams, particularly on a large rack, or as an economical option for toproping.
Thirty years ago, Chouinard’s hexentrics (and later, tube chocks) were the sole option for medium to wide cracks. Now there are several other designs, though camming devices have for the most part replaced all the rest as the nut of choice for medium to wide cracks. Still, new products such as the Metolius Curved Hexes and Wild Country Rockcentrics indicate an enduring appreciation for simple and effective technology. However, the basic design, like that of a mousetrap, hasn’t changed much in one hundred years because the original article did the job nicely, and still does.
Because the sides of a hex (both regular and curved models) are angled similar to the opposing faces of a taper, you generally can place them using the same rules of thumb that apply to tapers. You want that match-fit, in which as much surface area as possible is flush on the stone. If you look at a hex, you will see it affords two possible placement angles, plus a third if the nut is placed endwise. Chances are, one of these attitudes is going to work if the crack constricts at all. When the crack is especially uniform, the hex works best through the camming action on the convex side. In those rare cracks that are perfectly parallel-sided, you’re hexed and have to go with SLCDs.
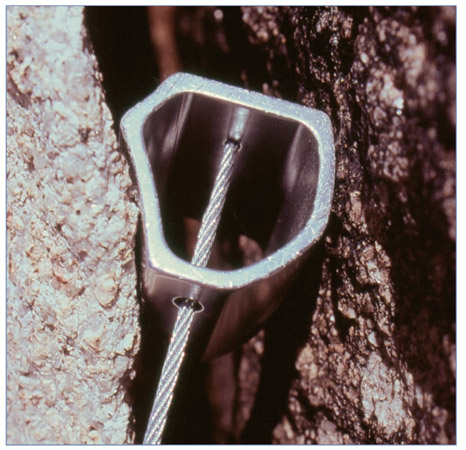
This is what to look for: great surface contact on both sides, with the curve of the nut form-fitting the slot in the rock. Bomber!
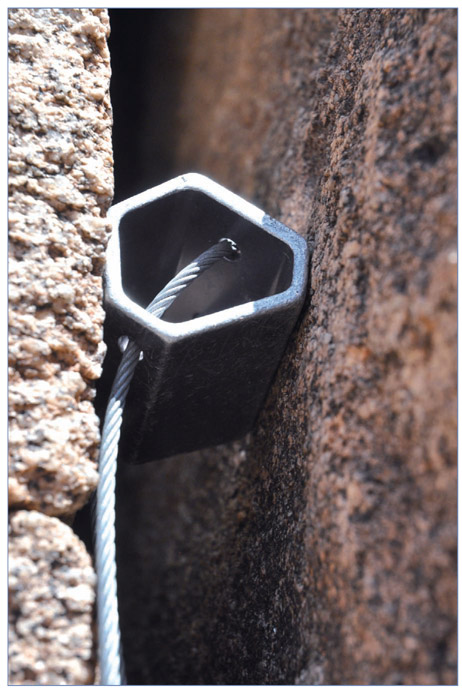
Bomber. Great surface contact. A load on this nut would create a camming effect to further key it into the crack.
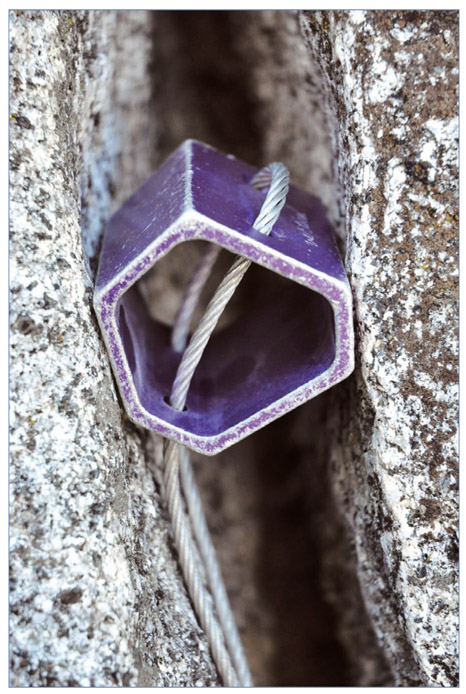
A match-fit for this hex; it’s flush with the crack, in a slight constriction, and near the lip for easy removal. Since the nut is not in a bottleneck, however, its placement is prone to wiggling out with even nominal rope drag, as are similar placements. Set the nut with a good tug. The holding power is not in question, only getting the hex to stay put. Remember, if the crack were only slightly more parallel, the nut could slip down into the opening below.
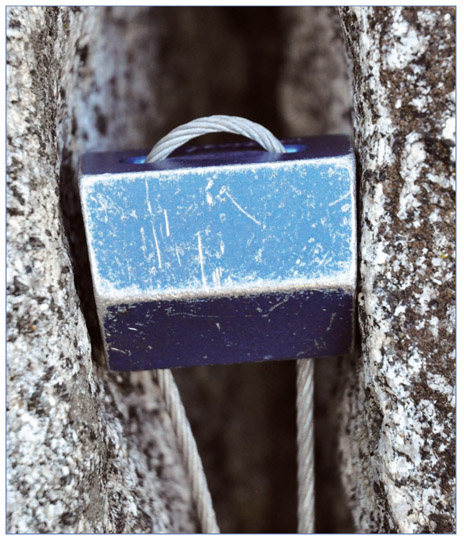
You couldn’t hang your hat on this dud—a common type of endwise placement with beginners. The right side is flush against the wall of the crack, but look at the left side! Minimal surface contact. This nut simply does not correspond to the geometry of the crack and would likely fail if loaded. A little higher and deeper in the crack a bomber placement awaits . . .
The beauty of the Tricam is its ability to work in both parallel and constricting cracks, and its uncanny knack for fitting where nothing else can. The Tricam design is meant to create a stable tripod with the two parallel camming rails flat against one side of the crack, and the fulcrum or “stinger” point contacting the opposite side, preferably in a dimple of small feature in the stone. For placement in parallel-sided cracks, Camp USA, who took over manufacture of Tricams from Lowe Alpine, advises: “Cock the Tricam by running the sling down the cam channel. Look for a rugosity of some sort on which to position the fulcrum point. (This is not absolutely necessary but often makes the placement more secure.) Give a good jerk on the sling to set the nut.”
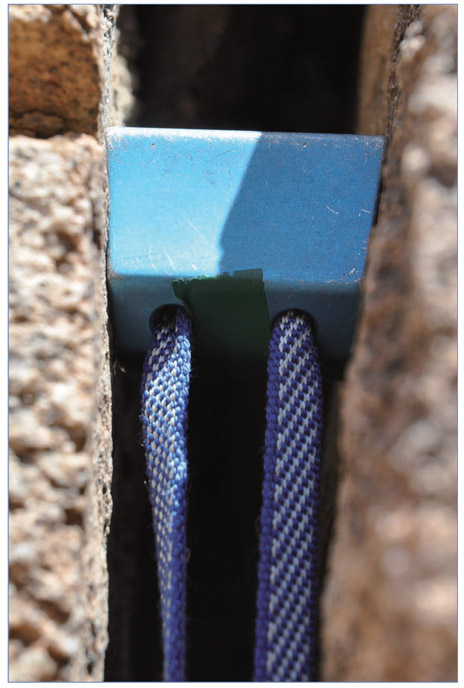
Good endwise placement—flush contact on both ends, well seated, and bomber. Set it well and you’re good to go.
Rock hardness, crack taper, and flare will affect the security of a given placement. If the placement is prone to sideways or outward pull, sling the Tricam, or extend it with a quickdraw. Practice is necessary to judiciously place the Tricam with one hand. Many climbers consider the unit a somewhat screwy, often fussy specialty item; those who climb rock heavily featured with horizontal, seamy cracks, or pockets and huecos, swear by them (though the second on the rope can find them intractable).
Tricams are particularly useful in areas like the Gunks because when they are buried in a horizontal crack, only a soft sling runs over the lip of the crack, as opposed to a cable. In horizontal cracks, in the absence of a sharp edge (that may denude or cut the sling), many climbers try to place Tricams nose down. This often puts less of a bend in the sling contacting the rock. Tricams are sold in eleven overlapping sizes. The smallest four feature color-coded, anodized heads and lighter-weight Dyneema slings. (For more on Dyneema, see the Webbing section later in the guide.)
The smaller Tricams—numbers 0.5 through 2—are the most useful and the most stable. Used as belay anchors, they allow the climbing team to save SLCDs for the lead. At 9.4 ounces, the largest unit is quite a load, and the larger units tend to be less than perfectly stable. Tricam slings cannot be readily replaced unless you send them to a company such as Yates Gear, which professionally replaces the slings.
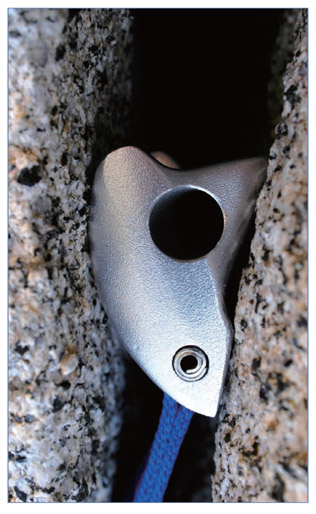
A well-placed Tricam set in passive mode.
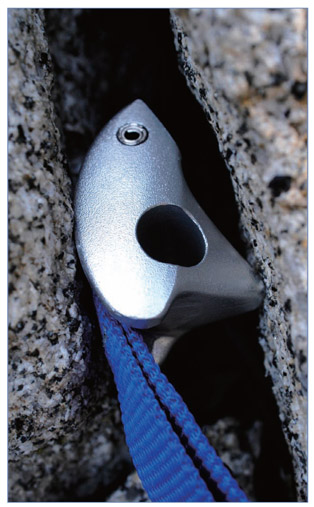
Tricam in camming mode.
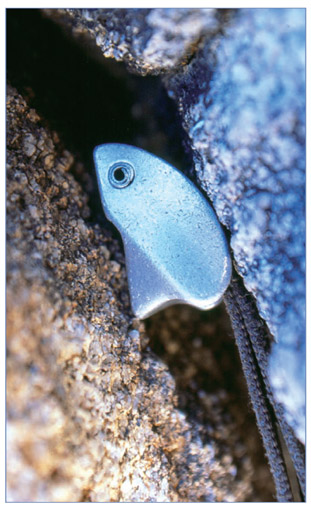
Not good. This Tricam is set in camming mode with the point resting against a crystal, meaning it’s unlikely to withstand much sideways rope wiggle and it might fall out of the crack.
The Tricam’s ability to literally bore into soft rock and avert disaster is best illustrated by another story from the field. Craig Luebben told me that one of his most terrifying moments came on the second ascent of the beastly Silmarillion, in Zion Canyon. “I was groveling up a sandy piece of desert offwidth, ready to pitch off, with only a number 7 Tricam between me and my belayer 70 feet below. Suddenly the Tricam popped out and caught on my boot. Eying the chopper ledges in my landing zone, then the ground some 800 feet below, I squirmed like hell to fetch the Tricam. I had no other gear to fit the crack, and downclimbing was out. After some world-class squirreling, I finally snagged the piece, reset it, and fell. I frigged the rest of the lead, afraid to move an inch above the precious but shuddering Tricam.” He finished off the route then went back home and invented the Big Bro.
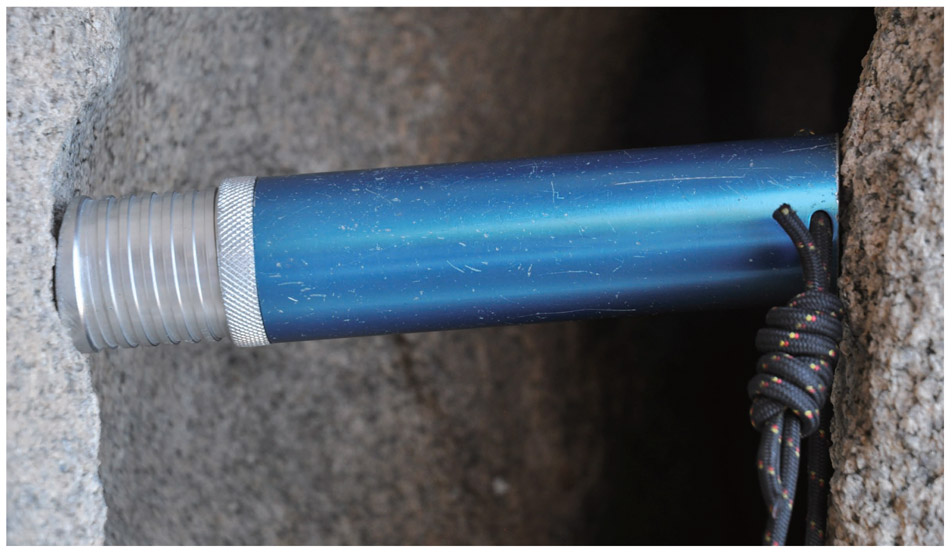
With the ends of the Big Bro solidly in contact with the rock, and with the collar tightly cinched, this placement will hold any direction of pull.
The Big Bro is a spring-loaded tube of 6061 aluminum for use in wide cracks. Its minimum breaking strength is over 3,200 pounds. Six sizes provide an expansion range from 3.2 to 18.4 inches. They come color coded for easy size identification.
Craig Luebben, the inventor, is a throwback—a climber who savors offwidth cracks and chimneys. What started out as a senior honors thesis for his engineering degree has been refined into the most effective—and virtually the only—mode of protection for cracks bigger than 6.5 inches. The Big Bro appears to be simply a spring-loaded tube chock, but it’s much more than that. Though it takes some preliminary fiddling and experimenting to get the knack of placing a Big Bro quickly and correctly, each unit comes with a pamphlet on use, and a climber can get the hang of it in a matter of minutes.
Aid It
One of the best ways to understand how good, or bad, your placements are is to grab a big rack of nuts and aid climb a popular 5.10 crack (make sure it’s a steep one). If you don’t know how to aid climb, go with somebody who does. It is one thing to practice slotting nuts and eyeballing them on the ground. But the real learning begins once you start weighting the same placements. The exercise is self-evident the moment you put your weight on the nut.
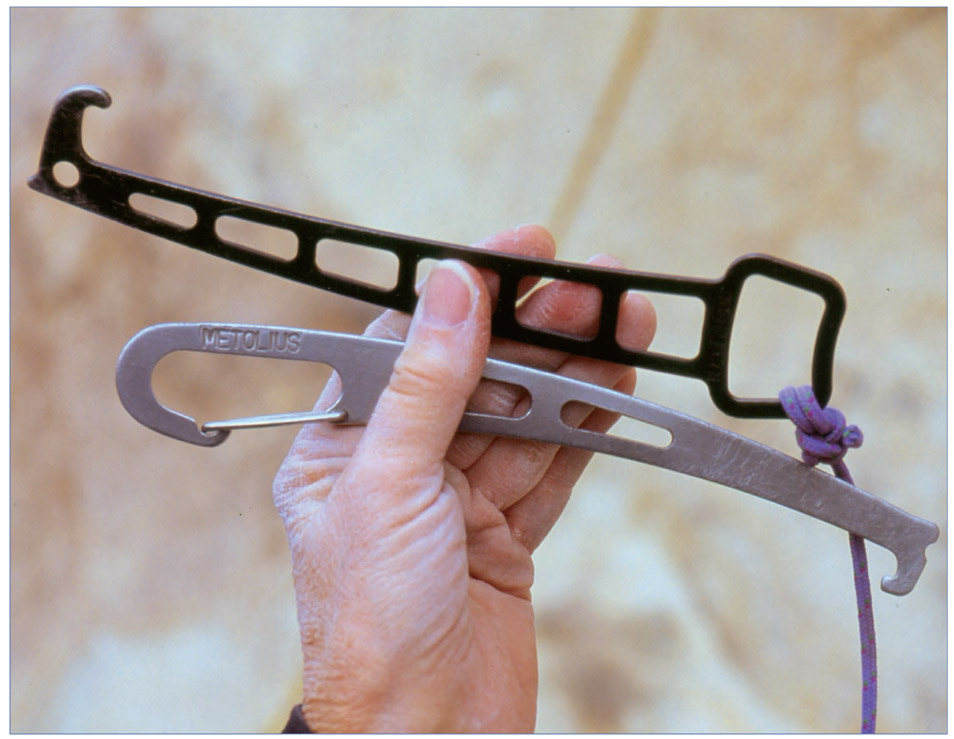
Top: Black Diamond. Bottom: Metolius. Without a nut tool, you’ll struggle to clean small, well-set nuts. Nevertheless, many climbers rarely use a nut tool. To speed removal of larger nuts, tap with a carabiner, large nut, or fist-size rock in the opposite direction (usually upwards) for which the nut was set.
A set of six Big Bros weighs nearly 3½ pounds, and will set you back almost $500, but they work like magic, and the alternative is nearly always no protection at all. The number 2 Big Bro alone provides nearly the same expansion range as an entire set of the old Chouinard tube chocks, and the number 4 has a greater range than a whole set of traditional cams. For wide cracks, the Big Bro is as revolutionary as the first Friends were for smaller cracks.
To remove passive nuts, first try a gentle approach, wiggling the piece out the way it went in. If a taper is stuck, you might try a slight upward tug. But remember, jerking in any direction other than straight down from the bottom of the nut may kink or even break strands of the cable (resulting in hateful “wild hairs,” little filaments of sharp cable that can and will prick your chafed fingers like porcupine quills).
If the piece still won’t come out, try loosening it with increasingly harder nudges from a nut tool. Nut tools come in a variety of shapes and styles. All the good ones feature a hook-shaped end that is capable of pushing, pulling, and otherwise prodding a stubborn nut loose, plus a hole for tying a keeper cord. A nut tool will more than pay for itself by helping you avoid losing stubborn gear, and it is a standard item on many climbers’ racks. If a taper is apparently stuck fast, place the end of a nut tool against the wedge itself, and tap the other end of the tool with a large nut, fist-size rock, carabiner, or other object. If the piece moves but won’t come out, it’s a matter of fiddling with it until you stumble across the same path and orientation in which it was placed. If the piece still won’t come free, better to leave it before you completely trash the cable, so it will be of use to future parties. Someone more crafty, persistent, or lucky might be able to clean it from the cliff.
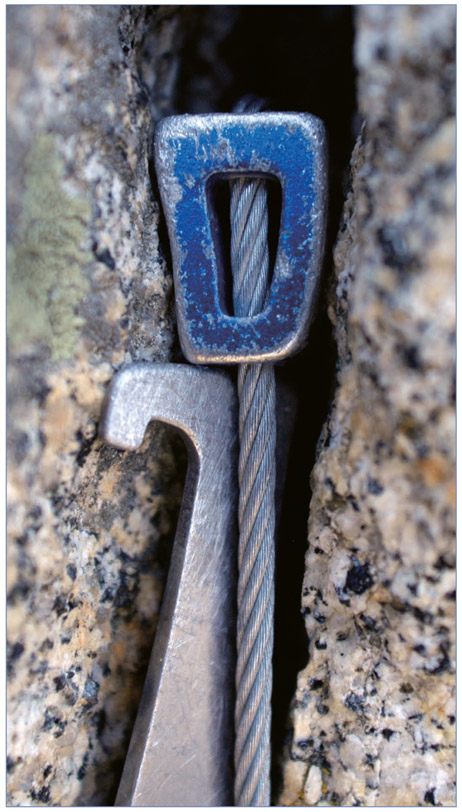
Removing a taper with a nut tool.