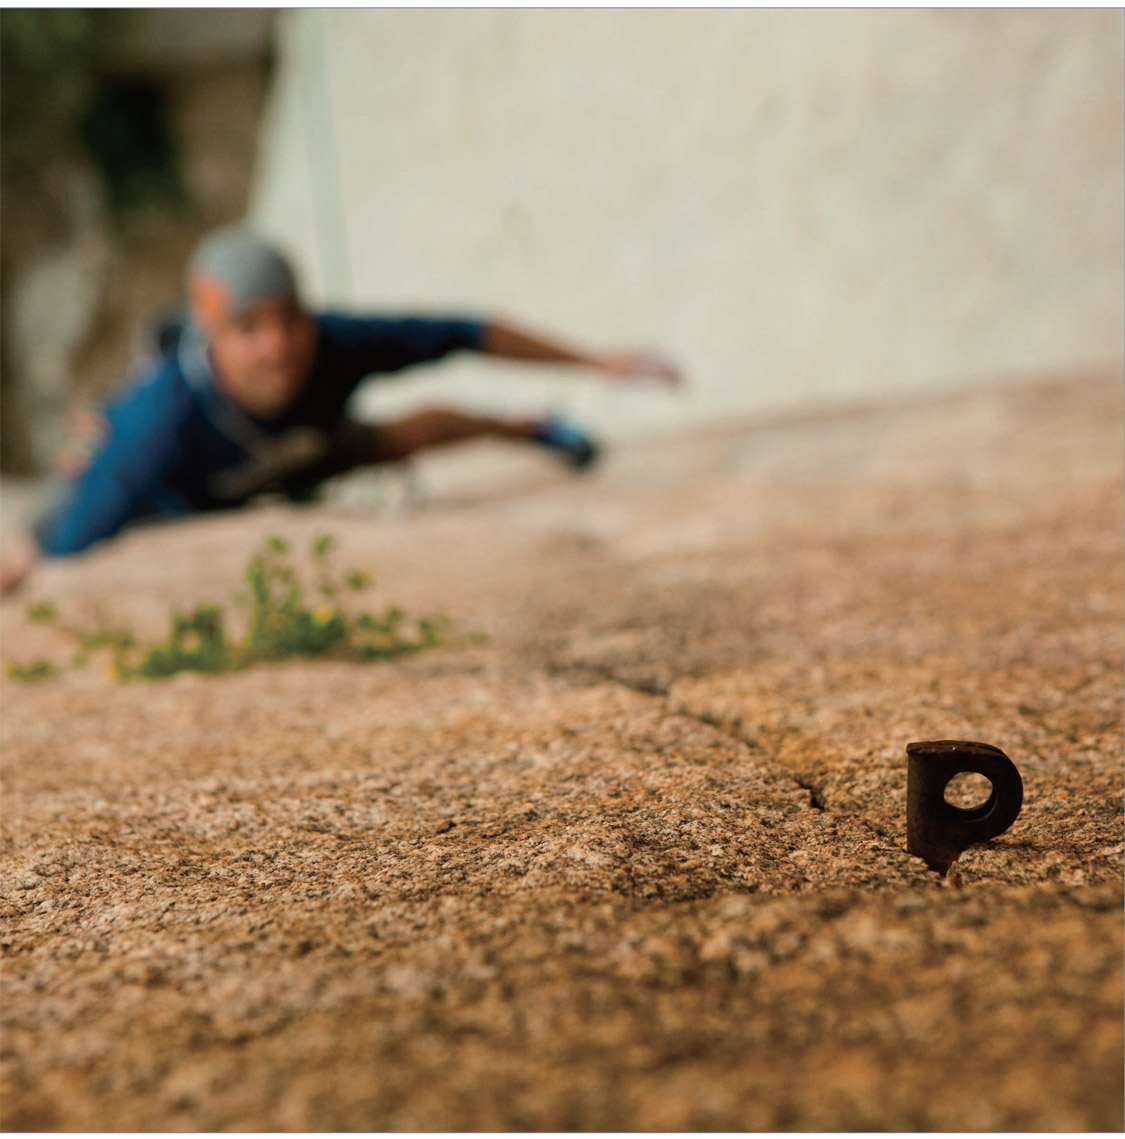

PHOTO BY ANDREW BURR
One rule of thumb about fixed gear: Never trust it outright. Because it’s fixed doesn’t mean it will hold a fall, only that it’s stuck. One summer a new fixed pin might be so bomber that the Incredible Hulk couldn’t clean it with an 8-pound sledge. But after the winter’s freeze and thaw, that same pin may be as loose as a tent stake in peat (more on this shortly). Fixed nuts tend to be more reliable, but not always. Remember this: Somebody probably has tried like the Devil to clean the nut, and its position has probably been compromised. Always check the placement. Since everybody and his brother have tried to clean it, the cable is probably damaged. Fixed micros are almost always abused and worthless. Same goes for SLCDs. Various cleaning widgets and the dread of leaving a $50 to $100 device make fixed SLCDs a rare, but not unseen, occurrence. Usually the cams are rolled so tight you’d need a Sawzall to get the unit out. Still, consider the unit unreliable. The maxim is: Eyeball and test any and all fixed anchors, and presume they are suspect even if they look good. And back them up whenever possible.
While pitons no longer have much practical value in free climbing, they are often mandatory tackle for most big walls (though there is currently a clean aid rage going on in Yosemite and other big wall meccas). By and large, the harder the big wall, the more pitoning is required. Knowledge of their use, however, is essential to appreciating their strengths and limitations as fixed anchors.
Piton craft is best left up to the individual to develop—there’s really no other way; but several points are worth mentioning. First, common sense is the rule. Use a piton that fits the crack and enters about 75 percent of the way in before you start hammering. Both the spine and the two running edges of the peg should have good bite in the crack, and the peg should ring as you drive it home—like the rising ring of a xylophone. Try to bury it to the hilt, but don’t overdrive it, or you’ll either never get it out, or ruin it trying to. In soft rock, particularly desert sandstone, you can almost create your own placement by blasting an oversize pin into an undersize crack, but it still might come out with your fingers. Piton use in any rock creates such vile scarring that it is always best to use nuts whenever possible.
There are four basic piton designs. Knifeblades (called Bugaboos in the larger sizes) come in six sizes, from ⅛ to  inch in width, and from 3 to
  inches in length. Precision grinding ensures a uniform taper. Lost Arrows (aka horizontals) come in eight sizes, from
  to
to  inch in width, and from 1¾ to
  inches long. Angles come in six sizes, from ½ to 1½ inches. The RURP (Realized Ultimate Reality Piton), a postage stamp–size peg with a thin, ½-inch-long blade, is for aid only. For merely thin cracks, knifeblades usually work better than RURPs, which come into their own in incipient cracks, where their hatchet-like blades can burrow into the rock.
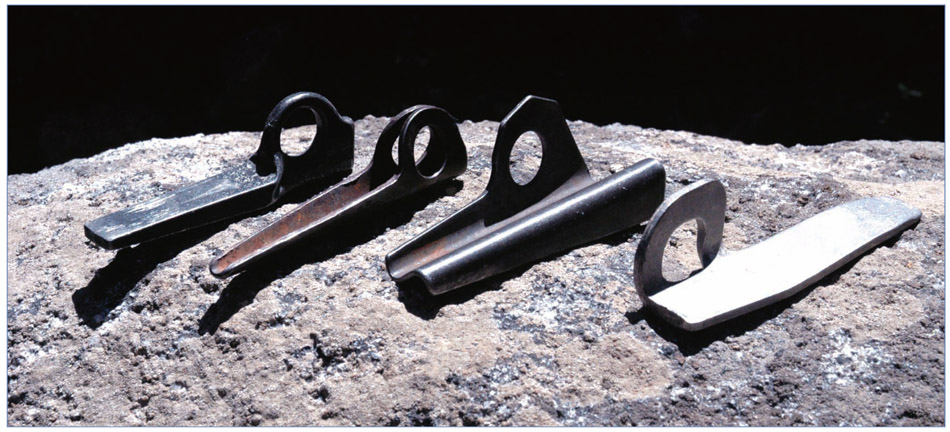
Pitons, left to right: Lost Arrow, angle, Leeper Z, knifeblade.
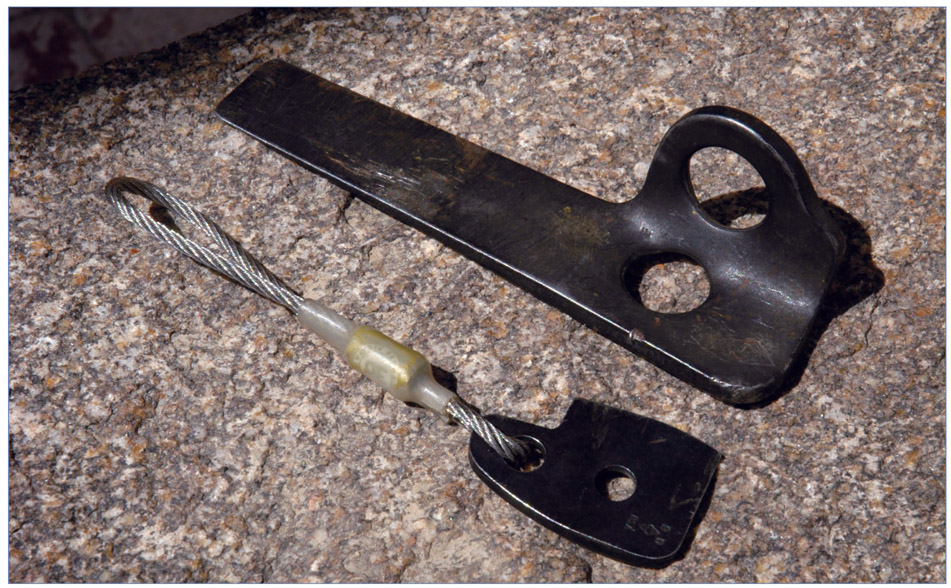
Knifeblade (top) and RURP.
Piton design has changed little in forty years. The 4130 chrome-moly steel is harder than glacier-polished granite. European imports are generally inferior and rarely seen in the United States. All told, Black Diamond pitons probably are the finest mass-produced line in the world.
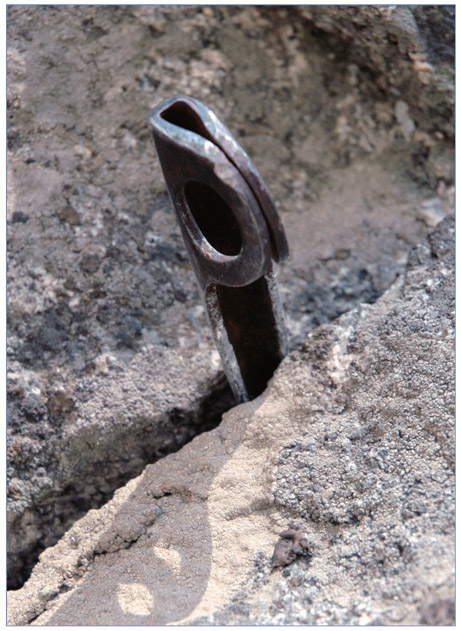
Set the pin in the crack by hand. Ideally about 75 percent of the pin should fit in the crack before you use the hammer.
The best way to learn piton craft is to grab a handful of pegs, a hammer, and aid slings, go to some junky crag where nobody climbs, and experiment low to the ground. Bang in a few, and stand on them to see just how much or how little various placements will hold. After dinking around for a couple of hours, you’ll catch on. There’s a barbaric joy in slugging steel into the rock, no question about it. Since pitons are rarely used to protect free climbing anymore, the best way to get dialed in is to venture onto a beginning wall climb. Over the course of a dozen or so pitches, you might place and clean one hundred or more pitons, plenty to get a journeyman’s feel for the work. Many beginning aid climbers find it helpful to wear glasses of some sort to protect their eyes from the spraying rock fragments that result from errant hammer blows.
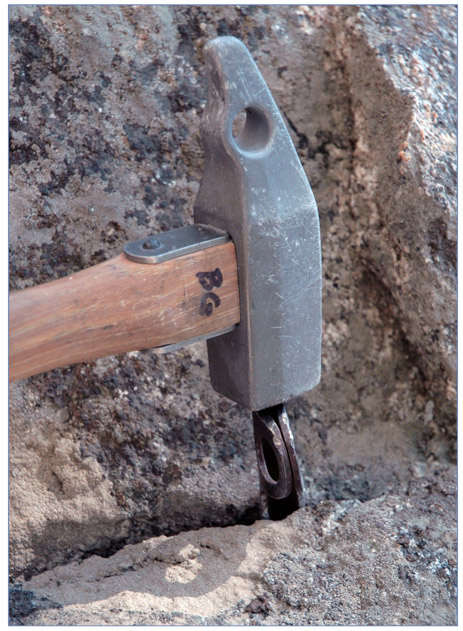
Pound it in the rest of the way.
I recall the time British ace Ron Fawcett and I were trying to speed climb an aid route on Washington Column in Yosemite. Up in the middle is a left-slanting arch, which at that time bristled with fixed gear. Presuming the gear was all bomber, I never tested anything or even looked at it; I simply started clipping across it. About 15 feet off the belay, a fixed Angle popped the second I weighted it; Ron was inattentive, dropped me about 25 feet, and I wrenched to a stop with all the hide raked off my knuckles. As this tale illustrates, that fixed piton might look bomber and be no good at all. Again, never trust any fixed gear outright.
Assuming you have no interest in big walls, have no hammer as you approach a fixed piton belay station, or must rely on fixed pins for lead protection, how do you gauge the security of your anchor? First, inspect the pins. How rusty are they? Do they move? Are they fully driven, or do they hang halfway out of the crack? Are they wee and creaky knifeblades, funky soft steel European pegs, or beefy Lost Arrows or Angles? As with tapers, the bigger the better. Do they cam into a hole in the crack, or will a hard pull likely twist them from their placement? At best, it’s still a crapshoot, so back up fixed pins whenever possible.
I can say it again, but many climbers still won’t believe that a piece of iron beat into a crack is not necessarily sound. To further prove my point, travel back to Suicide Rock in the early ’70s. The name was never more germane than for a young climber from the San Diego area known affectionately as Acapulco Bill, a moniker he earned after a string of spectacular falls that more resembled cliff diving than leader falls. Since Acapulco Bill would only lead, he fell often and far, so far that he had no right to continue on this earth. Somehow he got it in his mind that every fixed pin was solid as Excalibur in situ. Whenever he would spot a fixed pin, he’d slot a quick nut and rush headlong, often running the rope out upwards of 50 feet in his mad quest for some cracked and rusty peg hammered home by John Mendenhall in the ’30s. Twice I saw him lunge for such a peg; twice I saw the peg ping out in his hands; and twice I saw Acapulco Bill pitch off for one of his legendary dives. I think it was his wife who finally got him back to the beach and away from the crags.
The reason I mention these stories is that if you venture onto big trad climbs, especially the popular trade routes, fixed pitons are common, unavoidable, and often required insofar as they are driven into the only possible placement in a given portion of crack. If you heed the examples we’ve spelled out here, you’ll likely stay out of trouble. Nothing is ever a given with fixed gear.
For more than fifty years, the bolt was the bane of sportsmanlike climbing, though it always played an important role. First ascensionists justified the judicious bolt, but routinely risked much and scared themselves stiff to avoid placing it. The attitudes of sport climbing have changed all that, and presently the majority of the most notorious routes are predominantly, if not entirely, bolt protected. The bold runout is, for the most part, a relic of the past. Since bolts now play such a leading role in current climbing—at all levels—it’s best we go into some detail about them.
Before the early 1980s, no company manufactured bolts specifically designed for climbing, leaving folks to rummage through the local hardware store for whatever might work as a rock anchor. Some climbers researched the subject, checking manufacturer guidelines and specs for tension (straight out pull) and shear strength, going with the best they could find or, in some cases, whatever was on sale. These bolts were devised as hardware fasteners and construction anchors for concrete, block, brick, and stone. Because there were many varieties of these bolts, if you should ever climb an old, obscure route in a seldom-visited area, you might clamber upon some curious, seldom-seen, and almost certainly rickety bolts. On well-traveled routes, local activists have generally replaced the old construction items with bomber, made-for-climbing bolts, hangers, and anchor setups.
Back in the 1950s, though, the Star Dryvin bolt was the norm for use as a rock-climbing anchor. Star Dryvins were wedge-type hammer-ins and can infrequently still be found on classic climbs in Yosemite, Tahquitz, the Tetons, and a host of other areas. In the desert, many climbers preferred to bang in a ½-inch baby angle piton into a ⅜-inch drilled hole, rather than use one of the hardware store bolts. A ½-inch baby angle slugged into a ⅜-inch hole has been tested at an average of 3,500 pounds (shear strength), provided the eye of the pin is pointed down and the hole drilled at a slight downward angle. Pullout strength is only about 1,000 pounds, however.
Anyway, for twenty years, the bolt of choice was the Star Dryvin, which used a lead sleeve and a steel nail. The sleeve was tapped into the hand-drilled hole, then the nail was hammered home, spreading the sleeve. In even the best rock, and in the larger ⅜-inch size, the shear strength of these bolts was little more than 1,000 pounds, and they’d pull out with far less force. If you should ever come across an antique bolt with a star-shaped icon on the nailed head—beware. You’ve just found the climbing equivalent of an arrowhead. Even when newly placed—and that was many decades ago— Star Dryvins were iffy. Climbers in the know will remove the bolt on the spot, bagging a genuine relic for their one-bolt museum.
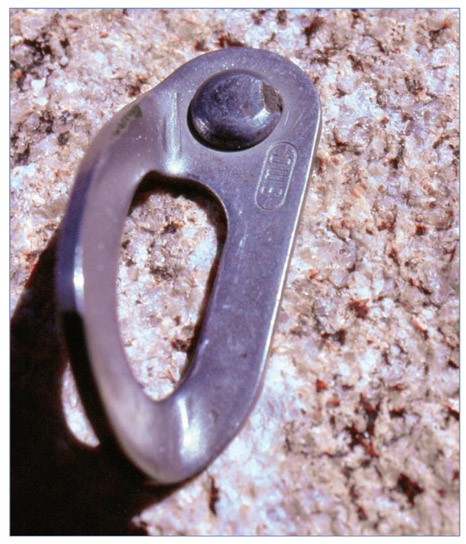
A relic from the old days, this ¼-inch Rawl Drive buttonhead still looks good after twenty-five years; the stainless steel hanger shows no signs of corrosion. In trad climbing areas most aging, ¼-inch bolts have been replaced, but you’ll still find some on more obscure climbs, stuck in the stone like slow-ticking time bombs. In fine-grained, iron-hard granite, one of these contraction bolts might hold 2,000 pounds. In anything less than perfect rock, old Rawl buttonheads should never be trusted. Here the placement looks acceptable: The bolt is perpendicular to the plane of the rock face, and the head of the bolt and hanger is flush to the rock. What can’t be judged by visual inspection is the length of the bolt. These ¼ buttonheads come in lengths ranging from ¾ inch to 1½ inches. I’ve replaced dozens of these ¼-inch bolts over the years. Many were removed simply by putting a claw hammer behind the hanger and prying outward, with about the same force required to pull a nail from a piece of particleboard.
Another vintage, rarely seen, and altogether lousy bolt for a climbing anchor was the infamous Rawl Zamac Nailin. These duds look much like the ¼-inch Rawl Drive buttonhead, save for the center pin/nail in the middle of the buttonhead, which is hammered flush to the buttonhead during installation. On its best day in Yosemite granite a Zamac would shear off under a 1,500-pound load and would pull out with half as much poundage. The challenging Yosemite slab route, Shaky Flakes, had many of these Zamac nails protecting long, 5.10+ runouts, and worse still, the topo in the 1987 Yosemite Climbs guidebook noted that pitch 6 featured a “rivet belay,” which is like tying off a quarter horse to a whippoorwill. These “coffin nails” have long since been replaced, but heads up if you venture onto obscure routes established in the ’60s or early ’70s. You might get Zamaced.
In the ’60s, most climbers changed over to the ¼-inch Rawl Drive, hammer-in contraction bolt, though some pioneers (the legendary Fred Beckey among them) sometimes used the dinky 3/16-inch-diameter device. The Rawl Drive hammer-in featured a split shank that was squeezed together when banged into the narrow hole. The outward spring force against the walls of the hole kept the bolt snug—for a while. These bolts came in both buttonhead and screw-top styles, the latter being weaker because of the threads. When newly placed, the shear strength of the ¼-inch-diameter Rawl Drive was only about 2,200 pounds, while the pull-out strength, especially in soft rock, was in the low 100s, if even that high. A liability for the threaded version was that the threads could get stripped during placement. If the threads do not extend above the nut once the nut has been tightened, the bolt is basically worthless. (Such a bolt failed and killed two climbers ascending fixed lines on Yosemite’s Glacier Point Apron. The route was later named Anchors Away.) For nearly twenty years, though, these contraction bolts were used without question and were employed easily five to one over all other designs.
While the ¼-inch Rawl was by far the most popular bolt, some climbers switched over to the  - and ⅜-inch-diameter sizes. These larger sizes were still possible to hand drill and were vastly stronger—in both shear and pullout strength— than the ¼-inch-diameter model. The 5/16-inch-diameter Rawl Drive buttonhead had a shear strength of about 4,800 pounds, and in hard granite, for a time became the hand-drilled bolt of choice of many ground-up first ascensionists. Unfortunately the
  -inch-diameter Rawl Drive was discontinued. Although there was still the ⅜-inch-diameter model, with a titanic shear strength approaching 7,500 pounds (in perfect granite), few climbers were willing to hand drill a ⅜-inch-diameter hole 2 inches deep while balanced on a crumbling rugosity, so they appeared more often as rappel and anchor bolts. For lead protection, the ¼-inch Rawl still reigned.
Only after about ten years did the abundant shortcomings of the ¼-inch Rawl Drive come to light. First, contraction bolts are under constant pressure. Given time, that pressure decreases and the bolt’s outward-spring force becomes far less; thus the bolt can creep from the hole as the tension relaxes. Radical changes in temperatures—sweltering summers and freezing winters—hasten the process. Second, the metal is prone to corrosion, the rate of corrosion being tied to the mineral content of the rock. In fact all non-stainless steel bolts eventually rust. Improper placement, crooked or oblique holes, weakening through hammer blows, and a slew of other problems make even a perfectly set ¼-inch contraction bolt a liability after only a few seasons. Lastly, it takes considerable resistance to fully depress the bolt’s split shank, something impossible in softer rock like sandstone or quartz monzonite. More often than not, Rawl Drive bolts placed in soft rock deform the hole and never accomplish the requisite outward-spring tension needed to make them even remotely adequate as an anchor. Even the ⅜-inch-diameter Rawl Drive, when tested in soft rock, exhibited pullout strengths of between 500 and 1,000 pounds—unacceptable by any measure. Consequently, you should not trust a ¼-inch contraction bolt in softer rock, even if it’s been placed recently.
Considering that the Rawl Drive bolts were originally designed as temporary masonry anchors, it’s amazing they were largely functional for so many years. Why more of these ¼-inch contraction bolts have not failed is one of climbing’s great mysteries. Just how poor many of them have become was never better illustrated than when several local Suicide and Tahquitz climbers set out to replace all the old bolts in the Idyllwild climbing areas. Recall that before the sticky boot revolution of the early 1980s, the harder climbs at Suicide were much sought after, and many teams spent whole afternoons “falling up” them. Yet bolts that had held literally thousands of falls often were removed with a single hammer blow. Many were yanked out with a claw hammer with about the same effort needed to clean a nail from plywood. The message here is that extreme care should be used before trusting old contraction bolts. Though they were strong enough initially, time has drastically reduced their strength. Again, these bolts were designed not for rock climbing, but as lightweight industrial anchors for concrete and masonry, and they usually had served their intended purpose after a few weeks or months. They were never meant to act as the point from which a person’s life could hang, nor for decades of such use. If you do have to clip a sketchy ¼-inch bolt for lead pro, use a Yates Screamer, back it up if possible, and don’t fall.
Even worse than ¼-inch bolts are ¼-inch bolts with no hangers. Doubtless some blockhead pilfered the hanger and left you at the headwaters of Shit Creek. If you must climb this route (as opposed to going down, which should always be an option if the anchors are bogus), the best trick is to slide the head down on a smaller-size wired taper, slip the newly exposed loop of cable over the stud, and cinch the head tight against the stud. Hopefully the stud still has a nut to hold the taper cable on; otherwise, the placement is good only for aid. Even with a nut, this dicey connection to the bolt will not hold any outward pull, so don’t fall.
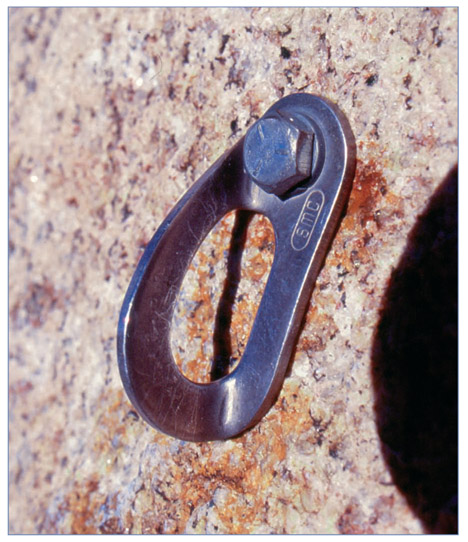
The ubiquitous hex-head 5-piece Rawl bolt. Somewhat of a standard, this is probably the most common bolt you’ll encounter, now sold under the brand name Powers Bolt. In a good placement the hanger should snug up flush and flat against the wall. A 5-piece Rawl actually has 6 pieces. In solid granite the 3/8-inch diameter rates at over 7,000 pounds shear strength and almost 5,000 pounds pullout strength.
There was a scandal approximately fifteen years ago when some distributors from hell were counterfeiting inferior bolts made from low-grade materials instead of the stronger alloys specified for anchors. It is not inconceivable that this type of alarming profiteering still occurs on occasion. While modern bolts have taken tons (literally) of abuse with few mishaps, no single anchor, bolt, or chock should be considered 100 percent reliable. Backups are essential, especially for belay and rappel anchors. Among the most dangerous times of a lead is the beginning of a pitch or just above a ledge, where few bolts or chocks separate the leader from the ground or ledge. To make matters worse, the impact force a leader can generate is greatest early in the pitch, when only a small amount of rope is available to absorb the shock of the fall.
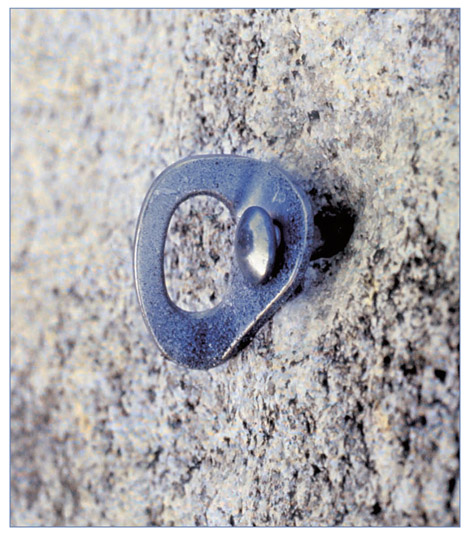
Behold the woeful “spinner,” when a bolt (like this) protrudes from the hole and the hanger is not flush against the rock. The hole was not drilled deep enough, and when hammered in, the shaft bottomed out in the back of the hole, preventing the head of the bolt from pinning the hanger flush against the rock.
In the early ’80s, when climbers first started using something other than Rawl contraction bolts, the USE Diamond Taper Bolt gained momentary popularity. The required hole was routine to drill, but the Taper Bolt tests were inconsistent. When testing for straight out pull, half the bolts tested to 3,000 pounds, while the other half failed on average at a measly 700 pounds. This push-type bolt is installed by screwing the tapered, threaded section into a lead sleeve, expanding the sleeve outward. Installation is straightforward, but the Taper Bolt is very tricky to place correctly. Inserting and hammering on the bolt easily mauls the lead sleeve. The gap between the head of the bolt and the rock must be judged exactly prior to torquing, because a specific number of turns are required for full strength. One turn too few seriously decreases its holding power, and one turn too many can strip the lead sleeve, rendering the bolt useless. Even climbers experienced with the Taper Bolt often botched placement, and worse yet, a poorly placed Taper Bolt is hard to detect without a crowbar. With only the ability to visually inspect the bolt, consider all Taper Bolts—especially the ¼-inch-diameter units—to be suspect. Long ago the Taper Bolt fell out of favor; it is not recommended and should be used with extreme caution when found on a route. To identify a Taper Bolt, look for the letters “USE” on the hex-shaped bolt head.
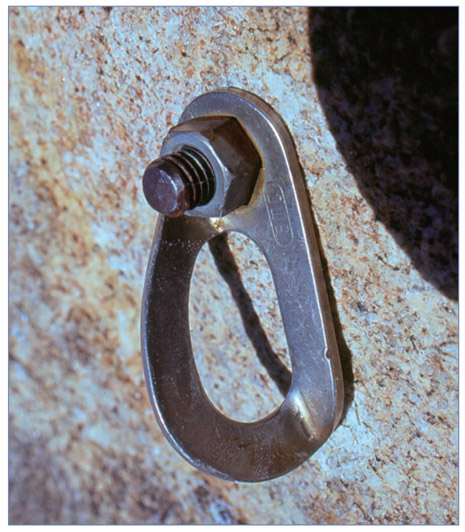
Amazingly, this bolt shows virtually no signs of corrosion after thirty years at Joshua Tree. Stainless steel has become the standard for bolts and hangers as it protects against corrosion, although many carbon steel bolts are used because they are less expensive.
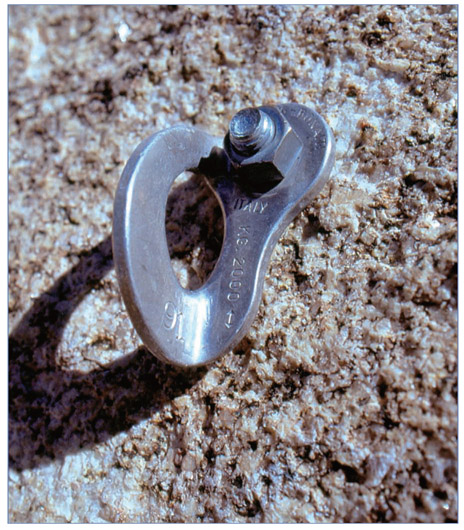
This ⅜ -inch threaded Rawl bolt looks perfectly set in great rock—good to go.
In the mid-1980s, when sport climbing and rappel bolting took over the US climbing scene, the quality of bolts drastically changed for the better. Modern sport-climbing routes do not feature the old-style Rawl Drive bolts, or any bolt of ¼-inch diameter. The modern standard calls for expansion bolts of ⅜- to ½-inch diameter. The Rawl 5-piece and Rawl Stud were the most popular bolts in the United States throughout the ’80s and ’90s. The Rawl 5-piece is a “pullout” type bolt that pulls a cone into an expanding sleeve by cranking on the bolt head with a wrench. The Rawl 5-piece (now sold under the brand name Powers Bolt) is one of the best rock bolts available. It has good strength (7,900 pounds shear strength for the ⅜ inch), is suitable for a variety of rock surfaces, and is relatively foolproof to install. For full-strength protection, the Rawl bolt is torqued to about 35 foot-pounds for the ⅜ incher, and 60 foot-pounds for the ½-inch model. Modest cost, availability, straightforward installation, and general reliability has made the Rawl 5-piece the bolt of choice.
Bolt Strength Ratings
Manufacturer strength ratings are gauged for the bolt being placed in cement. Since the density of concrete varies, there’s usually a chart giving strength ratings in pounds per square inch (PSI) for a bolt placed in different concrete densities, for example, 3000 PSI, 4000 PSI, 5000 PSI, etc. With 3000 PSI cement, it would take a 3,000-pound block to crush it. The hardest, fine-grained granite is probably the equivalent of 4000 to 5000 PSI concrete. To simplify our discussion, all strength ratings given here are based on bolts placed in 4000 PSI concrete, roughly equivalent to medium- to hard-density rock. Softer rock, like desert sandstone, would probably fall in the 0 to 2000 PSI range.
The Rawl Stud also pulls a cone into an expanding sleeve, but in this case only when a nut is tightened on the threaded bolt. A ⅜- by 2-inch Rawl Stud has a shear strength of 5,420 pounds and a pullout strength of 4,310 pounds. While not quite as strong as the Rawl 5-piece, owing to the threads on the bolt, the Rawl Stud is quicker and easier to place for those few remaining mavericks who do their bolting on lead and only have one hand to place and tighten the bolt (the other hand is hanging on to the holds). Over the last decade Petzl, Fixe, Raumer, and other companies have started making bolts specifically for rock climbing, and the 5-piece Rawl has not only stood the test of time, it seems to be as good as all the others.
We purposefully have neglected the business of how to place bolts. Establishing routes that require bolts traditionally has been, and should remain, in the realm of the expert, and therefore is beyond the scope of this guide. If you do place bolts, make sure you take the time to learn their proper use, as the lives of others will ride on your craftsmanship. More than one person has hit the deck because of another’s sloppy work. For those community service–minded individuals who replace aging and dangerous bolts, the standard is stainless steel for hangers, bolts, chains, anchor links, and ring hardware. By using stainless throughout, problems with galvanic and stress corrosion are nearly eliminated in all but the most corrosive saltwater environments. For more information on this subject, a good place to start is the American Safe Climbing Association (ASCA) website at www.safeclimbing.org.
With the rise in popularity of sport climbing has come a slew of new bolt hanger designs. Any of the commercially available hangers are certain to meet the specs required for the situation. Aluminum hangers, homemade or otherwise, should be considered suspect if they have taken repeated high-force falls. Always eyeball suspect hangers for cracks or other deformation. Stainless steel is the material of choice. The old-style SMC hanger is a relic from the ’70s and early ’80s that had significant stress/galvanic corrosion problems, rendering them untrustworthy. This hanger is readily identifiable by its dull yellow brown tint. It is somewhat thinner (slightly thinner than a quarter) than the newer, thicker, and totally bomber stainless steel hangers that after many years still retain their high sheen with little sign of corrosion. Another hanger to watch out for is the infamous Leeper hanger, manufactured and now recalled (due to stress corrosion problems) by Ed Leeper. These are easy to spot owing to their badly rusted condition and trapezoidal shape.
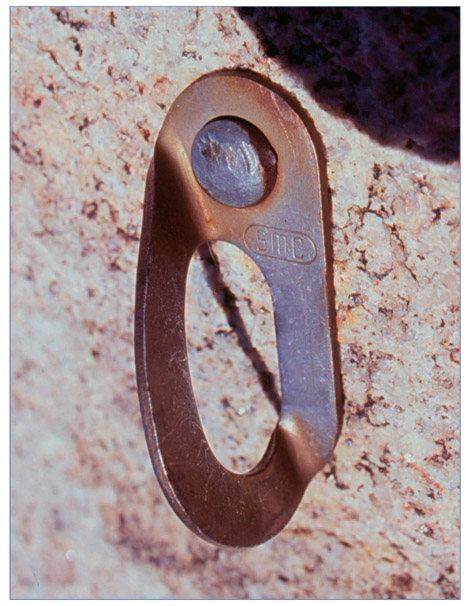
This ¼-inch buttonhead is installed using the infamous “SMC Death Hanger,” a moniker that stuck after several such hangers failed under body weight (possibly due to a stress corrosion problem) on Yosemite’s Middle Cathedral Rock. The hanger has taken on a distinctly bronze tint. NOT to be trusted.
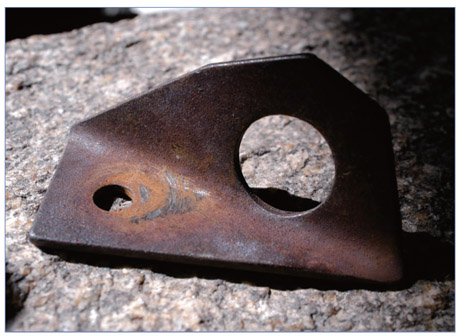
These hangers were recalled long ago by Ed Leeper due to stress corrosion problems. Though unreliable, many such hangers are still out there, especially in classic trad areas. These hangers should be replaced and upgraded to stainless steel, as should all ¼-inch bolts.
Metolius and Fixe have led the current trend to minimize the visual impact of fixed anchors by offering camouflaged stainless steel hangers. If not using these, responsible first ascensionists often paint their hangers to match the color of the rock. Petzl and Raumer also make excellent hangers, along with a handful of other companies.
Homemade hangers are seldom seen, but they are out there and run the gamut from sawed off and drilled angle iron to double links of chain. Some are good, some are bad—it’s your guess. Some of the older homemades, nicknamed “pop-offs,” feature a design that twists the downward pull of a falling climber into an outward pull on the bolt stud, which could prove disastrous with an old ¼-inch contraction bolt. Beware of any hanger that levers the bolt outward.
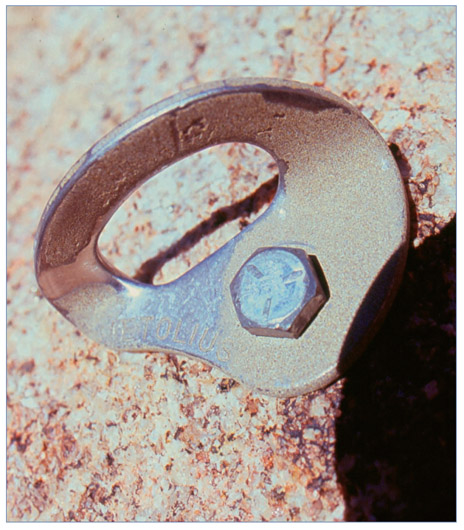
A ⅜-inch 5-piece Rawl with a Metolius hanger. Somebody painted it to match the rock, but the paint is chipping off. Factory-painted bolts fare much better.
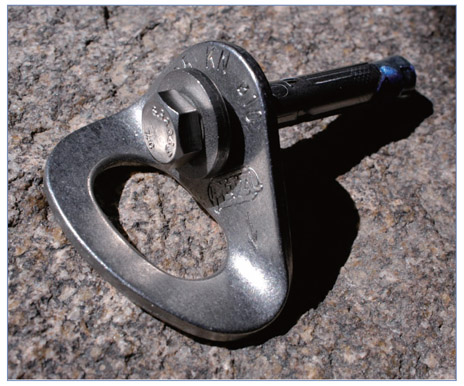
Stainless Powers ⅜-inch bolt with Petzl hanger. Bomber when properly placed.
Cost is the only reason not to use stainless steel bolt hardware. Carbon steel bolts cost about a third of what you pay for the stainless article. Carbon steel 5-piece Rawls have shown considerable corrosion after only ten years, and even in dry desert climates like Joshua Tree. If you’re going to take on the responsibility of replacing old bolts, or installing new ones on first ascents, strongly consider using stainless steel. Many companies (and the ASCA) will donate the requisite stainless bolts and hardware to those willing to spend the time and effort to upgrade old hardware.
For sea cliffs, even stainless steel bolts and hangers have shown rapid stress corrosion; in Thailand, for example, many old bolts have failed under body weight. The solution might be a single, glue-in titanium bolt. Ushba makes a corrosion-resistant, 10mm titanium ring bolt called the Tortuga, rated at 5,620 pounds. While expensive, everything else has so far failed over the short haul.
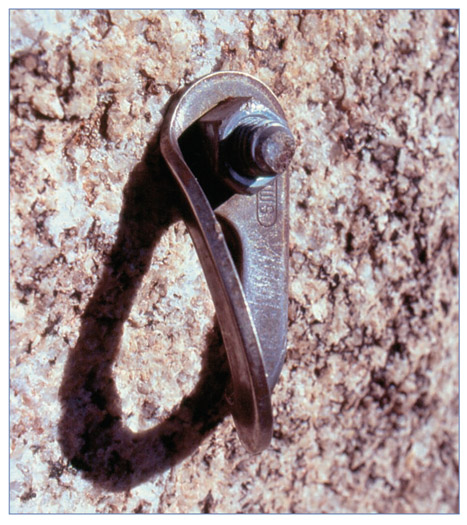
While over twenty years old, this threaded Rawl bolt and stainless steel SMC hanger still look good. The rock is solid desert granite, the placement is perpendicular, and the hanger is flush. Every twenty-year-old bolt should look so good.
A trend at some sport-climbing areas is to use construction cold shuts (hooks)—either open, closed, or welded—for hangers. Cold shuts used in climbing are generally borrowed from heavy construction work, where by and large they are used for anchoring, as well as interim links connecting two large chains. (The cold shut is slid between the end links of two chains and is then beaten “shut,” thus connecting the chain.) Because said chains are often hauling around mambo industrial loads, the larger shuts are usually quite strong—some test-rated to upwards of 3,000 pounds. However, because cold shuts are borrowed from construction, they are not UIAA-tested or approved. While they may, or may not, meet established climbing standards in terms of strength, they have been a staple in California climbing for over fifteen years, and to a lesser extent, at many other sport-climbing areas.
Even the strongest shuts are not used as protection, rather they are doubled up at the top of clip-and-go sport routes and serve as fixed anchors for the leader to lower and then to toprope other climbers wanting to follow, but not lead, the route. One handy feature of cold shuts is their relatively large diameter and rounded surface, which allows the rope to be placed directly through the hanger for lowering. When two open cold shuts are fixed at the tops of some routes, at the end of the climb, you simply drape the rope through the open shuts and lower off. Though some people still swear by them, others are leery to toprope off such hangers. Closed cold shuts may be adequate for lowering and toproping situations, but are not up to snuff for lead protection.
What to Do with That Bolt . . .
There is no absolutely reliable method to test in-situ bolts, but there are plenty of reasons to want to. Here are some suggestions:
Always consider a ¼-inch bolt suspect. They haven’t been placed as anchors for over two decades, though they are still found on older routes.
Make sure the bolt hanger is flush to the wall and not a “spinner,” where the hanger spins freely on the stud. A spinner indicates the hole was drilled too shallow for the bolt stud, or that the bolt stud has crept out from the hole, which happens with contraction bolts. And don’t try to fix the spinner by hammering on it. Had that been possible, the first party would have sunk it. Further hammering can only damage the shank and the head.
Keep an eye out for cratering, which occurs in brittle or extremely hard rock, and is usually the result of sloppy drilling, which forms a chipped-away crater around the hole. Cratering can greatly reduce the bolt’s purchase because the rock surrounding the shank is damaged.
Check the hanger for cracks.
If the bolt is a screwhead, make sure the nut is snug and the threads are in good shape. I learned this after taking a 30-foot grounder (into a snowbank, luckily) when the hanger popped off the denuded threads of such a bolt. If the bolt is a buttonhead, or looks like a machine bolt, again make sure it’s snugly set and free of fatigue cracks.
If the bolt is clearly bent, or looks to be set in an oblique hole, beware!
Discoloration is natural enough, but excessive rust denotes a so-called coffin nail. Use common sense. If the bolt looks funky, don’t trust it. And always back up bolts (that don’t meet the modern standard) with a nut, if possible. A perfect bolt is nearly impossible to pull out, even with an astronomical fall, but there are a lot of bolts out there that are something less than perfect. Better safe than splattered.
Welded cold shuts are available that meet the standard for lead climbing, lowering and toproping. Reportedly, it’s slightly easier for a quickdraw to accidentally unclip from a welded cold shut than from a traditional hanger, but the cold shut offers easy retreat from any point on the route, and it’s easier on carabiners.
Convenience has made cold shuts popular top anchors on routes that see massive traffic, especially so on sport climbs that people “lap” for workout purposes. The problem is that with all those ropes running through the shuts, coupled with the abrasion caused when lowering, a beefy cold shut can, after a few seasons (or less), thin to the breadth of a paper clip. Once a shut is visibly grooved, its holding power is significantly reduced and its temper shot from so much heating and cooling. Inspect shuts for wear and tear and avoid those that are clearly eroded from use. I’ve seen some shuts in Malibu State Park (a popular sport crag in Southern California) that were worn almost entirely through. Locals usually replace shuts on trade routes, but not always, so keep your eyes open and don’t trust the well-worn shuts. If and when you come across sketchy shuts, you might have to climb down to the last protection and lower off from there. Do whatever is necessary to avoid trusting untrustworthy gear. And use quick-draws whenever toproping off cold shuts.
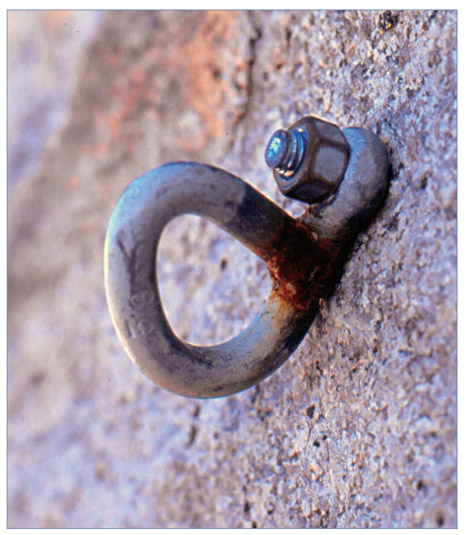
This welded steel cold shut shows signs of corrosion just a few years after installation. Many manufacturers (such as FIXE) now offer the preferable stainless steel cold shuts. While more expensive, they’ll most likely last a lifetime.
That much said, Fixe now sells a variety of sport-climbing hardware including stainless steel cold shuts, sport anchors, and ring anchors that will last far longer than the hardware store variety aluminum and steel cold shuts described above.
One of my first climbing outings was to Suicide Rock in Idyllwild, California—in winter. Rick Accomazzo and I spent two hours post-holing through hip-deep snowdrifts just getting to the crag, which had a 30-foot snow cone at its base— a boon, we reckoned, since the top of the cone put us above the crux lower moves of several then-prestigious routes. Ricky roped up, front-pointed up the snow cone, and went to work on Frustration. He got about 10 feet up a hinging lieback and set a nut, his wet boots skedaddling all over the place. Two moves higher, he popped, the 1-inch sling on the nut broke, and Ricky, poor fellow, slammed into and through the crust of the hollow snow cone, leaving behind a perfect sketch of his corpus, the kind detectives chalk around a slain thug on the tarmac. By the time Ricky had clawed his way out of the hole, his fingers were so numb that for two weeks afterwards he had to use his thumbs to take a leak. Our mistake was to string a nut with a sling we’d filched off a rappel anchor out at Joshua Tree. Who knows how old it was, or how it had been abused. Never again.
On the other hand, a climbing magazine ran a test some years back, where they filched several dozen slings left from popular rappel points on trade routes in Yosemite Valley. They repeatedly found that even when the slings were badly burned from ropes being pulled through them (to retrieve the ropes after rappel), or were sun bleached nearly white, four of these slings (no matter which ones), when combined, held loads exceeding 2,500 pounds, loads almost never encountered in climbing.
What these two anecdotes tell us is that old slings can respond to loading in unpredictable and surprising ways, whereas new slings are not only comparatively inexpensive but also predictably stout.
Slings that are 1 inch, 11/16 inch, 9/16 inch, 10 mm, and 18 mm in width are routinely used in anchor setups, as tie-ins, for equalizing two or more separate anchors, and for connecting ropes to trees, flakes, tunnels, and other natural rock features. Dyneema (Dyneema, Spectra, and Dynex are all the same thing) is currently favored over other so-called tech-webbing materials. Nevertheless, a brief overview is in order.
Since World War II, nylon webbing has been widely used in rock climbing. Invented to batten down gear on PT Boats, climbers have found nylon webbing (flat rope or “tape”) useful as gear slings, runners, and tie-offs. Later, several wraps of the 1- or 2-inch variety came to form the swami belt, the standard tie-in device (a harness of sorts) for more than twenty years. As of about 1980, formal harnesses—feather light and heroically strong— replaced the old swami belts, and webbing presently is used almost exclusively as sling material.
For fifty years standard nylon webbing was used to form slings of 1 and 9/16 inch diameter, the latter for tying off pitons. The 5/8-inch sling was introduced about twenty-five years ago. The strength of the material was more than adequate for its applications. The shortcomings of pure nylon, however, are that it weakens with age and use, and as is the case with all webbing, it is adversely affected by exposure to sunlight’s ultraviolet rays.
The great majority of nylon webbing is manufactured for the military, and the government has set minimum requirements, or specs, that the webbing must meet for use in life-support situations. Mil-spec simply refers to these government or military specifications. Fifteen years ago, Blue Water went several steps further than the minimum mil-specs to produce their outstanding Climb-Spec webbing.
The standard mil-spec webbing has a corduroy-type finish because of the many small ridges in the weave. Climb-Spec has refined this weave, eliminating the ridges to produce a “sateen” finish, which is essentially flat and smooth to the touch. This new weave affords two significant advantages: First, it allows a greater density of nylon thread, increasing the strength (of 1-inch webbing) some 500 pounds; second, and more importantly, it increases the wear-resistance upwards of 50 percent. Blue Water Climb-Spec is available in both 1 and 9/16 inch, and comes in bulk form or pre-sewn runners. The 1-inch sling tests out at 7,400 pounds (some 2,000 pounds higher than standard webbing), while the 9/16 inch is good to 4,500 pounds.
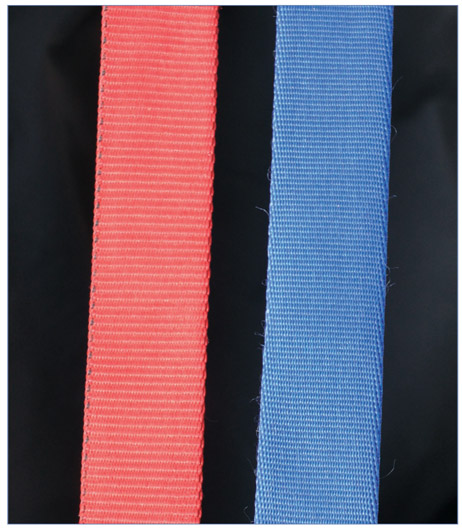
One-inch nylon webbing. Left: mil-spec. Right: Climb-Spec.
Though nylon is still a viable, sometimes preferable, material for slings, other materials have come to replace it in some situations. Blue Water’s Spectra is a molecular-weight polyethylene developed by Allied-Signal, Inc. It is the strongest fiber ever made. Pound for pound, it is ten times stronger than steel. It is also about ten times as expensive. Spectra-sewn runners are available in various sizes and are for those who want half the bulk and weight of other runners with no significant reduction in strength. According to Bill Griggers of Blue Water, the company doesn’t manufacture 1-inch Spectra slings because the cost would be prohibitive and 12,000-pound test webbing is absurd overkill. Spectra’s wear resistance is excellent. When cut, Spectra will not tear through. Spectra was for a time the sling of choice throughout the United States. However Dyneema (which the engineers at Black Diamond assure me is essentially the same thing as Spectra), also manufactured by Allied Signal, has come to replace Spectra as the favored sling material. Dyneema is fifteen times stronger than steel. It’s now available in 8mm width as the standard size.
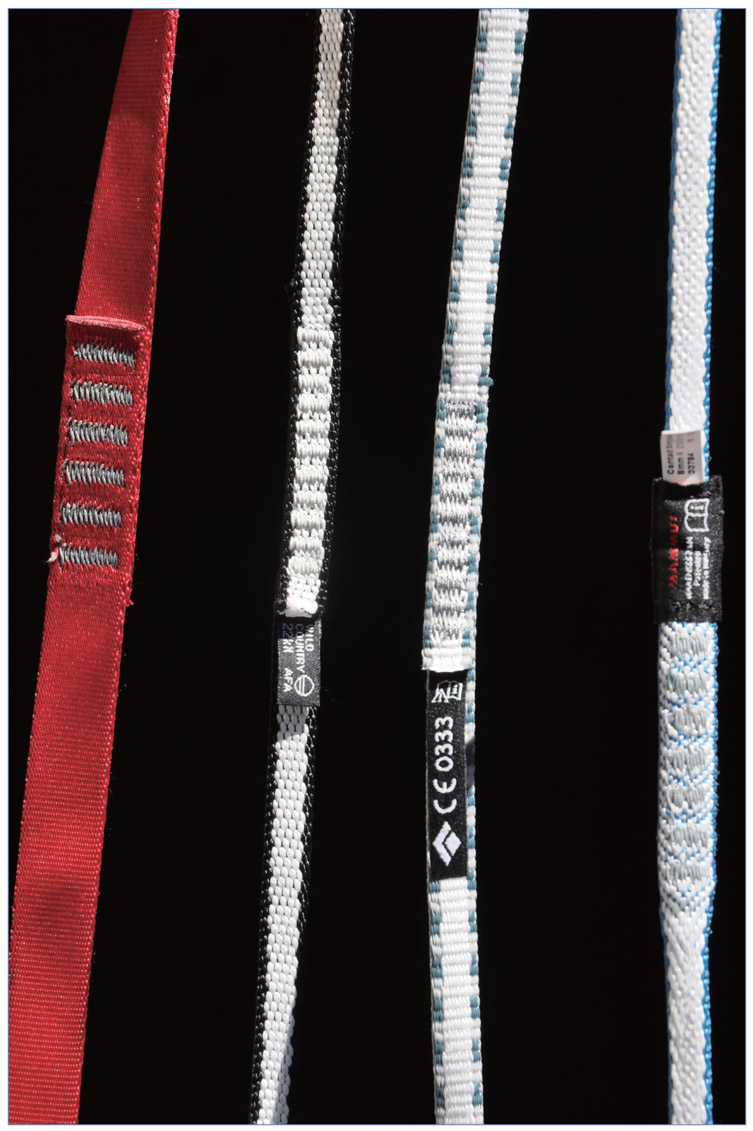
Sling comparison. Left to right: 18 mm Black Diamond nylon runner, rated at 22 kN loop strength (4,946 pounds);Wild Country 10 mm Dyneema sling (22 kn loop strength); Black Diamond 10 mm Dynex Runner (22 kN loop strength); Mammut 8 mm Dyneema Contact Sling (22 kN loop strength).
High Tech vs. Nylon
Recent testing strongly suggests that old-style nylon sling material (and cordage) is superior for general use in rock climbing. The mega-strong “tech webbings” (such as Spectra/Dyneema materials) were originally produced for the military, generally for securing static loads. Static forces in climbing are basically body-weight loads, far too small to require sling material “stronger than steel.” More importantly, in a climbing context, the strength of sling materials is significant only during falls, when dynamic, not static, forces are generated. Since climbing’s roped safety system acts as a peak (dynamic) force load limiter, nylon with just a little bit of stretch helps to absorb peak forces, while the virtually static tech webbing translates dynamic forces directly to the carabiners and protection devices, which can blow apart under high-impact dynamic loading. Moreover, recent tests from several sources indicate that nylon webbing and cordage can absorb (without breaking) greater dynamic forces than high-tensile strength cord and spectra or Dyneema webbing.
Aside from the price, Spectra/Dyneema do have shortcomings. They can be up to 19 percent less resistant to UV damage than regular mil-spec nylon, and too slick to work as well as nylon for the friction knots used in self-rescue situations (Prusik knot, Klemheist, etc.). They also have a low melting temperature, so a rope running across can burn them easily. They do not stretch at all, which can also cause them to heat up when directly weighted in a dynamic fall situation. Spectra/Dyneema can actually be weaker than standard nylon webbing under these conditions because standard webbing will stretch. In this sense the biggest strength of these super fibers is also their biggest weakness. As we will discuss later, the reliability of anchors and the overall safety system depends on the dynamic qualities of the components to slow down the loading curve so peak loading doesn’t occur all at once. Imagine tying a double boot to end A of a stout rubber band, and another double boot to end A of a shoestring. If you were to drop both boots from the same height while holding the B ends of the rubber band and shoestring, which double boot would provide the bigger and more sudden loading? This is an exaggerated contrast of stretchy nylon and no-stretch Spectra and high-tensile cord, but understand that in some cases, stronger material can actually result in a less secure overall system.
Despite the drawbacks of these new fibers, and others like them, many climbers consider them superior to standard nylon webbing for use as sling material. However, nylon runners also have some drawbacks of their own. There have been isolated cases of mil-spec runners tearing over razor-sharp edges. And nylon does wear out, so it is not unheard of for old runners to break under the impact of a fall. But I have never heard of a nylon sling in good condition breaking when the system has been properly rigged. Consequently the far cheaper nylon webbing remains a viable, and in some cases, a favored choice for slings— provided the climber keeps a sharp eye on their condition and retires them when signs of wear are obvious. If the nylon feels stiff, it probably has been affected by sunlight—but the webbing may be weakened and show no such sign. If there is any doubt, retire your runners after using them for a period of, say, one hundred days, remembering that the relatively inexpensive nylon is far less precious than your life.
Sewn webbing loops are stronger, lighter, and less bulky than knotted ones, so most climbers usually use sewn slings. Nylon slings equipped with a water knot can come in handy for tying around trees, flakes, and tunnels in the event of a retreat, but you should check the water knots frequently, as they have a tendency to come untied.
Short, sewn loops of webbing called quickdraws are one of the principal uses of webbing these days. Quickdraws are mandatory equipment for clipping the lead rope into bolts and chocks; they prevent rope drag and decrease the likelihood that the rope will wiggle a chock out of its placement.
Sling material is always in the process of being improved as new manufacturing techniques and textiles become available. In today’s world of technology, even the most popular and field-tested gear remains the same for only a matter of years before something better comes along. So as with all other climbing gear, sling material requires ongoing study to keep abreast of leading technology. The other option is to simply go with low-tech, inexpensive, time-proven nylon, which in some essential ways is just as good, and sometimes far better, than the space-age item.
Accessory cord comes in several styles made from different materials. In the old days cordage was used to sling hexes and nuts; now those products come equipped with wire cables, and cordage is mostly used to fashion cordelettes and prusiks. It comes in a range of diameters up to 9mm and can be bought in any length desired, custom cut off a spool at your local climbing store.
The differences between standard nylon accessory cord (aka utility cord) and newer high-tensile cords (such as New England Ropes’ Tech Cord, Sterling’s Powercord and Blue Water’s Titan Cord) are fairly simple to sort out. Nylon stretches a small amount because it’s made strictly of nylon; the high-tensile cords are essentially static, because the core material (Dyneema or Technora) is static, even though the sheath consists of nylon.
Sterling’s 7 mm nylon cordelette is made with a nylon sheath over a nylon core, offering a little bit of stretch. This is a standard all-purpose cordelette favored by many professional guides, rated at 2,788 pound tensile strength and over 5,000 pounds when tied into a loop with a double fisherman’s knot.
Bluewater markets the 5.5 mm diameter Titan Cord, with a Dyneema core and nylon sheath, rated at 3,080 pounds tensile stength. They say its “combination of high strength, low elongation, and light weight provides superior characteristics over other combinations. Dyneema does not lose significant strength with repetitive flexing and offers a huge increase in abrasion and cut resistance over other materials. BW Titan cord can be cut and sealed with a hot knife.”
In recent years “high tenacity” cords have come onto the market, utilizing aramid fibers (namely Technora) for the core, with a nylon sheath. Aramid fiber has an exceptionally high breaking strength (stronger than Spectra or Dyneema) with low stretch and an extremely high melting point (900 f) making it difficult to cut and melt. The Sterling 6mm Powercord has a Technora core and nylon sheath, with a breaking strength of around 19kn or 4,271 pounds and the 5mm Tech Cord, sold by Maxim/New England Ropes with a 100 percent Technora core and polyester sheath, rates at a whopping 5,000 pounds tensile strength. But studies have shown that with repeated flexing aramid fibers break down more quickly (losing strength) than good old fashioned nylon. In fact, one particular study showed that when one section of Technora fiber cord was loaded with a 40 pound weight and flexed 180 degrees over an edge 1000 times, the material lost 50 percent of its strength, while nylon cord, in the same test, lost virtually no strength. Further research is warranted.
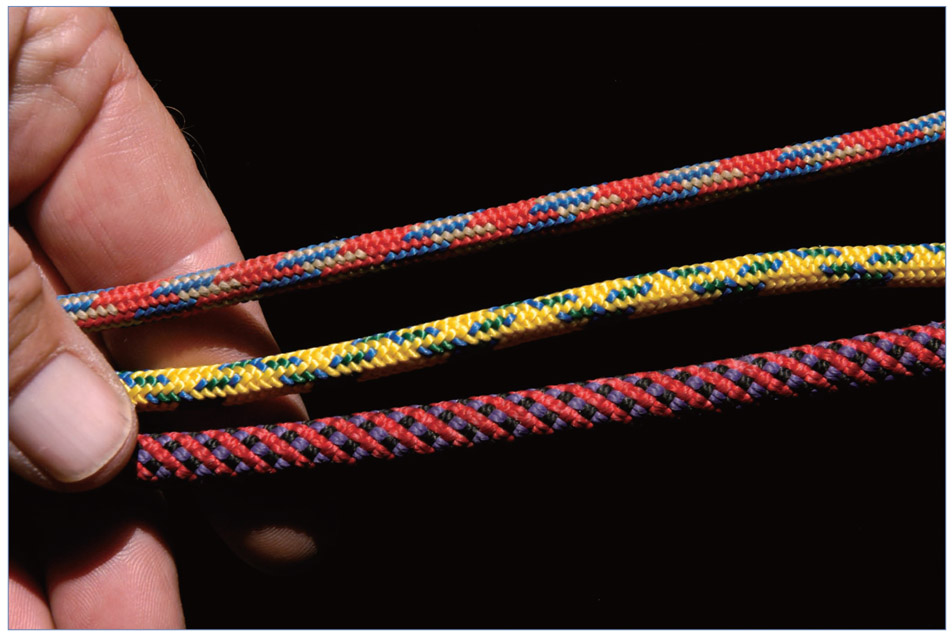
“Tech Cord” and nylon accessory cord. Top to bottom: 6mm nylon (Prusik) cord, 6.5mm Sterling PowerCord, and 7mm nylon Sterling cordelette cord.
The hi-tech cords are lighter, less bulky, and, most importantly, stronger—but this strength advantage can be lost depending on which knot is used (up to 40 percent loss of strength on high tensile with a figure eight knot), whereas knotted nylon hardly loses any strength at all.
Which cord works best for what situation is a matter of some debate, but the most up-to-date thinking recommends 7mm nylon, with its attending stretch, for use in rigging cordelettes. The increased stretch equals decreased force on the anchor, meaning more security in the event of a fall.
As far as knots go, it is generally accepted that a double fisherman’s knot is sufficient for nylon cord, while a triple fisherman’s knot is best for high-tensile cord.