Chapter 5:
Django
Django is a free and open source high-level Python web framework
that helps in the development of a website.
5.1 : Django Installation
Step 1:
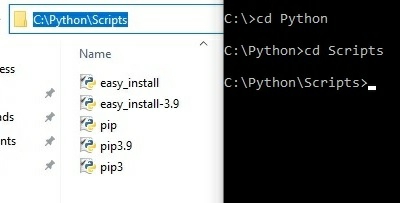
Open command prompt -> Go to the file location where Python
folder is present (Python installed in Chapter 4, section 4.1
) -> Go to Scripts
folder
My Python folder is present in C drive. C drive -> Python folder -> Script.
Step 2:
Check for the presence of pip
application into the Scripts
folder. Let’s display the pip
version by using command pip –version
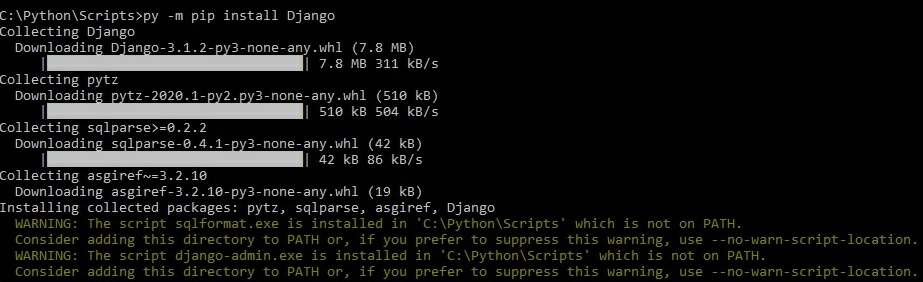
Step 3:
To install Django, type the command
py –m pip install Django
During the installation process, I encountered a warning saying “
Consider adding this directory to PATH
”
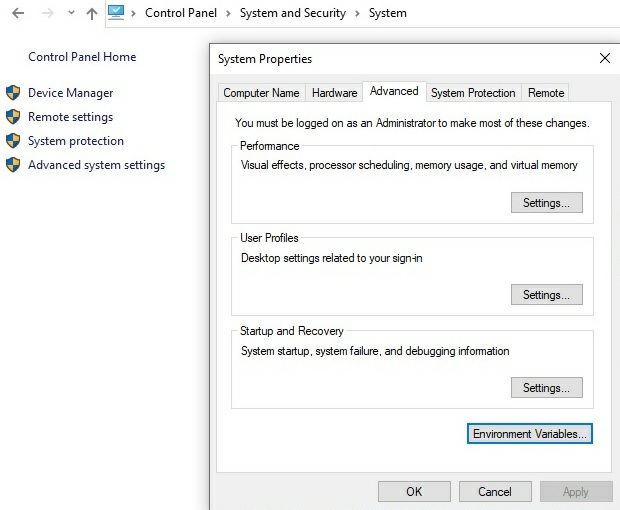
. So let’s fix this warning..
Go to Environment Variables
-> Now add the pip
file location into PATH variables.
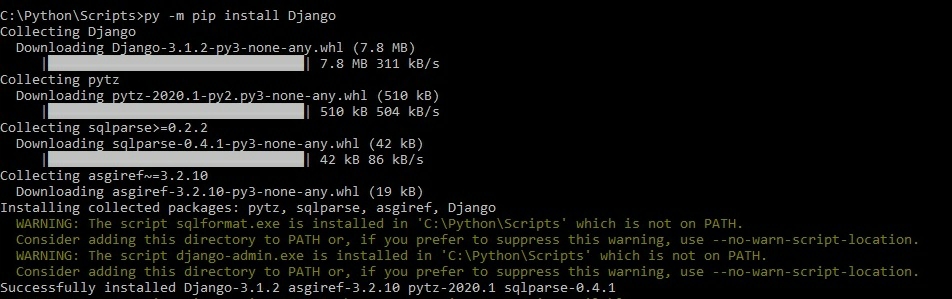
Now it says “Successfully installed Django”
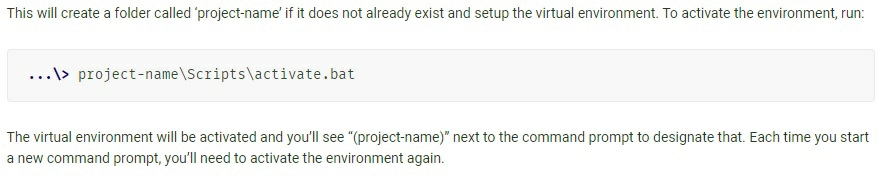
To create a virtual environment
Django documentation says the following:
So let’s create a folder (I named my folder
Python_script)
.
Open Command prompt -> navigate to the folder location (Python_script)
then write the following command:
We see Django created the folder for us.
Now Django documentation says:
So let’s activate the virtual environment. Open Command prompt -> Navigate to Scripts
folder -> run the following command:
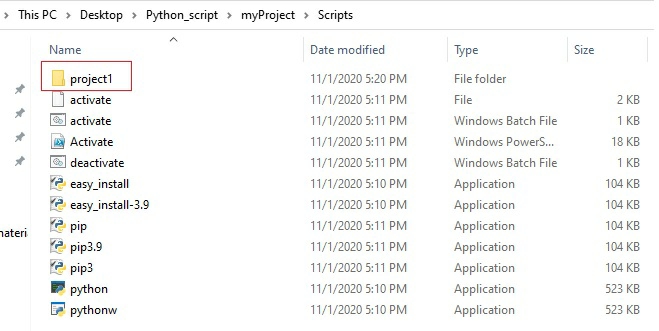
Step 5:
After setting up the virtual environment, open command prompt -> navigate to above Scripts
folder -> create the Django project by using the following command:
django-admin startproject
project_name
(I named my project
project1
).
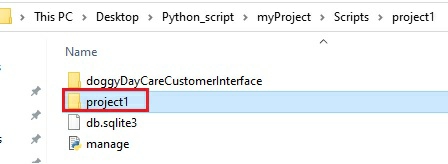
We see that Django created the project folder (project1
) for us.
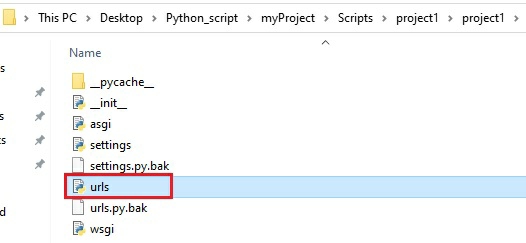
NOTE:
All Django main projects reside within the Scripts
folder
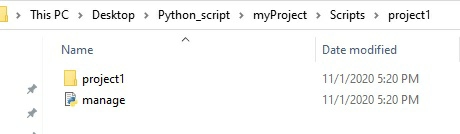
Step 6:
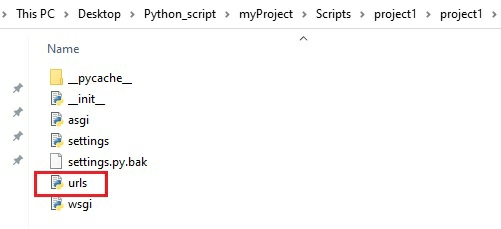
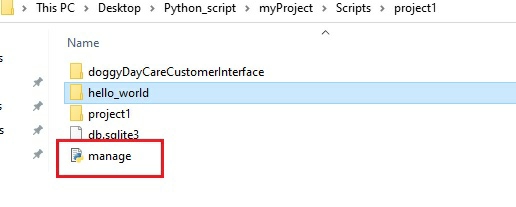
Open the project folder (project1
) and you will see the presence of manage.py
file. This file is the most important file and is needed to run a Django project.
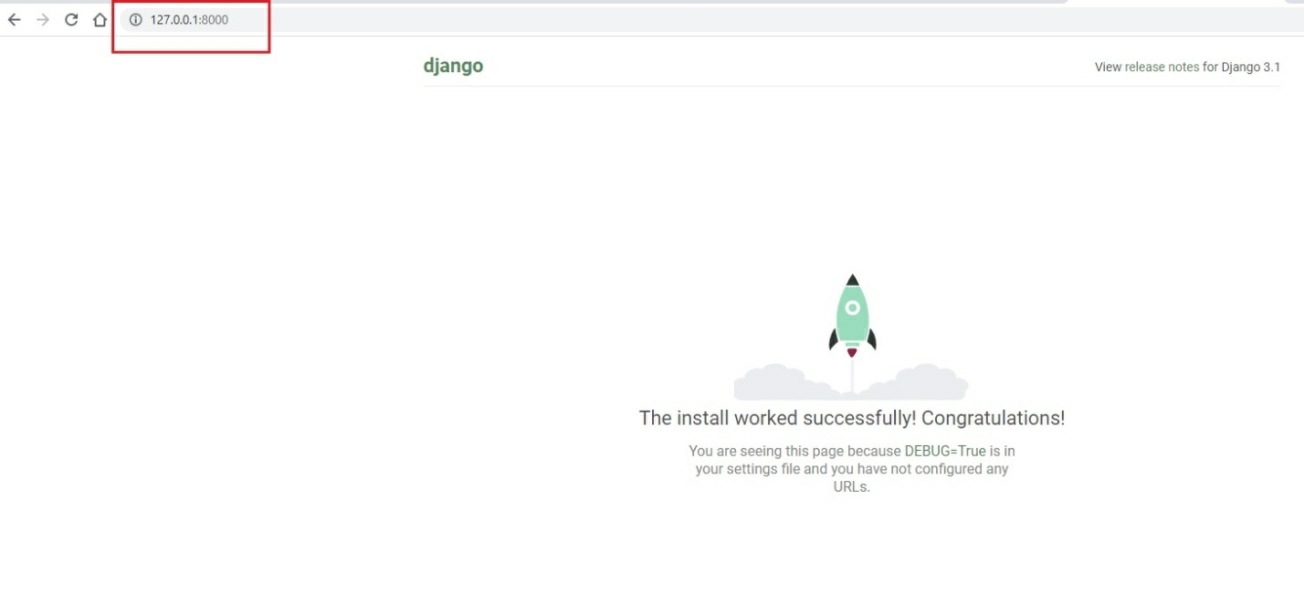
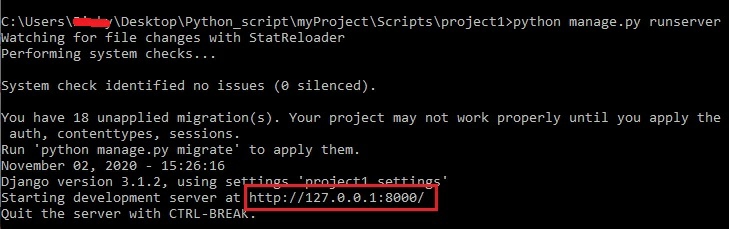
Now let’s run
our first Django project (project1
).
Open command prompt -> navigate to the project1
folder location where manage.py
file is present -> run the following command:
python manage.py runserver
Open web browser and go to site highlighted in the screen shot above.
The installation works perfectly.
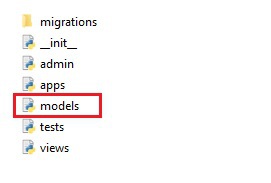
App stands for Application.
What is the difference between a Django project and a Django app?
A project
refers to the entire application all together, while an app
refers to a sub module of the main project.
Let’s take Amazon for example. Amazon is a huge company and it may be divided into multiple departments. One department may handle the Amazon Marketplace, other department may handle the Amazon KDP and so on. So in this case, Amazon Marketplace and Amazon KDP become apps
or sub divisions of the big project
Amazon.
Now let’s create an
app
and connect it with our main project
(project1
)
.
Step 1:
Open command prompt -> since the app
will reside within the main project (project1
),
we need to navigate to the project location -> now create a new app
with the help of the command:
python manage.py startapp
app_name
(I gave the name of my
app
doggyDayCareCustomerInterface
).
We see Django automatically creates the new app
folder within the main project (project1
).
Step 2:
Now let’s connect our newly created app
(doggyDayCareCustomerInterface)
with the main project (project1
)
.
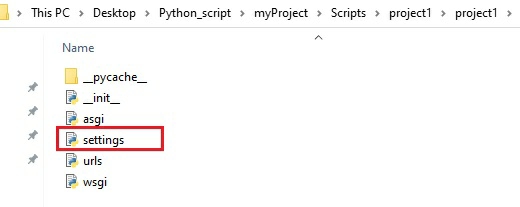
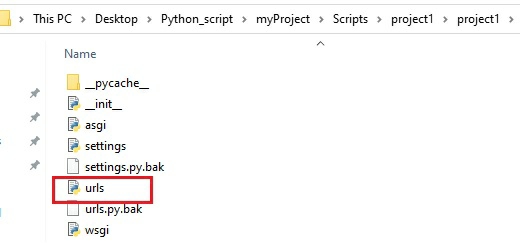
Open the project1
folder which contains all the important Python
files like settings.py
,
urls.py
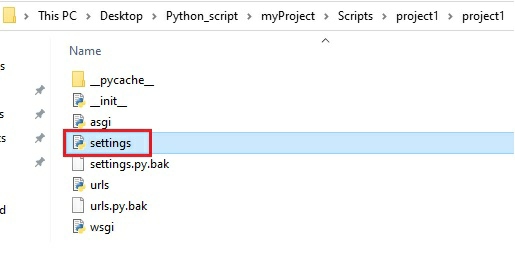
-> open settings.py
file
In settings.py
, add the newly created app
(doggyDayCareCustomerInterface)
into the list of INSTALLED_APPS
and click save.
The connection between the app
(doggyDayCareCustomerInterface)
and the project
(project1
)
is now established.
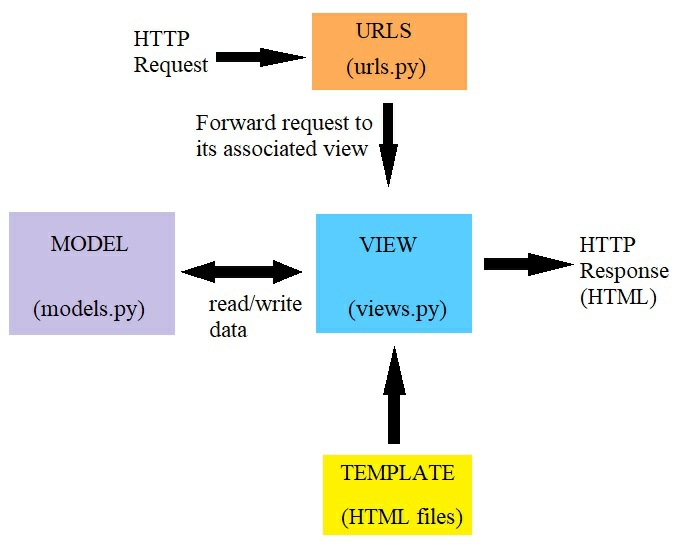
5.2.1 : Django Architecture
We have successfully created our new app
(doggyDayCareCustomerInterface).
Each app
must contain the following:
-
urls.py file
– It contains the list of all urls
present within the app
.
-
views.py file
– It contains all the functions
and classes
which will perform tasks.
-
models.py file
– It contains the models
or the database tables.
-
admin.py file
- It helps to register the models
into Django Admin App
.
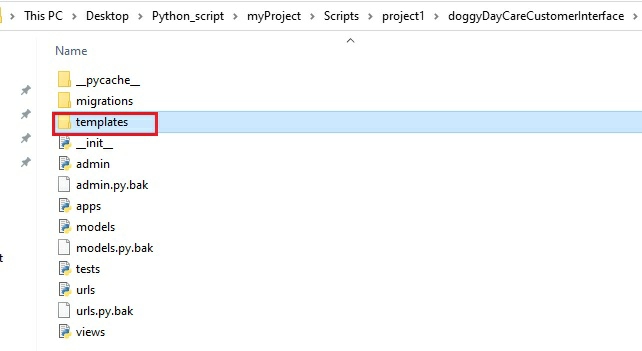
-
templates folder
– It contains all the HTML files.
-
static folder
– It contains all the static
files like CSS, Images and Javascripts.
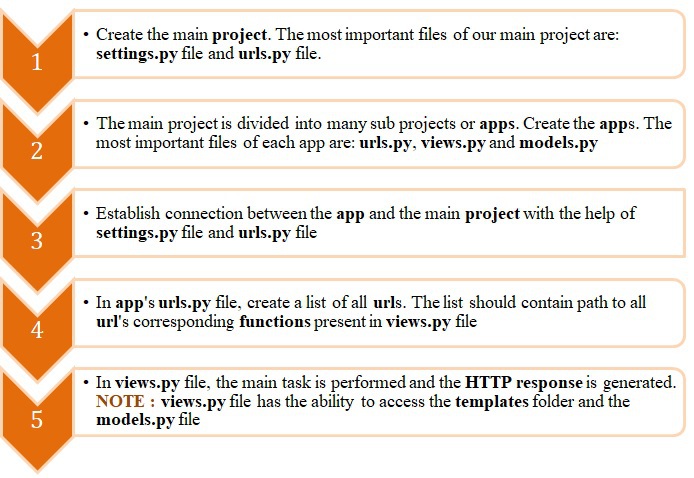
The Django process is very simple:
-
A
HTTP request from a user first goes to
urls.py
file where it looks for its associated
url name and with that name finds its associated
function which is present in
views.py file.
-
The function in
views.py file throws the
HTTP response (HTML file from
templates folder) to the user.
●
views.py
file also has the ability to access models.py
file to read or write data.
●
models.py
contains all the models
or database tables
Now let’s create a simple Django Hello World
app
to understand the entire process.
5.2.2 : Hello World Example
Step 1:
Let’s create a new app
within project1
and name it helloWorld
.
Step 2:
Now let’s connect our newly created app
(helloWorld)
with the main project (project1
)
.
Open folder project1
-> Open settings.py
file -> Add hello_world
within INSTALLED_APPS
and click save.
Step 3:
Now open hello_world
app
folder and check for the presence of urls.py, views.py
and models.py
file. If urls.py
is not present then create a new Python
file and name it urls.py
.
Please note:
I am using Notepad++ to write all my codes.
Step 4:
Within hello_world
app
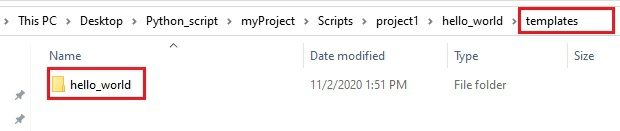
, create a new folder and name it templates.
Step 5:
Inside templates
folder create another folder with the same name as the app
. This new folders templates ->
hello_world
will contain all HTML files used exclusively by hello_world
app
.
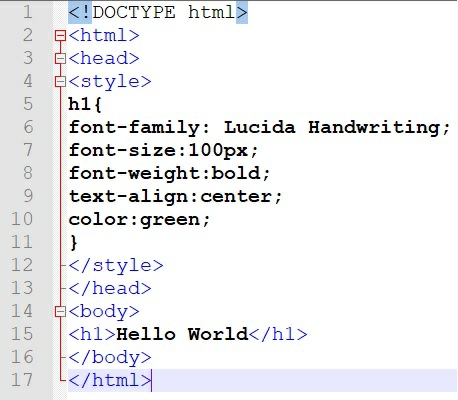
Create a simple HTML file (I named my file
index.html
) and save it inside templates ->
hello_world
folder.
Step 6:
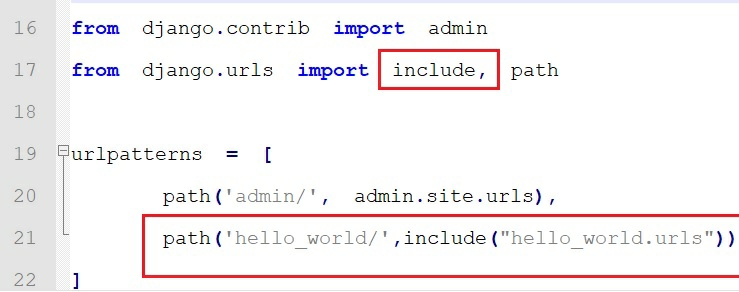
Open urls.py
file and write the following piece of code shown in the screen shot below
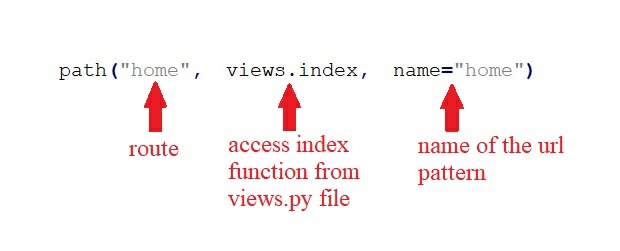
●
urlpatterns
is a tuple
which contains the paths to each function
written in views.py
file. It defines the connection between the urls
and the views
.
●
path( )
function
is used for routing url
s to the appropriate view
functions
.
Step 7:
Connect our app
’s (hello_world)
urls.py
file with our main project’s (project1
) urls.py
file. To do that:
●
Open project folder (project1)
where important files like settings.py
and urls.py
files are present -> Open urls.py
file
●
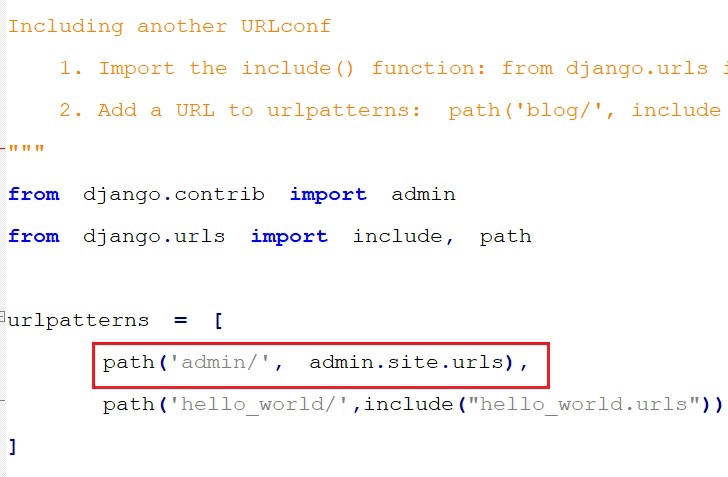
Into our main project’s urls.py
file, create a path that will lead to us to hello_world
app
and its corresponding url
s and
click save.
NOTE:
To use include ( )
function
, we need to import it from django.urls
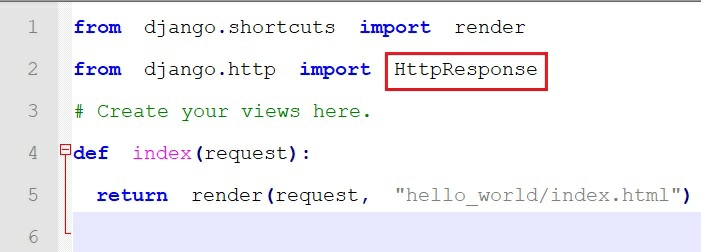
Step 8:
Open app’s (hello_world)
views.py
file and create the index
function
which is called from app’s (hello_world)
urls.py
file.
The index
function
takes the HTTP request
and with the help of render( )
function
gives a HTTP response which is the index.html
file stored in templates
-> hello_world
folder.
Render( )
function is used to return an Http response
and to use this function
we need to import HttpResponse
as shown in the screen shot above.
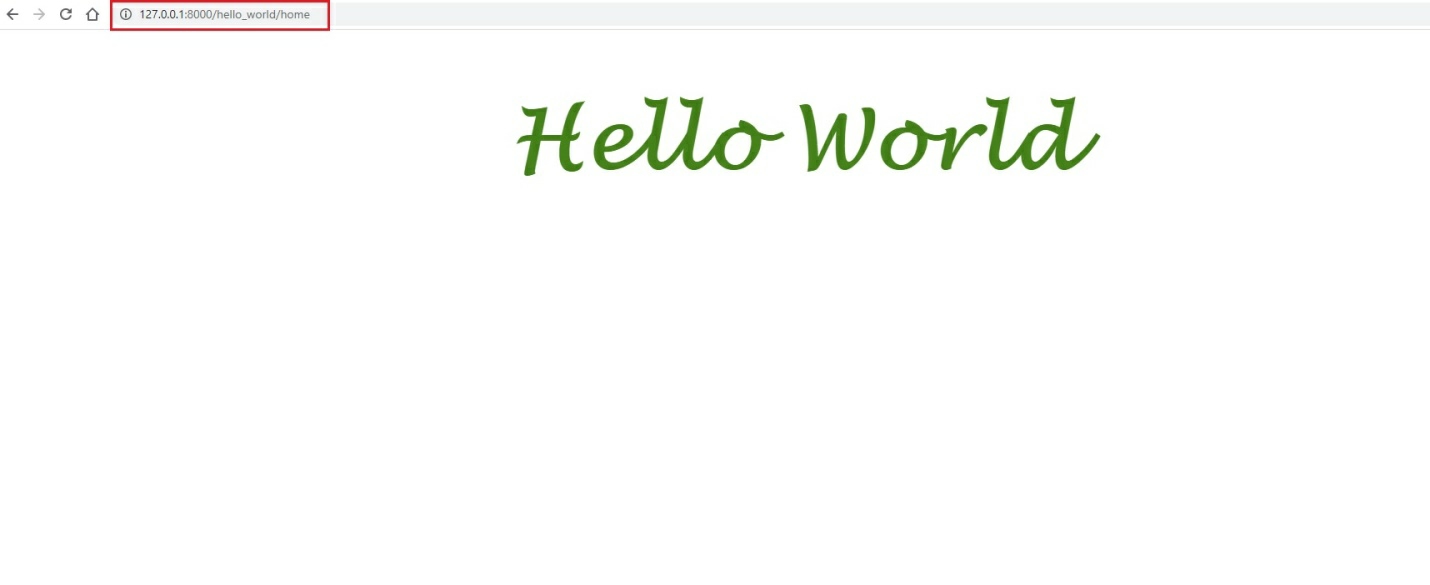
Step 9:
Save everything and run the project.
Open command prompt -> navigate to the main project (project1
) location where the manage.py
file is present -> run the following command:
python manage.py runserver
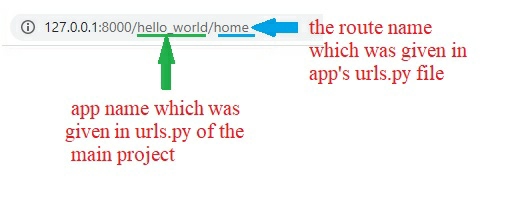
Open your web browser -> go to
http://127.0.0.1:8000/
and type the following
url
depicted in the screen shot below.
Let’s summarize the entire Django process.
Django Models are more like database tables where data are stored.
Let’s create some models
or tables for our app
doggyDayCareCustomerInterface
(created in section 5.2)
.
Step 1:
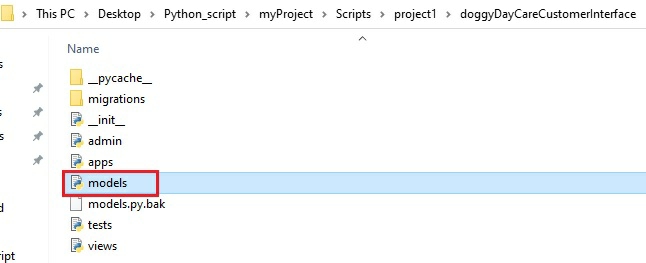
Inside doggyDayCareCustomerInterface
app
folder look for models.py
file.
Step 2:
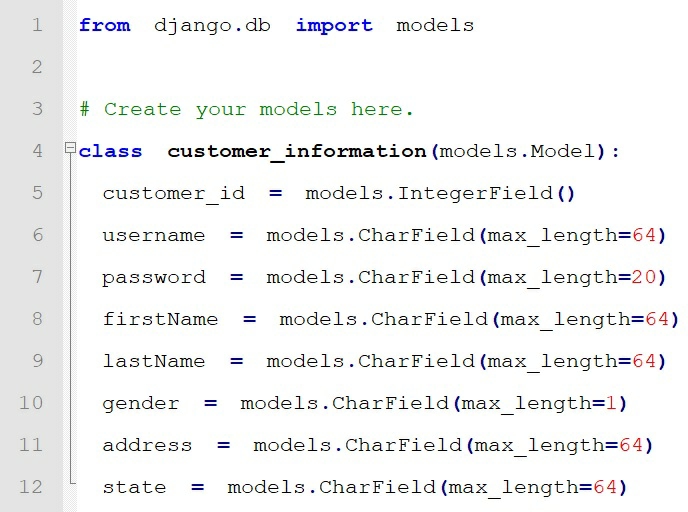
Inside models.py
we will create two model
classes
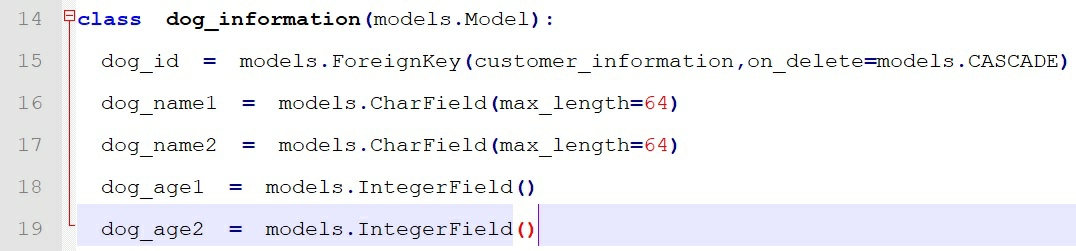
, customer_information
and dog_information
.
●
models.IntegerField( )
creates a column to store integer values.
models.CharField(max_length= n)
creates a column to store character values, where n
specifies the max length.
●
To establish relationship between the two models
or tables, we used Foreign Key.
on_delete = models.CASCADE
means that if the reference object is deleted, then also delete its associated records pointing to the reference object.
NOTE :
To add primary key to a particular field, set primary_key
to True
.
Example : name = models.CharField(max_length=50, primary_key=True)
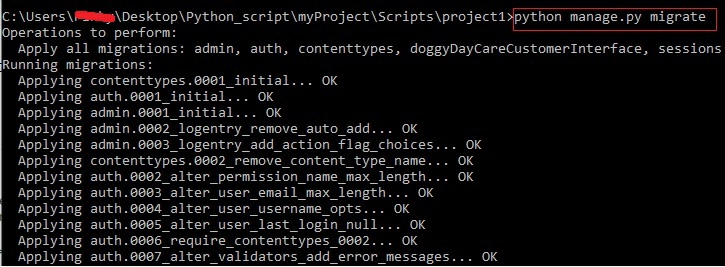
Step 3:
Start the migration process
of creating the tables.
Open command prompt -> navigate to main project folder (project1
) location where manage.py
file is present -> run the following command:
python manage.py makemigrations
For applying the migration to Django database run the following command:
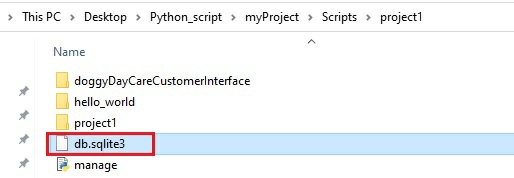
Step 4:
Open the SQLITE
file
present in the main project folder (project1
) location and notice the presence of newly created models
in that file.
Step 5:
Now let’s add some data into our models
.
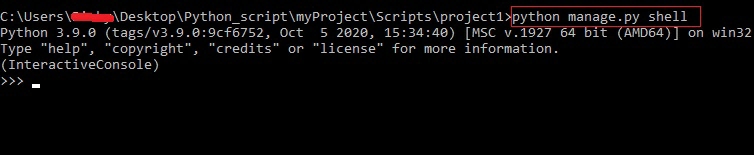
Open command prompt -> navigate to the main project folder (project1
) location where SQLITE
file
and manage.py
file is present and enter the following command:
In order to work with models, we need to import them first.
●
from
doggyDayCareCustomerInterface
.models import
customer_information
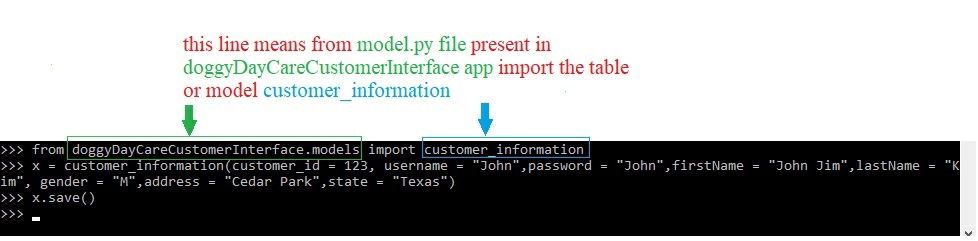
The syntax for inserting data is
:
model_name ( column1 = “
data
”, column2 = “
data
”, column3 =
123
……… )
●
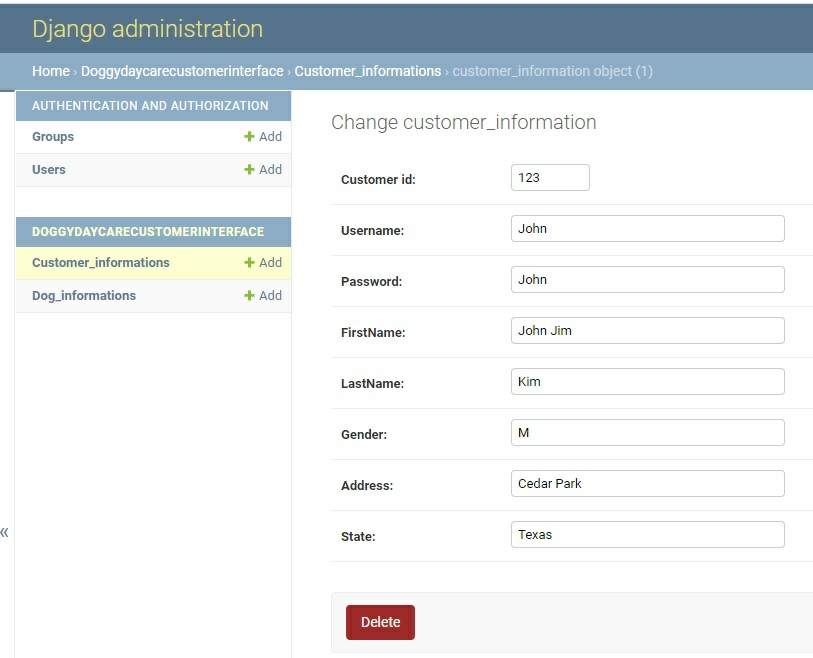
Inserted some data into customer_information
model or table:
x = customer_information (customer_id = 123, username = “John”, password = “John”, firstName = “John Jim”, lastName = “Kim”, gender = “M”, address = “Cedar Park”, state = “Texas”)
●
Save the data
x .
save( )
We have successfully inserted a new record into our customer_information
model or table. Now let’s access that record from Django admin app
.
Django has already created an app
for us for data manipulation and it is called the Admin App
. This app
gives us the ability to insert
, update
or delete
data without going through the hassle of writing multiple database queries.
Steps to access the Django Admin App
are:
Step 1:
Open the project folder (project1
) which contains important files settings.py
and urls.py
- > Open the urls.py
file and check for the presence of path to the admin
app
:
●
path(‘admin/’, admin.site.urls)
Step 2:
Now open command prompt - > navigate to the main project (project1
) folder location.
To access the admin app
, we need to create our administrative account which can be done with the help of the following command:
python manage.py createsuperuser
Step 3:
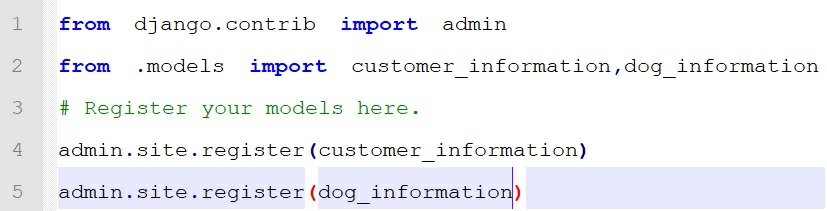
Go to app
(doggyDayCareCustomerInterface
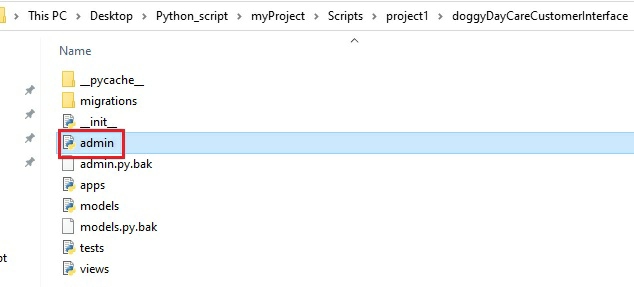
) -> Open its admin.py
file -> Import and Register the models
(created in section 5.3
) -> click save
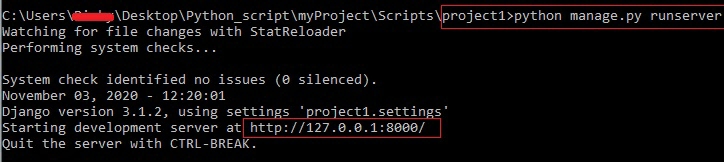
Step 4:
Open command prompt -> navigate to the main project (project1
) folder location where the manage.py
file is present -> run the project using the following command
python manage.py runserver
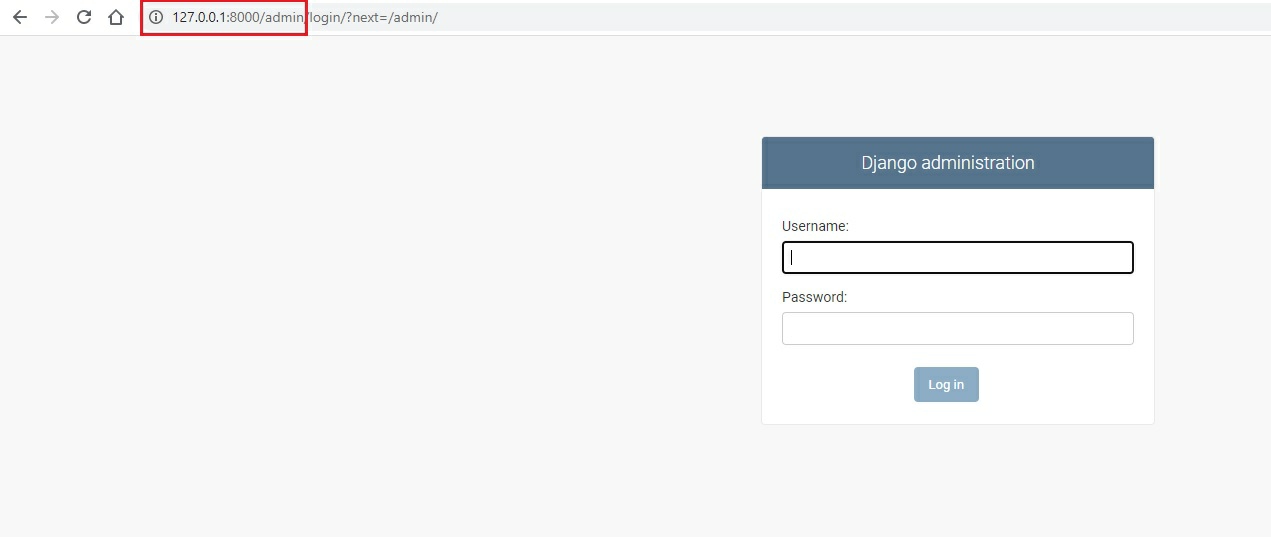
Enter username and password -> click Log In
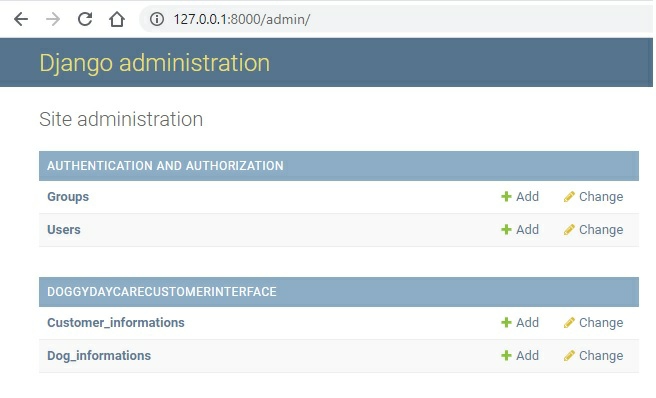
The admin app
shows the models
or tables with records (created in section 5.3
)
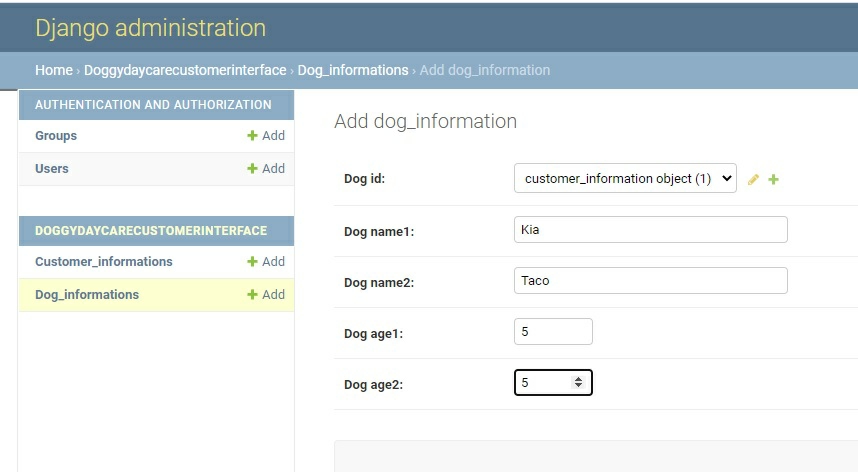
Add some associated dog information into dog_information
model
or table and click save.
5.5 : How to navigate to different pages of our project using Django
In section 5.2, we have created our app
doggyDayCareCustomerInterface
and connected it with our main project project1.
In section 5.3 we created its models
or database tables.
Now let’s follow the steps from Hello World
Example (section 5.2.2
) and make our doggyDayCareCustomerInterface
app
functional.
Please Note:
doggyDayCareCustomerInterface
app
is the continuation of the Doggy Day Care Center
project and it will contain all the HTML files which we created in Chapter 1 and 2.
Step 1:
Established connection between the main project and doggyDayCareCustomerInterface
app
through settings.py
file (already done in section 5.2
).
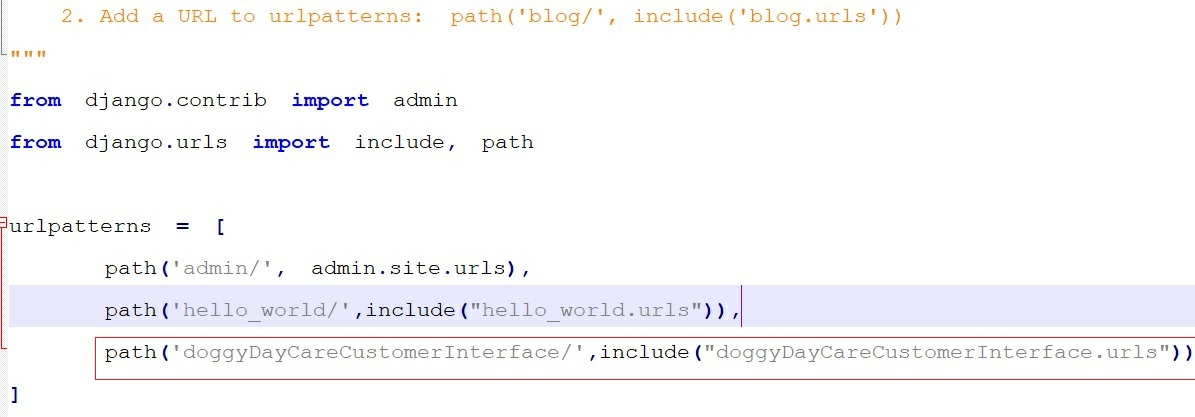
Step 2:
Now let’s include the app
’s path and all its url
s into main project’s (project1
)
urls.py
file.
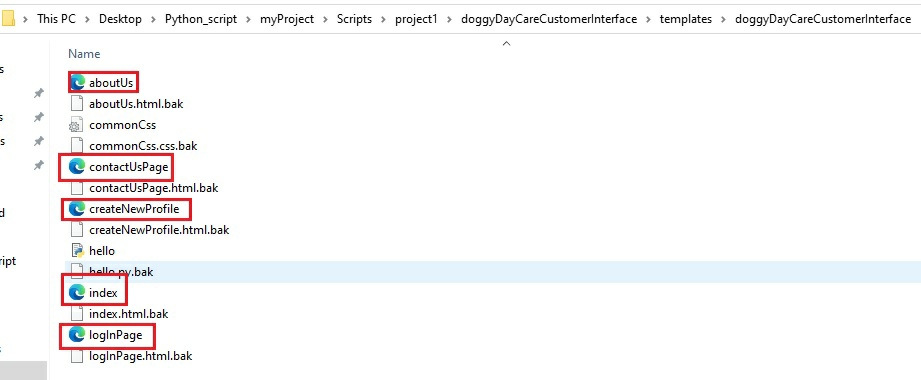
Step 3:
Create the templates
folder -> Create another folder within templates
folder with the same name as the app
and paste all the Doggy Day Care
project’s HTML files into it.
Step 4:
Now let’s go to the app
’s (doggyDayCareCustomerInterface)
urls.py
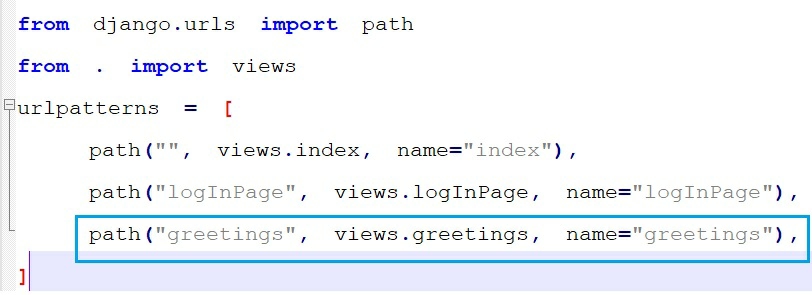
file and add the following lines of code:
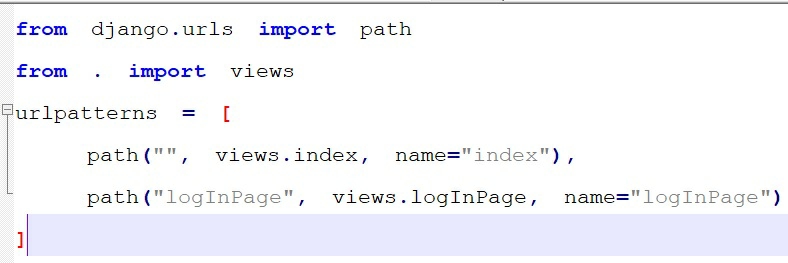
urls.py
Step 5:
Open app
’s (doggyDayCareCustomerInterface)
views.py
file and add the following lines of code:
views.py
Code Explanation:
●
In urls.py
file, path(“”, views.index, name=”index”)
does not have any routing name. This means when there is no routing name simply proceed to index
function
present in views.py
file. The index
function
returns index.html
(Home page of Doggy Day Care project
) file to the user.
●
In urls.py
file, path(“logInPage”, views.logInPage, name=”logInPage”)
have a routing name and url
name of logInPage
. This means when the routing name is logInPage
proceed to logInPage
function
present in views.py
file. The logInPage
function
returns logInPage.html
(Log In page of Doggy Day Care project
) to the user.
Step 6:
Open index.html
file of the Doggy Day Care Project
(
created in section 1.2.1, Chapter 1)
-> Notice there was a hardcoded path given to the HTML href attribute
which would lead us to Log In
HTML page.
Now delete the old path and in that href attribute
give the url
name
logInPage
from urls.py
file.
The syntax for adding the url
name
from urls.py
file into a HTML file is:
{% url ‘
url_name’
%}
{% … %} are called Template Tags
in Django. They are mainly used within HTML document to:
1. Load some external information.
2. Perform loops or logic.
When user click on the Log In
button of the Home Page
, the href attributes
leads us to url
name logInPage
. The request proceeds to urls.py
file, where it looks for the path
with url
name logInPage
. Now with the help of this name, it goes to its associated function
logInPage
present in views.py
file. Function
logInPage
simply returns the Log In
page to the user (please refer to codes above
).
Step 7:
Let’s run our project and check whether the navigation from Home page
to Log In page
is performing correctly or not.
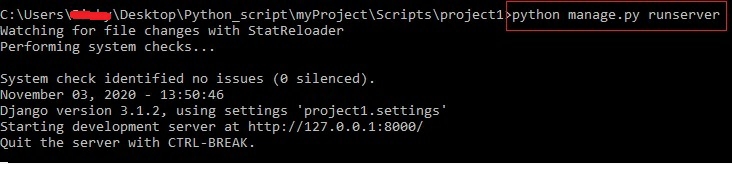
Open command prompt -> navigate to the main project (project1
) location where manage.py
file is present and run the following command:
python manage.py runserver
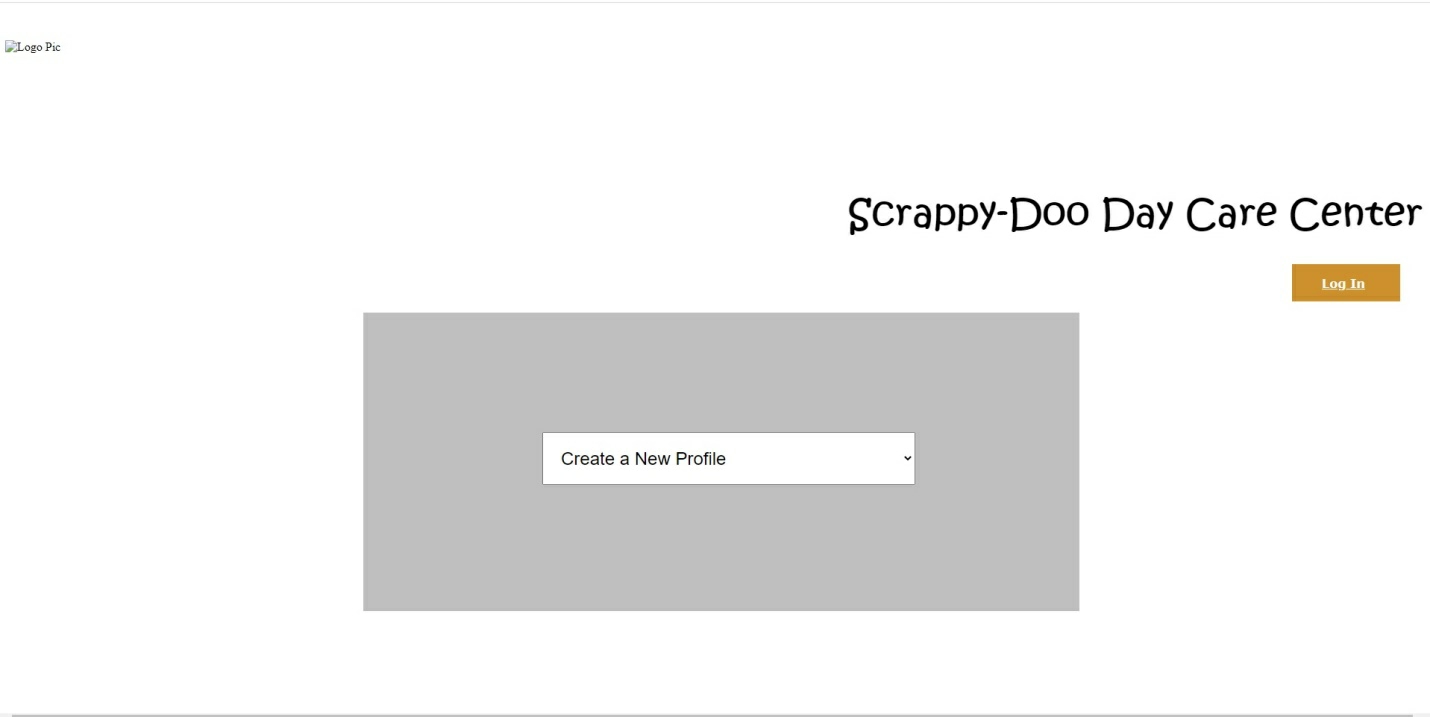
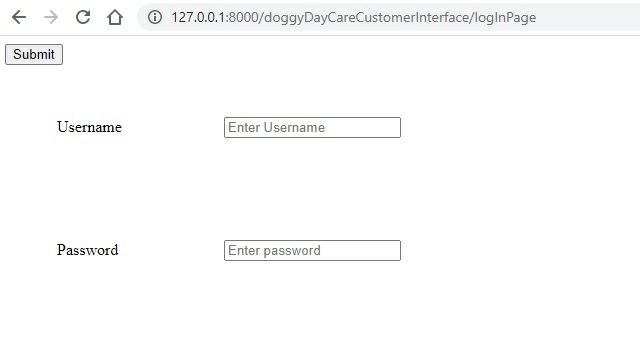
Open web browser -> go to
http://127
.0.0.1:8000/doggyDayCareCustomerInterface/
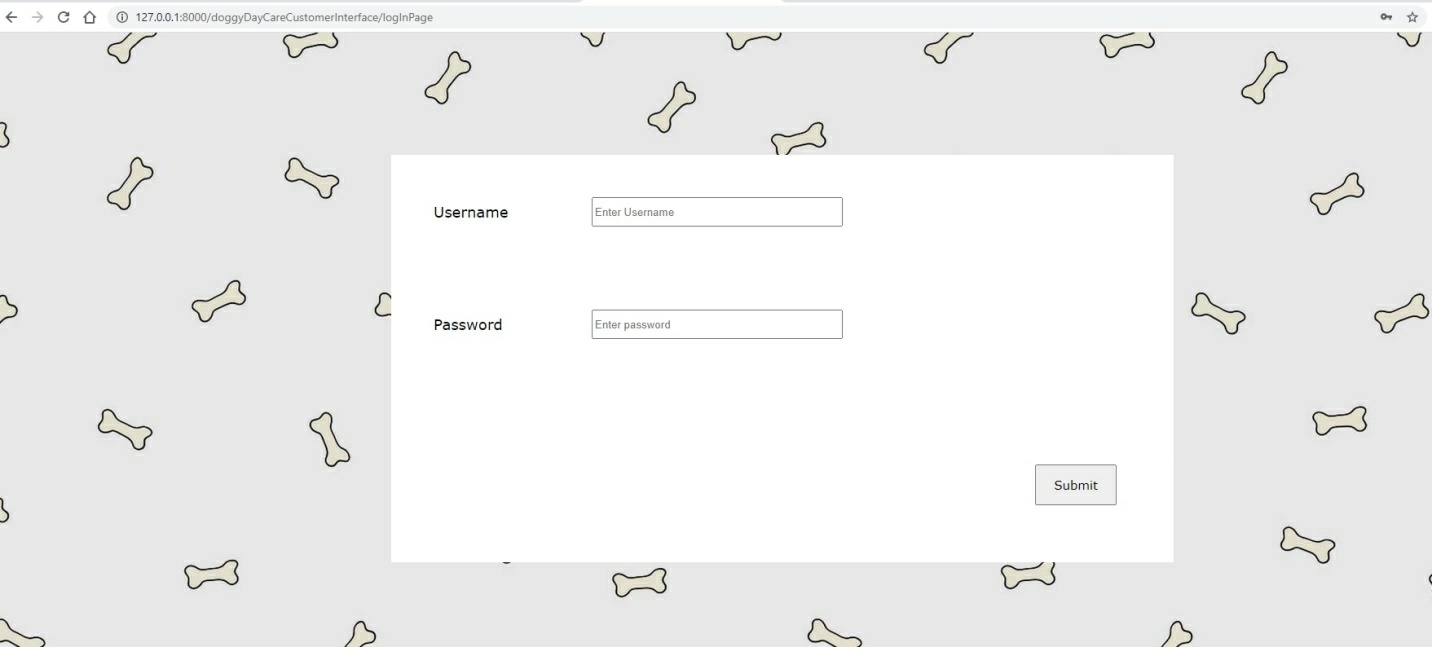
Now click on Log In button to check the navigation works properly or not.
The navigation works perfectly.
Now follow the steps above and replace all hardcoded paths present in index.html
files with url names
.
Everything works fine
but you will notice one BIG flaw. You will notice that the pages loaded without any images and CSS. So let’s fix this issue in the next section.
5.6 : How to load static files like CSS & Images into our Django App
In section 5.2, we have created our app
doggyDayCareCustomerInterface
and connected it with our main project project1.
In section 5.3, we created its models
or tables
In section 5.5, we have learnt how to navigate to different pages.
Now let’s learn how to load images and CSS into our doggyDayCareCustomerInterface
app
.
Before we begin, please note in Chapter 1, we have done Internal CSS
for index.html
file and External CSS
for the rest of the pages. The name which we gave to our External CSS
file was commonCss.css
Step 1:
Open settings.py
file of the main project (project1
).
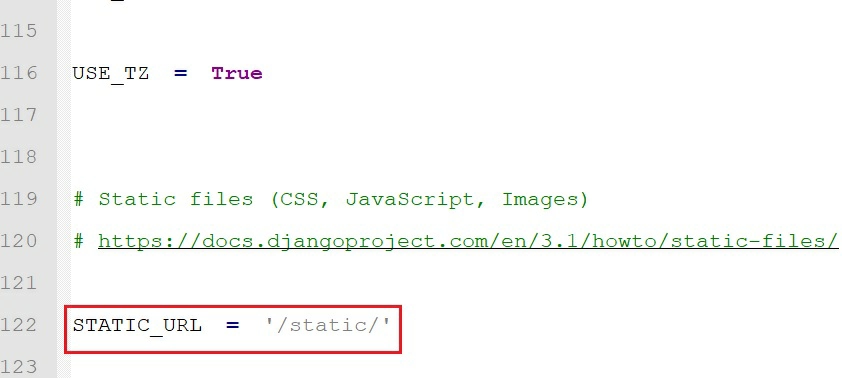
Scroll down and look for the STATIC_URL
. It says all static files like CSS, Images, Javascript will be stored in static
.
So let’s create our static
folder.
Step 2:
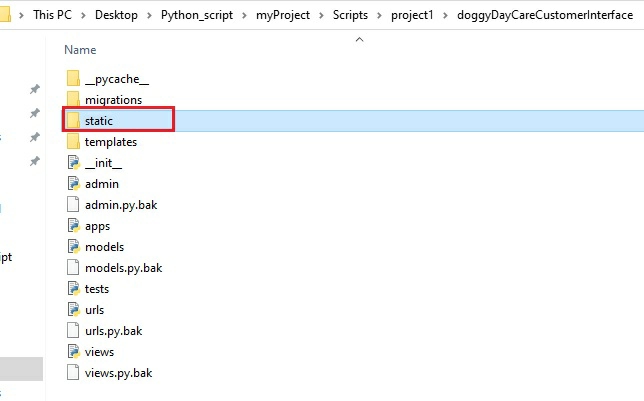
Open app
folder (doggyDayCareCustomerInterface
) -> create a new folder within it and name it static
Step 3:
Inside static
folder create another folder and its name should be same as the app
’s name. This folder will contain all static
files used exclusively by doggyDayCareCustomerInterface
app
.
Step 4:
Add all the images and CSS files into static
-> doggyDayCareCustomerInterface
folder.
Step 5:
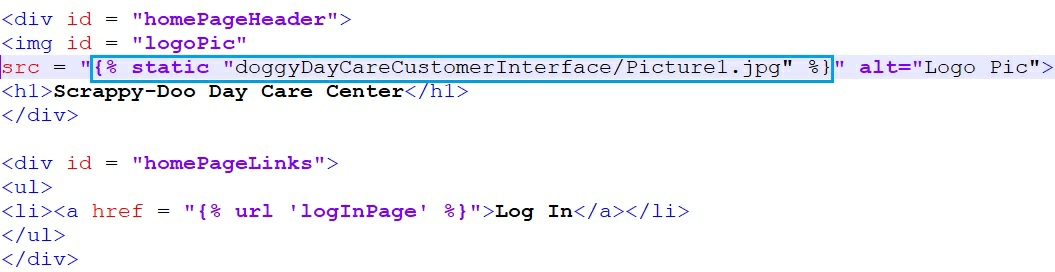
Open index.html
(
Doggy Day Care Project Home Page
)
file -> in <head>
section of the HTML document, write the following line of code:
{% load static %}
index.html

.
Then add the static files with the help of syntax
:
{% static ‘
subdirectory/static_file_name’
%}
Step 6:
Now let’s load External CSS
file commonCss.css
into our logInPage.html (
Log In page
) file.
{% load static %}
{% static “
doggyDayCareCustomerInterface/commonCss.css”
%}
logInPage.html
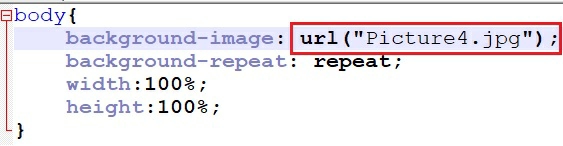
How to access a static file (image) from another static file (CSS)?
1
. Since both are static
files are in the same location, we simply have to give the static
file name (image name
) into the CSS url ( )
function
.
2
. We do not have to use the following line of code:
Now let’s run our project. Open command prompt -> navigate to the main project (project1
) location where manage.py
file is present and run the following command:
python manage.py runserver
Open web browser -> Go to
http://127
.0.0.1:8000/doggyDayCareCustomerInterface/
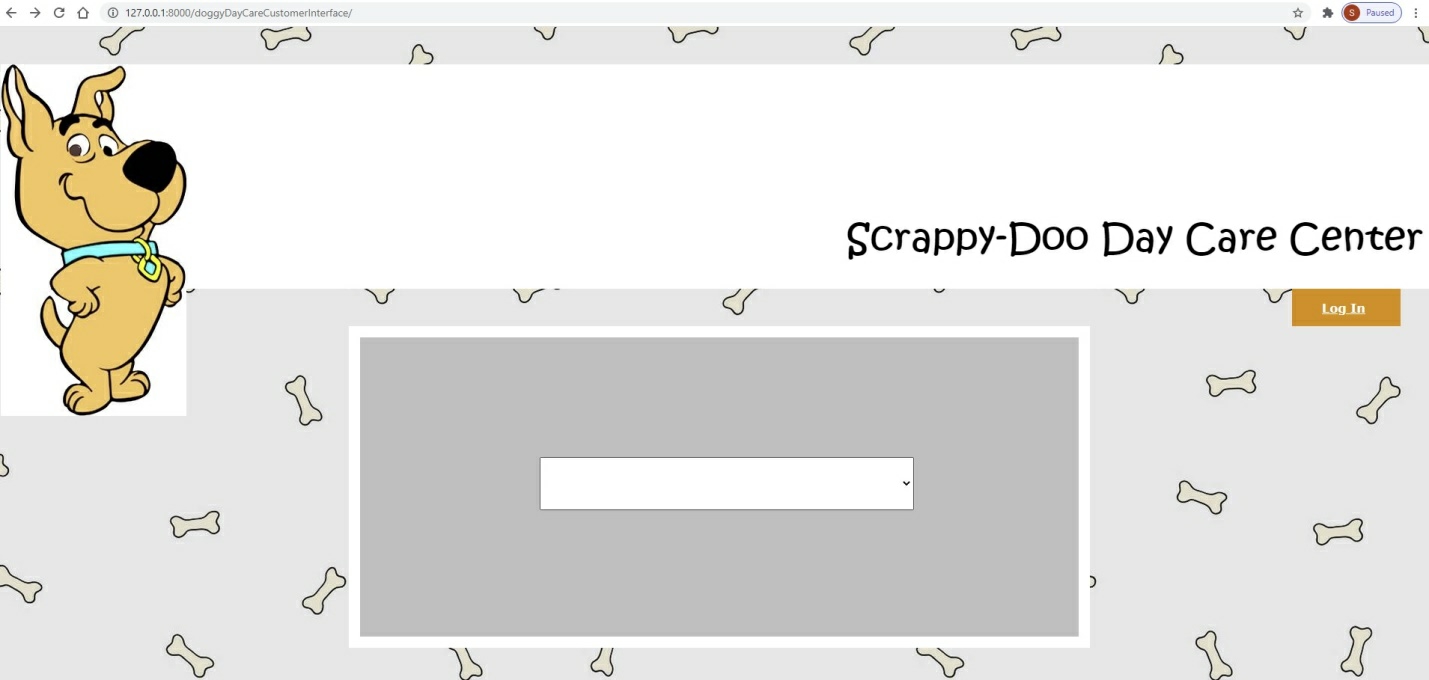
The images and CSS show perfectly.
How to add Javascript static file into our HTML document?
Similar to External CSS
file, we need to create an External Javascript
file and save it with Javascript extension .js
.
Then add the Javscript file into our HTML document. The syntax for this:
<script src="{% static
'file_name
.js' %}"> </script>
Working with Django form
can be little bit complicated and requires a lot of steps. Well I will try my best to simplify the steps for you all.
Before we go into our Log In
page of Doggy Day Care
project
, let’s first understand how Django form
actually works with a simple example.
Let’s create a simple HTML file within our doggyDayCareCustomerInterface
app
and name it test123.html.
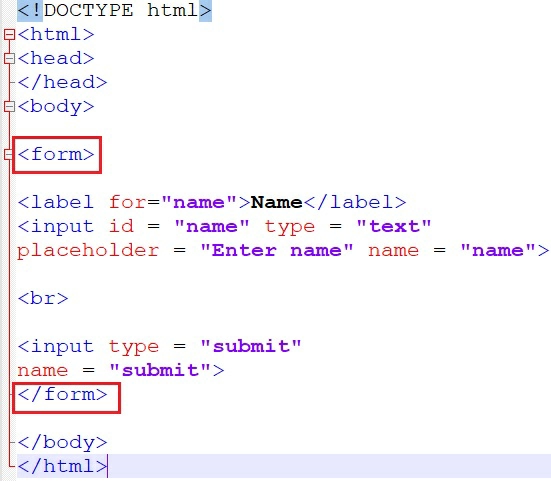
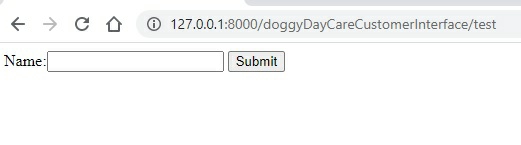
In test123.html,
I created an input field Name
and a submit button. When the form
is submitted, I would like to show another HTML file as response which will contains the submitted Name
from the form
.
test123.html
The above piece of code shows a HTML form
with an input field and a submit button. But in Django, this simple form
will work little differently. So let’s follow the steps below of creating a Django form
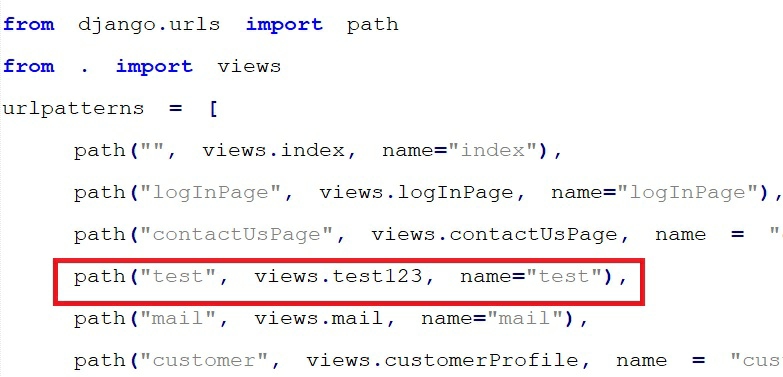
Step 1:
Open doggyDayCareCustomerInterface
app
’s urls.py
file -> create a path with route name and url
name test
and which will lead us to a function
test123
present in views.py
file.
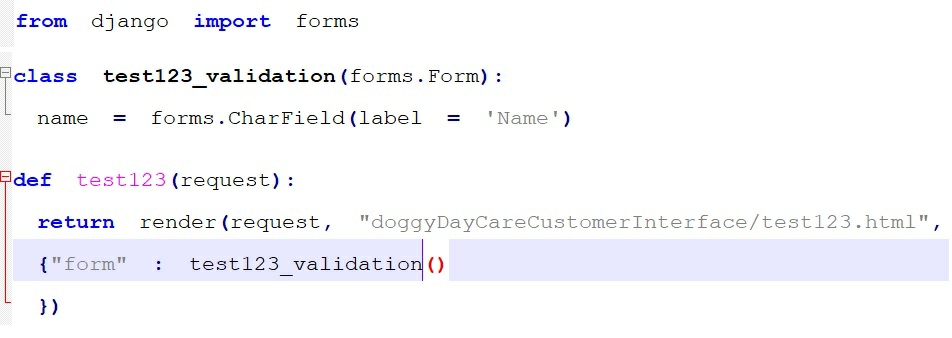
Step 2:
Open views.py
file -> created a form
class
and named it test123_validation
. Inside this class
, all the form
objects
with its data type are declared.
Form
objects
are simply the input fields present within the <form>
tag of a HTML document.
Please note:
Our test123.html
file contains only one input file Name
. So in class
test123_validation
, I created only one input form field name
which will hold character values.
Step 3:
In views.py
file create the function
test123
. Inside the function, all the form objects
from class
test123_validation
are passed into a variable form
and this variable form
is used by test123.html
file.
test123
function
returns the test123.html
file with all the form objects.
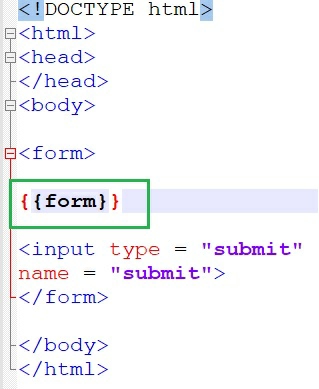
Step 4:
Inside test123.html
, we simply have to plug in the form
variable within template tag
{{ … }}
and Django will automatically generate the input fields with its corresponding <label>
tags
{{ … }} is a template tag and is used to plug in variables into a HTML document.
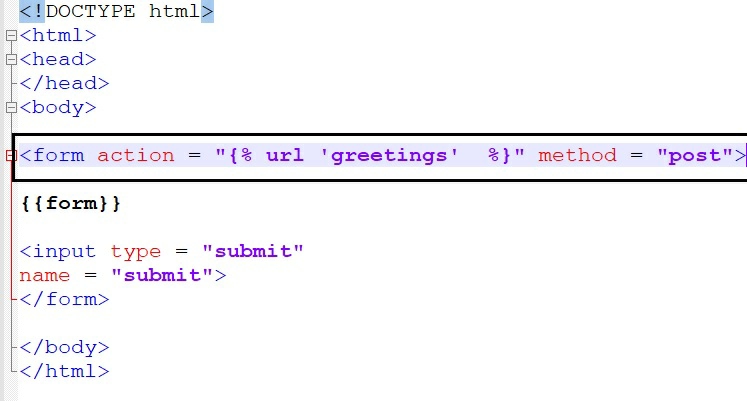
Step 5:
Now let’s add the action attribute.
Once the form
is submitted, I would like to navigate to url
name greetings
. (In section 5.5, we have learned how to navigate to different pages)
Step 6:
Open urls.py
file -> create a new path with url name
greetings
which will lead us to greetings
function
present in views.py
file.
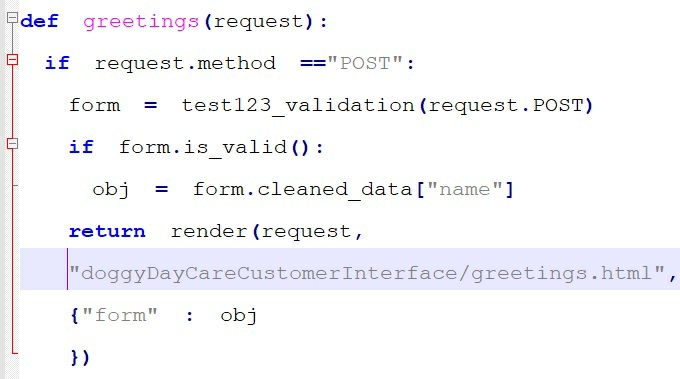
Step 7:
Open views.py
file and create our greetings
function
which will handle the request
from the user.
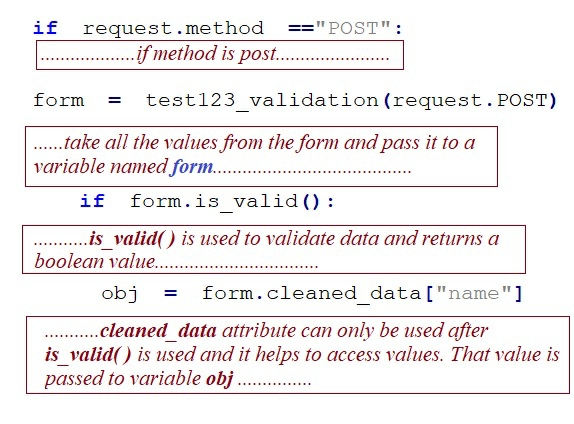
Code Explanation:
In short it means:
-
If the method is POST
, take the values from the form
field which belongs to class
test123_validation
and pass it into a variable form.
If value is present, take that value and store it in variable obj
.
NOTE:
cleaned_data
attribute is used to access the value from the input field.
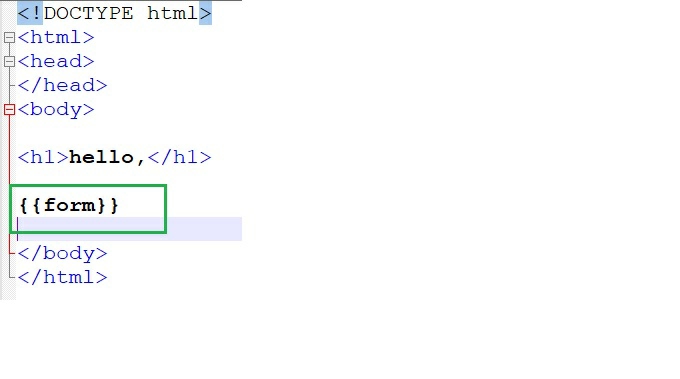
greetings.html
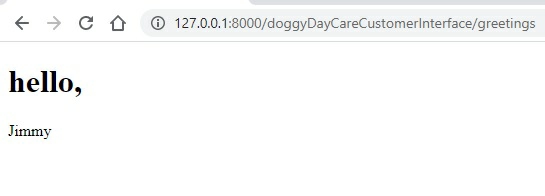
Now let’s run our project. Open command prompt -> navigate to the main project (project1
) folder location where manage.py
file is present -> run the project using the following command
python manage.py runserver
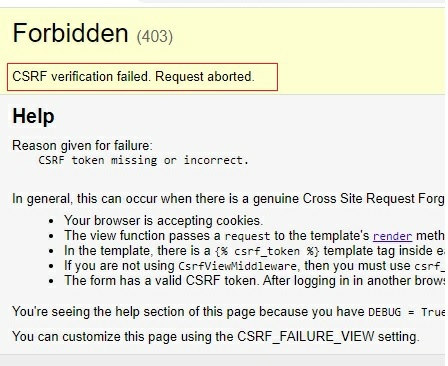
Open web browser -> go to http://127.0.0.1:8000/doggyDayCareCustomerInterface/test
After I entered the name and clicked the submit button, an error
shows up.
This error appeared because I forgot to add csrf token
within the <form>
tag of test123.html
.
A Django csrf token is a unique value generated exclusively for authenticated users. It MUST be used with all Django forms because it helps to protect the user’s information and prevent any kind of malicious activities.
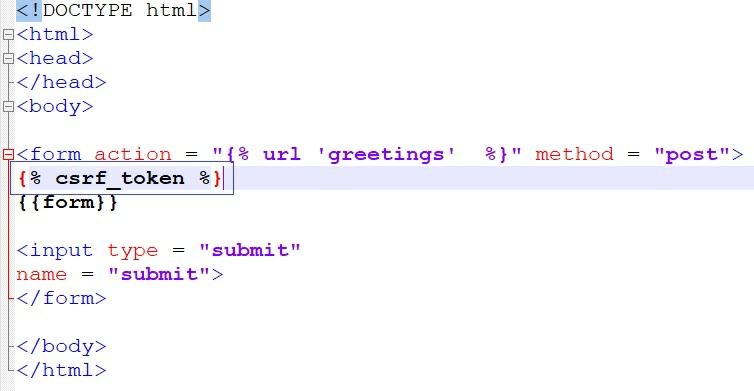
So let’s add the csrf token
within <form>
tag of test123.html
file and save it.
test123.html
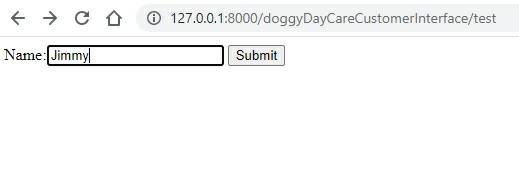
Run the project.
Everything works perfectly.
Let’s summarize the entire process:
-
From views.py
-> function
test123,
the form
class
is passed into a variable form
which is accessed by test123.html
and in that HTML page we simply plug in the variable. Once the variable is plugged in, Django automatically generates all the input fields.
In real world, no pages look simple as the example above. Web pages are far more complex and contain CSS, Javascript and lot more. In the next section we will learn how to manually insert Django form fields
into our HTML file without disturbing the original DOM
structure.
Example :
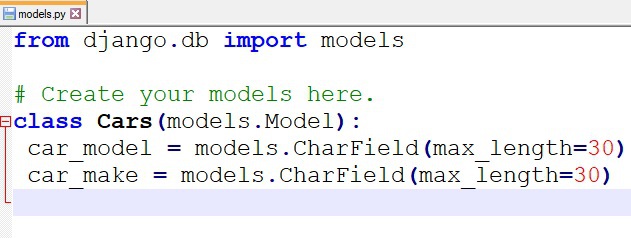
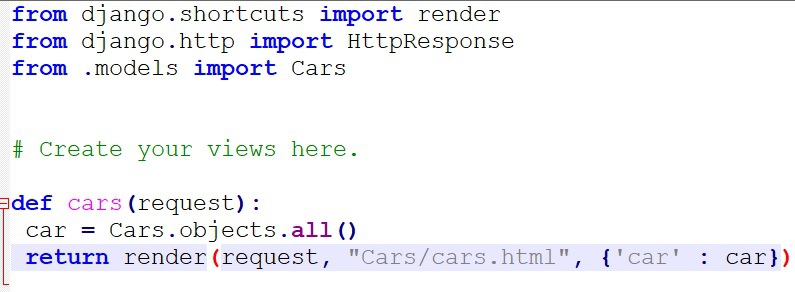
In this example, we will create a database model and insert some data into it. Then we will print out the data from the model into a HTML file.
- Let’s create a new app
within our main project (project1
). (I named my new app
cars)
.
Then connect the newly created app (cars
) with the main project (project1
) through settings.py
and urls.py
file.
- Setup the urls.py
file, views.py
file and templates
folder.
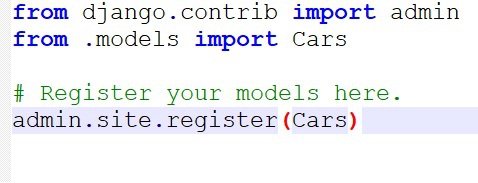
- Open models.py
file and create a new model (I named my model
Cars
).
- Start the migration process (discussed in section 5.3)
.
- Now register the models in admin.py
file.
Let’s add some data into it and display the data in a HTML document.
In views.py
file add the following lines of code (code discussed in previous sections)
.
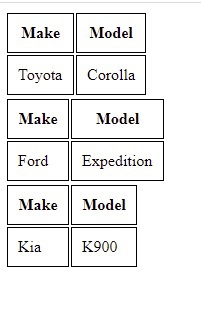
In cars.html
file display the records using for loop
.
Please Note :
In Django if you start a loop in a template, you need to end the loop.
Example: {% for … %} ….. {% endfor %}
,
{% if … %} ….. {% endif %}
Run the project.
5.8 :
Django Form with CSS & Rendering form fields manually
Now let’s open our doggyDayCareCustomerInterface
app
-> go to templates
-> doggyDayCareCustomerInterface
and open our logInPage.html
file
(section 5.5 has the steps of creating the
templates
folder
).
logInPage.html
You will notice two things after going through the code above and they are:
If we follow the Django form
steps in section 5.7 and simply plug in a variable containing all form
fields, you will notice none of the table format and the CSS will load. In order to prevent that from happening, let’s manually and individually render Django form
fields without disturbing the entire DOM
structure of the HTML document.
Now we will create the Django form
for Log In
page.
Step 1:
Create a path in urls.py
file which will lead us to our Log In
page. (we already did this part in section 5.5
).
Step 2:
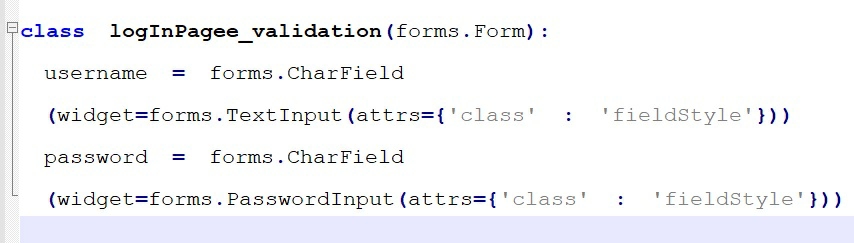
Open views.py
file -> create a class
containing all the form
fields of Log In
page.
Please Note:
If we want to add a Javscript
Event
into our Django form
field
, we can add that in attributes attrs.
Example:
password = forms.CharField (widget=forms.PasswordInput (attrs = { 'class' : 'fieldStyle', 'onchange' : 'js_function_name( )' }))
Now in function
logInPage
, let’s pass the above form
fields into a variable form
which is accessed by logInPage.html
HTML file.
views.py
Step 3:
Open logIn.html
file -> in place of <input>
tags, I am rendering the Django form
fields manually with the help of dot (.) operator.
logIn.html
NOTE:
When form fields
are rendered manually, Django will not generate its corresponding <label>
tag automatically. We need to manually add the label
for its corresponding field and to do that Id_for_label
is used.
.Id_for_label
is used if we are constructing labels for the fields manually
.
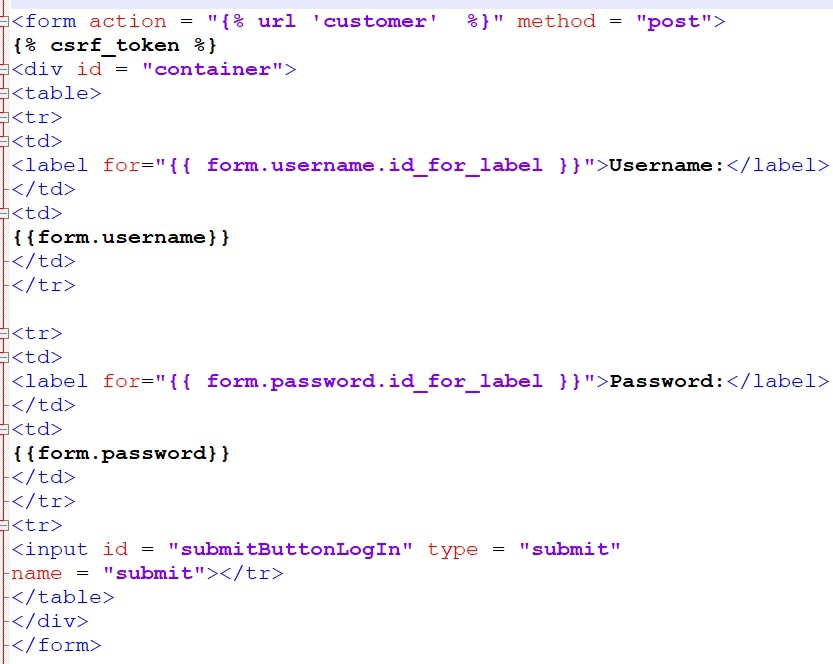
Save everything and check whether the new changes made in our logInPage.html
works properly or not.
Everything looks good.
Let’s proceed to performing the validation process in the next section.
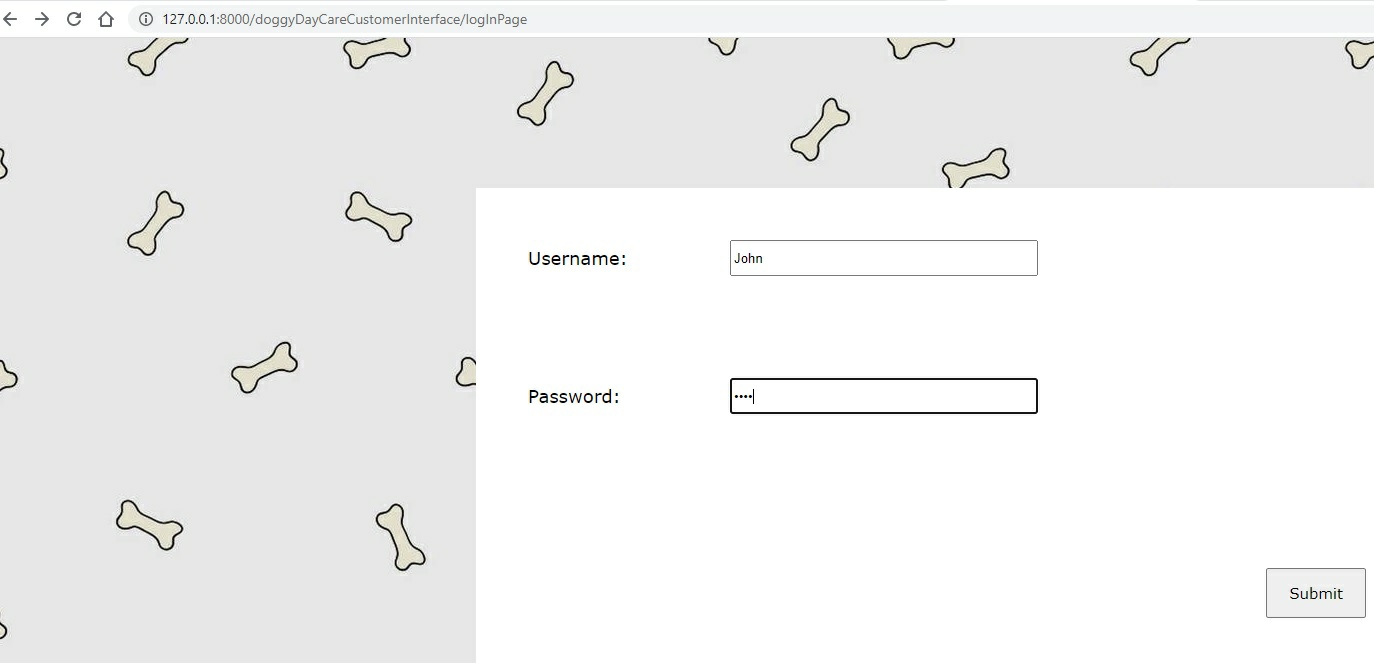
5.9 : Log In Page Validation process
In section 5.3, we have created models
or database tables for our doggyDayCareCustomerInterface
app
In section 5.8, we have created the form
for our Log In
page.
Now let’s perform the validation process.
Please note when the form
is submitted from logInPage.html (
created in section 5.8
),
it leads us to url
name customer
as shown in the screen shot below.
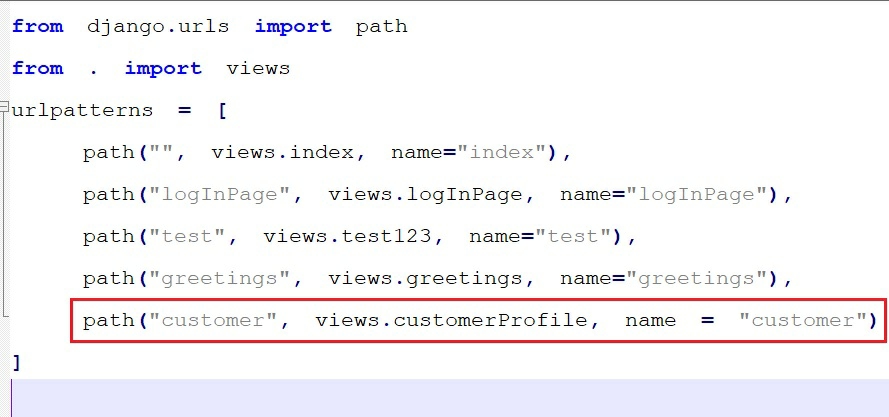
Step 1:
Open urls.py
file -> create a path with url
name, route
name customer
and which will lead to function
customerProfile
present in views.py
file
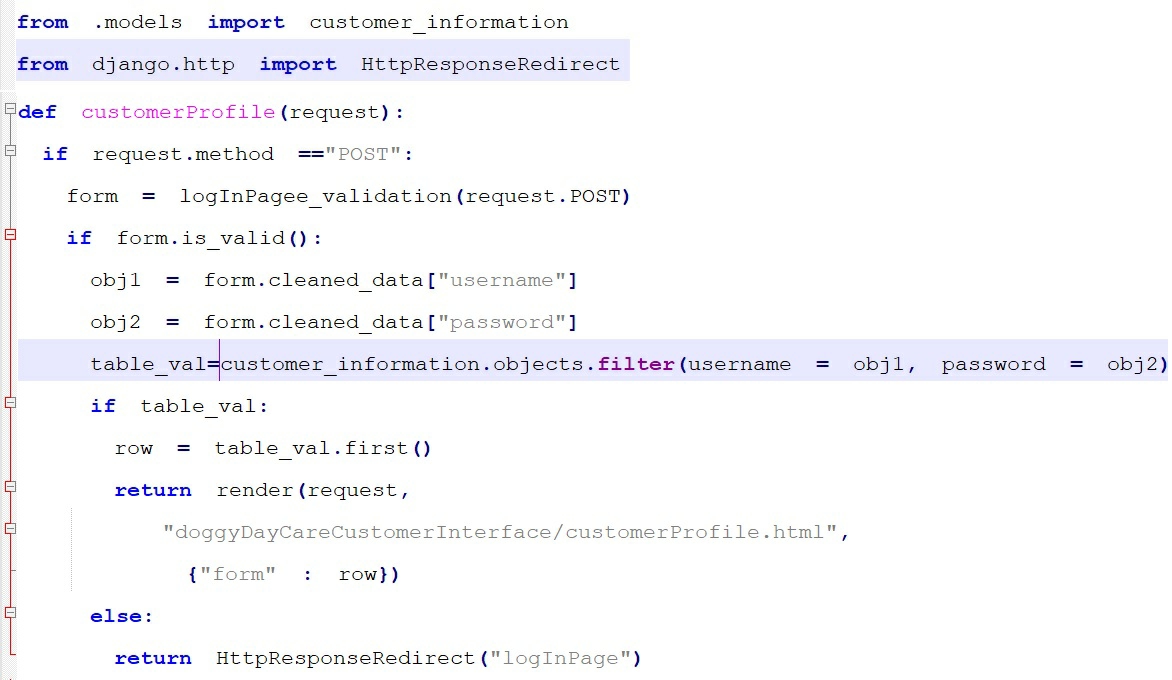
Step 2:
Open views.py
file and let’s create our function
customerProfile
. The function will take the request
from the user, check whether the entered username and password matches with its corresponding database records or not and then throw a response
.
Code Explanation:
In section 5.7, we have discussed lines of code from:
if request.method =="POST"
to
obj2 = form.cleaned_data["password"]
.
Now let’s discuss the code from line:
table_val = customer_information.objects.filter(username = obj1, password = obj2)
.

The above line of code is a database query where it looks for a record in customer_information
model
or table whose username
= obj1
and password
= obj2
.
We are all familiar with database select
queries like:
select * from
table_name
where
column_name = “value”
.
But in Django the syntax of the above select
query is little different. The Django equivalent of the above select
query is:
table_name
. objects . filter (
column_name = “value”
)
You can also use get( )
method in place of filter( )
method.
NOTE :
The Django equivalent of select * from
table_name
is:
table_name
. objects . all ( )
customer_information
is present in models.py
file. To access the table in views.py
file, first we need to import the table from the models.py
file.
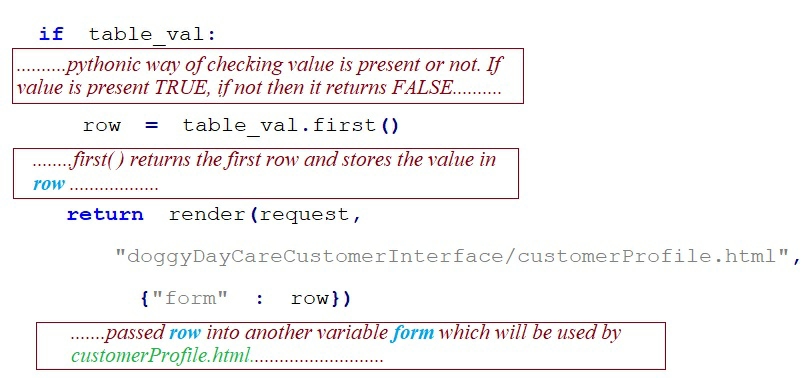
Please follow the screen shot below for line by line code explanation.
In short it means,
Take the data from the above query and store it in variable table_val.
If value is present, take the first row with the help of first( ) method
and store the data into another variable row.
Now pass that row
variable into another variable form
which will be accessed
by HTML file customerProfile.html
.
The above steps are performed if the form
is valid. Now if the form
is not valid then redirect
back to the url
name logInPage
.
To use HttpResponseRedirect
, we need to import it first.
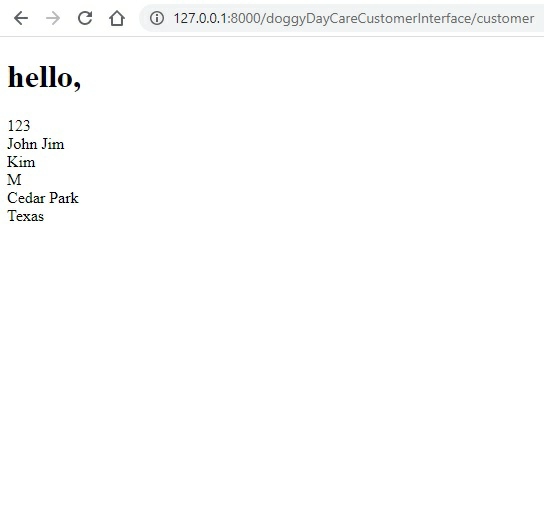
Now in customerProfile.html
, let’s display the data from customer_information
model
or table.
customerProfile.html
Now run the project. Open command prompt -> navigate to the main project (project1
) folder location where manage.py
file is present -> run the project using the following command
python manage.py runserver
Open web browser -> go to
http://127.0.0.1:8000/doggyDayCareCustomerInterface/
logInPage
The validation works perfectly.
5.10 : Displaying data from multiple tables or models into Web Page
In section 5.3, we have created the models
for our doggyDayCareCustomerInterface
app
.
In section 5.9, we have learned how to display information into our web page from one table or model
.
Now in this section, we will learn how to display information from multiple tables or models
.
Few important points to note are:
Due to this relationship, the dog_id
column will display associated data from ALL columns of customer_information
model
. Instead of displaying data from all columns, I would like to display data from only one column customer_id
and to do that we need the __init__
function
(__init__ function
discussed in chapter 4)
.
So let’s add the __init__
function
into our customer_information
class
f “…”
is a Python formatted string literal that contains expressions within { } and these expressions are replacement fields.
In the same function, I added a new line of code:
In the above highlighted query I am performing a Join
, I access the username
field (present in
customer_information models
) from dog_id
column and look for a record whose username
= obj1
. Then I store the result of the query in val2.
Code explanation of
function customerProfile( )
is present in sections 5.9.
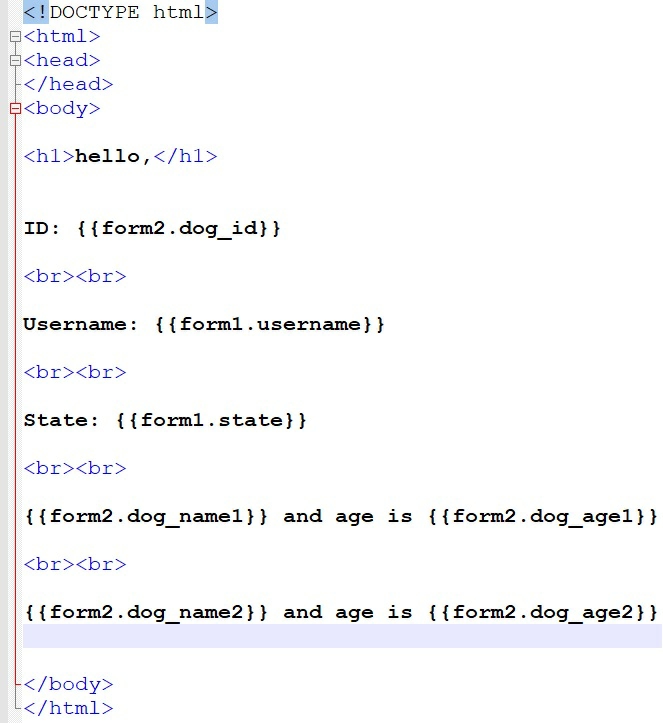
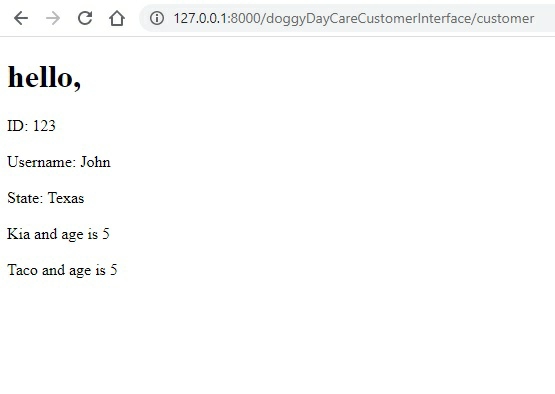
Now let’s update our customerProfile.html
file and plug in the variables.
In ID
, I am displaying the data from dog_id
column which in turn will display its associated data from only one column customer_id
and this was possible because of the presence of __init__
function
.
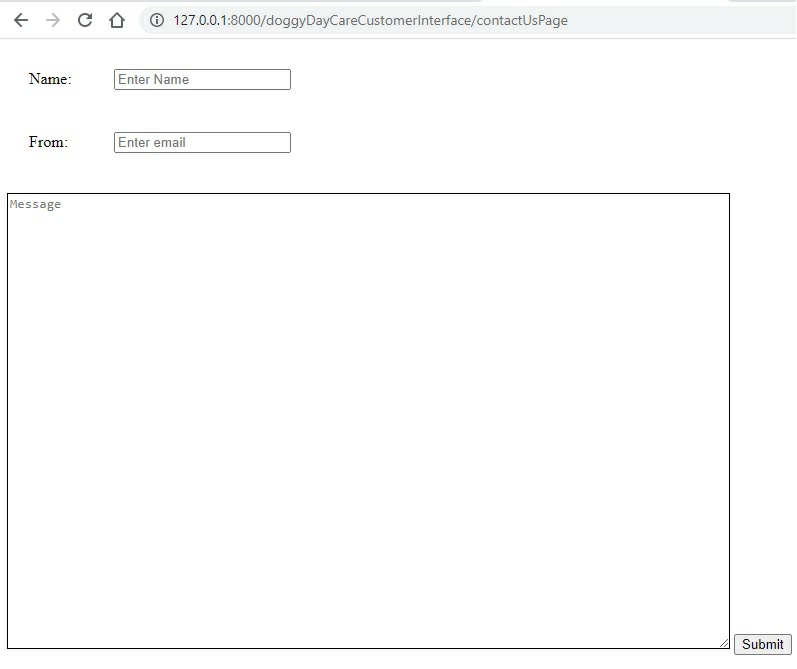
We created our Contact Us
page in Chapter 2.
Now let’s follow the steps below and make our contactUsPage.html
file Django compatible.
Step 1:
Open the doggyDayCareCustomerInterface
app
’s index.html
(Home page
of Doggy Day Care project
) file and give an url
name (page
navigation discussed in section 5.5
)
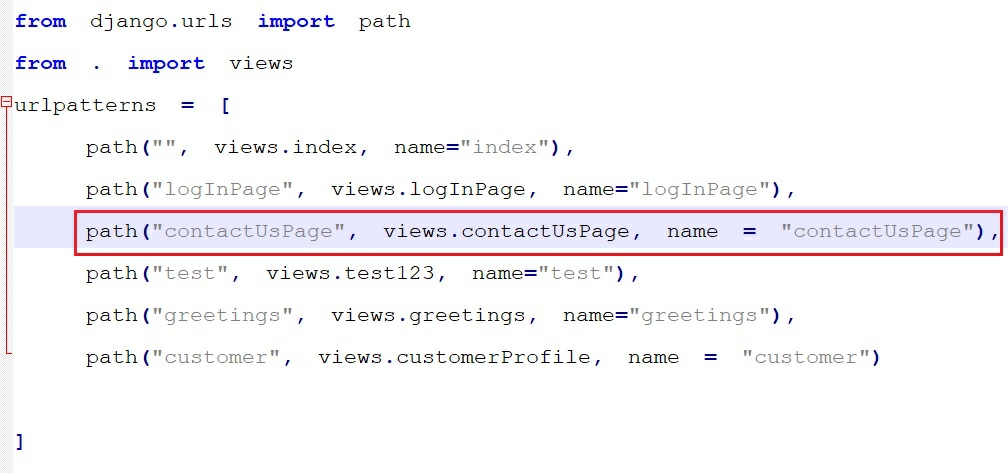
Step 2:
Open urls.py
file and create a path that will lead us to contactUsPage
function present in views.py
file.
urls.py
Step 3:
Open views.py
file and create the function
contactUsPage( ).
This function will simply return the contactUsPage.html
page.
views.py
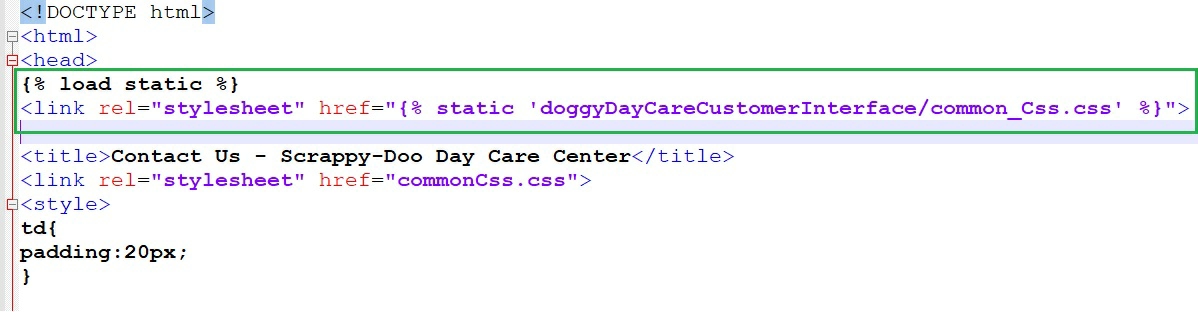
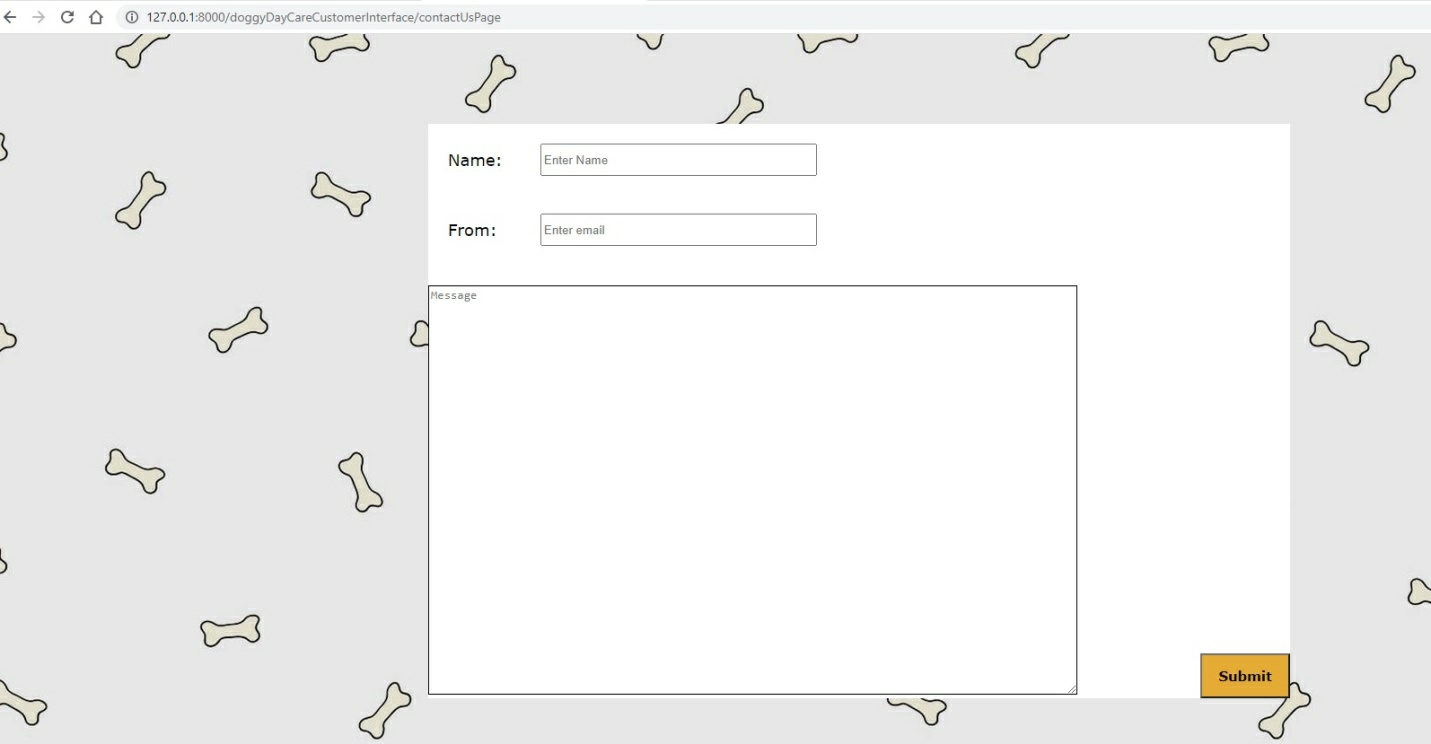
Step 4:
Our web page appeared without any styling information so let’s load the styling information into our HTML file (discussed in section 5.6
)
contactUsPage.html
Step 5:
Now let’s create the form
. (Django
form
discussed in section 5.7, 5.8 & 5.9
)
Open views.py
file -> create a new class
which will contain all the form
fields of Contact Us
page.
Now create the function contactUsPage
and
pass the form
fields into our contactUsPage.html
file.
Step 6:
Open contactUsPage.html
file and render the
form
fields manually (discussed in section 5.8
).
Step 7:
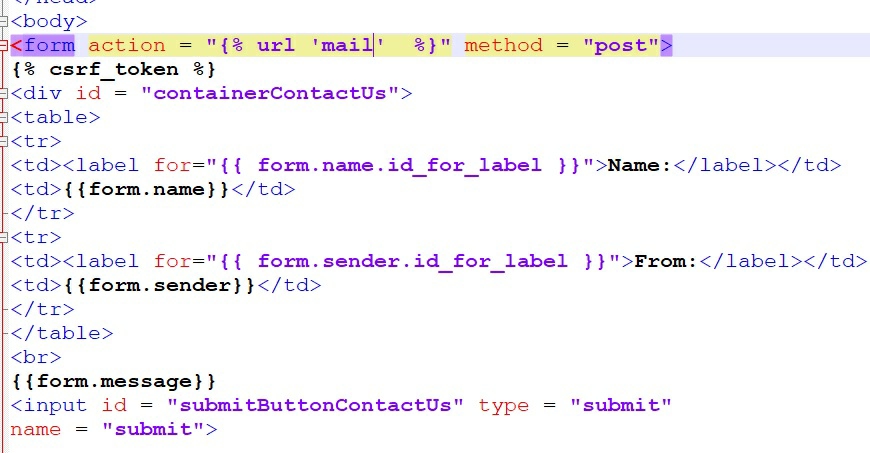
In contactUsPage.html,
add action
attribute to <form>
tag.
Once the form
is submitted, it will take us to url
name mail
.
So let’s open our urls.py
file and create a path with the url
name and route
name as mail
and which will lead us to function
mail
present in views.py
file.
urls.py
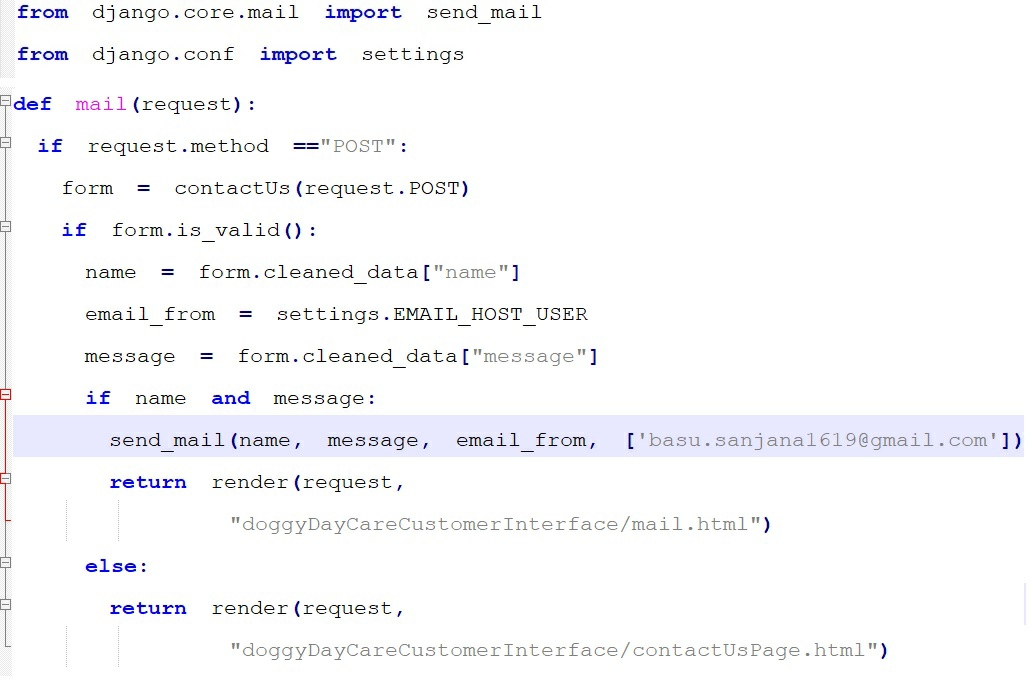
Step 8:
Open views.py
file and create the function mail( )
.
views.py
Code Explanation:
We have already discussed lines of code from:
if request.method =="POST"
to
name = form.cleaned_data["name"]
(discussed in section 5.8, 5.9 and 5.10
).
Now let’s discuss the lines of code from:
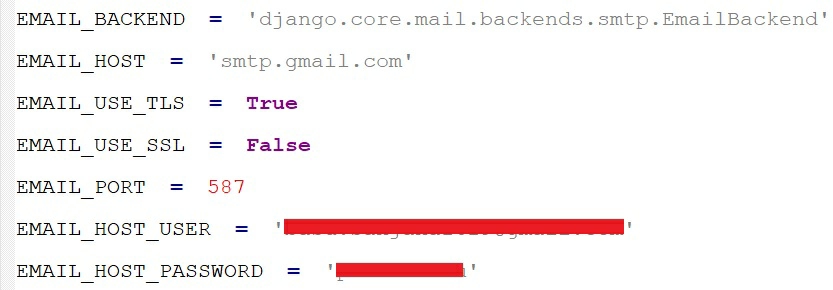
email_from = settings.EMAIL_HOST_USER
But before we understand the above line of code, let’s first open the main project (project1
) folder and go to settings.py
file. In settings.py
file, insert the following lines of code.
●
EMAIL_HOST
contains the host to use for sending email. Its default value is 'localhost'
●
EMAIL_HOST_USER
contains the account name from which we will send an email
●
EMAIL_HOST_PASSWORD
contains the password of the email account that we are using to send emails.
●
EMAIL_PORT
contains the port used by the SMTP server.
SMTP stands for Simple Mail Transfer Protocol and SMTP server helps to send and receive email between senders and receivers.
●
EMAIL_USE_TLS
contains a Boolean value true or false. This setting specifies whether to use an explicit TLS (secure) connection when talking to the SMTP server.
TLS stands for Transport Layer Security that helps to encrypts data sent over the Internet to prevent malicious activities by hackers.
●
EMAIL_USE_SSL
contains a Boolean value true or false
.
This setting specifies whether to use an
implicit TLS (secure) connection when talking to the SMTP server
.
SSL stands for Secure Sockets Layer. It helps to encrypt communication between a web browser and a web server.
Please Note:
Between EMAIL_USE_TLS
and EMAIL_USE_SSL
, only set one of those settings to True
.
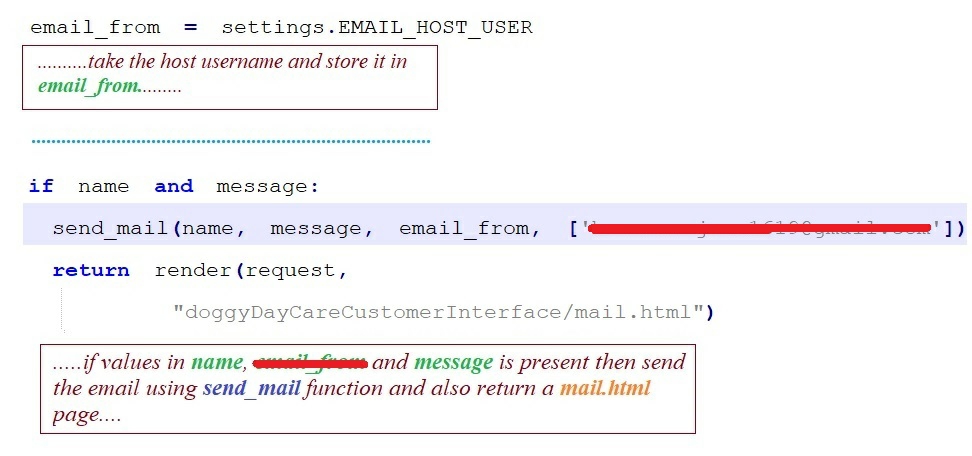
Now let’s proceed with our code discussion from line:
email_from = settings.EMAIL_HOST_USER
This line means from settings.py
file access the EMAIL_HOST_USER
value and store it in email_from
variable.
Please follow the screen shot below for code explanation:
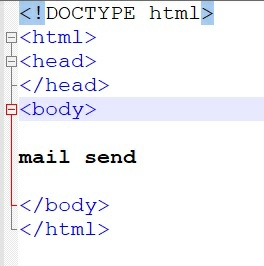
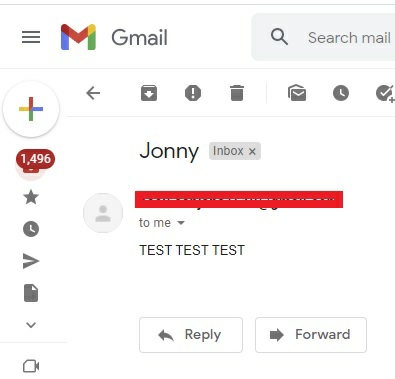
mail.html
If mail is send successfully, the function
mail
( )
will throw mail.html
file to user
What is Django send_mail function?
send_mail function
is used to send mail. The syntax is:
'Subject’
,
'Message
'
,
'from@example.com'
,
[
'to@example.com'
]
While using the Django send_mail function
, it is very important to maintain the order of the syntax. The subject
(a string value) should come first, then message
(
a string value)
, then from
_
email
(
a string value)
, then recipient_email
(
a list
of string value)
.
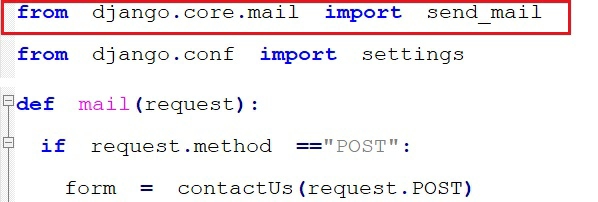
Before using Django send_mail
function we need to import it from django.core.mail
module as shown in the screen shot below.
Step 9:
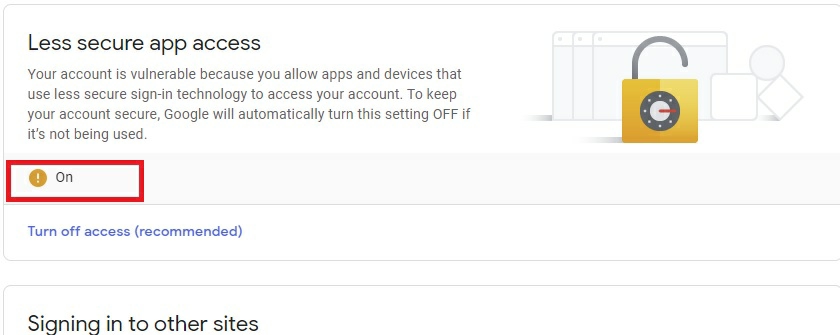
I would like to send and receive emails using Gmail
. Since our web application (Doggy Day Care project
) is not a Google registered service so it falls in the category of less secured app. In order to access Gmail
through my web application, we need to turn
on
the less secure app access.
Please note:
Since we are turning on the less secure app access. I recommended not using your main Gmail account for it.
Step 10:
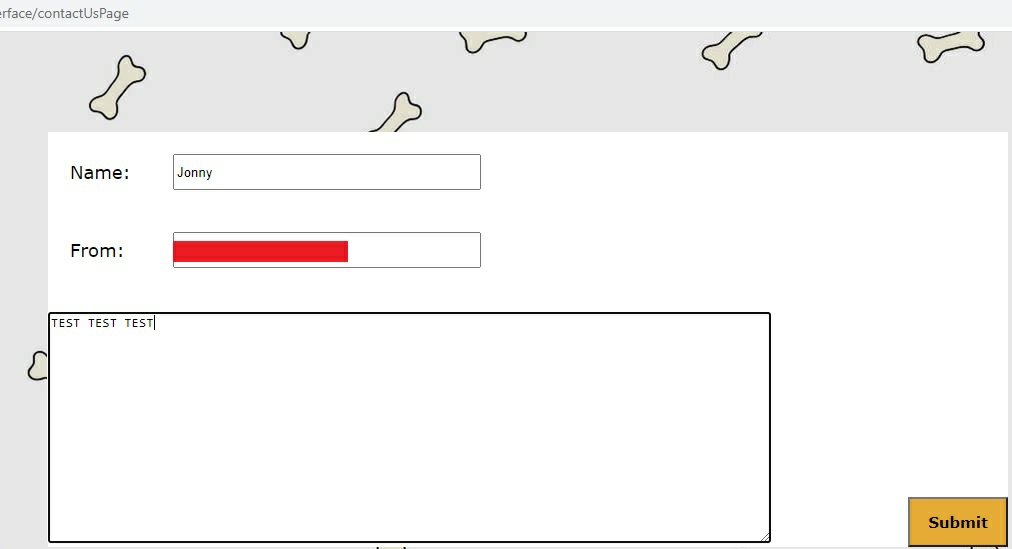
Now let’s run our project.
Now go to http://127.0.0.1:8000/doggyDayCareCustomerInterface/
contactUsPage
The mail was sent successfully.